


- SAP Community
- Products and Technology
- Technology
- Technology Blogs by Members
- Principal propagation in a multi-cloud solution be...
Technology Blogs by Members
Explore a vibrant mix of technical expertise, industry insights, and tech buzz in member blogs covering SAP products, technology, and events. Get in the mix!
Turn on suggestions
Auto-suggest helps you quickly narrow down your search results by suggesting possible matches as you type.
Showing results for
MartinRaepple
Active Participant
Options
- Subscribe to RSS Feed
- Mark as New
- Mark as Read
- Bookmark
- Subscribe
- Printer Friendly Page
- Report Inappropriate Content
06-19-2023
12:52 PM
This blog post is the seventh part of a tutorial series. For a better understanding of the concepts and technologies, it is highly recommended that you read part IV first, and then come back here again. Part IV introduces the Microsoft Power Platform with some of its key components that you will use in this part of the tutorial series as well, such as the On-Premises Data Gateway (OPDG), Power Automate, and Connectors. Since there is no "one-size-fits-all" approach for integration scenarios between Microsoft's and SAP's platforms using principal propagation, this series starts with part I explaining the technology standards for principal propagation in the context of calling a simple Web Service on SAP Business Technology Platform (BTP) on behalf of the authenticated user (or principal) from Azure Active Directory (Azure AD). Parts II, III, IV and V extend this scenario step by step by adding on-premise connectivity, Microsoft Teams integration, and API management to it. I do recommend reading these parts as well to get an understanding of the different scenarios and recommended options to implement them. Part VI looks at the reverse direction for propagating the principal from SAP Cloud Identity Services to Azure in the context of calling the Microsoft Graph API from an BTP application. This part takes in in-depth look at principal propagation for an application built with the Microsoft Power Platform making a Remote Function Call (RFC) to an SAP system on-premise using a Business Application Programming Interface (BAPI) to search a product catalogue. Check out episode 142 of the SAP on Azure video podcast series for a live demo of this scenario. |
All variants for principal propagation in this blog series used HTTP secured by Transport Layer Security (TLS) as the application layer protocol for calling a Web service on BTP (see part I), an OData service on SAP NetWeaver Gateway (see parts II, III, IV and V), or the Graph API (see part VI) to call Microsoft 365 services. The OAuth 2.0 Authorization Framework is the de-facto security standard for restricting access to the data exposed by these RESTful services. To enable principal propagation, additional standards such as the Security Assertion Markup Language (SAML) 2.0 and OpenID Connect (OIDC) 1.0 are required for a secure and interoperable transfer of the security context and identity information of the authenticated user (or principal) across system- and network boundaries. Please refer to the other parts of this blog series for a detailled explanation how OAuth, SAML and OpenID can be combined for secure principal propagation.
For RFCs and BAPIs, none of the beforementioned protocols can be used to secure the communication and propagate the principal between an external client and the SAP Application Server (AS) ABAP. For these services, Secure Network Communications (SNC) can be applied to secure RFCs. SNC uses the standardized Generic Security Service Application Program Interface (GSS-API) for integrating with a cryptographic library for encrypting the data traffic on the network level and supporting single sign-on (SSO) to an SAP system using X.509 client certificates or the Kerberos protocol as specified in RFC 4120.
Principal Propagation with Kerberos Delegation
The Kerberos protocol, named after the three-headed guard dog of Hades from the Greek mythology, requires a trusted authority, the Key Distribution Center (KDC), to facilitate SSO between the client and a "kerberized" service or resource on a server. The protocol not only defines these three entities, but also three phases of their message exchange as illustrated in figure 1:

Figure 1: The Kerberos protocol
- Authentication Service (AS) exchange: The client requests a ticket-granting ticket (
TGT) with an authentication service request (AS_REQ) message (1) from the Authentication Service (AS) of the KDC. The user authenticates at the AS by encrypting this message with her secret key KC that is created by hashing the user's password stored in the KDC's account directory. Upon successfull decryption, the KDC constructs the TGT for the user and returns it to the client with aAS_REP(2) message. The TGT is encrypted with the KDC's secret key KK and is a special type of Kerberos ticket that can only be used by the client to obtain other tickets from the KDC. - Ticket-Granting Service (TGS) exchange: To establish an authenticated communication session with the service, the client uses the TGT (instead of the long-term secret key KC from the user's hashed password) and requests a service ticket (ST) from the KDC's Ticket Granting Service (TGS) with a ticket-granting service request (
TGS_REQ) message (3). The service for which the ST is requested for is identified by its Service Principal Name (SPN). SPNs uniquely identify an instance of a service and are registered on a user or computer account in the KDCs account directory by setting theservicePrincipalNameattribute of the object. The KDC returns the ST for the service encrypted with the service key KS to the client with a ticket-granting service response (TGS_REP) message (4). - Client/Server Authentication (AP) exchange: The client sends the ST to the service with an application server request (
AP_REQ) message requesting access to the service (5). The server can validate the ticket by decrypting it with its service key KS where it finds the user's unique name (cname). Optionally, the client might request that the server verify its own identity by sending back a application server response (AP_REP) message (6).
For propagating the authenticated user from the service to another service, the Kerberos protocol provides the Service for User (S4U) extensions. These extensions allow a service to obtain a Kerberos service ticket for a different service on-behalf-of a user that has not authenticated to the KDC. S4U includes the S4U2self and S4U2proxy extensions:
- The Service-for-User-to-Self (S4U2self) extension is intended to be used by a service to obtain a ticket for itself on-behalf-of a user who has authenticated in some other way than by using Kerberos to the service. With S4U2self, the service gets a ticket just as if the user had used Kerberos.
- The Service-for-User-to-Proxy (S4U2proxy) extension allows a service to
call another service, acting on-behalf-of the user. The first service uses a Kerberos service ticket as if the user had obtained the service ticket for it and sends the ticket to a second service directly. Configuration at the KDC's TGS can be used to limit the scope of the S4U2proxy extension, also known as constrained delegation. The second service is typically a proxy performing some work for the first service, and the proxy requires to do that work under the authorization context of the user.
Figure 2 shows the two S4U Kerberos extensions (steps 10 to 13) in the context of the complete end-to-end message flow for the scenario in this blog post:

Figure 2: System landscape and message flow
- Jack Davis as the application test user in this tutorial logs on to the domain-joined Windows workstation on the corporate network. This results in a Kerberos TGT issued by the local Active Directory Domain Service (AD DS) acting as the KDC (see figure 1, steps 1 & 2). The same applies to services in the corporate domain, such as the OPDG, that also obtains a TGT from AD DS.
- The user launches the "SAP Product Search" Power Platform app in a web browser. The app consists of two components (see figure 3): A canvas app providing the user interface to search for the price of a product in the Enterprise Procurement Model (EPM) demo application of the SAP system in the corporate network. The business logic to connect to SAP, transforming the BAPI response data, and error handling, is implemented in a Power Automate flow. The flow uses the SAP ERP Connector's prebuilt Call SAP function (V2) action to invoke the
BAPI_EPM_PRODUCT_GET_DETAILBusiness Application Programming Interface (BAPI) of the EPM demo application. Figure 3: Application components
 - For authentication to Power Platform, the app requires an OpenID Connect (ID) token for authentication and an OAuth access token for authorization, and redirects the user to the app's Azure AD tenant authorization endpoint to trigger authentication with the OAuth 2.0 authorization code flow. For a complete SSO experience, the setup in this scenario synchronizes the user accounts from the corporate Active Directory Domain Services (AD DS) to the Azure AD tenant with Azure AD Connect and Password Hash Synchronization (PHS) enabled. With PHS, hashes of the user passwords in AD DS are synchronized by Azure AD Connect to Azure AD so that the users can login with the same password on-premises and in the cloud. This feature can be combined with Seamless SSO in Azure AD Connect to automatically sign-in users when they are on their corporate devices connected to the corporate network. The following steps 4 to 6 explain this process in more detail.
- Azure AD challenges the browser to provide a Kerberos ticket for the user by sending an
HTTP 401 Unauthorizedresponse. - The browser requests the Kerberos ticket from AD DS for the computer account representing Azure AD in AD DS.
- The browser forwards the encrypted Kerberos ticket to Azure AD which can decrypt it using the shared key for the account.
- Upon successful SSO to the cloud, the Azure AD tenant generates an OAuth 2.0 authorization code for the user and sends it to the SAP Product Search app by redirecting the user's web browser.
- The app redeems the authorization code for an OAuth access token and OpenID Connect (ID) token by sending the authorization code to the Azure AD tenant's token endpoint.
- When the user enters a product ID and clicks the search button, the app triggers the flow which in turn uses the SAP ERP connector to call the SAP system's BAPI via the OPDG on the corporate network. The flow passes the product ID to the BAPI's input parameters and sends the user's ID token in the call to the SAP ERP Connector. The ID token must successfully pass the validations of its claims, such as the intended recipient (
audience), the trustedissuer who constructed the token (Azure AD tenant), and the validity of theexpiration of the token, before the User Principal Name (UPN) is extracted from it and send to the OPDG. - OPDG uses the Kerberos S4U2self extension to retrieve a forwardable service ticket for itself on behalf of the Azure AD-authenticated user. To do so, OPDG has to run under a service user account (e.g. CORP\GatewaySvc) within the AD domain, uniquely identified by its SPN (e.g. gateway/WIN-OPDG). OPDG needs to map the UPN from the Azure AD-authenticated user to a different UPN of the user in the on-premise AD, using an unused Active Directory attribute such as
msDS-cloudExtensionAttribute1in this scenario. This lab setup requires user mapping because the user's UPN suffix in Azure AD (e.g. jdavis@bestruncorp.onmicrosoft.com) is different from her suffix in the corporate AD (e.g. jdavis@corp.bestrun.com). As specified by the S4U2self extension, OPDG creates the PA_FOR_USER data structure with the mapped user name and sends it with aTGS_REQmessage to AD DS. - AD DS uses OPDG's identity from its
TGTsent with theTGS_REQmessage to create the OPDG service ticket and returns the service ticket for the user in theTGS_REPmessage. - The SAP system is configured for SNC and Kerberos-based SSO (e.g. for SAP GUI), which requires registration of an SPN for the SAP system's service account in AD DS following the format "SAP/<SID>", e.g. SAP/A4H. OPDG is now attempting to obtain a service ticket for the SAP system on-behalf-of the user with the S4U2proxy Kerberos extension. OPDG sends the
TGS_REQmessage with the user's service ticket for OPDG obtained in the previous step as anadditional-ticketin the request. - AD DS makes sure the
forwardableflag is set in the OPDG's service ticket found in theadditional-ticketand uses its local policy to determine if OPDG is allowed to obtain a service ticket on behalf of a user to the SAP system. If these conditions are met, the TGS crafts theTGS_REPmessage to return the user's service ticket to the SAP. This response contains thecnamefield identifying the user's UPN in AD DS that was taken from theadditional-ticket. - OPDG utilizes the locally installed SAP Connector for Microsoft .NET 3.1 (NCo 3.1) and SAP Cryptographic Library to make a secure, SNC-protected synchronous RFC call to the BAPI, authenticated with the Kerberos ticket from the previous step for the SAP system obtained on-behalf-of the Azure AD-authenticated user from AD DS. The SAP system can single sign-on the user with the Kerberos ticket by mapping its
cnameto the user's SNC name (e.g. p:CN=JDAVIS@CORP.BESTRUN.COM). - If all authorization checks for the propagated user are successfull (such as the permission to call the BAPI), the response from the BAPI is sent back by the SAP ERP Connector to the flow, checked for any errors, and parsed for the price of the product which is returned to the app.
Prerequisites and lab setup
The following list of prerequisites must be met to successfully complete the exercises of part VII:
- A Power Platform environment. You can reuse the environment from part IV, or (if you started your journey here) can get a new one with a free Power Apps trial account or Microsoft 365 Developer license and by following these instructions.
- Administrative access to an Active Directory domain and on-premises systems for simulating the corporate network in your lab environment. You can create the required systems in your lab environment as Hyper-V VMs and configure them according to the table below:
System
Operating system & software
Active Directory Domain Controller (AD DC)
- Windows Server 2019
- Active Directory Domain Services (AD DS role). Installing the AD DS role and promoting a Windows Server to a domain controller is documented here. The domain name used in this tutorial is corp.bestrun.com (NetBIOS: CORP), but you can also choose any other name.
- Azure AD Connect, version 2.1.20.0, following these installation instructions.
On-Premises Data Gateway (OPDG) Server
- Windows Server 2019, domain-joined
- On-Premises Data Gateway, minimum version 3000.178.9 (June 2023) or newer. Installation instructions and how to register the OPDG in your Power Platform environment can be found here.
- SAP Connector for Microsoft .NET 3.1 (NCo 3.1). Select NCo 3.1 compiled with .NET Framework 4.6.2 - SAP Connector for Microsoft .NET 3.1.<n>.<n> for Windows 64 bit (x64) for download.
- SAP Cryptographic Library (
sapcrypto.dll) 64 bit, version 8.5.25 (or newer). Download the latest version of the SAP Cryptographic Library from the SAP Support Portal's Software Download (S-User required). Search for "CommonCryptoLib" in the Support Packages and Patches area. - Optional tools for troubleshooting:
Workstation
- Windows 10 Pro, domain-joined
- SAP GUI 7.70
- SAP Secure Login Client 3.0
SAP System
- SAP Application Server ABAP
- Note: The SAP system is not required to be domain-joined and not to have line-of-sight to the AD DC. Therefore you can run it also in the cloud. If you don't have a system available for testing, the SAP Cloud Appliance Library (CAL) provides a simple way to deploy a test and development system for evaluation purposes on Azure. Use the SAP ABAP Platform 1909, Developer Edition appliance template which fulfills all requirements for this tutorial by installing an SAP Application Server ABAP 7.54 SP2.
Table 1: Lab setup - Administrative access to an Azure AD tenant (which is included in the Microsoft 365 Developer license). The domain name of the tenant used in this tutorial is bestruncorp.onmicrosoft.com, but you can also choose any other name.
- Checkout branch
part7of the blog series GitHub repository with a Git client of your choice and the following commands:
git clone https://github.com/raepple/azure-scp-principal-propagation.git

cd azure-scp-principal-propagation

git checkout part7
The following exercises require switching between different roles. The table below lists those user roles and corresponding accounts used in the configuration steps of the scenario:
| Role | User accounts |
| Administrator |
|
| Developer |
|
| Application test user |
|
You will start the exercises to setup the end-to-end scenario illustrated in figure 2 by configuring the service account and SPN in the corporate Active Directory for the SAP system and setup the SAP system for SNC to test single sign-on with the SAP GUI. You can skip the following section if your SAP system is already configured for Kerberos-based SSO.
Configure SAP for Kerberos-based SSO with Active Directory
| Step | Description | Screenshot |
| 1 | As a domain administrator, launch the Active Directory Users and Computers Microsoft Management Console (MMC) snap-in on the Domain Controller host. Right-click on Users in your domain to open the context menu and select New → User to create the new service account for the SAP system. |  |
| 2 | Enter Kerberos<SID> as the First name, Full name and User login name. Replace <SID> with the ID of your SAP system (e.g. "A4H"). Click Next. |  |
| 3 | Enter the password for the new service user account. Select User cannot change password and Password never expires. Click Next. |  |
| 4 | Click Finish. |  |
| 5 | Start the ADSI Editor (adsiedit.msc) to maintain the Service Principal Name (SPN) of the new service account. Select CN=Users from your domain's default naming context, and right-click on the CN=Kerberos<SID> user object. From the context menu, select Properties. Alternatively to steps 5 to 8, you can also use the command line as an Administrator and enter the following command: setspn –A SAP/<SID> <domain>\Kerberos<SID>Replace <domain> with the NetBIOS name of your domain (e.g. "CORP"), and <SID> with the ID of your SAP system (e.g. "A4H"). |  |
| 6 | Select servicePrincipalName from the list. Click Edit. |  |
| 7 | Enter the Service Principal Name (SPN) for the SAP service account in the format "SAP/<SID>". Replace <SID> with the ID of your SAP system (e.g. "A4H"). Click Add. |  |
| 8 | Click OK. |  |
| 9 | Go back to the Active Directory Users and Computers MMC snap-in and select the new SAP service account Kerberos<SID> from the Users list. Right-click on it and select Properties from the context menu. |  |
| 10 | Switch to the Account tab. Under Account options, activate the checkbox for This account supports Kerberos AES 256 bit encryption. Click OK. |  |
| 11 | Login to the domain on the workstation host with your application test user (e.g. CORP\jdavis). |  |
| 12 | Start SAP GUI and login as the SAP administrator. Run transaction SNCWIZARD to start the SNC Configuration wizard. |  |
| 13 | If you see the error message "DEFAULT profile in the DB and in the file system are different" then run transaction RZ10 first, and select Utilities → Import Profiles → Of active servers, and return to the SNCWIZARD. On the Start page of the SNC Configuration wizard, click Continue. |  |
| 14 | Accept the default value for system's SNC Identity and click Continue. |  |
| 15 | Click Continue. |  |
| 16 | Click Close. |  |
| 17 | Log off from the SAP system to restart the application server. |  |
| 18 | As SAP system user <SID>adm, use the commands sapcontrol -nr <instance_number> -function Stopand sapcontrol -nr <instance_number> -function Startto restart the application server. Replace <instance_number> with the number of your application service instance, e.g. "00". |  |
| 19 | After the restart of the application server, log on to SAP GUI and run transaction SNCWIZARD again. |  |
| 20 | On the Start screen, click Continue. |  |
| 21 | Click Continue. |  |
| 22 | In the SPNEGO Configuration, click Display/Change to switch into edit mode. |  |
| 23 | Click Add to configure a new Kerberos User Principal. |  |
| 24 | Enter the following values: User Principal Name: Kerberos<SID>@<full-qualified name of your Active Directory Domain in uppercase letters, e.g. "CORP.BESTRUN.COM"> Password: <The password you specified in step 3> Confirm Password: <The password you specified in step 3> |  |
| 25 | Click Exit. Click Save to store the updated SPNEGO Configuration. |  |
| 26 | Click Skip on the X.509 Credentials wizard step. |  |
| 27 | Click Complete to finalize the wizard. |  |
| 28 | Open the SAP Secure Login Client and right-click on the Kerberos Token from the Profiles list. Select Copy SNC name to clipboard from the context menu. | 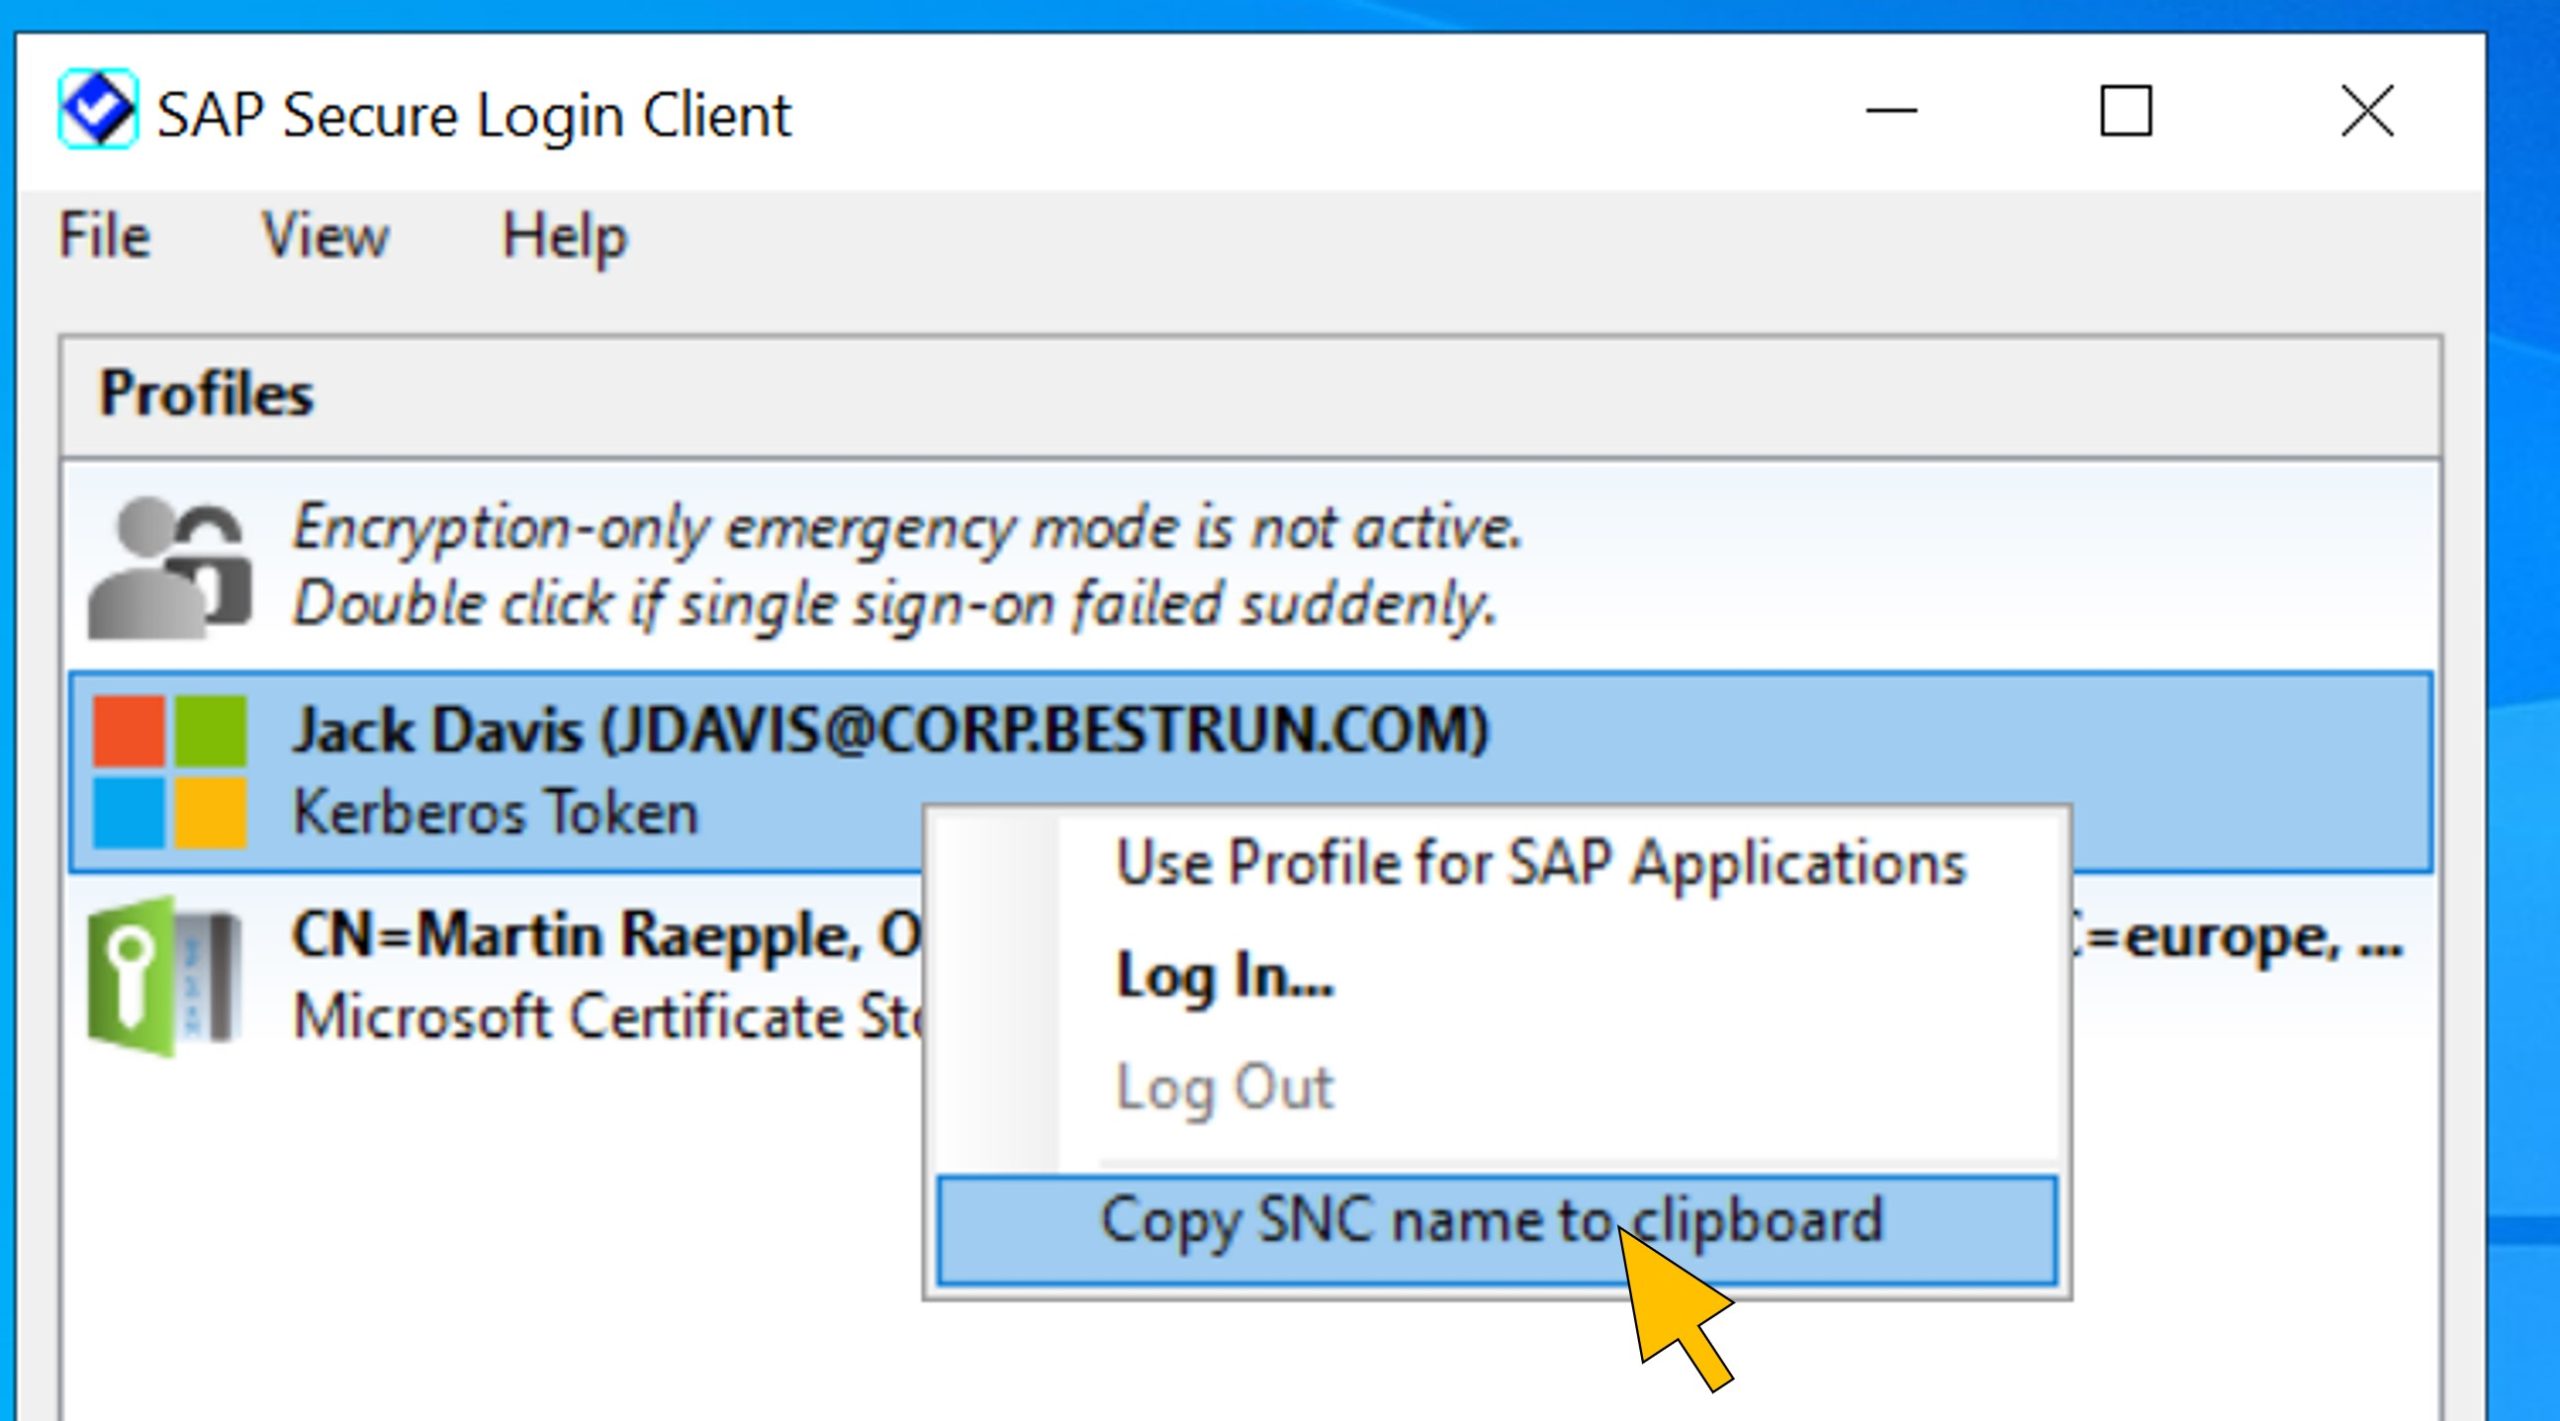 |
| 29 | Go back to SAP GUI and run transaction SU01 to maintain the application user's SNC mapping. Enter the application test user's ID (e.g. JDAVIS) in the User field and click Change. |  |
| 30 | Switch to the tab SNC. Maintain the user's SNC name by pasting the value you copied in step 28 from the clipboard (e.g. p:CN=JDAVIS@CORP.BESTRUN.COM). Click Save. |  |
| 31 | Repeat the last two steps for maintaining the SNC mapping for the developer's user account. Enter the developer user's ID (e.g. DEVUSER) in the User field and click Change. |  |
| 32 | Switch to the tab SNC. Maintain the developer user's SNC name (e.g. p:CN=DEVUSER@CORP.BESTRUN.COM). Click Save. |  |
| 33 | Log off as the administrator from SAP GUI. |  |
| 34 | Right-click on the SAP system connection and select Properties... from the menu. |  |
| 35 | Switch to the Network tab. Activate the checkbox Activate Secure Network Communication. In the SNC Name field, enter the SAP system's SNC Identity from step 12. Click Finish. |  |
| 36 | Right-click on the system's connection and select SNC Logon with Single Sign-On to test the new SNC setup. |  |
| 37 | You should be single signed-on as user JDAVIS to the SAP system. Click Log off (or select System → Log off from the menu) to log out as user JDAVIS. | 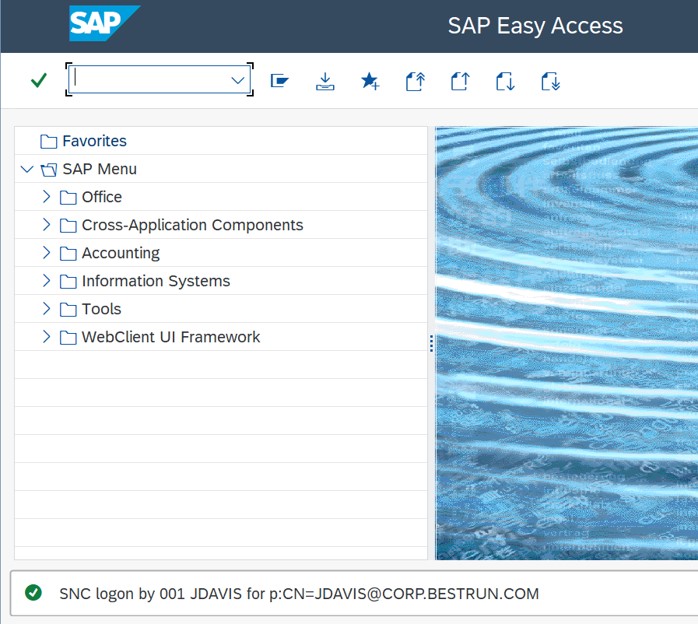 |
Configure OPDG for Kerberos Constrained Delegation
By default, OPDG runs as the machine-local service account NT Service\PBIEgwService. To use Kerberos Constrained Delegation with the protocol's S4U extensions, OPDG has to run under a service account in the domain.
| Step | Description | Screenshot |
| 38 | On the Domain Controller host, go back to the Active Directory Users and Computers Microsoft Management Console (MMC) snap-in. Right-click on Users in your domain and select New → User from the context menu. Enter "GatewaySvc" as the First name, Full name and User login name. Click Next. |  |
| 39 | Enter the password for the OPDG domain service account. Select User cannot change password and Password never expires. Click Next. | |
| 40 | Click Finish. |  |
| 41 | As the domain administrator, run the following command to create an SPN for the new service account which is required to configure the Kerberos delegation in the next step: setspn –S gateway/<OPDG hostname> <domain>\GatewaySvcReplace <OPDG hostname> with the hostname of your OPDG system. You can find out the name by entering the command hostname. |  |
| 42 | Right-click on the new service account and select Properties from the context menu. |  |
| 43 | Switch to the Delegation tab. Select Trust this user for delegation to specified services only and Use any authentication protocol. Click Add. |  |
| 44 | Click Users or Computers. |  |
| 45 | Enter "Kerberos<SID>" in the object names field. Replace <SID> with your SAP system's ID, e.g. "A4H". Click Check Names to resolve it to the full existent name. Click OK. |  |
| 46 | The list of allowed services now contains the value from the SPN (Service Type / Computer) of the SAP system. The new OPDG service account can request a service ticket only for the SAP system on-behalf-of the propagated user with the Kerberos S4U2proxy protocol extension. Click Select All. |  |
| 47 | Click OK. |  |
| 48 | Click OK. |  |
| 49 | The OPDG service account must be granted to local policies on the OPDG host. Perform this configuration with the Local Group Policy Editor by running gpedit.msc from an Administrator command prompt. |  |
| 50 | Go to Local Computer Policy → Computer Configuration → Windows Settings → Security Settings → Local Policies → User Rights Assignment. Grant the OPDG domain service account (e.g. "CORP\GatewaySvc") the local policy Act as part of the operating system by double-clicking on it. Click Add User or Group. |  |
| 51 | Enter the name of your OPDG's domain service account (e.g. "GatewaySvc") and click Check Names to resolve it to the full existent name. Click OK. The service account's domain name (e.g. "CORP\GatewaySvc") is now added to the policy's user list. Click OK to apply the new configuration. |  |
| 52 | Repeat the same step for the Impersonate a client after authentication policy by double-clicking on it. Click Add User or Group and resolve the OPDG's service account to the full existent name with Check Names. Click OK. |  |
| 53 | The service account's name (e.g. "CORP\GatewaySvc") is now added to the policy's user list. Click OK. Close the Local Group Policy Editor. |  |
| 54 | Start the OPDG app from the desktop link on the gateway host, or by running C:\Program Files\On-premises data gateway\EnterpriseGatewayConfigurator.exe.Click Sign in to login as the Power Platform System administrator user who registered the OPDG in the environment. | 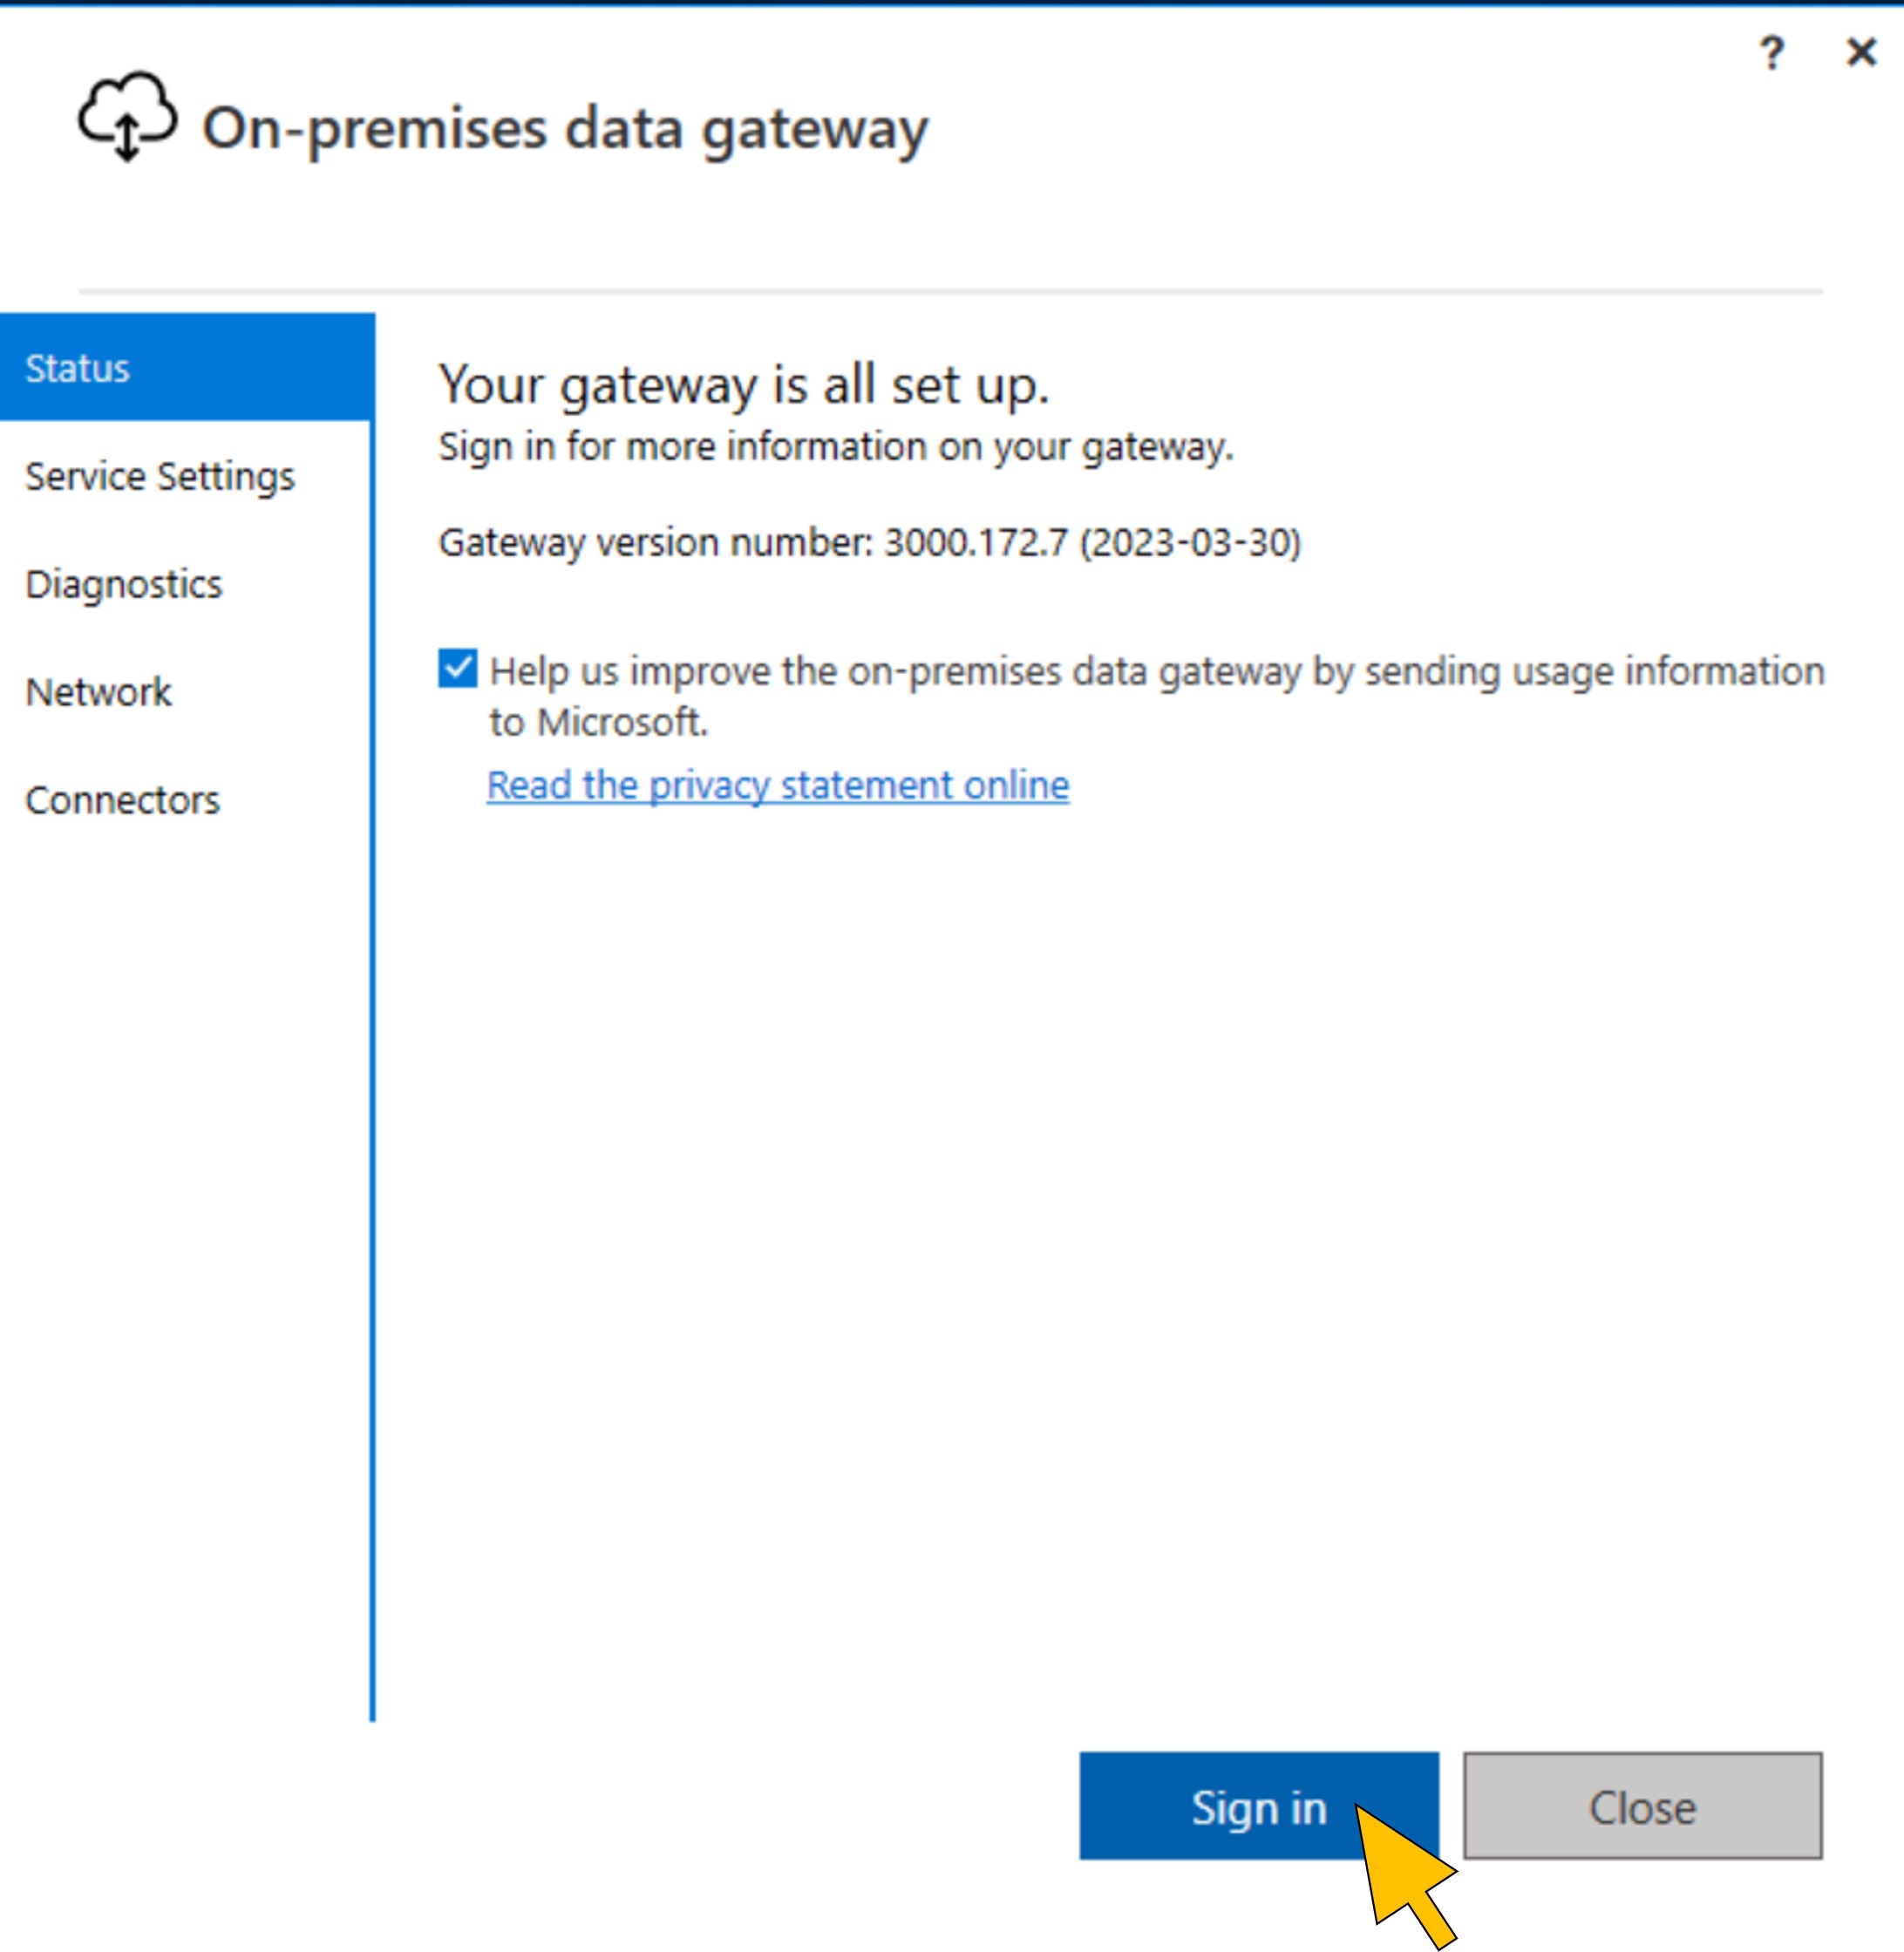 |
| 55 | Select Service Settings from the configurator's menu. Click Change account. |  |
| 56 | Click Apply and Restart. |  |
| 57 | Enter your OPDG's service account name (e.g. "CORP\GatewaySvc") and password from step 34. Click Configure. |  |
| 58 | Provide your Power Platform System administrator sign-in account, by clicking on Sign in. |  |
| 59 | Choose Migrate, restore or takeover an existing gateway to restore your gateway registration. | 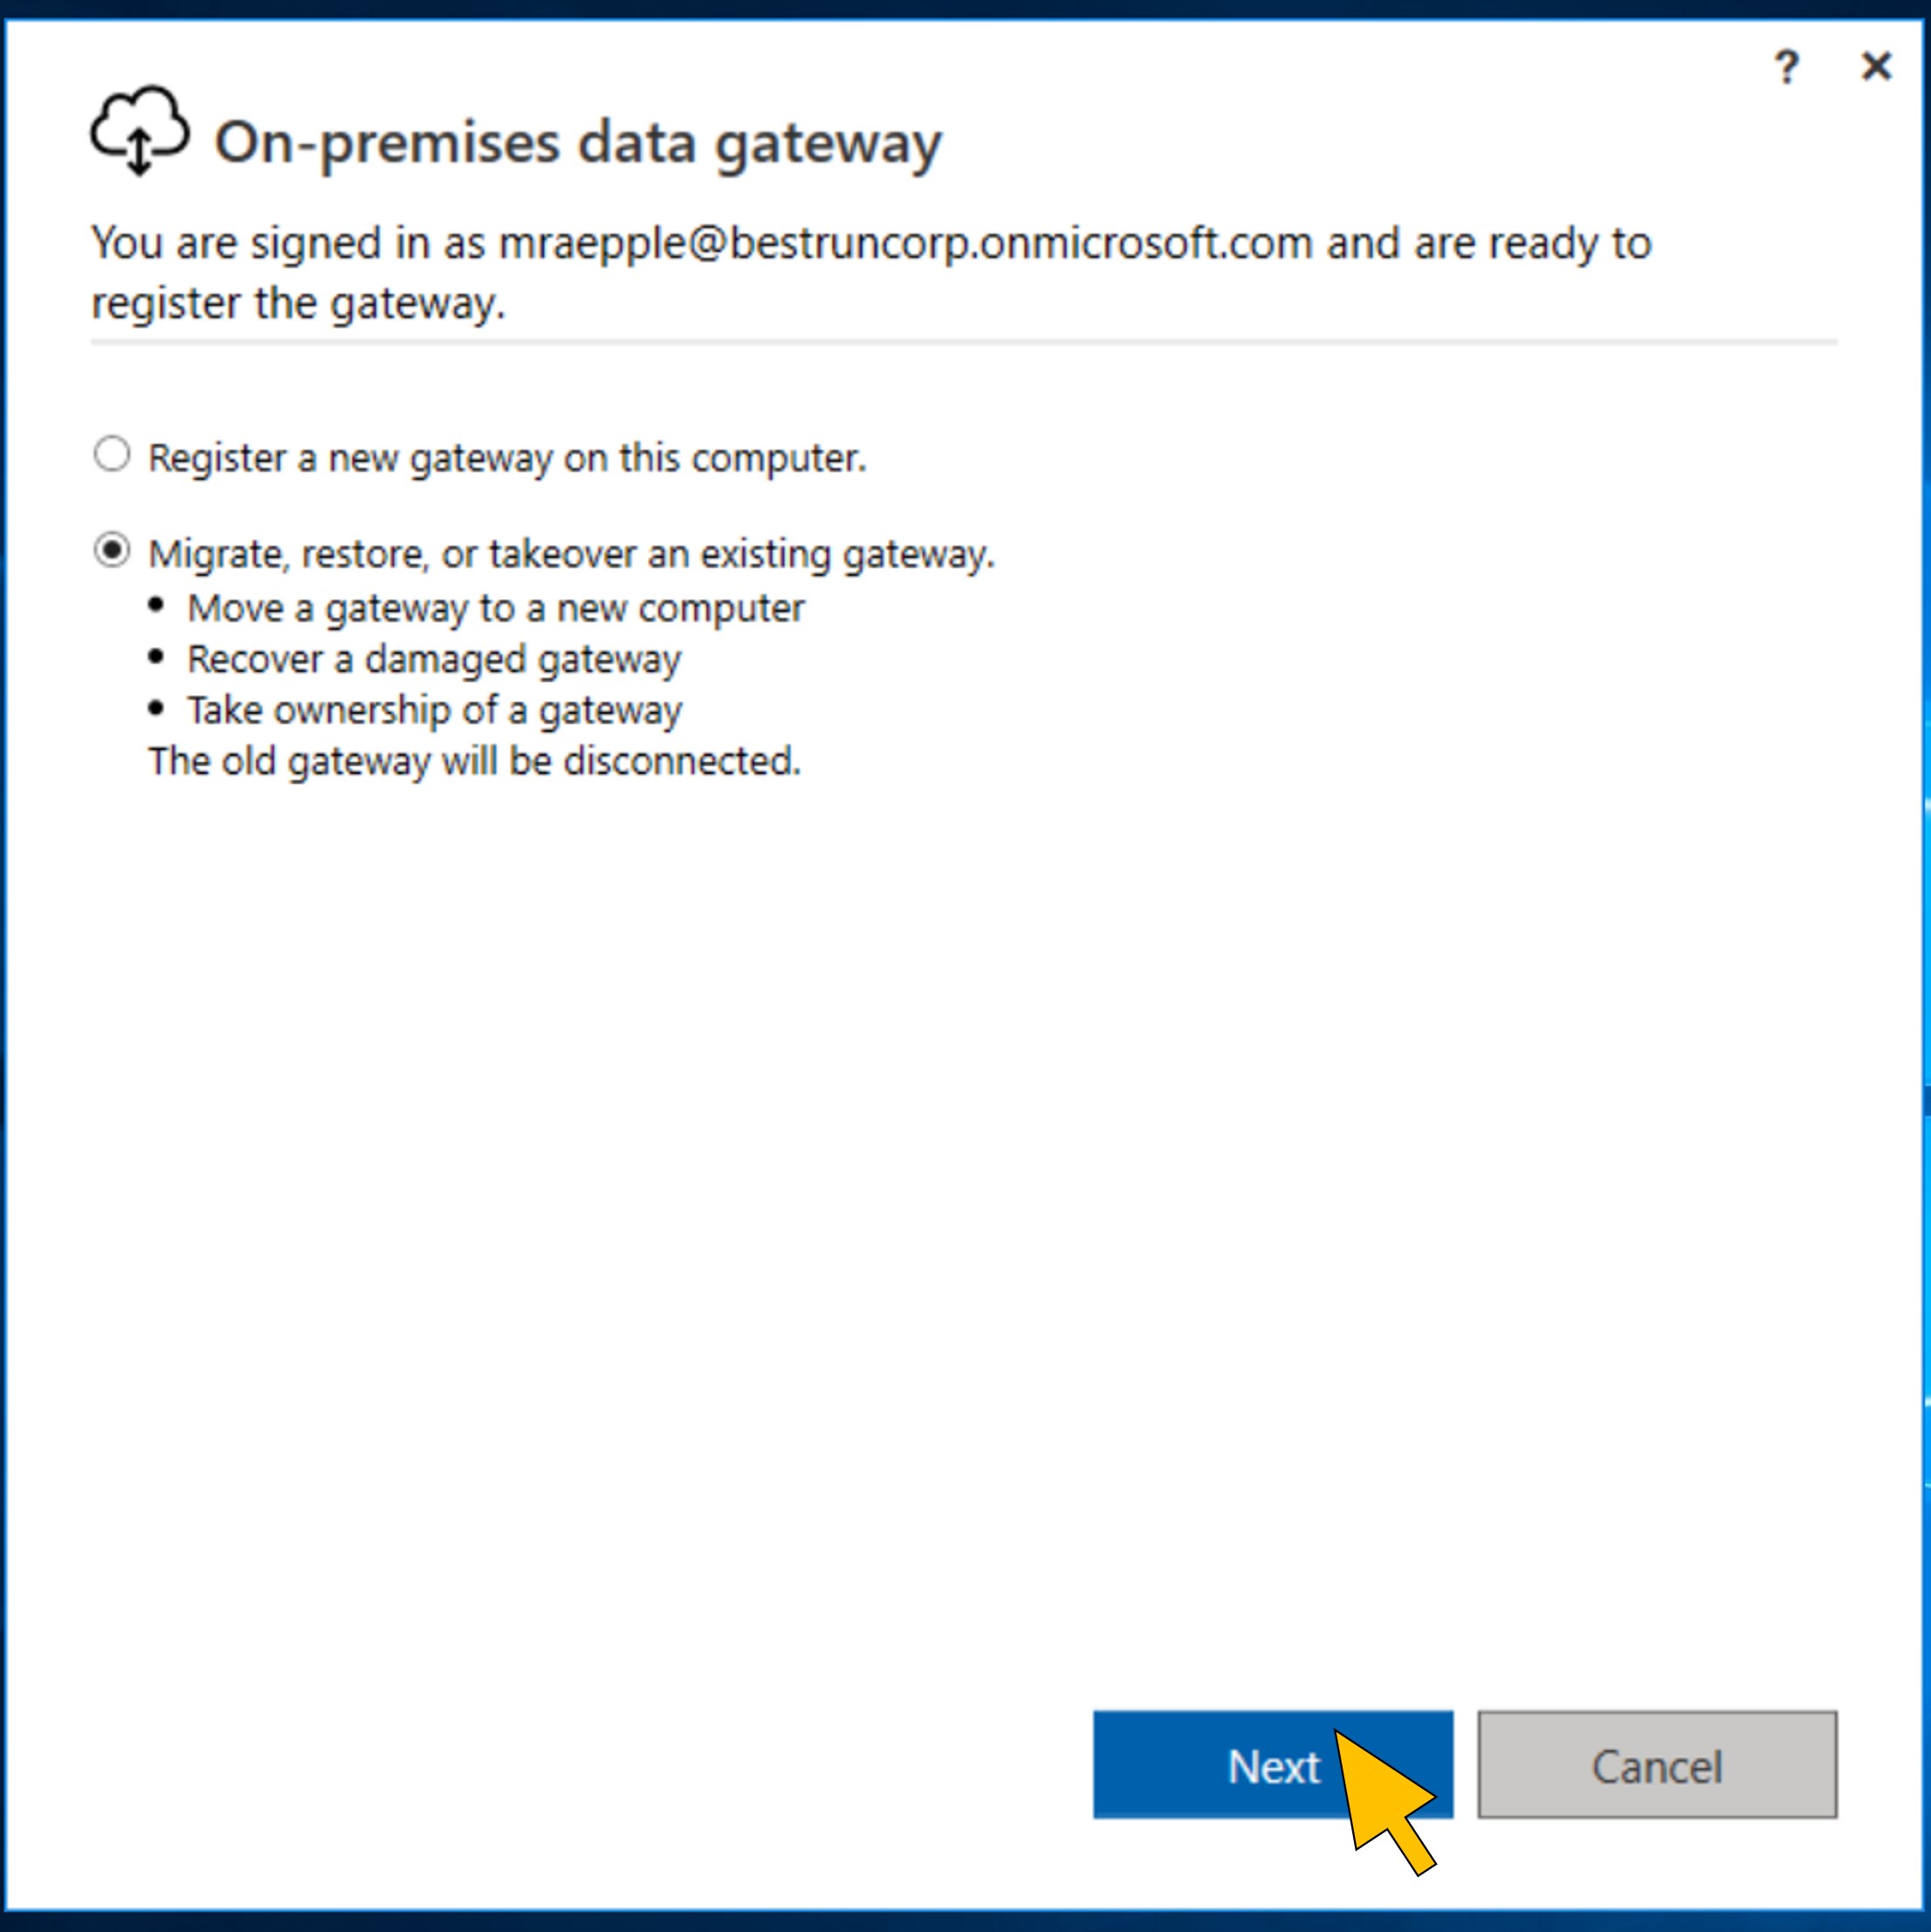 |
| 60 | Select your gateway cluster and instance from the drop-down boxes and provide the recovery key you've chosen during the initial registration. Click Configure. |  |
| 61 | After the restoration is complete, your OPDG service instance uses the domain service account (e.g. "CORP\GatewaySvc"). |  |
| 62 | Add the OPDG service account to the Windows Authorization and Access Group. This is requried because the user accounts that the gateway will impersonate are in Azure AD and thus not in the same domain as the OPDG service account. On the Domain Controller host, go back to the Active Directory Users and Computers Microsoft Management Console (MMC) snap-in. Select the Builtin folder for your domain and double-click on the Windows Authorization and Access Group security group. |  |
| 63 | Switch to the Members tab of the security group. Click Add. |  |
| 64 | Enter the name of your OPDG's domain service account (e.g. "GatewaySvc") and click Check Names to resolve it to the full existent SPN. Click OK. |  |
| 65 | The OPDG service account is now added to the policy's user list. Click OK to apply the new configuration. |  |
Install and configure the SAP Cryptographic Library
For SNC communication between the OPDG and the SAP system, the SAP Cryptographic Library must be installed on the gateway host along with SAP NCo 3.1.
| Step | Description | Screenshot |
| 66 | Download the latest version of the SAP Cryptographic Library from the SAP Support Portal's Software Download (S-User required), and copy the library file ( sapcrypto.dll) to the OPDG's installation directory on the gateway host (C:\Program Files\On-premises data gateway).Right-click on the sapcrypto.dll file and select Properties from the context menu. |  |
| 67 | Switch to the Details tab to check the version of the library. It should be 8.5.25 or newer. Click OK. | 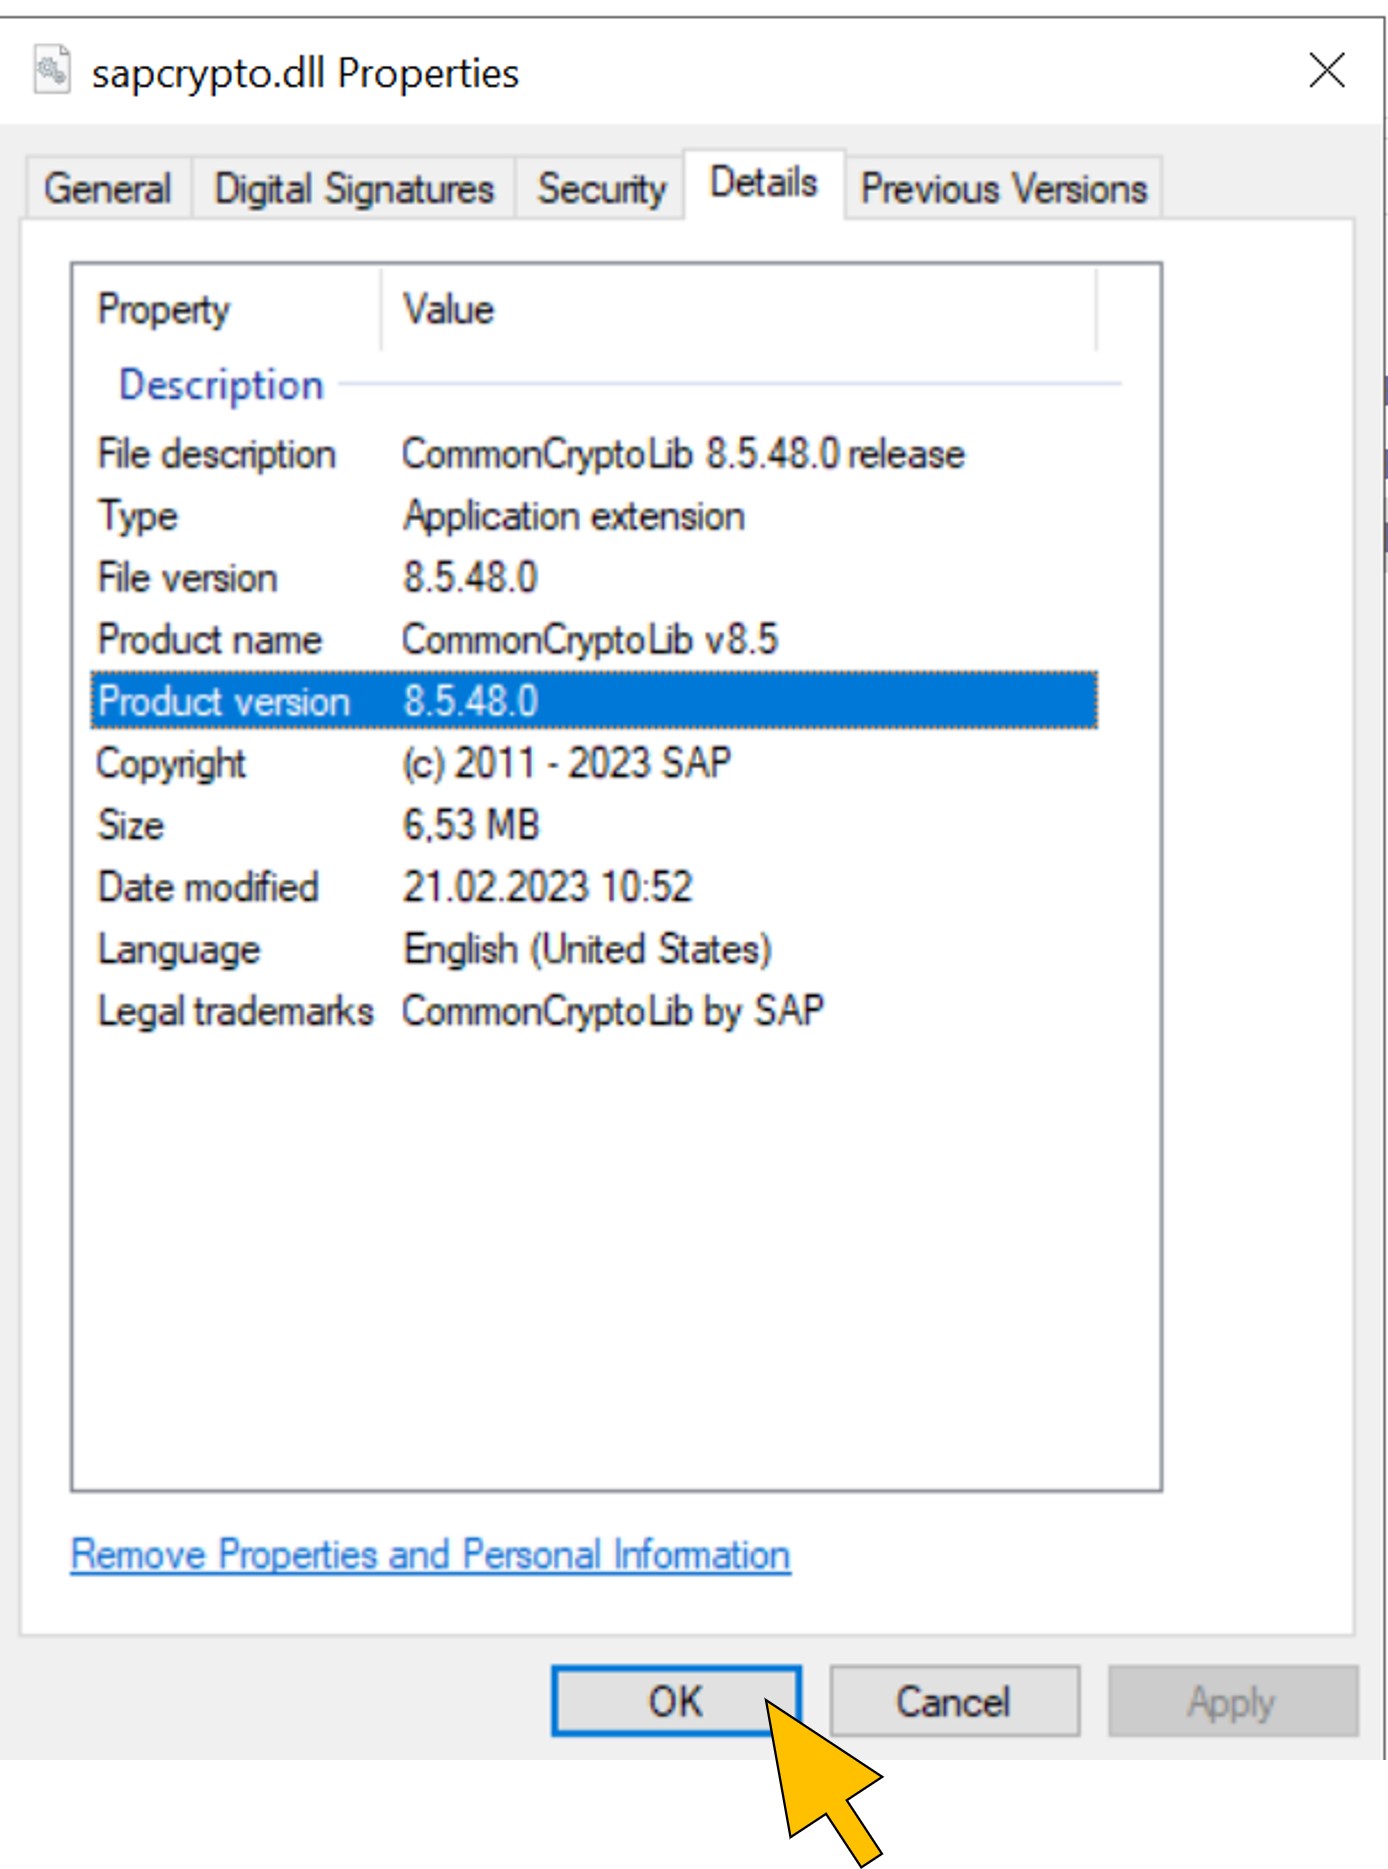 |
| 68 | Create a new text file ccl/snc/enable_kerberos_in_client_role = 1Save the file. |  |
| 69 | Grant read and execute permissions to both the sapcrypto.ini and sapcrypto.dll files to the gateway service user account and the AD user(s) that the service user impersonates.Right-click on the files and select Properties from the context menu. Switch to the Security tab. Check that the groups Domain Users and Authenticated Users are in the list. Click OK. |  |
| 70 | Create a CCL_PROFILE system environment variable and set its value to the path of thesapcrypto.iniconfiguration file.On the gateway host, launch the Control Panel and navigate to System and Security → System. Click Advanced system settings. |  |
| 71 | Click Environment Variables. |  |
| 72 | Under System variables, click New. |  |
| 73 | Enter CCL_PROFILE as the variable name.For the variable value, enter the full path to your sapcrypto.ini file, e.g. C:\Program Files\On-premises data gateway\sapcrypto.iniClick OK. |  |
| 74 | Click OK. |  |
Configure User Mappings in Active Directory
To enable Kerberos-based principal propagation for a user in this scenario, a mapping from the user's full username (User Principal Name, UPN) in Azure AD to the user's local name in AD is required. For this purpose we will use the unused attribute
msDS-cloudExtensionAttribute1 of the local AD user to store the Azure AD UPN. Any other unused Active Directory attribute can be used as well.For the application test user Jack Davis in this scenario, you will set the
msDS-cloudExtensionAttribute1 attribute of the local AD domain user account jdavis@corp.bestrun.com to the user's Azure AD UPN jdavis@bestruncorp.onmicrosoft.com for linking his two accounts. The same applies to the application development user devuser, who requires a mapping from devuser@corp.bestrun.com to devuser@bestruncorp.onmicrosoft.com.| Step | Description | Screenshot |
| 75 | On the gateway host, open the file Microsoft.PowerBI.DataMovement.Pipeline.GatewayCore.dll.config in the OPDG installation folder (C:\Program Files\On-premises data gateway) in an editor. |  |
| 76 | Search for the setting ADUserNameReplacementProperty and set its value to SAMAccountName. |  |
| 77 | Search for the setting ADUserNameLookupProperty and set it to the value msDS-cloudExtensionAttribute1.Save the changes in the file. |  |
| 78 | Click Restart now from the OPDG's configurator Service Settings tab to apply the changes. |  |
| 79 | On the Domain Controller host, click Start, and select Windows Administrative Tools → ADSI Edit from the menu. In the ADSI Editor, navigate in the left-side object tree to CN=Users under the domain's Default naming context. Right-click on the test user's object (e.g. CN=Jack Davis) and select Properties from the context menu. |  |
| 80 | Select the attribute msDS-cloudExtensionAttribute1 from the list and click Edit. |  |
| 81 | Enter the test user's Azure AD UPN (e.g. jdavis@<domainname>.onmicrosoft.com) in the Value field. Replace <domainname> with your Azure AD tenant's domain name, e.g. bestruncorp. Click OK. |  |
| 82 | Repeat steps 79 to 81 for the developer user object (e.g. CN=Developer User) and map it to the user's Azure AD UPN (e.g. devuser@<domainname>.onmicrosoft.com).via the msDS-cloudExtensionAttribute1 attribute.Click OK and close the ADSI Editor. |  |
Configure SAP User Authorizations
Next, the SAP system is configured for the application test user and power platform developer who need a different set of authorizations. The developer needs a set of authorizations used by the SAP ERP Connector for looking up the RFCs offered by the system during development of the Power Automate flow and at runtime. In addition, the application test user role requires the authorization to call the
BAPI_EPM_PRODUCT_GET_DETAILS BAPI to search the product catalog with the Power App.| Step | Description | Screenshot |
| 83 | Go back to SAP GUI and log in as the administrator user. Start transaction PFCG to define a new role for the application users in this scenario. |  |
| 84 | Enter PRODUCT_SEARCH_BAPI in the Role field.Click Single Role. |  |
| 85 | Click Save. |  |
| 86 | Switch to the Authorization tab. Click the pencil button to edit the new role's authorization data. |  |
| 87 | Click Do not select templates. |  |
| 88 | Click Manually. |  |
| 89 | Enter S_RFC for the Authorization Object in the first row.Click OK. |  |
| 90 | Click the pencil button to edit the authorization checks for field RFC_NAME. |  |
| 91 | Enter the following values in the Value Intrvl table's 'From' column:
Click Save. |  |
| 92 | Click the pencil button to edit the authorization checks for field Activity (ACTVT). |  |
| 93 | Select Execute from the list. Click Save. |  |
| 94 | Click the pencil button to edit the authorization checks for field RFC_TYPE. |  |
| 95 | Select FUNC (Function Module) from the list. Click Save. |  |
| 96 | Click Save to save the application user role. |  |
| 97 | Click Generate. |  |
| 98 | Click Exit. |  |
| 99 | Switch to the User tab. Enter your application test user's ID (e.g. JDAVIS) in the first row of the User Assignment table. Click Save. |  |
| 100 | Click User Comparison. |  |
| 101 | Click Full Comparison, then Close the dialog window. |  |
| 102 | Click Exit. |  |
| 103 | Next, create the role for the application developer. Enter PRODUCT_SEARCH_DEVELOPER in the Role field.Click Single Role. |  |
| 104 | Repeat steps 85 to 90 for the new role. Enter the following values in the Value Intrvl table's 'From' column:
Click Save. Continue by repeating steps 92 to 98 for the application developer role. |  |
| 105 | Switch to the User tab. Enter your application test user's ID (e.g. DEVUSER) in the first row of the User Assignment table. Click Save. |  |
| 106 | Click User Comparison. |  |
| 107 | Click Full Comparison, then Close the dialog window. | |
| 108 | Click Exit. |  |
Setup the Power Platform canvas app and flow
All on-premise components (SAP system, OPDG, and AD) are now configured properly for Kerberos-based principal propagation of the Azure AD-authenticated user in the Power Platform canvas app which triggers the Power Automate flow to call the SAP system.
In this step, you will import the application components as a solution in your Power Platform environment and configure them according to your test lab setup. If you want to deploy to a new environment for this scenario, go to Power Platform admin center and create it.
| Step | Description | Screenshot |
| 109 | Login to Power Apps Studio at https://make powerapps.com with your Power Platform developer user. From the top menu, select the environment to deploy the scenario components. |  |
| 110 | Click Import solution from the top menu bar. |  |
| 111 | Click Browse and select the file SAPProductSearchSolution.zip from the Git repository's /ProductSearchApp folder.Click Next. |  |
| 112 | Click Next. |  |
| 113 | Open the drop-down box and select New connection. |  |
| 114 | In the SAP ERP Connection dialog, select Azure AD integrated as the Authentication Type. In the Choose a gateway drop-down box, select your OPDG instance for this scenario. Click Create. |  |
| 115 | The new connection requires authentication to your Azure AD tenant. Click Fix connection. |  |
| 116 | Sign-in to your Azure AD tenant with your development user's account that you configured the SNC mapping in step 32 and AD mapping in step 82, and assigned the PRODUCT_SEARCH_DEVELOPER role in step 105. |  |
| 117 | Upon successful sign-in, switch back to the previous browser tab. |  |
| 118 | Click Refresh. |  |
| 119 | The new connection is now selected by the import solution wizard. Click Import. |  |
| 120 | Wait for the completion of the import as indicated by the green banner. Then select the imported SAP Product Search Solution from the list. |  |
| 121 | From the solution components, select the SAPERPSettings environment variable. This variable is used by the SAP ERP connector action in the Power Automate flow to configure the SAP system connection parameters. It is in JSON format. |  |
| 122 | Click New value to overwrite the default value. |  |
| 123 | Enter the SAPERPSettings environment variable's new value according to your lab setup and the example below. You can use the default value as a template in a text editor.Click Save. |  |
| 124 | Select the SAP Product Search canvas app from the solution. | 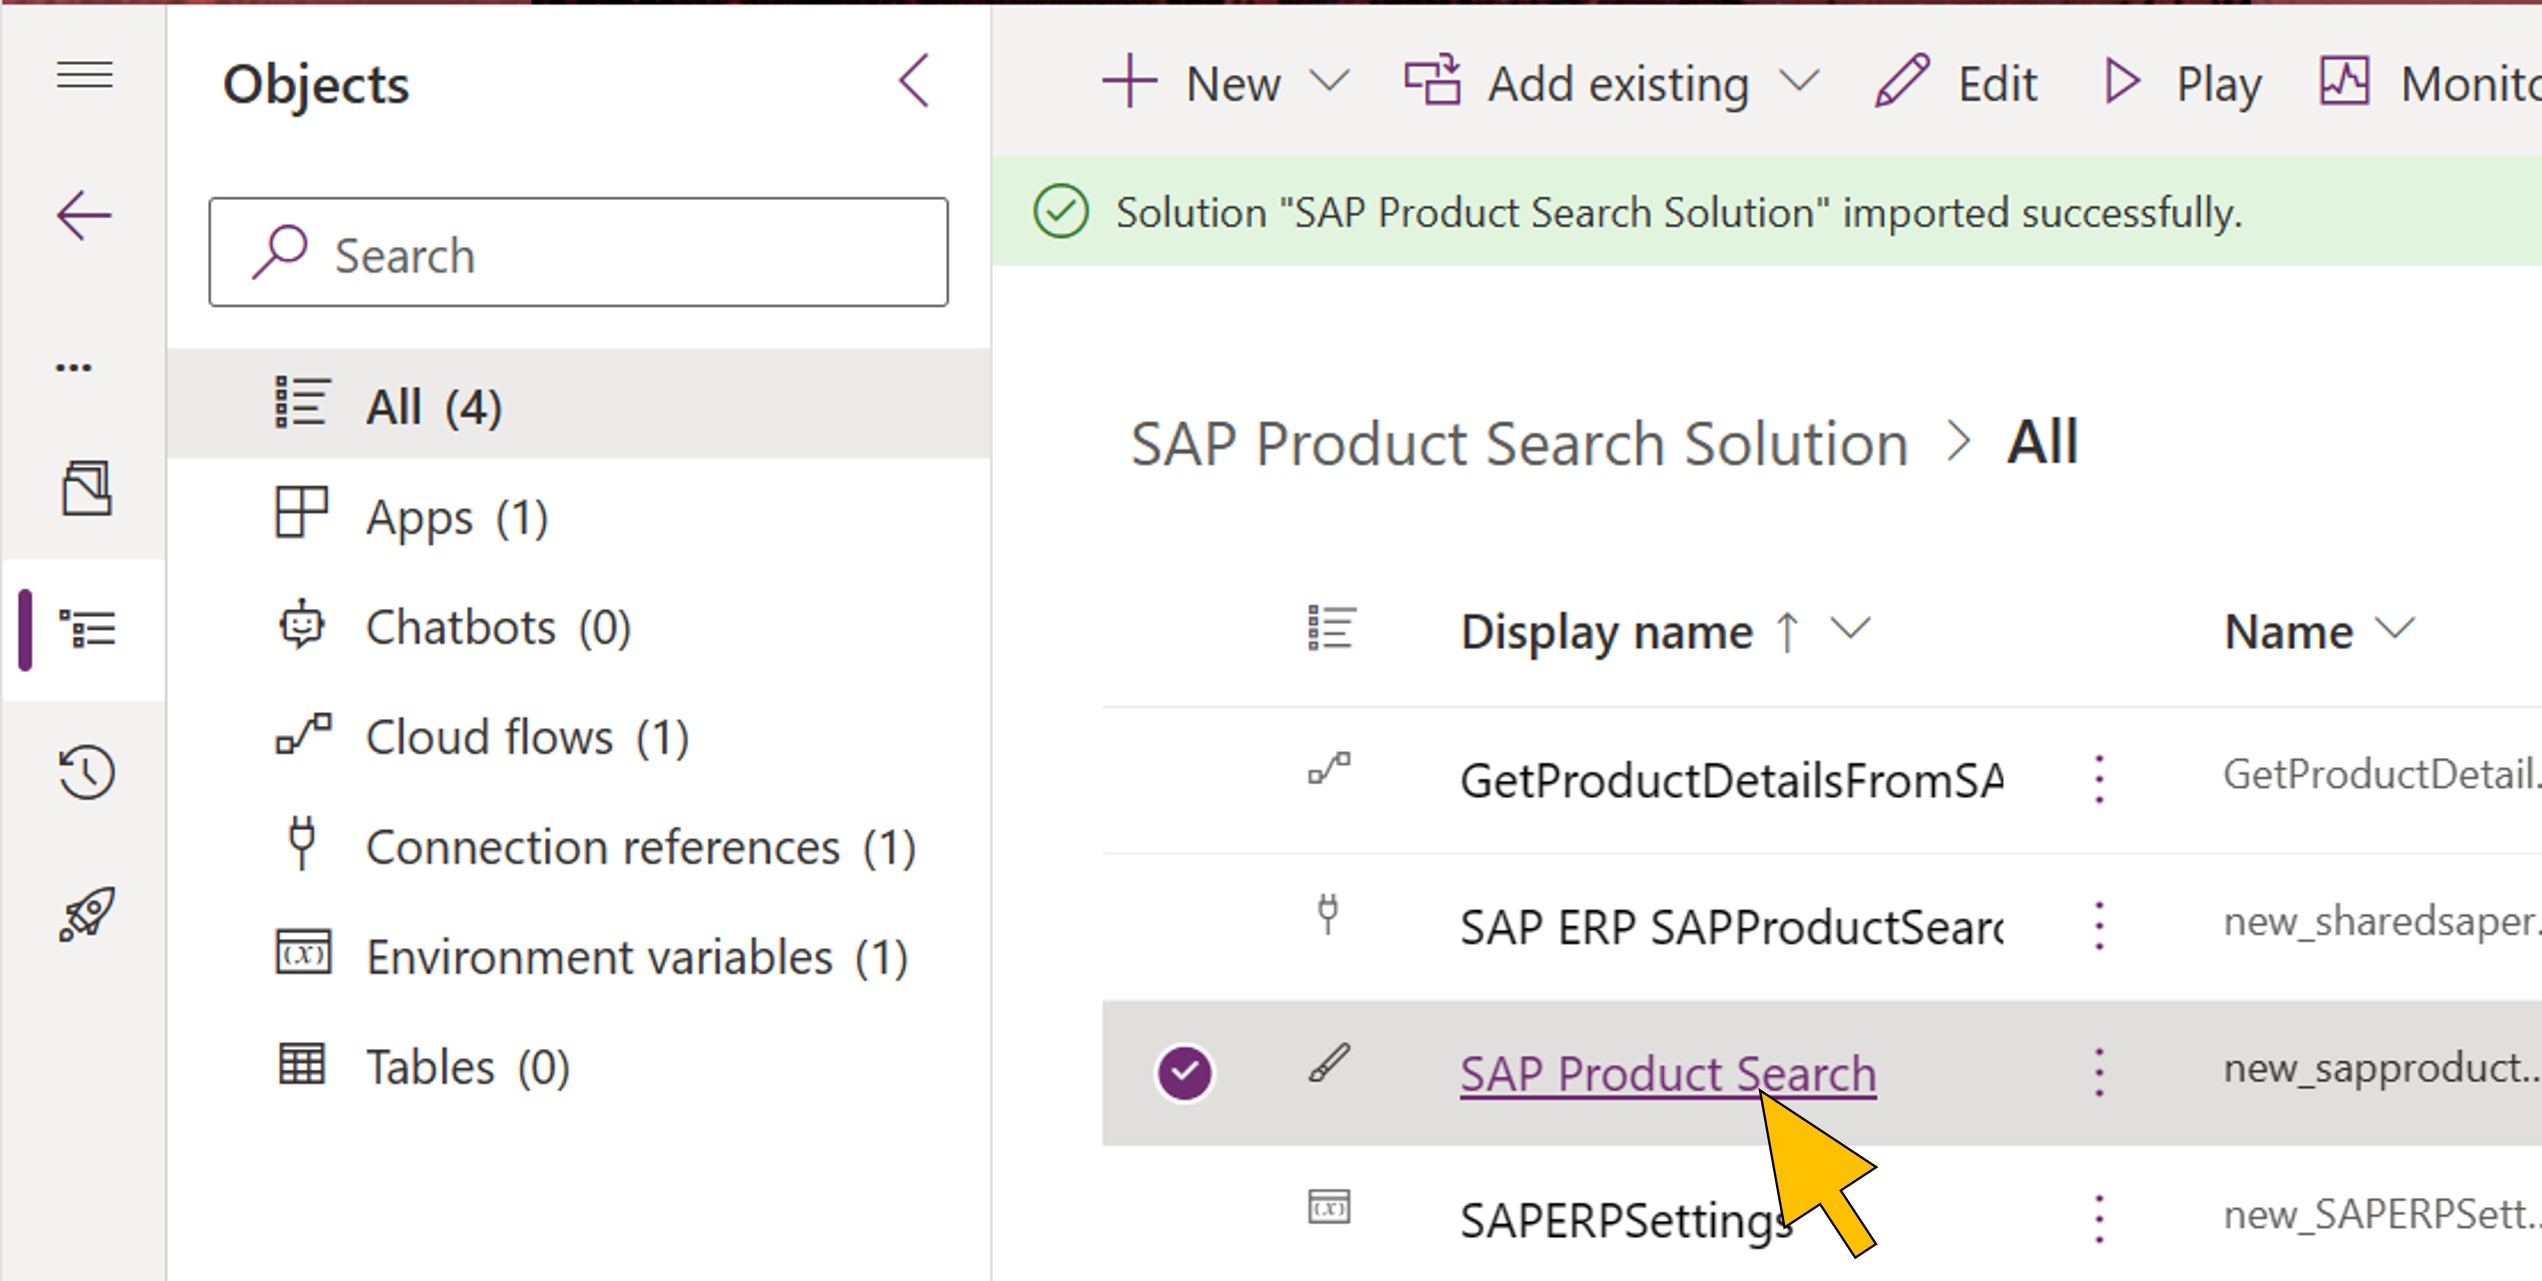 |
| 125 | The Power Apps Studio opens the SAP Product Search canvas app in edit mode. Click Allow. |  |
| 126 | Select Power Automate from the left-side navigation menu to list the flows used by the canvas app. From the list, select the ellipsis ('…') next to the GetProductDetailsFromSAP flow. Click Refresh. |  |
| 127 | Click Publish. |  |
| 128 | Click Publish this version. |  |
| 129 | You need to provide your application test user(s) access to the app. Click Share. | 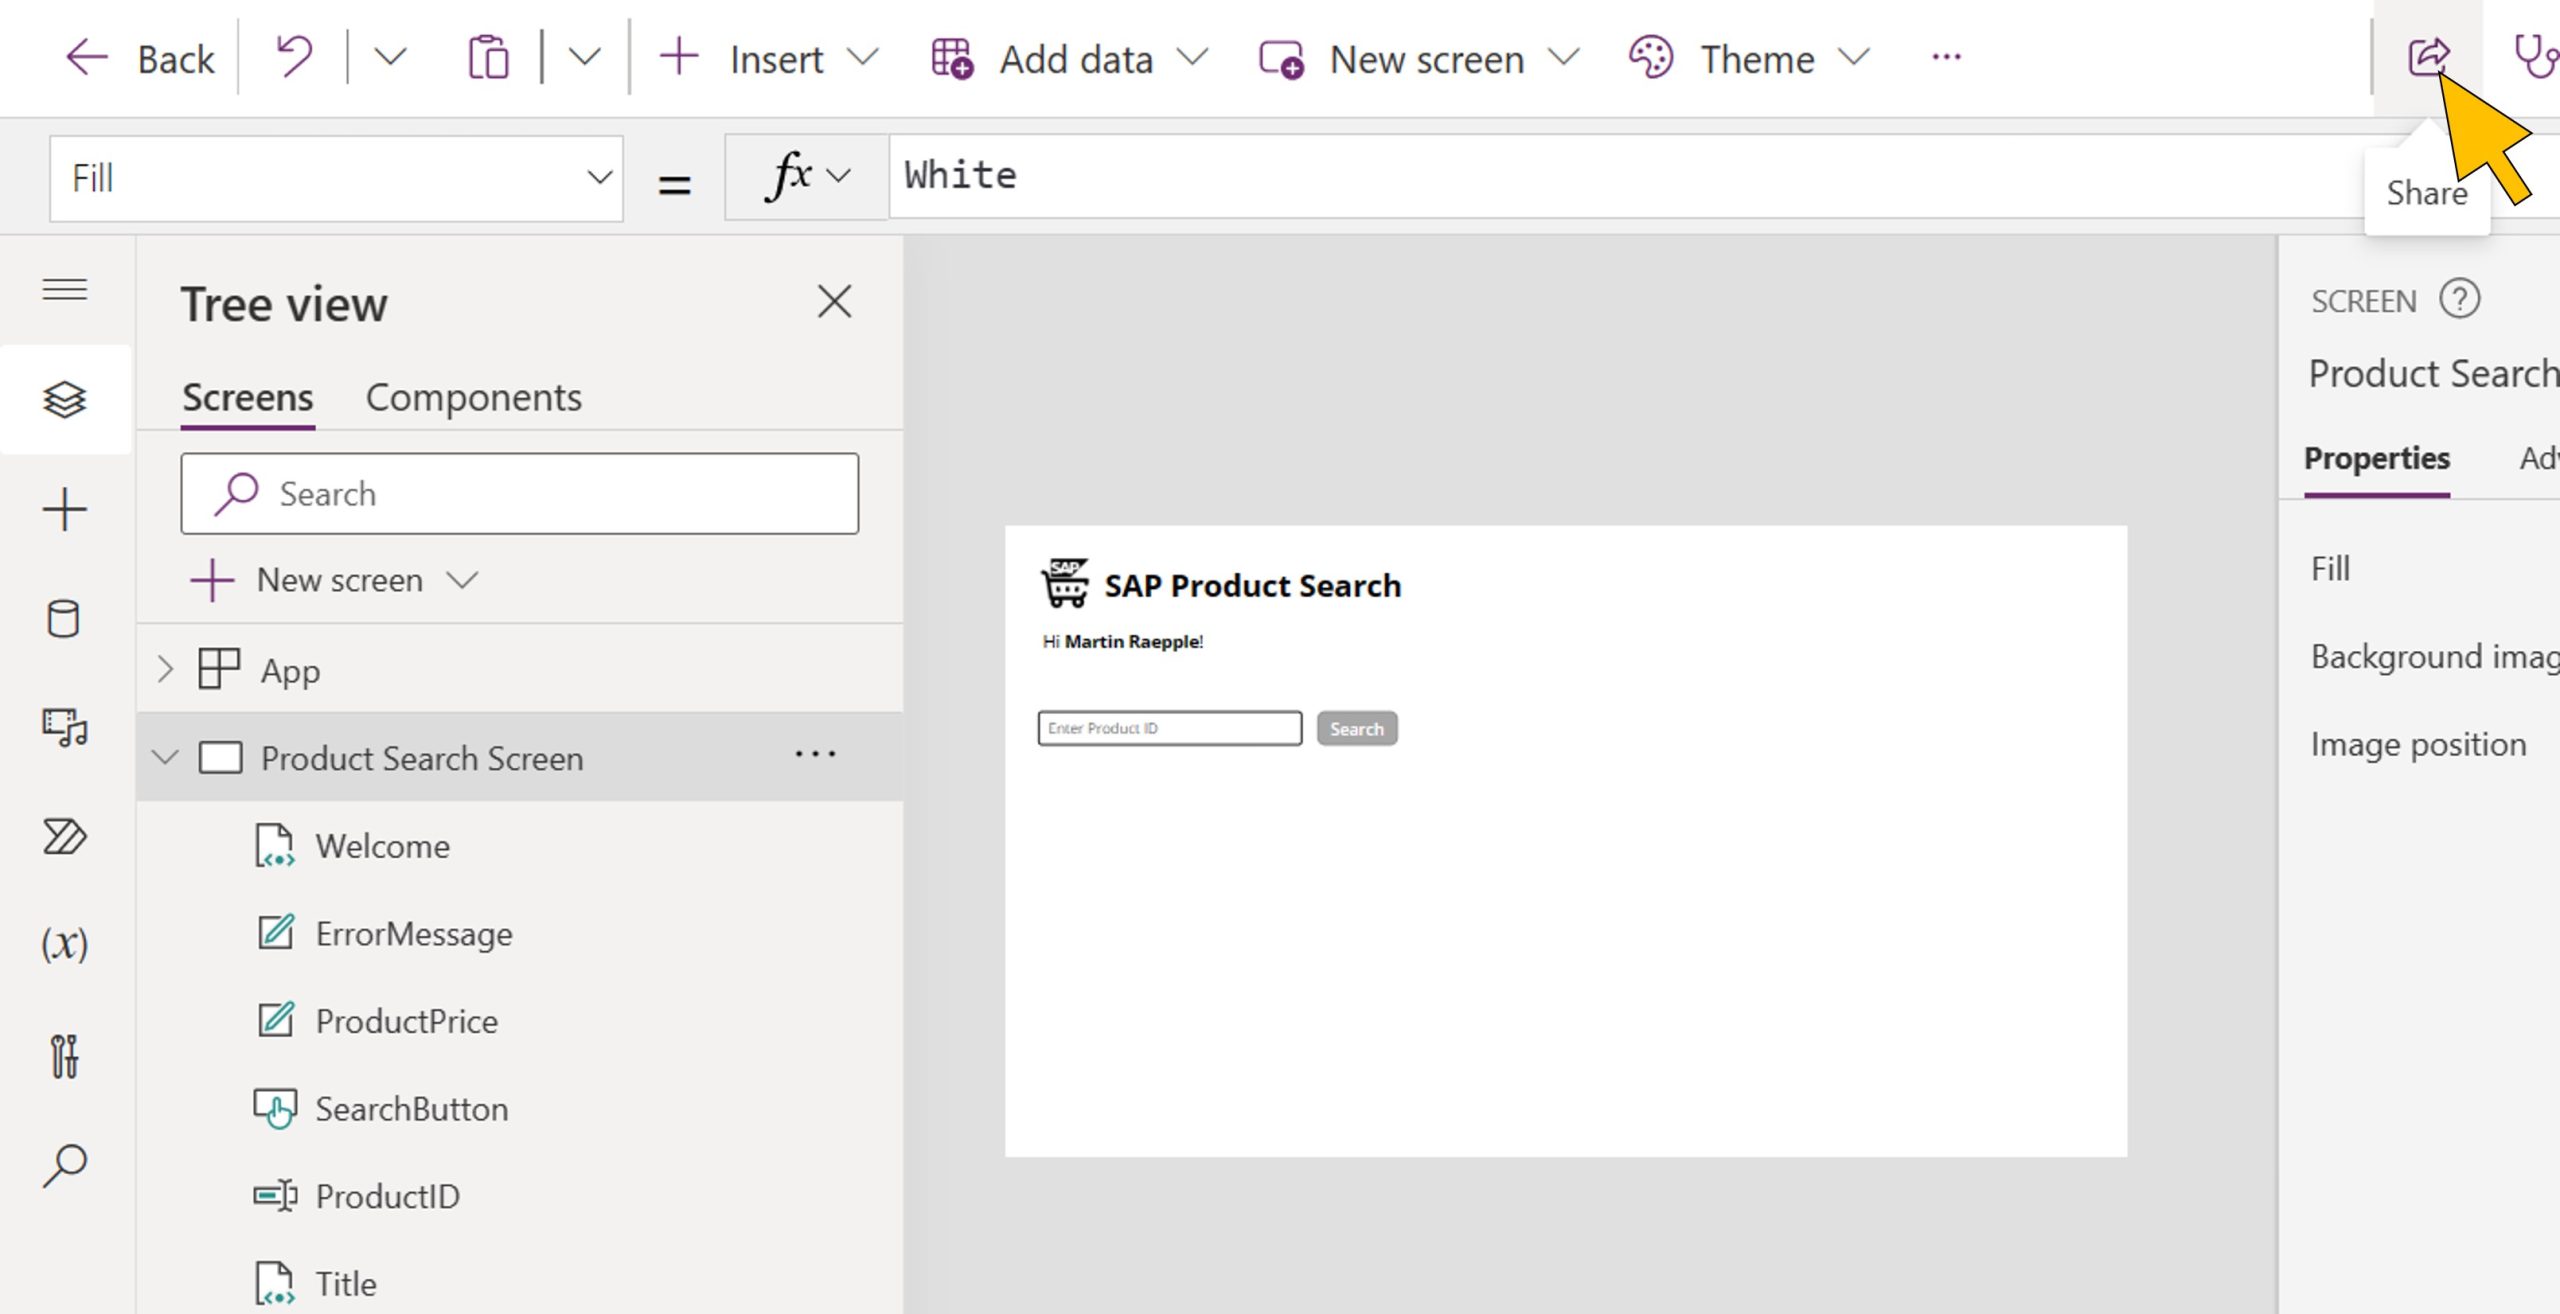 |
| 130 | Enter your application test user's name (e.g. "Jack Davis") in the search field. Click on the user account. Note: Instead of configuring single users, you can also type "Everyone" in the search filed and share the app with "Everyone in <tenant org>". |  |
| 131 | Deactivate the checkbox Send an email invitation to the user. Click Share. |  |
| 132 | Close the Share dialog box. |  |
| 133 | Click the Copy link to clipboard icon next to the app's Web link. |  |
| 134 | Since the SAP Product Search app uses the SAP ERP Connector which is Premium tier connector, the application test user requires a Power App license to use this app. In a new browser tab, open the Microsoft 365 admin center at https://admin.microsoft.com/ and login as your Power Platform administrator. Select Billing → Licenses from the left-side navigation menu. Click Microsoft Power App Plan 2 Trial. |  |
| 135 | Click Assign licenses. In the search box, enter your application test user's name and select the user's account from the list. Click Assign. You can now log out from the Microsoft 365 admin center. |  |
| 136 | Similar to the canvas app, it is also required to set the user's permission to access the OPDG instance. Go to the Power Platform admin center at https://admin.powerplatform.microsoft.com and login as your Power Platform admin user. Select Data (Preview) from the left-side navigation menu and switch to the On-premises data gateway tab. For the OPDG instance in your scenario, select the ellipsis ('…'). From the context menu, select Manage users. |  |
| 137 | In the search field, start entering your application test user's name. Select the user's account from the list to add it. |  |
| 138 | Click Share. |  |
Testing the scenario
All required components are configured for testing the scenario in the following steps.
| Step | Description | Screenshot |
| 139 | Login to the domain on the workstation host with your application test user (e.g. CORP\jdavis). | |
| 140 | Open a web browser and paste the URL copied in step 133 into the address field. |  |
| 141 | Since you have synchronized your AD users with Azure AD Connect, you are single signed-on with the application test user to your Azure AD tenant and the app is loaded. |  |
| 142 | The SAP ERP connector requires a connection on-behalf-of the authenticated user. Click Allow to give consent to the requested permission to use this connection. |  |
| 143 | Enter a product ID form the catalog in the entry field, e.g. AR-FB-1000. Click Search. |  |
| 144 | The app triggers the flow which calls the SAP system on-behalf-of the Azure AD-authenticated user. The SAP ERP connector obtains a Kerberos ticket from Active Directory for the user found in the msDS-cloudExtensionAttribute1 attribute. Upon receiving the Kerberos ticket with the BAPI call, the SAP system is able to map the AD user via the SNC mapping to a local user in the system, for whom it checks the proper authorizations to invoke the BAPI. Finally, the response with the product details is returned to the Power Automate flow, which parses the response and sends the price information back to the canvas app. |  |
Congratulations! You've successfully completed the scenario. The following sections provide additional information about optional settings to improve the end user's experience, configure for load balancing, and some troubleshooting tips.
Bypass the user consent
In step 142, the user has been asked to confirm the requested permissions of the SAP ERP Connector. In most enterprise scenarios, this user consent is usually not required, and can be bypassed with the following Powershell commands for Power apps administration:
| Step | Description | Screenshot |
| 145 | Start a Windows Powershell as an administrator. Import the necessary modules using the following commands: Install-Module -Name Microsoft.PowerApps.Administration.PowerShellInstall-Module -Name Microsoft.PowerApps.PowerShell -AllowClobberConfirm the questions with "Y". |   |
| 146 | Provide your Power Platform administrator credentials using the following command: Add-PowerAppsAccount |  |
| 147 | The command opens the prompt to collect your Power Platform administrator credentials. |  |
| 148 | Run the Power Apps cmdlet Get-AdminPowerAppEnvironmentand copy the value for your scenario's EnvironmentName to a temporary textfile. |  |
| 149 | Run the Power Apps cmdlet Get-AdminPowerApp -EnvironmentName <value from step 148>with the value obtained in the previous step. Copy the value for your app's AppName to the temporary textfile. |  |
| 150 | With the two values for EnvironmentName and AppName run the command: Set-AdminPowerAppApisToBypassConsent -EnvironmentName <value from step 148> -AppName <value from step 149>This command changes the bypassConsent flag of the SAP Product Search app to true. |  |
Configure Load Balancing via SAP Message Server
In step 123, the connection parameters are configured for a specific application server instance. While this setup is appropriate for development and testing purposes, it may not be the preferred choice in a production environment. There the SAP landscape usually runs an SAP Message Server which load-balances the RFC calls to multiple application servers.
If you want to setup the scenario for load balancing via SAP Message Server, change the SAPERPSettings environment variable according to the following template:
{

    "MessageServerHost": "<SAP Message Server address or hostname, e.g. 23.123.153.183>",

    "Client": "<your client ID, e.g. 001>",

    "LogonType": "Group",

    "MessageServerService": "<The service name or port number that the Message Server is listening under for load balancing requests, e.g. 3601>",

    "SncLibraryPath": "C:\\Program Files\\On-premises data gateway\\sapcrypto.dll",

    "SncPartnerName": "<SAP system's SNC name, e.g. 'p:CN=A4H'>",

    "SncQOP": "Default",

    "SncSso": "On",

    "SystemID": "<SAP system's ID, e.g. A4H>",

    "UseSnc": "true"

}
Here is an example of a valid connection string using SAP Message Server. You can use transaction
SMMS (Message Service Monitor) to find the correct value for parameter MessageServerService:{
"MessageServerHost": "20.123.153.183",
"Client": "001",
"LogonType": "Group",
"MessageServerService": "3601",
"SncLibraryPath": "C:\\Program Files\\On-premises data gateway\\sapcrypto.dll",
"SncPartnerName": "p:CN=A4H",
"SncQOP": "Default",
"SncSso": "On",
"SystemID": "A4H",
"UseSnc": "true"
}Troubleshooting
In complex integration scenarios across various system-, network- and technology-boundaries, troubleshooting usually starts with gathering information about what the issue is and where it occurs. Therefore the techniques in this last section start with troubleshooting the scenario from the user's perspective and then explain how to obtain detailed error traces from the system components along the end-to-end communication path.
Debugging with the Power Platform tools
To starting debugging the application scenario, login to https://make powerautomate.com with your Power Platform developer user. Select My flows from the left-side navigation menu and click on the Run button of the GetProductDetailsFromSAP flow. You can enter a product ID to search for in the entry field and click Run flow to start a new instance of the flow (figure 4):

Figure 4: Manually triggering the flow in the scenario
In the confirmation dialog box (figure 5), click the Flow Runs Page link. This page shows the run history of the GetProductDetailsFromSAP flow. Click on the fist item in the list to see the results from the last run. As shown in the following screenshot, the 3rd step Call SAP function (V2) - BAPI EPM PRODUCT GET DETAIL failed with a BadGateway error. By clicking on Show raw outputs you can view more details about the underlying issue. The user who started the instance (in this case the Power Platform developer user) obviously didn't have the required permissions in the SAP system to call the BAPI according to the exception message:

Figure 5: Monitor flow run
Lower-level issues such as Kerberos- or user-mapping-related problems are usually reported back to the flow as an InternalServerError by the SAP ERP Connector. In this case you should take a closer look at the available error traces in the different log files.
SNC and Kerberos troubleshooting
A good starting point for troubleshooting SNC and Kerberos is the Guided Answers wizard for SNC Kerberos Configuration for SAP GUI troubleshooting. In addition, the following (non-complete) list of SAP Notes also provides resolutions for common SNC-related problems:
- 1635019: No user exists with SNC name - canonical name not resolved
- 1696905: SNC name configuration to support Kerberos and Certificates
- 1848999: Central Note for CommonCryptoLib 8 (SAPCRYPTOLIB)
- 1878155: SNC Error Code A2210231: Kerberos ticket not yet valid
- 2265085: Unable to load GSS-API DLL sapcrypto.dll
- 2384027: Error A2210233:Kerberos ticket contains wrong service name target
- 2446327: SNC Error Code A221021D Server refuses offered key exchange algorithm
- 2497505: SNC Error Code A2200210 Peer certificate verification failed - Kerberos configuration
Turning on SNC traces for SAP NCo and the SAP system can further help with the root cause analysis:
- On the SAP system, login as the operating system administrator, and change to the directory where the SAP Cryptographic Library is loaded from, e.g
/usr/sap/<SID>/<INST>/exe, and create a new text file namedsectrace.iniwith the following content:
LEVEL=4
DIRECTORY=<new-or-empty-subfolder>
DIRECTORYmust be set to a valid folder name for the respective platform. It must be the subfolder of an existing one, and should be placed in a local drive. IfDIRECTORYdoesn't exist it will be created. As an example,DIRECTORYcan be set on a Linux system to/usr/sap/<SID>/<INST>/sectrace.
The following screenshot shows the traces generated in filesec-disp+work-<nnnnnn>.trcby the SAP GUI login of the application test user in step 37:
- To enable SNC tracing on the OPDG, open the
sapcrypto.ini(see step 68) and add the following two lines to it:
ccl/trace/level=4
ccl/trace/directory=C:\snctrc
Generated trace files can be found in the directory specified by theccl/trace/directoryprofile parameter.
As the size of the generated trace files may grow quickly and tracing also reduces the performance of the systems, it is recommended to remove
sectrace.ini and/or the configuration profile parameters from sapcrypto.ini once the troubleshooting activities are completed.An in-depth analysis of the Kerberos message exchange between OPDG and SAP is possible with Wireshark, a tool for capturing and analyzing network traffic. Install the tool on the OPDG host and follow the steps below to capture the Kerberos taffic of steps 10 to 14 from figure 2:
Launch Wireshark. Select the network interface(s), e.g. Ethernet, to capture traffic for, and click on Start capturing packets. |  |
| Run the application scenario (steps 139 to 144) |  |
Enter "kerberos" in the display filter field and press Enter. In the captured messages filtered for the Kerberos protocol, look for any error messages. The screenshot shows the TGS_REQ message (figure 2, step 12) with the user's service ticket for OPDG obtained in the previous step as an additional-ticket in the request. |  |
Collecting the logs from OPDG
Launch the OPDG app (see step 54) and sign-in as the Power Platform administrator. Select Diagnostics and click Export logs as shown in figure 6:

Figure 6: Exporting OPDG logs
Unzip the file that is saved to the
ODGLogs folder on your Windows desktop. Look for the most recent GatewayErrors* file in the archive. The following screenshot shows the log file with an error message that the SAP Cryptographic Library could not be found in the OPDG installation directory:
Figure 7: OPDG log excerpt
Other common issues
Finally, table 2 contains a non-complete list of common error message in the scenario and suggests possible ways to resolve them.
| If you see this ... | ... try this: |
When signing on to the Power app, the error message PowerPINotAuthorizedException is shown:  | Go to Power Platform admin center at https://admin.powerplatform.microsoft.com and login as your Power Platform admin user. Select Data (Preview) from the left-side navigation menu and switch to the On-premises data gateway tab. For the OPDG instance in your scenario, select the ellipsis ('…'). From the context menu, select Manage users. Check if the user you signed-on to the app is in the list of users assigned to the Connection Creator role of the gateway and that the SAP ERP Connection type is activated.
|
| When executing the search, a No RFC authorization error message is shown:
| An error in the app indicating an RFC authorization issue can be fixed by checking the correct role design (steps 83ff) and the assignment to the user (step 99). To troubleshoot authorization problems of the propagated principal in the backend start a system trace as the SAP admin with transaction ST01 as shown in the screenshot below. Select Authorization checks from the Trace Components and click Trace on.
Re-run the scenario and click Trace off, then Anaysis. On the next screen, enter "*" for the user name and click Start Reporting (F8):
The orange-colored lines in the report show failed authorization checks due to missing permissions of the user in the system. |
GatewayTimeout caused by SAP system connection timeout with the message "partner '<IP address of SAP system>:48<instance number>' not reached"  | Make sure that port 48<instance number> (e.g. 4800) on the SAP system can be reached from the OPDG. In case you deployed a CAL instance on Azure, check the Network security group (NSG) settings on the subnet and network interface level for corresponding rules to allow network traffic over this port as shown in the following screenshot:
|
Table 2: Common error message and their possible resolution
14 Comments
You must be a registered user to add a comment. If you've already registered, sign in. Otherwise, register and sign in.
Labels in this area
-
"automatische backups"
1 -
"regelmäßige sicherung"
1 -
"TypeScript" "Development" "FeedBack"
1 -
505 Technology Updates 53
1 -
ABAP
14 -
ABAP API
1 -
ABAP CDS Views
2 -
ABAP CDS Views - BW Extraction
1 -
ABAP CDS Views - CDC (Change Data Capture)
1 -
ABAP class
2 -
ABAP Cloud
3 -
ABAP Development
5 -
ABAP in Eclipse
1 -
ABAP Platform Trial
1 -
ABAP Programming
2 -
abap technical
1 -
abapGit
1 -
absl
2 -
access data from SAP Datasphere directly from Snowflake
1 -
Access data from SAP datasphere to Qliksense
1 -
Accrual
1 -
action
1 -
adapter modules
1 -
Addon
1 -
Adobe Document Services
1 -
ADS
1 -
ADS Config
1 -
ADS with ABAP
1 -
ADS with Java
1 -
ADT
2 -
Advance Shipping and Receiving
1 -
Advanced Event Mesh
3 -
AEM
1 -
AI
7 -
AI Launchpad
1 -
AI Projects
1 -
AIML
9 -
Alert in Sap analytical cloud
1 -
Amazon S3
1 -
Analytical Dataset
1 -
Analytical Model
1 -
Analytics
1 -
Analyze Workload Data
1 -
annotations
1 -
API
1 -
API and Integration
3 -
API Call
2 -
API security
1 -
Application Architecture
1 -
Application Development
5 -
Application Development for SAP HANA Cloud
3 -
Applications and Business Processes (AP)
1 -
Artificial Intelligence
1 -
Artificial Intelligence (AI)
5 -
Artificial Intelligence (AI) 1 Business Trends 363 Business Trends 8 Digital Transformation with Cloud ERP (DT) 1 Event Information 462 Event Information 15 Expert Insights 114 Expert Insights 76 Life at SAP 418 Life at SAP 1 Product Updates 4
1 -
Artificial Intelligence (AI) blockchain Data & Analytics
1 -
Artificial Intelligence (AI) blockchain Data & Analytics Intelligent Enterprise
1 -
Artificial Intelligence (AI) blockchain Data & Analytics Intelligent Enterprise Oil Gas IoT Exploration Production
1 -
Artificial Intelligence (AI) blockchain Data & Analytics Intelligent Enterprise sustainability responsibility esg social compliance cybersecurity risk
1 -
ASE
1 -
ASR
2 -
ASUG
1 -
Attachments
1 -
Authorisations
1 -
Automating Processes
1 -
Automation
2 -
aws
2 -
Azure
1 -
Azure AI Studio
1 -
Azure API Center
1 -
Azure API Management
1 -
B2B Integration
1 -
Backorder Processing
1 -
Backup
1 -
Backup and Recovery
1 -
Backup schedule
1 -
BADI_MATERIAL_CHECK error message
1 -
Bank
1 -
BAS
1 -
basis
2 -
Basis Monitoring & Tcodes with Key notes
2 -
Batch Management
1 -
BDC
1 -
Best Practice
1 -
bitcoin
1 -
Blockchain
3 -
bodl
1 -
BOP in aATP
1 -
BOP Segments
1 -
BOP Strategies
1 -
BOP Variant
1 -
BPC
1 -
BPC LIVE
1 -
BTP
13 -
BTP Destination
2 -
Business AI
1 -
Business and IT Integration
1 -
Business application stu
1 -
Business Application Studio
1 -
Business Architecture
1 -
Business Communication Services
1 -
Business Continuity
1 -
Business Data Fabric
3 -
Business Fabric
1 -
Business Partner
12 -
Business Partner Master Data
10 -
Business Technology Platform
2 -
Business Trends
4 -
BW4HANA
1 -
CA
1 -
calculation view
1 -
CAP
4 -
Capgemini
1 -
CAPM
1 -
Catalyst for Efficiency: Revolutionizing SAP Integration Suite with Artificial Intelligence (AI) and
1 -
CCMS
2 -
CDQ
12 -
CDS
2 -
Cental Finance
1 -
Certificates
1 -
CFL
1 -
Change Management
1 -
chatbot
1 -
chatgpt
3 -
CL_SALV_TABLE
2 -
Class Runner
1 -
Classrunner
1 -
Cloud ALM Monitoring
1 -
Cloud ALM Operations
1 -
cloud connector
1 -
Cloud Extensibility
1 -
Cloud Foundry
4 -
Cloud Integration
6 -
Cloud Platform Integration
2 -
cloudalm
1 -
communication
1 -
Compensation Information Management
1 -
Compensation Management
1 -
Compliance
1 -
Compound Employee API
1 -
Configuration
1 -
Connectors
1 -
Consolidation Extension for SAP Analytics Cloud
2 -
Control Indicators.
1 -
Controller-Service-Repository pattern
1 -
Conversion
1 -
Cosine similarity
1 -
cryptocurrency
1 -
CSI
1 -
ctms
1 -
Custom chatbot
3 -
Custom Destination Service
1 -
custom fields
1 -
Customer Experience
1 -
Customer Journey
1 -
Customizing
1 -
cyber security
3 -
cybersecurity
1 -
Data
1 -
Data & Analytics
1 -
Data Aging
1 -
Data Analytics
2 -
Data and Analytics (DA)
1 -
Data Archiving
1 -
Data Back-up
1 -
Data Flow
1 -
Data Governance
5 -
Data Integration
2 -
Data Quality
12 -
Data Quality Management
12 -
Data Synchronization
1 -
data transfer
1 -
Data Unleashed
1 -
Data Value
8 -
database tables
1 -
Datasphere
3 -
datenbanksicherung
1 -
dba cockpit
1 -
dbacockpit
1 -
Debugging
2 -
Defender
1 -
Delimiting Pay Components
1 -
Delta Integrations
1 -
Destination
3 -
Destination Service
1 -
Developer extensibility
1 -
Developing with SAP Integration Suite
1 -
Devops
1 -
digital transformation
1 -
Documentation
1 -
Dot Product
1 -
DQM
1 -
dump database
1 -
dump transaction
1 -
e-Invoice
1 -
E4H Conversion
1 -
Eclipse ADT ABAP Development Tools
2 -
edoc
1 -
edocument
1 -
ELA
1 -
Embedded Consolidation
1 -
Embedding
1 -
Embeddings
1 -
Employee Central
1 -
Employee Central Payroll
1 -
Employee Central Time Off
1 -
Employee Information
1 -
Employee Rehires
1 -
Enable Now
1 -
Enable now manager
1 -
endpoint
1 -
Enhancement Request
1 -
Enterprise Architecture
1 -
ESLint
1 -
ETL Business Analytics with SAP Signavio
1 -
Euclidean distance
1 -
Event Dates
1 -
Event Driven Architecture
1 -
Event Mesh
2 -
Event Reason
1 -
EventBasedIntegration
1 -
EWM
1 -
EWM Outbound configuration
1 -
EWM-TM-Integration
1 -
Existing Event Changes
1 -
Expand
1 -
Expert
2 -
Expert Insights
2 -
Exploits
1 -
Fiori
14 -
Fiori Elements
2 -
Fiori SAPUI5
12 -
first-guidance
1 -
Flask
1 -
FTC
1 -
Full Stack
8 -
Funds Management
1 -
gCTS
1 -
General
1 -
Generative AI
1 -
Getting Started
1 -
GitHub
9 -
Grants Management
1 -
groovy
1 -
GTP
1 -
HANA
6 -
HANA Cloud
2 -
Hana Cloud Database Integration
2 -
HANA DB
2 -
HANA XS Advanced
1 -
Historical Events
1 -
home labs
1 -
HowTo
1 -
HR Data Management
1 -
html5
8 -
HTML5 Application
1 -
Identity cards validation
1 -
idm
1 -
Implementation
1 -
input parameter
1 -
instant payments
1 -
Integration
3 -
Integration Advisor
1 -
Integration Architecture
1 -
Integration Center
1 -
Integration Suite
1 -
intelligent enterprise
1 -
iot
1 -
Java
1 -
job
1 -
Job Information Changes
1 -
Job-Related Events
1 -
Job_Event_Information
1 -
joule
4 -
Journal Entries
1 -
Just Ask
1 -
Kerberos for ABAP
8 -
Kerberos for JAVA
8 -
KNN
1 -
Launch Wizard
1 -
Learning Content
2 -
Life at SAP
5 -
lightning
1 -
Linear Regression SAP HANA Cloud
1 -
Loading Indicator
1 -
local tax regulations
1 -
LP
1 -
Machine Learning
2 -
Marketing
1 -
Master Data
3 -
Master Data Management
14 -
Maxdb
2 -
MDG
1 -
MDGM
1 -
MDM
1 -
Message box.
1 -
Messages on RF Device
1 -
Microservices Architecture
1 -
Microsoft Universal Print
1 -
Middleware Solutions
1 -
Migration
5 -
ML Model Development
1 -
Modeling in SAP HANA Cloud
8 -
Monitoring
3 -
MTA
1 -
Multi-Record Scenarios
1 -
Multiple Event Triggers
1 -
Myself Transformation
1 -
Neo
1 -
New Event Creation
1 -
New Feature
1 -
Newcomer
1 -
NodeJS
3 -
ODATA
2 -
OData APIs
1 -
odatav2
1 -
ODATAV4
1 -
ODBC
1 -
ODBC Connection
1 -
Onpremise
1 -
open source
2 -
OpenAI API
1 -
Oracle
1 -
PaPM
1 -
PaPM Dynamic Data Copy through Writer function
1 -
PaPM Remote Call
1 -
PAS-C01
1 -
Pay Component Management
1 -
PGP
1 -
Pickle
1 -
PLANNING ARCHITECTURE
1 -
Popup in Sap analytical cloud
1 -
PostgrSQL
1 -
POSTMAN
1 -
Prettier
1 -
Process Automation
2 -
Product Updates
5 -
PSM
1 -
Public Cloud
1 -
Python
4 -
python library - Document information extraction service
1 -
Qlik
1 -
Qualtrics
1 -
RAP
3 -
RAP BO
2 -
Record Deletion
1 -
Recovery
1 -
recurring payments
1 -
redeply
1 -
Release
1 -
Remote Consumption Model
1 -
Replication Flows
1 -
research
1 -
Resilience
1 -
REST
1 -
REST API
1 -
Retagging Required
1 -
Risk
1 -
Rolling Kernel Switch
1 -
route
1 -
rules
1 -
S4 HANA
1 -
S4 HANA Cloud
1 -
S4 HANA On-Premise
1 -
S4HANA
3 -
S4HANA_OP_2023
2 -
SAC
10 -
SAC PLANNING
9 -
SAP
4 -
SAP ABAP
1 -
SAP Advanced Event Mesh
1 -
SAP AI Core
8 -
SAP AI Launchpad
8 -
SAP Analytic Cloud Compass
1 -
Sap Analytical Cloud
1 -
SAP Analytics Cloud
4 -
SAP Analytics Cloud for Consolidation
3 -
SAP Analytics Cloud Story
1 -
SAP analytics clouds
1 -
SAP API Management
1 -
SAP BAS
1 -
SAP Basis
6 -
SAP BODS
1 -
SAP BODS certification.
1 -
SAP BTP
21 -
SAP BTP Build Work Zone
2 -
SAP BTP Cloud Foundry
6 -
SAP BTP Costing
1 -
SAP BTP CTMS
1 -
SAP BTP Innovation
1 -
SAP BTP Migration Tool
1 -
SAP BTP SDK IOS
1 -
SAP BTPEA
1 -
SAP Build
11 -
SAP Build App
1 -
SAP Build apps
1 -
SAP Build CodeJam
1 -
SAP Build Process Automation
3 -
SAP Build work zone
10 -
SAP Business Objects Platform
1 -
SAP Business Technology
2 -
SAP Business Technology Platform (XP)
1 -
sap bw
1 -
SAP CAP
2 -
SAP CDC
1 -
SAP CDP
1 -
SAP CDS VIEW
1 -
SAP Certification
1 -
SAP Cloud ALM
4 -
SAP Cloud Application Programming Model
1 -
SAP Cloud Integration for Data Services
1 -
SAP cloud platform
8 -
SAP Companion
1 -
SAP CPI
3 -
SAP CPI (Cloud Platform Integration)
2 -
SAP CPI Discover tab
1 -
sap credential store
1 -
SAP Customer Data Cloud
1 -
SAP Customer Data Platform
1 -
SAP Data Intelligence
1 -
SAP Data Migration in Retail Industry
1 -
SAP Data Services
1 -
SAP DATABASE
1 -
SAP Dataspher to Non SAP BI tools
1 -
SAP Datasphere
9 -
SAP DRC
1 -
SAP EWM
1 -
SAP Fiori
3 -
SAP Fiori App Embedding
1 -
Sap Fiori Extension Project Using BAS
1 -
SAP GRC
1 -
SAP HANA
1 -
SAP HCM (Human Capital Management)
1 -
SAP HR Solutions
1 -
SAP IDM
1 -
SAP Integration Suite
9 -
SAP Integrations
4 -
SAP iRPA
2 -
SAP LAGGING AND SLOW
1 -
SAP Learning Class
1 -
SAP Learning Hub
1 -
SAP Master Data
1 -
SAP Odata
2 -
SAP on Azure
2 -
SAP PartnerEdge
1 -
sap partners
1 -
SAP Password Reset
1 -
SAP PO Migration
1 -
SAP Prepackaged Content
1 -
SAP Process Automation
2 -
SAP Process Integration
2 -
SAP Process Orchestration
1 -
SAP S4HANA
2 -
SAP S4HANA Cloud
1 -
SAP S4HANA Cloud for Finance
1 -
SAP S4HANA Cloud private edition
1 -
SAP Sandbox
1 -
SAP STMS
1 -
SAP successfactors
3 -
SAP SuccessFactors HXM Core
1 -
SAP Time
1 -
SAP TM
2 -
SAP Trading Partner Management
1 -
SAP UI5
1 -
SAP Upgrade
1 -
SAP Utilities
1 -
SAP-GUI
8 -
SAP_COM_0276
1 -
SAPBTP
1 -
SAPCPI
1 -
SAPEWM
1 -
sapfirstguidance
1 -
SAPHANAService
1 -
SAPIQ
1 -
sapmentors
1 -
saponaws
2 -
SAPS4HANA
1 -
SAPUI5
5 -
schedule
1 -
Script Operator
1 -
Secure Login Client Setup
8 -
security
9 -
Selenium Testing
1 -
Self Transformation
1 -
Self-Transformation
1 -
SEN
1 -
SEN Manager
1 -
service
1 -
SET_CELL_TYPE
1 -
SET_CELL_TYPE_COLUMN
1 -
SFTP scenario
2 -
Simplex
1 -
Single Sign On
8 -
Singlesource
1 -
SKLearn
1 -
Slow loading
1 -
soap
1 -
Software Development
1 -
SOLMAN
1 -
solman 7.2
2 -
Solution Manager
3 -
sp_dumpdb
1 -
sp_dumptrans
1 -
SQL
1 -
sql script
1 -
SSL
8 -
SSO
8 -
Substring function
1 -
SuccessFactors
1 -
SuccessFactors Platform
1 -
SuccessFactors Time Tracking
1 -
Sybase
1 -
system copy method
1 -
System owner
1 -
Table splitting
1 -
Tax Integration
1 -
Technical article
1 -
Technical articles
1 -
Technology Updates
15 -
Technology Updates
1 -
Technology_Updates
1 -
terraform
1 -
Threats
2 -
Time Collectors
1 -
Time Off
2 -
Time Sheet
1 -
Time Sheet SAP SuccessFactors Time Tracking
1 -
Tips and tricks
2 -
toggle button
1 -
Tools
1 -
Trainings & Certifications
1 -
Transformation Flow
1 -
Transport in SAP BODS
1 -
Transport Management
1 -
TypeScript
3 -
ui designer
1 -
unbind
1 -
Unified Customer Profile
1 -
UPB
1 -
Use of Parameters for Data Copy in PaPM
1 -
User Unlock
1 -
VA02
1 -
Validations
1 -
Vector Database
2 -
Vector Engine
1 -
Visual Studio Code
1 -
VSCode
2 -
VSCode extenions
1 -
Vulnerabilities
1 -
Web SDK
1 -
work zone
1 -
workload
1 -
xsa
1 -
XSA Refresh
1
- « Previous
- Next »
Related Content
- Deliver real-life use cases with SAP BTP – Fleet Driver Tracking Solution in Technology Blogs by SAP
- BTP trial C4C iflow 500 internal server error in Technology Q&A
- Application Router | Migrating from the Neo Environment to the Multi-Cloud Foundation in Technology Blogs by SAP
- SAP Cloud Platform Portal Developer Challenge: VANTAiO Extranet Portal in Technology Blogs by Members
Top kudoed authors
| User | Count |
|---|---|
| 8 | |
| 7 | |
| 5 | |
| 4 | |
| 4 | |
| 4 | |
| 4 | |
| 4 | |
| 3 | |
| 3 |