
- SAP Community
- Products and Technology
- Technology
- Technology Blogs by Members
- Principal propagation in a multi-cloud solution be...
Technology Blogs by Members
Explore a vibrant mix of technical expertise, industry insights, and tech buzz in member blogs covering SAP products, technology, and events. Get in the mix!
Turn on suggestions
Auto-suggest helps you quickly narrow down your search results by suggesting possible matches as you type.
Showing results for
MartinRaepple
Active Participant
Options
- Subscribe to RSS Feed
- Mark as New
- Mark as Read
- Bookmark
- Subscribe
- Printer Friendly Page
- Report Inappropriate Content
02-24-2021
11:08 PM
Note: This blog post is the third part of a tutorial series. If you arrived here without reading the first and second part, please do so before you continue, and then come back here again. Part I describes principal propagation between an application frontend running on Microsoft Azure, calling a Web Service deployed to SAP Business Technology Platform (BTP). Part II extends the scenario by propagating the Azure-authenticated user via BTP and SAP Cloud Connector to an SAP Gateway system for displaying the user's data. Part III (this blog post) adds the application layer on top of the infrastructure and shows how to use and configure common platform services in Azure and BTP for principal propagation in the context of a chat bot in Microsoft Teams. A live demo of this scenario is also available on Episode #31 of the great SAP on Azure Video podcast series (starting at min 23:30) from hobruche , goran-condric, and roboban. Part IV uses a “low-code” approach for implementing the chatbot of this part with Microsoft Power Platform, demonstrated in episode #40 of the SAP on Azure Video Podcast series. Part V looks at different aspects for production readiness, such as API management, monitoring and alerting (live demo available on episode #83 in the SAP on Azure video podcast series). Part VI turns the scenario into the opposite direction by propagating the SAP-authenticated user of a BTP business application to call the Microsoft Graph API and retrieve the user’s Microsoft Outlook events. Finally, part VII looks at principal propagation from Microsoft Power Platform to SAP in the context of making Remote Function Calls (RFCs) and using Business Application Programming Interfaces (BAPIs) with the Kerberos protocol. See episode 142 of the SAP on Azure video podcast series for a live demo of this scenario. |
Adding the business application
Up to this point in the blog series, you have a working setup to enable end-to-end principal propagation between Azure, SAP Business Technology Platform (BTP) and an SAP ABAP system on premise. However, we are still missing a real application scenario on top of the infrastructure. Testing so far occurred at the raw HTTP(S) protocol level using Postman as our tool of choice. With this 3rd part of the blog series, you will build a distributed cloud application with different components running in Azure, BTP and SAP backend on-premise. From an end-user perspective, this application offers a chat bot interface in Microsoft Teams, which allows to search for IT equipment in a product catalogue. The product data such as price, category and an image is retrieved from the SAP backend system, where access control is enforced based on the Azure AD-authenticated user's authorizations. Let's have a look at the application components in more detail.
The client: Teams Bot
You will use a conversational bot in Microsoft Teams to let the user search for the product in the catalogue for a given product identifier. The bot application's implementation is based on the code samples for the Bot Framework V4 SDK and is using single sign-on (SSO) authentication with Teams. This feature provides a true SSO experience to the user: The initial authentication in Teams is used to the authenticate the user at all other application components in the scenario which helps to achieve the main goal for this scenario: The user should only be promted once to enter her login credentials, and must not be asked again to authenticate when accessing any other components or services for a seamless and secure user experience. This includes authentication to the bot in Teams itself, but also any other service in the Cloud and on-premise as described below.
The integration layer: SAP Cloud Platform Integration
SAP Cloud Platform Integration (CPI) provides services to develop and manage enterprise-wide integration scenarios across heterogeneous landscapes between applications on BTP, other Cloud platforms such as Azure, and on-premise solutions. In the first and second part of the blog series, you deployed a web service on BTP developed from custom code and the SAP Cloud Platform SDK. In this part, the custom code will be replaced by an integration process deployed on CPI which transfers and transforms the data between the Teams bot and the backend on-premise. CPI offers rich capabilities such as the web-based integration flow (iFlow) designer tool to develop the integration process as a graphical model, and monitor its executions. The new process exposes an API endpoint to the bot in Teams and connects to the backend with the built-in OData Connector in CPI. The SAP Cloud Connector (SCC) connection configured in the previous blog post will be reused
The backend: Core Data Services
SAP Core Data Services (CDS) is a Data Definition Language (DDL) which allows the ABAP developer to design and create database views. CDS uses an SQL-like syntax and enhances it with additional features, such as exposing a view as an OData service. You can further implement access-control logic to the data returned by a CDS view using a Data Control Language (DCL) document. In this scenario you will deploy a CDS view which exposes selected fields from the product catalogue table as an OData service. Users can only view products which are in the product category they are allowed to access. The product categories are managed in a classical authorization object assigned to a role.
Application scenario overview
The following new components are added to the scenario:
- The user is running the Microsoft Teams desktop or Web client, which connects to the bot application deployed to Azure App Services. App Services are also used to host other types of applications on Azure, such as static or dynamic web sites.
- Azure Bot Service makes the bot application available to the communication application(s), such as Teams, Facebook or Slack, using channels. For this scenario, you register a Teams channel in the Bot Service which facilitates the communication with the user in Teams based on messages.

With the new components the general flow of messages remains almost unchanged from part II:
- The user is signed-in to Microsoft Teams using her work, school, or Microsoft account, and starts the bot application in Teams. The bot (running in Azure App Services) sends back a message to tell Teams to obtain an authentication token for it.
- Teams requests the access token for the bot application from the Azure AD OAuth token endpoint using the user’s session. For a true single sign-on experience, this step does not require the user to enter any login credentials. Only if the user is using the bot application for the first time, a request prompt appears asking the user to provide consent to any of the requested scopes and/or to handle step-up authentication (if required), such as two-factor authentication.
- Upon successful exchange of the user token sent in the previous step, Azure AD sends the bot application access token back to Teams. Teams sends the token to the bot in Azure which contains the required identity information such as the user's email address.
- Similar to the scenario in part I and II, the bot now exchanges this access token for a Security Assertion Markup Language (SAML) assertion containing the user’s attributes and unique identifier, using the On-Behalf-Of (OBO) flow in Azure AD.
- Following RFC 7522, the SAML assertion is used as an interoperable user credential across the two Cloud platforms. This step reverses the previous exchange by sending the SAML assertion to the OAuth authorization server (XSUAA) in BTP to receive a new OAuth access token, now issued by BTP. Similar to the token request from Teams to Azure AD in step 2, this token request also requires a client id and secret from BTP, which is generated from a service key bound to the Process Integration runtime in BTP.
- With the access token issed by BTP's OAuth authorization server, the bot can call the Product Search Process endpoint URL to trigger the execution of a new instance in BTP. As one of the steps, the process invokes the OData service exposed by the SAP backend through the SAP Cloud Connector (SCC). The follwing picture shows the integration process in more detail:
 The first box with the label
 Create messagetakes the HTTP headerproductIdcontaining the product identifier entered by the user in the conversation with the bot from the incoming request and creates a message header from it. This message header is referenced in the next process step (labelCall OData Service) to pass it as a parameter in the OData call to the backend. - Similar to the HTTP destination from the setup in part II, the HTTP connection to SCC calls the URL exposed by SCC and uses the authentication type Principal Propagation. It also passes the product identifier from the message header as a query string in the OData call.
- Finally, SCC converts the user’s identity into the short-lived X.509 certificate that is used to invoke the OData service exposed by the CDS view in the ABAP system defined as follows:
@AbapCatalog.sqlViewName: 'ZPRVIEW'
@AbapCatalog.compiler.compareFilter: true
@AbapCatalog.preserveKey: true
@AccessControl.authorizationCheck: #CHECK
@EndUserText.label: 'Product view'
@OData.publish: true
define view ZPRODUCTSVIEW as select from SEPM_I_Product {
key ProductUUID,
Product,
ProductType,
ProductCategory,
Price,
Currency,
Height,
Width,
Depth,
DimensionUnit,
ProductPictureURL,
SupplierUUID,
Weight,
WeightUnit
}
The CDS view filters selected fields from the tableSEPM_I_Productand enforces an authorization check by setting theAccessControl.authorizationCheckannotation totrue. The corresponding DCL defines a PFCG condition (aspect pfcg_auth) that associates the CDS elementProductCategorywith the authorizations of the current user for the authorization objectS_EPM_PD. You will configure the authorization object to restrict the user's access to specific product categories in the catalogue, such as Headsets, Tablers or PCs.
@EndUserText.label: 'Access control for product category'

@MappingRole: true

define role ZDCLPRODUCTCATEGORY {

    grant select on ZPRODUCTSVIEW

    where (ProductCategory) = aspect pfcg_auth(S_EPM_PD,

                                PDCATEGORY, ACTVT = '03');

}
Preparation
- First, checkout the branch
part3of the blog series GitHub repository with a Git client of you choice:
git clone https://github.com/raepple/azure-scp-principal-propagation.git

cd azure-scp-principal-propagation

git checkout part3
- To create the CDS and DCL objects in your SAP backend you have to install Eclipse IDE and the ABAP Development Tools (ADT) for Eclipse. Follow these instructions for setting up the front-end component of ADT in Eclipse.
- Developing the bot for Teams is best done with Microsoft Visual Studio Code which you should also install in your development environment.
- In addition, you need a Microsoft 365 E5 developer subscription to access Teams. To setup the subscription, you must first join the Microsoft 365 Developer Program. After doing so, see https://docs.microsoft.com/en-us/visualstudio/subscriptions/vs-m365 for more details and how to activate the subscription for your account.
- Finally, you will need the Azure Command Line Interface (CLI). Installation instructions for Windows, macOS and Linux can be found here.
That's it! Let's follow this implementation process, starting in the backend, continuing with the integration layer in BTP, and finalizing the frontend in Teams:
- Create the Core Data Service in SAP Gateway and protect it with the DCL.
- Create an new role in the backend to configure which allows you to configure the test user's authorizations for selected product categories.
- Implement the CPI-based integration process which orchestrates the invocation of the product search service from the bot in Teams via SCC to the SAP Gateway system.
- Finally, configure the bot channel for Teams and deploy it as an App Service in Azure.
Secure, deploy, and activate the Core Data Service
| Step | Description | Screenshot |
| 01 | Start Eclipse and click on Open Perspective |  |
| 02 | Change to the ABAP Perspective |  |
| 03 | Select Create an ABAP Project |  |
| 04 | Select a system from the list. As outlined in part II, I am choosing my local instance of the free developer edition for AS ABAP 7.52, SP04, running on Hyper-V. Click Next. |  |
| 05 | Keep the default connection parameters and click Next. |  |
| 06 | Enter the login credentials of a user with developer permissions in the system (e.g. user DEVELOPER in the free developer edition). Click Next. |  |
| 07 | Choose a name for the new project (e.g. ProductSearchService). Click Finish. |  |
| 08 | In the context menu of your package choose New. Select Other ABAP Repository Object. |  |
| 09 | Select Data Definition. Click Next. |  |
| 10 | Enter the name ZPRODUCTSVIEW, and a description (e.g. Product Items). Click Next. |  |
| 11 | Accept the default transport request (local). Click Next. |  |
| 12 | Select the Define View template. Click Finish. |  |
| 13 | Open the file zproductsview.asddls from the Git repository subfolder /SAPGateway. Copy & paste the content into the new Data Definition.Save the file with Ctrl+S. Then click Ctrl+F3 to activate it. |  |
| 14 | In the context menu of the new ZPRODUCTSVIEW Data Definition, choose New Access Control. |  |
| 15 | Enter the name ZDCLPRODUCTCATEGORY and choose a description (e.g. DCL for product category). Click Next. |  |
| 16 | Again, accept the default transport request (local) and click Next. Select the Define Role with PFCG Aspect template. Click Finish. |  |
| 17 | Open the file zdclproductcategory.asdcls from the Git repository subfolder /SAPGateway. Copy & paste the content into the new Access Control.Save the file with Ctrl+S. Then click Ctrl+F3 to activate it. |  |
| 18 | Login to the SAP Gateway system with SAP GUI. Start transaction /IWFND/MAINT_SERVICE for activating the new CDS-based OData service. Click Add Service. |  |
| 19 | Enter Local for the System alias. Enter Z* as the Technical Service Name. Click Get Services. |  |
| 20 | Activate the checkbox for the service PPRODUCTSVIEW_CDS from the result list. Click Add selected Services. |  |
| 21 | Enter $TMP for the Package Assignment and activate Enable OAuth for Service. Click OK. |  |
Your OData service is now up and running in the SAP Gateway system. It is protected by the DCL which requires the user to be assigned to the requested product category via the build-in authorization object S_EPM_PD. In the next step you will configure a role to assign and configure the required authorizations to your user(s).
Maintain the user's authorization in the backend
| Step | Description | Screenshot |
| 22 | Start the role maintenance with transaction /nPFCG. Create a new role by entering the name (e.g. PRODUCT_SEARCH). Click Single Role. |  |
| 23 | Press Ctrl+S to save the new role, then switch to the Authorizations tab. |  |
| 24 | Click the pencil symbol to change the new role's authorization data | 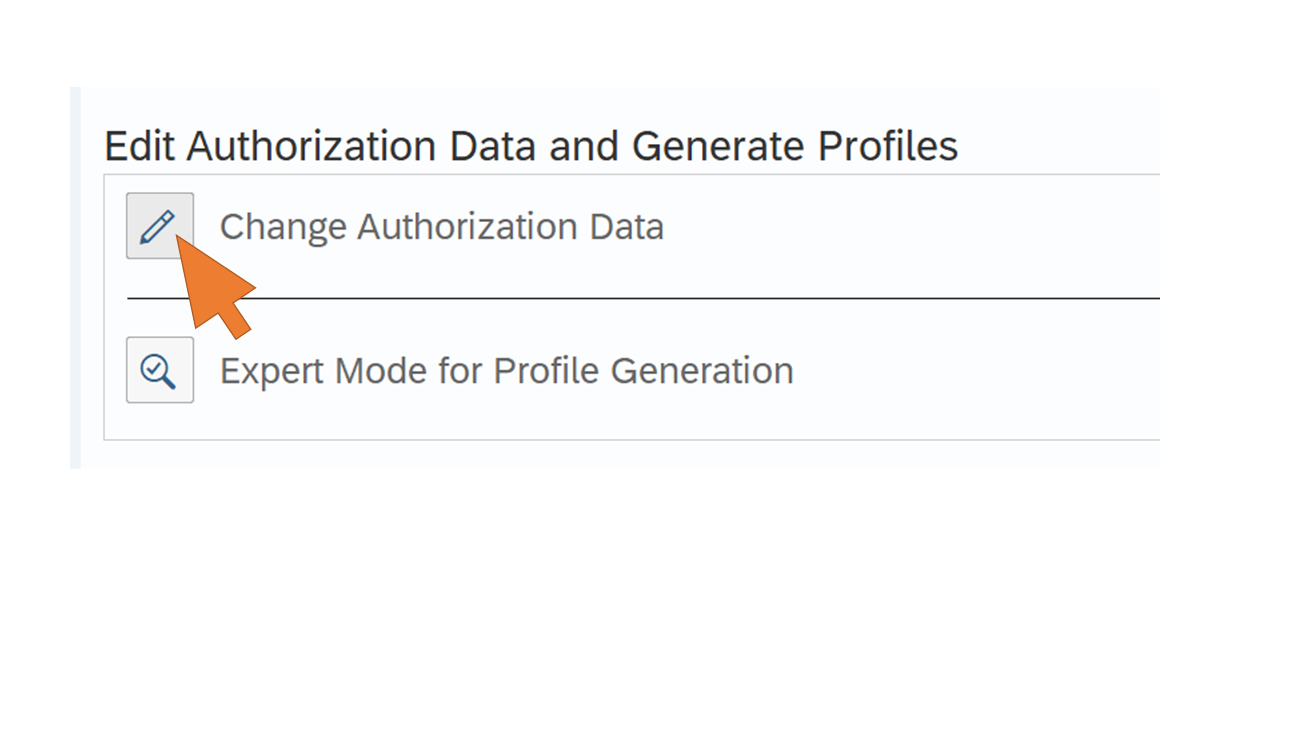 |
| 25 | Click Do not select templates. |  |
| 26 | Select More -> Manual entry of authorization objects | 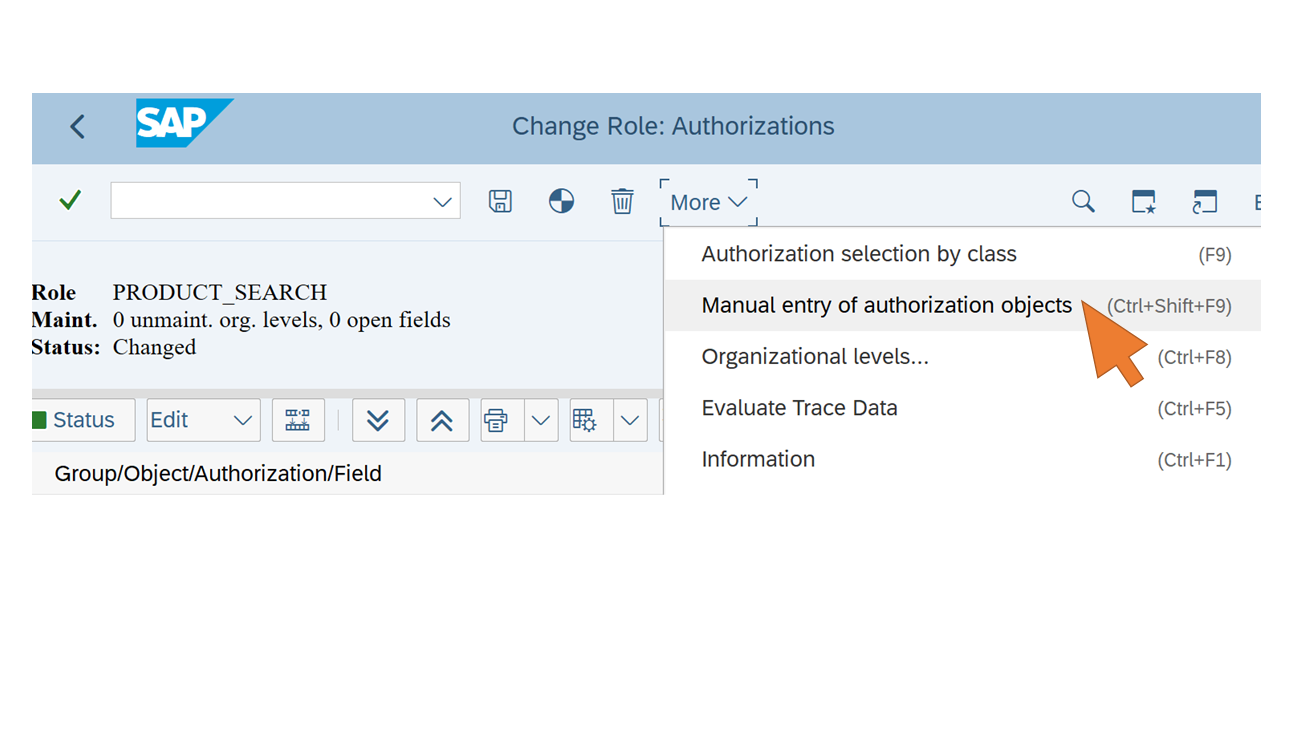 |
| 27 | Enter the following authorization objects:
Click OK. |  |
| 28 | Change the value of the field SRV_NAME from the authorization object S_SERVICE to restrict the user's access to the CDS-based OData Product Search service only. Click on the pencil symbol for the field. |  |
| 29 | Select TADIR Service from the Type box. In the first row of the table, select object type IWSV and click on the value help to search for the service object name. |  |
| 30 | Browse through the list and select ZPRODUCTSVIEW_CDS. Click OK. |  |
| 31 | In the second row of the table, select object type IWSG and click on the value help to search for the service object name. |  |
| 32 | Browse through the list and select the entry ZPRODUCTSVIEW_CDS_0001. Click OK. |  |
| 33 | Click Save. |  |
| 34 | Open the tree view for the fields of the S_EPM_PD authorization object. Change the value of the field PDCATEGORY to limit access to only a selected product category for the user. Click the pencil symbol for the field. |  |
| 35 | Select a product category (e.g. Flat Screen Monitors) from the list and click OK. |  |
| 36 | Click Save. | 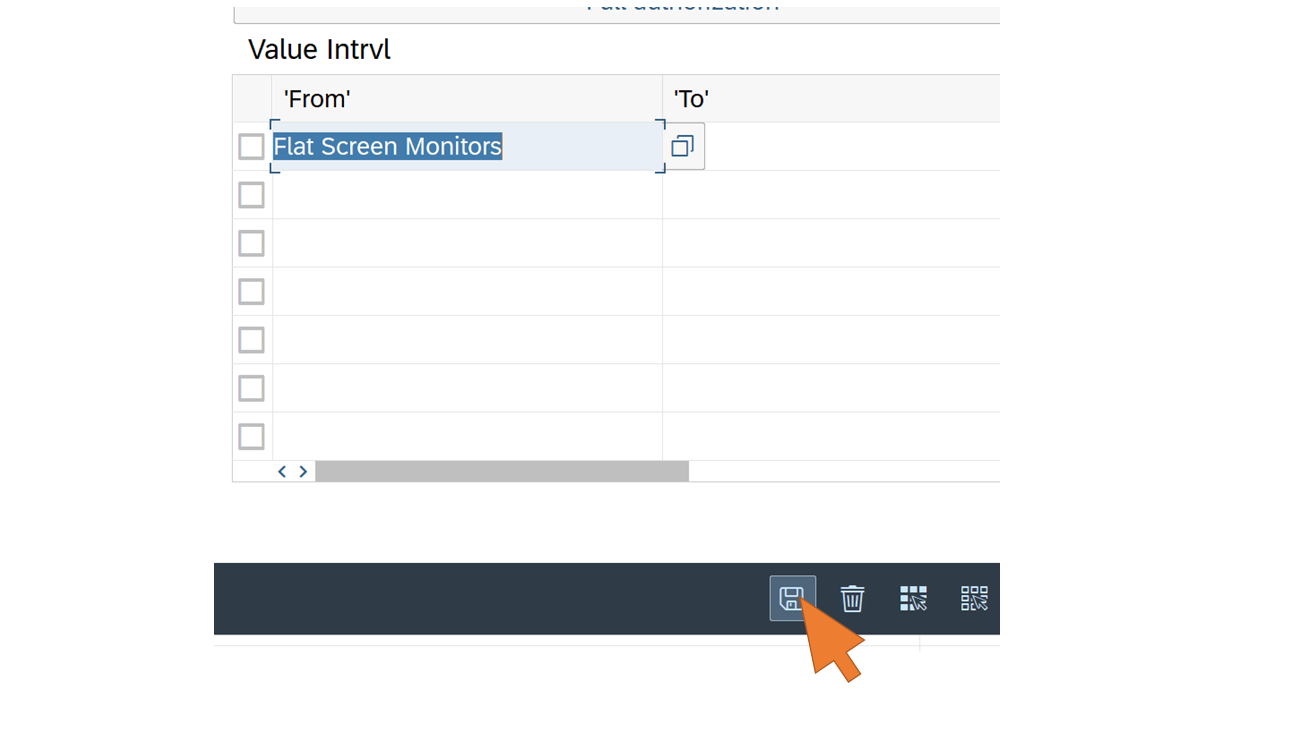 |
| 37 | Click on the pencil symbol for the field ACTVT. |  |
| 38 | Select (03) Display from the list and click Save. |  |
| 39 | Click Save and confirm the dialog to assign the suggested profile name with OK. |  |
| 40 | Click Generate to generate the profile. |  |
| 41 | You can now close the Authorization editor by clicking Exit. |  |
| 42 | Switch to the User tab. Enter the User ID of your test user (e.g. JDOE from the previous part of the blog series) to assign the new role. Make sure that this user has an e-mail address set in its profile that matches the e-mail address of your Azure AD-logged-in user in Teams. Click Save. |  |
| 43 | Update the assignments of the role profile to the newly added user by clicking on the button User comparison. Then confirm the dialog with Complete comparison. |  |
| 44 | The status of the User comparison should now turn to green. Save the role and user assignment. |  |
| 45 | Click Exit. |  |
The new service in SAP Gateway is now ready and can be called by SCC. At this point you should make sure that the SCC instance you configured in part II is up and running. You don't need to apply any changes to the configuration since you specified the access policy in SCC's Cloud to On-Premise settings for the root path (/) in the SAP Gateway system. This also includes the new CDS service deployed for the Teams bot integration.
Continue with the integration layer in BTP.
Implement the Integration Flow with CPI
| Step | Description | Screenshot |
| 46 | Open the BTP Cockpit in a new browser tab and login with your (trial) account admin. Navigate to your trial account and select Services –> Instances and Subscriptions from the left side navigation menu. Click Create to create the subscription for the integration suite. |  |
| 47 | Enter "Integration" in the search filed and select Integration Suite with plan trial. Click Create. |  |
| 48 | Select the new subscription after successful creation and click on Go to Application. |  |
| 49 | The Integration Suite application opens in a new tab. Click Add Capabilities. |  |
| 50 | For this scenario you only need to select the first capability for process integration. Click Next. |  |
| 51 | Click Next on the second step of the wizard. Click Activate to enable the selected capability. |  |
| 52 | Wait until the status changes to Active. Then close the browser tab. |  |
| 53 | Back in the previous browser tab, click Create again. | 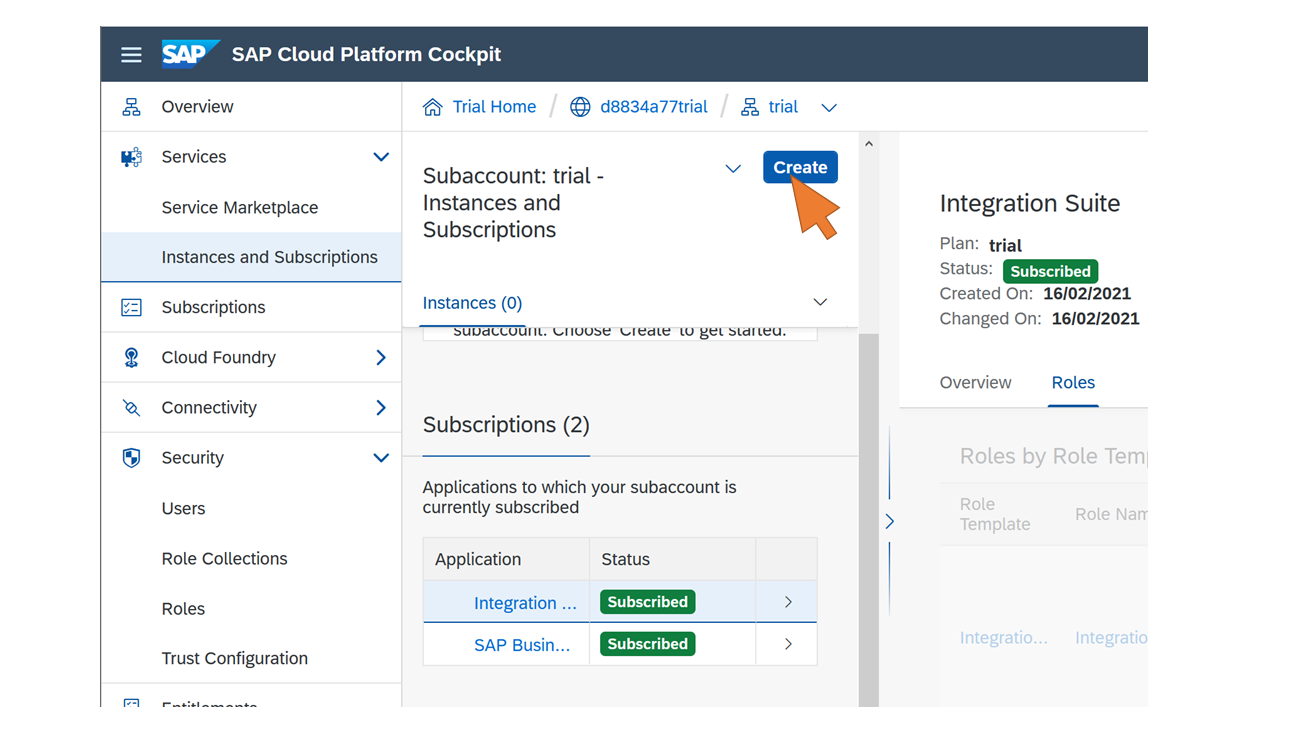 |
| 54 | Enter "Process" in the search field and select Process Integration from the results. |  |
| 55 | Enter or select the following values:
Click Next. |  |
| 56 | Paste the following JSON snippet into the text field:Click Create. |  |
| 57 | Select the newly created instance from the list. Click Create in the Service Keys section. |  |
| 58 | Enter a name (e.g. "productsearch") for the new service key. Click Create. |  |
| 59 | Select View from the context menu of the newly created service key. |  |
| 60 | Download the service key for later use. The credentials included in this file are required by the bot to request the access token from SCP. |  |
| 61 | Assign yourself the necessary roles to access and use the BTP Integration capabilities. Select Security -> Trust Configuration from the left side navigation menu. Select the Default Identity Provider from the list. |  |
| 62 | Enter your account admin/user's email address and click Show Assignments. Click Assign Role Collections and select the role collection PI_Administrator from the list. Click Assign Role Collection. Repeat this step for the role collections PI_Business_Expert and PI_Integration_Developer. |  |
| 63 | Select Instances and Subscriptions from the left side navigation. |  |
| 64 | Click on the Go to Application icon of the Integration Suite subscription. | 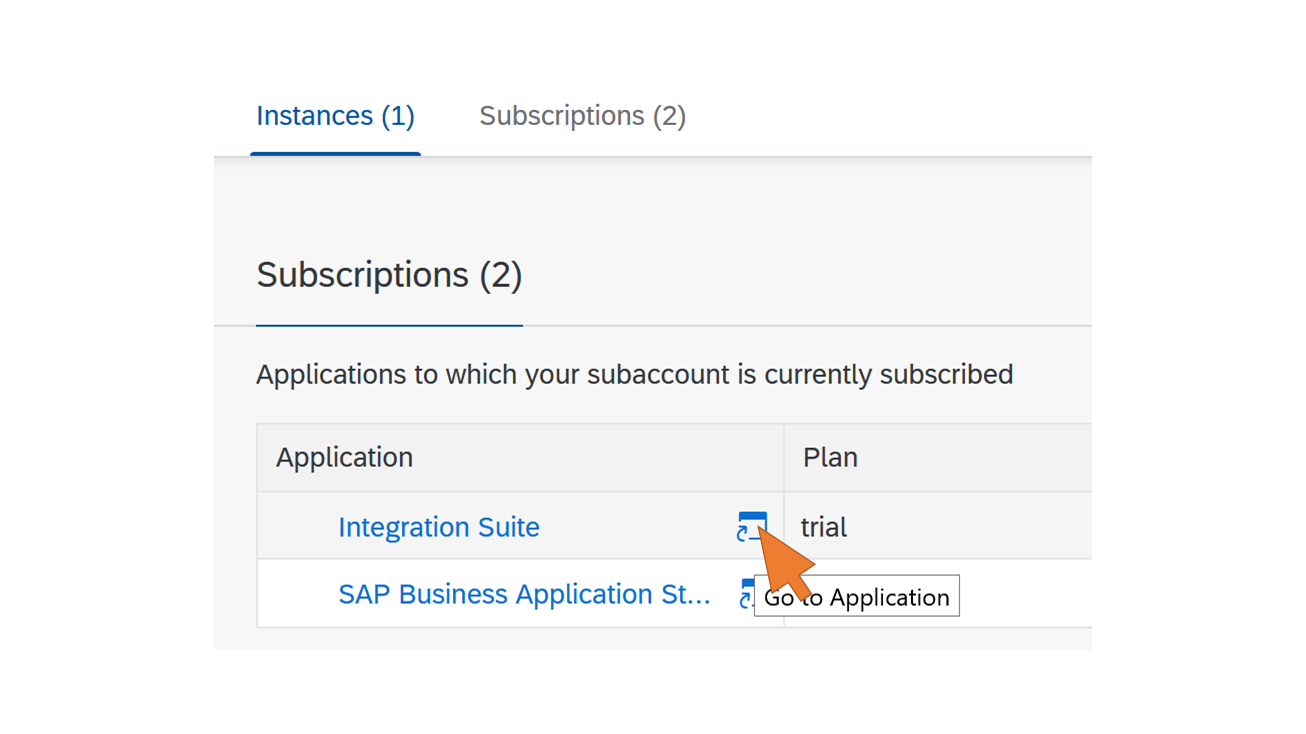 |
| 65 | The application opens in a new tab. Click on the Process Integration tile. |  |
| 66 | Click the pencil icon on the left side naviation. |  |
| 67 | Click Import and select the file ProductSearchIntegrationFlow.zip from the folder SCP of the cloned Git repository. |  |
| 68 | Click on the imported content package for the Product Search Integration Flow. |  |
| 69 | Select the tab Artifacts and click on the Product Search integration flow. |  |
| 70 | Click Deploy to create a new process instance. | 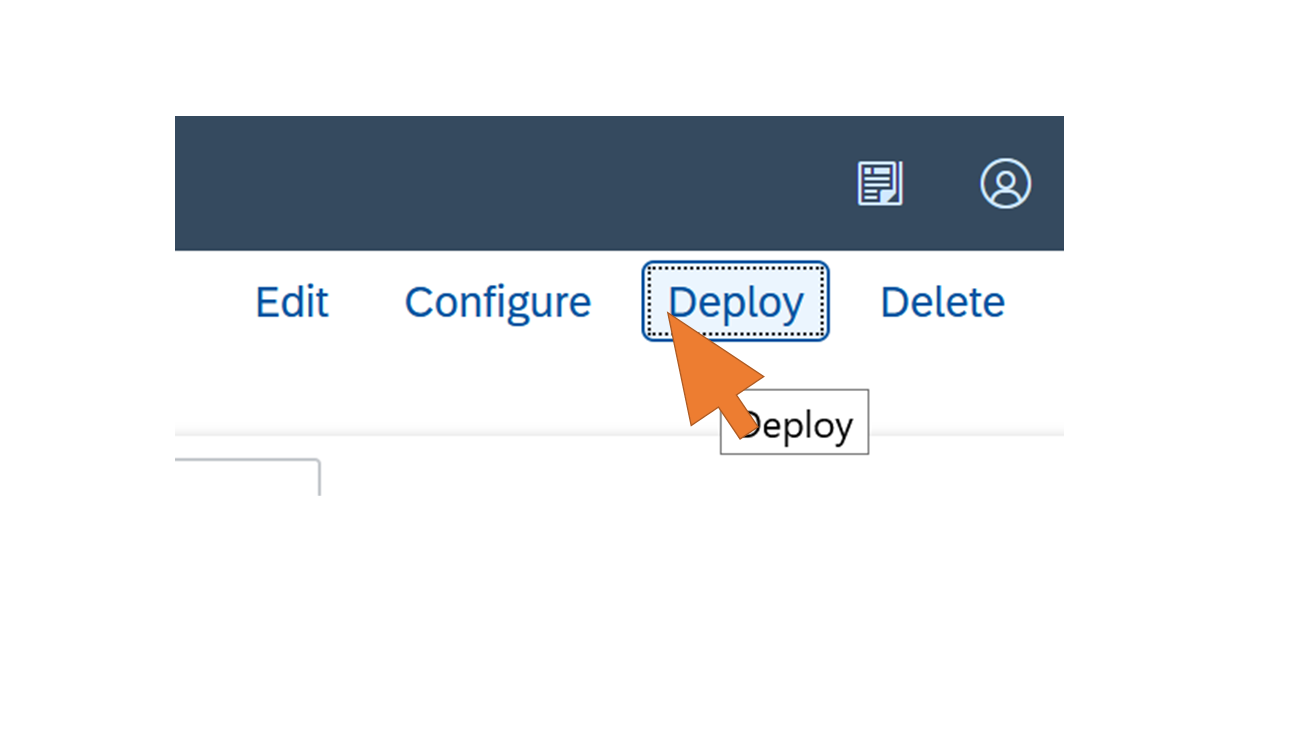 |
| 71 | Switch to the Operations view by clicking on the eye icon. Wait until the tile for processes in state Started shows the count 1. |  |
The invocation of the iFlow requires the end user to be assigned to the role ESBMessaging.send. Therefore you need to add this role to the existing Role Collection "Application User" which you created in part I, step 12.
Maintain the user's authorizations in BTP
| Step | Description | Screenshot |
| 72 | In the BTP Cloud Cockpit browser tab, navigate to Security - Role Collections in the left side navigation. Select Application User from the ist. |  |
| 73 | Click Edit. | 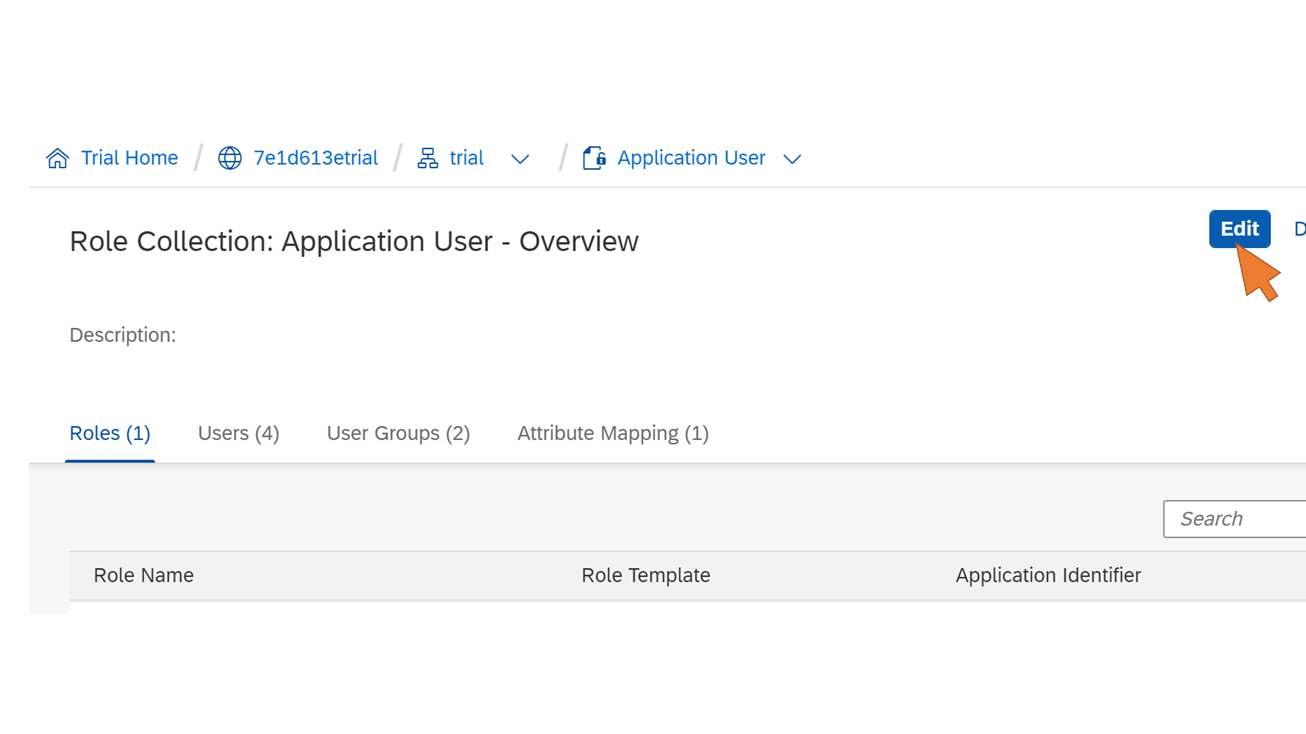 |
| 74 | Click the value help for the new role name. |  |
| 75 | Select MessagingSend from the list of Role Name. Activate the checkbox for the new entry in the table and click Add. |  |
| 76 | Click Save to update the existing Role Collection. |  |
You have now deployed the process integration flow successfully. Let's finalize the application scenario with the frontend component by setting up the chat bot in Teams.
Register the bot channel for Teams
| Step | Description | Screenshot |
| 77 | Login to the Azure Portal and move over the Resource groups icon. Click on the + Create button to create a new resource group for the bot resources. |  |
| 78 | Enter ProductSearchBotRG as the name for the new resource group and a region closest to you. Click Review + create. Upon successful validation, click Create. |  |
| 79 | After a few seconds, click on the Notification icon and Go to resource group | 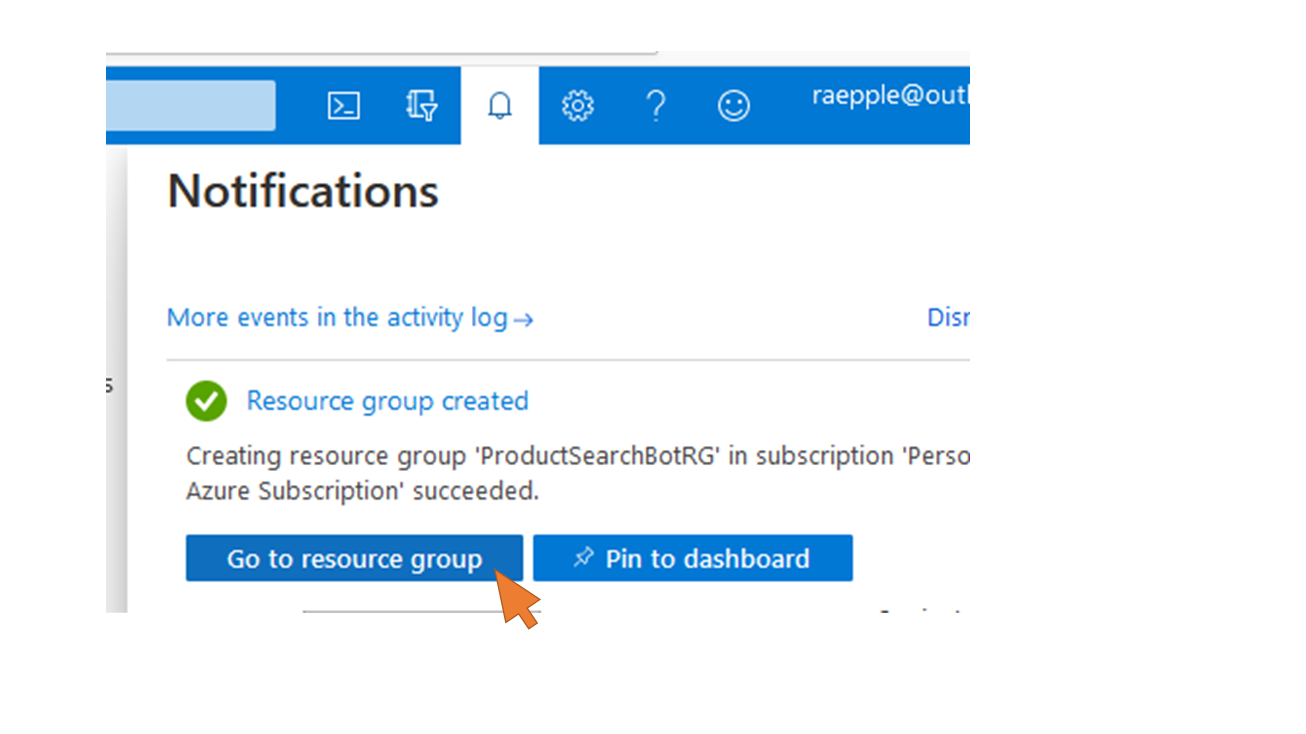 |
| 80 | Click + Add to create a new resource in the group. |  |
| 81 | Start searching for the new resource by entering "Bot" in the search field. Select Bot Channels Registration from the list. |  |
| 82 | Click Create |  |
| 83 | Enter the following data for the new Bot registration:
Click on Microsoft App ID and Password at the end of the form to avoid the automatic creation of an Azure AD app registration for the new bot. You will reuse the existing app registration from part I (step 16ff). | 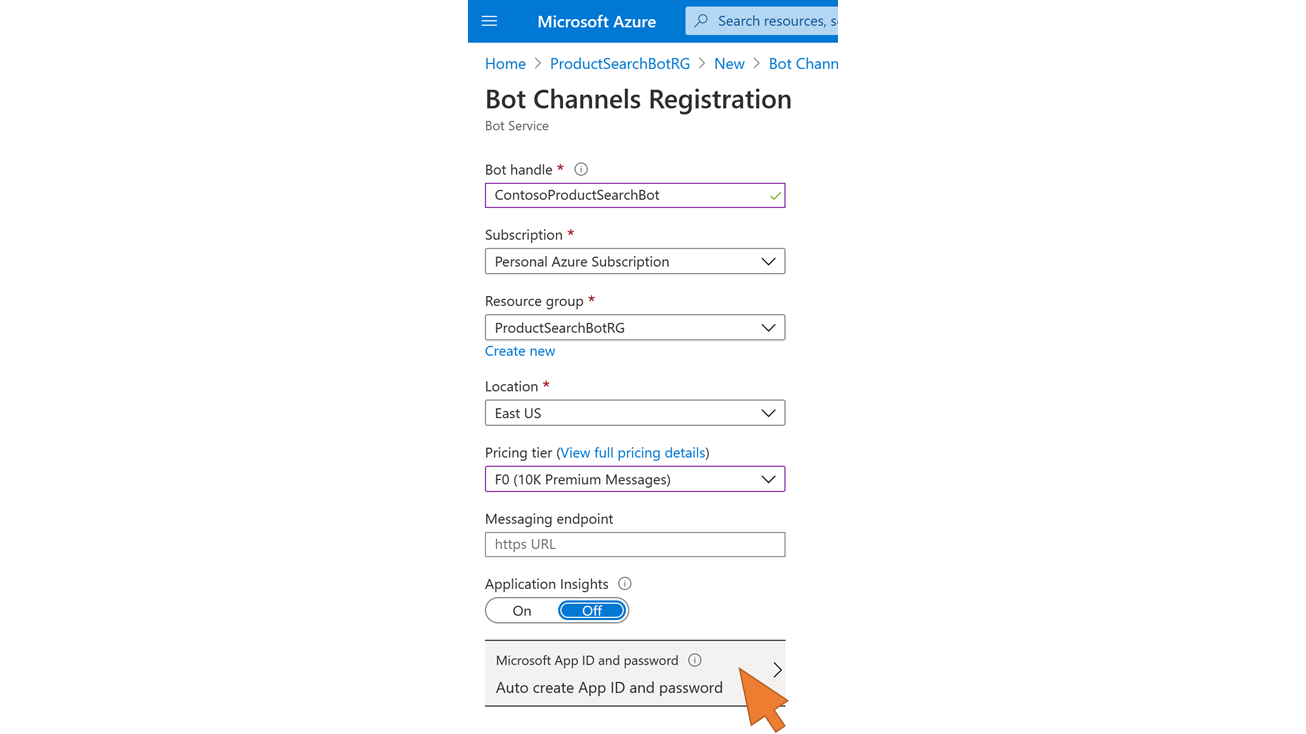 |
| 84 | Click + Create New |  |
| 85 | Enter the following values:
If you don't have these values any more, repeat steps 16 to 20 from part I. Just as a reminder, you may have them also stored in your Postman collection configuration. Click OK. |  |
| 86 | Click Create. |  |
| 87 | After a few seconds, click on Go to resource in the notifications. |  |
| 88 | Select Configuration from the left navigation menu and click on the Manage link to open your bot's Azure AD application registration. |  |
| 89 | Select Authentication from the left side menu and click on Add URI. |  |
| 90 | Enter the value https://token.botframework.com/.auth/web/redirect in the field. This is the authorization callback URL used by the bot to receive the token from Azure AD. Click Save. |  |
| 91 | Select Expose an API from the left-side navigation. Click on the pencil symbol to edit the Application ID URI. Change the URI to api://botid-<AAD client id> Save the changes. |  |
| 92 | Click + Add a client application |  |
| 93 | Add the client id 1fec8e78-bce4-4aaf-ab1b-5451cc387264 to the list. This is the id of the Teams mobile/desktop application. By adding it here you will avoid that users in Teams are asked to give their consent when using the Product Search Bot application. Click Add application. |  |
| 94 | Repeat the previous step and add the client id 5e3ce6c0-2b1f-4285-8d4b-75ee78787346 for the Teams web application. |  |
| 95 | Close the Expose an API settings to go back to the bot configuration. | 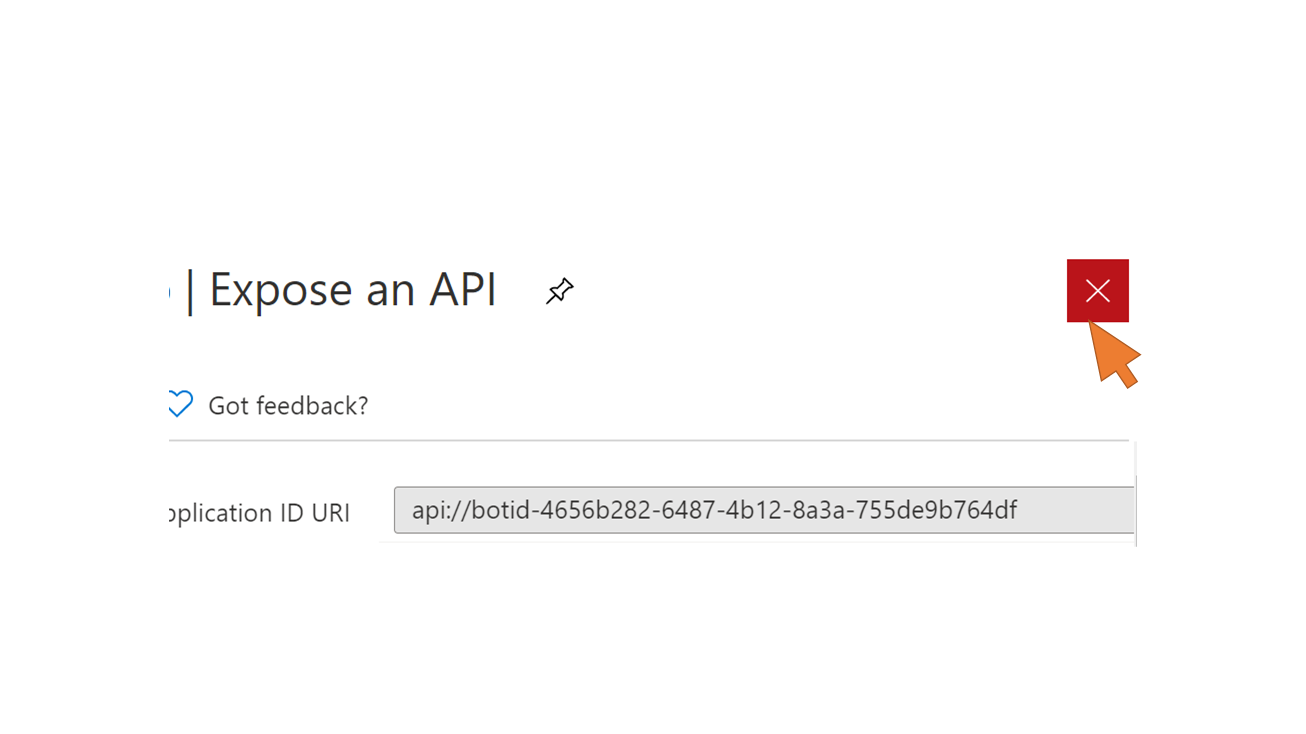 |
| 96 | Click the Add setting button. |  |
| 97 | Enter or select the following values:
Click Save. | 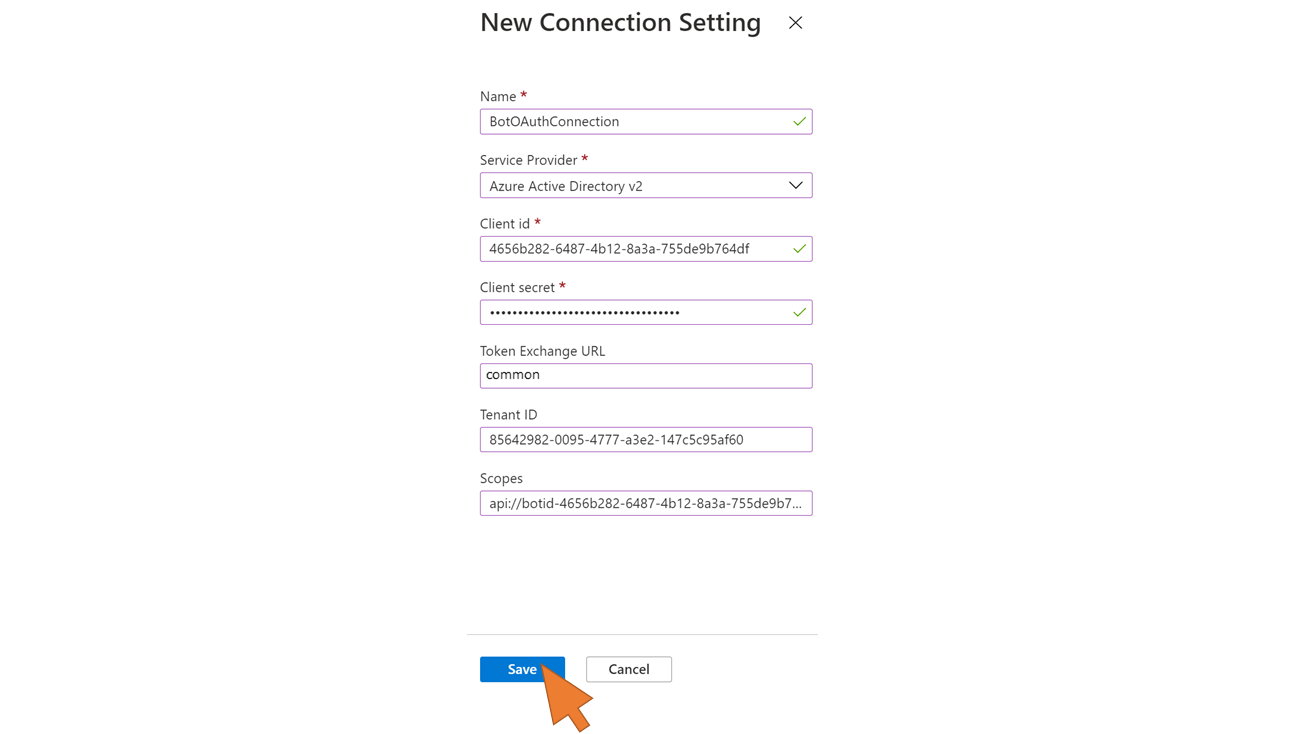 |
| 98 | Test the new connection by selecting it again from the list |  |
| 99 | Click on Test Connection |  |
| 100 | As a result you should see a successful login confirmation. If you are interested in the token content, copy the token value in the clipboard and analyse its content at https://aka.ms/jwt. Close the tab. |  |
| 101 | Select Channels from the left side navigation and click on the Teams tile to add a new channel for Microsoft Teams to your bot. |  |
| 102 | Click Save to add the new channel and confirm the Terms of Use. |  |
Configure and deploy the bot
| Step | Description | Screenshot |
| 103 | Start Visual Studio Code. Select File -> Open Folder... from the menu and open the subfolder /ProductSearchBot containing the bot source code from the directory where you cloned the Git repository. |  |
| 104 | Run a build task to compile the bot sources by pressing Ctrl+Shift+B. Select Build from the list. |  |
| 105 | Open the file appsettings.json from the root of the /ProductSearchBot directory.Replace the <placeholders> in the file appsettings.json with the following values:
Press Ctrl+S to save the changes to the file. |  |
| 106 | Open the file manifest.json from the subfolder /TeamsAppManifest and replace all <placeholders> for <AAD bot app client id> with the value from step 23 of part I of the blog series.Note: This is the same value used for the MicrosoftAppId setting in the previous step. Press Ctrl+S to save the changes to the file. |  |
| 107 | Go back to your web browser tab in the Azure Portal and select your ProductSearchBotRG resource group from the lop-level navigation |  |
| 108 | Create a new App Service resource to deploy the bot in Azure. Click + Add. |  |
| 109 | Enter "Web App" in the search field and select Web App from the search results |  |
| 110 | Click Create. |  |
| 111 | Enter or select the following values for the new Web App resource:
Click Review + create. Click Create. Wait until the deployement has finished. |  |
| 112 | Open the notifications and click Go to resource |  |
| 113 | In the App Service Overview, click Copy to clipboard for the URL. |  |
| 114 | Select CORS from the left side navigation. Enter the following URLs to the list of allowed URLs: Click Save. |  |
| 115 | Select Overview from the left side navigation. Navigate back to the ProductSearchBotRG Resource Group for the Bot. |  |
| 116 | Select your Bot Channel Registration from the resource group. | 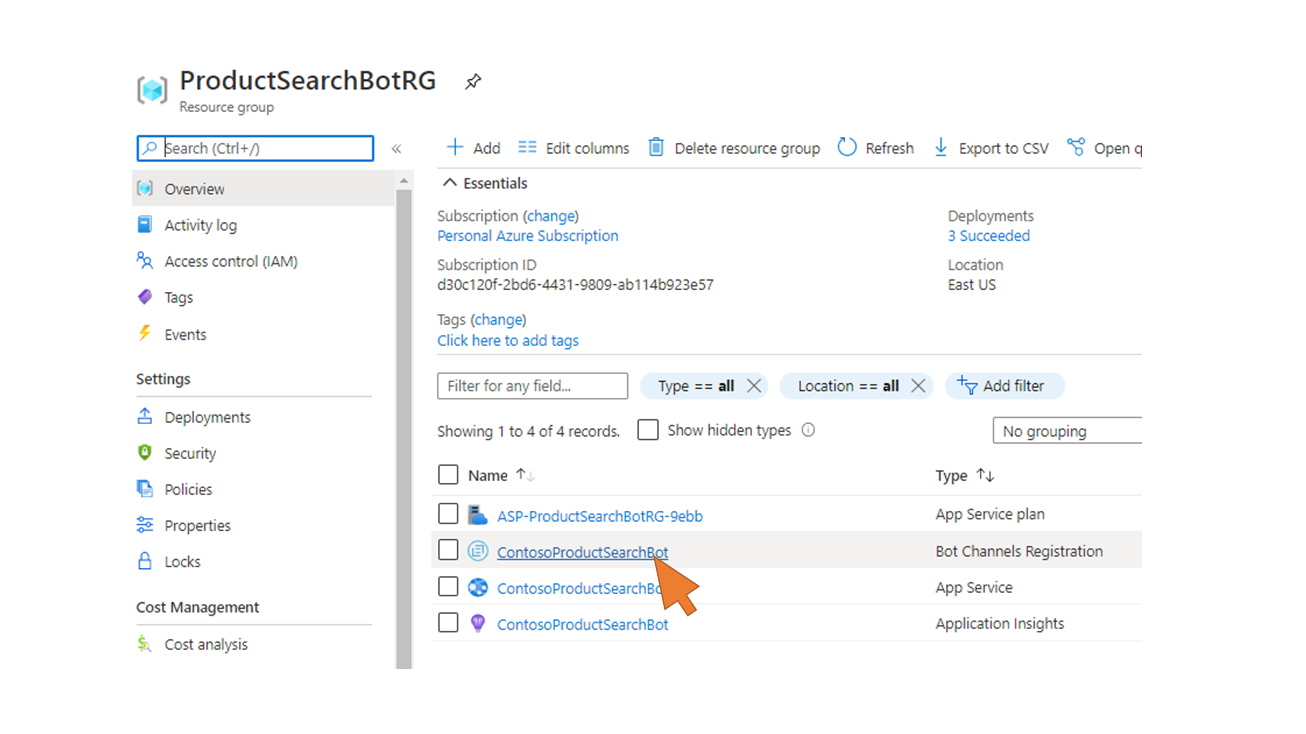 |
| 117 | Select Configuration from the left side navigation. Paste the URL from the clipboard in the field Messaging endpoint. Append the path /api/messages to it. Click Apply. |  |
| 118 | Open a command prompt or new Terminal in Visual Studio Code, and change to the subdirectory /ProductSearchBot of your cloned Git repository.Login to Azure with the Azure CLI command az login.A browser window opens to process the login. |  |
| 119 | Upon successfull login, use a ZIP tool of your choice to compress the subdirectory /ProductSearchBot in a ZIP-file (ProductSearchBot.zip). |  |
| 120 | Deploy the ZIP file to your App Service instance with the command az webapp deployment source config-zip --resource-group "ProductSearchBotRG" --name "<YourCompany>ProductSearchBot" --src "./ProductSearchBot.zip"Make sure that you replace <YourCompany> in the name parameter of the command with the name chosen in step 57.Wait until the deployment is completed. |  |
Ready for testing? There are many options to test the new bot, e.g. locally with the Bot Framework Emulator, in the Azure Portal using the Web Chat on the Bot Channel Registration resource, or directly in the Teams Web or desktop app. You will use the latter in the following section, but before that you must add the bot to your Teams app catalogue.
Upload the Bot and test it in the Teams Desktop Client
| Step | Description | Screenshot |
| 121 | In the command prompt, change to the subfolder /TeamsAppManifest of the ProductSearchBot.Use your ZIP tool to compress the three files in a ZIP-file ( manifest.zip). |  |
| 122 | Login to Teams Admin Center with your M365 administrator account. Select Teams apps - Manage apps from the left side navigation. | 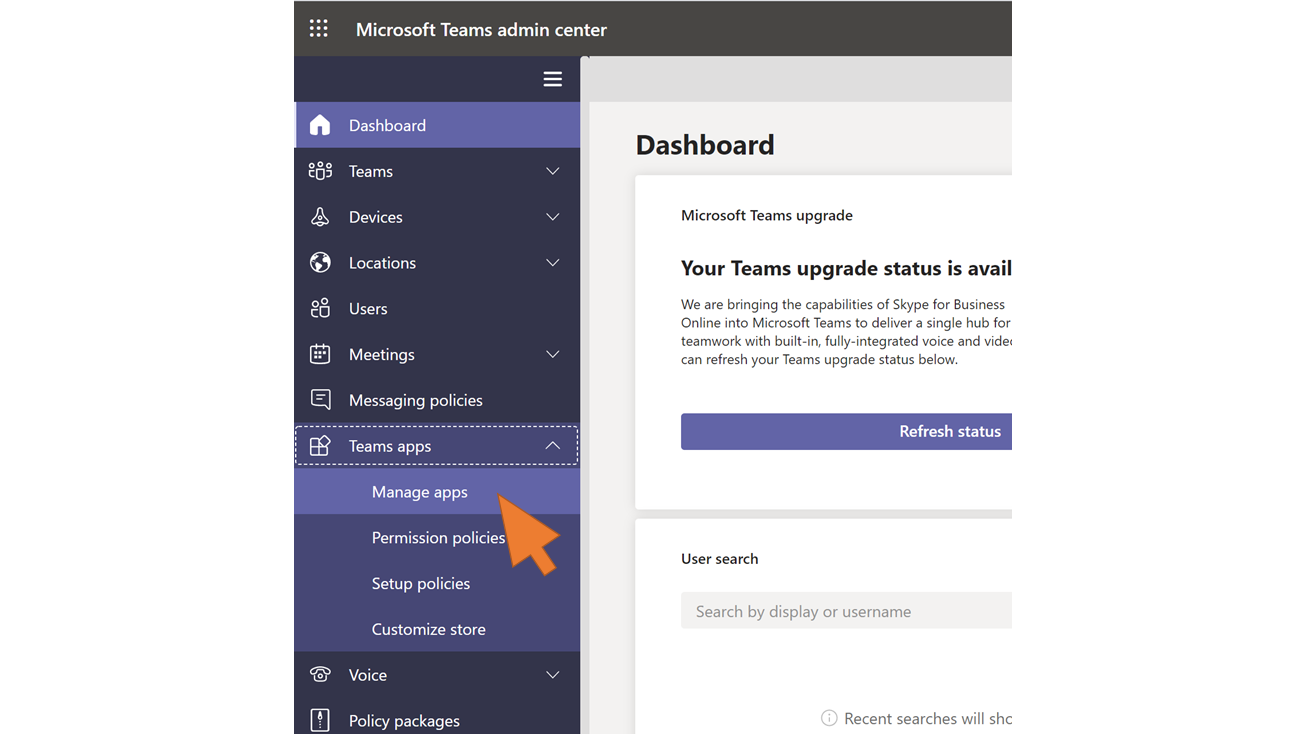 |
| 123 | Click + Upload. In the dialog windows, click Select a file. Select the manifest.zip file you created in step 121. |  |
| 124 | Upon successful upload you should see the confirmation that the Product Search Bot has been added to the apps catalogue. |  |
| 125 | Open your Teams desktop app. If it is not installed yet you can download it from here. Login with the credentials of your test user in Azure AD. Note: This user must have an email address in Azure AD matching the user's email address in the SAP backend system. |  |
| 126 | Click the Apps icon. |  |
| 127 | Select the tile for the Product Search Bot app. |  |
| 128 | Click Add. |  |
| 129 | The bot starts with a welcome message. Follow the instructions and type anything in the chat (e.g. "Hi there!") The bot confirms that your are (single) signed-on based on your existing login to Teams. Confirm the question to show your Azure AD token with Yes. |  |
| 130 | The Base64-encoded access token is shown in the chat. Answer the question on which product to look for with the input HT-1000 |  |
| 131 | The bot replies that no products were found. HT-1000 is a product in the Notebooks product category. However, the user assigned to the PRODUCT_SEARCH role in the backend only has access to the Flat Screen Monitor products. You will extend the authorizations of the user now in the backend to also lookup Notebooks from the catalogue. |  |
| 132 | In the SAP Gateway system,start transaction PFCG and navigate to the authorization settings of role PRODUCT_SEARCH. See steps 22ff for more detail. |  |
| 133 | Select Notebooks in the second row of this table. Click OK. |  |
| 134 | Update the authorizations by (re-)generating the profiles. |  |
| 135 | Continue with the chat flow. This time click No when being asked to orint out the access token. |  |
| 136 | Again, enter the product name "HT-1000" in the textfield. |  |
| 137 | Thits time the bot shows the result from the query. This proves that the user has been single-signed on through Teams at the Bot and successfully propagated via CPI to the backend. There the DCL kicked in when calling the CDS-based OData Service and ensured that the user can only view products from categories she is allowed to access. |  |
Thanks for staying tuned on this long journey and hope you enjoyed it as much as I did!
3 Comments
You must be a registered user to add a comment. If you've already registered, sign in. Otherwise, register and sign in.
Labels in this area
-
"automatische backups"
1 -
"regelmäßige sicherung"
1 -
505 Technology Updates 53
1 -
ABAP
14 -
ABAP API
1 -
ABAP CDS Views
2 -
ABAP CDS Views - BW Extraction
1 -
ABAP CDS Views - CDC (Change Data Capture)
1 -
ABAP class
2 -
ABAP Cloud
2 -
ABAP Development
5 -
ABAP in Eclipse
1 -
ABAP Platform Trial
1 -
ABAP Programming
2 -
abap technical
1 -
absl
1 -
access data from SAP Datasphere directly from Snowflake
1 -
Access data from SAP datasphere to Qliksense
1 -
Accrual
1 -
action
1 -
adapter modules
1 -
Addon
1 -
Adobe Document Services
1 -
ADS
1 -
ADS Config
1 -
ADS with ABAP
1 -
ADS with Java
1 -
ADT
2 -
Advance Shipping and Receiving
1 -
Advanced Event Mesh
3 -
AEM
1 -
AI
7 -
AI Launchpad
1 -
AI Projects
1 -
AIML
9 -
Alert in Sap analytical cloud
1 -
Amazon S3
1 -
Analytical Dataset
1 -
Analytical Model
1 -
Analytics
1 -
Analyze Workload Data
1 -
annotations
1 -
API
1 -
API and Integration
3 -
API Call
2 -
Application Architecture
1 -
Application Development
5 -
Application Development for SAP HANA Cloud
3 -
Applications and Business Processes (AP)
1 -
Artificial Intelligence
1 -
Artificial Intelligence (AI)
4 -
Artificial Intelligence (AI) 1 Business Trends 363 Business Trends 8 Digital Transformation with Cloud ERP (DT) 1 Event Information 462 Event Information 15 Expert Insights 114 Expert Insights 76 Life at SAP 418 Life at SAP 1 Product Updates 4
1 -
Artificial Intelligence (AI) blockchain Data & Analytics
1 -
Artificial Intelligence (AI) blockchain Data & Analytics Intelligent Enterprise
1 -
Artificial Intelligence (AI) blockchain Data & Analytics Intelligent Enterprise Oil Gas IoT Exploration Production
1 -
Artificial Intelligence (AI) blockchain Data & Analytics Intelligent Enterprise sustainability responsibility esg social compliance cybersecurity risk
1 -
ASE
1 -
ASR
2 -
ASUG
1 -
Attachments
1 -
Authorisations
1 -
Automating Processes
1 -
Automation
1 -
aws
2 -
Azure
1 -
Azure AI Studio
1 -
B2B Integration
1 -
Backorder Processing
1 -
Backup
1 -
Backup and Recovery
1 -
Backup schedule
1 -
BADI_MATERIAL_CHECK error message
1 -
Bank
1 -
BAS
1 -
basis
2 -
Basis Monitoring & Tcodes with Key notes
2 -
Batch Management
1 -
BDC
1 -
Best Practice
1 -
bitcoin
1 -
Blockchain
3 -
BOP in aATP
1 -
BOP Segments
1 -
BOP Strategies
1 -
BOP Variant
1 -
BPC
1 -
BPC LIVE
1 -
BTP
11 -
BTP Destination
2 -
Business AI
1 -
Business and IT Integration
1 -
Business application stu
1 -
Business Architecture
1 -
Business Communication Services
1 -
Business Continuity
1 -
Business Data Fabric
3 -
Business Partner
12 -
Business Partner Master Data
10 -
Business Technology Platform
2 -
Business Trends
1 -
CA
1 -
calculation view
1 -
CAP
3 -
Capgemini
1 -
CAPM
1 -
Catalyst for Efficiency: Revolutionizing SAP Integration Suite with Artificial Intelligence (AI) and
1 -
CCMS
2 -
CDQ
12 -
CDS
2 -
Cental Finance
1 -
Certificates
1 -
CFL
1 -
Change Management
1 -
chatbot
1 -
chatgpt
3 -
CL_SALV_TABLE
2 -
Class Runner
1 -
Classrunner
1 -
Cloud ALM Monitoring
1 -
Cloud ALM Operations
1 -
cloud connector
1 -
Cloud Extensibility
1 -
Cloud Foundry
3 -
Cloud Integration
6 -
Cloud Platform Integration
2 -
cloudalm
1 -
communication
1 -
Compensation Information Management
1 -
Compensation Management
1 -
Compliance
1 -
Compound Employee API
1 -
Configuration
1 -
Connectors
1 -
Consolidation Extension for SAP Analytics Cloud
1 -
Controller-Service-Repository pattern
1 -
Conversion
1 -
Cosine similarity
1 -
cryptocurrency
1 -
CSI
1 -
ctms
1 -
Custom chatbot
3 -
Custom Destination Service
1 -
custom fields
1 -
Customer Experience
1 -
Customer Journey
1 -
Customizing
1 -
Cyber Security
2 -
Data
1 -
Data & Analytics
1 -
Data Aging
1 -
Data Analytics
2 -
Data and Analytics (DA)
1 -
Data Archiving
1 -
Data Back-up
1 -
Data Governance
5 -
Data Integration
2 -
Data Quality
12 -
Data Quality Management
12 -
Data Synchronization
1 -
data transfer
1 -
Data Unleashed
1 -
Data Value
8 -
database tables
1 -
Datasphere
2 -
datenbanksicherung
1 -
dba cockpit
1 -
dbacockpit
1 -
Debugging
2 -
Delimiting Pay Components
1 -
Delta Integrations
1 -
Destination
3 -
Destination Service
1 -
Developer extensibility
1 -
Developing with SAP Integration Suite
1 -
Devops
1 -
digital transformation
1 -
Documentation
1 -
Dot Product
1 -
DQM
1 -
dump database
1 -
dump transaction
1 -
e-Invoice
1 -
E4H Conversion
1 -
Eclipse ADT ABAP Development Tools
2 -
edoc
1 -
edocument
1 -
ELA
1 -
Embedded Consolidation
1 -
Embedding
1 -
Embeddings
1 -
Employee Central
1 -
Employee Central Payroll
1 -
Employee Central Time Off
1 -
Employee Information
1 -
Employee Rehires
1 -
Enable Now
1 -
Enable now manager
1 -
endpoint
1 -
Enhancement Request
1 -
Enterprise Architecture
1 -
ETL Business Analytics with SAP Signavio
1 -
Euclidean distance
1 -
Event Dates
1 -
Event Driven Architecture
1 -
Event Mesh
2 -
Event Reason
1 -
EventBasedIntegration
1 -
EWM
1 -
EWM Outbound configuration
1 -
EWM-TM-Integration
1 -
Existing Event Changes
1 -
Expand
1 -
Expert
2 -
Expert Insights
1 -
Fiori
14 -
Fiori Elements
2 -
Fiori SAPUI5
12 -
Flask
1 -
Full Stack
8 -
Funds Management
1 -
General
1 -
Generative AI
1 -
Getting Started
1 -
GitHub
8 -
Grants Management
1 -
groovy
1 -
GTP
1 -
HANA
5 -
HANA Cloud
2 -
Hana Cloud Database Integration
2 -
HANA DB
1 -
HANA XS Advanced
1 -
Historical Events
1 -
home labs
1 -
HowTo
1 -
HR Data Management
1 -
html5
8 -
Identity cards validation
1 -
idm
1 -
Implementation
1 -
input parameter
1 -
instant payments
1 -
Integration
3 -
Integration Advisor
1 -
Integration Architecture
1 -
Integration Center
1 -
Integration Suite
1 -
intelligent enterprise
1 -
Java
1 -
job
1 -
Job Information Changes
1 -
Job-Related Events
1 -
Job_Event_Information
1 -
joule
4 -
Journal Entries
1 -
Just Ask
1 -
Kerberos for ABAP
8 -
Kerberos for JAVA
8 -
Launch Wizard
1 -
Learning Content
2 -
Life at SAP
1 -
lightning
1 -
Linear Regression SAP HANA Cloud
1 -
local tax regulations
1 -
LP
1 -
Machine Learning
2 -
Marketing
1 -
Master Data
3 -
Master Data Management
14 -
Maxdb
2 -
MDG
1 -
MDGM
1 -
MDM
1 -
Message box.
1 -
Messages on RF Device
1 -
Microservices Architecture
1 -
Microsoft Universal Print
1 -
Middleware Solutions
1 -
Migration
5 -
ML Model Development
1 -
Modeling in SAP HANA Cloud
8 -
Monitoring
3 -
MTA
1 -
Multi-Record Scenarios
1 -
Multiple Event Triggers
1 -
Neo
1 -
New Event Creation
1 -
New Feature
1 -
Newcomer
1 -
NodeJS
2 -
ODATA
2 -
OData APIs
1 -
odatav2
1 -
ODATAV4
1 -
ODBC
1 -
ODBC Connection
1 -
Onpremise
1 -
open source
2 -
OpenAI API
1 -
Oracle
1 -
PaPM
1 -
PaPM Dynamic Data Copy through Writer function
1 -
PaPM Remote Call
1 -
PAS-C01
1 -
Pay Component Management
1 -
PGP
1 -
Pickle
1 -
PLANNING ARCHITECTURE
1 -
Popup in Sap analytical cloud
1 -
PostgrSQL
1 -
POSTMAN
1 -
Process Automation
2 -
Product Updates
4 -
PSM
1 -
Public Cloud
1 -
Python
4 -
Qlik
1 -
Qualtrics
1 -
RAP
3 -
RAP BO
2 -
Record Deletion
1 -
Recovery
1 -
recurring payments
1 -
redeply
1 -
Release
1 -
Remote Consumption Model
1 -
Replication Flows
1 -
Research
1 -
Resilience
1 -
REST
1 -
REST API
1 -
Retagging Required
1 -
Risk
1 -
Rolling Kernel Switch
1 -
route
1 -
rules
1 -
S4 HANA
1 -
S4 HANA Cloud
1 -
S4 HANA On-Premise
1 -
S4HANA
3 -
S4HANA_OP_2023
2 -
SAC
10 -
SAC PLANNING
9 -
SAP
4 -
SAP ABAP
1 -
SAP Advanced Event Mesh
1 -
SAP AI Core
8 -
SAP AI Launchpad
8 -
SAP Analytic Cloud Compass
1 -
Sap Analytical Cloud
1 -
SAP Analytics Cloud
4 -
SAP Analytics Cloud for Consolidation
2 -
SAP Analytics Cloud Story
1 -
SAP analytics clouds
1 -
SAP BAS
1 -
SAP Basis
6 -
SAP BODS
1 -
SAP BODS certification.
1 -
SAP BTP
20 -
SAP BTP Build Work Zone
2 -
SAP BTP Cloud Foundry
5 -
SAP BTP Costing
1 -
SAP BTP CTMS
1 -
SAP BTP Innovation
1 -
SAP BTP Migration Tool
1 -
SAP BTP SDK IOS
1 -
SAP Build
11 -
SAP Build App
1 -
SAP Build apps
1 -
SAP Build CodeJam
1 -
SAP Build Process Automation
3 -
SAP Build work zone
10 -
SAP Business Objects Platform
1 -
SAP Business Technology
2 -
SAP Business Technology Platform (XP)
1 -
sap bw
1 -
SAP CAP
2 -
SAP CDC
1 -
SAP CDP
1 -
SAP Certification
1 -
SAP Cloud ALM
4 -
SAP Cloud Application Programming Model
1 -
SAP Cloud Integration for Data Services
1 -
SAP cloud platform
8 -
SAP Companion
1 -
SAP CPI
3 -
SAP CPI (Cloud Platform Integration)
2 -
SAP CPI Discover tab
1 -
sap credential store
1 -
SAP Customer Data Cloud
1 -
SAP Customer Data Platform
1 -
SAP Data Intelligence
1 -
SAP Data Migration in Retail Industry
1 -
SAP Data Services
1 -
SAP DATABASE
1 -
SAP Dataspher to Non SAP BI tools
1 -
SAP Datasphere
9 -
SAP DRC
1 -
SAP EWM
1 -
SAP Fiori
2 -
SAP Fiori App Embedding
1 -
Sap Fiori Extension Project Using BAS
1 -
SAP GRC
1 -
SAP HANA
1 -
SAP HCM (Human Capital Management)
1 -
SAP HR Solutions
1 -
SAP IDM
1 -
SAP Integration Suite
9 -
SAP Integrations
4 -
SAP iRPA
2 -
SAP Learning Class
1 -
SAP Learning Hub
1 -
SAP Odata
2 -
SAP on Azure
1 -
SAP PartnerEdge
1 -
sap partners
1 -
SAP Password Reset
1 -
SAP PO Migration
1 -
SAP Prepackaged Content
1 -
SAP Process Automation
2 -
SAP Process Integration
2 -
SAP Process Orchestration
1 -
SAP S4HANA
2 -
SAP S4HANA Cloud
1 -
SAP S4HANA Cloud for Finance
1 -
SAP S4HANA Cloud private edition
1 -
SAP Sandbox
1 -
SAP STMS
1 -
SAP SuccessFactors
2 -
SAP SuccessFactors HXM Core
1 -
SAP Time
1 -
SAP TM
2 -
SAP Trading Partner Management
1 -
SAP UI5
1 -
SAP Upgrade
1 -
SAP-GUI
8 -
SAP_COM_0276
1 -
SAPBTP
1 -
SAPCPI
1 -
SAPEWM
1 -
sapmentors
1 -
saponaws
2 -
SAPUI5
4 -
schedule
1 -
Secure Login Client Setup
8 -
security
9 -
Selenium Testing
1 -
SEN
1 -
SEN Manager
1 -
service
1 -
SET_CELL_TYPE
1 -
SET_CELL_TYPE_COLUMN
1 -
SFTP scenario
2 -
Simplex
1 -
Single Sign On
8 -
Singlesource
1 -
SKLearn
1 -
soap
1 -
Software Development
1 -
SOLMAN
1 -
solman 7.2
2 -
Solution Manager
3 -
sp_dumpdb
1 -
sp_dumptrans
1 -
SQL
1 -
sql script
1 -
SSL
8 -
SSO
8 -
Substring function
1 -
SuccessFactors
1 -
SuccessFactors Time Tracking
1 -
Sybase
1 -
system copy method
1 -
System owner
1 -
Table splitting
1 -
Tax Integration
1 -
Technical article
1 -
Technical articles
1 -
Technology Updates
1 -
Technology Updates
1 -
Technology_Updates
1 -
Threats
1 -
Time Collectors
1 -
Time Off
2 -
Tips and tricks
2 -
Tools
1 -
Trainings & Certifications
1 -
Transport in SAP BODS
1 -
Transport Management
1 -
TypeScript
2 -
unbind
1 -
Unified Customer Profile
1 -
UPB
1 -
Use of Parameters for Data Copy in PaPM
1 -
User Unlock
1 -
VA02
1 -
Validations
1 -
Vector Database
1 -
Vector Engine
1 -
Visual Studio Code
1 -
VSCode
1 -
Web SDK
1 -
work zone
1 -
workload
1 -
xsa
1 -
XSA Refresh
1
- « Previous
- Next »
Related Content
- SAP Cloud Integration: Understanding the XML Digital Signature Standard in Technology Blogs by SAP
- Single Sign On to SAP Cloud Integration (CPI runtime) from an external Identity Provider in Technology Blogs by SAP
- SAP Datasphere - Space, Data Integration, and Data Modeling Best Practices in Technology Blogs by SAP
- Integrating with SAP Datasphere Consumption APIs using SAML Bearer Assertion in Technology Blogs by SAP
- Managing Recurring Pay Components in SuccessFactors Using Batch Upsert in Technology Blogs by Members
Top kudoed authors
| User | Count |
|---|---|
| 11 | |
| 9 | |
| 7 | |
| 6 | |
| 4 | |
| 4 | |
| 3 | |
| 3 | |
| 3 | |
| 2 |