

- SAP Community
- Products and Technology
- Technology
- Technology Blogs by Members
- Principal propagation in a multi-cloud solution be...
Technology Blogs by Members
Explore a vibrant mix of technical expertise, industry insights, and tech buzz in member blogs covering SAP products, technology, and events. Get in the mix!
Turn on suggestions
Auto-suggest helps you quickly narrow down your search results by suggesting possible matches as you type.
Showing results for
MartinRaepple
Active Participant
Options
- Subscribe to RSS Feed
- Mark as New
- Mark as Read
- Bookmark
- Subscribe
- Printer Friendly Page
- Report Inappropriate Content
04-13-2021
9:33 AM
| Note: This blog post is the fourth part of a tutorial series. If you arrived here without reading the first, second and third part, please do so before you continue, and then come back here again. Part I describes principal propagation between Microsoft Azure, calling a simple Web Service deployed on SAP Business Technology Platform (BTP). Part II extends the scenario by propagating the Azure-authenticated user via BTP and SAP Cloud Connector to an SAP Gateway system for displaying the user's data. Part III adds a business application to the scenario connecting common platform services in Microsoft Azure and SAP BTP for principal propagation in the context of a chat bot in Microsoft Teams. A live demo of the chatbot is available on episode #31 of the SAP on Azure Video podcast series (starting at min 23:30). Part IV (this blog post) uses a “low-code” approach for implementing the chatbot with Microsoft Power Platform, demonstrated in episode #40 of the SAP on Azure Video Podcast series. Part V looks at different aspects for production readiness, such as API management, monitoring and alerting (live demo available on episode #83 in the SAP on Azure video podcast series). Part VI turns the scenario into the opposite direction by propagating the SAP-authenticated user of a BTP business application to call the Microsoft Graph API and retrieve the user’s Microsoft Outlook events. Finally, part VII looks at principal propagation from Microsoft Power Platform to SAP in the context of making Remote Function Calls (RFCs) and using Business Application Programming Interfaces (BAPIs) with the Kerberos protocol. See episode 142 of the SAP on Azure video podcast series for a live demo of this scenario. |
Implementing the Teams chatbot with Power Virtual Agents and Power Automate
Part III introduced a real-world business application to the scenario by adding a Microsoft Teams-based chat bot which allows the user to order new IT equipment from a product catalogue managed by the ABAP backend. The bot is implemented in C# using the Bot Framework Software Development Kit (SDK) along with the Azure Bot Service, which enables the classical or "pro-code" developer to create a compelling chat bot experiences. This includes single sign-on (SSO) from Teams and end-to-end principal propagation with the Azure AD-authenticated user when accessing the product data in the backend system. You can find the complete source code of the bot in GitHub. The dialog between the user and the bot is implemented as a Waterfall dialog from the SDK by defining the series of steps to collect information from the user and to guide her through a series of tasks.
Part IV of the blog series (this post) builds the same chatbot user experience with Microsoft's low-code interface Power Virtual Agents (PVA). PVA provides a code-free graphical interface to define the conversational flow with the user. A PVA-based bot can be installed as an app in Teams and provide SSO for the Azure AD-authenticated user - similar to the implementation in part III.
The following diagramm shows the dialog flow of the product search bot from the graphical toolset in PVA:

The conversation is triggered by phrases, keywords, or questions that a user is likely to type when looking for a new product in the catalogue. The conversation with the bot starts with an authentication node. Upon successful login, a set of variables are available to the following nodes, such as the access token issued to the bot (
bot.AuthToken) containing the logged-in users information. Next, the use has to type in the search term to look for in the SAP system's product catalogue, which adds another variable (productID) to the dialog.To automate activities and call the backend system, the PVA-based bot uses Flows in Microsoft Power Automate (PA). Similar to PVA, PA provides a workflow engine with a point-and-click flow designer to build the business automation logic. In this scenario, the product search bot uses two Flows in PA:
- The Exchange Token Flow is called by the bot to obtain an SAP-issued OAuth access token for the Azure AD-authenticated user. It essentially covers the token exchange logic for principal propagation that is implemented by the SCPClient class in the Bot Framework-based version of part III. The step Exchange AAD JWT to AAD SAML Assertion uses the on-behalf-of flow to exchange the bot access token (obtained via the
bot.AuthTokenvariable and passed as the input parameterAADJWTto the flow) into a SAML assertion for the user. Next, the Get SAP Bearer Token with SAML Assertion step in the flow uses a secure connection to the SAP backend system to request an access token for the product search OData service according to RFC 7522 . This requires a valid OAuth client configured in the SAP backend system to authorize the token request, and a user in the backend system who matches the common identity attribute (such as the email address) of the user in Azure AD. The flow returns the access token found in the SAP backend system's token response message to the PVA bot as a new variable (SAPToken).

- The Call SAP OData Service Flow gets the SAP-issued OAuth access token as an input parameter and passes it in the Authorization Header (according to RFC 6750) to the SAP backend system call of the Product Search OData service, along with the product id entered by the user in the chat bot.

Accessing the CDS OData service via On-Premises Data Gateway
Power Automate Flows make use of Connectors to integrate with other services and systems. The HTTP with Azure AD connector can fetch resources via HTTP(S) from various Web services, or from an on-premise service. For the latter use case, the connector can be configured to use a gateway component from Microsoft which provides a secure connection between the corporate network and the Cloud. The On-Premises Data Gateway (OPDG) provides a similar functionality as the SAP Cloud Connector (SCC) introduced in part II of the blog series by establishing an outbound connection from the corporate network to the Cloud. Thus, it is not required to open any inbound ports in your corporate firewall.
You could configure the HTTP with Azure AD connector in the Power Automate Flows to request the OAuth access token from the XSUAA token endpoint and fetch the product catalogue data via the iFlow-exposed URL from SAP Cloud Platform Integration (CPI) as implemented in the SDK-based bot in part III. However, this part of the blog series proposes an alternative solution using the OPDG. Unlike SCC, OPDG has no built-in support for principal propagation to generate short-lived certificates based on an incoming OAuth access token from the Cloud, but it securely forwards HTTP(S) requests from the Cloud to the SAP backend. Therefore we will now get the SAP-issued OAuth access token directly from the backend (and no longer from XSUAA), and call the Product Search OData service directly from the PA Flow (and not via CPI).
Compared to the solution in part III, the OPDG-based approach slightly reduces the total number of steps to call the product search service with the Azure AD-authenticated user from the bot. The complete end-to-end flow is illustrated in the following diagram:

- Similar to part III, the bot is started by the already logged-on user in Microsoft Teams. The PVA-based Product Search bot sends back a message to tell Teams to obtain an authentication token for it.
- By configuring single sign-on for the PVA bot and adding the corresponding authentication node to the conversation flow, the bot requests an access token from Azure AD using the user’s session. This requires the registration of an application representing the PVA bot in Azure AD. Since the user is already logged-on in Teams, this step does not ask the user to re-enter her credentials.
- Azure AD returns the access token to the bot which contains the required identity information such as the user’s email address. The token is now accessible via the
AuthTokenvariable to any following steps in the conversation. After successful (single) sign-on, the bot asks the user to enter the id of a product to search for in the catalogue managed in the SAP backend. - Next, the bot starts the token exchange process as described above with the Exchange Token flow in PA. The assertion is configured by the SAML settings of an Enterprise application registration in Azure AD for the SAP backend system.
- The Exchange Token flow uses the HTTP with Azure AD connector and an on-premise connection via the OPDG to send the SAML assertion with an access token request to the SAP backend system's OAuth Authorization Server. Compared to the XSUAA-issued access token in part III, the token from the SAP backend system is not a JSON Web Token, but a bearer token. Bearer token do not self-contain the digitally signed identity information of the user and authorized scope(s), but are essentially a "pointer" to this data in the system that issued the token.
- Finally, the bot invokes the CDS-based OData Product Search service on-behalf-of the Azure AD-authenticated user by passing the bearer token to it. Again, the HTTP with Azure AD connector is used and configured via an OPDG connection to request the data for the user-provided product ID securely via the encrypted tunnel.
With the above changes to the solution architecture, the following additional configuration settings must be applied in the SAP backend system:
- A trust relationship between Azure AD and the OAuth Authorization Server in the SAP backend, which is required for the Exchange Token PA flow to successfully request the access token using the SAML Bearer Assertion Grant. Otherwise, the SAML assertion signed by Azure AD will be rejected by the SAP backend's OAuth server.
- Setup of an OAuth client for the Exchange Token PA flow to request the access token from the backend's OAuth Authorization Server.
- Enhancing the existing PRODUCT_SEARCH role created in part III in the SAP backend with the S_SCOPE authorization object to match the backend user's permissions with the requested scope of the OAuth client.
- Configuration of the SSL server to provide a secure connection between the OPDG and the SAP backend system. This requires a TLS certificate with a common name (CN) of the SAP backend's full qualified domain name (FQDN). The certificate's issuer (certificate authority, CA) must also be trusted by the OPDG. You will re-use the OpenSSL-based corporate CA configured in part II of the blog series.
Before you get started with the items above, make sure to meet the following prerequisites:
- Ensure that SAML is enabled in your SAP backend system. If it is not enabled yet, use transaction SAML2 to configure your SAP system as a Service Provider as described here.
- Ensure that the required ICF nodes under /sap/bc/sec/oauth2 are activated. You can check with transaction SICF their current status:

- To build the PVA bot, you can use your Microsoft 365 E5 developer subscription to sign-up for a free Power Virtual Agents trial license with your developer subscription's admin account. You should also install the Users sample data pack in your developer subscription which will create a set of test users in your subscription's Azure AD tenant.
- Download and install the OPDG by following these instructions. The hosts running OPDG and your SAP system must have network connectivity. Make sure that you choose the region matching your PVA environment's region. You should see a status page in your OPDG instance like this:

- Checkout the branch
part4of the blog series GitHub repository with a Git client of you choice:
git clone https://github.com/raepple/azure-scp-principal-propagation.git

cd azure-scp-principal-propagation

git checkout part4
Setup TLS in the SAP system
| Step | Description | Screenshot |
| 1 | Login with SAP GUI and start transaction STRUST. Switch to the change mode (Ctrl+F1) and double-click on the SSL server Standard node. Right-click and select Replacement Wizard from the context menu. | 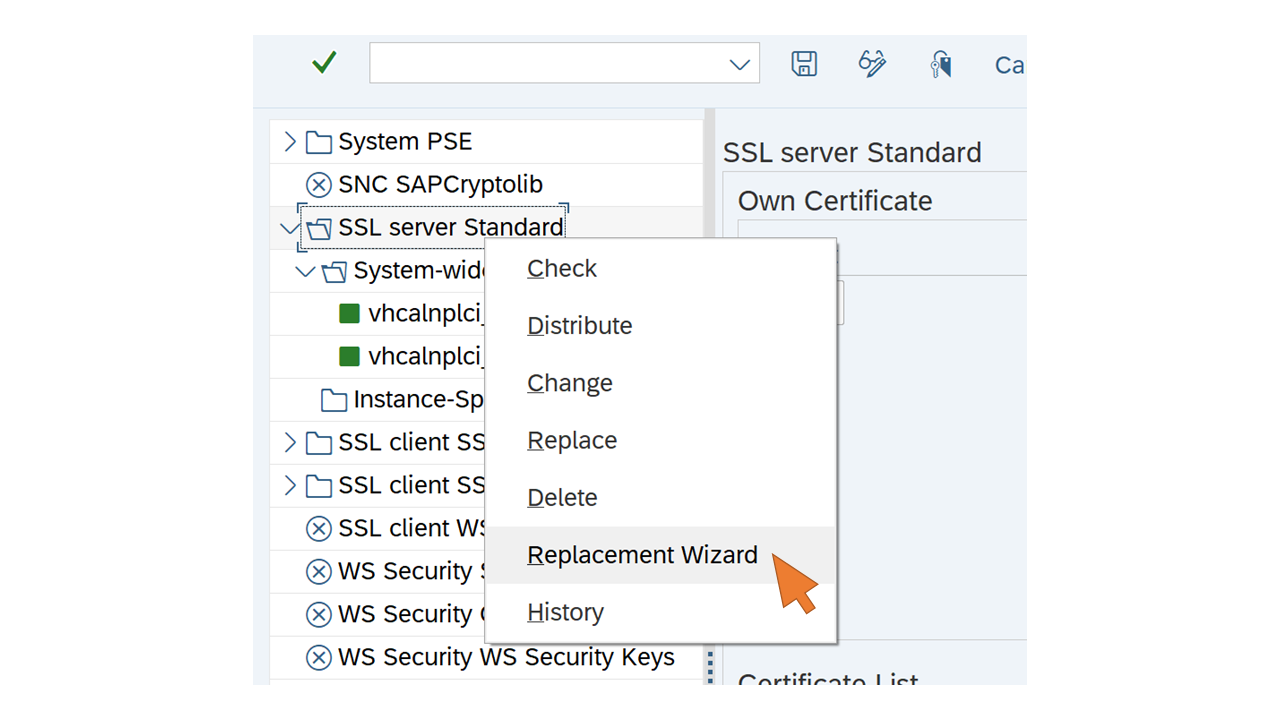 |
| 2 | Click Start. Enter the distinguished name (DN) of the new SSL certificate with the full-qualified domain name (FQDN) of your SAP system as the Subject Alternative Name (SAN) with the "DNS=" attribute following this pattern: DNS=<FQDN>, OU=<Org Unit>, O=<Organization>, C=US, CN=<FQDN> In a scenario setup using the ABAP developer trial system, you could choose a FQDN like "vhcalnplci.bestrun.corp", which results in the following DN as shown in the screenshot: DNS=vhcalnplci.bestrun.corp, OU=SAP Team, O=BestRun, C=US, CN=vhcalnplci.bestrun.corp Click Choose Distinguished Name. |  |
| 3 | Keep the proposed algorithm and key length and click on Select Algorithm. |  |
| 4 | Click Create Key Pair. |  |
| 5 | Click Save as local file and save the new Certificate Signing Request (CSR) as a new file, e.g. vhcalnplci.csr, to your OpenSSL (see part II) installation's subdirectory trustedca/csr. Click Next. |  |
| 6 | Open a command line and change to the subdirectory trustedca of the OpenSSL installation. Run the command openssl ca -config trustedca.cnf -out .\certs\vhcalnplci.pem -infiles .\csr\vhcalnplci.csrto sign the CSR. |  |
| 7 | Go back to the replacement wizard. Click Load local file and select the signed certificate response file .\certs\vhcalnplci.pem created in the previous step to load its content into the text field. |  |
| 8 | Open your OpenSSL Trusted CA's signing certificate (trustedca/trustedca.crt) in a text editor. Copy the content into the clipboard and paste it at the end of imported certificate response file content (after the -----END CERTIFICATE----- tag) in the text field.Click Import Certificate Response. |  |
| 9 | Click Activate New Key Pair and Certificate. |  |
| 10 | Click Back (F3). |  |
| 11 | You should now make sure that the host running your OPDG can reach the SAP system under the specified FQDN (e.g. vhcalnplci.bestrun.corp). For testing purposes you can resolve the chosen FQDN on the OPDG host to the SAP system's IP address by adding a new entry to the OPDG's hosts file (C:\Windows\System32\drivers\etc\hosts), e.g. |  |
| 12 | The OPDG host must also trust the issuer of the SAP system's new TLS certificate to successfully establish a secure connection. Therefore, open the Certificate Management console on the OPDG host and import the TrustedCA's signing certificate. Run certlm.msc on the OPDG host. Select Trusted Root Certification Authorities from the list. Right-click and select All tasks -> Import from the context menu. Click Next. |  |
| 13 | Select the TrustedCA's signing certificate ( trustedca/trustedca.crt) from your OpenSSL installation directory.Click Next. |  |
| 14 | Click Next and Finish to complete the import wizard. |  |
You have now successfully setup secure connectivity between your OPDG instance and the SAP backend.
Setup trust and federation between Azure AD and the SAP OAuth server
| Step | Description | Screenshot |
| 15 | Start transaction SAML2 in SAP GUI, and click on Metadata. | 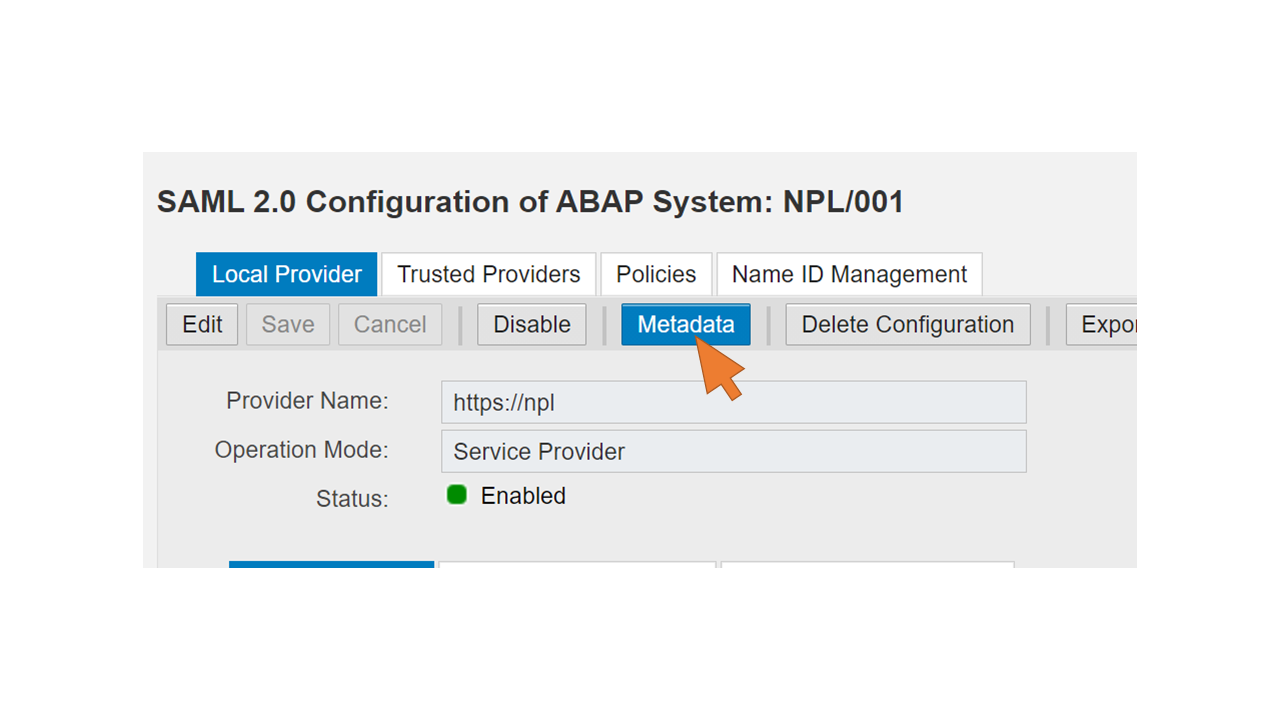 |
| 16 | Select Service Provider and click on Download Metadata. | |
| 17 | Login to Azure Portal with your Microsoft 365 E5 developer subscription's admin account and select Azure Active Directory from the portal menu. Select Enterprise Applications from the left-side menu. |  |
| 18 | Click New application. |  |
| 19 | Enter "SAP NetWeaver" in the search box of the Azure AD Gallery. Click on the SAP NetWeaver tile from the search result. |  |
| 20 | Click Create. |  |
| 21 | Click the tile Set up single sign on. |  |
| 22 | Select SAML. | 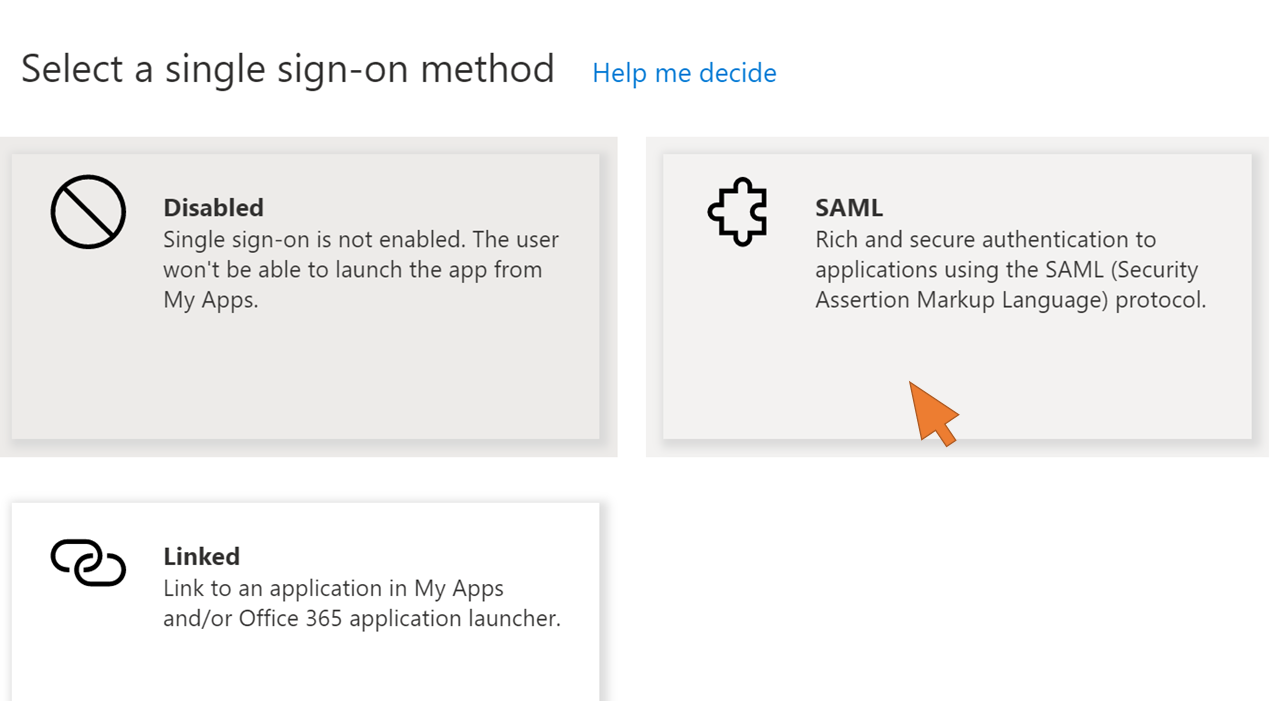 |
| 23 | Click on Upload metadata file and choose the file your downloaded in step 15. Click Add. |  |
| 24 | Store the Identifier (Entity ID) in a temporary file. You will need the value later when configuring the bot. Change the Reply URL from the metadata file import according to the following pattern: https://<SAP FQDN>:<SSL port>/sap/bc/sec/oauth2/token Replace <SAP FQDN> with the full-qualified domain name you configured during SSL setup in step 2, e.g. https://vhcalnplci.bestrun.corp:44300/sap/bc/sec/oauth2/token For the required Sign On URL, enter any valid URL, e.g. https://vhcalnplci.bestrun.corp:44300/nwbc. This value is not relevant for the scenario. Click Save. |  |
| 25 | Close the Basic SAML Configuration settings and click on the Edit button for the User Attributes & Claims setting. |  |
| 26 | Click on the Unique User Identifier (Name ID) claim. |  |
| 27 | Choose user.mail from the Source attribute drop down list and click Save. |  |
| 28 | Close the User Attributes & Claim settings. Click on the Download link of the Certificate (Raw) for the app's SAML Signing Certificate. |  |
| 29 | Repeat the previous step with the Federation Metadata (XML) Download link. |  |
| 30 | Go back to transaction SAML2 and switch to the tab Trusted Providers. Select OAuth 2.0 Identity Providers from the drop-down list. |  |
| 31 | Click Add and select Upload Metadata File |  |
| 32 | Select the metadata file from Azure AD you downloaded in step 29 and click Next. |  |
| 33 | Select the SAML signing certificate from Azure AD you downloaded in step 28 and click Next. |  |
| 34 | Click Next. | 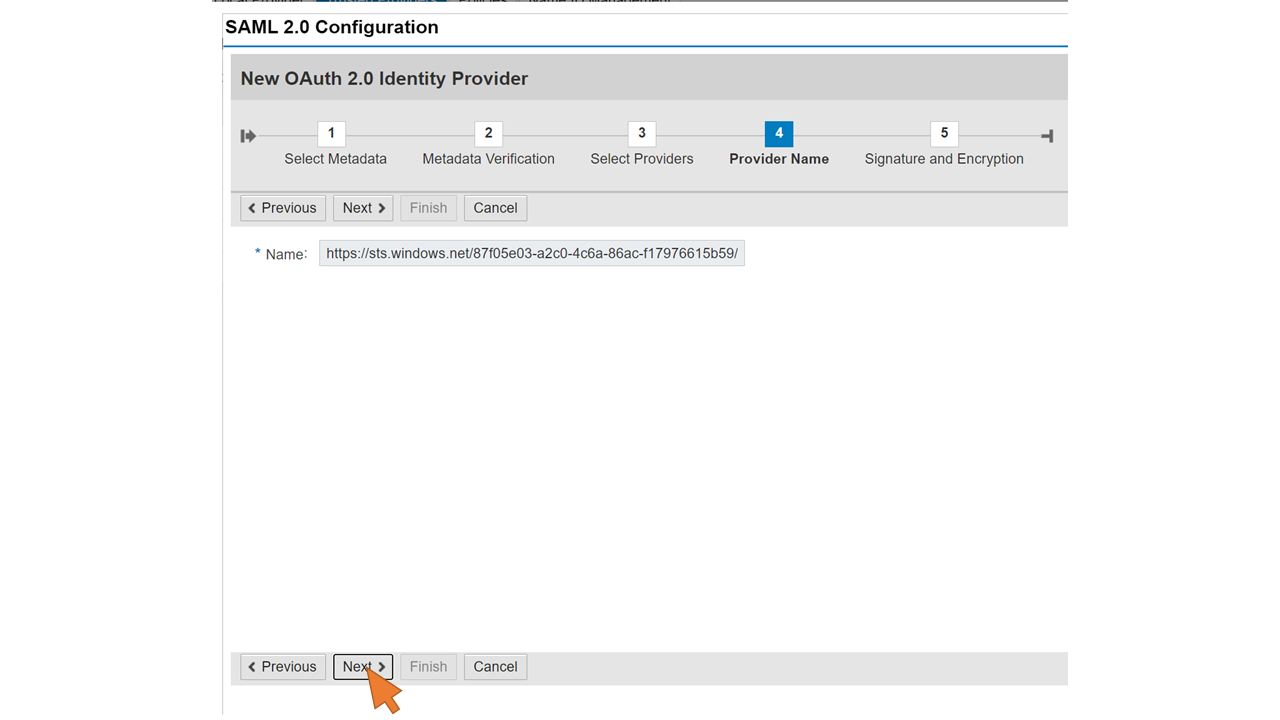 |
| 35 | Click Finish. |  |
| 36 | For the new trusted identity provider, click Edit to configure the federation settings. |  |
| 37 | Click Add. |  |
| 38 | Select E-Mail to match the Name ID claim setup configured for Azure AD in step 27 and click OK. | 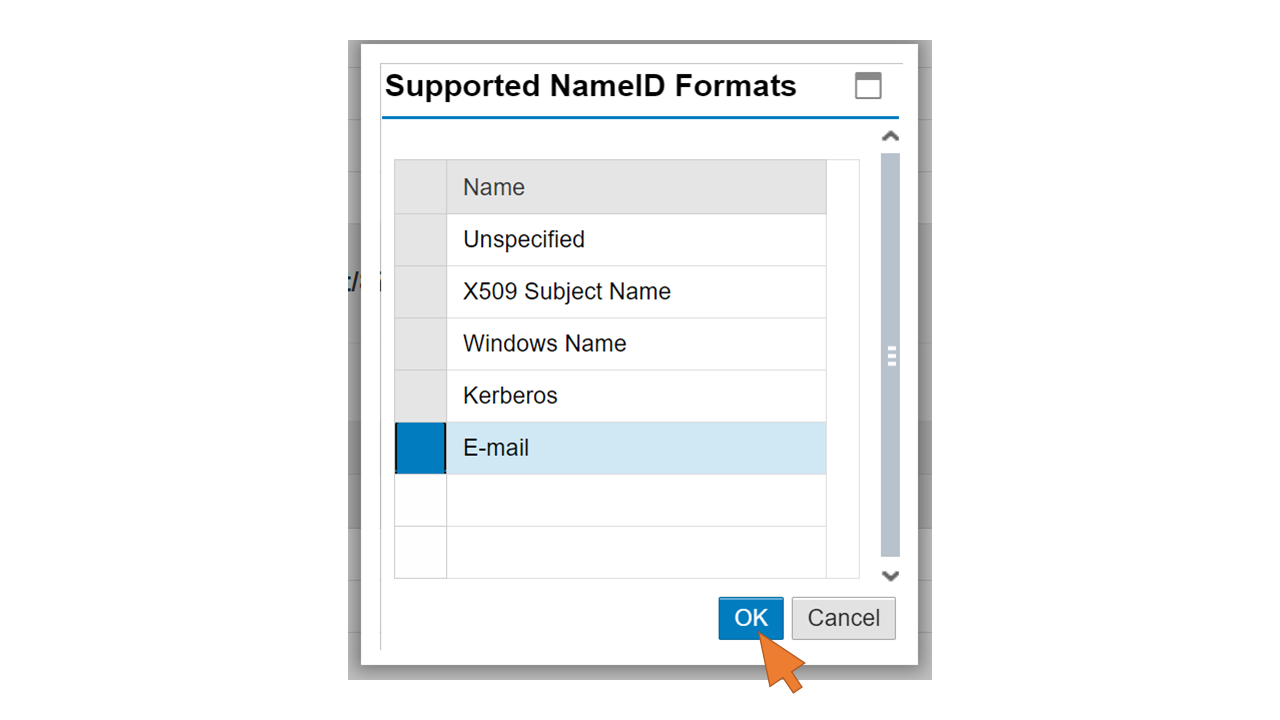 |
| 39 | Click Save. |  |
| 40 | Click Enable and confirm with OK. |  |
You have now setup trust between your Azure AD tenant and the SAP backend OAuth server. Identities are federated based on the e-mail address. To authorize the PVA bot to request an access token from SAP, an OAuth client is needed and will be configured in the next step.
Configure the SAP OAuth Client
| Step | Description | Screenshot |
| 41 | The new OAuth client requires an existing system user associated with it. Therefore, begin with transaction SU01 and enter CHATBOT for the new user's name. Click Create. |  |
| 42 | Enter a Last name (e.g. "Chatbot client") and switch to the Logon Data tab. |  |
| 43 | Select System from the User Type drop-down list, and enter a New password. This will be the OAuth client secret used by the PVA bot when requesting the access token. Click Save. |  |
| 44 | Start transaction SOAUTH2. | 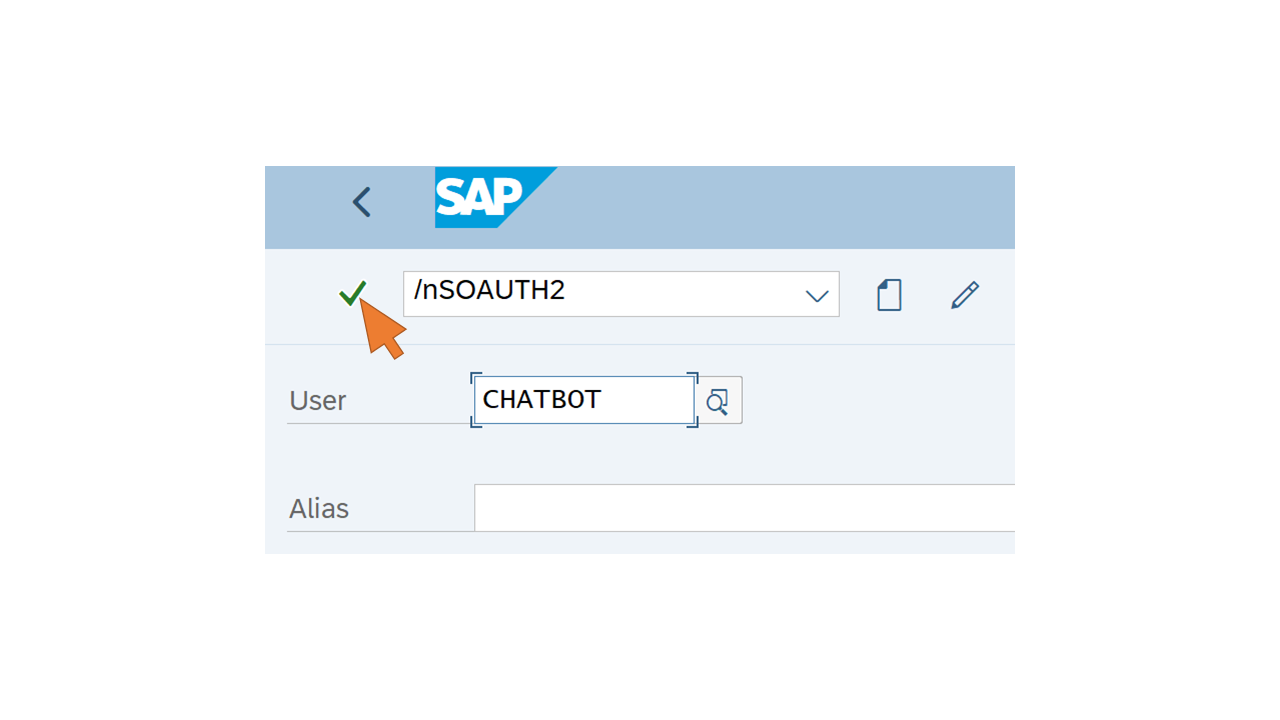 |
| 45 | Click Create. |  |
| 46 | For the OAuth 2.0 Client ID, open the value help and select the previously created CHATBOT user. Provide a description of the new client (e.g. "Client for PVA Chatbot"). Click Next. |  |
| 47 | Deselect the checkbox for SSL Client Certificate and click Next. |  |
| 48 | Open the value help for Trusted OAuth 2.0 IdP and select the previously created identity provider for your Azure AD tenant from the list. Click Next. |  |
| 49 | Select the first row in the Scope Assignment table and open the value help for the OAuth 2.0 Scope ID. Select ZPRODUCTSVIEW_CDS_0001 from the search results. Note: If this scope does not appear in the list, go back to part III of the tutorial series and ensure that you enabled OAuth for the CDS view according to steps 18-21. Click Next. | 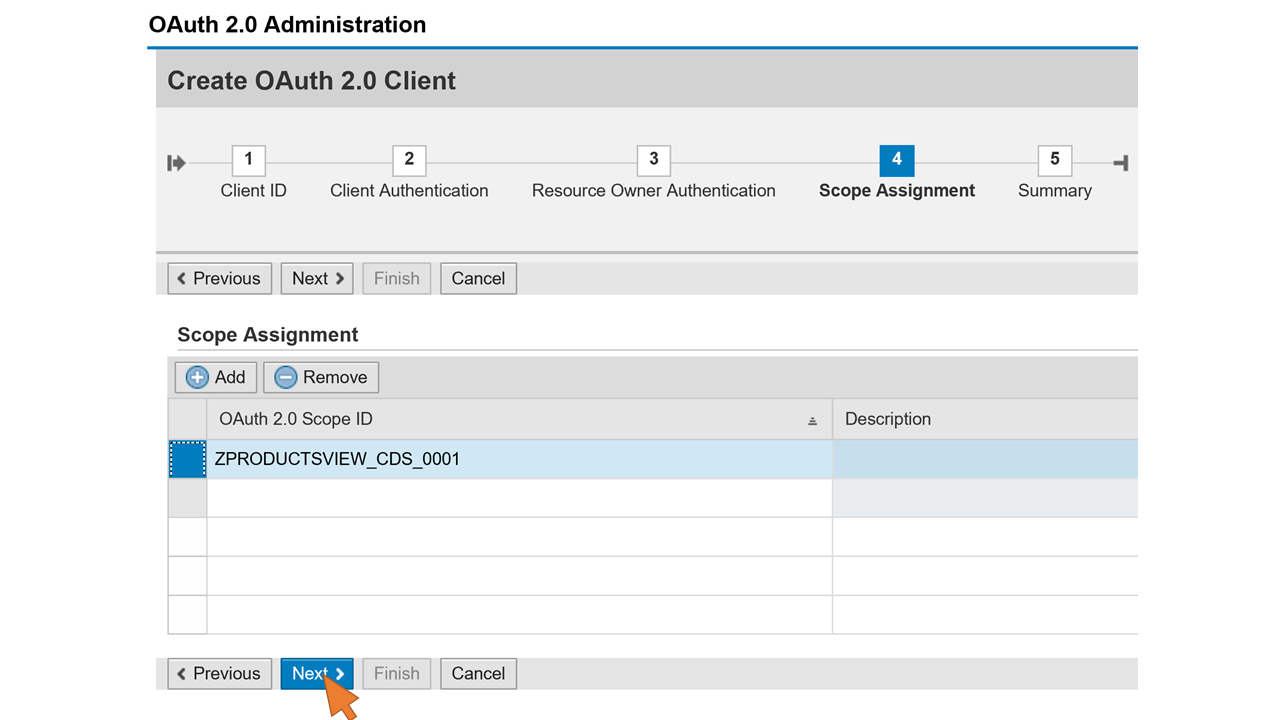 |
| 50 | Click Finish. |  |
Next you need to align the permissions for the end user to match the OAuth scope assigned to the new OAuth client. The bot cannot request an access token from SAP on behalf of the user if the user's assinged role does not contain the permission for the requested scope(s). Therefore you will update the existing PRODUCT_SEARCH role in the next step.
Update the backend authorizations
| Step | Description | Screenshot |
| 51 | Start transaction PFCG and enter PRODUCT_SEARCH in the Role entry field. Click Change. |  |
| 52 | Switch to the Authorizations tab and click on Change Authorization Data. | 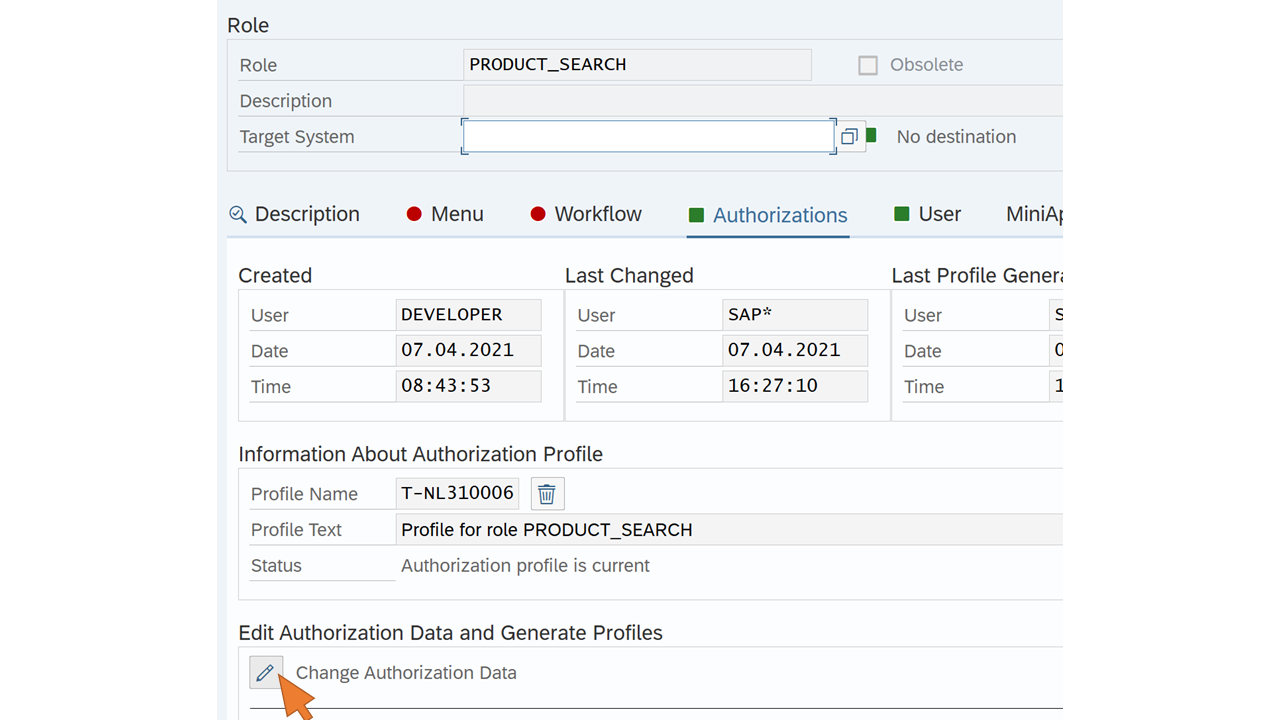 |
| 53 | Click Manually. |  |
| 54 | Enter S_SCOPE in the first row of the table. Click OK. |  |
| 55 | Open the tree view for the fields of the S_SCOPE authorization object. Change the value of the field OA2_CLIENT to limit access to only a selected OAuth client. Click the pencil symbol for the field. |  |
| 56 | In the first row of the table, click on the value help of the From column. Select the user CHATBOT from the list and click Copy. |  |
| 57 | Click Save. |  |
| 58 | Change the value of the field OA2_SCOPE to limit access to only a selected OAuth scope. Click the pencil symbol for the field. |  |
| 59 | In the first row of the table, click on the value help of the From column.Select the scope ZPRODUCTSVIEW_CDS_0001 from the list and click Copy. | 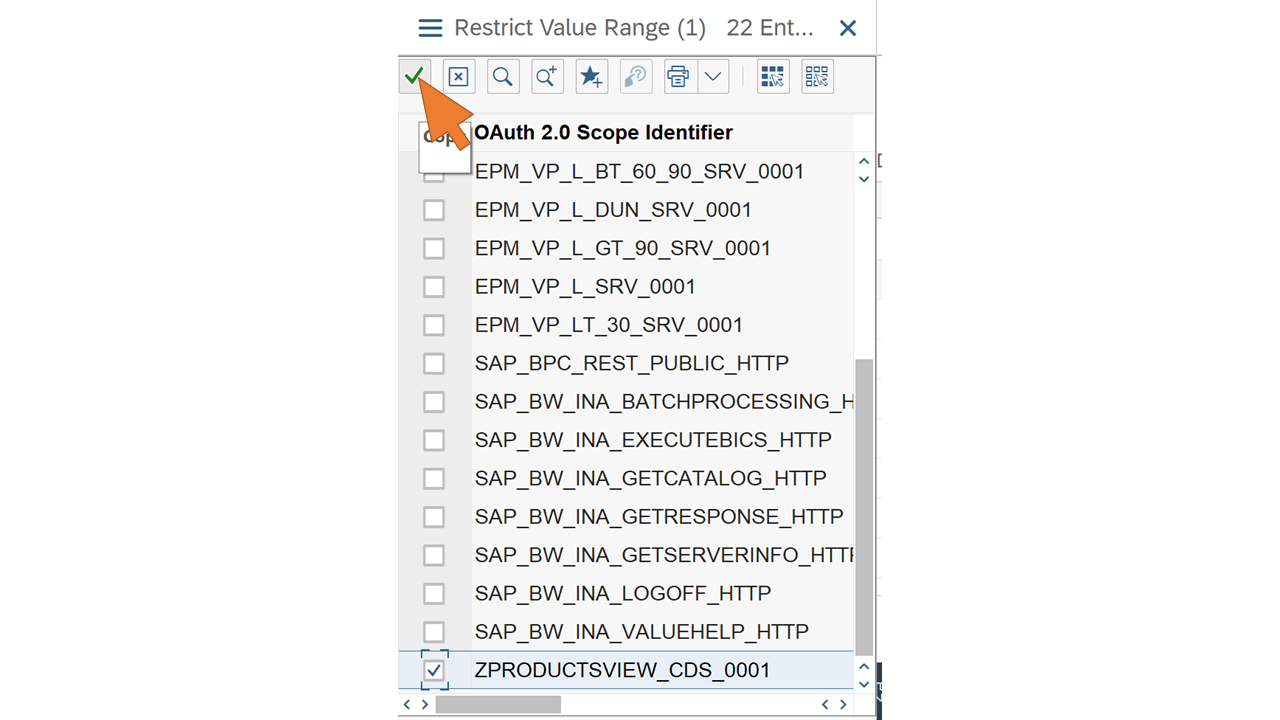 |
| 60 | Click Save. |  |
| 61 | Click Save, then Generate |  |
With this step all required changes in the SAP backend are completed. Let's continue with the implementation of the bot and flows, which are available as a solution ready to import into your power platform environment. You will use environment variables to configure the solution according to your scenario setup.
Import and configure the solution
| Step | Description | Screenshot |
| 62 | Register a new application in Azure AD for the PVA bot. Select Azure Active Directory from the Azure Portal menu and click App registrations on the left-side navigation. |  |
| 63 | Click + New registration |  |
| 64 | Enter a name for the new app (e.g. "Product Search Bot PVA"). Select the option "Accounts in this organizational directory only (<tenant name> only - Single tenant)" for Supported Account Types. For the Redirect URI, keep "Web" and enter "https://token.botframework.com/.auth/web/redirect" to support Teams-based SSO. Click Register. |  |
| 65 | Select Overview from the left-side navigation. Click Copy to clipboard next to the Application Client ID and store it in a temporary file. Also Copy to clipboard and store the Directory (tenant) ID. You will need these values later for the configuration of the PVA solution. |  |
| 66 | Select Certificates & secrets from the left-side navigation and click + Client secret |  |
| 67 | Enter a name (e.g. "PVA") and click OK. |  |
| 68 | Click on Copy to clipboard and store the secret in a temporary file. You will need it later for the configuration of the PVA solution. |  |
| 69 | Select API permissions from the left-side navigation and click on Grant admin consent for <tenant name> to suppress consent confirmation from users when using the bot. Confirm with OK. |  |
| 70 | To suppress consent confirmation when requesting the SAML assertion for the user, the SAP NetWeaver app must authorize the bot app. Click on your Azure AD directory name in the breadcrumb navigation. |  |
| 71 | Switch to the All applications tab and select the SAP NetWeaver (enterprise) app from the list. |  |
| 72 | Select Expose an API from the left-hand navigation menu and click on Add a client application. |  |
| 73 | Enter the Client ID from step 65, activate the checkbox for the user_impersonation scope. Click Add application. |  |
| 74 | Next, sign in to Power Apps. Select Solutions from the menu to import the solution. |  |
| 75 | Click Import. |  |
| 76 | Select the file ProductSearchBotPVA/ProductSearchBot_Solution.zip from the Git repository.Click Next. |  |
| 77 | Click Import. |  |
| 78 | Wait for the notification Solution "Product Search Bot" imported successfully. Then select the solution Product Search Bot from the list. | 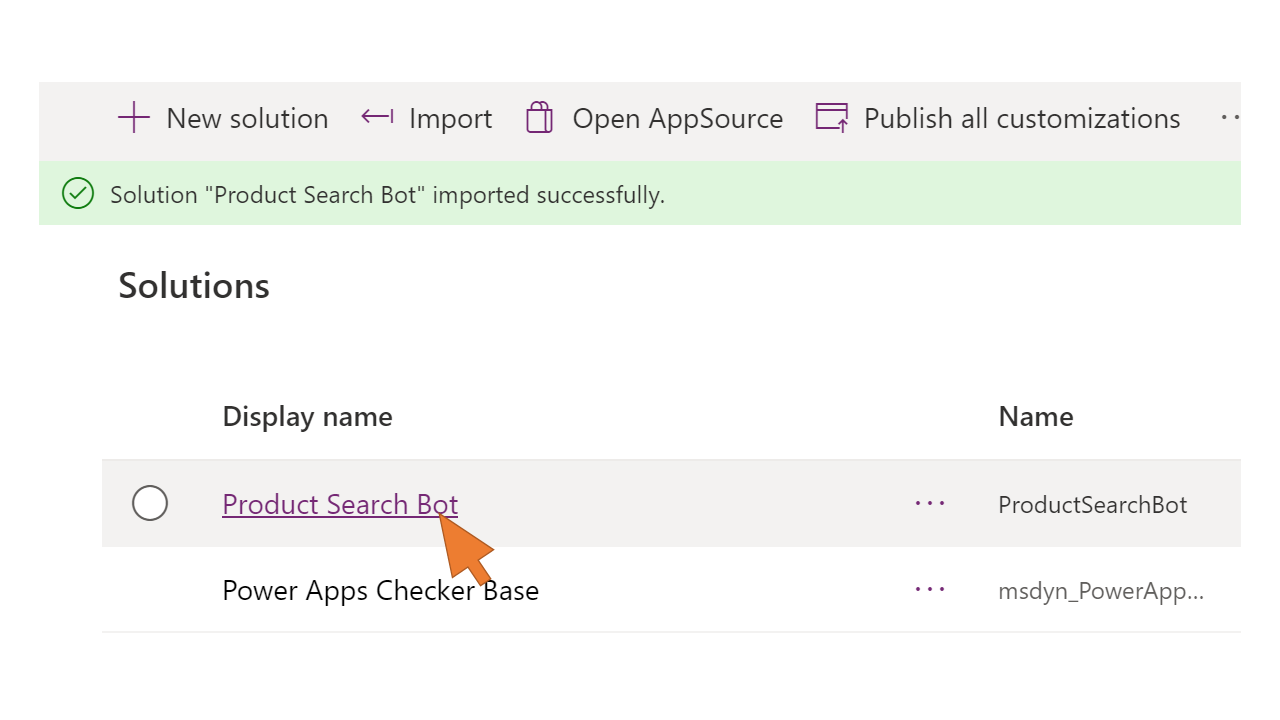 |
| 79 | Click on the BotAppClientID environment variable in the list. |  |
| 80 | Enter the Application Client ID from step 65 in the field Current Value. Click Save. | 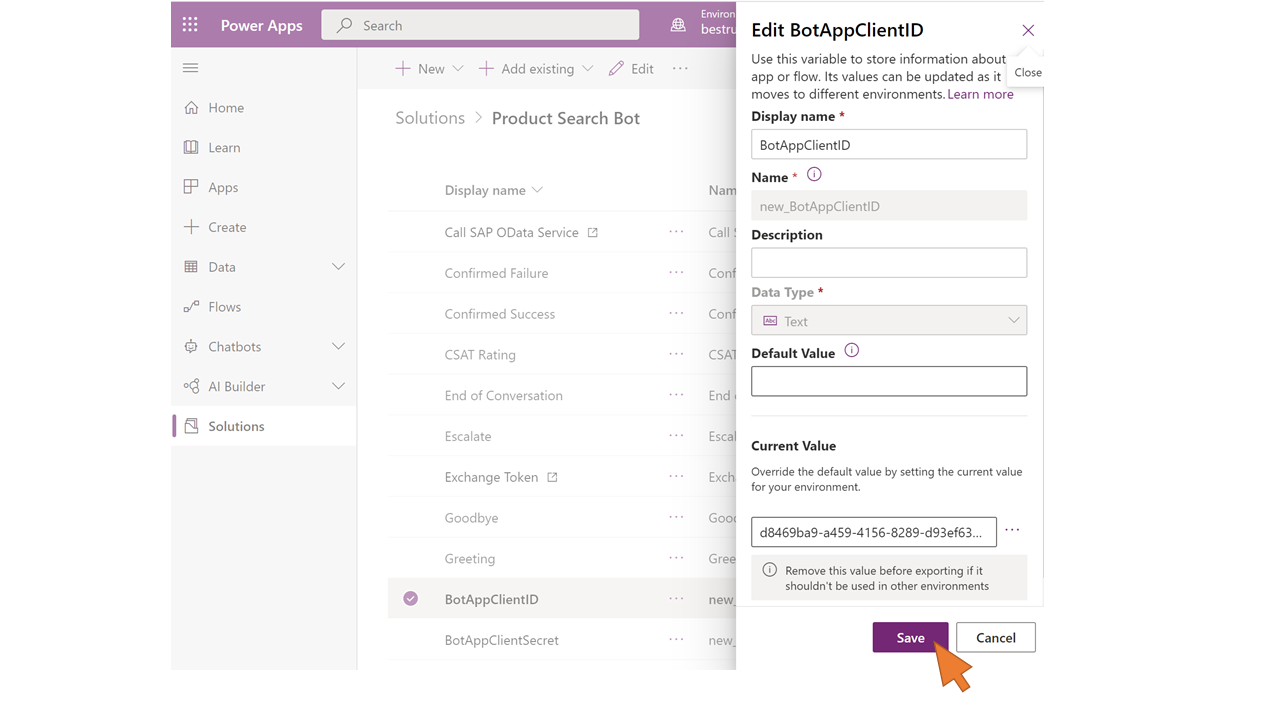 |
| 81 | Repeat the previous two steps for the following environment variables and values:
| |
| 82 | Select the Call SAP OData Service flow from the solution's component list. Power Automate opens in a new browser tab. | 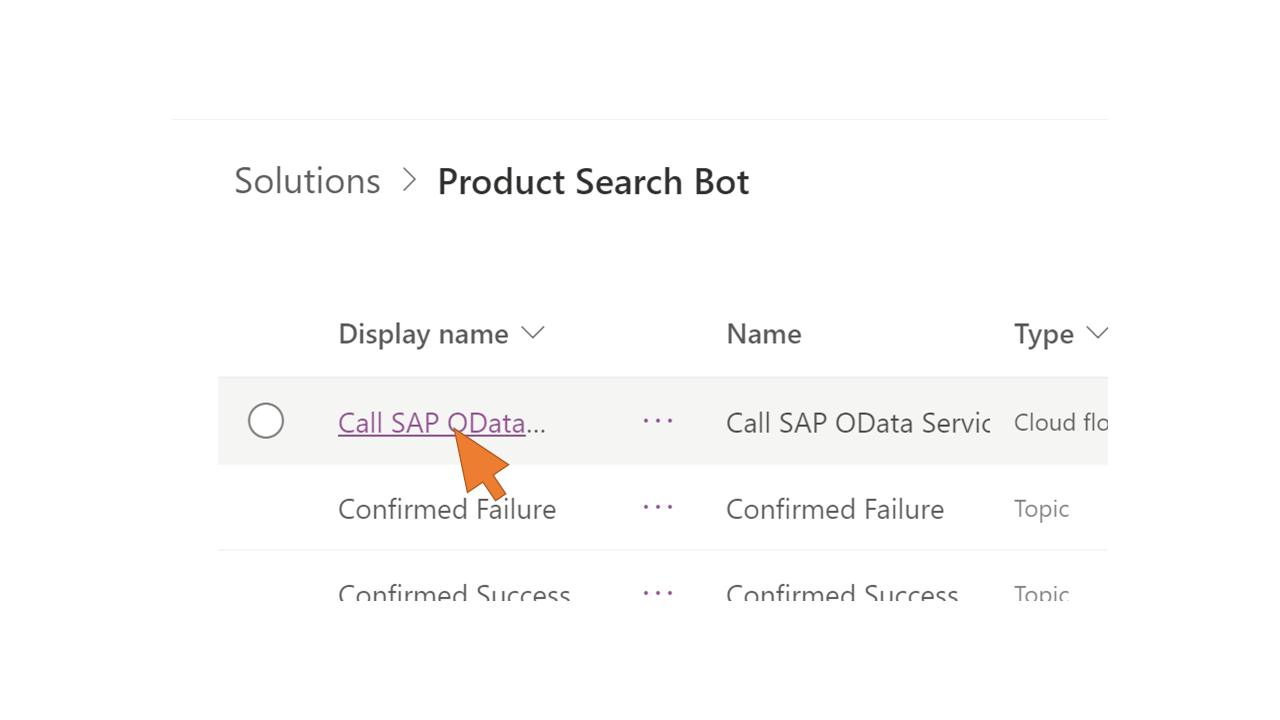 |
| 83 | Click Edit. | 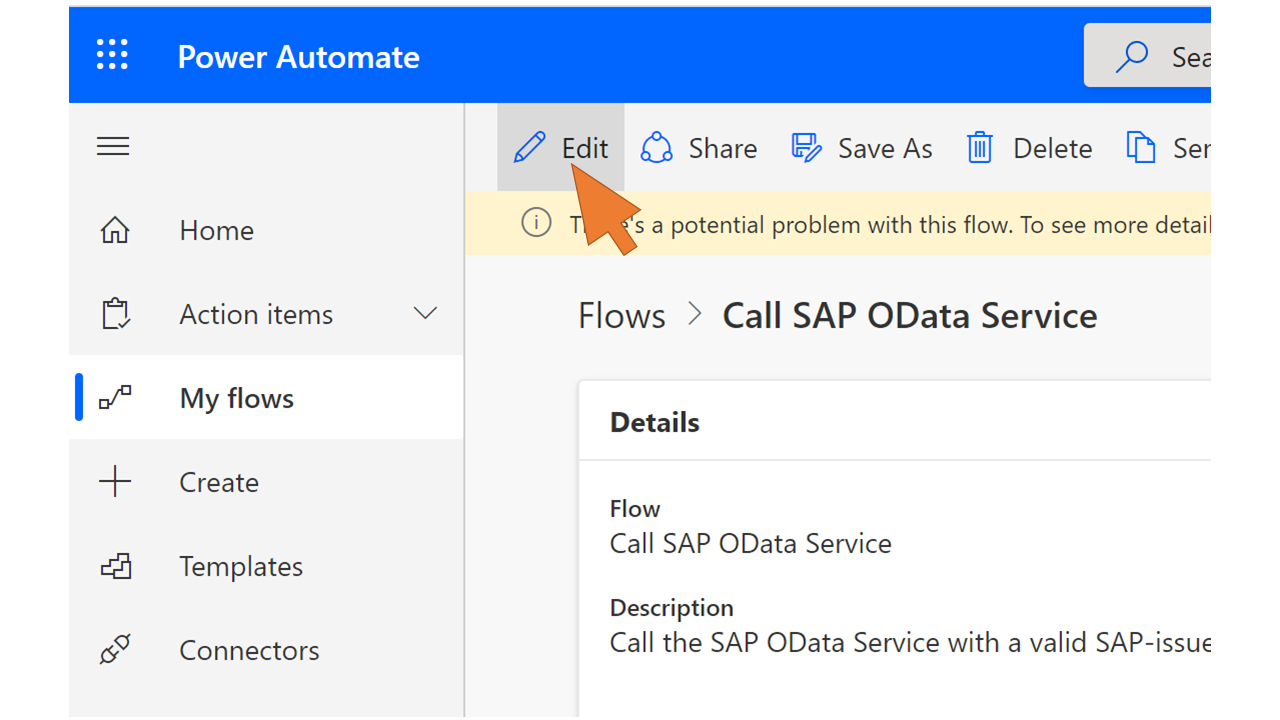 |
| 84 | Select the second step in the flow and click on the button + New connection reference to fix the current issue with the missing connection. |  |
| 85 | Enter the following connection settings:
Click Create. Note: If you don't see your OPDG instance listed in the Gateway drop-down box, check under Data -> Gateways the list of connected data gateways. You may have chosen a wrong region when installing the gateway if it is not listed. If your Power Platform environment's region is Europe, choose West Europe as the region for your OPDG. Also make sure that your OPDG instance is online and connected. |  |
| 86 | As you can see from the configuration of the step, the request is sent with an Authorization header containing the SAP access token passed as an input value to the flow. It also uses the product id passed as the second input value in the query string. Finally, the environment variable SAPODataServicePath is used to set the path for the request to the OData service. Click Save. |  |
| 87 | Click on the Back button. |  |
| 88 | Click Turn on to activate the flow. |  |
| 89 | Go back to the previous browser tab of the Power Apps portal and click on Done. |  |
| 90 | Select the Exchange Token flow from the solution's component list. Power Automate opens in a new browser tab. |  |
| 91 | Click Edit. |  |
| 92 | Select the 4th step in the flow and click the link invalid connection. |  |
| 93 | Enter the following connection settings:
Click Create. |  |
| 94 | Click Save. |  |
| 95 | Click Back. |  |
| 96 | Click Turn on. |  |
| 97 | Go back to the previous browser tab of the Power Apps portal and click on Done. Select the Product Search Bot from the solution's component list. |  |
| 98 | A new browser tab opens the bot in Power Virtual Agents. Select Manage -> Channels from the left-hand navigation. Click on the tile for Microsoft Teams. | 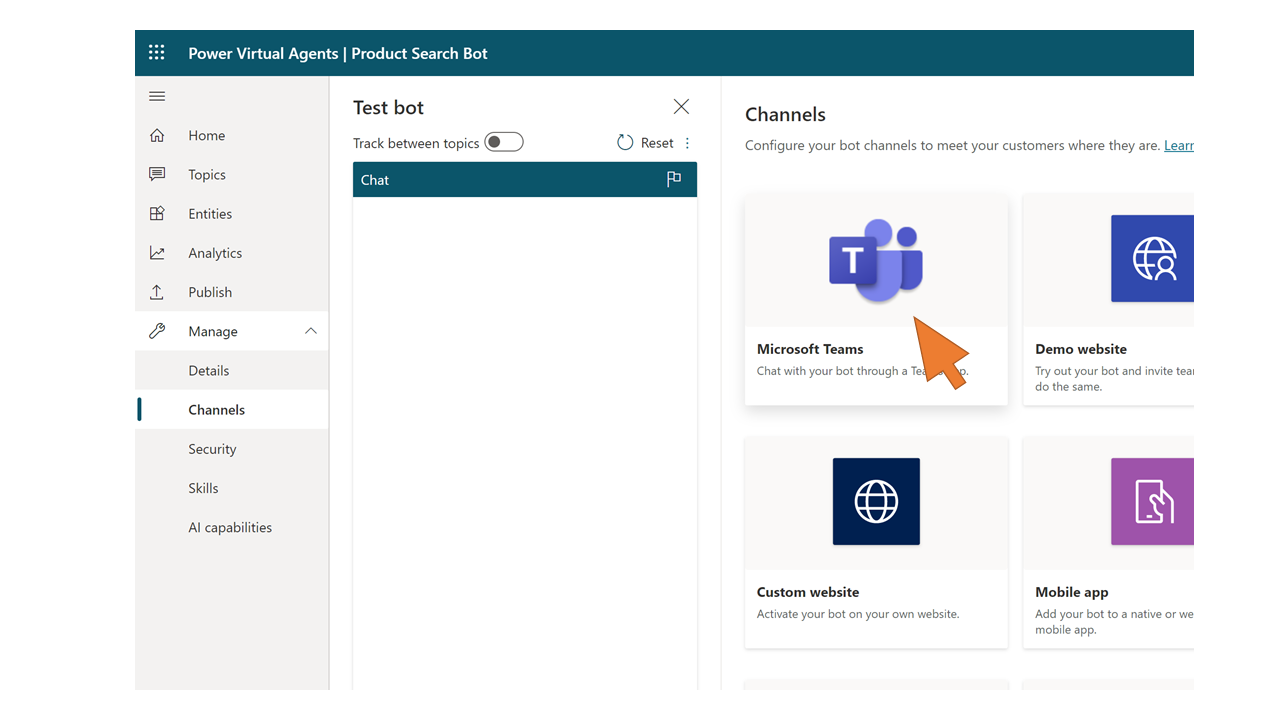 |
| 99 | To enable the Teams channel for the PVA bot, click on Turn on Teams. |  |
| 100 | Click on Submit for admin approval. |  |
| 101 | Scroll down and click on Copy to copy the App ID for the PVA bot used by Teams for SSO. |  |
| 102 | Go back to the Azure Portal and select Expose an API from the menu. Click on Set to define the Application ID URI. |  |
| 103 | Set the Application ID URI according to this pattern: api://botid-<app-id> Replace app-id with the value in the clipboard from step 101. Click Save. |  |
| 104 | Click + Add a scope. |  |
| 105 | Choose a name of the new scope (e.g. “Product.Read”), select Admin and users for consent, and enter the required display name and consent description. Click Add scope. | 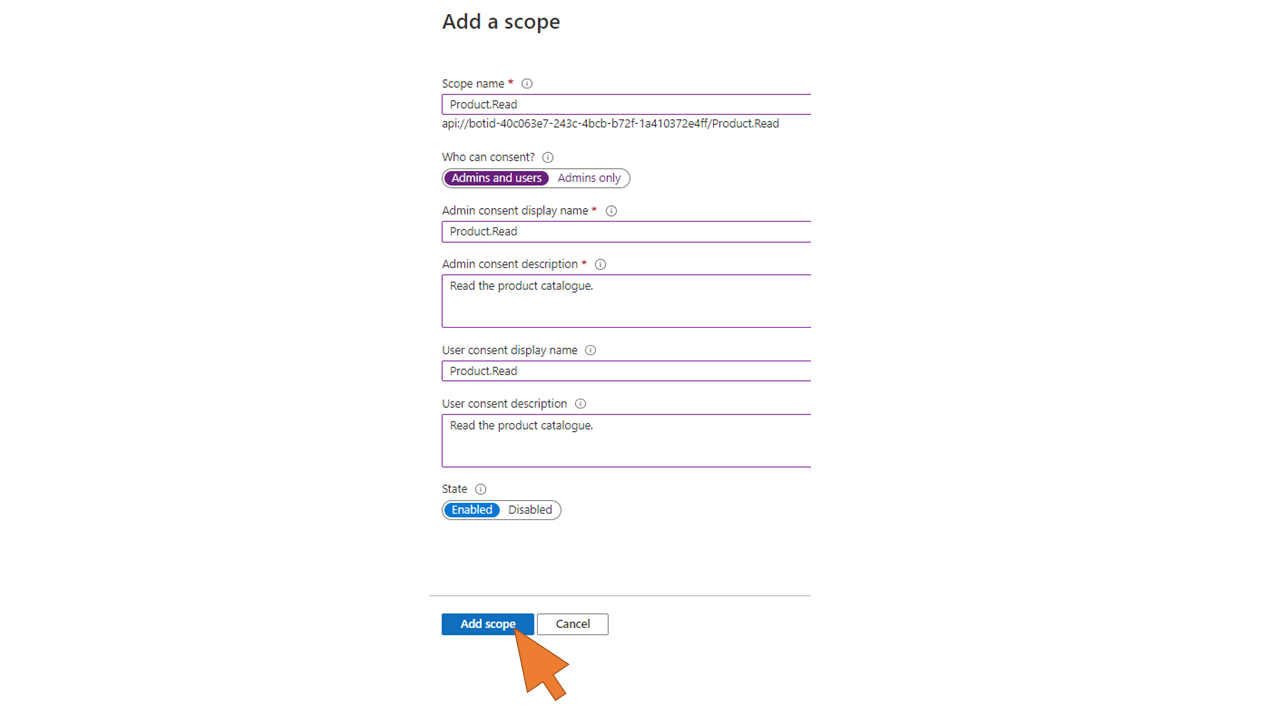 |
| 106 | Click + Add a client application |  |
| 107 | Add the client id 1fec8e78-bce4-4aaf-ab1b-5451cc387264 to the list. This is the id of the Teams mobile/desktop application. By adding it here you will avoid that users in Teams are asked to give their consent when using the PVA Product Search Bot. Click Add application. Repeat this step and add the client id 5e3ce6c0-2b1f-4285-8d4b-75ee78787346 for the Teams web application. | 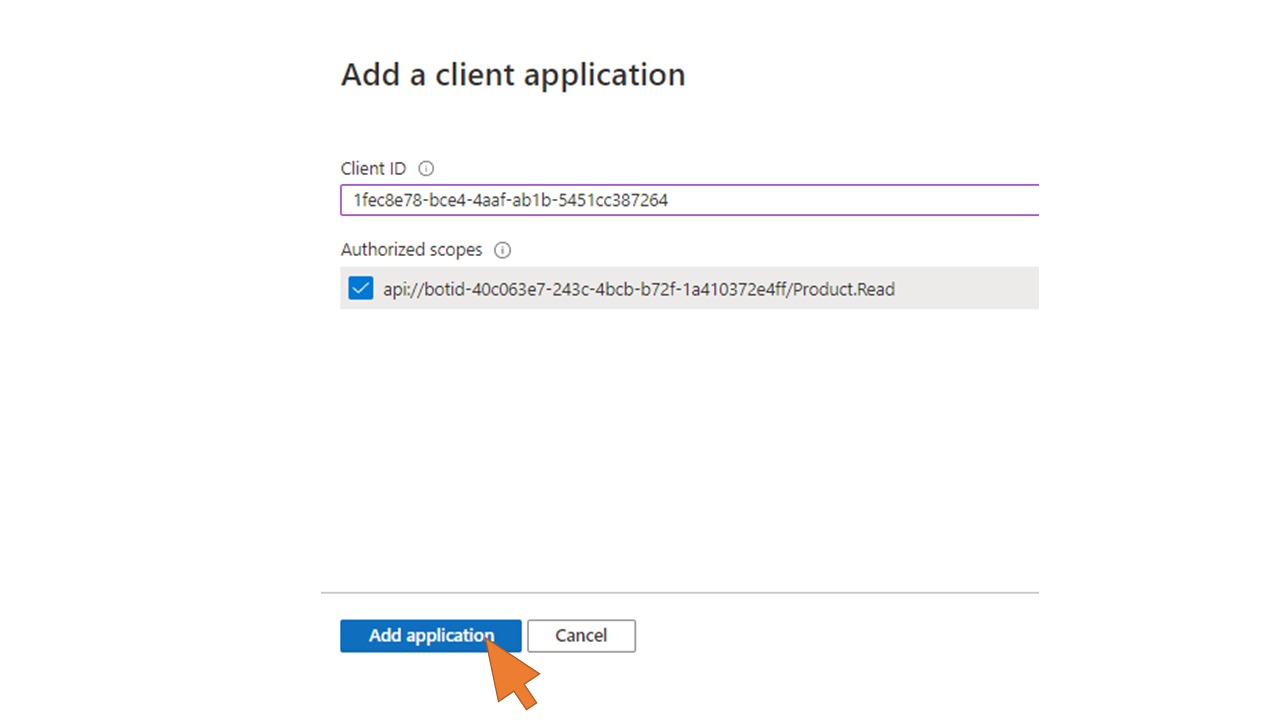 |
| 108 | Go back to the Power Virtual Agents browser tab and click Close. Select Manage -> Security from the menu. Click on the Authentication tile. |  |
| 109 | Enter the following authentication settings for the bot:
Click Save. | 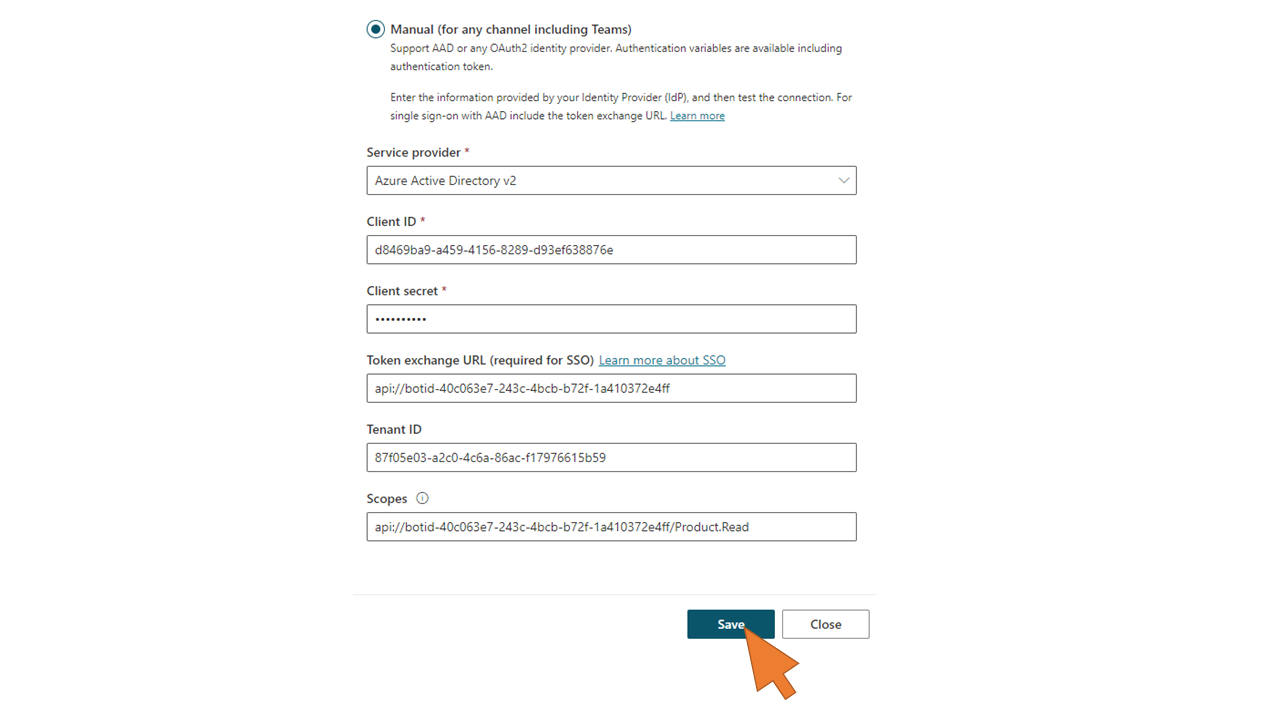 |
| 110 | Confirm with Save. | 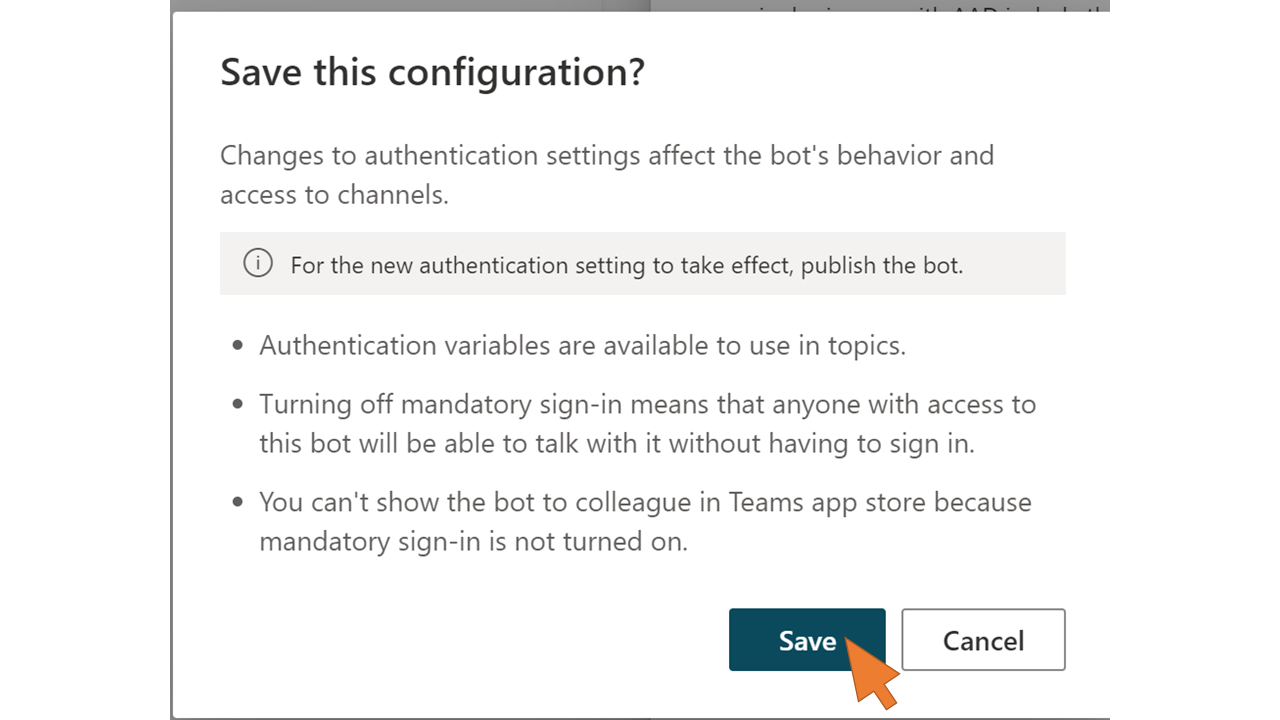 |
| 111 | Wait for the notification that the authentication settings are saved. Click on the link Go to publishing. |  |
| 112 | Click Publish. |  |
| 113 | Confirm with Publish. | 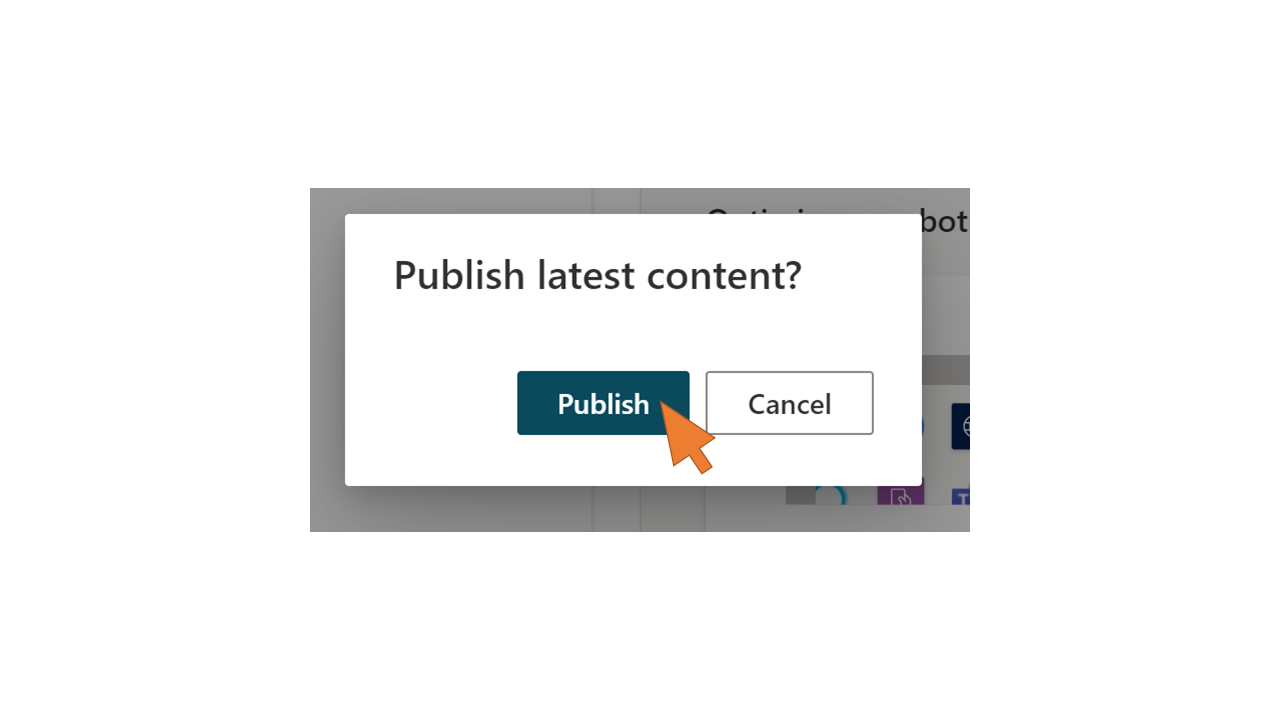 |
You've now successfully deployed and configured the solution containing the PVA chatbot and PA flows. Let's test it in Microsoft Teams.
Test the PVA chatbot in Microsoft Teams
| Step | Description | Screenshot |
| 114 | Go to Manage -> Channels.Click on the tile for Microsoft Teams. | |
| 115 | Click Open bot |  |
| 116 | You are asked to sign-in to Teams. Note: Login with a user from your Azure AD tenant who has an email address matching a user in your SAP system with the same email address. |  |
| 117 | Click Add. |  |
| 118 | Enter a trigger phrase from your bot's topic, e.g. "Purchase a new notebook" |  |
| 119 | You get single signed-on to the bot, and your bot's OAuth access token is displayed. Enter a product id search term, e.g. "HT". The bot will search for products in the backend according to the currently logged-on user's authorizations for product categories, e.g. Notebooks. In the search results, only Notebooks matching the entered product id are displayed. Note: You can copy the Base64-encoded token and decode its content with https://aka.ms/jwt. | 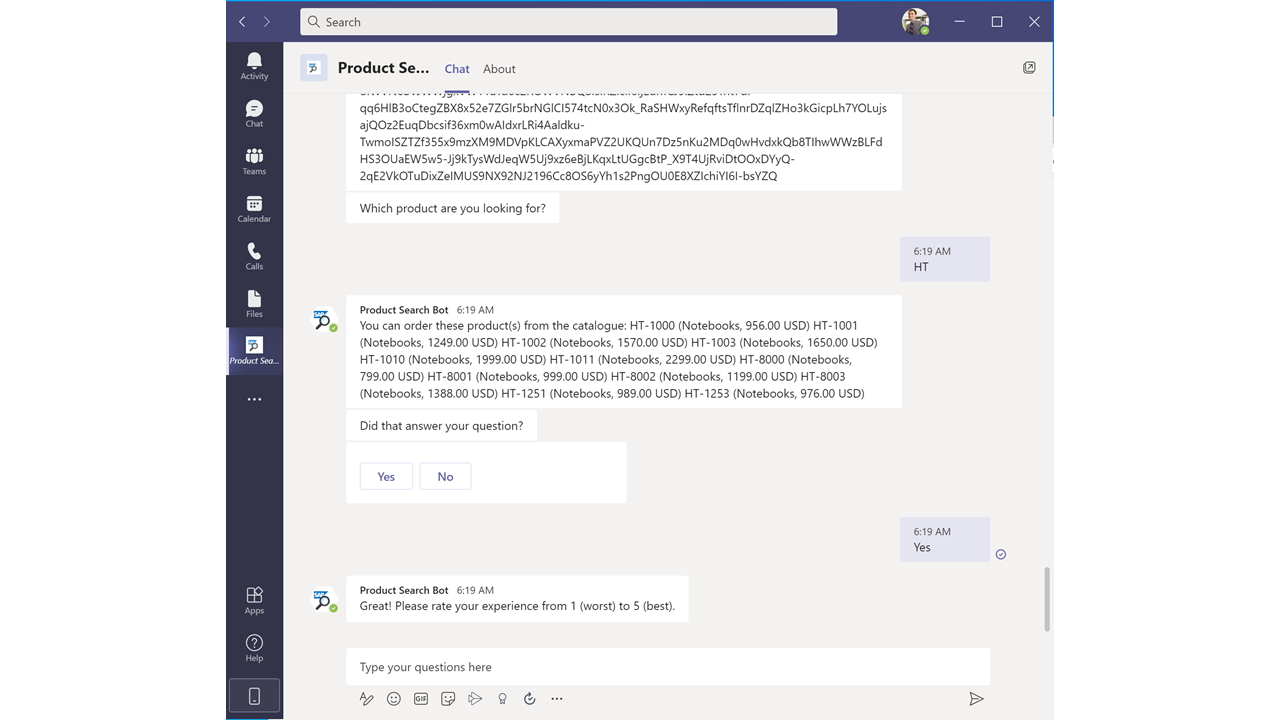 |
| 120 | You can change the user's authorizations in the backend by changing the corresponding authorization object. Go to transaction PFCG in SAP GUI and change the authorization field PDCATEGORY from Notebooks to Headsets. Save the changes and re-generate the profile (see step 61) |  |
| 121 | Start a new search in the bot. Again, enter the search term "HT" when asked by the bot for the product id. | 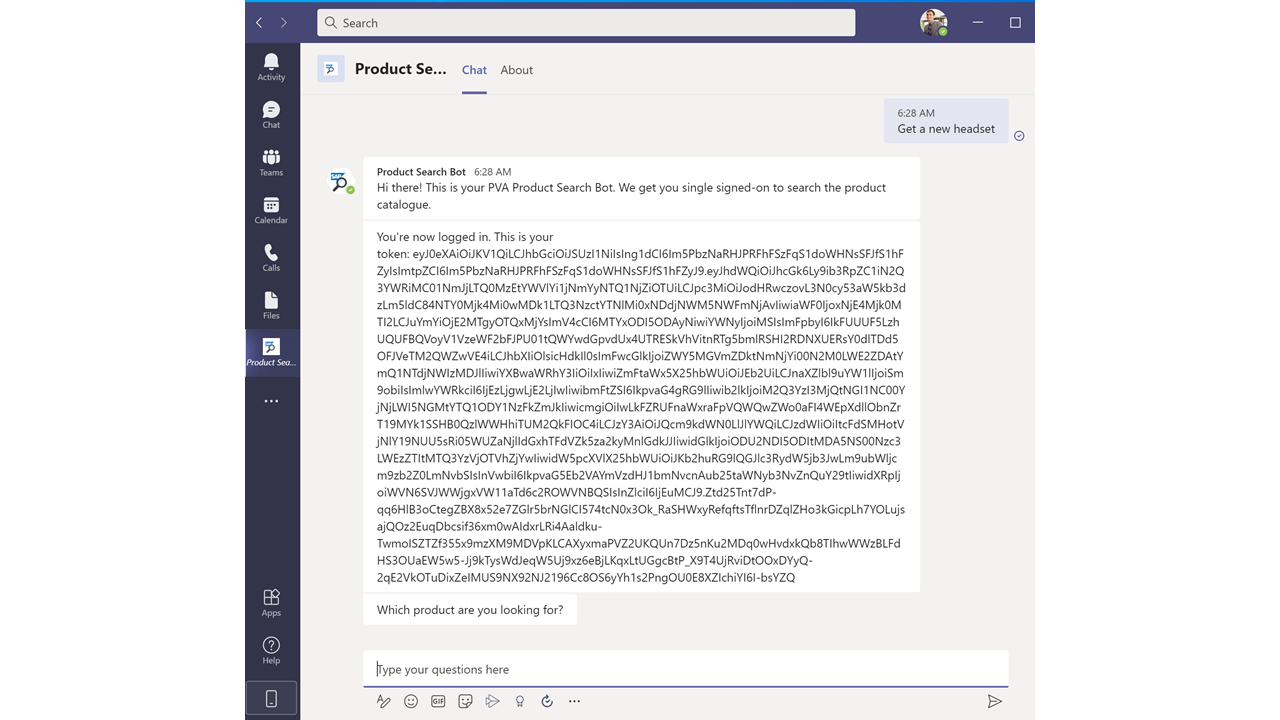 |
| 122 | This time, the search results only inlcude headsets with the matching product name. |  |
Again, I hope you enjoyed extending the integration scenario for principal propagation with Microsoft Power Platform and the on-premises data gateway.
5 Comments
You must be a registered user to add a comment. If you've already registered, sign in. Otherwise, register and sign in.
Labels in this area
-
"automatische backups"
1 -
"regelmäßige sicherung"
1 -
"TypeScript" "Development" "FeedBack"
1 -
505 Technology Updates 53
1 -
ABAP
14 -
ABAP API
1 -
ABAP CDS Views
2 -
ABAP CDS Views - BW Extraction
1 -
ABAP CDS Views - CDC (Change Data Capture)
1 -
ABAP class
2 -
ABAP Cloud
3 -
ABAP Development
5 -
ABAP in Eclipse
1 -
ABAP Platform Trial
1 -
ABAP Programming
2 -
abap technical
1 -
abapGit
1 -
absl
2 -
access data from SAP Datasphere directly from Snowflake
1 -
Access data from SAP datasphere to Qliksense
1 -
Accrual
1 -
action
1 -
adapter modules
1 -
Addon
1 -
Adobe Document Services
1 -
ADS
1 -
ADS Config
1 -
ADS with ABAP
1 -
ADS with Java
1 -
ADT
2 -
Advance Shipping and Receiving
1 -
Advanced Event Mesh
3 -
AEM
1 -
AI
7 -
AI Launchpad
1 -
AI Projects
1 -
AIML
9 -
Alert in Sap analytical cloud
1 -
Amazon S3
1 -
Analytical Dataset
1 -
Analytical Model
1 -
Analytics
1 -
Analyze Workload Data
1 -
annotations
1 -
API
1 -
API and Integration
3 -
API Call
2 -
API security
1 -
Application Architecture
1 -
Application Development
5 -
Application Development for SAP HANA Cloud
3 -
Applications and Business Processes (AP)
1 -
Artificial Intelligence
1 -
Artificial Intelligence (AI)
5 -
Artificial Intelligence (AI) 1 Business Trends 363 Business Trends 8 Digital Transformation with Cloud ERP (DT) 1 Event Information 462 Event Information 15 Expert Insights 114 Expert Insights 76 Life at SAP 418 Life at SAP 1 Product Updates 4
1 -
Artificial Intelligence (AI) blockchain Data & Analytics
1 -
Artificial Intelligence (AI) blockchain Data & Analytics Intelligent Enterprise
1 -
Artificial Intelligence (AI) blockchain Data & Analytics Intelligent Enterprise Oil Gas IoT Exploration Production
1 -
Artificial Intelligence (AI) blockchain Data & Analytics Intelligent Enterprise sustainability responsibility esg social compliance cybersecurity risk
1 -
ASE
1 -
ASR
2 -
ASUG
1 -
Attachments
1 -
Authorisations
1 -
Automating Processes
1 -
Automation
2 -
aws
2 -
Azure
1 -
Azure AI Studio
1 -
Azure API Center
1 -
Azure API Management
1 -
B2B Integration
1 -
Backorder Processing
1 -
Backup
1 -
Backup and Recovery
1 -
Backup schedule
1 -
BADI_MATERIAL_CHECK error message
1 -
Bank
1 -
BAS
1 -
basis
2 -
Basis Monitoring & Tcodes with Key notes
2 -
Batch Management
1 -
BDC
1 -
Best Practice
1 -
bitcoin
1 -
Blockchain
3 -
bodl
1 -
BOP in aATP
1 -
BOP Segments
1 -
BOP Strategies
1 -
BOP Variant
1 -
BPC
1 -
BPC LIVE
1 -
BTP
13 -
BTP Destination
2 -
Business AI
1 -
Business and IT Integration
1 -
Business application stu
1 -
Business Application Studio
1 -
Business Architecture
1 -
Business Communication Services
1 -
Business Continuity
1 -
Business Data Fabric
3 -
Business Fabric
1 -
Business Partner
12 -
Business Partner Master Data
10 -
Business Technology Platform
2 -
Business Trends
4 -
BW4HANA
1 -
CA
1 -
calculation view
1 -
CAP
4 -
Capgemini
1 -
CAPM
1 -
Catalyst for Efficiency: Revolutionizing SAP Integration Suite with Artificial Intelligence (AI) and
1 -
CCMS
2 -
CDQ
12 -
CDS
2 -
Cental Finance
1 -
Certificates
1 -
CFL
1 -
Change Management
1 -
chatbot
1 -
chatgpt
3 -
CL_SALV_TABLE
2 -
Class Runner
1 -
Classrunner
1 -
Cloud ALM Monitoring
1 -
Cloud ALM Operations
1 -
cloud connector
1 -
Cloud Extensibility
1 -
Cloud Foundry
4 -
Cloud Integration
6 -
Cloud Platform Integration
2 -
cloudalm
1 -
communication
1 -
Compensation Information Management
1 -
Compensation Management
1 -
Compliance
1 -
Compound Employee API
1 -
Configuration
1 -
Connectors
1 -
Consolidation Extension for SAP Analytics Cloud
2 -
Control Indicators.
1 -
Controller-Service-Repository pattern
1 -
Conversion
1 -
Cosine similarity
1 -
cryptocurrency
1 -
CSI
1 -
ctms
1 -
Custom chatbot
3 -
Custom Destination Service
1 -
custom fields
1 -
Customer Experience
1 -
Customer Journey
1 -
Customizing
1 -
cyber security
3 -
cybersecurity
1 -
Data
1 -
Data & Analytics
1 -
Data Aging
1 -
Data Analytics
2 -
Data and Analytics (DA)
1 -
Data Archiving
1 -
Data Back-up
1 -
Data Flow
1 -
Data Governance
5 -
Data Integration
2 -
Data Quality
12 -
Data Quality Management
12 -
Data Synchronization
1 -
data transfer
1 -
Data Unleashed
1 -
Data Value
8 -
database tables
1 -
Datasphere
3 -
datenbanksicherung
1 -
dba cockpit
1 -
dbacockpit
1 -
Debugging
2 -
Defender
1 -
Delimiting Pay Components
1 -
Delta Integrations
1 -
Destination
3 -
Destination Service
1 -
Developer extensibility
1 -
Developing with SAP Integration Suite
1 -
Devops
1 -
digital transformation
1 -
Documentation
1 -
Dot Product
1 -
DQM
1 -
dump database
1 -
dump transaction
1 -
e-Invoice
1 -
E4H Conversion
1 -
Eclipse ADT ABAP Development Tools
2 -
edoc
1 -
edocument
1 -
ELA
1 -
Embedded Consolidation
1 -
Embedding
1 -
Embeddings
1 -
Employee Central
1 -
Employee Central Payroll
1 -
Employee Central Time Off
1 -
Employee Information
1 -
Employee Rehires
1 -
Enable Now
1 -
Enable now manager
1 -
endpoint
1 -
Enhancement Request
1 -
Enterprise Architecture
1 -
ESLint
1 -
ETL Business Analytics with SAP Signavio
1 -
Euclidean distance
1 -
Event Dates
1 -
Event Driven Architecture
1 -
Event Mesh
2 -
Event Reason
1 -
EventBasedIntegration
1 -
EWM
1 -
EWM Outbound configuration
1 -
EWM-TM-Integration
1 -
Existing Event Changes
1 -
Expand
1 -
Expert
2 -
Expert Insights
2 -
Exploits
1 -
Fiori
14 -
Fiori Elements
2 -
Fiori SAPUI5
12 -
first-guidance
1 -
Flask
1 -
FTC
1 -
Full Stack
8 -
Funds Management
1 -
gCTS
1 -
General
1 -
Generative AI
1 -
Getting Started
1 -
GitHub
9 -
Grants Management
1 -
groovy
1 -
GTP
1 -
HANA
6 -
HANA Cloud
2 -
Hana Cloud Database Integration
2 -
HANA DB
2 -
HANA XS Advanced
1 -
Historical Events
1 -
home labs
1 -
HowTo
1 -
HR Data Management
1 -
html5
8 -
HTML5 Application
1 -
Identity cards validation
1 -
idm
1 -
Implementation
1 -
input parameter
1 -
instant payments
1 -
Integration
3 -
Integration Advisor
1 -
Integration Architecture
1 -
Integration Center
1 -
Integration Suite
1 -
intelligent enterprise
1 -
iot
1 -
Java
1 -
job
1 -
Job Information Changes
1 -
Job-Related Events
1 -
Job_Event_Information
1 -
joule
4 -
Journal Entries
1 -
Just Ask
1 -
Kerberos for ABAP
8 -
Kerberos for JAVA
8 -
KNN
1 -
Launch Wizard
1 -
Learning Content
2 -
Life at SAP
5 -
lightning
1 -
Linear Regression SAP HANA Cloud
1 -
Loading Indicator
1 -
local tax regulations
1 -
LP
1 -
Machine Learning
2 -
Marketing
1 -
Master Data
3 -
Master Data Management
14 -
Maxdb
2 -
MDG
1 -
MDGM
1 -
MDM
1 -
Message box.
1 -
Messages on RF Device
1 -
Microservices Architecture
1 -
Microsoft Universal Print
1 -
Middleware Solutions
1 -
Migration
5 -
ML Model Development
1 -
Modeling in SAP HANA Cloud
8 -
Monitoring
3 -
MTA
1 -
Multi-Record Scenarios
1 -
Multiple Event Triggers
1 -
Myself Transformation
1 -
Neo
1 -
New Event Creation
1 -
New Feature
1 -
Newcomer
1 -
NodeJS
3 -
ODATA
2 -
OData APIs
1 -
odatav2
1 -
ODATAV4
1 -
ODBC
1 -
ODBC Connection
1 -
Onpremise
1 -
open source
2 -
OpenAI API
1 -
Oracle
1 -
PaPM
1 -
PaPM Dynamic Data Copy through Writer function
1 -
PaPM Remote Call
1 -
PAS-C01
1 -
Pay Component Management
1 -
PGP
1 -
Pickle
1 -
PLANNING ARCHITECTURE
1 -
Popup in Sap analytical cloud
1 -
PostgrSQL
1 -
POSTMAN
1 -
Prettier
1 -
Process Automation
2 -
Product Updates
5 -
PSM
1 -
Public Cloud
1 -
Python
4 -
python library - Document information extraction service
1 -
Qlik
1 -
Qualtrics
1 -
RAP
3 -
RAP BO
2 -
Record Deletion
1 -
Recovery
1 -
recurring payments
1 -
redeply
1 -
Release
1 -
Remote Consumption Model
1 -
Replication Flows
1 -
research
1 -
Resilience
1 -
REST
1 -
REST API
1 -
Retagging Required
1 -
Risk
1 -
Rolling Kernel Switch
1 -
route
1 -
rules
1 -
S4 HANA
1 -
S4 HANA Cloud
1 -
S4 HANA On-Premise
1 -
S4HANA
3 -
S4HANA_OP_2023
2 -
SAC
10 -
SAC PLANNING
9 -
SAP
4 -
SAP ABAP
1 -
SAP Advanced Event Mesh
1 -
SAP AI Core
8 -
SAP AI Launchpad
8 -
SAP Analytic Cloud Compass
1 -
Sap Analytical Cloud
1 -
SAP Analytics Cloud
4 -
SAP Analytics Cloud for Consolidation
3 -
SAP Analytics Cloud Story
1 -
SAP analytics clouds
1 -
SAP API Management
1 -
SAP BAS
1 -
SAP Basis
6 -
SAP BODS
1 -
SAP BODS certification.
1 -
SAP BTP
21 -
SAP BTP Build Work Zone
2 -
SAP BTP Cloud Foundry
6 -
SAP BTP Costing
1 -
SAP BTP CTMS
1 -
SAP BTP Innovation
1 -
SAP BTP Migration Tool
1 -
SAP BTP SDK IOS
1 -
SAP BTPEA
1 -
SAP Build
11 -
SAP Build App
1 -
SAP Build apps
1 -
SAP Build CodeJam
1 -
SAP Build Process Automation
3 -
SAP Build work zone
10 -
SAP Business Objects Platform
1 -
SAP Business Technology
2 -
SAP Business Technology Platform (XP)
1 -
sap bw
1 -
SAP CAP
2 -
SAP CDC
1 -
SAP CDP
1 -
SAP CDS VIEW
1 -
SAP Certification
1 -
SAP Cloud ALM
4 -
SAP Cloud Application Programming Model
1 -
SAP Cloud Integration for Data Services
1 -
SAP cloud platform
8 -
SAP Companion
1 -
SAP CPI
3 -
SAP CPI (Cloud Platform Integration)
2 -
SAP CPI Discover tab
1 -
sap credential store
1 -
SAP Customer Data Cloud
1 -
SAP Customer Data Platform
1 -
SAP Data Intelligence
1 -
SAP Data Migration in Retail Industry
1 -
SAP Data Services
1 -
SAP DATABASE
1 -
SAP Dataspher to Non SAP BI tools
1 -
SAP Datasphere
9 -
SAP DRC
1 -
SAP EWM
1 -
SAP Fiori
3 -
SAP Fiori App Embedding
1 -
Sap Fiori Extension Project Using BAS
1 -
SAP GRC
1 -
SAP HANA
1 -
SAP HCM (Human Capital Management)
1 -
SAP HR Solutions
1 -
SAP IDM
1 -
SAP Integration Suite
9 -
SAP Integrations
4 -
SAP iRPA
2 -
SAP LAGGING AND SLOW
1 -
SAP Learning Class
1 -
SAP Learning Hub
1 -
SAP Master Data
1 -
SAP Odata
2 -
SAP on Azure
2 -
SAP PartnerEdge
1 -
sap partners
1 -
SAP Password Reset
1 -
SAP PO Migration
1 -
SAP Prepackaged Content
1 -
SAP Process Automation
2 -
SAP Process Integration
2 -
SAP Process Orchestration
1 -
SAP S4HANA
2 -
SAP S4HANA Cloud
1 -
SAP S4HANA Cloud for Finance
1 -
SAP S4HANA Cloud private edition
1 -
SAP Sandbox
1 -
SAP STMS
1 -
SAP successfactors
3 -
SAP SuccessFactors HXM Core
1 -
SAP Time
1 -
SAP TM
2 -
SAP Trading Partner Management
1 -
SAP UI5
1 -
SAP Upgrade
1 -
SAP Utilities
1 -
SAP-GUI
8 -
SAP_COM_0276
1 -
SAPBTP
1 -
SAPCPI
1 -
SAPEWM
1 -
sapfirstguidance
1 -
SAPHANAService
1 -
SAPIQ
1 -
sapmentors
1 -
saponaws
2 -
SAPS4HANA
1 -
SAPUI5
5 -
schedule
1 -
Script Operator
1 -
Secure Login Client Setup
8 -
security
9 -
Selenium Testing
1 -
Self Transformation
1 -
Self-Transformation
1 -
SEN
1 -
SEN Manager
1 -
service
1 -
SET_CELL_TYPE
1 -
SET_CELL_TYPE_COLUMN
1 -
SFTP scenario
2 -
Simplex
1 -
Single Sign On
8 -
Singlesource
1 -
SKLearn
1 -
Slow loading
1 -
soap
1 -
Software Development
1 -
SOLMAN
1 -
solman 7.2
2 -
Solution Manager
3 -
sp_dumpdb
1 -
sp_dumptrans
1 -
SQL
1 -
sql script
1 -
SSL
8 -
SSO
8 -
Substring function
1 -
SuccessFactors
1 -
SuccessFactors Platform
1 -
SuccessFactors Time Tracking
1 -
Sybase
1 -
system copy method
1 -
System owner
1 -
Table splitting
1 -
Tax Integration
1 -
Technical article
1 -
Technical articles
1 -
Technology Updates
15 -
Technology Updates
1 -
Technology_Updates
1 -
terraform
1 -
Threats
2 -
Time Collectors
1 -
Time Off
2 -
Time Sheet
1 -
Time Sheet SAP SuccessFactors Time Tracking
1 -
Tips and tricks
2 -
toggle button
1 -
Tools
1 -
Trainings & Certifications
1 -
Transformation Flow
1 -
Transport in SAP BODS
1 -
Transport Management
1 -
TypeScript
3 -
ui designer
1 -
unbind
1 -
Unified Customer Profile
1 -
UPB
1 -
Use of Parameters for Data Copy in PaPM
1 -
User Unlock
1 -
VA02
1 -
Validations
1 -
Vector Database
2 -
Vector Engine
1 -
Visual Studio Code
1 -
VSCode
2 -
VSCode extenions
1 -
Vulnerabilities
1 -
Web SDK
1 -
work zone
1 -
workload
1 -
xsa
1 -
XSA Refresh
1
- « Previous
- Next »
Related Content
- Principal Propagation Dest Connection to onpremise SAP system is not working from SAP CAP project in Technology Q&A
- Principal Propagation to OnPremise ERP in SC SDK Java: Failed to get on-premise proxy headers in Technology Q&A
- SAP Cloud Platform Portal Developer Challenge: VANTAiO Extranet Portal in Technology Blogs by Members
- How to propagate authentication from SuccessFactors to OnPremise Fiori with HCP and CloudConnector? in Technology Q&A
- Error 503 when Opening SAP Web IDE MultiCloud Edition in Technology Q&A
Top kudoed authors
| User | Count |
|---|---|
| 8 | |
| 5 | |
| 5 | |
| 4 | |
| 4 | |
| 4 | |
| 3 | |
| 3 | |
| 3 | |
| 2 |