
- SAP Community
- Products and Technology
- Technology
- Technology Blogs by Members
- Principal propagation in a multi-cloud solution be...
Technology Blogs by Members
Explore a vibrant mix of technical expertise, industry insights, and tech buzz in member blogs covering SAP products, technology, and events. Get in the mix!
Turn on suggestions
Auto-suggest helps you quickly narrow down your search results by suggesting possible matches as you type.
Showing results for
MartinRaepple
Active Participant
Options
- Subscribe to RSS Feed
- Mark as New
- Mark as Read
- Bookmark
- Subscribe
- Printer Friendly Page
- Report Inappropriate Content
11-02-2022
9:27 AM
Note: This blog post is the sixth part of a tutorial series. If you arrived here without reading the first part, please do so before you continue, and then come back here again. Part I explains the key concepts and technology standards for principal propagation in the context of calling a simple Web Service deployed on SAP Business Technology Platform (BTP) on behalf of the authenticated user from Azure Active Directory (AAD). Part II of this blog series extends the scenario by propagating the Azure-authenticated user via BTP and SAP Cloud Connector to an SAP Gateway system. Part III adds a business application to the scenario by implementing a chatbot in Microsoft Teams with the Microsoft Bot Framework V4 SDK, SAP BTP Integration Suite, and Core Data Services in the SAP Gateway system. A live demo of this scenario is available on episode #31 of the great SAP on Azure Video podcast series (starting at min 23:30) from hobruche , goran-condric, and roboban. Part IV uses a “low-code” approach for implementing the chatbot of part III with Microsoft Power Platform, demonstrated in episode #40 of the SAP on Azure Video Podcast series. Part V looks at different aspects for production readiness, such as API management, monitoring and alerting (live demo available on episode #83 in the SAP on Azure video podcast series). I do recommend looking at parts II to V as well to get an in-depth understanding of all bits and pieces, but they are not a prerequisite to implement the solution in this part of the blog series. Part VI (this blog post) starts looking at the reverse direction for propagating the authenticated user (aka "principal") from SAP to Azure. Don't miss SAP TechEd 2022 and check out session XP106 (Single Sign-On and Principal Propagation in Multi-Cloud Environments), where marko.sommer and I focus on this scenario and show a live demo. Finally, part VII looks at principal propagation from Microsoft Power Platform to SAP in the context of making Remote Function Calls (RFCs) and using Business Application Programming Interfaces (BAPIs) with the Kerberos protocol. See episode #142 of the SAP on Azure video podcast series for a live demo of this scenario. |
Microsoft Graph
In the previous parts of this blog series, data has always been retrieved from an SAP-provided service. Part I started the journey with a simple Web Service implemented as a Java servlet deployed on the SAP Business Technology Platform (BTP) Cloud Foundry (CF) environment. From part II onwards, the service is hosted on an SAP Gateway system. With this part, we are turning the data and token exchange flow for propagating the authenticated user (principal) into the opposite direction: The user logs on to a web application on BTP which accesses data on behalf of this user from Microsoft Cloud service resources.
With Microsoft Graph, applications can leverage the rich data set from Microsoft 365 services such as Outlook, OneDrive, Teams and others. Instead of interacting with these services through different Software Development Kits (SDKs), Application Programming Interfaces (APIs), security, messaging and data formats, Microsoft Graph offers a centralized, consistent, RESTful API to access this data. The Microsoft Graph service directs the calls to the right source to free the developer from understanding where exactly the data lives. Graph also aggregates calls for efficiency and performance, and allows the developer to easily traverse the graph of data. This way, it’s easy to build an application that – for example – based on a security alert traverses the graph to see which users might be affected, and for each user, which devices and documents might be affected – thus making it easy to connect data from across many services to enable faster response to threats and asset protection. The Operational Purchaser Chatbot for SAP S/4HANA is an example of an SAP business application using Graph to integrate with Microsoft's collaboration services. It provides a convenient way to initiate an ad-hoc collaboration via Microsoft Teams to reach out to a supplier via the contact data associated with them and create calendar events in Outlook.
This blog post looks at a similar scenario which reads the SAP-authenticated user's calendar events from Outlook. To do so, the web application running on BTP requires an OAuth access token formatted as a JSON Web Token (JWT) with the following content:
- The token must be issued by Azure AD for the signed-in user and contain information such as the user's unique identifier
- It must contain the permissions (aka scopes) that the application needs to access the data in Microsoft Graph on behalf of the user. Microsoft Graph supports two types: Delegated and application permissions. Delegated permissions require the user or an administrator consent to the permissions that the application requests to make Microsoft Graph calls on behalf of the signed-in user. Application permissions are used by application such as background services or daemons that run without a signed-in user context and use their own identity, also known as a service principal. For the scenario in this blog post, delegated permissions are required to retrieve the user's calendar events.
- Information for whom the access token is issued for, also referred as audience. In this scenario, the token's audience must be set to the URL that uniquely identifies the Graph service (application) in Azure AD. The Graph service checks that the
audienceelement's value in the token ishttps://graph.microsoft.com. Otherwise, the request will be rejected because the token is considered to be used for a different service.
Scenario overview
The starting point in this scenario is the user's access token issued by the SAP Cloud Identity tenant's authentication service (IAS), indicated as AT(IAS)APP in returned by step 2 in figure 1 below and following the notation <token type>(<issuer>)<audience>. The complete token exchange is orchestrated by the OAuth 2.0 and OpenID Connect (OIDC) authorization and authentication frameworks and their respective token types, which are access tokens (AT), refresh tokens (RT), and identity tokens (ID). Thus, AT(IAS)IAS is an access token, issued by the IAS tenant's OAuth 2.0 authorization server, with an audience set to the IAS tenant's client ID. All tokens except for refresh tokens are formatted as JWTs. Compared to the token exchange in the previous parts of this blog series (see part I, Interoperability and standards, for more details), SAML 2.0 - or more precisely the SAML assertion as an OAuth 2.0 authorization grant defined in section 2.1 of RFC 7522 - is no longer used in this scenario. Instead of transforming between different token formats (JWT to SAML and back to JWT), this scenario only uses JWTs for the token exchange. It is important to note that for this token exchange no direct trust relationship between the application on BTP and Azure AD is required. The application only has a trust relationship to the IAS tenant, and the IAS tenant maintains the trust relationship to the Azure AD tenant (and vice versa).
All authentication requests for the business application on BTP are forwarded by the IAS tenant to the Azure AD tenant which is configured as a corporate identity provider (IdP) in IAS. IAS acts as a proxy and delegates authentication to Azure AD in the role of the relying party to the corporate identity provider. The IAS tenant therefore requires an application registration in Azure AD. The same applies to the business application on BTP which is also registered as an application in Azure AD.

Figure 1: Authentication and token exchange flows
Let's have a closer look at the steps in figure 1:
- The user accesses the BTP business application's app router URL on BTP, which serves as a single point of entry for an application running in the CF environment. This Node.js based component serves static content, authenticates users as a service provider, rewrites URLs, and can proxy requests to other micro services (such as the Java-based Calendar Service in this demo business application) while forwarding the user infomation obtained from the identity provider. In this scenario, the app router delegates authentication to the IAS tenant using OIDC. It starts the authentication process by redirecting the user' browser to the IAS tenant's OAuth server authorization endpoint at https://<IAS tenant name>.accounts.ondemand.com/oauth2/authorize and sending an OAuth authorization request using the authorization code grant type with the request parameters defined in RFC 6749, section 4.1.1. Those include the application's endpoint (
redirect_uri) to where IAS will send the authorization code response to after completing step 4. It further contains the application's client ID generated from the application's binding to the BTP identity services. - Because the user is not yet authenticated at the IAS tenant, the user's browser is redirected to the IAS tenant's single sign-on (SSO) endpoint at https://<IAS tenant name>.accounts.ondemand.com/saml2/idp/sso.
- The business application is configured in IAS to pass all authentication requests to Azure AD as its corporate IdP. Therefore, IAS sends an OAuth authorization request to the Azure AD tenant's OAuth authorization endpoint at https://login.microsoftonline.com/<AAD Tenant ID>/oauth2/v2.0/authorize using the authorization code grant flow. This time, the
redirect_uriparameter instructs Azure AD to send the authorization code response back to IAS at https://<IAS tenant name>.accounts.ondemand.com/oauth2/callback. This callback URI must be configured in Azure AD for the IAS tenant's application registration. Otherwise, Azure AD will reject the authorization request. - The user gets prompted by Azure AD to enter the credentials. Upon successful authentication, Azure AD sends the authorization code to IAS by redirecting the user's web browser to the URI specified in the previous request (https://<IAS tenant name>.accounts.ondemand.com/oauth2/callback?code=...).
- IAS receives the authorization code and sends an access token request to Azure AD's token endpoint at https://login.microsoftonline.com/<AAD Tenant ID>/oauth2/v2.0/token according to RFC 6749 (section 4.1.3) by redeeming the code in the
codeparameter. Azure AD issues an access token and refresh token (RT(AAD)IAS which is cached for later use in step 😎 for the authenticated user with an audience set to the IAS tenant's OIDC name. Figure 2 shows an example for AT(AAD)IAS:
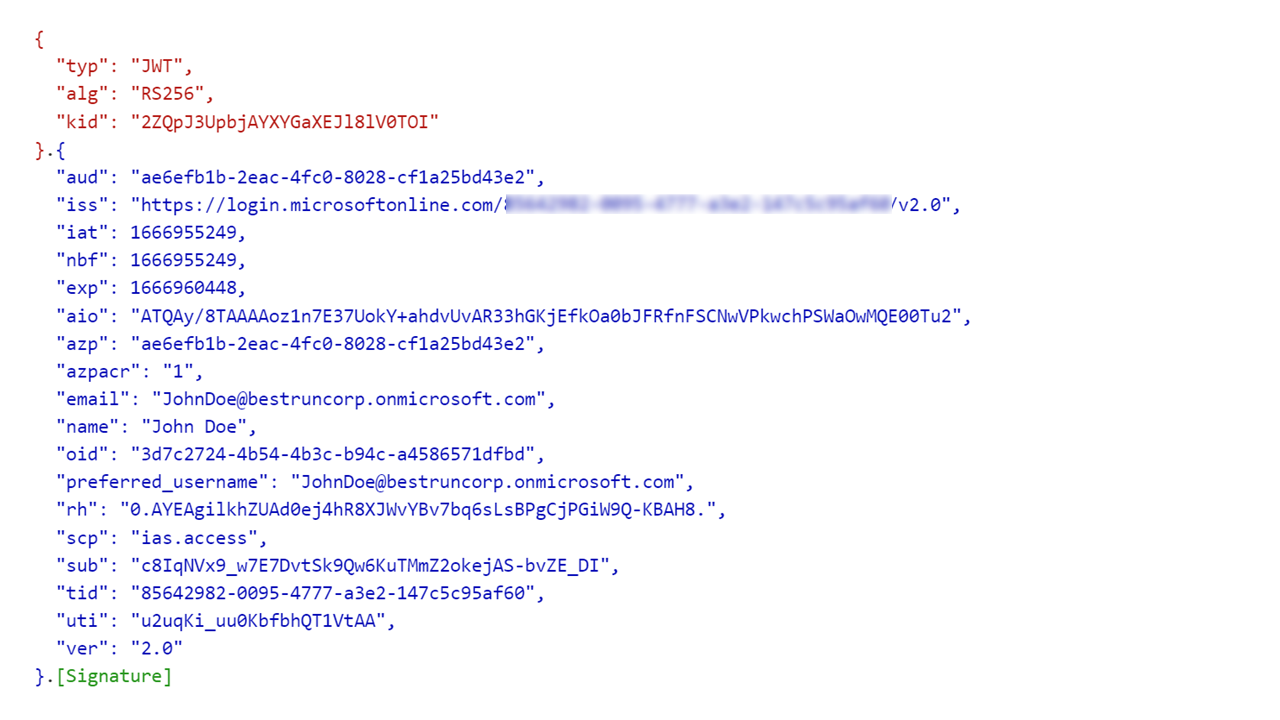
Figure 2: AT(AAD)IAS returned to IAS tenant in step 5
- iss(uer) matches the value of the issuer configured for the corporate IdP in IAS (https://login.microsoftonline.com/<AAD tenant ID>/v2.0)
- aud(ience) is the application (client ID) of the application registration for IAS in AAD
- sc(o)p(e) is the default custom scope configured for the IAS application registration in AAD which is also referred in the OIDC corporate IdP configuration in IAS
- sub(ject) is a pairwise unique identifier of the user in AAD in the context of the IAS application. It changes for each application in the AAD tenant.
- o(bject)id is the Azure AD tenant-wide unique identifier of the user. Other than the sub(ject) user identifier, the object id remains the same across all applications in the tenant. The user's object id is used when making queries to Microsoft online services, such as the Microsoft Graph, as done in step 10 in this scenario.
IAS also generates an access token AT(IAS)APP (see figure 3), identity token ID(IAS)APP, and refresh token RT(IAS)APP which are sent back to the application in the response from the previous request in step 4.
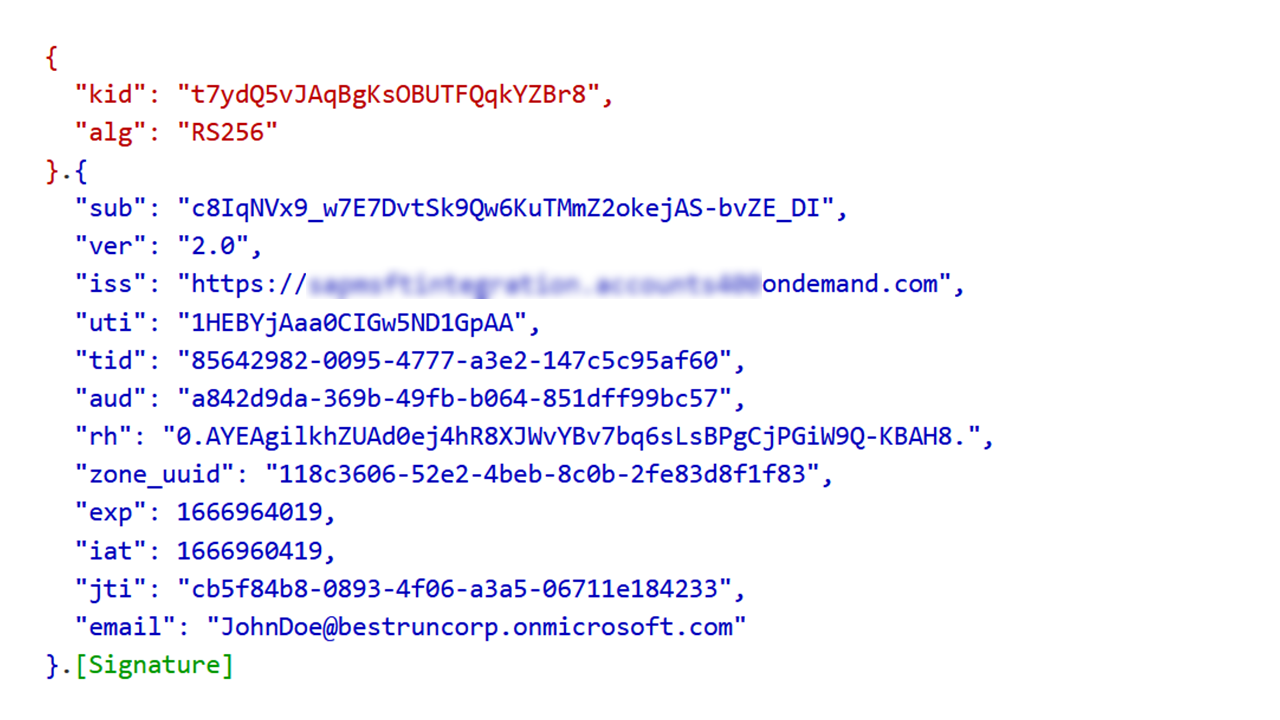
Figure 3: AT(IAS)APP returned to business application in the response of step 4
- iss(uer) is the OIDC name of the IAS tenant (https://<IAS tenant name>.accounts.ondemand.com)
- aud(ience) is the client ID of the BTP business application in the IAS tenant
- sub(ject) is taken from the original AT(AAD)IAS token and is the same pairwise unique identifier of the user in AAD in the context of the IAS application.
- The BTP business application requests a client assertion (see the OAuth Client Credentials info box below for more details) from the IAS tenant to use it in the subsequent requests for the token exchange via the IAS tenant's OIDC proxy. The client application sends a token request to the IAS tenant's token endpoint by passing the parameters
grant_typewith valueclient_credentialsandresourcewith valueurn:sap:identity:corporateidpas body parameters. The POST request is authenticated with the client ID and secret of the business application in IAS. The client assertion from IAS takes the form of a signed JWT as shown in figure 4 that proofs the application's identity to AAD when requesting tokens via the IAS corporate IdP OIDC proxy.

Figure 4: Client assertion AT(IAS)AAD
- iss(uer) is the OIDC name of the IAS tenant (https://<IAS tenant name>.accounts.ondemand.com)
- aud(ience) is the Azure AD tenant (https://login.microsoftonline.com/<AAD tenant ID>/v2.0)
- sub(ject) is the client ID of the business application in the IAS tenant.
To ensure that Azure AD accepts this assertion as a valid client credential, Azure AD must trust the IAS tenant as an external issuer (IdP) of the client assertion. This trust relationship is maintained as a federated identity credential (IASTenantFederation in figure 1) in the application registrations for the BTP business application and IAS tenant in Azure AD.
- The business application exchanges the IAS-issued ID token ID(IAS)APP into an Azure AD-issued access token AT(AAD)APP via the IAS tenant's OIDC proxy token exchange endpoint (https://<IAS tenant name>.accounts.ondemand.com/oauth2/exchange/corporateidp). The POST request uses the
assertionparameter to pass the base64-encoded IAS ID token of the user. - IAS token service sends a refresh token request using RT(AAD)IAS cached in step 5 to obtain a new access token AT(AAD)APP for the business application, shown in figure 5:
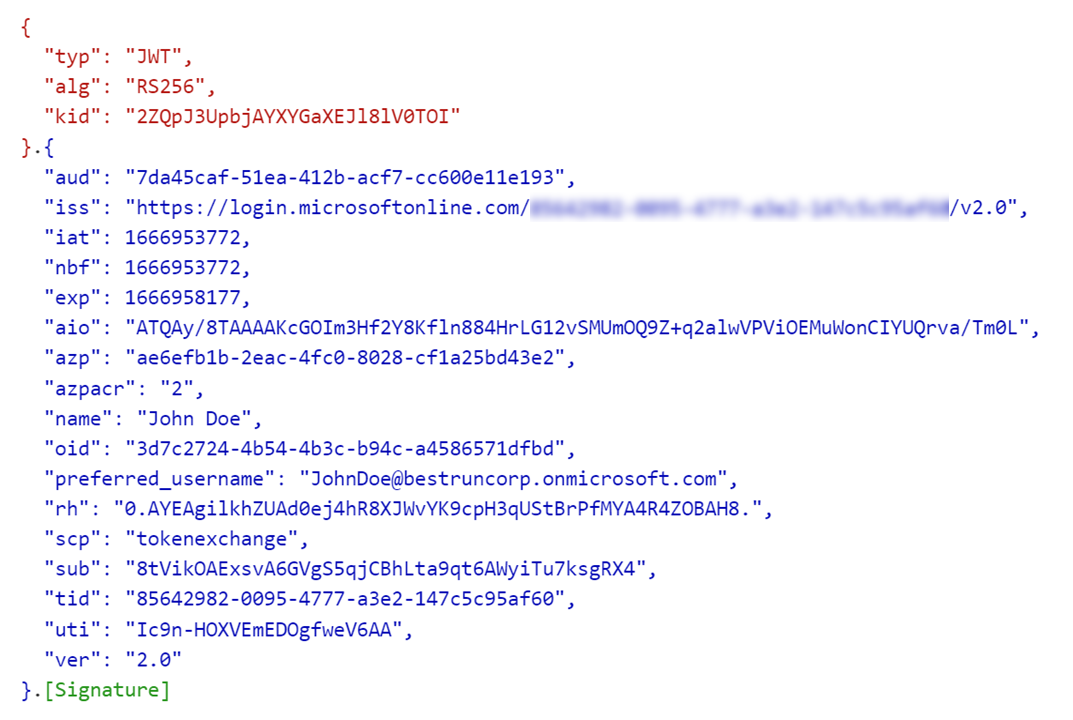
Figure 5: Business application access token AT(AAD)APP
- iss(uer) is the OIDC name of the Azure AD tenant (https://login.microsoftonline.com/<AAD tenant ID>/v2.0)
- aud(ience) is the client ID of the business application in the Azure AD
- sub(ject) is the pairwise unique identifier of the user in AAD in the context of the business application. It is different from the user's sub(ject) claim in figure 2 because it changes for each application in the AAD tenant.
- The business application uses the Azure AD On-behalf-Of (ObO) flow for requesting the access token AT(AAD)GRAPH required to call Microsoft Graph API on behalf of the logged-in user. This POST request to the Azure AD tenant's token endpoint uses the following body parameters:
assertion: The user's access token for the application obtained in the previous step (AT(AAD)APP)grant_type: urn:ietf:params:oauth:grant-type:jwt-bearerclient_assertion: Client assertion AT(IAS)AAD obtained in step 6 for authenticating the business application as an authorized client to Azure ADclient_assertion_type: urn:ietf:params:oauth:client-assertion-type:jwt-bearerrequested_token_use: on_behalf_ofscope: https://graph.microsoft.com/.default
The scope parameter instructs Azure AD to generate a new token suitable for calling the Graph API on behalf of the authenticated user as shown in figure 6:

Figure 6: Graph API access token AT(AAD)GRAPH
- iss(uer) is the Azure AD tenant (https://sts.windows.net/<AAD tenant ID>/). This value is different from previous Azure AD-issued tokens for the IAS tenant application (see figure 2) and BTP appplication (see figure 5). The Graph API is an Microsoft-owned application in Azure AD which has a different version ("1.0", see ver(sion) claim in figure 6) than the two customer-owned applications ("2.0"). More details on the two token formats in Azure AD and the differences between version 1 and 2 can be found here.
- aud(ience) is set to the Graph API's application ID URI in Azure AD (https://graph.microsoft.com)
- sub(ject) is the pairwise unique identifier of the user in AAD in the context of the Graph API (application). It is different from the user's sub(ject) claim in figures 2 and 5 because it changes for each application in the AAD tenant.
- sc(o)p(e) contains the delegated permission Calendars.Read to allow the business application making the Microsoft Graph call on behalf of the signed-in user and access her calendar events from Outlook.
- Finally, the business application calls the Microsoft Graph API at https://graph.microsoft.com/v1.0/me/calendar/events to read the signed-in user's calendar events. This HTTP GET request uses the authorization header to send the user's AT(AAD)GRAPH Graph API token according to RFC 6750. The response (see figure 7) contains the Open Data Protocol (OData)-compliant calendar events of the user:

Figure 7: OData response payload from Graph API
The response payload starts with the @odata.context element containing the Azure AD tenant-wide unique user's object ID (see oid claim in figures 2, 5 and 6) in the Graph API query URL. The value element holds an array of calendar events for this user.
| OAuth Client Credentials |
Using client ID and client secret is the most common method to authenticate a client application's token request to an OAuth authorization server. From a security and administration perspective, this type of client credentials has some drawbacks:
As an alternative to client secrets, RFC 7523, section 2.2, defines the use of JWTs (aka client assertion) as client credentials for client authentication. In short, the specification defines using a client_assertion parameter with any OAuth grant to authenticate the client, as long as the receiver trusts the issuer of the JWT. Thus, client assertions eliminate the risk of leaking secrets or having secrets expire. The client is in full control of the lifecycle of its credential which provides enough means to assert the client's identity to the authorization server. |
Preparation
Check out the code for the BTP application with
git clone https://github.com/raepple/azure-scp-principal-propagation.git

git checkout part6
If you haven't already done so from your setup in part I, make sure you have the following tools installed on your local development environment:
- Download and install the Cloud Foundry CLI
- Download and install the latest version of Maven
- Download and install a Java Development Kit (JDK) Version 8 or later
Furthermore, access to the following cloud services is required:
- A BTP enterprise account with Space Manager access. The BTP trial account used in part I of this blog series doesn't include the Identity service of SAP BTP which is required in this part to bind an instance to the business application.
- Administrator-level access to an Azure AD tenant to create and configure the application registrations. The Microsoft 365 E5 developer subscription that you may have created in part III of the blog series will work for this scenario.
- Administrator-level access to an SAP Cloud Identity service tenant
Register the applications in Azure AD
The token exchange and OIDC proxy setup between the business application on BTP, IAS, and the Azure AD tenant, requires a trust relationship which is established by registering two applications in the Azure AD tenant (see figure 1):
- "SAPIASTenant" represents the SAP Cloud Identity Service tenant
- "SAPBTPApplication" represents the business application deployed on SAP BTP
| Step | Description | Screenshot |
| 1 | Login to Azure Portal (e.g. with your Microsoft 365 E5 developer subscription’s admin account) and select Azure Active Directory from the portal menu. Select App registrations from the left-side menu. |  |
| 2 | Click + New registration |  |
| 3 | Enter "SAPIASTenant" for the Name of the new application registration. Select "Web" from the dropdown list in the Redirect URI section. Enter your IAS tenant's redirect URI in the Redirect URI section's text field: https://<IAS tenant name>.accounts.ondemand.com/oauth2/callback. Replace <IAS tenant name> with your tenant's name. Click Register. | 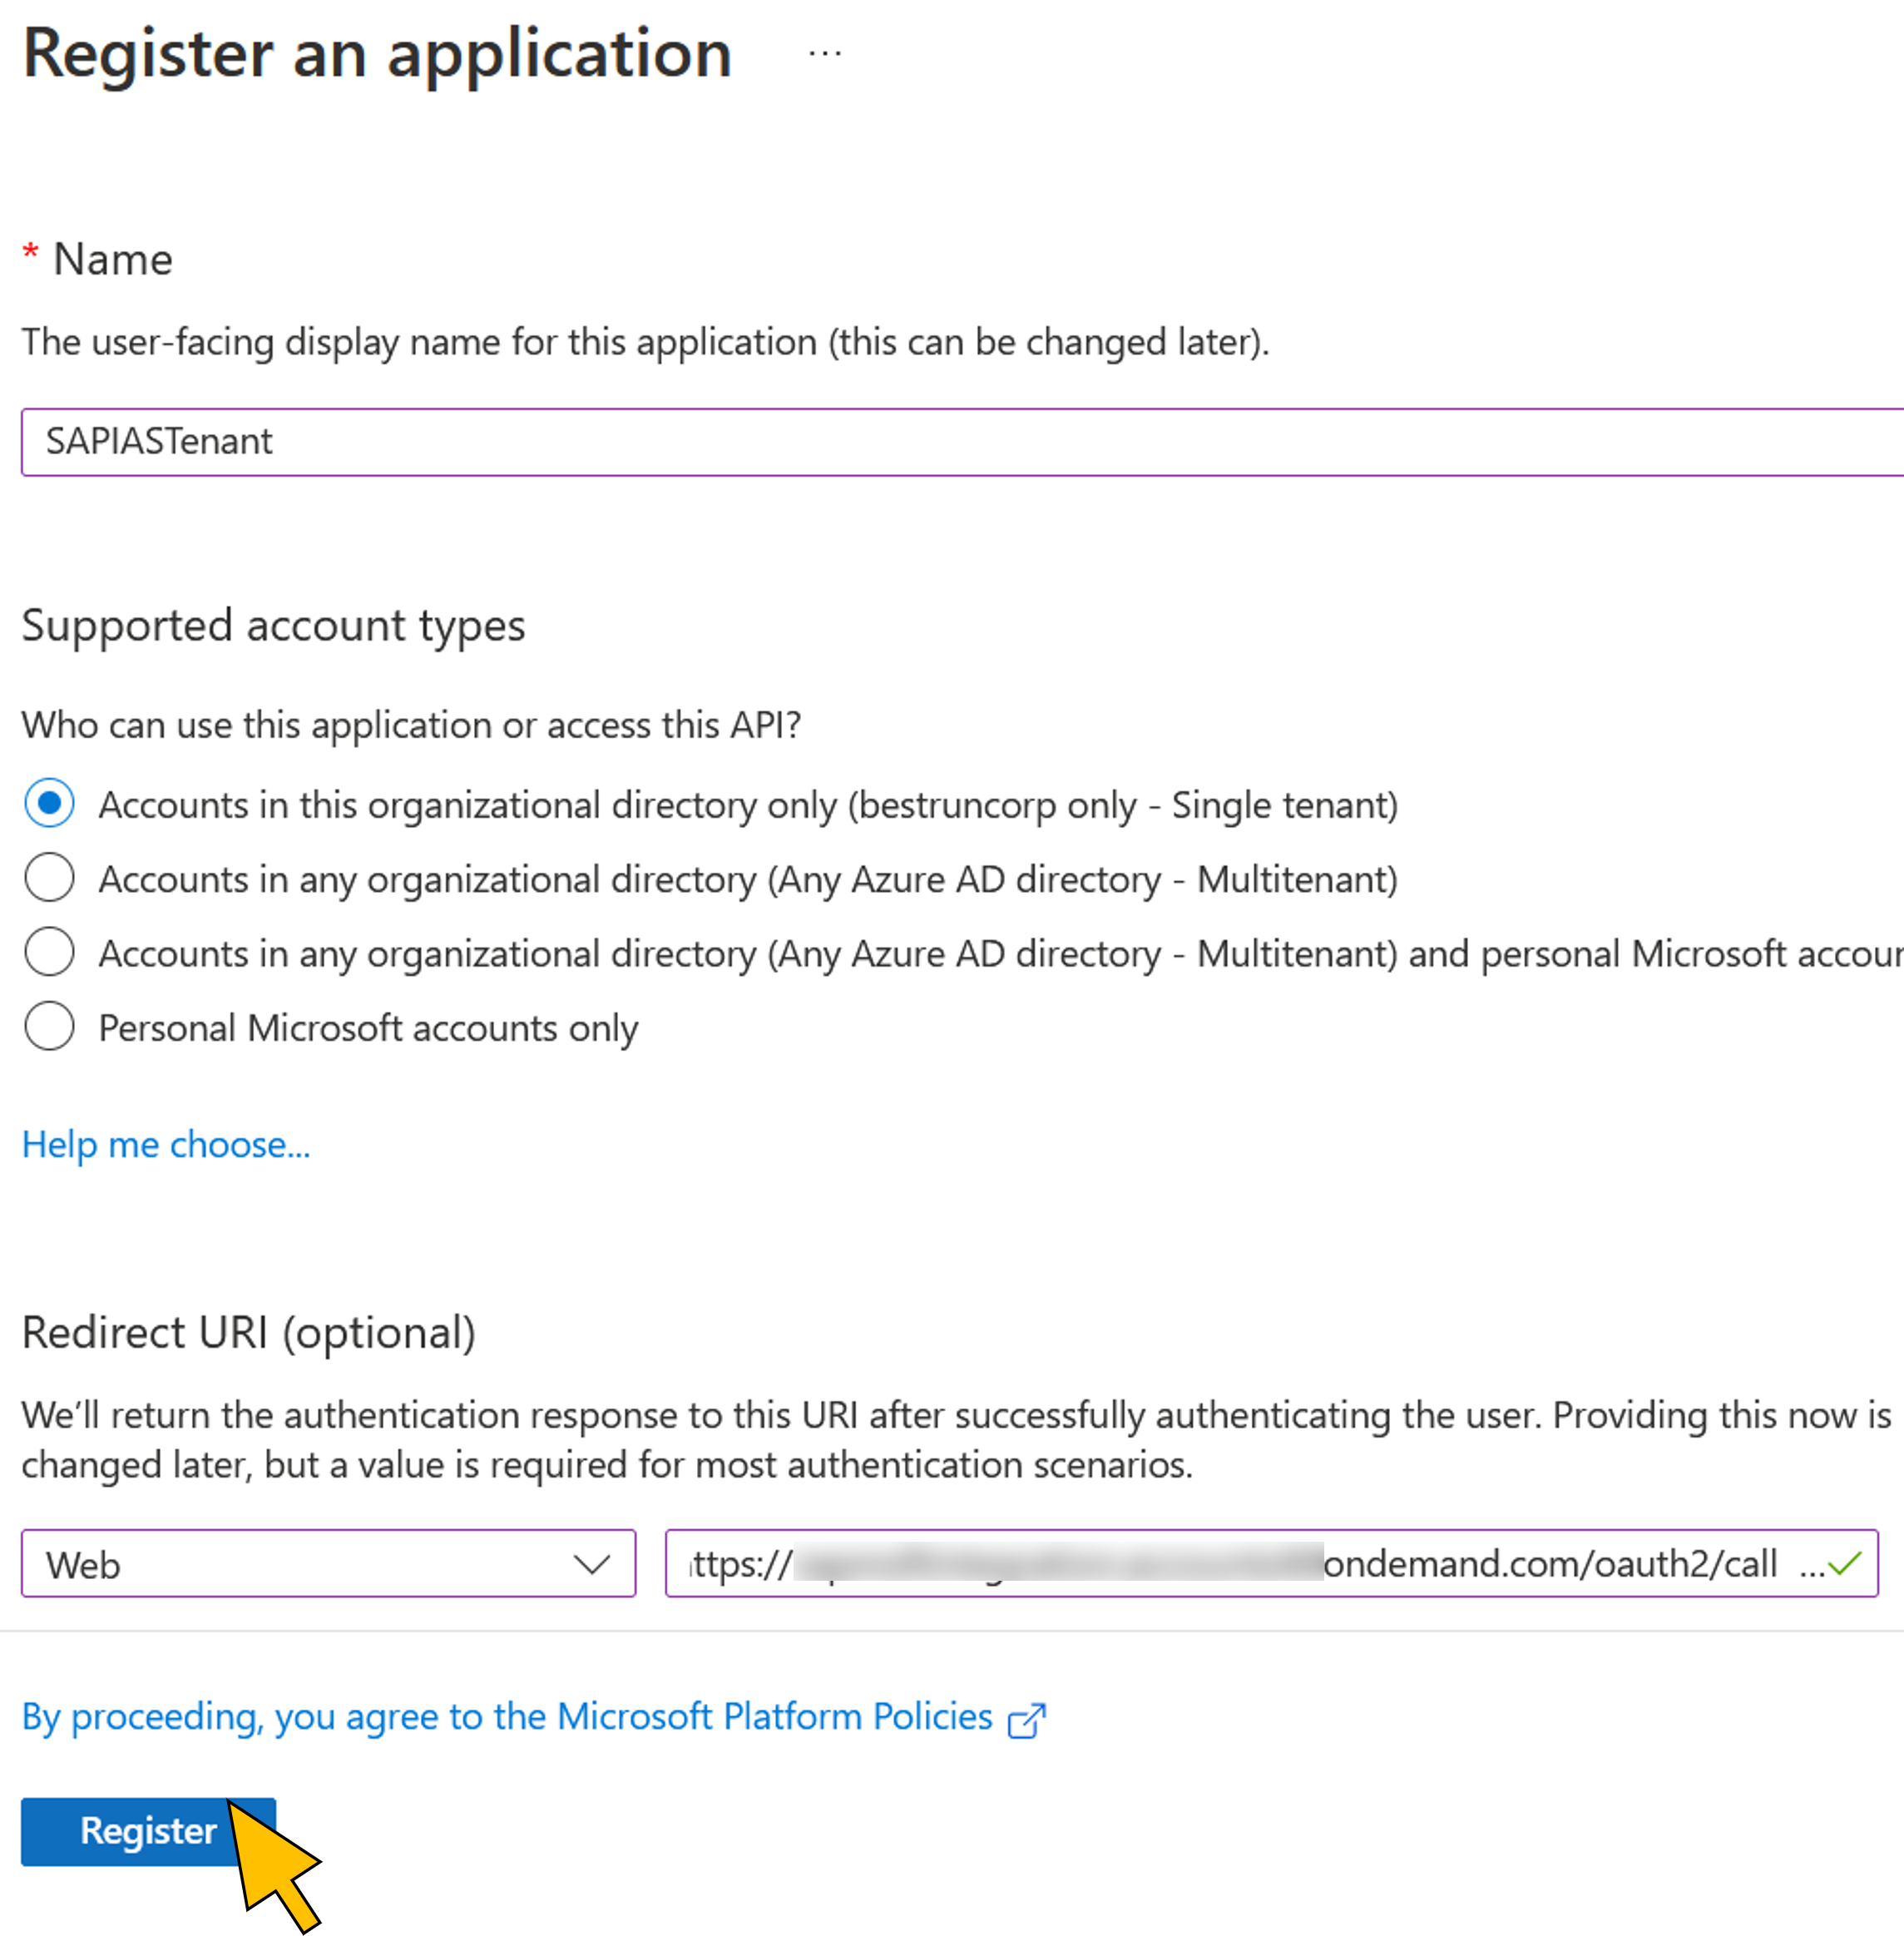 |
| 4 | Copy the newly generated Application (client) ID to a temporary text file. You will need it in the next step for deploying the sample application. |  |
| 5 | Select Manifest from the navigation menu to edit the application registration's manifest file. Change the value for the field accessTokenAcceptedVersion from null to 2.Click Save. |  |
| 6 | Click on the breadcrumb naviation to return to the list of application registrations. |  |
| 7 | Click + New registration | |
| 8 | Enter "SAPBTPGraphApp" for the Name of the new application registration. Click Register. |  |
| 9 | Copy the newly generated Application (client) ID to a temporary text file. You will need it in the next step for deploying the sample application. |  |
| 10 | Select Manifest from the navigation menu to edit the application registration's manifest file.Change the value for the fieldaccessTokenAcceptedVersion from null to 2.Click Save. |  |
Deploy the sample application on SAP BTP
| Step | Description | Screenshot |
| 11 | Open the file vars.yml from the BTP subdirectory of your Git repository's local copy in an editor. |  |
| 12 | Change the following placeholder values:
Save the changes. |  |
| 13 | Open the file manifest.json from the BTP/application/src/main/webapp subdirectory and change the placeholder values in line 57:
Save the changes. |  |
| 14 | Open the file MainView.controller.js from the BTP/application/src/main/webapp/controller subdirectory and change the placeholder values in line 13:
Save the changes. |  |
| 15 | Open a command prompt and change to the BTP subdirectory Run mvn clean package. The build process should end with a BUILD SUCCESS message. |  |
| 16 | Login to your SAP BTP CF subaccount with the command cf login -a https://api.cf.<region>.hana.ondemand.com Replace <region> with your subaccount's region, e.g. ap21. Enter your subaccount administrator's email and password and select your target org and space. |  |
| 17 | Create a new service instance of the SAP BTP identity service with the command cf create-service identity application ias-btpgraph |  |
| 18 | Create a new service instance of the SAP BTP destination service with the command cf create-service destination lite destination-btpgraph |  |
| 19 | Run the command cf push --vars-file ./vars.yml This will deploy the application's components to your SAP BTP CF subaccount. |  |
| 20 | Login to the SAP BTP Cockpit and navigate to your CF subaccount. |  |
| 21 | Go to Cloud Foundry > Spaces in the navigation menu. Click on the space selected for the deployment of the application. | 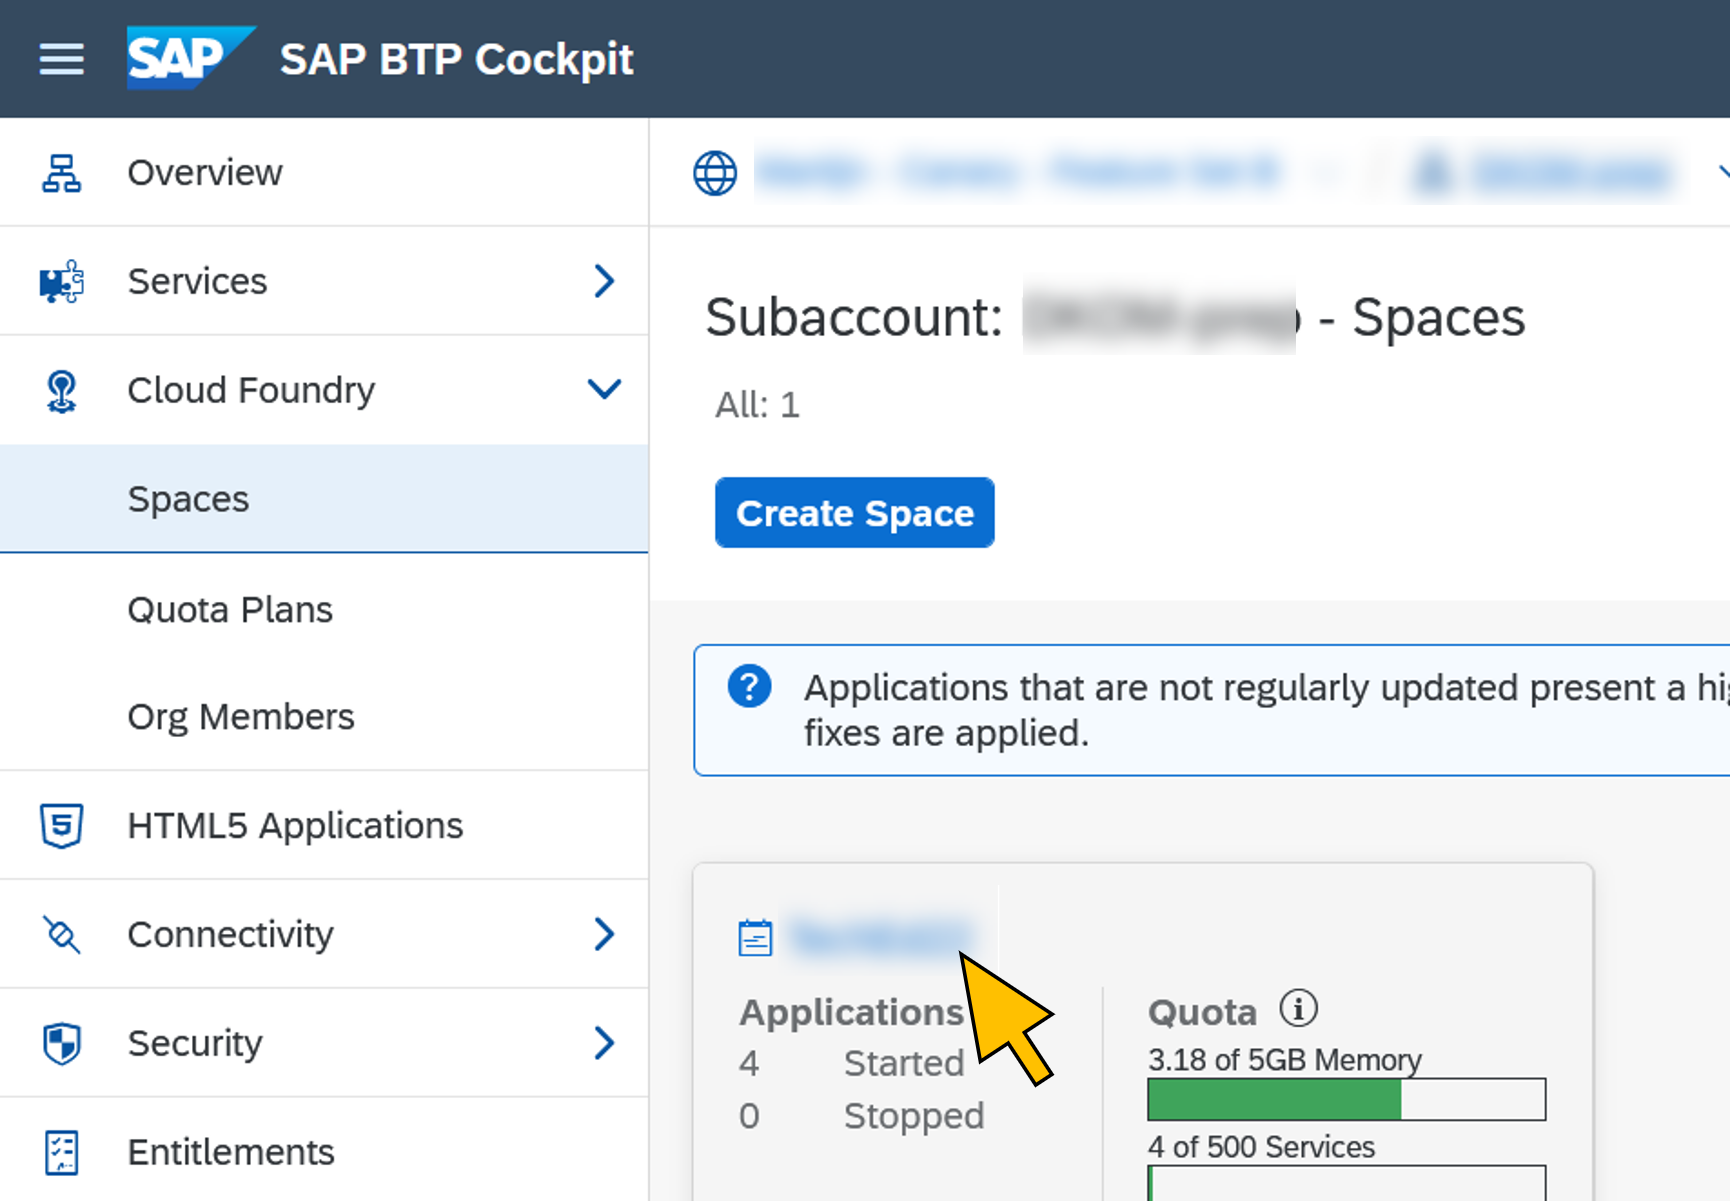 |
| 22 | Go to Services > Instances in the navigation menu. Select the ias-btpgraph service instance from the list. Click View Credentials. |  |
| 23 | Copy the value of the clientid element in line 2 to a temporary text file. This is the OAuth client ID of the business application in the IAS tenant. You will need this id in the next step to configure trust to your IAS tenant in Azure AD. Click Close. |  |
Configure trust to the IAS tenant in Azure AD
Trust to the IAS tenant is configured in Azure AD with a new federated identity credential. In addition, a client secret is required for the initial token exchange in step 5 of figure 1. Both credentials will be configured for the application registrations in the following step.
| Step | Description | Screenshot |
| 24 | Go back to the Azure Portal from step 10. Select Certificates & secrets from the navigation menu of the SAPBTPGraphApp application registration. Switch to the tab Federated credentials. Click Add credential. |  |
| 25 | Select Other Issuer from the Federated credential scenario dropdown list. | 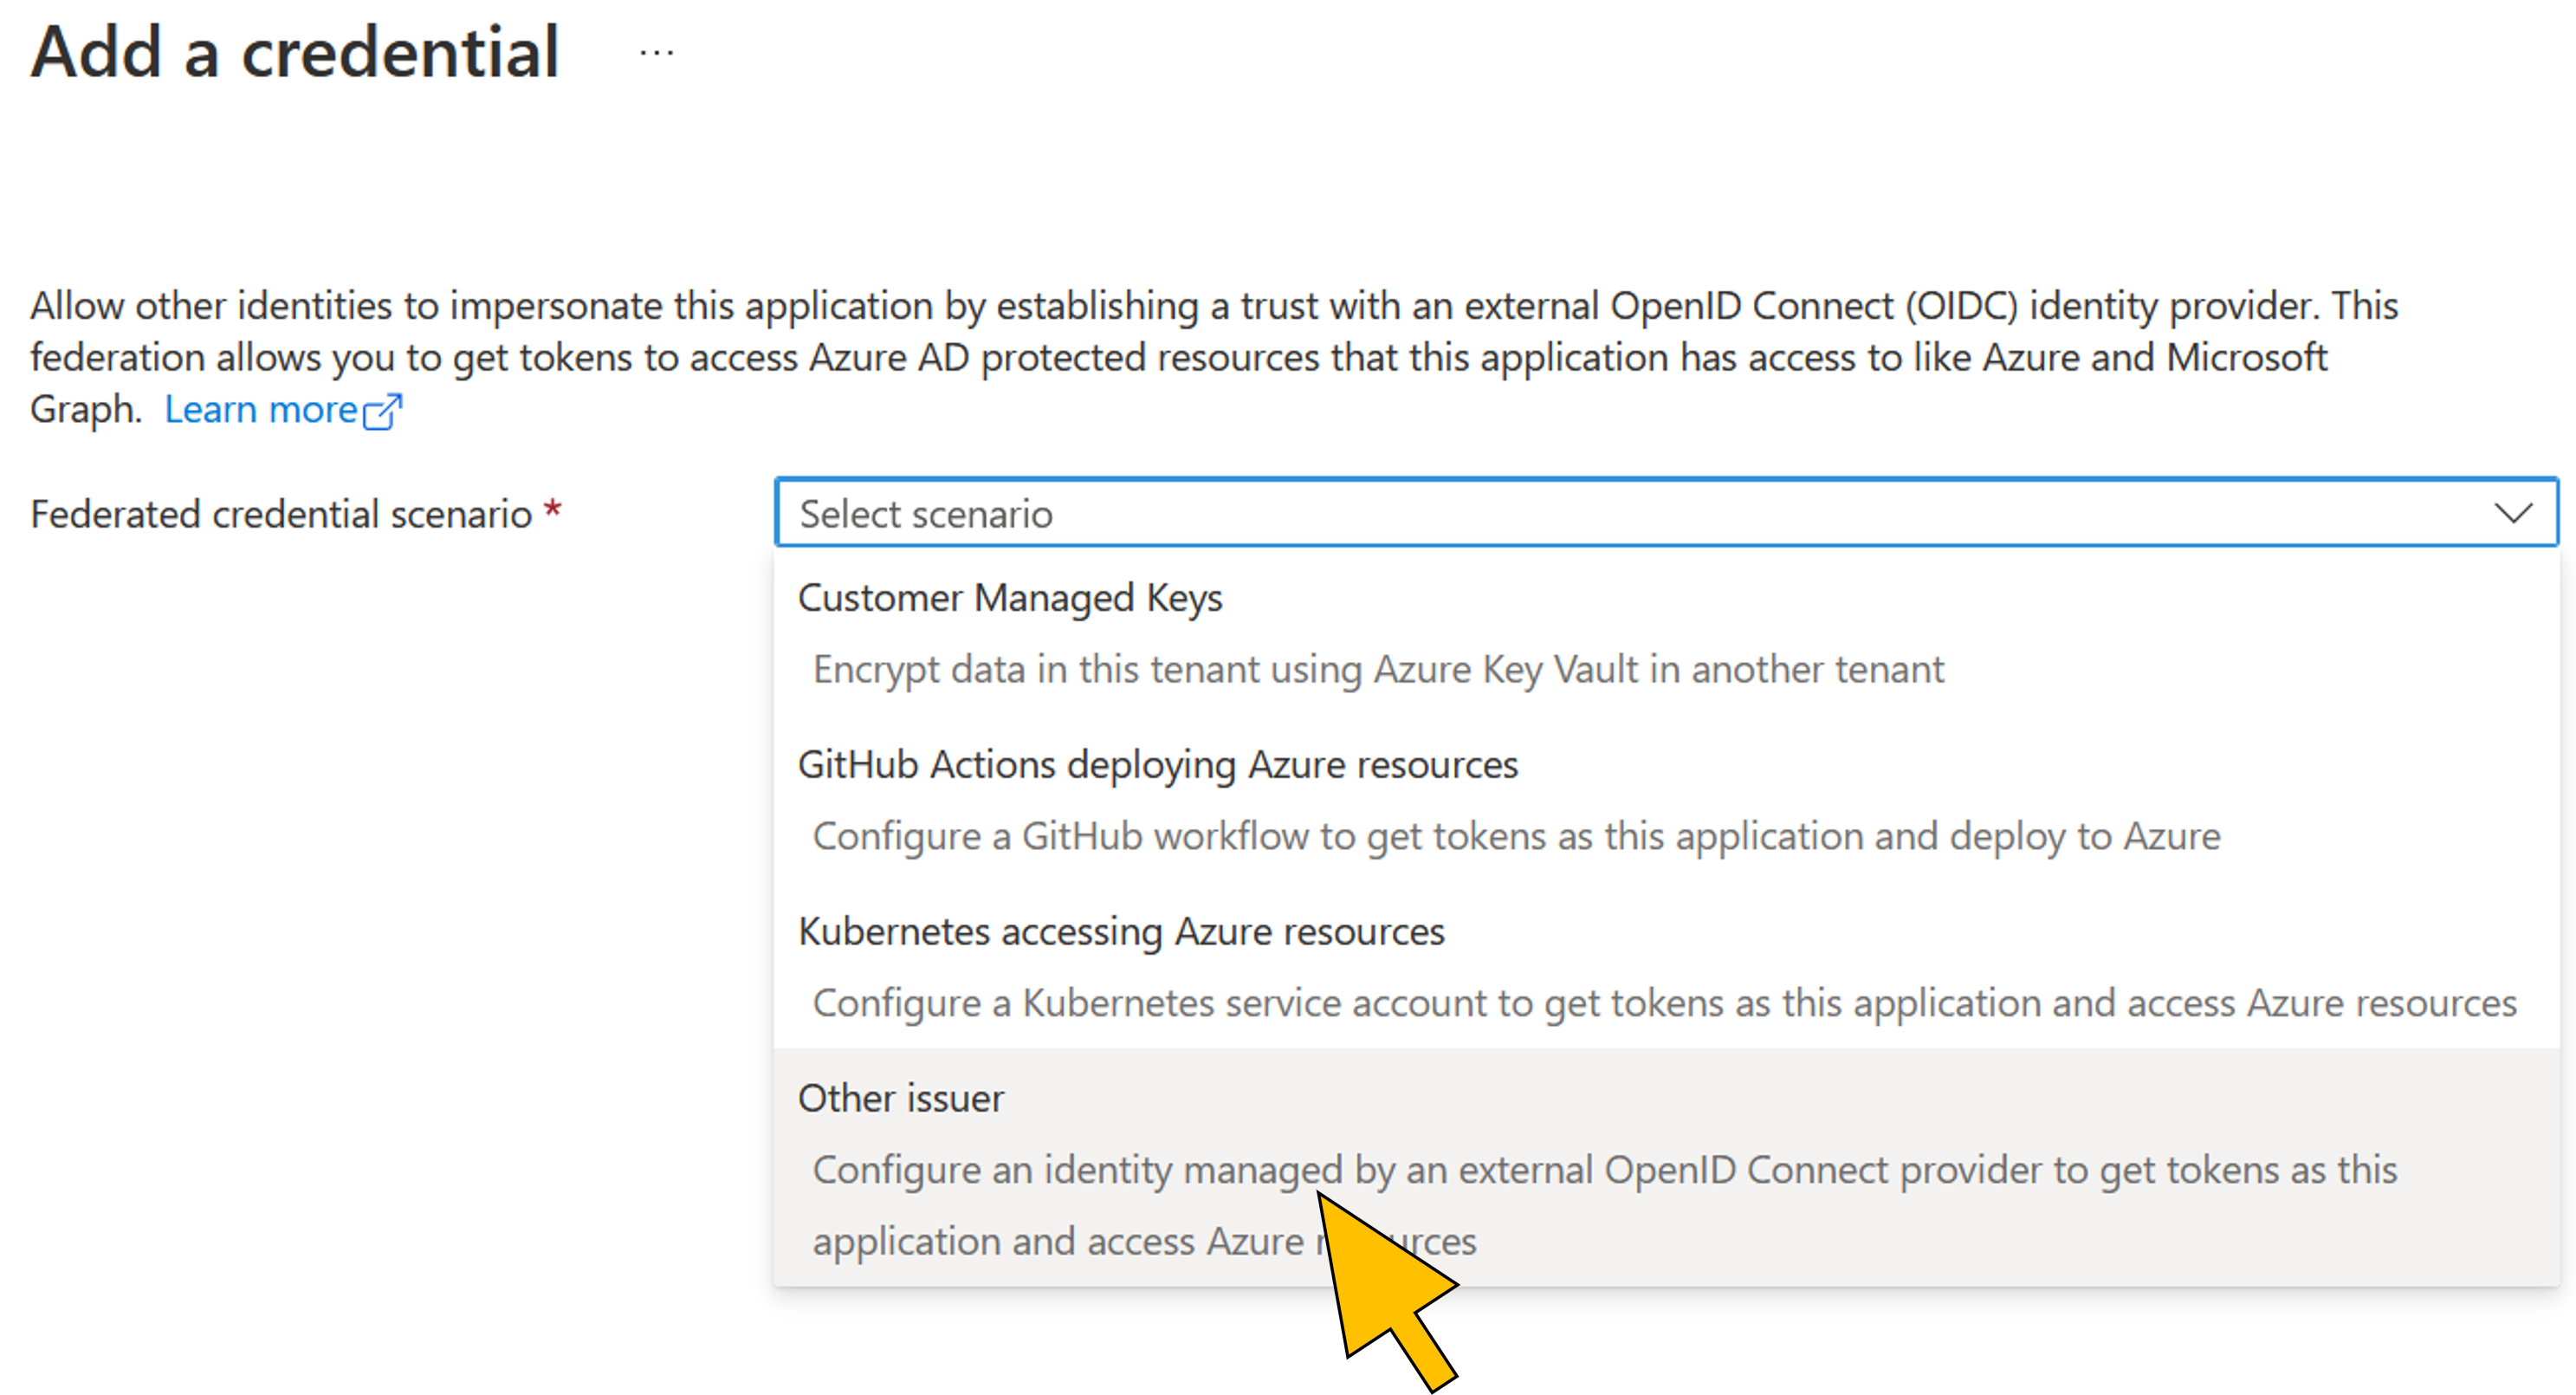 |
| 26 | Enter the following values:
Click Add. | 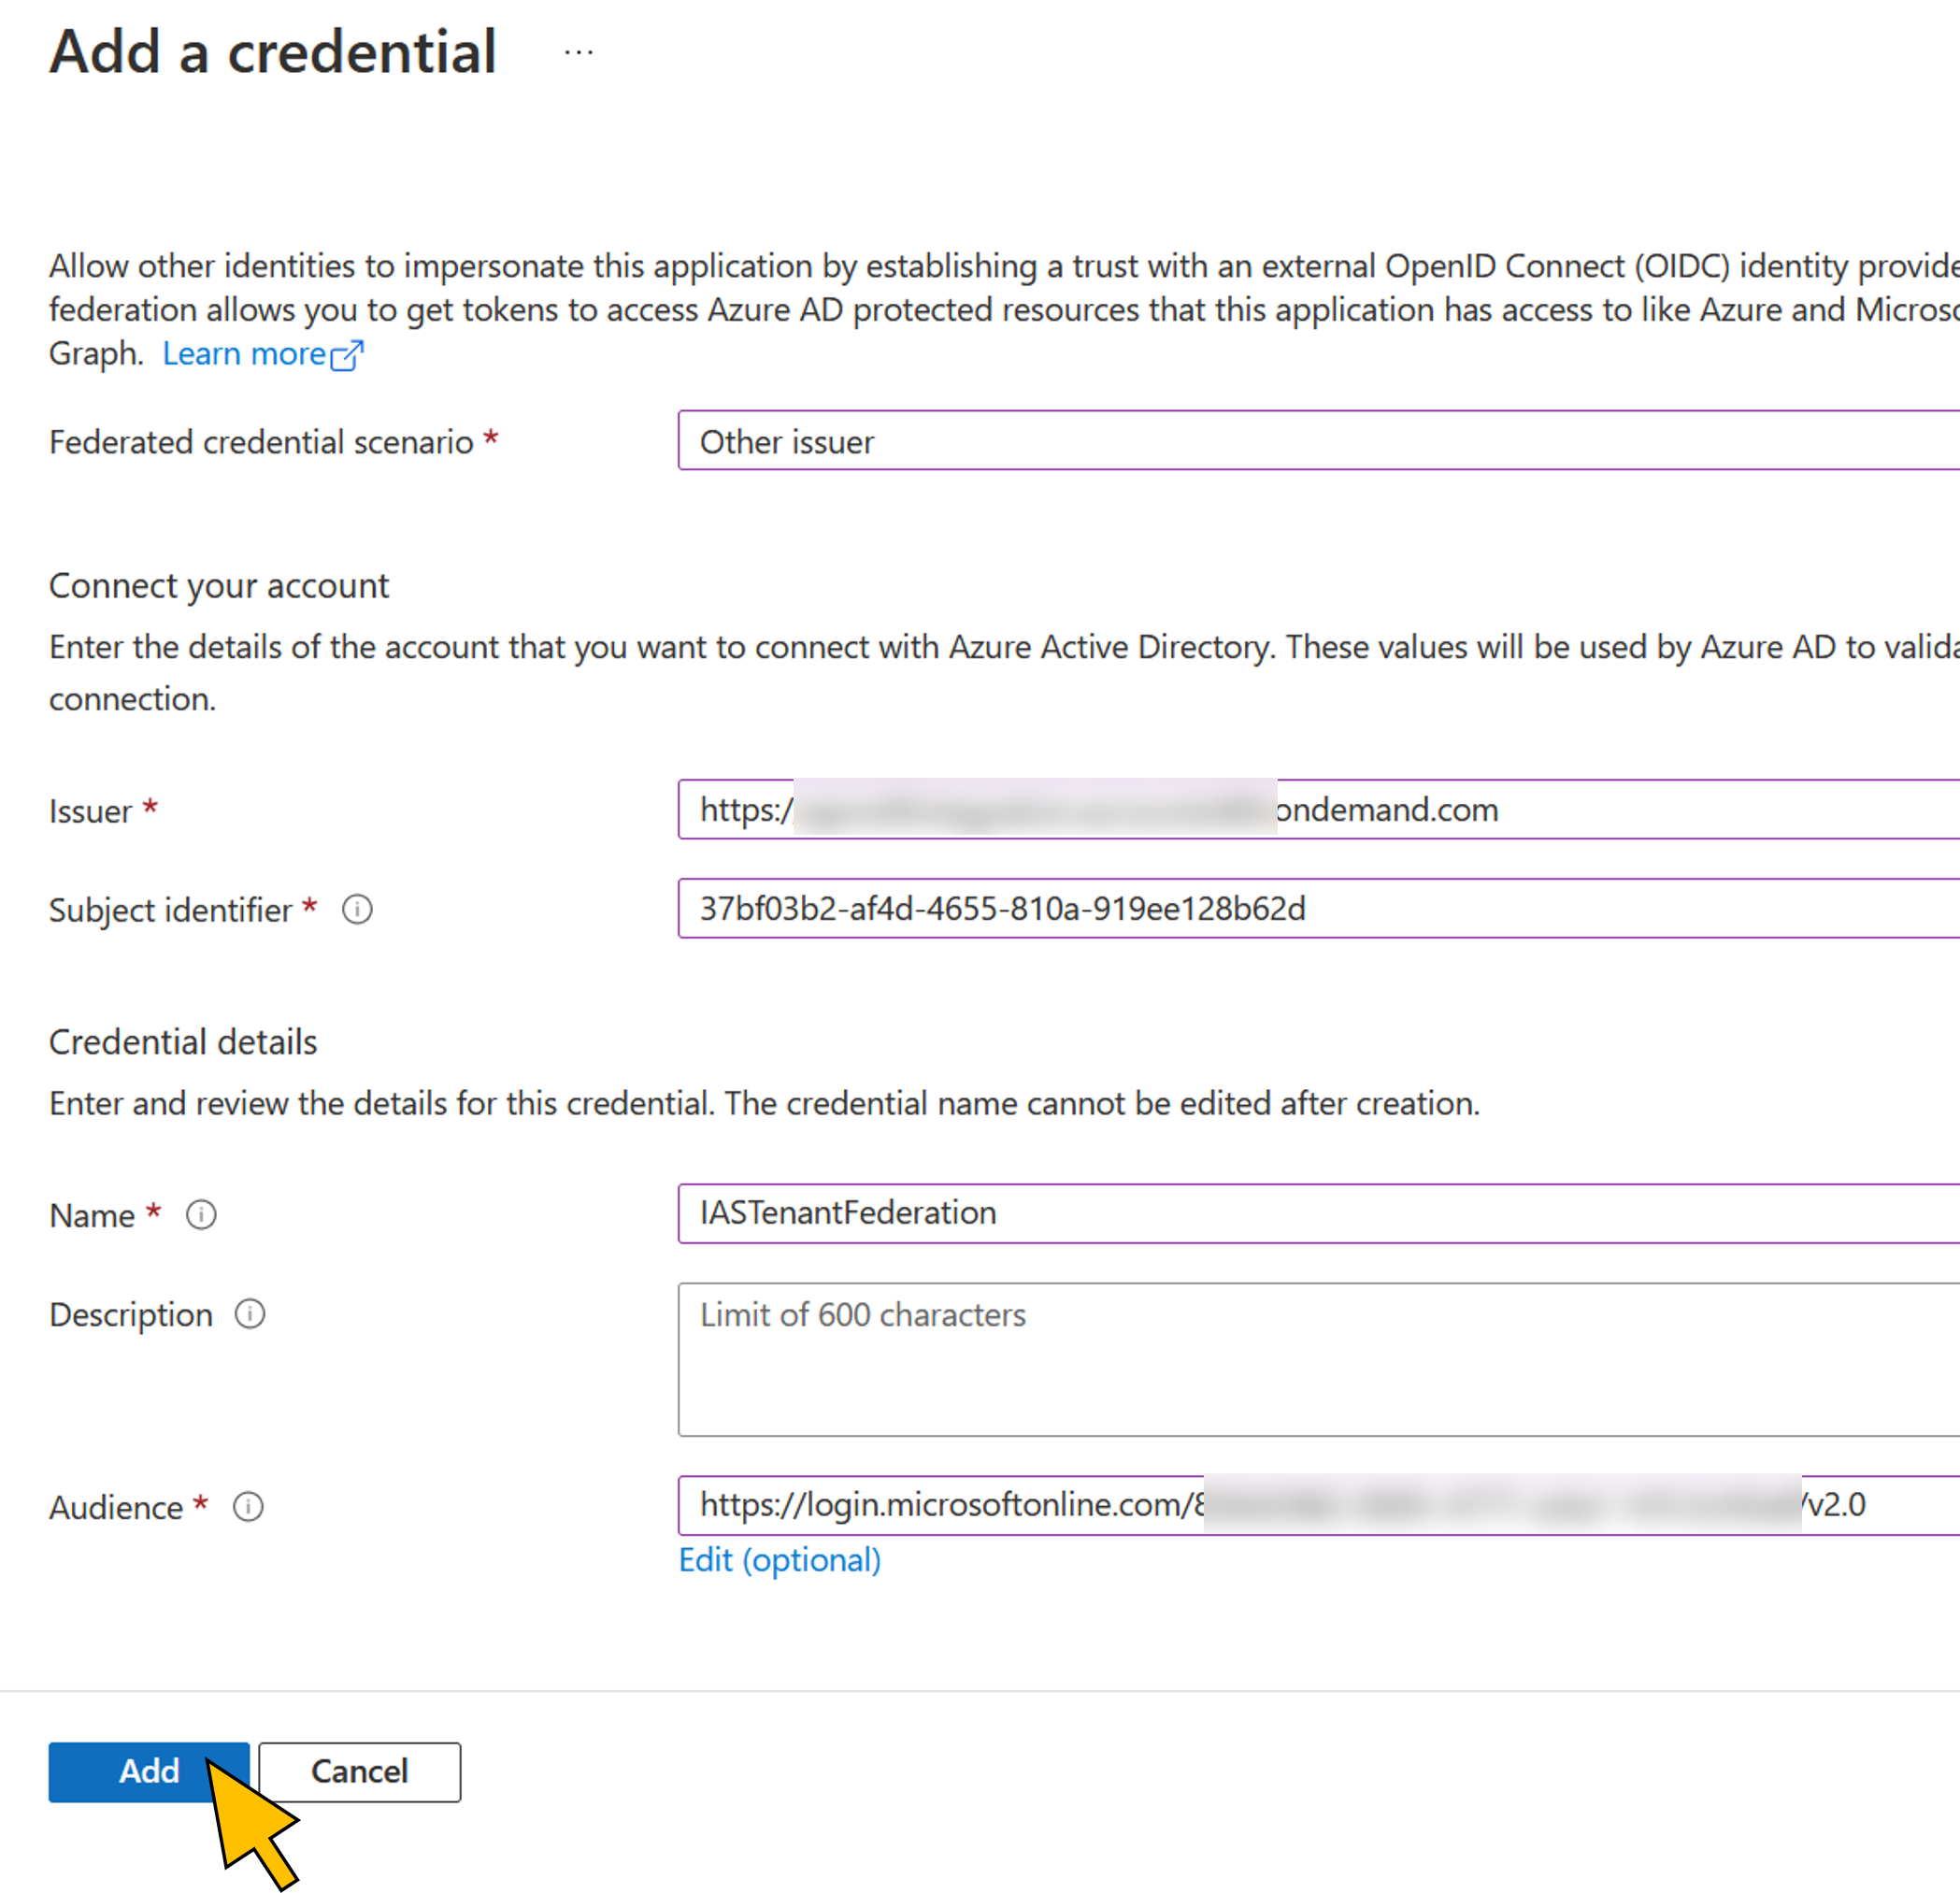 |
| 27 | Navigate back to the App registrations with the breadcrumb navigation. |  |
| 28 | Select the SAPIASTenant app from the list. Select Certificates & secrets from the menu and switch to the Client secrets tab. Click + New client secret. |  |
| 29 | Enter "OIDCProxy" for the Description. Click Add. |  |
| 30 | Click Copy to clipboard in the Value column and paste it to a temporary text file. You will need it later in the setup process. |  |
| 31 | Switch to the tab Federated credentials. Click + Add credential. |  |
| 32 | Enter the following values:
Click Add. | |
Configure Graph API permissions and scopes in Azure AD
To request the Outlook calendar event on behalf of the user, the business application (SAPBTPGraphApp) requires the Graph API permission Calendars.Read. SAPBTPGraphApp also exposes the custom scope "token.exchange". This scope is referred to as a (downstream) API permission for the SAPIASTenant application registration and required for steps 7 and 8 in figure 1. For the initial token request to Azure AD (see step 5 in figure 1 and figure 2), the SAPIASTenant application exposes the custom scope "ias.access".
| Step | Description | Screenshot |
| 33 | Go to Expose an API in the navigation menu. Click + Add a scope. |  |
| 34 | Accept the default value for the Application ID URI. Click Save and continue. |  |
| 35 | Enter "ias.access" for the new Scope name. Provide an Admin consent display name and description. Click Add scope. |  |
| 36 | Copy the full-qualified URI of the new scope (api://<client id>/ias.access) from the clipboard to temporary text file. It will be used in a later setup step. |  |
| 37 | Click on the breadcrumb naviation to return to the list of application registrations. |  |
| 38 | Select the SAPBTPGraphApp application from the list. Choose API permissions from the navigation menu. Click + Add a permission. | 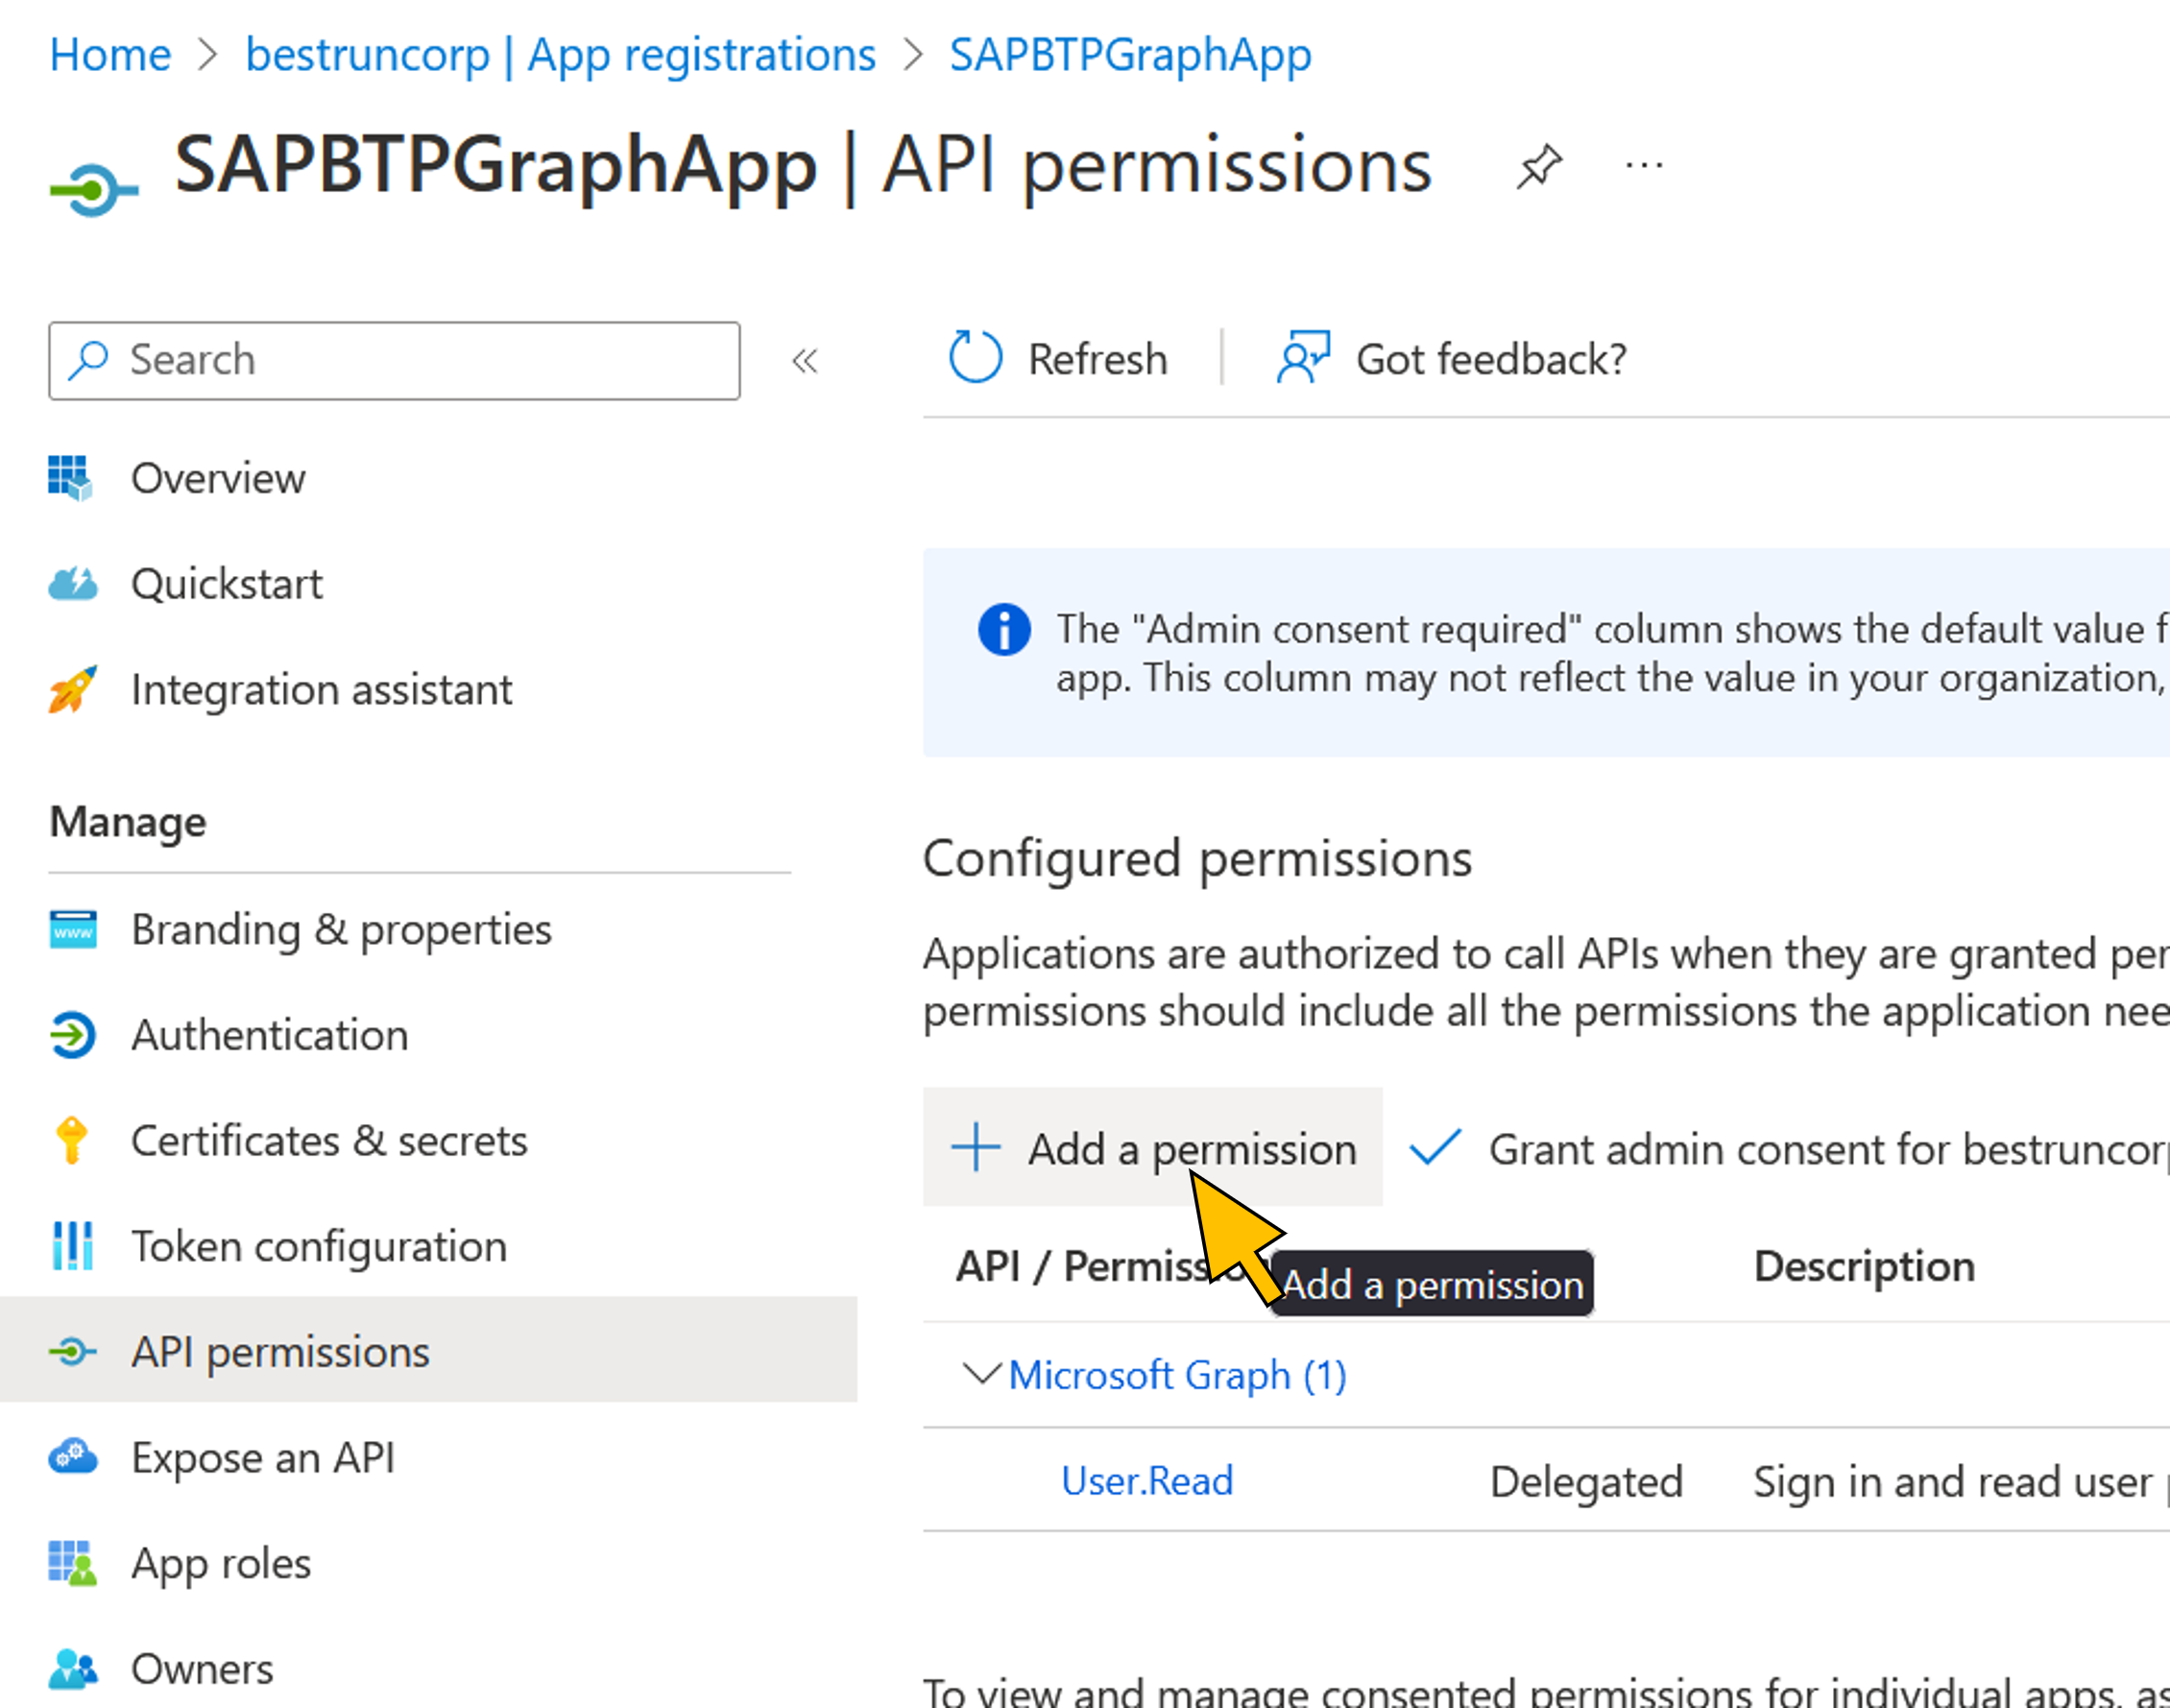 |
| 39 | Click the Microsoft Graph tile. |  |
| 40 | Click the Delegated permissions tile. |  |
| 41 | Enter "Calendar" in the search text box. From the search results, activate the checkbox for the Calendars.Read permission. Click Add permissions. |  |
| 42 | Click Grant admin consent for <Azure AD tenant name> and confirm with Yes so that the user is not prompted to consent to the Graph permissions used by the application. |  |
| 43 | Navigate to Expose an API in the menu. Click + Add a scope. | 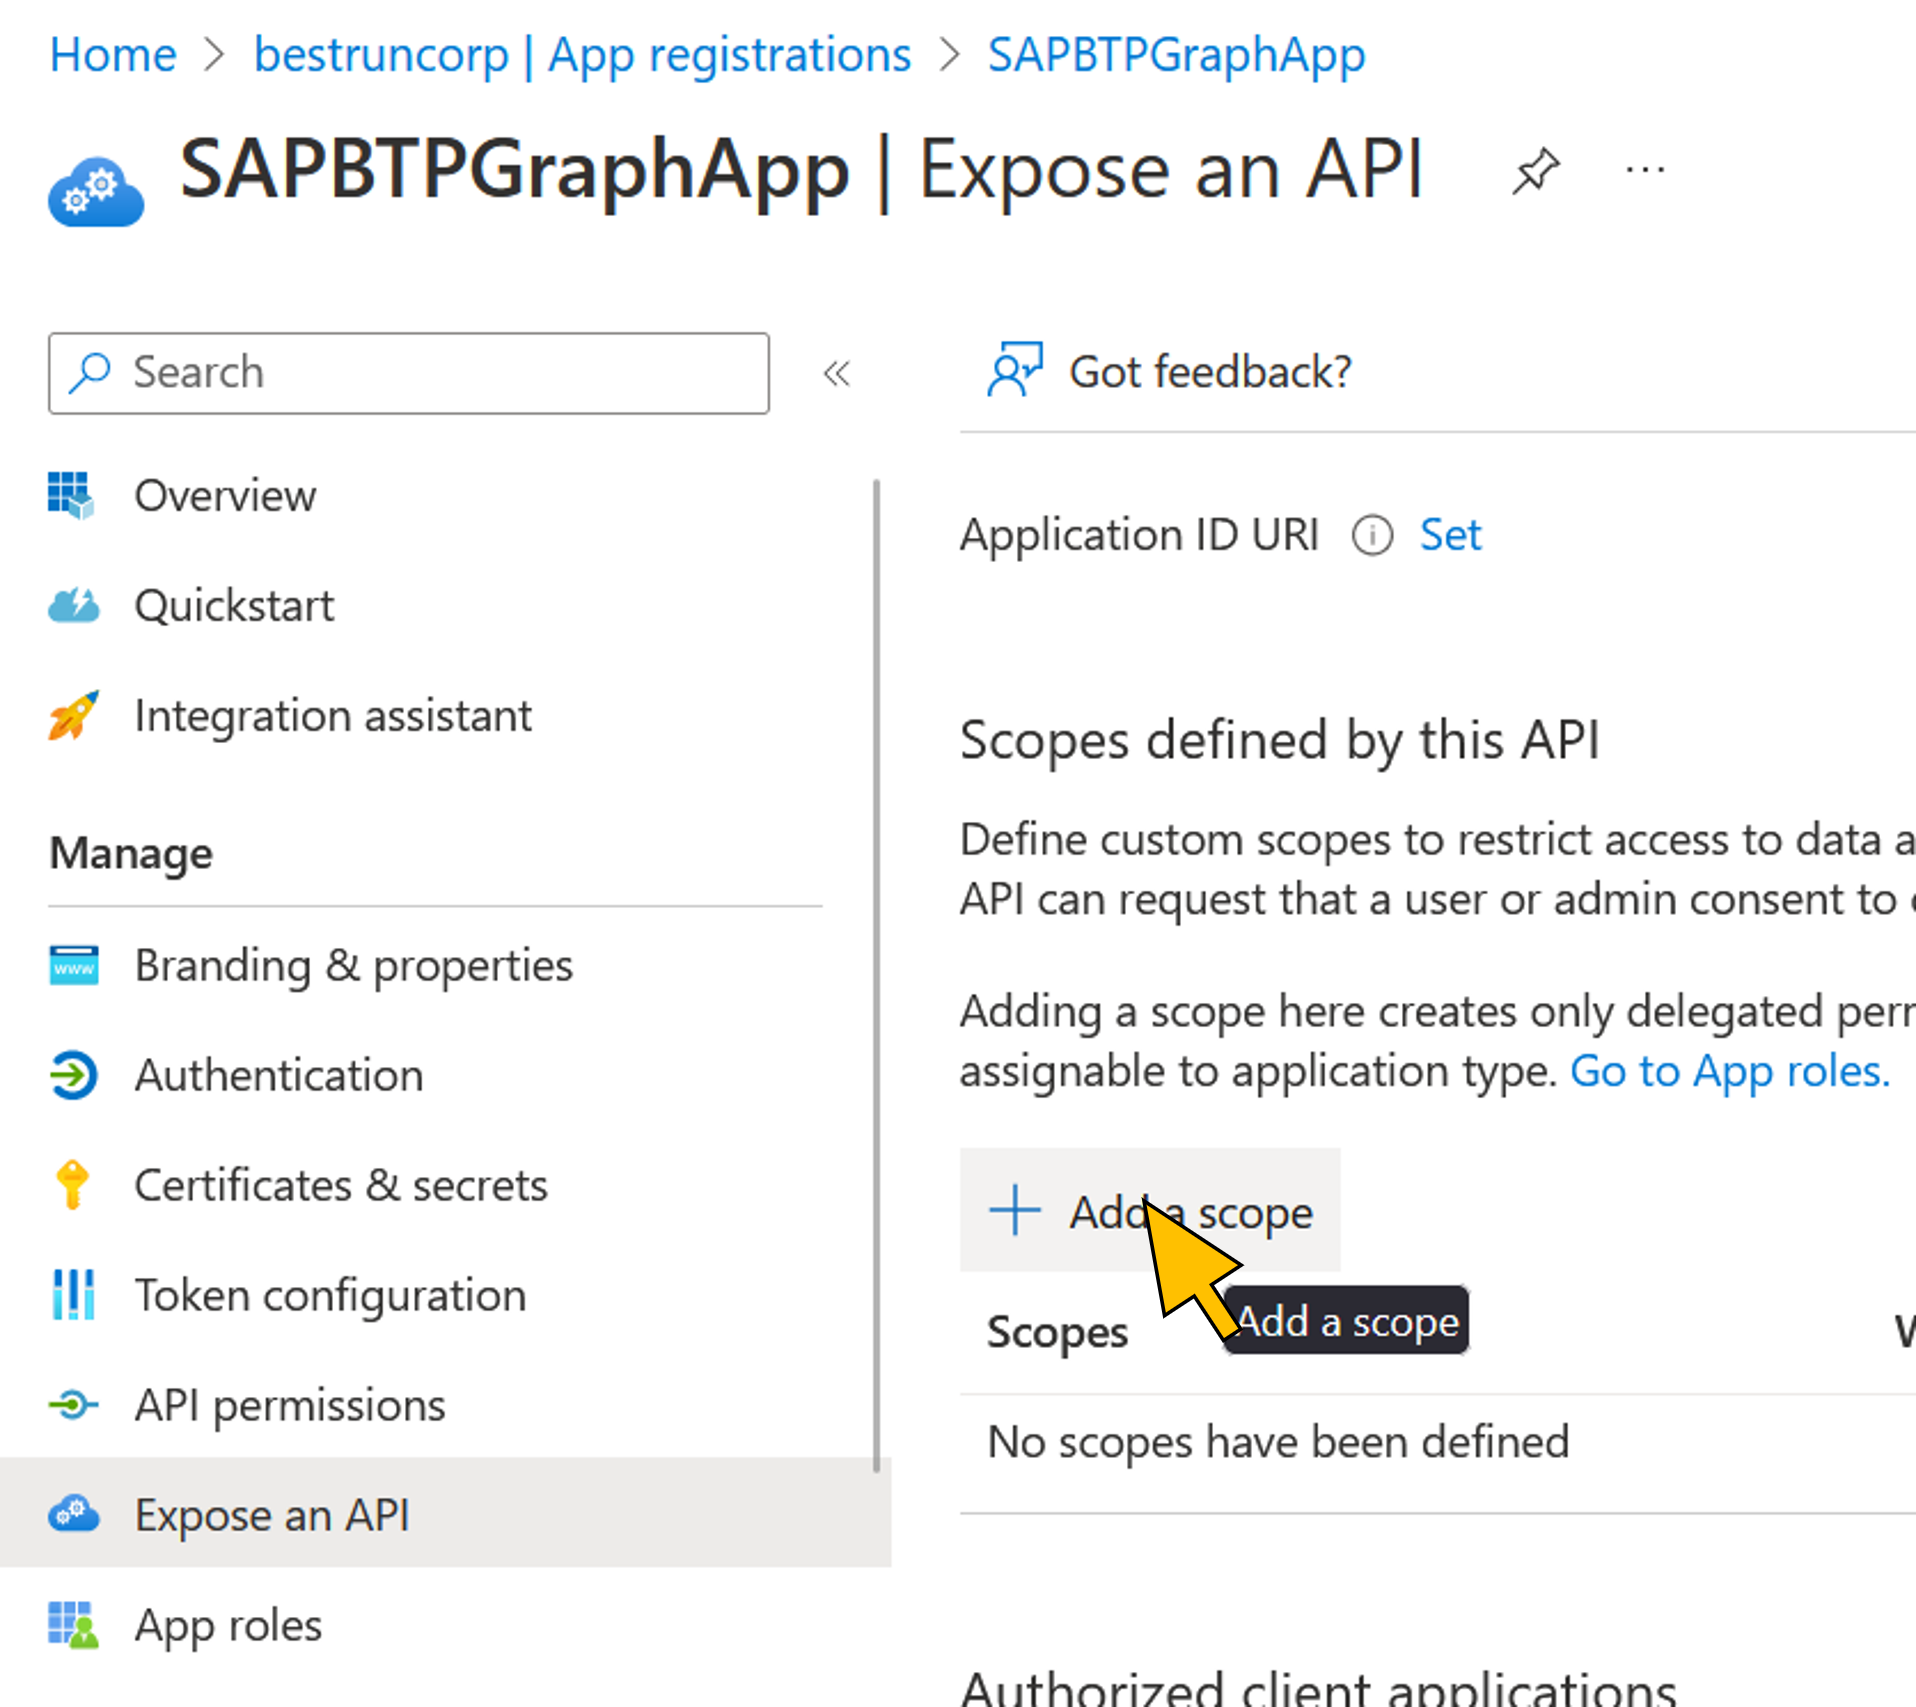 |
| 44 | Accept the default value for the Application ID URI. Click Save and continue. |  |
| 45 | Enter "token.exchange" for the new Scope name. Provide an Admin consent display name and description. Click Add scope. |  |
| 46 | Click on the breadcrumb naviation to return to the list of application registrations. |  |
| 47 | Select the SAPIASTenant application from the list. Choose API permissions from the navigation menu. Click + Add a permission. |  |
| 48 | Switch to the tab My APIs |  |
| 49 | Select the SAPBTPGraphApp from the list. Activate the checkbox for the token.exchange permission. Click Add permissions. |  |
| 50 | Click Grant admin consent for <Azure AD tenant name> and confirm with Yes so that the user is not prompted to consent to the requested permissions of the SAPIASTenant application. |  |
Setup the Corporate Identity Provider and OIDC Proxy in SAP Cloud Identity tenant
| Step | Description | Screenshot |
| 51 | Login as an administrator to your SAP Cloud Identity service administration console at https://<IAS tenant name>.accounts.ondemand.com/admin |  |
| 52 | Go to Identity Providers > Corporate Identity Providers and click Create. Enter a Display name (e.g. "Azure Active Directory") and click Save. |  |
| 53 | Click on Identity Provider Type from the Trust settings of the new corporate identity provider. |  |
| 54 | Select OpenID Connect Compliant from the list. Click Save. | 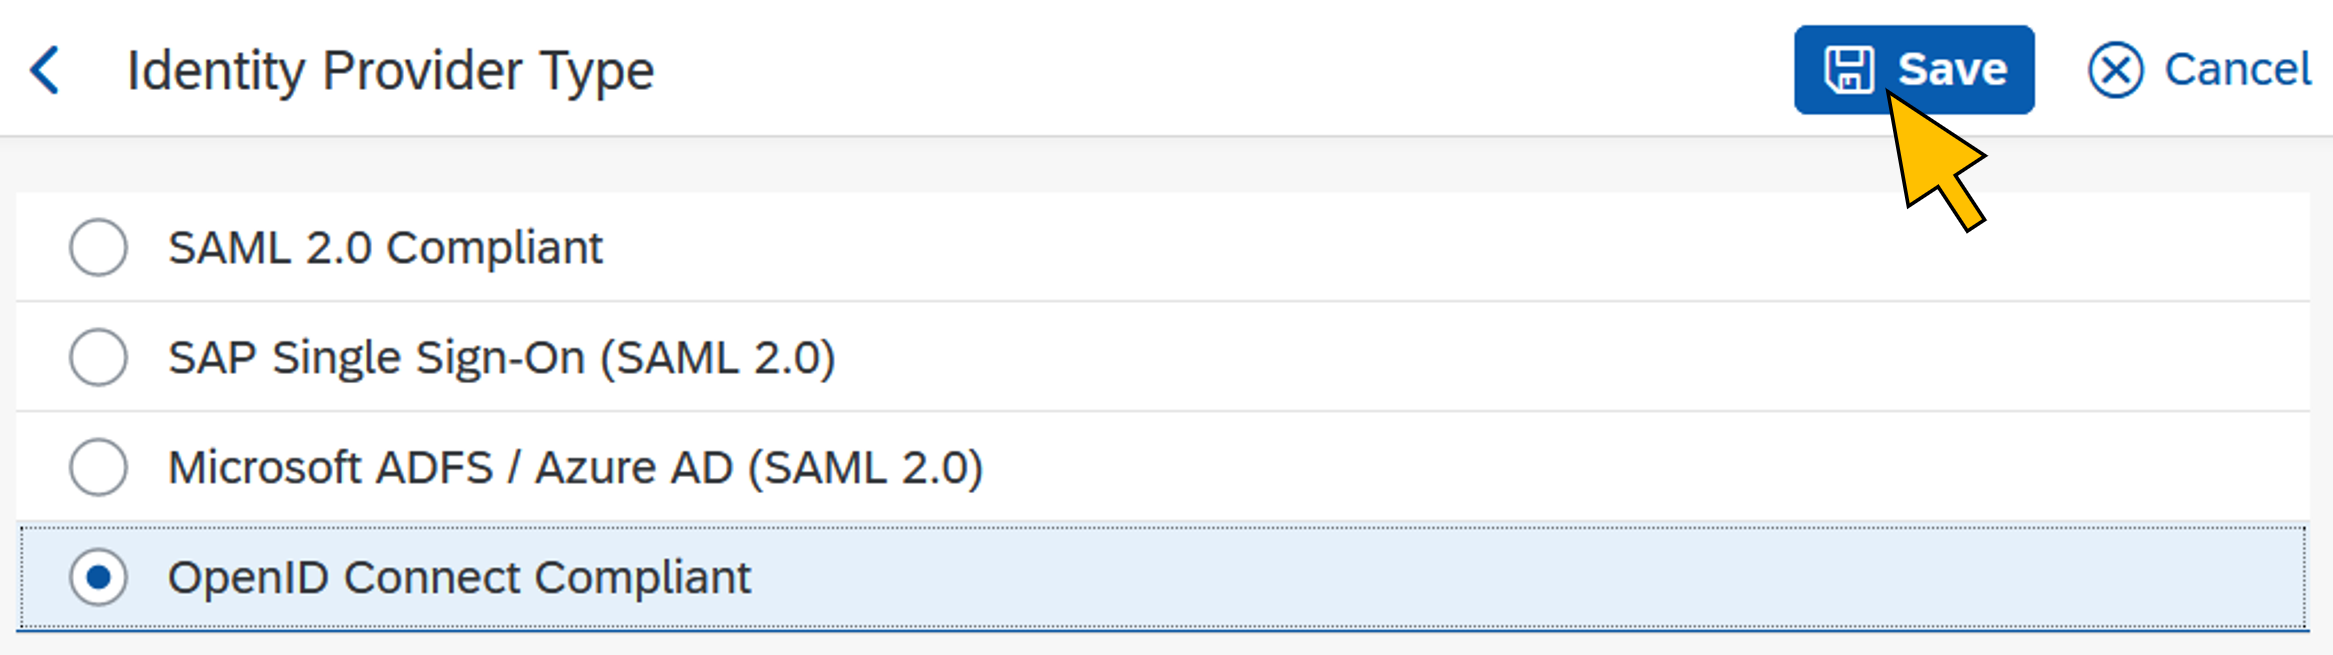 |
| 55 | Click on OpenID Connect Configuration from the Trust settings of the new corporate identity provider. |  |
| 56 | Enter your Azure AD tenant's OIDC Discovery URL (https://login.microsoftonline.com/<AAD tenant ID>/v2.0) Click Load. The Issuer field gets populated from the loaded Azure AD tenant's OIDC metadata. | 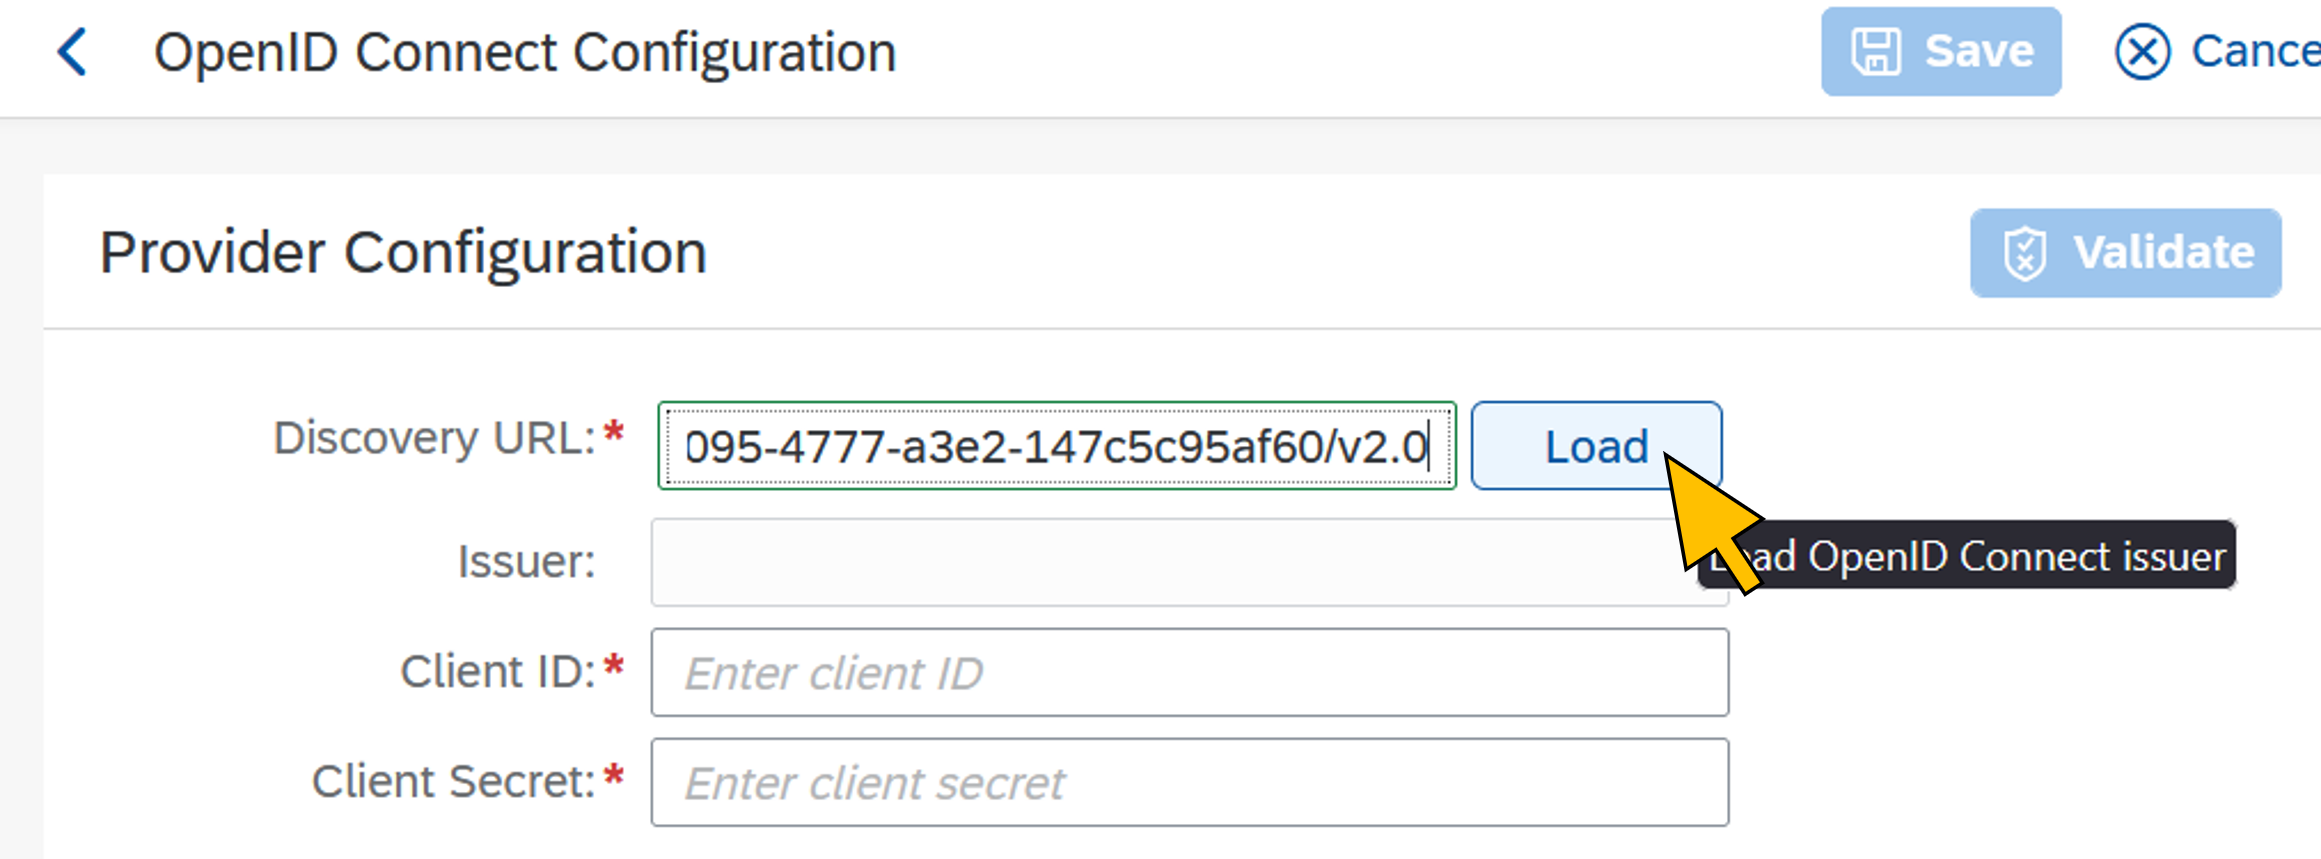 |
| 57 | Enter the SAPIASTenant's client ID in the Client ID field. In the Client Secret field, enter the value of the OIDCProxy secret copied in step 30. Click Validate. |  |
| 58 | Verify a successful validation of the OIDC configuration. Click OK. |  |
| 59 | Click + Add |  |
| 60 | Copy and paste the full-qualified URI of the SAPIASTenant application's custom scope (api://<client id>/ias.access) copied in step 36 for the new scope. Click Save. |  |
| 61 | Click + Add again and add the scope "email". Click Save. |  |
| 62 | Click Save. |  |
| 63 | Go to Applications & Resources > Applications Select the application ias-btpgraph from the list which was created from the identity service binding. Click OpenID Connect Configuration from the Single Sign-On settings. |  |
| 64 | In the Redirect URIs section, click Add. |  |
| 65 | Enter the business application's OAuth 2.0 redirect URL, which is at https://approuter-btpgraph-<ID>.cfapps.<region>.hana.ondemand.com/login/callback. Replace <ID> and <region> with the values you used in step 10. Click Save. |  |
| 66 | In the Conditional Authentication settings of the application, click Conditional Authentication. |  |
| 67 | Select the Corporate Identity Provider created in step 52 from the dropdown list as the Default Authenticating Identity Provider for the ias-btpgraph application. This will forward all authentication requests from the business application to the Azure AD tenant. Click Save. |  |
Configure destinations in the SAP BTP subaccount
The application uses the SAP Cloud SDK to authenticate against the SAP BTP destination service and retrieve the following destinations into the application:
aadTokenEndpoint: Azure AD token endpoint at https://login.microsoftonline.com/<AAD tenant ID>/oauth2/v2.0/token
iasTokenEndpoint: SAP Cloud Identity service tenant's token endpoint at https://<IAS tenant name>.accounts.ondemand.com/oauth2/token
iasTokenExchange: SAP Cloud Identity service's token exchange service endpoint at https://<IAS tenant name>.accounts.ondemand.com/oauth2/exchange/corporateidp
| Step | Description | Screenshot |
| 68 | Go back to the SAP BTP Cockpit and navigate to your CF subaccount. Select Connectivity > Destinations from the navigation menu. Click New Destination. | 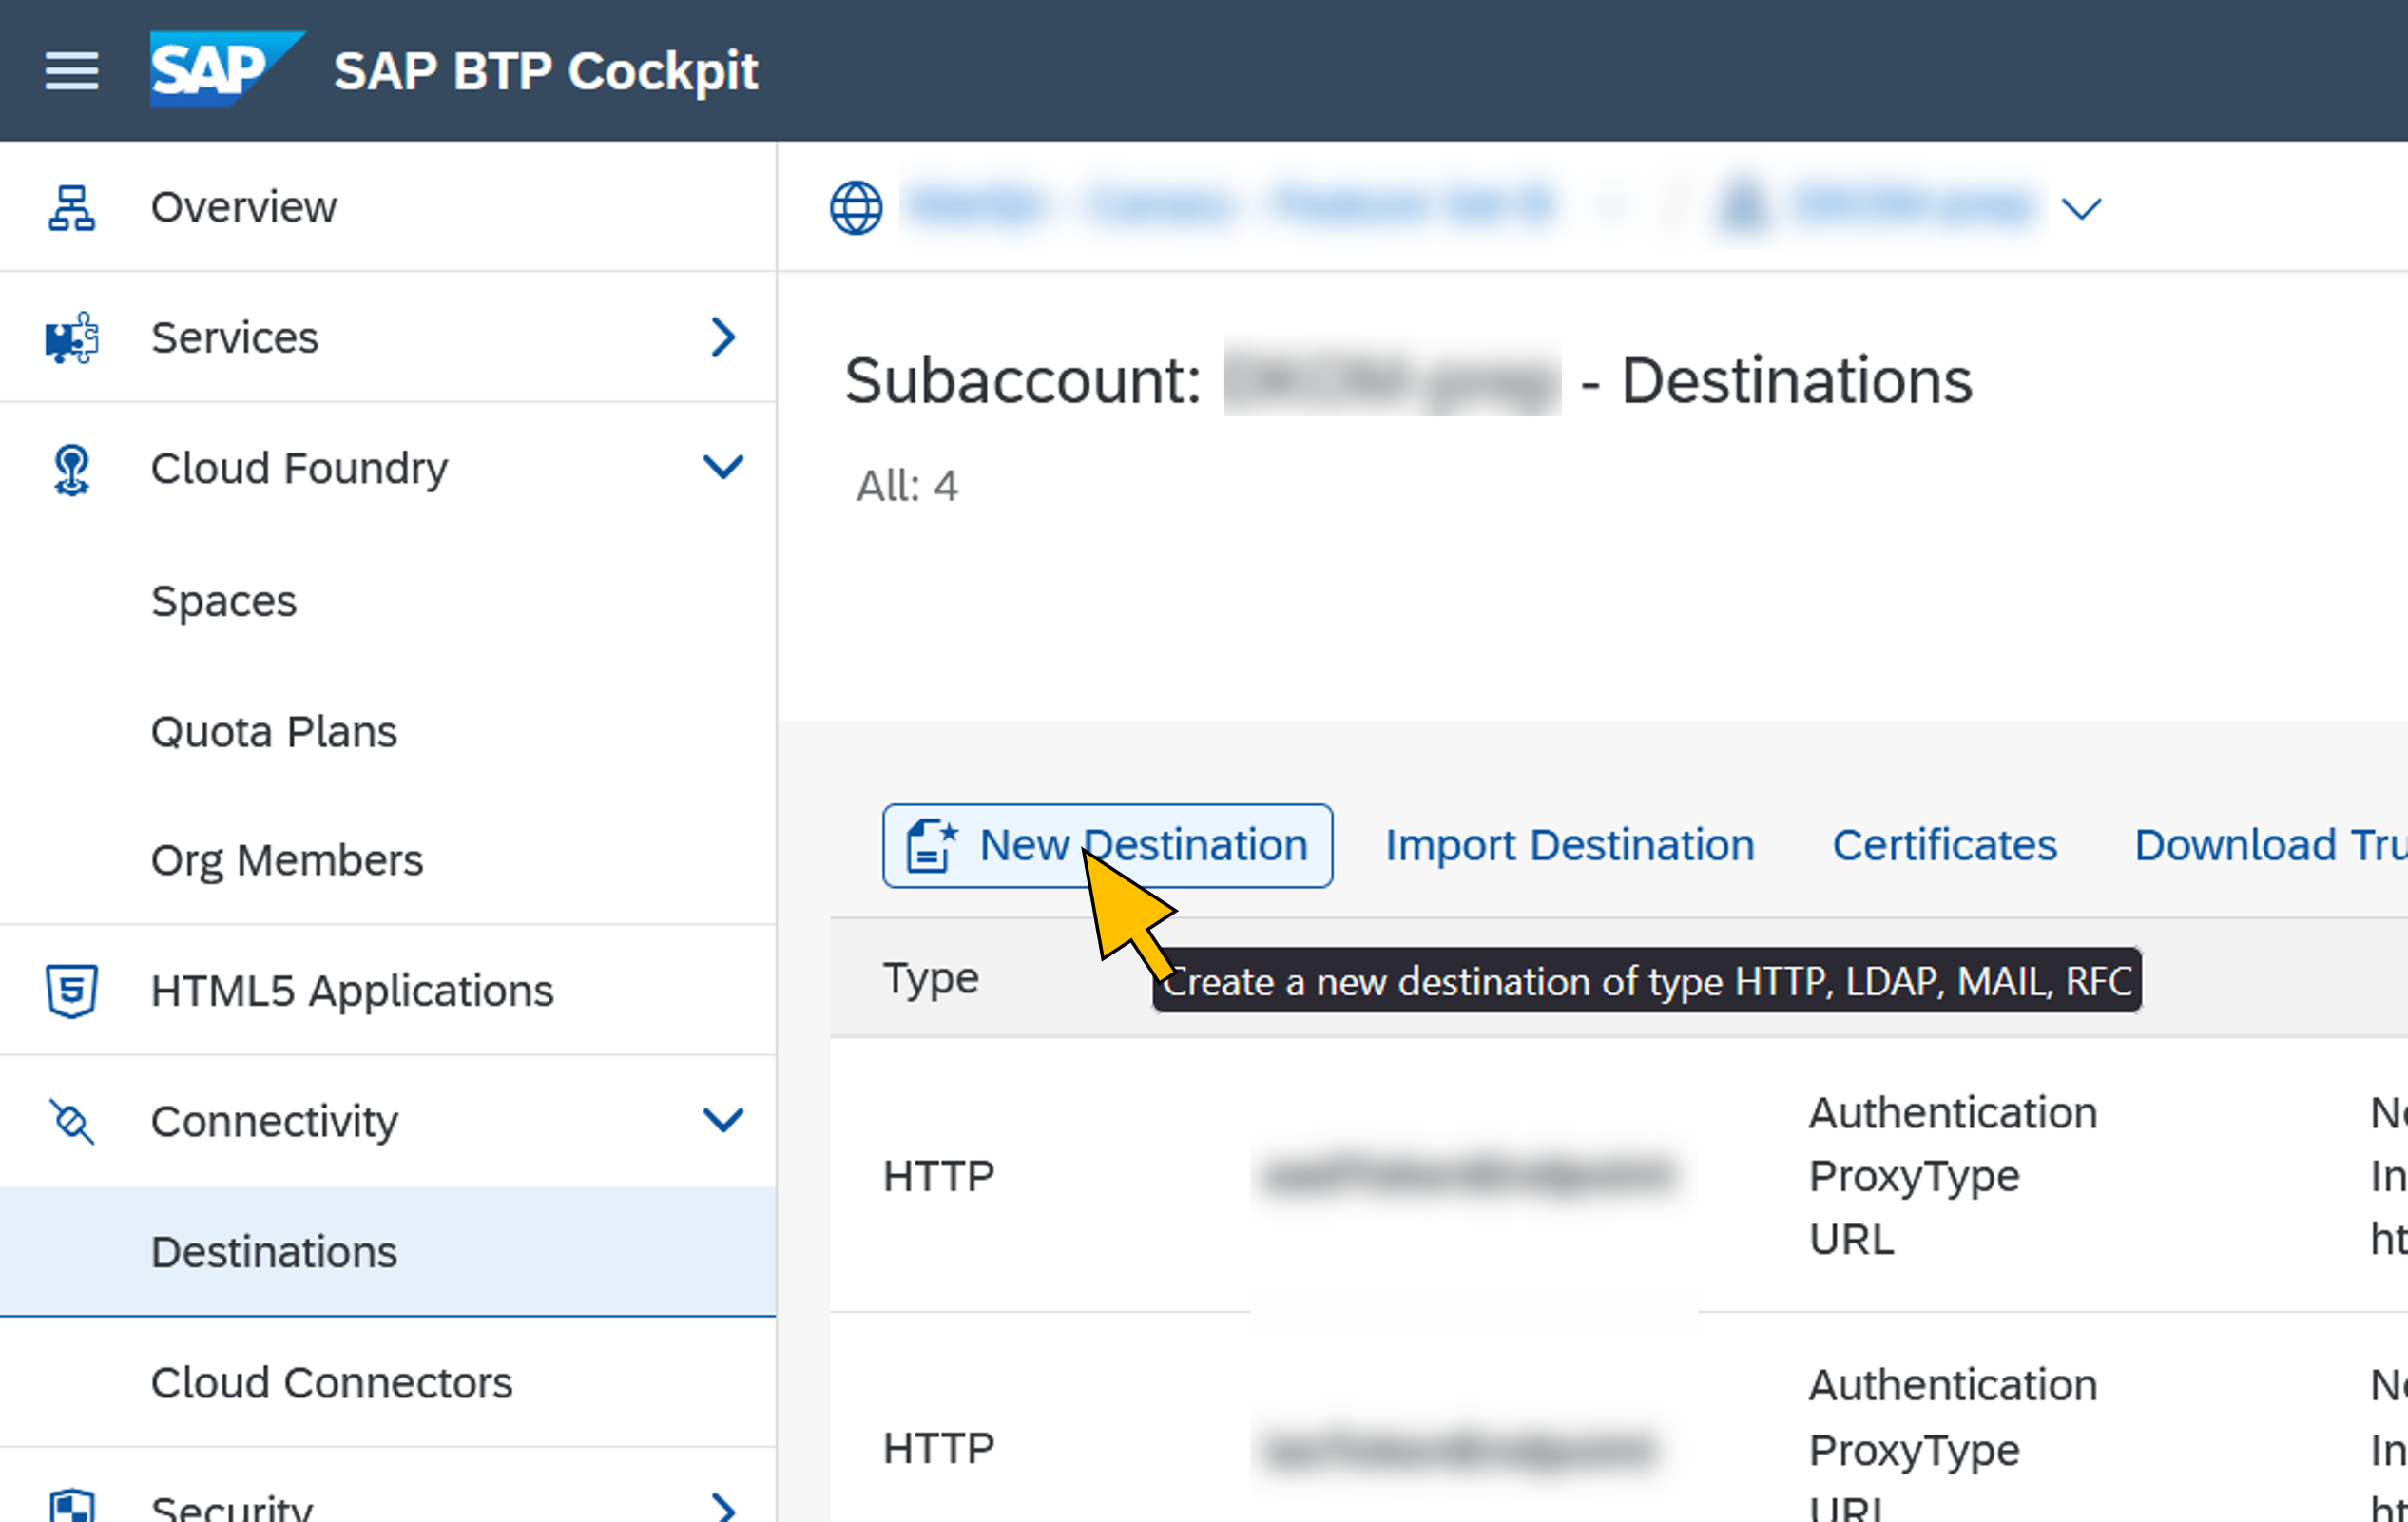 |
| 69 | Enter the following values for the first destination:
Click Save. | 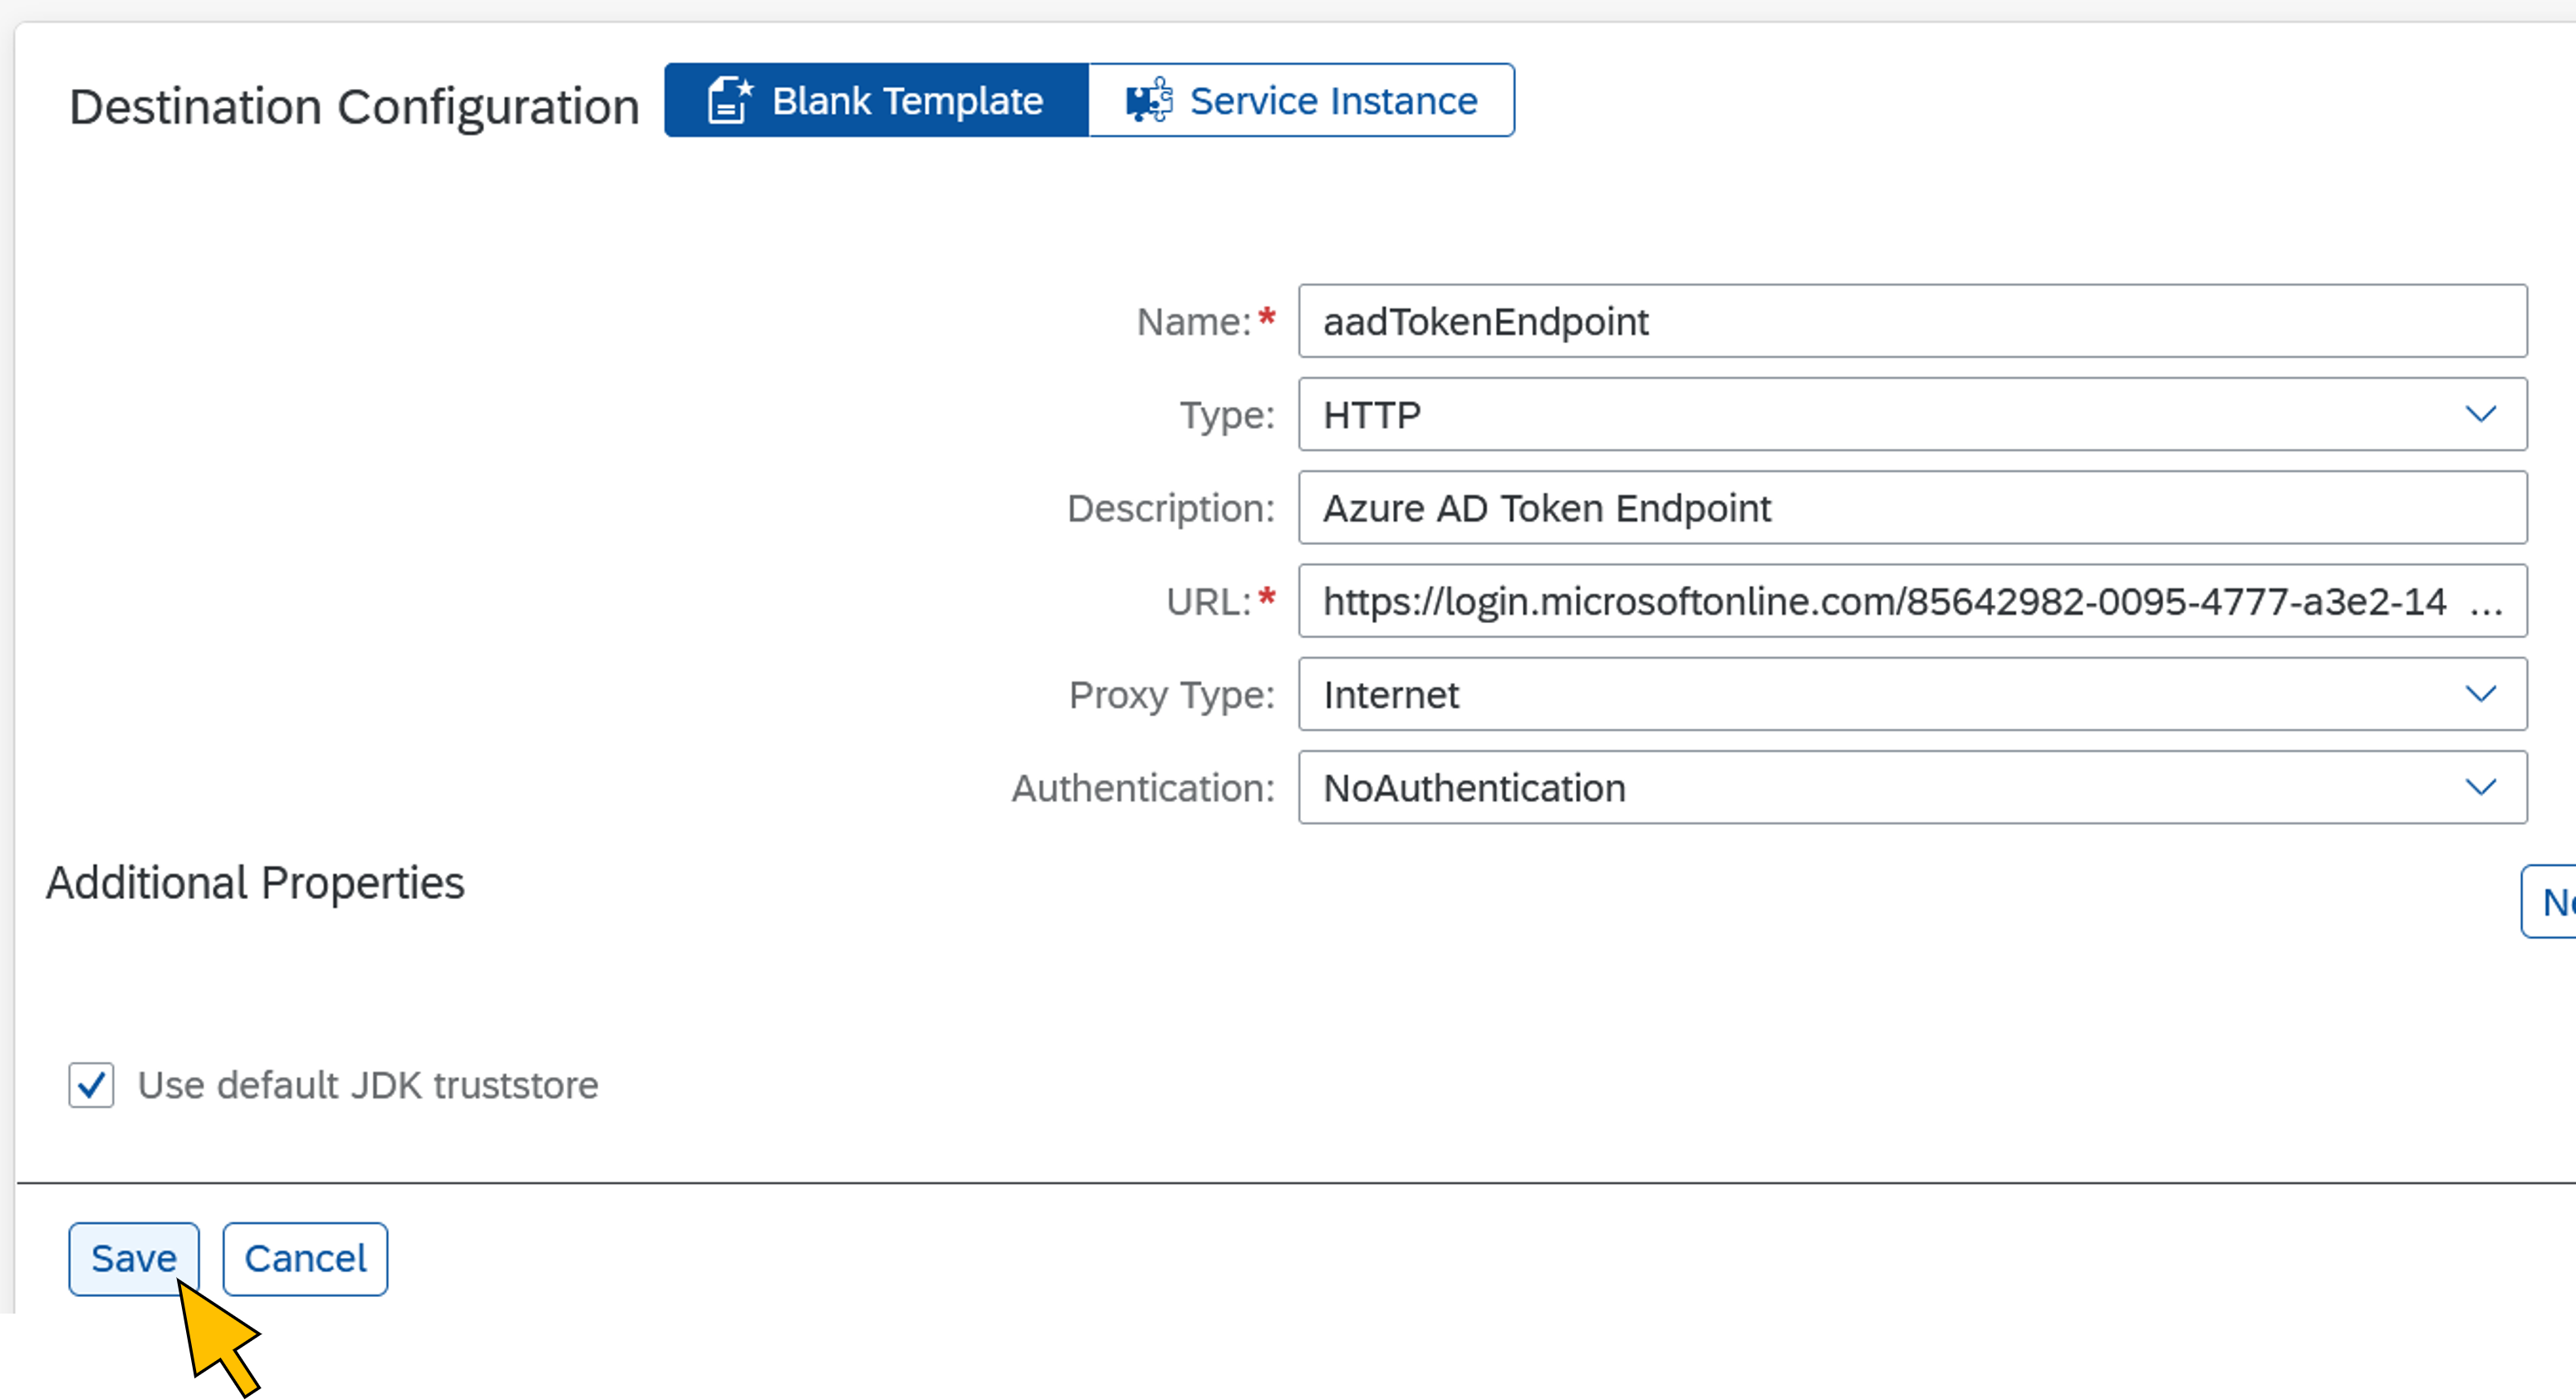 |
| 70 | Repeat steps 68 and 69 with following values for the second destination:
Click Save. |  |
| 71 | Repeat steps 68 and 69 with following values for the third destination:
Click Save. |  |
Test the scenario
| Step | Description | Screenshot |
| 72 | Open a new web browser (e.g. in a private window) and go to the URL of your business applications's approuter at https://approuter-btpgraph-<ID>.cfapps.<region>.hana.ondemand.com/ Replace <ID> and <region> with the same values from step 12. Because the business application in the IAS tenant is configured to forward the authentication request to the corporate IdP, the user is prompted by the Azure AD tenant to enter their credentials. Enter your test user's email address and click Next. | 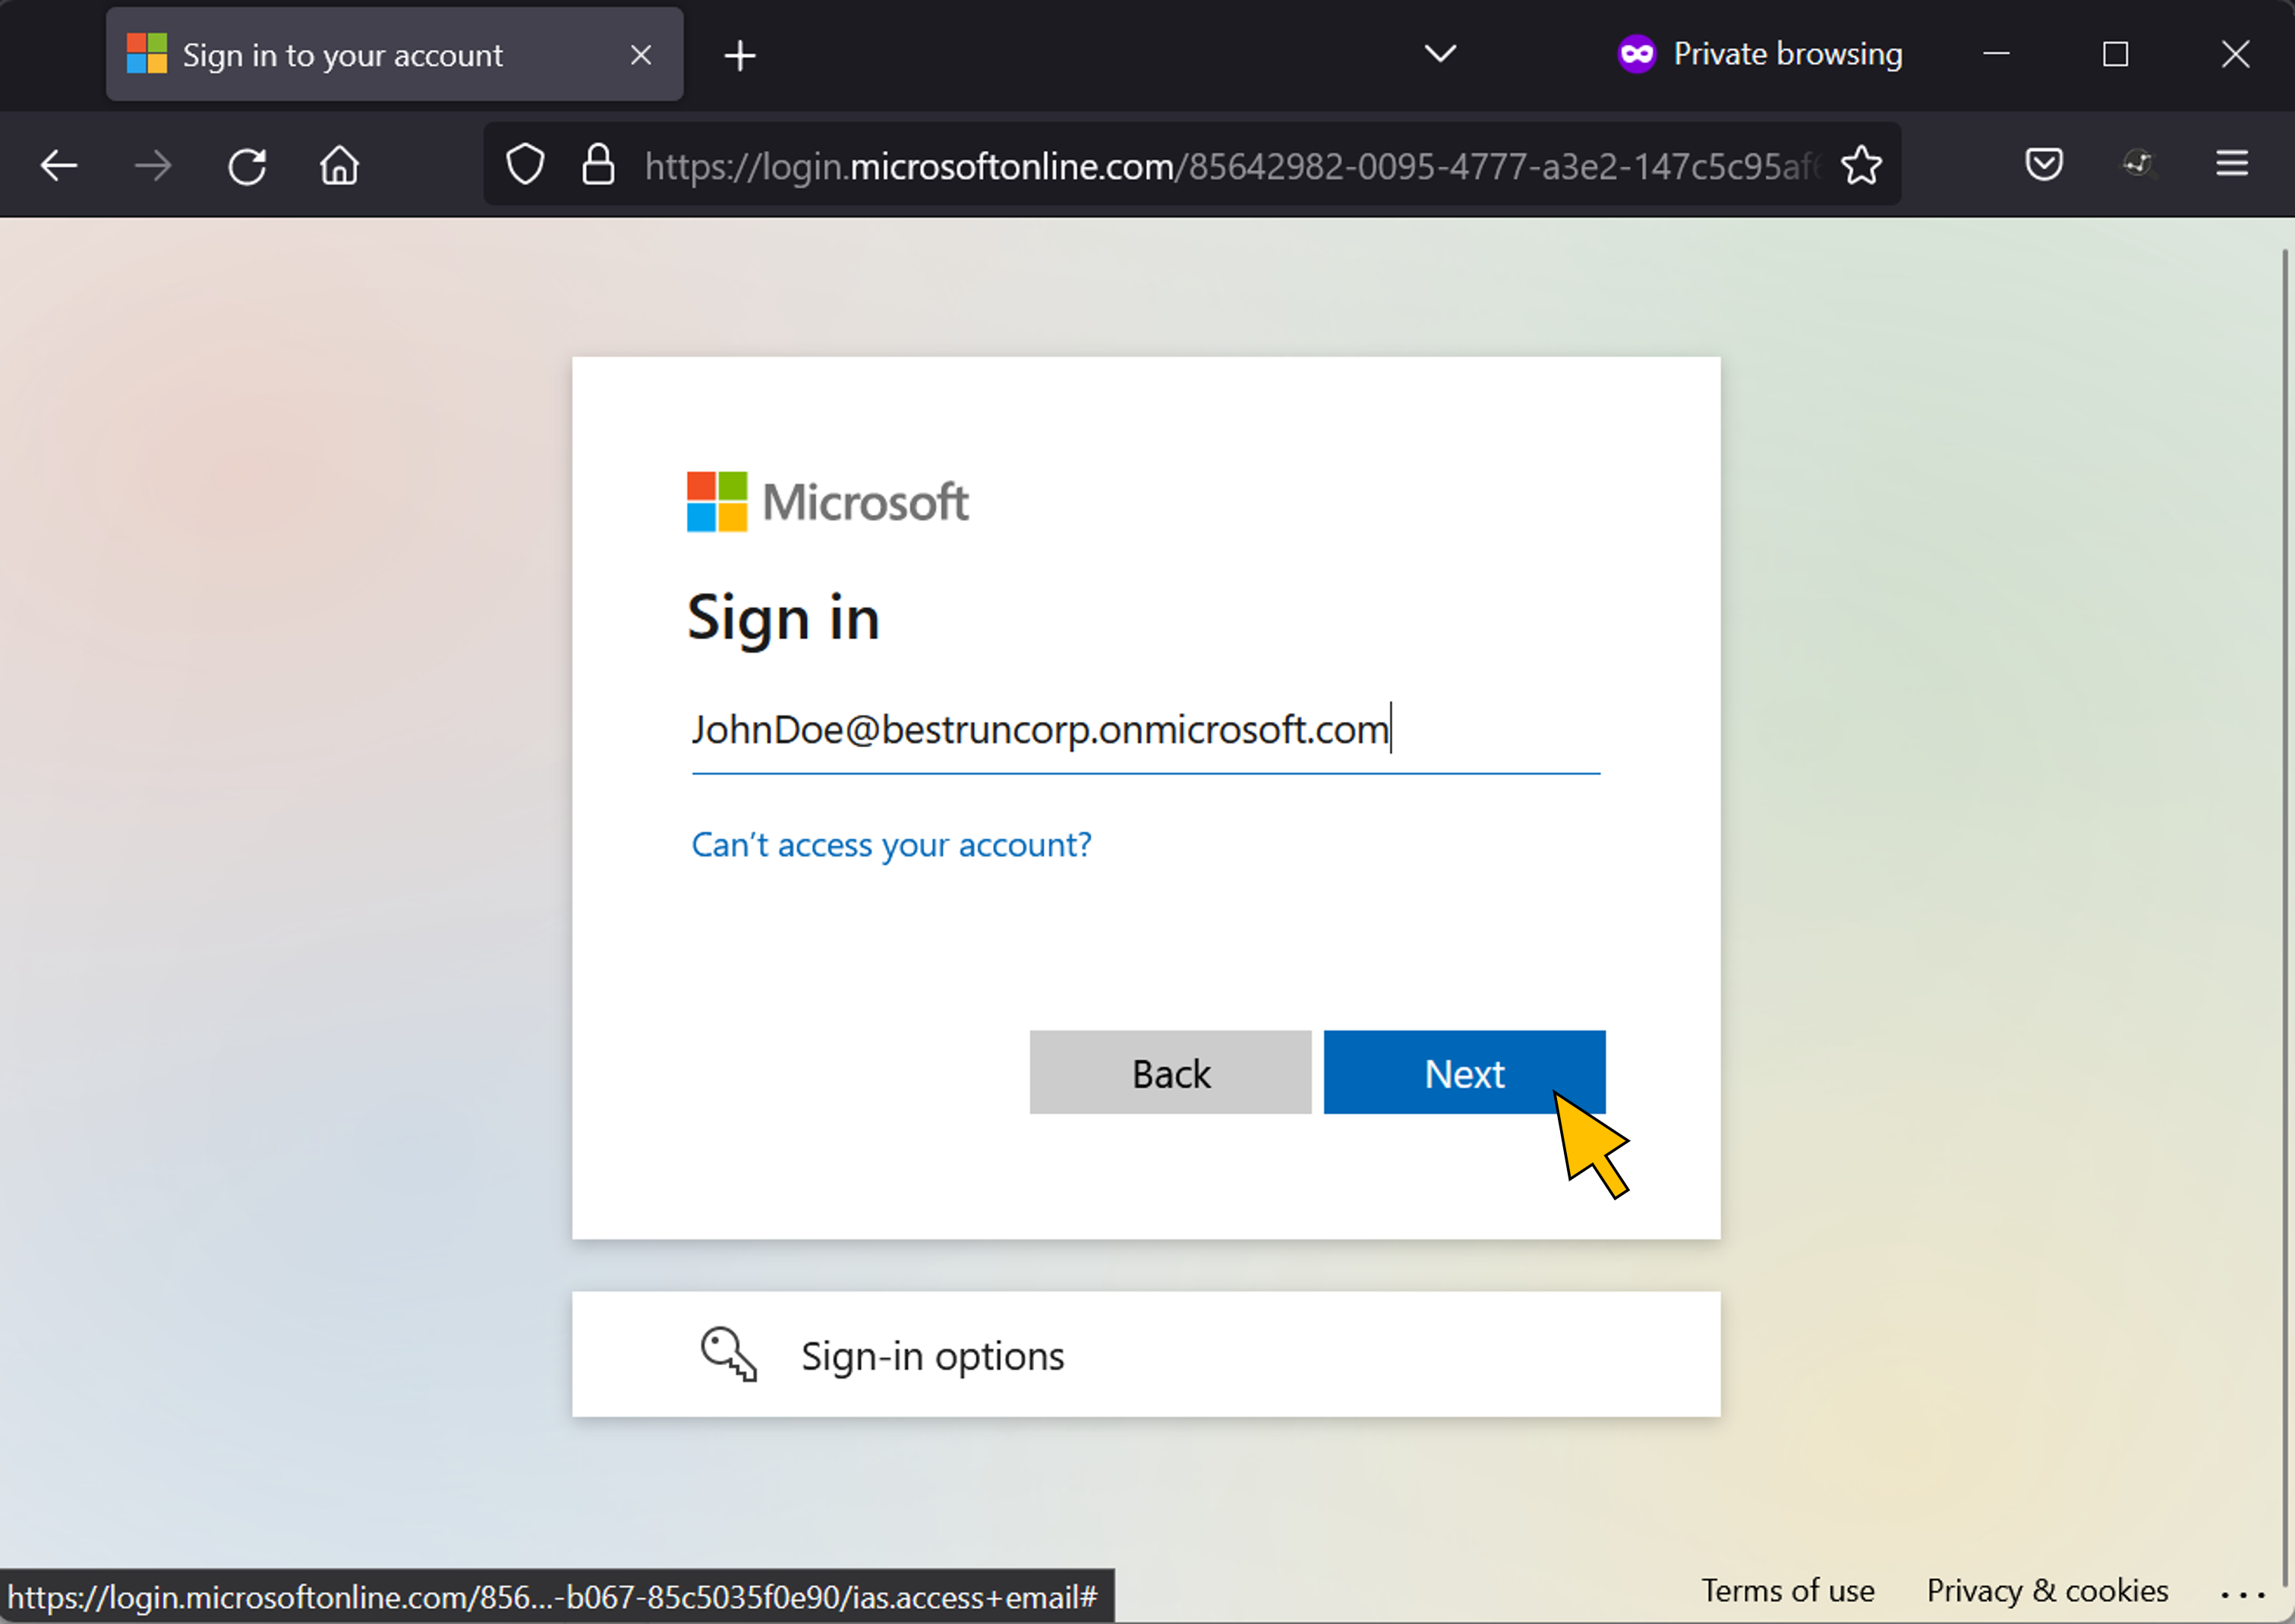 |
| 73 | Enter your user's password and click Sign in. |  |
| 74 | As a logged-in user, you can see your calendar events listed by application in the UI5 frontend. At this time there may be no events found. |  |
| 75 | Open a new browser tab and login to the Outlook web interface at https://outlook.office.com/calendar/view/month You will be single signed-on with your test user. Click New event. |  |
| 76 | Choose a title for the new event and click Save. |  |
| 77 | Go back to the previous browser tab and refresh the business application’s page (Ctrl+R). This time the application lists the new calendar event you’ve just created for the user. By requesting the Graph API token as shown in figure 1, the application could retrieve the data on behalf of the IAS- and Azure AD-authenticated user. |  |
| 78 | To take a look behind the scenes, open the application’s debug page at https://approuter-btpgraph-<ID>.cfapps.<region>.hana.ondemand.com/debug This page lists the tokens in Base64-encoded format that are exchanged between BTP, IAS and Azure AD. |  |
| 79 | Copy the value of the Graph access token (last token in the list) and paste its value into a JWT debugger tool such as https://jwt.ms |  |
Conclusion
With this part of the blog series you’ve successfully implemented principal propagation starting from the authenticated user in SAP BTP calling a service in the Microsoft Cloud, which is equally important than the opposite direction covered by the previous parts. A big thank you goes to the security product teams on the SAP- and Microsoft-side who worked hard in the last months to enable this scenario.
1 Comment
You must be a registered user to add a comment. If you've already registered, sign in. Otherwise, register and sign in.
Labels in this area
-
"automatische backups"
1 -
"regelmäßige sicherung"
1 -
"TypeScript" "Development" "FeedBack"
1 -
505 Technology Updates 53
1 -
ABAP
14 -
ABAP API
1 -
ABAP CDS Views
2 -
ABAP CDS Views - BW Extraction
1 -
ABAP CDS Views - CDC (Change Data Capture)
1 -
ABAP class
2 -
ABAP Cloud
2 -
ABAP Development
5 -
ABAP in Eclipse
1 -
ABAP Platform Trial
1 -
ABAP Programming
2 -
abap technical
1 -
absl
1 -
access data from SAP Datasphere directly from Snowflake
1 -
Access data from SAP datasphere to Qliksense
1 -
Accrual
1 -
action
1 -
adapter modules
1 -
Addon
1 -
Adobe Document Services
1 -
ADS
1 -
ADS Config
1 -
ADS with ABAP
1 -
ADS with Java
1 -
ADT
2 -
Advance Shipping and Receiving
1 -
Advanced Event Mesh
3 -
AEM
1 -
AI
7 -
AI Launchpad
1 -
AI Projects
1 -
AIML
9 -
Alert in Sap analytical cloud
1 -
Amazon S3
1 -
Analytical Dataset
1 -
Analytical Model
1 -
Analytics
1 -
Analyze Workload Data
1 -
annotations
1 -
API
1 -
API and Integration
3 -
API Call
2 -
Application Architecture
1 -
Application Development
5 -
Application Development for SAP HANA Cloud
3 -
Applications and Business Processes (AP)
1 -
Artificial Intelligence
1 -
Artificial Intelligence (AI)
4 -
Artificial Intelligence (AI) 1 Business Trends 363 Business Trends 8 Digital Transformation with Cloud ERP (DT) 1 Event Information 462 Event Information 15 Expert Insights 114 Expert Insights 76 Life at SAP 418 Life at SAP 1 Product Updates 4
1 -
Artificial Intelligence (AI) blockchain Data & Analytics
1 -
Artificial Intelligence (AI) blockchain Data & Analytics Intelligent Enterprise
1 -
Artificial Intelligence (AI) blockchain Data & Analytics Intelligent Enterprise Oil Gas IoT Exploration Production
1 -
Artificial Intelligence (AI) blockchain Data & Analytics Intelligent Enterprise sustainability responsibility esg social compliance cybersecurity risk
1 -
ASE
1 -
ASR
2 -
ASUG
1 -
Attachments
1 -
Authorisations
1 -
Automating Processes
1 -
Automation
1 -
aws
2 -
Azure
1 -
Azure AI Studio
1 -
B2B Integration
1 -
Backorder Processing
1 -
Backup
1 -
Backup and Recovery
1 -
Backup schedule
1 -
BADI_MATERIAL_CHECK error message
1 -
Bank
1 -
BAS
1 -
basis
2 -
Basis Monitoring & Tcodes with Key notes
2 -
Batch Management
1 -
BDC
1 -
Best Practice
1 -
bitcoin
1 -
Blockchain
3 -
BOP in aATP
1 -
BOP Segments
1 -
BOP Strategies
1 -
BOP Variant
1 -
BPC
1 -
BPC LIVE
1 -
BTP
11 -
BTP Destination
2 -
Business AI
1 -
Business and IT Integration
1 -
Business application stu
1 -
Business Application Studio
1 -
Business Architecture
1 -
Business Communication Services
1 -
Business Continuity
1 -
Business Data Fabric
3 -
Business Partner
12 -
Business Partner Master Data
10 -
Business Technology Platform
2 -
Business Trends
1 -
CA
1 -
calculation view
1 -
CAP
3 -
Capgemini
1 -
CAPM
1 -
Catalyst for Efficiency: Revolutionizing SAP Integration Suite with Artificial Intelligence (AI) and
1 -
CCMS
2 -
CDQ
12 -
CDS
2 -
Cental Finance
1 -
Certificates
1 -
CFL
1 -
Change Management
1 -
chatbot
1 -
chatgpt
3 -
CL_SALV_TABLE
2 -
Class Runner
1 -
Classrunner
1 -
Cloud ALM Monitoring
1 -
Cloud ALM Operations
1 -
cloud connector
1 -
Cloud Extensibility
1 -
Cloud Foundry
4 -
Cloud Integration
6 -
Cloud Platform Integration
2 -
cloudalm
1 -
communication
1 -
Compensation Information Management
1 -
Compensation Management
1 -
Compliance
1 -
Compound Employee API
1 -
Configuration
1 -
Connectors
1 -
Consolidation Extension for SAP Analytics Cloud
1 -
Controller-Service-Repository pattern
1 -
Conversion
1 -
Cosine similarity
1 -
cryptocurrency
1 -
CSI
1 -
ctms
1 -
Custom chatbot
3 -
Custom Destination Service
1 -
custom fields
1 -
Customer Experience
1 -
Customer Journey
1 -
Customizing
1 -
cyber security
2 -
Data
1 -
Data & Analytics
1 -
Data Aging
1 -
Data Analytics
2 -
Data and Analytics (DA)
1 -
Data Archiving
1 -
Data Back-up
1 -
Data Governance
5 -
Data Integration
2 -
Data Quality
12 -
Data Quality Management
12 -
Data Synchronization
1 -
data transfer
1 -
Data Unleashed
1 -
Data Value
8 -
database tables
1 -
Datasphere
2 -
datenbanksicherung
1 -
dba cockpit
1 -
dbacockpit
1 -
Debugging
2 -
Delimiting Pay Components
1 -
Delta Integrations
1 -
Destination
3 -
Destination Service
1 -
Developer extensibility
1 -
Developing with SAP Integration Suite
1 -
Devops
1 -
digital transformation
1 -
Documentation
1 -
Dot Product
1 -
DQM
1 -
dump database
1 -
dump transaction
1 -
e-Invoice
1 -
E4H Conversion
1 -
Eclipse ADT ABAP Development Tools
2 -
edoc
1 -
edocument
1 -
ELA
1 -
Embedded Consolidation
1 -
Embedding
1 -
Embeddings
1 -
Employee Central
1 -
Employee Central Payroll
1 -
Employee Central Time Off
1 -
Employee Information
1 -
Employee Rehires
1 -
Enable Now
1 -
Enable now manager
1 -
endpoint
1 -
Enhancement Request
1 -
Enterprise Architecture
1 -
ETL Business Analytics with SAP Signavio
1 -
Euclidean distance
1 -
Event Dates
1 -
Event Driven Architecture
1 -
Event Mesh
2 -
Event Reason
1 -
EventBasedIntegration
1 -
EWM
1 -
EWM Outbound configuration
1 -
EWM-TM-Integration
1 -
Existing Event Changes
1 -
Expand
1 -
Expert
2 -
Expert Insights
1 -
Fiori
14 -
Fiori Elements
2 -
Fiori SAPUI5
12 -
Flask
1 -
Full Stack
8 -
Funds Management
1 -
General
1 -
Generative AI
1 -
Getting Started
1 -
GitHub
8 -
Grants Management
1 -
groovy
1 -
GTP
1 -
HANA
5 -
HANA Cloud
2 -
Hana Cloud Database Integration
2 -
HANA DB
1 -
HANA XS Advanced
1 -
Historical Events
1 -
home labs
1 -
HowTo
1 -
HR Data Management
1 -
html5
8 -
HTML5 Application
1 -
Identity cards validation
1 -
idm
1 -
Implementation
1 -
input parameter
1 -
instant payments
1 -
Integration
3 -
Integration Advisor
1 -
Integration Architecture
1 -
Integration Center
1 -
Integration Suite
1 -
intelligent enterprise
1 -
Java
1 -
job
1 -
Job Information Changes
1 -
Job-Related Events
1 -
Job_Event_Information
1 -
joule
4 -
Journal Entries
1 -
Just Ask
1 -
Kerberos for ABAP
8 -
Kerberos for JAVA
8 -
Launch Wizard
1 -
Learning Content
2 -
Life at SAP
1 -
lightning
1 -
Linear Regression SAP HANA Cloud
1 -
local tax regulations
1 -
LP
1 -
Machine Learning
2 -
Marketing
1 -
Master Data
3 -
Master Data Management
14 -
Maxdb
2 -
MDG
1 -
MDGM
1 -
MDM
1 -
Message box.
1 -
Messages on RF Device
1 -
Microservices Architecture
1 -
Microsoft Universal Print
1 -
Middleware Solutions
1 -
Migration
5 -
ML Model Development
1 -
Modeling in SAP HANA Cloud
8 -
Monitoring
3 -
MTA
1 -
Multi-Record Scenarios
1 -
Multiple Event Triggers
1 -
Neo
1 -
New Event Creation
1 -
New Feature
1 -
Newcomer
1 -
NodeJS
2 -
ODATA
2 -
OData APIs
1 -
odatav2
1 -
ODATAV4
1 -
ODBC
1 -
ODBC Connection
1 -
Onpremise
1 -
open source
2 -
OpenAI API
1 -
Oracle
1 -
PaPM
1 -
PaPM Dynamic Data Copy through Writer function
1 -
PaPM Remote Call
1 -
PAS-C01
1 -
Pay Component Management
1 -
PGP
1 -
Pickle
1 -
PLANNING ARCHITECTURE
1 -
Popup in Sap analytical cloud
1 -
PostgrSQL
1 -
POSTMAN
1 -
Process Automation
2 -
Product Updates
4 -
PSM
1 -
Public Cloud
1 -
Python
4 -
Qlik
1 -
Qualtrics
1 -
RAP
3 -
RAP BO
2 -
Record Deletion
1 -
Recovery
1 -
recurring payments
1 -
redeply
1 -
Release
1 -
Remote Consumption Model
1 -
Replication Flows
1 -
Research
1 -
Resilience
1 -
REST
1 -
REST API
1 -
Retagging Required
1 -
Risk
1 -
Rolling Kernel Switch
1 -
route
1 -
rules
1 -
S4 HANA
1 -
S4 HANA Cloud
1 -
S4 HANA On-Premise
1 -
S4HANA
3 -
S4HANA_OP_2023
2 -
SAC
10 -
SAC PLANNING
9 -
SAP
4 -
SAP ABAP
1 -
SAP Advanced Event Mesh
1 -
SAP AI Core
8 -
SAP AI Launchpad
8 -
SAP Analytic Cloud Compass
1 -
Sap Analytical Cloud
1 -
SAP Analytics Cloud
4 -
SAP Analytics Cloud for Consolidation
2 -
SAP Analytics Cloud Story
1 -
SAP analytics clouds
1 -
SAP BAS
1 -
SAP Basis
6 -
SAP BODS
1 -
SAP BODS certification.
1 -
SAP BTP
20 -
SAP BTP Build Work Zone
2 -
SAP BTP Cloud Foundry
5 -
SAP BTP Costing
1 -
SAP BTP CTMS
1 -
SAP BTP Innovation
1 -
SAP BTP Migration Tool
1 -
SAP BTP SDK IOS
1 -
SAP Build
11 -
SAP Build App
1 -
SAP Build apps
1 -
SAP Build CodeJam
1 -
SAP Build Process Automation
3 -
SAP Build work zone
10 -
SAP Business Objects Platform
1 -
SAP Business Technology
2 -
SAP Business Technology Platform (XP)
1 -
sap bw
1 -
SAP CAP
2 -
SAP CDC
1 -
SAP CDP
1 -
SAP CDS VIEW
1 -
SAP Certification
1 -
SAP Cloud ALM
4 -
SAP Cloud Application Programming Model
1 -
SAP Cloud Integration for Data Services
1 -
SAP cloud platform
8 -
SAP Companion
1 -
SAP CPI
3 -
SAP CPI (Cloud Platform Integration)
2 -
SAP CPI Discover tab
1 -
sap credential store
1 -
SAP Customer Data Cloud
1 -
SAP Customer Data Platform
1 -
SAP Data Intelligence
1 -
SAP Data Migration in Retail Industry
1 -
SAP Data Services
1 -
SAP DATABASE
1 -
SAP Dataspher to Non SAP BI tools
1 -
SAP Datasphere
9 -
SAP DRC
1 -
SAP EWM
1 -
SAP Fiori
2 -
SAP Fiori App Embedding
1 -
Sap Fiori Extension Project Using BAS
1 -
SAP GRC
1 -
SAP HANA
1 -
SAP HCM (Human Capital Management)
1 -
SAP HR Solutions
1 -
SAP IDM
1 -
SAP Integration Suite
9 -
SAP Integrations
4 -
SAP iRPA
2 -
SAP Learning Class
1 -
SAP Learning Hub
1 -
SAP Odata
2 -
SAP on Azure
1 -
SAP PartnerEdge
1 -
sap partners
1 -
SAP Password Reset
1 -
SAP PO Migration
1 -
SAP Prepackaged Content
1 -
SAP Process Automation
2 -
SAP Process Integration
2 -
SAP Process Orchestration
1 -
SAP S4HANA
2 -
SAP S4HANA Cloud
1 -
SAP S4HANA Cloud for Finance
1 -
SAP S4HANA Cloud private edition
1 -
SAP Sandbox
1 -
SAP STMS
1 -
SAP SuccessFactors
2 -
SAP SuccessFactors HXM Core
1 -
SAP Time
1 -
SAP TM
2 -
SAP Trading Partner Management
1 -
SAP UI5
1 -
SAP Upgrade
1 -
SAP Utilities
1 -
SAP-GUI
8 -
SAP_COM_0276
1 -
SAPBTP
1 -
SAPCPI
1 -
SAPEWM
1 -
sapmentors
1 -
saponaws
2 -
SAPS4HANA
1 -
SAPUI5
4 -
schedule
1 -
Secure Login Client Setup
8 -
security
9 -
Selenium Testing
1 -
SEN
1 -
SEN Manager
1 -
service
1 -
SET_CELL_TYPE
1 -
SET_CELL_TYPE_COLUMN
1 -
SFTP scenario
2 -
Simplex
1 -
Single Sign On
8 -
Singlesource
1 -
SKLearn
1 -
soap
1 -
Software Development
1 -
SOLMAN
1 -
solman 7.2
2 -
Solution Manager
3 -
sp_dumpdb
1 -
sp_dumptrans
1 -
SQL
1 -
sql script
1 -
SSL
8 -
SSO
8 -
Substring function
1 -
SuccessFactors
1 -
SuccessFactors Time Tracking
1 -
Sybase
1 -
system copy method
1 -
System owner
1 -
Table splitting
1 -
Tax Integration
1 -
Technical article
1 -
Technical articles
1 -
Technology Updates
1 -
Technology Updates
1 -
Technology_Updates
1 -
Threats
1 -
Time Collectors
1 -
Time Off
2 -
Tips and tricks
2 -
Tools
1 -
Trainings & Certifications
1 -
Transport in SAP BODS
1 -
Transport Management
1 -
TypeScript
2 -
unbind
1 -
Unified Customer Profile
1 -
UPB
1 -
Use of Parameters for Data Copy in PaPM
1 -
User Unlock
1 -
VA02
1 -
Validations
1 -
Vector Database
1 -
Vector Engine
1 -
Visual Studio Code
1 -
VSCode
1 -
Web SDK
1 -
work zone
1 -
workload
1 -
xsa
1 -
XSA Refresh
1
- « Previous
- Next »
Top kudoed authors
| User | Count |
|---|---|
| 11 | |
| 10 | |
| 7 | |
| 6 | |
| 4 | |
| 4 | |
| 3 | |
| 3 | |
| 3 | |
| 3 |