

- SAP Community
- Products and Technology
- Enterprise Resource Planning
- ERP Blogs by SAP
- Output Management – Customize Master Form for Logo...
Enterprise Resource Planning Blogs by SAP
Get insights and updates about cloud ERP and RISE with SAP, SAP S/4HANA and SAP S/4HANA Cloud, and more enterprise management capabilities with SAP blog posts.
Turn on suggestions
Auto-suggest helps you quickly narrow down your search results by suggesting possible matches as you type.
Showing results for
Product and Topic Expert
Options
- Subscribe to RSS Feed
- Mark as New
- Mark as Read
- Bookmark
- Subscribe
- Printer Friendly Page
- Report Inappropriate Content
11-21-2017
3:36 AM
Please find list of related blogs
Please refer to S/4HANA SQUARE ONE for other blogs
In SAP S/4HANA Cloud, Adobe forms (XFA) are the standard technology for rendering application objects (such as purchase orders, contracts, or invoices) into PDF format. Output management in the cloud provides the necessary framework for form template development and maintenance, data assembly, rendering, and output determination for forms.
The form is separated into two parts Master Form Template & Content Form Template as shown in the graphic below. The blog shows how to customize the Master Form Template, shown here in black lines for logo & Footer Blocks - Address, Tel/Fax/eMail. There is a separate blog to customize Content Form Template which is shown in Blue arrow with shading in green.
One Master Form Template can be shared between different Content Form Templates as below:
Billing Document     Scheduling Agreement       Purchase Order

Sales Document       Outgoing Check             Purchase Contact

Payment Advice       Accounting Document Item   Outbound Delivery

Goods Movement       Physical Inventory         Request for Quotation

Supplier Invoice     Settlement Document        Production Planning

Manufacturing Order
The list of standard forms is available in the spreadsheet as per the link below nicely categorized into document type, etc BP_CLD_ENTPR_S4CLD2002_19_Forms_List_EN_US.xlsx
TIP: To check if printing is setup correctly the easiest way in case of ERP/S4HANA on-prem is to send screen printout to the printer, but in S/4HANA cloud, if you open Print Queue there is a button Create Test Page. For end to end testing you will have to create any of the above documents and setup Output Management, Output Control, Form Determination, etc.
Please note that you should download/modify/upload template in Q-System. After it is uploaded in Q, you can move across landscape using Q-System tile “Export Software Collection” and then import into P-System using tile “Import Software Collection”.
From 1711 onwards the master form customization is simplified by customizing logo, footer, sender address in SSCUI. This also reduces the effort of having to create separate forms per Country and per Company Code, each one can be defined in SSCUI as a separate line in Master Form Determination. If you want to only replace Logo and/or Sender Address and/or Footer Blocks please follow step 1 to 3.
If you want to further customize the form, replace STEPS 1 – 3 with steps in Appendix STEPS A1 – A5.
STEP 1: OUTPUT MANAGEMENT – MANAGE LOGOS
In Q-System/Starter System select Fiori group – Output Management – Fiori tile Manage Logos. You will require authorization to Catalog SAP_CORE_BC_OM which is part of Role SAP_BR_ADMINISTRATOR.
Click on Go to see if there are any logos already added. Click on + and then + and add the logo
Click on Save. You can click on Go again to confirm if record is added.
STEP 2: OUTPUT MANAGEMENT – MANAGE TEXTS
In Q-System/Starter System select Fiori group – Output Management – Fiori tile Manage Texts. You will require authorization to Catalog SAP_CORE_BC_OM which is part of Role SAP_BR_ADMINISTRATOR.
Click on Go to see if there are any texts already added. Click on + and then + and add the text as below:
Also add text for Footer 2 if needed. After the text is added, you should have below screen for one company.
STEP 3: SSCUI – MASTER FORM TEMPLATE DETERMINATION
In Q-System/Starter System select Fiori group – Implementation Cockpit – Fiori tile Manage Your Solution. You will require authorization to Role SAP_BR_BPC_EXPERT
Select Configure Your Solution, enter (1) “Master Form” and click on (2) Search, Select (3) >
click Configure below
Click on New Entries. Select Organization ID = 1710 and Master Form Template = SOMU_FORM_MASTER_LETTER as shown below.
TIP: If you find templates with APOC_DEMO_FORM_MASTER_*, please do not use these templates instead of SOMU_FORM_MASTER_LETTER as they contain hard coded information and some fields may not populate as they are not bound to S4HC system.
(It is optional to restrict the form like Org Unit Type = EKORG (= Purchasing Organization)). 

If the system prompts for a transport, please create transport so that the changes are saved and will be available in Production system after Q2P transport.
Click on Save.
The Master form configuration is complete at this point. The steps below are to print a purchase order to check the master form is edited correctly.
STEP 4: CONFIGURE OUTPUT PARAMETER DETERMINATION
In Q System Select Fiori group – Output Control, Fiori tile Output Parameter Determination. You will require authorization with business role SAP_BR_ADMINISTRATOR business catalog SAP_CA_BC_OC.
Select Show Rules for (1) Purchase Order Determination Step (2) Output Type and check that Dispatch Time is “immediately”
If not, click on (4) Edit and change the value to Immediately.
Check that Determination Step Channel is set to PRINT
Select Show Rules for (1) Purchase Order and Determination Step (2) Printer Settings Click on (3) Edit, select value under Column (4) Print Queue (scroll to the right) and click (5) popup to select the appropriate Print Queue (6) and click on (7) OK.
TIP: In the above screen please note there is always a Print Queue by name DEFAULT, but it cannot print to Cloud Print manager. The purpose of DEFAULT queue is for sending any output that does not have queue defined. Also please note that the Print Queues do not belong to a specific business user.Click on (8) Activate
STEP 5: CREATE PURCHASE ORDER
Select Fiori group – Purchase Order Processing, Fiori tile Manage Purchase Order. You will require authorization with business role SAP_BR_PURCHASER business catalog SAP_MM_BC_PO_PROCESS_PC.
Select one record for Purchase Order.
Please Note - if this is a new system, you will have to add necessary master data details to create new purchase order.
Select the Purchase Order and Click on Copy
Click on Order, two outputs are generated, eMail and Printout. The graphic shows from where in Output Parameter Determination the different settings are obtained.
Click on Preview icon to display the printout in PDF format.
USEFUL INFORMATION:
- When you download a Content Form you may be prompted to download Master fragment. The purpose of this is so that you see the complete form and is provided just for maintaining the Content form offline.
- Do not move footer blocks into content area.
- Number of forms depends on how many companies X number of languages e.g. 5 companies x 3 languages = 15 forms
- If the Country has different paper size - then separate form is required for each paper size
- In case you want to change from old format to new, the customization was done only for Logo, Footer and Sender address, it would be better to do Steps 1, 2 and 3, switch over to new changed forms and then abandon/delete the old customized master forms
- In case you want to change the Form title from F2 Invoice to Invoice please change it's description in SSCUID 102402 Billing: Document Types

- Steps in APPENDIX are not needed and are shown for further customization.
=======APPENDIX FOR FURTHER CUSTOMIZATION=======
If you want to customize the form more than just logo, sender address, footer blocks please use STEPS A1-A5 instead of STEPS 1-4. Standard Forms that were provided before S/4HANA Cloud 1711 needed the customization as below:
STEP A1: INSTALL ADOBE LIVECYCLE DESIGNER
Select Fiori app from Group – Additional Software, Fiori tile - Install Additional Software. You will require authorization with business role SAP_BR_ADMINISTRATOR business catalog SAP_CORE_BC_IAS.
Click on Download for Adobe LiveCycle Designer. This is a 32-bit application that runs on both platforms 32-but as well as 64-bit.
The system will prompt for S-User id login to the SAP Service Marketplace and your S-User id requires download authorization. Click on the (1) File and click (2) Save.
Locate ZIP file in download folder and extract, RightClick ALD110P_5-80000927.EXE and select below:
Front End Installer is started, follow defaults to install software on desktop.
STEP A2: DOWNLOAD MASTER FORM TEMPLATE
Select Fiori app from group – Output Management, Fiori tile - Maintain Form Templates. 
To easily select the template, please set filter as required - click on (1) Predelivered Templates, (2) Description as Master, (3) Available Languages as English, (4) Available Countries as USA, Click on (5) Go and (6) RightArrow to open the Master Template.
Note (1) Data Source as FDP_OM_FORM_MASTER_SRV. This will be needed later when uploading the Master Form Template. Click on (2) Download
Create folder master_form_template
Save as file master_form_template.zip and extract
STEP A3: EDIT MASTER FORM TEMPLATE
Start Adobe LiveCycle Designer. If you are looking for the application in Windows 10, and don't have shortcut, please type Windows Key + “formdesigner” as below to locate below
Open file SOMU_FORM_MASTER_LETTER.xdp and select Yes for question “Do you want Designer to update the connection using the modified XML Schema”
The Master form template is a separate XDP file and contains different layout definitions (fragments): Landscape_Factsheet,
Landscape_ItemList,
Portrait_Factsheet,
Portrait_ItemList,
Portrait_OutboundLetter.
Only one of them at a time can be referenced by the application form. Purchase Order uses the last fragment above. Each fragment is designed for a specific page orientation (landscape or portrait) and layout variant (fact sheet, item list or outbound letter).
Each fragment includes first page (mst1) and subsequent pages (mst2).
Expand Portrait_OutboundLetter, click on imgLogo, tab Field and point URL to the logo file location on the desktop.
In order to change Address, Tel/Fax/eMail you should select corresponding (1) txtLine and click on tab (2) Value to edit (3) Default. The figure shows the objects corresponding to the three footer boxs.
TIP: Please note that in the Default text there is a "line feed" character between “The predefined Company” and “3475 Deer Creek” which you cannot see.So you have to replace text before and after this character. The easy way is to use Nodepad++ to edit the address data and paste it back into the field in formdesigner.
In Notepad++ first take menu option Edit => EOL Conversion => Unix (LF)
Type the text as above and then paste it back into the formdesigner. Once you have all the details, click on Preview PDF to see the changes. You may have to edit this in Fragment Landscape_Factsheet to see the preview and then paste the same text over to Portrait_OutboundLetter.

TIP: You should edit the same logo and footer text in the other fragments, (namely - Landscape_Factsheet, Landscape_ItemList, Portrait_Factsheet, Portrait_ItemList) as some of these may be used by other documents.


For each of these fragments, change has to be made 2 times – under mst1 (first page) and then mst2 (Subsequent pages). There are 10 places to replace the logo and Footer boxes in the entire master template.
Save the form for e.g. MYCOMPANY_FORM_MASTER_US_E.xdp
STEP 4: UPLOAD MASTER FORM TEMPLATE
In Q System select the Fiori group – Output Management -Fiori tile Maintain Form Templates.
Click on (1) New, enter (2) Form Template Name, (3) Language, (4) Select Form Template File, (5) Data Source – this should be the one you noted down from STEP A2 DOWNLOAD MASTER FORM TEMPLATE which is FDP_OM_FORM_MASTER_SRV, (6) Form Type as Master, click on (7) OK
The system uses the OData Service to access the custom form.
Please pay special attention to select the correct Data Source.
System adds predefined prefix YY1_ to the form template name as shown below. You can enter Description and select Available Countries as below: Click on OK.
STEP A5: SSCUI - MASTER FORM TEMPLATE DETERMINATION
In Q-System select Fiori group - Implementation Cockpit - Fiori tile Manage Your Solution. You will require authorization to Role SAP_BR_BPC_EXPERT
Select Configure Your Solution, enter (1) “Master Form” and click on (2) Search, Select and click on (3) Start
Click on New Entries. Enter Channel = PRINT.
It is optional to restrict the form like shown below Org Unit Type = EKORG (= Purchasing Organization), Org Unit Id = 1710 if this form is meant for and select Master Form Template = YY1_MYCOMPANY_FORM_MASTER as shown below.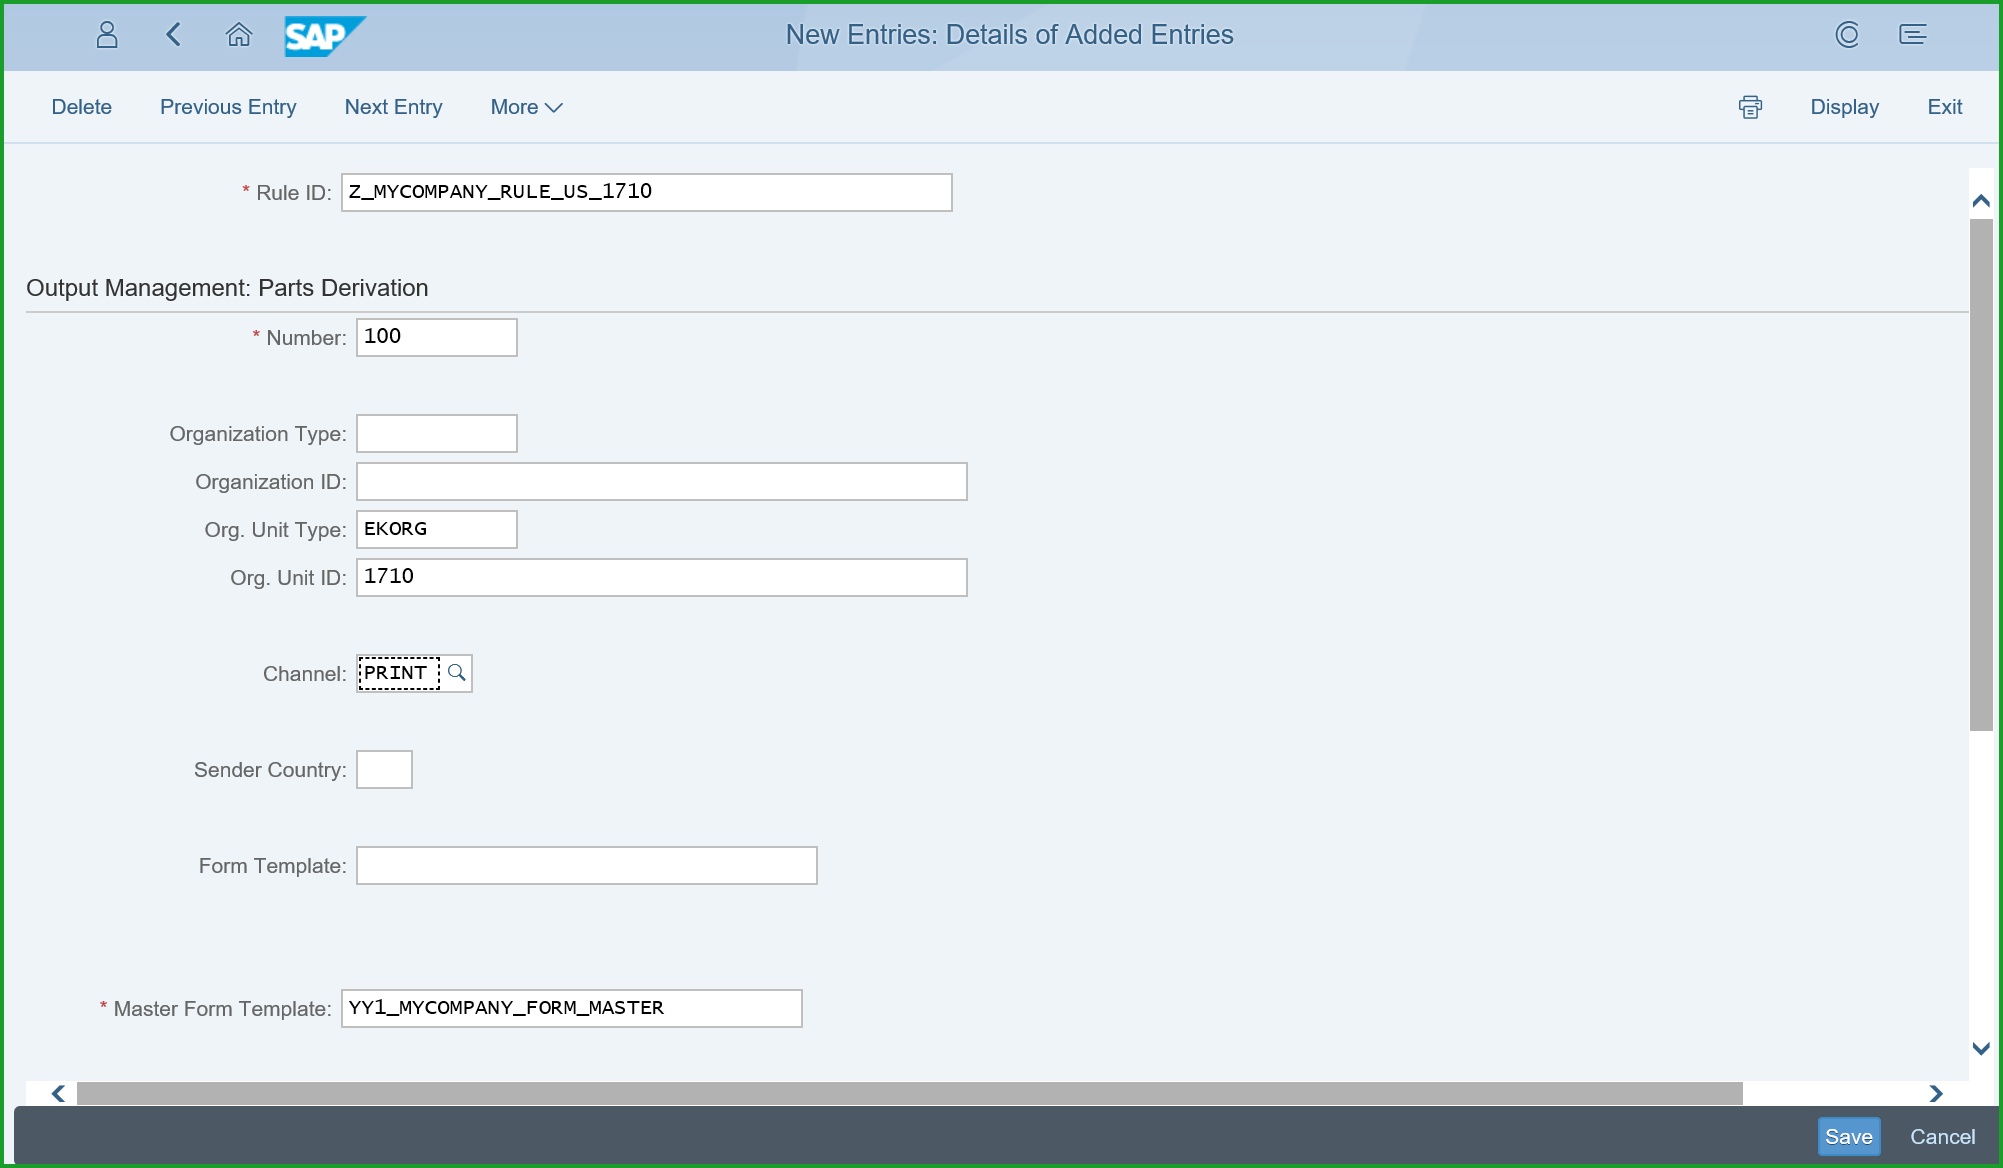
TIP: If you are not able to locate the Master Form Template easily, click on Search, expand Restrictions, enter name of form object as YY1_*, click on search and select form the list 
If the system prompts for a transport, please create transport so that the changes are saved and will be available in Production system after Q2P transport.
Click on Save.
Now you can continue with STEPS 4 and 5 of previous section to complete the Output Parameter Determination and Printing.
LANDSCAPE CONSIDERATIONS:
The SSCUI configuration as per step 3 will be transported using the Q2P transport using Configure Your Solution, confirm all Mandatory SSCUIs and select the Proceed to Run button. Please refer Execute Configuration Transport Sprints.
Within the above procedure it is mentioned that the form should be transported from Q system to P system using the Fiori Tile Transport Management -> Export Software Collection in Q system and Import Collection in P system.
In Export Software Collection, click on (1) Add Items and select (2) Filters (3) as "Form Template" , "Form Template Logo" and "Form Template Text" and click on (4) Go. From among Form Templates, select (5) the form and add click on (6) OK to add to the Software Collection. You can then click on (7) Export button at the bottom of the screen.
In case you get error like "Logo has not been exported yet. Export it and Import into P" , please refer KBA SAP Note 2830484 - An exception was raised in Proceed to Run Phase
COMPONENT FOR INCIDENTS:
You can create OSS messages using component:
BC-CCM-PRN - Output Management, Cloud Print Manager
CA-GTF-OC - Output Control for forms (S4HANA)
OTHER REFERENCES:
Output Management (1LQ)
Extensibility (1N9)
Some of the notes below are for S/4HANA on-prem but would help with some content.
SAP Note 2228611 - Output Management in SAP S/4HANA (S4OP)
SAP Note 2791338 - FAQ: SAP S/4HANA output management (S4OP)
SAP Note 2292646 - SAP S/4HANA output control - form templates with fragments (S4OP)
SAP Note 2292681 - SAP S/4HANA output control - form master templates (S4OP)
Thank you,
Mahesh Sardesai
SAP Canada
S/4HANA Cloud Product Expert
- SAP Managed Tags:
- SAP S/4HANA Finance,
- NW ABAP Print and Output Management,
- SAP S/4HANA Public Cloud
Labels:
31 Comments
You must be a registered user to add a comment. If you've already registered, sign in. Otherwise, register and sign in.
Labels in this area
-
Artificial Intelligence (AI)
1 -
Business Trends
363 -
Business Trends
24 -
Customer COE Basics and Fundamentals
1 -
Digital Transformation with Cloud ERP (DT)
1 -
Event Information
461 -
Event Information
24 -
Expert Insights
114 -
Expert Insights
160 -
General
1 -
Governance and Organization
1 -
Introduction
1 -
Life at SAP
415 -
Life at SAP
2 -
Product Updates
4,684 -
Product Updates
220 -
Roadmap and Strategy
1 -
Technology Updates
1,502 -
Technology Updates
89
Related Content
- Customer address in coordinates, not street/postal code/etc in Enterprise Resource Planning Q&A
- Improvements to manage treasury position in SAP Treasury and Risk Management in Enterprise Resource Planning Blogs by SAP
- How to disable the standard form pdf adding in output management/output history of customer invoices in Enterprise Resource Planning Q&A
- How to set up the Data Migration Cockpit in Enterprise Resource Planning Blogs by Members
- How to manage two credit limits for one customer in same sales area ? in Enterprise Resource Planning Q&A
Top kudoed authors
| User | Count |
|---|---|
| 11 | |
| 10 | |
| 9 | |
| 8 | |
| 7 | |
| 7 | |
| 6 | |
| 5 | |
| 4 | |
| 4 |