- SAP Community
- Products and Technology
- Technology
- Technology Blogs by SAP
- LaMa Custom Point-in-time DB Refresh for AnyDB
- Subscribe to RSS Feed
- Mark as New
- Mark as Read
- Bookmark
- Subscribe
- Printer Friendly Page
- Report Inappropriate Content
Table of contents
SAP LaMa Features Used
Overview
System Refresh Workflow
Configuration
Custom Restore DB
Custom Import License
Custom Provisioning
Execution
Disclaimer
This blog is published “AS IS”. Any software coding and/or code lines / strings (“Code”) included are only examples and are not intended to be used in any productive system environment. The Code is only intended to better explain and visualize the features of SAP Landscape Management. No effort has been made to make the code production quality (e.g. security, error handling, robustness, etc.). If you use any of the code shown, you are doing it at your own risk.
Information in this blog could include technical inaccuracies or typographical errors. Changes may be periodically made.
Assumptions
It is assumed that your environment is already setup correctly for creating custom processes in LaMa. This blog does not go over all the configuration steps. If this is your first time using LaMa Automation Studio then I recommend that you start with something simple and then move on to more complex setups like custom provisioning. Please refer to this blog by my colleague @naeem_maqsud for other examples. If you are new to LaMa configuration for provisioning tasks then you could refer to this blog by Naeem for guidance.
Overview and Motivation
For SAP NetWeaver or ABAP Platform based systems on anyDB, SAP LaMa provides a system refresh workflow that is based on cloning storage volumes. This is the quickest way to copy a large database, but there can be many reasons why this approach is not possible or suitable, therefore; each step of the system refresh provisioning process can be customized.
A key motivation for this article is to show how an existing backup of the source system can be used along with the point-in-time recovery. In my experience, this is the most common approach, rather than taking a backup of the source system specifically for the system refresh or copy. Restoring the DB to a point in time is important to ensure that all systems in the refreshed environment are synchronized, and so users know what data to expect based on that point in time. In the demonstrated scenario, we leverage your existing DB-restore script and pass the necessary parameters.
System Refresh Workflow
The following table shows the standard key provisioning steps in the delivered system refresh workflow and how we will customize it.
Step | Default Step | Custom Substitute | Source | Target |
1 | PCA export |
|
| ✔️ |
2 | Prepare clone volumes | Skip | ✔️ | ✔️ |
3 | Clone volumes | Skip | ✔️ | ✔️ |
4 | Restore DB Backup | Custom Restore DB |
| ✔️ |
5 | Finalize clone volumes | Skip | ✔️ | ✔️ |
6 | SWPM | Skip |
| ✔️ |
7 |
| Custom Import License |
| ✔️ |
8 | PCA Import |
|
| ✔️ |
Because we are using your existing DB restore script for the system copy, we simply skip the volume clone steps and instead of executing the delivered DB restore step, your existing custom script is executed.
We skip the SWPM step because we are doing a DB-copy based system refresh and we already have a script that takes care of the DB restore, which inherently takes care of the DB rename and related activities.
SAP LaMa Features Used
In this scenario, the following SAP LaMa features are demonstrated:
- Custom Operations (of type OS shell script)
- Custom Hooks
- Custom Provisioning
- Operation Templates
- Custom Properties
Configuration
As we can deduce from the system refresh workflow table, we need:
- a custom restore DB step,
- a custom import license step, and
- to customize the provisioning process to skip and replace steps.
Custom Restore DB
Assumptions:
- you have a custom DB restore script called zRestoreDB.sh located in the folder /scripts/lama/
- the script takes parameters:
- Source DB name
- Target DB name
- Restore point-in-time date
- Restore point-in-time time
Steps:
1. To make LaMa aware of an OS script, we create a configuration file to let the SAP Host Agent know how to call the script and what parameters are required.
Use the vi editor as root user to create the definition file called zRestoreDB.conf in folder /usr/sap/hostctrl/exe/operations.d/
sudo vi /usr/sap/hostctrl/exe/operations.d/zRestoreDB.conf
File contents:
Name: zRestoreDB
Username: $[SAPSYSTEMNAME:#tolower#required]adm
Command: /scripts/lama/zRestoreDB.sh $[LVM_SRC_SAPSYSTEMNAME:#required] $[SAPSYSTEMNAME:#required] $[PROP-restore_pit_date:#required] $[PROP-restore_pit_time:#required]
ResultConverter: flat
Platform: Unix
Note the parameters which are passed to zRestoreDB.sh. The first two parameters are variables inherently known to LaMa. The second two parameters are properties (PROP), which we will create in LaMa later.
Ensure the ownership and permissions are root:root and 755
sudo chmod 755 /usr/sap/hostctrl/exe/operations.d/zRestoreDB.conf
sudo chown root:root /usr/sap/hostctrl/exe/operations.d/zRestoreDB.conf
2. Set the ownership and permissions of the script folder and file.
In the script definition file, Username specifies the OS executing user – in this case, it is <sid>adm. Therefore, the <sid>adm must have execute permissions, but root must be the owner of the folder and file. Also, root must be the only user that can modify the file. The following ownership and permissions take care of this.
sudo chown root:sapsys /scripts/lama /scripts/lama/zRestoreDB.sh
sudo chmod 775 /scripts/lama        #(750 also works for added security)
sudo chmod 755 /scripts/lama/zRestoreDB.sh
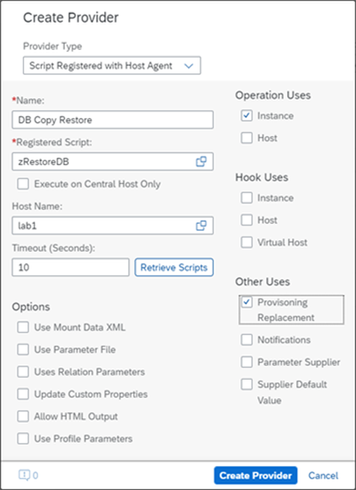
3. Create the provider definition in LaMa.
Go to Automation Studio > Provider Definitions > Create > Script Registered with Host Agent.
Note the different provider types available in SAP LaMa.
If the definition file is created correctly, we can specify the host, click [Retrieve Scripts] and we will see the name in the drop-down for Registered Script. The scope/operation uses for this provider is Instance and Provisioning Replacement.
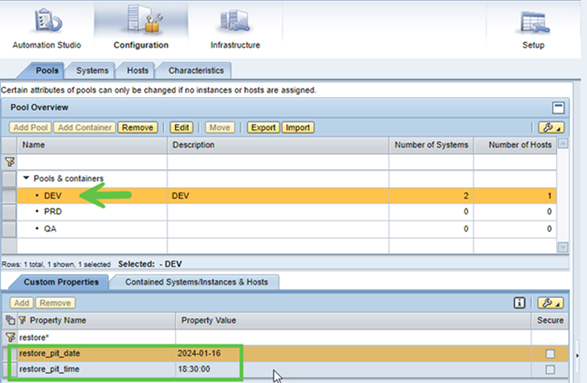
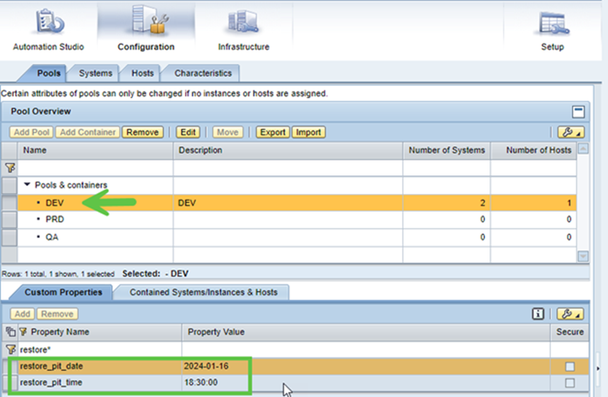
4. We need to pass the database restore script the point in time to which the database should be restored. For this, we define custom properties, which can be defined at a number of logical or physical levels. In this scenario it makes sense to define the property at the pool level so that each system in the same pool will be refreshed to the same point in time. Perhaps the pool name DEV is not a great example because development systems are not usually refreshed, but this is just a lab environment.
Now, your DB restore custom provider is configured.
Custom Import License
The SWPM step takes care of the DB restore and installs a temporary SAP license, then the Post-Copy Automation (PCA) takes care of importing the previously-exported license. Since we are taking care of the DB restore with our existing script, we need to take care of importing the license - otherwise only SAP* can log in. Since the license is already exported, we just need to import it the same way that PCA does. For this, we will use another custom script provider.
Steps:
1. As with the DB restore script, we create the definition file for the license import script.
sudo vi /usr/sap/hostctrl/exe/operations.d/ zImportLic.conf
File contents:
Name: zImportLic
Username: $[SAPSYSTEMNAME:#tolower#required]adm
Command: /usr/sap/sapscripts/zImportLic.sh $[PROF-ctc/export_data:#required] $[SAPSYSTEMNAME:#tolower#required] $[PROF-DIR_EXECUTABLE:#required]
ExitCode: success(0;1;2;3;4)
ResultConverter: flat
Platform: Unix
Note the parameters which are passed to zImportLic.sh. The first and third parameters are profile (PROF) parameter values. As part of the refresh activity, LaMa sets the value for ctc/export_data to the path to where the PCA data (including SAP license) will be exported. The path includes a folder with a time stamp suffix.
Ensure the ownership and permissions are root:root and 755
sudo chmod 755 /usr/sap/hostctrl/exe/operations.d/zImportLic.conf
sudo chown root:root /usr/sap/hostctrl/exe/operations.d/zImportLic.conf
2. Create the license import script /scripts/lama/zImportLic.sh with the following content:
#!/bin/bash

# Check if all 3 mandatory parameters are provided
if [ $# -ne 3 ]; then
    echo "Usage: $0 datadir sid exedir"
    exit 9
fi

logfile="/usr/sap/log/zImportLic.log"
sid=${2^^}
exedir="$3"
ctcfile="$1/ctc_data/refresh/export_LICENSE_$sid.ctc"
transcmd=""
translog=""

echo "SID is $sid"
echo "Export data directory is $1"
echo "Executable directory is $exedir"

# check if the export ctc file exists
if test -f $ctcfile; then
   echo "Found license export $ctcfile"
else
   echo "Did not find license export control file $ctcfile"
   exit 9;
fi

# get the R3trans command from the ctc file
transcmd=$(grep ^I $ctcfile)
transcmd=${transcmd:1}
echo "R3trans import command file: $transcmd"

# get the R3trans log file path from the ctc file
translog=$(grep ^L $ctcfile)
translog=${translog:1}
echo "R3trans import log file: $translog"

echo "Executing $exedir/R3trans -u 18 $translog $transcmd"

#$exedir/R3trans -u 18 $translog $transcmd

rc=$?

if (( "$rc" > 4 )); then
   echo "R3trans finished with return code $rc"
   exit $rc;
fi

sleep 3

exit 0
3. Set the ownership and permissions of the script folder and file.
sudo chown root:sapsys /scripts/lama/zImportLic.sh
sudo chown 755 /scripts/lama/zImportLic.sh
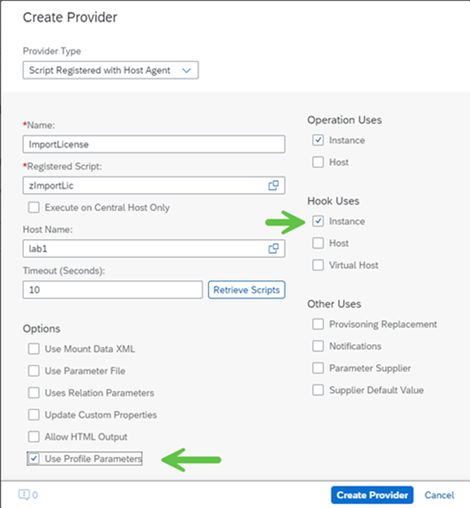
4. Create the provider definition in LaMa.
Again, go to Automation Studio > Provider Definitions > Create > Script Registered with Host Agent.
The scope/operation uses for this provider is Instance and will be used in a Hook.
Remember, values of profile and parameters are required by the script: PROF-ctc/export_data:#required and PROF-DIR_EXECUTABLE:#required. Therefore, we need to select the option Use Profile Parameters.
5. The license needs to be imported before the PCA task list is executed so a technical user other than SAP* can log on (via RFC) and execute the task list. Therefore, we create a custom hook before the PCA import step.
Go to Automation Studio > Custom Hooks, Create.
Hook for operation: Post copy automation import Note all of the operations available for hook creation!
Hook Type: Pre Hook
The custom hook to import the license is configured.
Custom Provisioning
Now we customize the refresh workflow to skip some default steps and execute your custom DB restore script instead of the default DB restore. Note that step 7 in the table below is taken care of by the custom hook we just created.
Step | Default Step | Custom Substitute | Source | Target |
1 | PCA export |
|
| ✔️ |
2 | Prepare clone volumes | Skip | ✔️ | ✔️ |
3 | Clone volumes | Skip | ✔️ | ✔️ |
4 | Restore DB Backup | Custom Restore DB |
| ✔️ |
5 | Finalize clone volumes | Skip | ✔️ | ✔️ |
6 | SWPM | Skip |
| ✔️ |
7 |
| Custom Import License |
| ✔️ |
8 | PCA Import |
|
| ✔️ |
Steps:
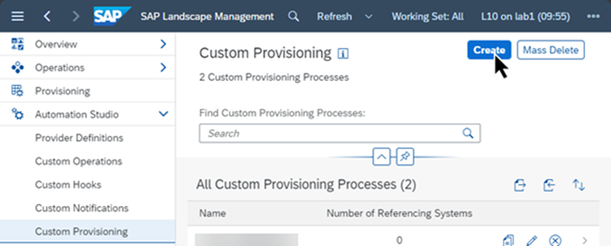
1. Go to Automation Studio > Custom Provisioning, Create.
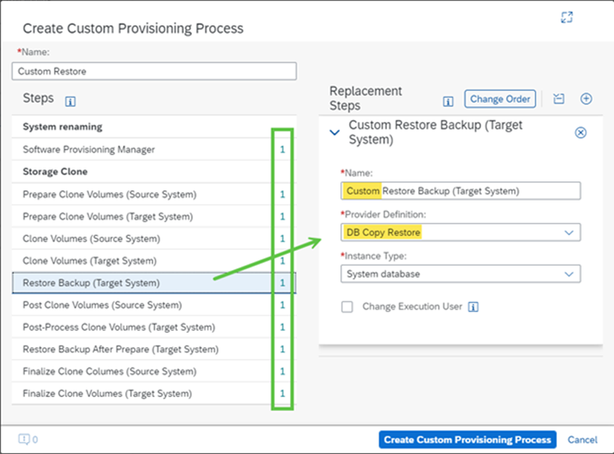
2. For each provisioning step besides Restore Backup, we add a replacement step using provider Skip Operation for instance type System database. To make the customization clear, we add a prefix of “Skip” to the replacement step name.
For the Restore Backup (Target System) step, select the DB Copy Restore provider we created earlier.
Now, all of the steps have a skip replacement step and your custom script will be used for the DB restore step.
3. Assign the custom provisioning to the source and target systems.
The custom provisioning is configured.
Execution
The moment of truth!
Steps:
1. Check/update the restore point-in-time.
2. Create the provisioning blueprint.
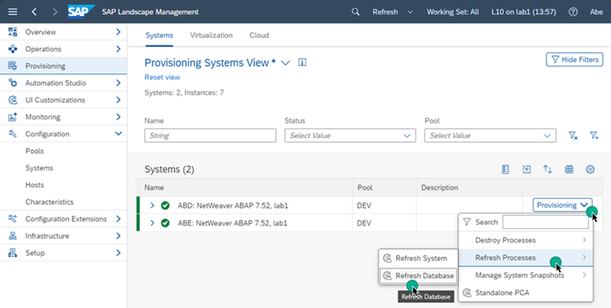
From the Provisioning View, select the context menu of the target system, Provisioning > Refresh Process > Refresh Database.
Enter the information required on each step of the roadmap and check validation errors or warnings in the bottom left of the window.
On the Custom Clone step, we can easily see what will happen because we used intuitive names for the provisioning replacement steps.
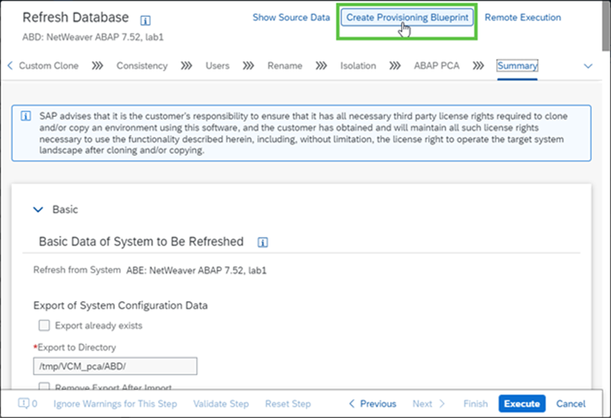
Once we reach the Summary step, we have the option of creating a Blueprint so we can repeat the activity without having to enter all the information in the roadmap again.
Provide a meaningful name, description, and context menu group name, then click save.
You have the option to click Done to close the prompt and continue with the execution of the blueprint. We will choose Navigate to Provisioning Blueprints.
The blueprint has been created.
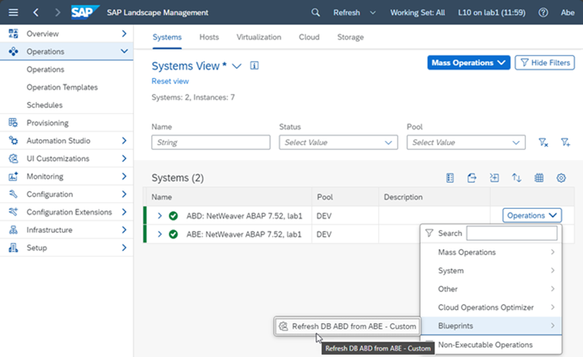
3. Create an Operation Template (optional). To schedule the activity, or to execute it without re-entering values for the prompts, we use Operation Templates.
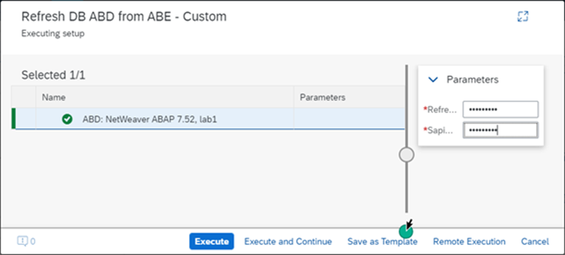
In the Operations view, from the context menu of the target system, select <menu_group_of_blueprint>, <blueprint_name>
Provide the values for the parameters you changed while creating the Blueprint, then click Save as Template.
Enter a meaningful name and click Save.
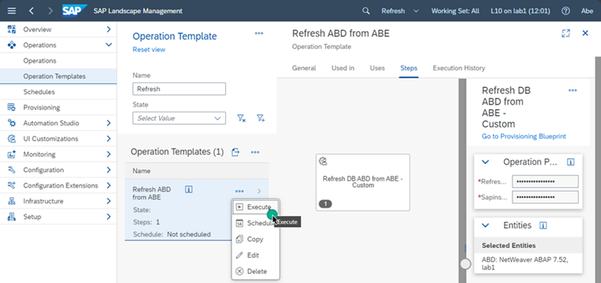
4. If you haven’t already executed the activity at the end of the roadmap, or by executing the Blueprint, we can finally execute the Operation Template.
From the Operations view, select Operation Templates, Execute from the context menu of the Operation Template, and then click Execute on the next screen.
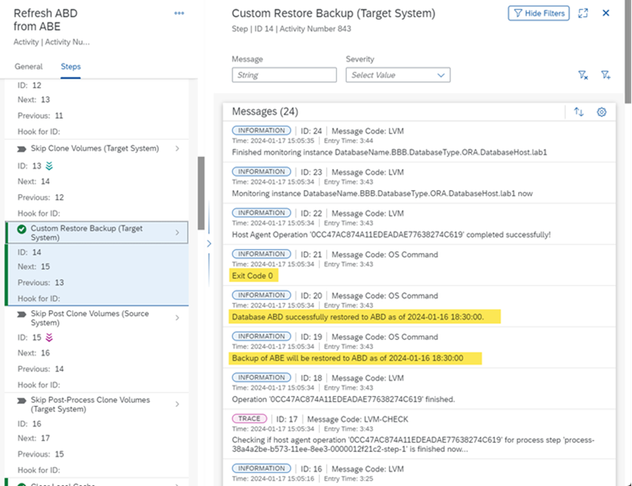
We can monitor the activity under Monitoring > Activities
We can see the steps which were skipped and that our custom restore backup step executed successfully.
When we click on a step, we can see the log. If our script prints anything to standard out, we will see it here.
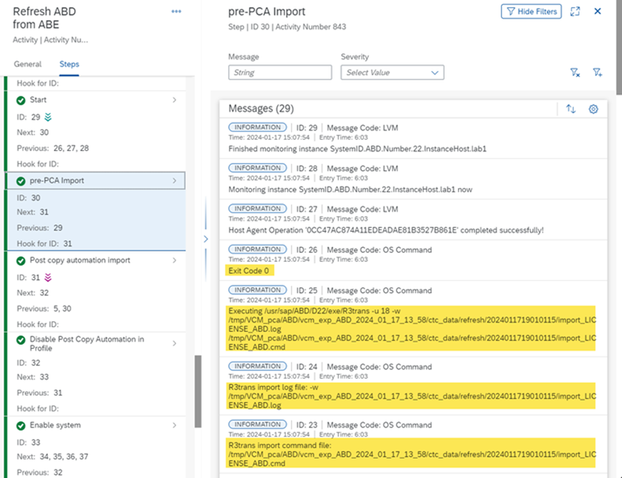
The license import script hook also executed successfully before the Post copy automation import step.
Congratulations on making it to the end of this article. I hope this is useful to you and has inspired some automation ideas. Happy automating!
- SAP Managed Tags:
- SAP Landscape Management, enterprise edition
You must be a registered user to add a comment. If you've already registered, sign in. Otherwise, register and sign in.
-
ABAP CDS Views - CDC (Change Data Capture)
2 -
AI
1 -
Analyze Workload Data
1 -
BTP
1 -
Business and IT Integration
2 -
Business application stu
1 -
Business Technology Platform
1 -
Business Trends
1,658 -
Business Trends
93 -
CAP
1 -
cf
1 -
Cloud Foundry
1 -
Confluent
1 -
Customer COE Basics and Fundamentals
1 -
Customer COE Latest and Greatest
3 -
Customer Data Browser app
1 -
Data Analysis Tool
1 -
data migration
1 -
data transfer
1 -
Datasphere
2 -
Event Information
1,400 -
Event Information
67 -
Expert
1 -
Expert Insights
177 -
Expert Insights
301 -
General
1 -
Google cloud
1 -
Google Next'24
1 -
GraphQL
1 -
Kafka
1 -
Life at SAP
780 -
Life at SAP
13 -
Migrate your Data App
1 -
MTA
1 -
Network Performance Analysis
1 -
NodeJS
1 -
PDF
1 -
POC
1 -
Product Updates
4,577 -
Product Updates
346 -
Replication Flow
1 -
REST API
1 -
RisewithSAP
1 -
SAP BTP
1 -
SAP BTP Cloud Foundry
1 -
SAP Cloud ALM
1 -
SAP Cloud Application Programming Model
1 -
SAP Datasphere
2 -
SAP S4HANA Cloud
1 -
SAP S4HANA Migration Cockpit
1 -
Technology Updates
6,873 -
Technology Updates
429 -
Workload Fluctuations
1
- Take over Customer Attributes from Solution Documentation into Test Step Designer in Technology Q&A
- Sapphire 2024 user experience and application development sessions in Technology Blogs by SAP
- SAP BW/4 - revamp and true to the line 2024 in Technology Blogs by Members
- Get started with SAP BTP ABAP Environment: Trial Account vs. Free Tier Option in Technology Blogs by SAP
- Creating a Custom Navigation Side Panel in SAP Analytics Cloud (Optimized Story Experience) in Technology Blogs by SAP
| User | Count |
|---|---|
| 33 | |
| 17 | |
| 15 | |
| 13 | |
| 11 | |
| 9 | |
| 8 | |
| 8 | |
| 8 | |
| 7 |

