
- SAP Community
- Products and Technology
- Enterprise Resource Planning
- ERP Blogs by Members
- SAP Fiori Elements : CDS And Overview Page-Part 2
Enterprise Resource Planning Blogs by Members
Gain new perspectives and knowledge about enterprise resource planning in blog posts from community members. Share your own comments and ERP insights today!
Turn on suggestions
Auto-suggest helps you quickly narrow down your search results by suggesting possible matches as you type.
Showing results for
PriyaRatan
Explorer
Options
- Subscribe to RSS Feed
- Mark as New
- Mark as Read
- Bookmark
- Subscribe
- Printer Friendly Page
- Report Inappropriate Content
10-20-2023
10:21 PM
In this blog, we would be developing an Overview page with 1 Analytical card with navigation to Multidimensional query. I have tried to keep this blog very detailed . My motivation to write this another blog is to give an idea on understanding the architectural relations between S/4 Hana Embedded analytics (SAP Fiori Elements + OData + Core Data Services ) .
Please follow and re-read all the steps carefully.
Pre-Requisites:
Introduction about the Blog:
Let’s Start:
Please follow the below steps for the development of an analytical card in Overview page
Please follow and re-read all the steps carefully.
Pre-Requisites:
- Please read SAP Fiori Elements : CDS And Overview Page-Part 1(SAP Fiori Elements and CDS View-Part 1) before this.
- Cloud connector and Destination should be properly configured.
- Access to Business Application Studio.
- Either you can go to SAP Business application studio from service marketplace in SAP BTP or you can directly connect with SAP Basis team to get the link for SAP BAS.Note : SAP BAS is a licensed product and each license is deployed by the either Client or the relevant organization. Hence , to get a clear understanding if you have the license , you will have to take help from SAP Basis or the relevant Account Manager (refer to KBA 3197520 - Questions Regarding Licensing and Sales of SAP Business Application Studio - SAP for Me)
- Access to TCodes such as ui2/flpd_cust (fiori launchpad designer) , ui2/iwfnd/maint_service(activation of OData services) , SE80 (ABAP Repository browser) , /ui2/semobj (Creation or display of semantic objects) and /ui2/flp (fiori launchpad).
- Basic knowledge in SAP Fiori.
- Should be able to create a Catalog , Tile and configure target mapping.
Introduction about the Blog:
- We will be developing an Overview Page using a front end tool Business Application Studio using open guided development . This feature of Open Guided development in Business applicaiton studio minizes the need to write the code manually and reduces effort and time.
- Type of Card and chart used in this blog - Analytical Card (Column chart)
- Navigation from Overview Page to Multidimensional query( Query browser/WebDynpro).
Let’s Start:
Please follow the below steps for the development of an analytical card in Overview page
- Cloud connector should be connected .
Hence, go to SAP BTP -> Connectivity-> Cloud connector -> Check the Cloud Connector connection :
- Destinations in SAP BTP should be configured properly(take help from SAP BASIS team) before starting the development in Business app studio.Click on the below icon to check if the connection is successful.
 Once the Cloud connector and destinations are configured properly , you can start developing applications in Business application studio and can deploy the applications to the development server via BAS.
- In SAP BTP, go to service marketplace and search for Business application studio:

- Open Business application studio and click on ‘Create Dev Space

- Provide custom dev space name and check relevant ‘SAP Extensions’ and click on ‘Create Dev Space’.
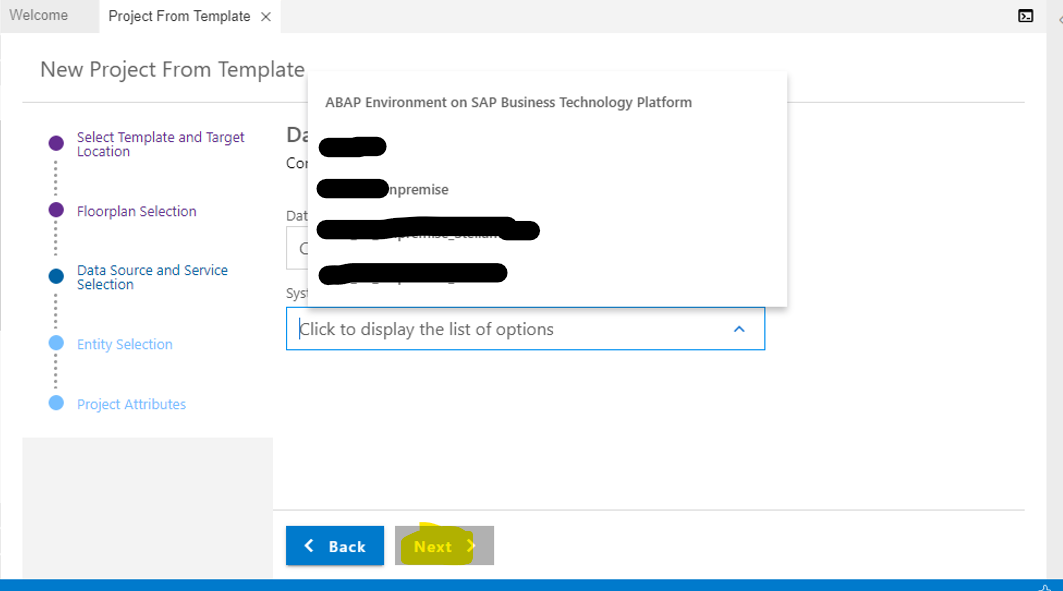
Note: Dev Space will be present only locally . This is just like a local repository which will contain all your SAP Fiori projects in Business application studio.Now, inside the Dev space, click on ‘Start from template’ in the home screen or you can go to File->New Project from template :
- Click on ‘Sap Fiori Application’.

- Click on Overview Page

- Dropdown to 'Data Source and service selection' and click on ‘Connect to a system’ :

- Select the destination which has been configured in SAP BTP (refer to step 3) and click on Next .
- Select the OData Service which was activated in the last blog (ZOVP_DEMO3_CDS) (Link - > OVP - Part 1 ) :

- Select the filter entity (Filter Entity:FILTER Entity Type contains all the attributes of the service.These attribute properties will be a part of Global Filters).

Note : Check Entity Type and entity set in the metadata of the service (covered in the last blog in detail. )

- Provide the Module (BAS Project) name (zovp_demo3), application title name, application namespace(same as module name for ex) , Description, path(BAS folder path for the project to be saved) , SAP UI5 Version(depending on the SAP Fiori version) and click on Next. select ‘Add deployment configuration’ ( For adding the Transport details ) and ‘Add FLP Configuration’ ( For adding semantic object and action -> for navigation purpose):


- In ‘Add deployment configuration’ , provide Target as 'ABAP' as the application has to be deployed as BSP application in SE80 repository,
Destination : chose correct destination configured in SAP BTP
SAPUI5 ABAP Respositry : Provide any custom name of the app .
Deployment description : Description of the application
Package: Package name
Transport Request : Provide a workbench transport request.
- Click on Next and in 'Add FLP configuration' , provide a semantic object and action (unique action name) .
Note :
Create a custom semantic object->Zfiori_objlist in /ui2/semobj TCode in SAP GUI.
ACTION can be custom/standard name given by a developer based on the requirement to distinguish different multidimensional queries at the time of navigation from Analytical card to Query browser ).Now, click on Finish.
- Project(zovp_demo3) is created.Once the project is created , BAS automatically generates folders and files which is a very big advantage of using Open guided development. In case of SAP Fiori Elements , best way to proceed to develop different floorplans is using Open guided development . Also, in case of developing a custom UI5 application from scratch (UI5 freestyle), it is advisable to proceed accordingly by creating views, controllers etc .Below is the usage of each file and folder created under the project zovp_demo3:WEBAPP : Contains files such as annotation.xml, i18n ,VAN.xml, manifest.json etc.
ANNOTATION.XML : Used to mention annotations and attributes related to chart(@UI.Chart), navigation (UI.Identification) , UI.PresentationVariant(Configure how data is displayed ), UI.DataPoint etc. Details related to each annotation and it's usage are mentioned in the below steps while we will be proceeding with open guided development.
i18N : Used to maintain texts globally in different languages such as EN, ES, FR etc.
LocalService-> *VAN.XML : Used to maintain selection screen fields , parameters etc.
Manifest.json : It is the main and important file which contains Data sources, Models , Folder paths linked to annotations file,VAN file,i18n , card related settings etc.
Package.json : Your package.json contains all the important info about your project. It includes the project's name and description, as well as other useful stuff like the package's version number and any dependencies the app needs. Also , to prevent different environments from having different installed dependencies and to get the same results across all environments , package.json is used. (Dependencies can be generated when a Fiori application already exists as a BSP application and needs some enhancement. If you want to generate dependecies , you can refer to my 3rd blog of the series which contains the information on how to generate dependencies ) .Now, Right click and select ‘Open Guided Development’ to create a card:
- Click on ‘Add an analytical card to an overview page’:

- Below is the detail description of the analytical card guide in BAS:

- Step 1(Mandatory) :
UI.Chart Annotaion - Used for all configurations related to the chart
(Chart Type, X-axis : Dimensions, Y-Axis : Measures/KeyFigures ).Here , Entity Type to be mentioned same as mentioned in Step 12.
Chart Qualifier : Specify any custom qualifier(zchart_quali) which will contain all the attributes such as Chart title, Chart Description, Dimension property, Measure property and Chart Type.
Provide the relevant details as below and click on Insert Snippet which will add the code automatically in annotations.xml file.
You can check the inserted code by opening annotations.xml file parallely .Now, Click Next :
- Step 2(Optional) :
UI.PresentationVariant - PresentationVariant can contain configuration of how the data is displayed . For example, Sort order(usually needed when using X axis as a time based dimension such as Year, Year Period etc) , max number of rows etc.
Configure this step, if needed as per the requirement or else , click Next .
- Step 3(Optional):
UI.DataPoint : A data point is a single item of information. It is usually a numerical representation, but may also be a textual representation. Know more about Datapoints-> Data Points .If required, configure this setting or else click on Next.
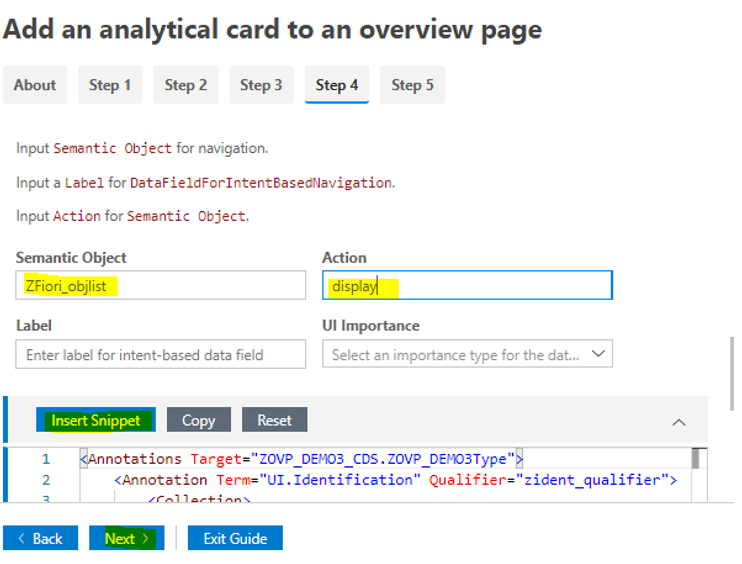
Step 4(Optional):
We will have to configure this step as we have to navitgate from OVP to Multidimensional query.
UI.Identification: This is basically used for Intent Based Navigation which means that this annotation/functionality is used for navigating to any URL( for eg : Navitation to SAP Analytics Cloud dashboard, or a desginated URL) and navigation to a multidimensional queries/Webdynpro apps which is configured via Fiori Launchpad designer through custom semantic objects and actions.
Note : In our demo , we are developing 1 Overview page with 1 analytical card containing a column chart. Once an end user clicks on a key figure/measure value configured for dimensions(X-axis) in the chart , it would navigate to query browser(detailed output) in another screen.
Provide Entity type and a custom qualifier(for eg : zident_qualifier).

Now, we will provide a created semantic object(Zfiori_objlist) and standard/custom action(standard action->display) (refer step 15) which would be configured later in SAP Fiori Launchpad Designer .
Click on Insert Snippet and Next.
Step 5(Mandatory):
This step is used to utilize all the properties defined in previous steps.
The properties for each step is present in a unique qualifier. In our demo , we have configured only Step 1(chart annotation) and Step 4(Identification annotation), so we are providing custom qualifiers given in step 1 and step4 in Step 5. Hence, provide the qualifiers below which are used in the previous steps.
Enter the Unique custom Card ID(Card ID name present in manifest.json file) .

Enter the Entity Set name :

Dropdown to Chart annotation path and enter the qualifier name(zchart_quali) entered in step:

Dropdown to Identification qualifier and enter the qualifier name entered in step 4(zident_qualifier) . Insert Snippet and click on exist guide:

Wow, you have configured the card related settings in Business application studio :).
Note: Once Step 5 is completed, a code is inserted in manifest.json file inside webapp folder of the created project, as the above configured settings are card related settings.
Below are the details for important attributes related to the card settings:
globalFilterModel : Represent the main global filter. The metadata (dimensions) will be present inside mainModel.
globalFilterEntityType : This is the entity type(refer step 13)
considerAnalyticalParameters: If parameters are present in the analytical report, then select True or else, False.
cards: This section comprises of the number of cards and it's related settings to be present in an OVP.
ZCard_123: 1st analytical card name.
enititySet: This is the entity set(refer step 13)
chartAnnotationPath : This is UI.Chart annotation which we have configured above in Point 20 (step 1) ( format -> com.sap.*#CustomQualifierName)
identificationAnnotationPath: This is UI.Identificaiton annotation which we have configured above in Point 23 (step 4) ( format -> com.sap.*#CustomQualifierName)

- Now, right click on the project name (zovp_demo3) and select ‘Open Service Manager’ to view the OData service being used in the project.


- Preview the application:
Right click on the project and click on 'Preview Applicaiton':
Now click on Start fiori run(This will hit YAML files present in the project) :
And, below is your First Overview Page application with 1 analytcal card :).
Note: The above created Overview page and analytical card exists only in Buisiness application studio tool as of now. Now , in order to run the application in Fiori launchpad and make it available for end users, we will have to deploy the application first from Buisiness application studio tool to the Fiori development server.
Once you deploy your application in Development server , it is deployed as a BSP applicaiton in ABAP system(refer point 26) and is captured under a workbench transport request which can be transported to Quality(QA) and then to Production servers . This is the main reason why cloud connector and SAP BTP destinations are needed to be configured properly. - Deployment : ( For detailed information , please refer Deploy a Fiori App using BAS/WebIde ).SAP offers two distinct options for the deployment of SAP Fiori applications: one is to deploy the application to an ABAP system(as a BSP applicaiton in ABAP repository(SE80 Tcode) , such as SAP S/4HANA, and the other is to deploy the app to Cloud Foundry.
Follow the below steps to deploy your app to SAP ABAP system:
Step 1: Right click on the project (zovp_demo3) and click on 'Open Terminal' to go to the Terminal section to deploy the application to the development server:
Step 2: Below is the terminal window:
Execute the below commands:
npm install:

npx fiori add deploy-config:
Press enter and provide the relevant details in the terminal as below and proceed :
Please choose the target : ABAP / Cloud Foundy –> Choose ABAP
Destination -> It will come by default as configured in SAP BTP
SAPUI5 ABAP Repository -> Provide any custom project name to be deployed in SE80 as BSP application.
Deployment Description -> Provide any custom project Description for SE80.
Package -> Provide a package to be used for the Fiori development.
How do you want to enter Transport Request -> Choose from existing / Enter Manually – Choose the relevant option and proceed
Transport Request -> Provide a workbench TR present in Fiori development
Start deployment (Y/n)? -> Click ‘Y’ and proceed for the deployment


npm run build:
Run this command. Once done with the deployment , you will get the below message :

npm run deploy(final deployment command) :

Congratulations again 🙂 .
Your Analytical applicaiton has been deployed to the Fiori Development server.
Now since the application has been deployed , there should be Fiori Catalog,Business Group,Relevant roles and Fiori Tile to view that application.
So let's :
Create a Fiori Catalog,
Create a Fiori Tile,
Complete Target Mapping,
Create a Business Group,
Get relevant user roles from security team,
And finally Add the application in the particular businss group in the Fiori launchpad.
Go to Fiori Launchpad designer (TCode – UI2/FLPD_CUST) to configure Catalog, Tile and target mapping related settings and open the relevant catalog in which the Fiori Tile needs to be present.
Note: If the catalog is not created, create a new catalog as per the requirement.
Refer to the link->SAP Fiori Catalog/Tile/Target Mapping- Link 1 or SAP Fiori Catalog/Tile/Target Mapping- Link 2 for the catalog/tile creation/target mapping.
We have already created a catalog 'ZDEMO_TEST' which will have our new Tile. Hence In the catalog ‘Zdemo_test’, below are the steps to create a new tile for the above overview application.
Step 1:
Click on the ‘+’ button:

Step 2: Click on ‘App launcher- Static’:

Step 3: Provide the below information’s and click on save

Note: Provide the same Semantic object and action as provided while configuring in Business application studio (Point 22).
Step 4:
Click on the ‘Target Mapping’ icon and Click on ‘Create target mapping’.

Step 5:
Enter the below fields:

Semantic Object and Action: Semantic object and action in target mapping is the linking and between tile and target mapping. Provide the same semantic object and action configured in Step 3.
Note: You have to configure target mapping 2 times .
First time,target mapping is used to navigate from Fiori Tile to the Overview Page where semantic object ->ZFiori_objlist, action-> display) ( Refer to point 33 and check the URL )
Title: Provide the same title name as mentioned in step 3.
URL: The URL /sap/bc/ui5_ui5/sap/zovp_demo3 ( ZOVP_DEMO3 is the project name given in Business application studio).
ID: ID is the application namespace present in manifest.json file in BAS.

- Add the tile to the Business group :
Step 1:
Click on 'Groups' and go to the created group and click on '+' button:

Step 2:
Click on F4 help :

Step 3:
Give the catalog name (ZDemoCatalog) and select the catalog :

Step 4:
Click on the Tick mark to add the tile to the Business group also.

- After the configuration of Target mapping/Tiles/Catalogs/Groups , get relevant authorizations and roles access of catalog and CDS Views from the security team. Once you have the relevant authorizations , go to Fiori launchpad .
- In the fiori launchpad, go to settings->App Finder ( to add the tile in the relevant catalog 😞

- Search for the created catalog which contains the above created tile 'Overview Page Demo' and add it to the required group as shown below:

- Tile ‘Overview Page Demo’ is created like below in the Fiori Launchpad. Once we click on the tile, it will navigate to the Overview Page which we have configured.

- In the URL , we will be able to see semantic object ‘ZFiori_objlist’ and action ‘display’ which we have configured in Fiori Launchpad Designer in point 27(Step 5).Note : Below OVP comprises of global filter which has 3 optional fields and 1 mandatory field (Currency) which is displayed here if you add @UI.selectionfiields annotations and @Consumptions.filter annotations in the CDS level.
You can also click on Adapt filters to add more filters to the global filter. We will be exploring more on global filter and multiple cards in the upcoming blogs .
- Again Congratulations 🙂
Your 1st Overview Page is created with a global filter and is present in the Fiori Launchpad. Few questions must be arising in your mind that :
Now, how to navigate from this chart to Multidimensional reports or WebDynpro Applications?
How to navigate to the detailed output once you click on any column of the fiscal year and it should display the overall data for the same year along with each key figures and dimensions in Query browser?To solve the same purpose, SAP has come up with Intent Based Navigation in SAP Fiori , which we willl be setting up in the further steps . - Go back to the Fiori Launchpad designer(/ui2/flpd_cust) and in the same catalog and tile which we have configured in point 27, click on ‘Create Target mapping’ again for the navigation from the analytical card to a multidimensional report (Query browser) .Note : If you remember , we discussed in point 28( step 5 ), that we have to configure target mapping 2 times . Hence ,this is the 2nd time that we will be configuring the same.

- Provide the below details again:
Important :
Semantic Object - Same as provided earlier
Action - Provide any custom action name , as this action will be configured in Business application studio in annotation.xml file as shown below:Application type: SAP Ui5 Fiori app.
URL : This is the standard configuration for a query browser(/sap/bc/ui5_ui5/sap/FIN_DS_ANALYZE ) .
( If you want to navigate to WebDynpro application then the standard configurations are different. Please refer to the link how-to-create-custom-fiori-multidimensional-reporting-application-in-s4hana-on-premise/ ).
ID : fin.acc.query.analyze (standard config)
Parameter 1 -> XQUERY : Provide 2CSQLViewName in the default value. (For analytical queries)
Parameter 2 -> XSEMANTIC: Provide * in the default value.
Parameter 3 -> Z**** (<SAP System Alias (to the backend system), e.g. S4FIN) .
Refer to the above link to get more details about the usage of each parameters.

Above action(zident_ovpdem) configured in Fiori launchpad designer has to be linked with the qulaifier(zovp_intentdemo) for Identification annotation in annotation.xml and manifest.json files in Business application studio.
Hence, provide the same custom action name in identification annotation as below :
annotation.xml file in Business Application Studio:

This Qualifier(zovp_indentdemo) has to be linked in identification annotation in card setting in manifest.json:

Note:
Enter the standard path ‘/sap/bc/ui5_ui5/sap/FIN_DS_ANALYZE’ in SICF service path which is a standard configuration to navigate to query browser.
Please note that , this service should be active in the system.
- Now go to fiori Launchpad(/ui2/flp) ,click on the tile Overview Page Demo, it will navigate to the Overview Page which we have developed :

You will be able to see semanctic object and 1st action configured in taget mapping in FLPD_CUST:
- Now,click on the fiscal year 2022 in the analytical card and it will navigate to the Multidimensional report(query browser):Note : In the below URL, you will be able to see same semantic object(Zfiori_objlist) and 2nd action(zident_ovpdem) configured in taget mapping in FLPD_CUST.
 Congratulations 🙂 . You have :
- Created a basic Overview page with 1 analytical card in Business application studio.
- Deployed the application to the development server.
- Learned Intent based navigation where you have navigated to Multidimensional query
- To be continued........Part 3 – Development of Overview page with multiple analytical with navigation to Multidimensional query. (yet to be published)Part 4 – Creation of a Global filter for a SAP Fiori Element ( here an Overview Page) and linking the global filter with multiple cards in Overview page.. (yet to be published)
You must be a registered user to add a comment. If you've already registered, sign in. Otherwise, register and sign in.
Labels in this area
-
"mm02"
1 -
A_PurchaseOrderItem additional fields
1 -
ABAP
1 -
ABAP Extensibility
1 -
ACCOSTRATE
1 -
ACDOCP
1 -
Adding your country in SPRO - Project Administration
1 -
Advance Return Management
1 -
AI and RPA in SAP Upgrades
1 -
Approval Workflows
1 -
Ariba
1 -
ARM
1 -
ASN
1 -
Asset Management
1 -
Associations in CDS Views
1 -
auditlog
1 -
Authorization
1 -
Availability date
1 -
Azure Center for SAP Solutions
1 -
AzureSentinel
2 -
Bank
1 -
BAPI_SALESORDER_CREATEFROMDAT2
1 -
BRF+
1 -
BRFPLUS
1 -
Bundled Cloud Services
1 -
business participation
1 -
Business Processes
1 -
CAPM
1 -
Carbon
1 -
Cental Finance
1 -
CFIN
1 -
CFIN Document Splitting
1 -
Cloud ALM
1 -
Cloud Integration
1 -
condition contract management
1 -
Connection - The default connection string cannot be used.
1 -
Custom Table Creation
1 -
Customer Screen in Production Order
1 -
Data Quality Management
1 -
Date required
1 -
Decisions
1 -
desafios4hana
1 -
Developing with SAP Integration Suite
1 -
Direct Outbound Delivery
1 -
DMOVE2S4
1 -
EAM
1 -
EDI
3 -
EDI 850
1 -
EDI 856
1 -
edocument
1 -
EHS Product Structure
1 -
Emergency Access Management
1 -
Energy
1 -
EPC
1 -
Financial Operations
1 -
Find
1 -
FINSSKF
1 -
Fiori
1 -
Flexible Workflow
1 -
Gas
1 -
Gen AI enabled SAP Upgrades
1 -
General
1 -
generate_xlsx_file
1 -
Getting Started
1 -
HomogeneousDMO
1 -
How to add new Fields in the Selection Screen Parameter in FBL1H Tcode
1 -
IDOC
2 -
Integration
1 -
Learning Content
2 -
LogicApps
2 -
low touchproject
1 -
Maintenance
1 -
management
1 -
Material creation
1 -
Material Management
1 -
MD04
1 -
MD61
1 -
methodology
1 -
Microsoft
2 -
MicrosoftSentinel
2 -
Migration
1 -
mm purchasing
1 -
MRP
1 -
MS Teams
2 -
MT940
1 -
Newcomer
1 -
Notifications
1 -
Oil
1 -
open connectors
1 -
Order Change Log
1 -
ORDERS
2 -
OSS Note 390635
1 -
outbound delivery
1 -
outsourcing
1 -
PCE
1 -
Permit to Work
1 -
PIR Consumption Mode
1 -
PIR's
1 -
PIRs
1 -
PIRs Consumption
1 -
PIRs Reduction
1 -
Plan Independent Requirement
1 -
Premium Plus
1 -
pricing
1 -
Primavera P6
1 -
Process Excellence
1 -
Process Management
1 -
Process Order Change Log
1 -
Process purchase requisitions
1 -
Product Information
1 -
Production Order Change Log
1 -
purchase order
1 -
Purchase requisition
1 -
Purchasing Lead Time
1 -
Redwood for SAP Job execution Setup
1 -
RISE with SAP
1 -
RisewithSAP
1 -
Rizing
1 -
S4 Cost Center Planning
1 -
S4 HANA
1 -
S4HANA
3 -
Sales and Distribution
1 -
Sales Commission
1 -
sales order
1 -
SAP
2 -
SAP Best Practices
1 -
SAP Build
1 -
SAP Build apps
1 -
SAP Cloud ALM
1 -
SAP Data Quality Management
1 -
SAP Maintenance resource scheduling
2 -
SAP Note 390635
1 -
SAP S4HANA
2 -
SAP S4HANA Cloud private edition
1 -
SAP Upgrade Automation
1 -
SAP WCM
1 -
SAP Work Clearance Management
1 -
Schedule Agreement
1 -
SDM
1 -
security
2 -
Settlement Management
1 -
soar
2 -
Sourcing and Procurement
1 -
SSIS
1 -
SU01
1 -
SUM2.0SP17
1 -
SUMDMO
1 -
Teams
2 -
User Administration
1 -
User Participation
1 -
Utilities
1 -
va01
1 -
vendor
1 -
vl01n
1 -
vl02n
1 -
WCM
1 -
X12 850
1 -
xlsx_file_abap
1 -
YTD|MTD|QTD in CDs views using Date Function
1
- « Previous
- Next »
Related Content
- SAP S4HANA Cloud Public Edition Logistics FAQ in Enterprise Resource Planning Blogs by SAP
- Third Party with Subcontracting PREQ from Schedule line doesnt generate component requirement in Enterprise Resource Planning Q&A
- Advance Return Management complete configuration(SAP ARM) in Enterprise Resource Planning Blogs by Members
- SAP Fiori for SAP S/4HANA - Composite Roles in launchpad content and layout tools in Enterprise Resource Planning Blogs by SAP
- Improvements to manage treasury position in SAP Treasury and Risk Management in Enterprise Resource Planning Blogs by SAP
Top kudoed authors
| User | Count |
|---|---|
| 5 | |
| 2 | |
| 2 | |
| 2 | |
| 2 | |
| 2 | |
| 2 | |
| 1 | |
| 1 | |
| 1 |