
- SAP Community
- Products and Technology
- CRM and Customer Experience
- CRM and CX Blogs by Members
- Extending metadata of SAP Marketing API’s In SAP C...
CRM and CX Blogs by Members
Find insights on SAP customer relationship management and customer experience products in blog posts from community members. Post your own perspective today!
Turn on suggestions
Auto-suggest helps you quickly narrow down your search results by suggesting possible matches as you type.
Showing results for
hakan_kose
Contributor
Options
- Subscribe to RSS Feed
- Mark as New
- Mark as Read
- Bookmark
- Subscribe
- Printer Friendly Page
- Report Inappropriate Content
10-29-2018
5:33 AM
Prerequisites
This blog is successor to this blog. I highly recommend reading first part before proceed to this one.
In SAP Cloud Platform Integration
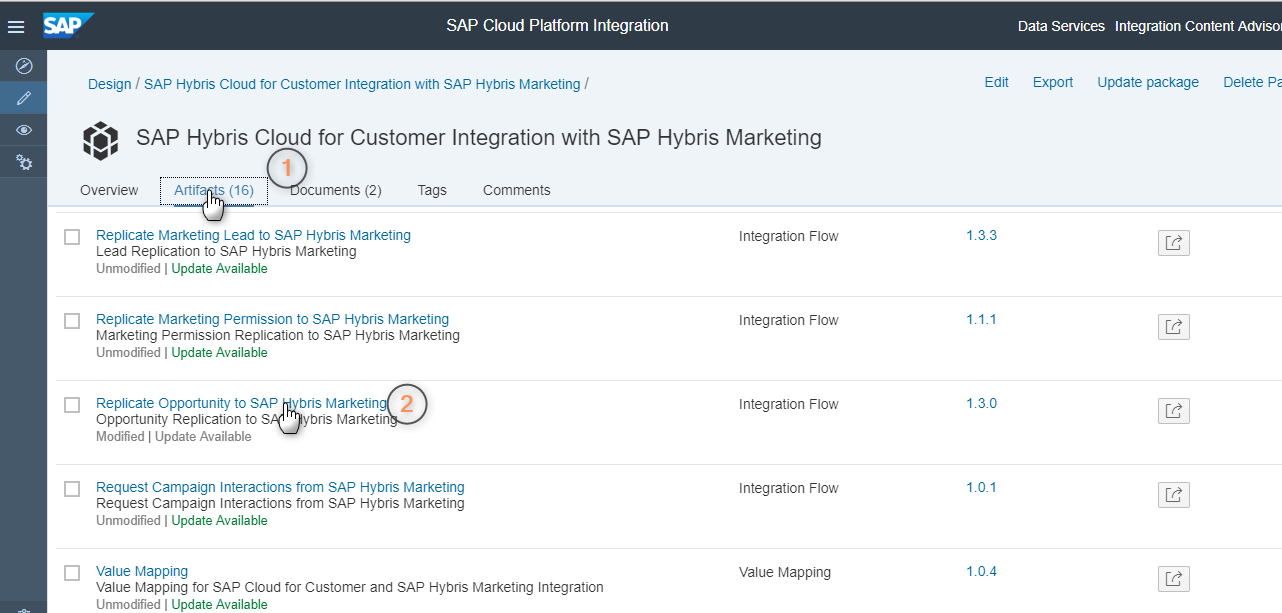
In SAP Cloud Platform Integration, you can perform activities as shown in below image.

Finding Corresponding Integration Package and Integration Flow
Since we're replicating opportunities from SAP Cloud for Sales to SAP Marketing Cloud, searching for SAP Cloud for Customer integration package in design tab in SAP Cloud Platform Integration would be a good start. When you find the integration package "SAP Hybris Cloud for Customer Integration with SAP Hybris Marketing", navigate to "Artifacts" tab. In listed integration flows, you'll notice the one for replicating opportunities: "Replicate Opportunity to SAP Hybris Marketing"
Click on the integration flow to go into details.
Left click on OData channel and go edit mode. When you select the OData channel, you are going to see two tabs in the below panel: "General" and "Adapter Specific". Switch to "Adapter Specific" tab

In "Adapter Specific" tab, scroll down until you see "Resource Path" field. Click on "Select" button.

At first step, choose "Remote" as "Connection Source". In the "Address" field, type the service URL you noted down in first part of this blog series. Choose "Internet" as "Proxy Type".
"Authentication" and "Credential Name" should be already filled automatically based on integration setting you did for this integration flow while you were setting up your integration with SAP Cloud for Sales.
Proceed to Step 2

At second step, leave "Operation" as "Create(POST)". Choose "5" as "Sub-Levels" and choose "Import Headers" as "Select Entity".
And then you can select relevant fields for your integration. You can mark "Select all fields" to select all fields at once (which I did in my implementation)

Finally you can click on "Finish"

Upon clicking on "Finish", a prompt is going to ask you if you want to save to-be-generated XSD file as a new file. Click "Yes" to save it as a new file.

A new EDMX as well as XSD file are generated and added to integration flow resources automatically. Note down XSD file name (i.e. ImportHeadersEntityPost15.xsd like in this example)

Now go to mapping block in the middle of integration process. Switch to tab "Properties" in the below panel and click on "Resource" hyperlink to go into details:

The mapping between SAP Cloud for Sales web service (the message named OpportunityReplicationBulkRequest here on the left side) and SAP Marketing Cloud OData service (the message named "Import Headers here on the right side) appears. If you expand nodes of the message "Import Headers" and look for our custom field "Sales Cycle", you can't find it. At this moment, it's pretty normal because we haven't replaced our message with the new one (that XSD file created in previous step) yet. That's the new XSD file which includes our custom field.
To replace the message with new one, click on the pencil icon on right corner for the message "ImportHeaders".

Under "Target Messages", under "Actions" column, click on "Replace message" - the icon next to trash bin icon.

A value help pops up for "Select Target Message". Now pick the XSD file you noted down in previous steps (It's ImportHeadersEntityPost15.xsd in our example)

And click on "OK" button to go back to mapping.

And now, that's it! You see that existing mappings are taken over automatically and your custom field "Sales Cycle" is waiting for you to map it!
If you now expand the nodes of "ImportHeaders" message on the right side, you can find your custom field as "YY1_SALES_CYCLE..." under "BusinessDocument" entity.
Look for "SalesCycleCode" field in the message "OpportunityReplicationBulkRequest" on the left. Once you find it, drag & drop it onto your custom field "YY1_SALES_CYCLE..." on the right side. A blue line should now appear to represent the mapping between these two fields.
Click on "OK" to go back to your integration flow.
Save your integration flow as new version by clicking on "Save as version". A pop-up appears with a new version. Provide comments if you like and finally deploy the integration flow by clicking on "Deploy".
Once your integration flow is deployed, you can now test your mapping by creating a new opportunity in SAP Cloud for Sales.
And you can check the results in "Import Monitor" app in SAP Marketing Cloud.
Conclusion
With this extensibility option, you are able to map any custom field created in SAP Marketing Cloud to any field available in source system's web service in SAP Cloud Platform Integration. This will enable you to bring more data hence more insight to your business.
7 Comments
You must be a registered user to add a comment. If you've already registered, sign in. Otherwise, register and sign in.
Labels in this area
-
ABAP
1 -
API Rules
1 -
c4c
1 -
CAP development
2 -
clean-core
2 -
CRM
1 -
Custom Key Metrics
1 -
Customer Data
1 -
Determination
1 -
Determinations
1 -
Introduction
1 -
KYMA
1 -
Kyma Functions
1 -
open SAP
1 -
RAP development
1 -
Sales and Service Cloud Version 2
1 -
Sales Cloud
1 -
Sales Cloud v2
1 -
SAP
1 -
SAP Community
1 -
SAP CPQ
1 -
SAP CRM Web UI
1 -
SAP Customer Data Cloud
1 -
SAP Customer Experience
1 -
SAP CX
2 -
SAP CX Cloud
1 -
SAP CX extensions
2 -
SAP Integration Suite
1 -
SAP Sales Cloud v1
2 -
SAP Sales Cloud v2
2 -
SAP Service Cloud
2 -
SAP Service Cloud v2
2 -
SAP Service Cloud Version 2
1 -
SAP Utilities
1 -
Service and Social ticket configuration
1 -
Service Cloud v2
1 -
side-by-side extensions
2 -
Ticket configuration in SAP C4C
1 -
Validation
1 -
Validations
1
Related Content
- SAP Launches CDP Industry Accelerator to Help Utilities Deliver Better Customer Experiences in CRM and CX Blogs by SAP
- Replicating Opt-Outs from external webforms to Marketing Cloud (via CPI Integration) in CRM and CX Questions
- SAP Sales and Service Cloud side-by-side extensions - Development Patterns in CRM and CX Blogs by Members
- SAP Emarsys Customer Engagement - Enhanced Lead Integration to SAP Sales Cloud Version 1 in CRM and CX Blogs by SAP
- Labs Talk: Customer Experience & Web 3 in CRM and CX Blogs by SAP
Top kudoed authors
| User | Count |
|---|---|
| 1 | |
| 1 | |
| 1 | |
| 1 |