
- SAP Community
- Products and Technology
- Technology
- Technology Blogs by SAP
- Application Runtime | Migrating from the Neo Envir...
Technology Blogs by SAP
Learn how to extend and personalize SAP applications. Follow the SAP technology blog for insights into SAP BTP, ABAP, SAP Analytics Cloud, SAP HANA, and more.
Turn on suggestions
Auto-suggest helps you quickly narrow down your search results by suggesting possible matches as you type.
Showing results for
Product and Topic Expert
Options
- Subscribe to RSS Feed
- Mark as New
- Mark as Read
- Bookmark
- Subscribe
- Printer Friendly Page
- Report Inappropriate Content
10-11-2020
3:32 PM
| This blog post series is about developing applications in a multi-cloud environment. For the end-to-end hands-on tutorial example, see
For the step-by-step series, visit
Questions? Post as comment. Useful? Give us a like and share on social media. Thanks! |


Hands-On Tutorials
Developing Secure Applications on the SAP Cloud Platform
In this blog series, we will explore developing secure applications in a multi-cloud Cloud Foundry environment.
In this blog, as appendix, we cover buildpacks, runtimes, vendor dependencies, application routes, and other application attributes which are slightly off-topic here in relation to our main story: the Cloud Foundry UAA component for User Accounts and Authorization or to be more precise the SAP XSUAA implementation of the service. However, for those less familiar with the SAP Cloud Platform and Cloud Foundry technology an brief digression about platform internals might be helpful for your understanding.
Give it a Trial
To understand the concepts just reading the blog suffices but should you want to get hands-on you can follow along using an SAP Cloud Platform trial account.
- SAP Cloud Platform Trial | Register for free | Log on
Global Accounts and Subaccounts
Signing up provide us with a global account of format <id>trial corresponding to the subscription. In addition, a trial subaccount is created in a regional data center of the cloud provider of our choice which (time of writing) is restricted to AWS in the regions US East and Europe, Frankfurt.
You can create additional subaccounts should you want to try things out in the other region or evaluate cross-region functionality.
The domain model and notion of global accounts and subaccounts matching a regional cloud provider datacenter are specific to the SAP Cloud Platform (and not to Cloud Foundry).
In the trial environment, the Cloud Foundry environment is automatically enabled for our subaccount with a Cloud Foundry Org name and Space. The Cloud Foundry Org name matches the name of our SAP Cloud Platform global account and that of our personal subdomain. This is typical for the trial environment but technically not required (you can use a different name for each).
We also have a single Cloud Foundry Space: dev with 0 applications and 0 service instances. As with subaccounts, we can create additional spaces if needed.

For the Cloud Foundry Orgs and Spaces concepts, see
- Orgs, Spaces, Roles, and Permissions | Cloud Foundry documentation
Side Note: For the story about why the URL points to "hana.ondemand.com", see
Cloud Foundry Subscription, Entitlements, and API Endpoint
The SAP Cloud Platform cockpit Subbacount: trial page displays the relevant information about this subaccount.
There is one active subscription in the trial (SAP Business Application Studio) and we also have a long list of entitlements, including SAP HANA Cloud and SAP HANA Schemas & HDI Containers, which we will also be using in the series.
The page also displays the Cloud Foundry API endpoint or target URL which we need to connect to a specific Cloud Foundry environment or, to be precise, to the Cloud Controller API.
For the trial environment the target URL points to the Cloud Foundry environment in either AWS Frankfurt or AWS US East

Cloud Foundry CLI
While the web interface of the SAP Cloud Platform cockpit is convenient for novice users, for automation and more advanced functionality you might find yourself using the CLI provides more often.
You can install the CLI from GitHub: github.com/cloudfoundry/cli/blob/master/README.md.
To connect to the trial environment we can use the cf login command. You will be prompted to provide the URL endpoint. Log in with your SAP Cloud Platform trial e-mail account (or generated passcode). In case you have multiple subaccounts (Cloud Foundry Org accounts, that is), you will be prompted to specify the one to use. This also applies to spaces but you can also pass org and space as parameters to the login command.
There are some options for each command and we can logon with SSO and passcodes instead of username/password, for example.
The cf commands are documented in the Cloud Foundry CLI Reference
With the cf api command you can change regional datacenters.
With cf target you can change org and space.
cf api

# shorthand for cf login

cf l -o <trial-id> -s dev --sso

# shorthand for cf target

cf t
The Power of Push
The notion and technology of platform-as-a-service lie originates with Heroku, Ruby, and Rack. Heroku itself is wordplay on heroic and haiku, and you can look up some samples here.
Cloud Foundry was initially also implemented in Ruby and here is a haiku that captures the essence of Cloud Foundry.
Here is my source code

Run it on the cloud for me

I do not care how
In 2015, Cloud Foundry was rearchitected for using Go. The virtual machines are now Diego cells, referencing that the Droplet Execution Agent (DEA) is now implemented for Go (DEA-Go). Similarly, the Warden containers are now running as Garden.

Source: LinuxFoundationX LFS132x Introduction to Cloud Foundry and Cloud Native Software Architecture
If you wish, you can also run Docker containers in a Diego cell. This is not relevant for our scenario and would require additional configuration to make this work with service instances (SAP HANA Cloud and XSUAA) but serves to clarify the inner workings of Diego: just another VM+Container architecture.
The How-To for Docker is covered below.

Start with an Argument
To deploy an application to Cloud Foundry, we use the cf push command. For the sample code used in this series, see
When we run the cf push command as-is, without arguments, the execution will fail with an incorrect usage message:
Incorrect Usage: The push command requires an app name.

The app name can be supplied as an argument or with a manifest.yml file.
The command syntax is returned.

This is the same usage information we find in the CLI Reference Guide
For a general overview, see
- Pushing an App | Cloud Foundry documentation

When a Name is not Enough
When we push the Node.js app to Cloud Foundry with a name, the runtime (buildpack) to use, dependencies, and start command are parsed from the application manifest package.json file included.
# works for Node but fails for Python

cf push myapp
When we push the Python app with only the name a staging error is returned with message:
No start command specified by buildpack or via Procfile.

App will not start unless a command is provided at runtime
When not enough information is provided, Cloud Foundry downloads all available buildpacks, creates a VM (cell) to build the app and here attempts to use the uas-dataflow-server-buildpack which fails.
As documented, Cloud Foundry will automatically use the Python buildpack if either requirements.txt or setup.py file is detected in the root directory of the project. Otherwise, buildpack needs to be provided as argument.
Changing the name from server.py into setup.py solves the buildpack issue. However, we still get errors as the script cannot be executed due to a ModuleNotFoundError.

Module Not Found
Application Dependencies
When we run an application locally we use a package manager (npm for Node, pip for Python) to install the dependencies. To run the same app in Cloud Foundry, we also need to provide the dependencies. How this is done depends on the runtime (buildpack) we are using
For Node.js dependencies and runtime requirements are defined in the application package file package.json.
{

  "name": "myapp",

   ...

  "dependencies": {

    "express": "^4.17.1"

  },

  "engines": {

    "node": "10.x.x"

  }

}
For the same purpose Python uses the file requirements.txt for the dependencies and runtime.txt for the Python kernel runtime.
Unless a specific version is required, just the name of the dependency suffices.
# Flask>=1.0.0

# Flask==1.2.0

Flask
This also applies to the dependencies of the dependency, Flask for example requires Werkzeug, Jinja2, MarkupSafe, and some others.
We could have specified all dependencies but could also leave this up to the package manager (pip).
When we run cf push myapp again we can see that both Flask and its dependencies are installed. Adding requiements.txt file solves two issues:
- Which buildpack to use
- Which modules to install
We are making progress but our Python deployment still fails because, as indicated in red, no start command is specified.
The build also generates two warnings about the PATH and pip version but these are specific to the buildpack. To makes these disappear we either have to provide our own buildpack or wait for the next version. We discuss the buildpacks in more detail below.

Where to Start?
When the dependencies are provided, Cloud Foundry can build the app but how should it run?
For Node.js, the start command is parsed from the application package file package.json.
{

  "name": "myapp",

  ...

  "scripts": {

    "start": "node server.js"

  }

}
When we deploy a Python application this needs to be provided via Procfile or at runtime.
No start command specified by buildpack or via Procfile.

App will not start unless a command is provided at runtime
Runtime
We can pass a runtime start command with the attribute --start_command (-c in shorthand). Typically, this would be the same command we use to execute the app locally.
cf push myapp -c "python -m server"
Procfile
A Procfile (no extension, uppercase P) expects the syntax "web: <command>". Here is an example.
web: FLASK_APP=web.py python3 -m flask run --host=0.0.0.0 --port=$PORT We could have use the same python -m server.py command but here we are setting an environment variable and then execute flask run with host and port name.
As documented
- Quickstart | Flask Documentation
This enables use to remove configuration (host and port to use) from the business logic.

When we push the Python app with a Procfile, the warning is no longer displayed and the output returns the alternative start command.
When a Procfile is detected, the command attribute is ignored.

Side Note: For some background, the Procfile goes back to Heroku and served to scale apps. It is not specific to Python.
As documented:
- Production Server Configuration | Cloud Foundry Documentation
- The Procfile | Heroku Dev Center
To scale apps in Cloud Foundry these days it is more common to use the instance attribute and the cf scale command.
- Scaling an App Using cf scale | Cloud Foundry documentation
- cf scale | Cloud Foundry Command Line Reference
Attributes and Manifests
With a name, app dependencies, buildpack, and start command we have our app running. To fine-tune the environment we can specify optional attributes.
Attributes
On the SAP Cloud Platform Cloud Foundry environment, apps run with 1 GB memory and 1 GB disk space. For small apps this may be too much and for large apps to little. We can control memory and disk allocation with the attributes -m and -k.
cf push myapp -m 128M -k 256M -c "python server.py" Manifest
As already indicate by the cf CLI, instead of passing attributes on the command line we can also use a manifest.yml file.
Incorrect Usage: The push command requires an app name.

The app name can be supplied as an argument or with a manifest.yml file.
Below a sample manifest.yml file. As with all YAMLs, the spaces have meaning (but we can move the attributes around).
The path attribute points to either the directory where the code is located or to a ZIP or JAR file with the code. As we have already seen, without this parameter the current directory is assumed (dot). In this application manifest the buildpack and path attribute are superfluous but stating the obvious at times avoids mistakes and surprises.
To try out the zip format, compress server.py and requirements.txt into an archive and use path: server.zip. For larger projects, using compression shortens the time to upload.
The CLI looks for a manifest.yml in the current directory. When stored elsewhere, we can use the attribute -f with the path to the manifest is.
As documented,
- App Manifest Attribute Reference | Cloud Foundry documentation
---

applications:

- name: myapp

  buildpacks:

  - python_buildpack

  path: .

  memory: 128M

  disk_quota: 256M

  random-route: true

  command: python server.py


Side Note: Initially the ML from YML was the same ML as in XML and HTML: Yet Another Markup Language (going back to the early days of Yahoo). Later the creators changed their mind and now it stands for YAML Ain't Markup Language, a recursive acronym which only makes sense to very few people. However, the statement is correct. YAML is not a markup language but a configuration file language and one that is, like Python, senstive to identation. In other words, spaces have meaning.
Buildpacks
In the manifest above we explicitly set the buildpack we want to use. Cloud Foundry uses a buildpack to create a droplet (tarball or zipped archived stored in a blobstore), which is later used to run the app. See the deployment diagram above.
The cf buildpacks command lists all available buildpacks provided by SAP.

However, you can download a more recent version from Cloud Foundry, if needed, or build your own.
As documented in the Cloud Foundry documentation
---

applications:

- name: myapp

  buildpacks:

    - https://github.com/cloudfoundry/python-buildpack.git

  ...
The console output below shows a Cloud Foundry cell creating a container and download Go to build the app, then the Python Buildpack version 1.7.21. The version provided by SAP Cloud Platform is currently 1.7.17 (see output above).
The rest is the same: 'go build' installs python, pip-pop ( to manage requirements.txt files) and then runs the Python package manager pip to install Flask, etc.

Runtime
The Python Cloud Foundry buildpack contains multiple Python versions. For example, buildpack 1.7.21 contains ten Python binaries from 3.5.9 (lowest) to 3.8.5 (highest). To configure the app for a particular runtime, add a file named runtime.txt to the root directory with the required version.
python-3.7.8As documented (as documented).
- Python Buildpack | Cloud Foundry documentation
- /github.com/cloudfoundry/python-buildpack/releases

Should the version of runtime.txt not match those available in the buildpack the droplet compilation fails.

For Node.js apps, the Node engine is specified in the package.json file.
Staging
First a container is created by a cell. The Python buildpack is downloaded and Python and pip are installed. Pip installs Flask and dependencies. The result is uploaded as droplet and the container stopped and destroyed.

After staging, a Cloud Foundry cell then powers up another container, this time to run the droplet.

The illustration above shows the cf push process. A Diego cell is a virtual machine. One is used to stage the app and create the droplet using a container (first created, then destroyed). Another to run the app.
As documented
- How applications are staged | Cloud Foundry documentation
The same information is provided by the SAP Cloud Platform Cockpit. When we click the application route we are directed to our app.

Routes
Each app needs to be mapped to a unique route. The "host" of the route is the app name. The "domain" for the trial this is either cfapps.eu10.hana.ondemand.com or cfapps.us10.hana.ondemand.com.
As "myapp" is a common name, we are likely to get the error:
The app cannot be mapped to route myapp.cfapps.eu10.hana.ondemand.com

because the route exists in a different space.

FAILED
To avoid this situation, you can use a unique identifier (e.g. today's date or a unique string as pre- or suffix).
Alternatively, you can use random routes. Random route generates a unique name for our app.
cf push myapp --random-route -c "python server.py" The equivalent app manifest syntax is
---

applications:

- name: myapp

  ...

  random-route: true
As documented
- Configuring Routes and Domains, Cloud Foundry documentation
- App Manifest Attribute Reference, Cloud Foundry documentation
Orphaned Routes
The random route generated this time is myapp-execellent-warthog-by but it will be different when we delete the app and redeploy. Eventually run out of your random routes quota. To reset the counter, use command
cf delete-orphaned-routes Alternatively, delete the route when you delete the app
As documented
Vendor App Dependencies
Node
When we deploy a Node.js app locally, dependencies are installed with the npm install command. This creates a node_modules directory under the project root.
With cf push the vendored dependencies are uploaded with the app. When we push the app the prebuild is detected (vendor dependencies).

Vendored dependencies can be blocked for updates by adding the package-lock.json file.
As documented
- package-lock.json | NPM Docs
Python
When the subaccount is configured for the China (Shanghai) region it is a requirement to deploy Cloud Foundry applications in SAP as self-contained, This requires the app to be bundled with all dependencies so that the staging process doesn't require any network calls. For the other regions it is not a requirement but still recommended.
pip download
For the Python buildpack create a vendor folder in the root directory and execute command:
# activate venv

mkdir vendor

pip download -r requirements.txt --no-binary=:none: -d vendor
Defaults to the platform of the running system. When running on macOS or Windows specify the target platform and optionally the required python version.
As documented,
- pip download | pip Reference Guide
- Python Buildpack | Cloud Foundry documentation
pip download -r requirements.txt -d vendor \

--platform manylinux1_x86_64 --python-version 37 \

--only-binary=:all: --no-binary=:none: --no-cache-dir
This time the provided dependencies are used to build the app.

pip freeze
Best practice is to specify in the requirement.txt file all dependencies with the pip freeze command.
As documented
- pip freeze | pip Reference Guide
# activate venv

pip install Flask

pip freeze -all > requirements.txt

pip download -r requirements.txt -d vendor \

--platform manylinux1_x86_64 --python-version 37 \

--only-binary=:all: --no-binary=:none: --no-cache-dir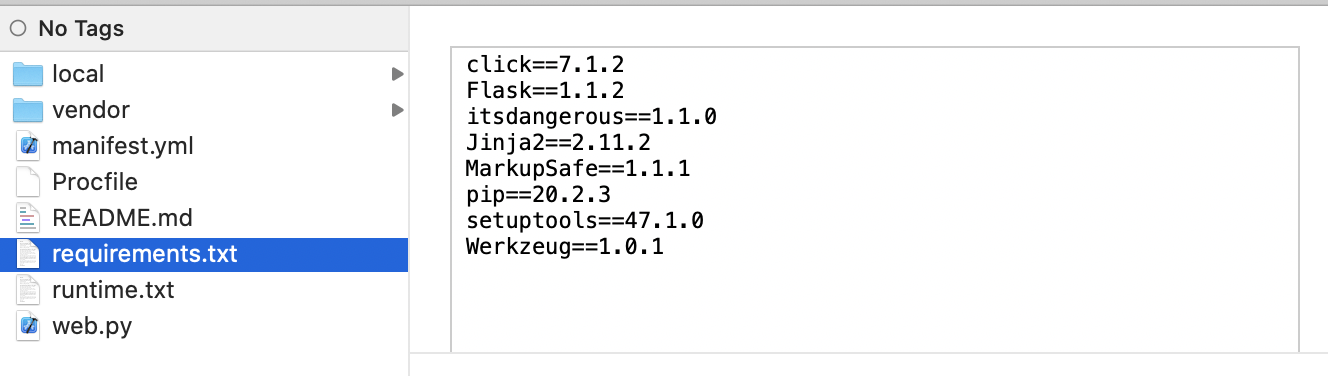
Containers
Docker and Diego
As we have seen, Cloud Foundry runs (Garden) containers inside virtual machines (cells). If you wish, you can also run Docker containers in a Diego cell. This is not relevant for our scenario and would require additional configuration to make this work with service instances (SAP HANA Cloud and XSUAA) but serves to clarify the inner workings of Diego: just another VM+Container architecture.
To test this out you need a local Docker installation, see www.docker.com for the downloads. We are going to assume you have done the Docker 101 tutorials and have fiddled with images and containers a bit and have an account on the Docker Hub.
For a step-by-step, see Deploy Application using Docker Container on SAP Cloud Foundry : 2020 by kachiever.
Dockerfile
First, ceate a Docker directory with a Dockerfile file.
# set base image (host OS)

FROM python:3.8


# set the working directory in the container

WORKDIR /app


# copy the dependencies file to the working directory

COPY requirements.txt .


# install dependencies

RUN pip install -r requirements.txt


# copy the content of the local src directory to the working directory

COPY src/ .


# command to run on container start

CMD [ "python", "./server.py" ]
We are using the same requirements.txt file as before and the orignal server.py file. To separate the configuration files from the source code, create a src file and move the server.py file.

Build
Build the container with command
docker build -t python-tutorial .This will build an image tagged as python-tutorial
- Download the Python image
- Change to the work directory /app
- Copy requirements.txt
- Run pip to install Flask and its dependencies
- Copy the source code (server.py)
- Run the command

Run
To run the container locally, use command:
docker run -d -p 3000:3000 python-tutorial
Into the Cloud
docker push
Now that we have validated that our local container is working, time to upload the image to Docker Hub. For tag the image and push it to Docker Hub. Of course, Docker Hub is just one choice. Alternatively, you can use Azure, Google Cloud, AWS, etc. to store the image. For the documentation, see Deploying an App with Docker.
docker login --username=<your user>

# note image ID

docker images

# tag the image <username>/<container>:<tag>

docker tag c8d87c346a6a dvkempen/python-tutorial:cloudfoundry

# push the container to the hub

docker push dvkempen/python-tutorial

cf push
With the container already in the cloud, it is a small step for Cloud Foundry to host it. We only need to provide our APPNAME and docker image with credentials. Optionally, again, use a manifest to control memory, disk, and other attributes. This works the same as with the apps. As documented: push - Cloud Foundry CLI Reference Guide
cf push myapp --docker-image dvkempen/python-tutorial:cloudfoundry --docker-username dvkempenAs indicated but the CLI output, you can set a local environment variable CF_DOCKER_PASSWORD for the password.
Note that the staging phase is now much shorter as we no longer need to build the image.

Get Started
For more information and additional tutorials, see
- Get Started with Cloud Foundry | Cloud Foundry
Share and Connect
Questions? Please post as comment.
Useful? Give us a like and share on social media.
Thanks!
If you would like to receive updates, connect with me on
- LinkedIn > linkedin.com/in/dvankempen
- Twitter > @dvankempen
For the author page of SAP PRESS, visit
Over the years, for the SAP HANA Academy, SAP’s Partner Innovation Lab, and à titre personnel, I have written a little over 300 posts here for the SAP Community. Some articles only reached a few readers. Others attracted quite a few more. For your reading pleasure and convenience, here is a curated list of posts which somehow managed to pass the 10k-view mile stone and, as sign of current interest, still tickle the counters each month. |
- SAP Managed Tags:
- SAP BTP, Cloud Foundry runtime and environment,
- SAP Business Technology Platform
Labels:
You must be a registered user to add a comment. If you've already registered, sign in. Otherwise, register and sign in.
Labels in this area
-
ABAP CDS Views - CDC (Change Data Capture)
2 -
AI
1 -
Analyze Workload Data
1 -
BTP
1 -
Business and IT Integration
2 -
Business application stu
1 -
Business Technology Platform
1 -
Business Trends
1,658 -
Business Trends
107 -
CAP
1 -
cf
1 -
Cloud Foundry
1 -
Confluent
1 -
Customer COE Basics and Fundamentals
1 -
Customer COE Latest and Greatest
3 -
Customer Data Browser app
1 -
Data Analysis Tool
1 -
data migration
1 -
data transfer
1 -
Datasphere
2 -
Event Information
1,400 -
Event Information
72 -
Expert
1 -
Expert Insights
177 -
Expert Insights
340 -
General
1 -
Google cloud
1 -
Google Next'24
1 -
GraphQL
1 -
Kafka
1 -
Life at SAP
780 -
Life at SAP
14 -
Migrate your Data App
1 -
MTA
1 -
Network Performance Analysis
1 -
NodeJS
1 -
PDF
1 -
POC
1 -
Product Updates
4,575 -
Product Updates
384 -
Replication Flow
1 -
REST API
1 -
RisewithSAP
1 -
SAP BTP
1 -
SAP BTP Cloud Foundry
1 -
SAP Cloud ALM
1 -
SAP Cloud Application Programming Model
1 -
SAP Datasphere
2 -
SAP S4HANA Cloud
1 -
SAP S4HANA Migration Cockpit
1 -
Technology Updates
6,872 -
Technology Updates
472 -
Workload Fluctuations
1
Related Content
- How to Install SAP Cloud Connector on a Mac M2 chipset in Technology Q&A
- How to Install SAP Cloud Connector on a Mac M2 Processor in Technology Q&A
- A python flask app sends the http request failed to invoke a S4 odata v4 service in Technology Q&A
- Import Data Connection to SAP S/4HANA in SAP Analytics Cloud : Technical Configuration in Technology Blogs by Members
- Automated check for SAP HANA Cloud availability with SAP Automation Pilot in Technology Blogs by SAP
Top kudoed authors
| User | Count |
|---|---|
| 17 | |
| 14 | |
| 13 | |
| 10 | |
| 9 | |
| 7 | |
| 7 | |
| 6 | |
| 6 | |
| 6 |