
- SAP Community
- Products and Technology
- Technology
- Technology Blogs by SAP
- Part 5: Configure Cloud Connector for Workflow Int...
Technology Blogs by SAP
Learn how to extend and personalize SAP applications. Follow the SAP technology blog for insights into SAP BTP, ABAP, SAP Analytics Cloud, SAP HANA, and more.
Turn on suggestions
Auto-suggest helps you quickly narrow down your search results by suggesting possible matches as you type.
Showing results for
Advisor
Options
- Subscribe to RSS Feed
- Mark as New
- Mark as Read
- Bookmark
- Subscribe
- Printer Friendly Page
- Report Inappropriate Content
12-01-2021
9:57 AM
This is part of a series of articles, which describe the steps to integrate an extension workflow using SAP Workflow Management on Business Technology Platform (BTP Workflow) into a Flexible Workflow in SAP S/4HANA OP.
Part 1: Integrating an Extension Workflow on SAP BTP into a Flexible Workflow
Part 2: SAP BTP Cockpit Configuration for Usage of SAP Workflow Management
Part 3: SAP S/4HANA Backend Configuration to Communicate with SAP BTP
Part 4: User and Roles for SAP BTP Workflow and Flexible Workflow
Part 5: Configure Cloud Connector for Workflow Integration
Part 6: Workflow Scenario with Extension Step
Part 7: Flexible Workflow in Integration Scenario
Part 8: Extension Workflow using SAP Workflow Management on SAP BTP
Part 9: End-to-End Test of Workflow Integration Scenario
Part 10: Problem Solving of Workflow Integration Scenario
1. Installation of SAP JVM
2. Installation of Cloud Connector
3. Add Subaccount to Cloud Connector
4. Add Backend System to Cloud Connector
5. Add Destination in SAP BTP
Before starting with the technical description I want to add a short explanation for motivating this issue. Of course it is not necessary to install a local Cloud Connector for using the integration. However, I used it in this scenario, because it helped me in other projects when developing apps on a WebIDE, which I had to connect to the backend ABAP system via local Cloud Connector. In our scenario it is important to understand the role of this tool - to tunnel requests between two systems.
Check out for several ways how to connect to SAP BTP with a Cloud Connector in SAP Help
The following descriptions refer to a Windows environment.
The Cloud Connector (CC) is based on Java. Therefore, java must be installed. Currently, CC works with java version 7 and 8 only. You find a suiting SAP JVM on SAPs tools website.
Fill the following fields:
The to-be-connected backend system must be maintained in Cloud Connector. Do it this way in CC:
Now, the system is maintained and should look in CC like this:
Although this section is not directly connected to Cloud Connector, it cannot be configured in an earlier step, since one value comes from CC configuration.
Logon to your SAP BTP cockpit >> subaccount
=> Conclusion: we successfully set up the Cloud Connector and can check that SAP BTP communicates with the backend system.
Part 1: Integrating an Extension Workflow on SAP BTP into a Flexible Workflow
Part 2: SAP BTP Cockpit Configuration for Usage of SAP Workflow Management
Part 3: SAP S/4HANA Backend Configuration to Communicate with SAP BTP
Part 4: User and Roles for SAP BTP Workflow and Flexible Workflow
Part 5: Configure Cloud Connector for Workflow Integration
Part 6: Workflow Scenario with Extension Step
Part 7: Flexible Workflow in Integration Scenario
Part 8: Extension Workflow using SAP Workflow Management on SAP BTP
Part 9: End-to-End Test of Workflow Integration Scenario
Part 10: Problem Solving of Workflow Integration Scenario
Content
1. Installation of SAP JVM
2. Installation of Cloud Connector
3. Add Subaccount to Cloud Connector
4. Add Backend System to Cloud Connector
5. Add Destination in SAP BTP
Before starting with the technical description I want to add a short explanation for motivating this issue. Of course it is not necessary to install a local Cloud Connector for using the integration. However, I used it in this scenario, because it helped me in other projects when developing apps on a WebIDE, which I had to connect to the backend ABAP system via local Cloud Connector. In our scenario it is important to understand the role of this tool - to tunnel requests between two systems.
Check out for several ways how to connect to SAP BTP with a Cloud Connector in SAP Help
The following descriptions refer to a Windows environment.
1. Installation of SAP JVM
The Cloud Connector (CC) is based on Java. Therefore, java must be installed. Currently, CC works with java version 7 and 8 only. You find a suiting SAP JVM on SAPs tools website.
- Download: https://tools.hana.ondemand.com/#cloud >> SAP JVM >> sample: sapjvm-8.1.075-windows-x64.zip
- Unzip the file and remember the JVM path, e.g. C:\Program Files\Java\sapjvm-8.1.075-windows-x64\sapjvm_8
- Set system environment variable - in Windows:
- Start menu >> advanced system properties >> Environment Variables...
- In the lower box add JAVA_HOME: (use the JVM path from above)
- In the lower box edit Path and add: %JAVA_HOME%\bin
- Unfortunately you have to restart your computer to activate the environment variables in case you had to add or change them.
2. Installation of Cloud Connector
- Download: https://tools.hana.ondemand.com/#cloud >> Cloud Connector >> sample: sapcc-2.13.2-windows-x64.msi
- Run this installation file
- Don't enter JVM/JRE/Java information
- Check, whether services are started: Start menu >> Services

3. Add Subaccount to Cloud Connector
- Logon to CC: https://localhost:8443/
- First access with user Administrator and password manage
- After first logon change the login data
- Button Add Subaccount

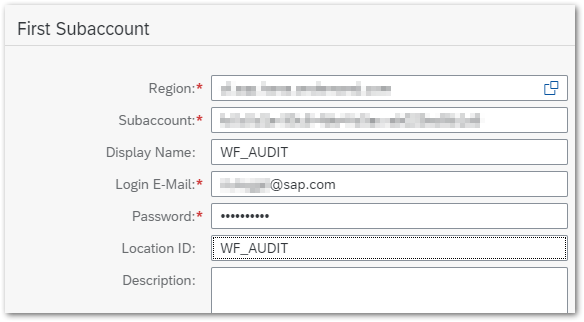
Fill the following fields:
- Region:
- Check dropdown list for accessible values and choose your value
- This is probably only one value. If there are more than one values, check in SAP BTP cockpit >> global account >> menu Subaccounts >> tile with your subaccount >> field Region, which should help finding the correct data center in above mentioned dropdown list.
- Subaccount: see Subaccount ID
- Display Name:
- Any meaningful name, which is later displayed in SAP BTP, remember this as CC subaccount name, sample WF_AUDIT
- Login E-Mail:
- Usually - especially in test scenarios - email of your user, otherwise use a generic administrator mailbox
- Password:
- Domain password of the user with email above
- Location ID:
- Another meaningful name for usage in SAP BTP in case in your CC are maintained several Subaccounts; remember this value as CC location ID, sample WF_AUDIT
- Description:
- Use this field for further Information (optional)
4. Add Backend System to Cloud Connector
The to-be-connected backend system must be maintained in Cloud Connector. Do it this way in CC:
- Menu Subaccount: CC subaccount name (sample: WF_AUDIT) >> Submenu Cloud To On-Premise
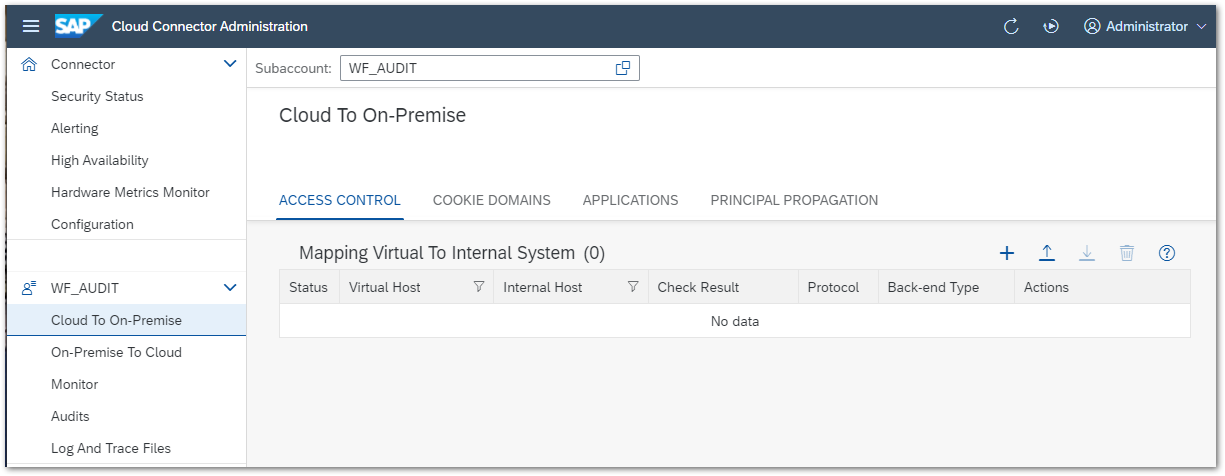
- Add system ("+")
- Back-end Type: ABAP System >> Next

- Protocol: HTTPS >> Next

- Internal Host: Https Host
- Internal Port: Https Port >> Next

- Same Values for Virtual Host and Port
- Principal type: None >> Next

- Host in Request Header: one of both entries >> Next

- Description: whatever you like >> Next
- Summary >> Finish

Now, the system is maintained and should look in CC like this:

- Below the shown part from screenshot above you can see an empty table. Add a resource here:
- Push '+' sign
- URL: add the path to all released resources only. In test environment the easiest way is path "/"
- Active: set checkbox
- WebSocket: do not set checkbox
- Access Policy: Path and all Sub-Paths (according to the simple way in test environment; in productive environment add appropriate constraints
- Save

- Check availability via pushing the button as shown in the screenshot:

5. Add Destination in SAP BTP
Although this section is not directly connected to Cloud Connector, it cannot be configured in an earlier step, since one value comes from CC configuration.
Logon to your SAP BTP cockpit >> subaccount
- Menu Connectivity >> Destinations
- Maintain backend system via link New Destination on top of the table on the right side

- Fields:
- Name: any meaningful name, which describes the target system (backend system), destination name of SAP S/4HANA from SAP BTP
- Type: HTTP
- Description: any meaningful description
- URL: http://https host:https port
- Proxy Type: OnPremise
- Authentication: Basic Authentication
- Location ID: CC location ID (see 3. Add Subaccount to Cloud Connector)
- User and Password come from backend callback communication user, which was created in Part 4: User and Roles for SAP BTP Workflow and Flexible Workflow
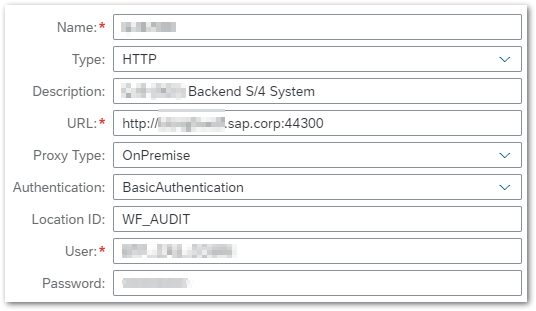
- Push button Check Connection at the bottom

=> Conclusion: we successfully set up the Cloud Connector and can check that SAP BTP communicates with the backend system.
- SAP Managed Tags:
- SAP Workflow Management,
- SAP Business Workflow
Labels:
You must be a registered user to add a comment. If you've already registered, sign in. Otherwise, register and sign in.
Labels in this area
-
ABAP CDS Views - CDC (Change Data Capture)
2 -
AI
1 -
Analyze Workload Data
1 -
BTP
1 -
Business and IT Integration
2 -
Business application stu
1 -
Business Technology Platform
1 -
Business Trends
1,658 -
Business Trends
93 -
CAP
1 -
cf
1 -
Cloud Foundry
1 -
Confluent
1 -
Customer COE Basics and Fundamentals
1 -
Customer COE Latest and Greatest
3 -
Customer Data Browser app
1 -
Data Analysis Tool
1 -
data migration
1 -
data transfer
1 -
Datasphere
2 -
Event Information
1,400 -
Event Information
66 -
Expert
1 -
Expert Insights
177 -
Expert Insights
299 -
General
1 -
Google cloud
1 -
Google Next'24
1 -
Kafka
1 -
Life at SAP
780 -
Life at SAP
13 -
Migrate your Data App
1 -
MTA
1 -
Network Performance Analysis
1 -
NodeJS
1 -
PDF
1 -
POC
1 -
Product Updates
4,577 -
Product Updates
345 -
Replication Flow
1 -
RisewithSAP
1 -
SAP BTP
1 -
SAP BTP Cloud Foundry
1 -
SAP Cloud ALM
1 -
SAP Cloud Application Programming Model
1 -
SAP Datasphere
2 -
SAP S4HANA Cloud
1 -
SAP S4HANA Migration Cockpit
1 -
Technology Updates
6,872 -
Technology Updates
427 -
Workload Fluctuations
1
Related Content
- Integrating CDS action in SAP Mobile Services for Data Retrieval in Technology Q&A
- Supporting Multiple API Gateways with SAP API Management – using Azure API Management as example in Technology Blogs by SAP
- Configuring SAP CI/CD pipeline for Deploying ReactJS application in Cloud Foundry in Technology Q&A
- Consuming SAP with SAP Build Apps - Mobile Apps for iOS and Android in Technology Blogs by SAP
- Configure SAP BTP destination REST API integration - Document information extraction - "AxiosError: in Technology Q&A
Top kudoed authors
| User | Count |
|---|---|
| 41 | |
| 25 | |
| 17 | |
| 14 | |
| 9 | |
| 7 | |
| 6 | |
| 6 | |
| 6 | |
| 6 |