


- SAP Community
- Products and Technology
- Technology
- Technology Blogs by SAP
- Part 6: Workflow Scenario with Extension Step
Technology Blogs by SAP
Learn how to extend and personalize SAP applications. Follow the SAP technology blog for insights into SAP BTP, ABAP, SAP Analytics Cloud, SAP HANA, and more.
Turn on suggestions
Auto-suggest helps you quickly narrow down your search results by suggesting possible matches as you type.
Showing results for
Advisor
Options
- Subscribe to RSS Feed
- Mark as New
- Mark as Read
- Bookmark
- Subscribe
- Printer Friendly Page
- Report Inappropriate Content
12-02-2021
7:33 PM
This is part of a series of articles, which describe the steps to integrate an extension workflow using SAP Workflow Management on Business Technology Platform (BTP Workflow) into a Flexible Workflow in SAP S/4HANA OP.
Part 1: Integrating an Extension Workflow on SAP BTP into a Flexible Workflow
Part 2: SAP BTP Cockpit Configuration for Usage of SAP Workflow Management
Part 3: SAP S/4HANA Backend Configuration to Communicate with SAP BTP
Part 4: User and Roles for SAP BTP Workflow and Flexible Workflow
Part 5: Configure Cloud Connector for Workflow Integration
Part 6: Workflow Scenario with Extension Step
Part 7: Flexible Workflow in Integration Scenario
Part 8: Extension Workflow using SAP Workflow Management on SAP BTP
Part 9: End-to-End Test of Workflow Integration Scenario
Part 10: Problem Solving of Workflow Integration Scenario
1. Dictionary Objects
... 1.1. Database Table
... 1.2. CDS View
2. Class
... 2.1. Interfaces
... 2.2. Attribute
... 2.3. Events
... 2.4. Methods
3. Business Object
... 3.1. Maintain Business Object Type
... 3.2. Maintain Object Node Type
... 3.3. Maintain CDS View
4. Tasks
5. Scenario
... 5.1. Context
... 5.2. Process Data
... 5.3. Activation
... 5.4. Activities
6. Consumer Connectivity
Storage of data is done via database. In this guide a new table is created, which will be the basis of a CDS view. This CDS view a needed for our scenario and is maintained in the scenario builder later.
In backend system:
In the scenario editor we need to reference a CDS view instead of a database table. Therefore, we create such a view, that is based on the database table created above.
Creation of CDS views can be done in eclipse using ABAP Development Tools (ADT). At this point we leave the "old ABAP world" for a short while.
In case you have not yet done it, get, unzip and install an eclipse version, that is suggested on https://tools.hana.ondemand.com/#abap Follow the instructions in Procedure section.
Afterwards:
This creates a new CDS view including all fields of our sample table ZCAS_AUDIT_TRNSP ignoring annotations. Remember the view name as CDS view name, sample ZCAS_AUDIT_TRNSP_CDS. We see the fastest way for testing purposes. For usage in production you should pay more attention to topics like security.
In your eclipse it should look like this:
For references we need a structure, which holds the key field(s) only. In our scenario this is field and data type REQNR.
In backend system:
To access data in our environment, we have to store and manage them. This is done with the help of a class. This class is used in the scenario editor, too.
Alternatively, you can use an existing business object, which is implemented via class mechanism (and not via transaction SWO1).
In backend system:
Here, we just set the key attribute with the value from import parameter.
Code:
The intention of this method is to be called as step in scenario builder and to send an email to the partner saying that he/she should approve or reject a request in SAP BTP. Sample: Method INFORM_PARTNER()
You can add some or no content in this method, it doesn't matter for the described process. The same is valid for the following two methods.
The intention of this method is to be called as step in scenario builder and to store decision of partner into the database holding requests. Sample: Method DATABASE_UPDATE()
The intention of this method is to be called as step in scenario builder and to send an email to the person, who created the request. In this email it is stated, which decision was made by the partner. In case of a rejection the requestor can contact the partner on a different channel outside the workflow getting a clarification about the reason. Sample: Method INFORM_REQUESTOR()
This method is called by the scenario builder, setting the key attribute and starting to create a new instance of this class.
This method is called by the scenario builder, returning the local persistent object reference (LPOR)
None of the other methods were implemented.
When using a customer business object, one has to maintain some additional values, otherwise the magic of finding related objects in scenario builder will not work (see in next section). When using SAP delivered business objects, all SAP object node type (SONT) information are available already.
In backend system:
Each task in the workflow should be implemented via appropriate method in our just created class.
We have 3 methods, see sections 2.4.2. - 2.4.4.
Do the same for each of the above three methods in backend system:
This way we create tasks in our scenario.
In backend system:

First of all we need a context element, which references the class classname, that was created above. This container element will be the central object of this scenario.
On tab Process Data we will maintain values that will describe and trigger the workflow.
Now, this tab should look like this:
On tab Activities we maintain an activity for each method, which we have forseen as activity-related methods in the class (section 2. Class)
Do the same for each of the above 3 methods:
Afterwards, this screen should look like this:
Please recognize the automatically created data in tabs Outcomes and Properties.
Repeat the steps for remaining activities.
Now we add the external step, which integrates BTP workflow into our scenario.
After closing the popup, the activity details screen is shown. It slightly differs from above shown activity details screen.
Let's figure out the binding:
This means, we later have to create a BTP workflow with the name: Name of SAP BTP workflow.
Click buttons Save, Check and Activate as usual. Always keep an eye on the Result of Syntax Check at the bottom of Scenario Editor.
Our Scenario is considered as a consumer type and has to be assigned to an external server destination and an OAuth 2.0 client configuration. Otherwise it would not be clear, which system must be called, when using the external step in a flexible workflow based on this scenario.
Customize in backend system as follows:
=> Conclusion: The main work concerning the things, which the workflow has to do is done now. We should celebrate this milestone! For the moment we will leave the SAP S/4HANA backend system and switch to the frontend (SAP Fiori launchpad).
Part 1: Integrating an Extension Workflow on SAP BTP into a Flexible Workflow
Part 2: SAP BTP Cockpit Configuration for Usage of SAP Workflow Management
Part 3: SAP S/4HANA Backend Configuration to Communicate with SAP BTP
Part 4: User and Roles for SAP BTP Workflow and Flexible Workflow
Part 5: Configure Cloud Connector for Workflow Integration
Part 6: Workflow Scenario with Extension Step
Part 7: Flexible Workflow in Integration Scenario
Part 8: Extension Workflow using SAP Workflow Management on SAP BTP
Part 9: End-to-End Test of Workflow Integration Scenario
Part 10: Problem Solving of Workflow Integration Scenario
Content
1. Dictionary Objects
... 1.1. Database Table
... 1.2. CDS View
2. Class
... 2.1. Interfaces
... 2.2. Attribute
... 2.3. Events
... 2.4. Methods
3. Business Object
... 3.1. Maintain Business Object Type
... 3.2. Maintain Object Node Type
... 3.3. Maintain CDS View
4. Tasks
5. Scenario
... 5.1. Context
... 5.2. Process Data
... 5.3. Activation
... 5.4. Activities
6. Consumer Connectivity
1. Dictionary Objects
Storage of data is done via database. In this guide a new table is created, which will be the basis of a CDS view. This CDS view a needed for our scenario and is maintained in the scenario builder later.
1.1. Database Table
In backend system:
- Run Transaction SE11
- Create a new database table, which holds the request information, sample name ZCAS_AUDIT_TRNSP
- Add fields as below:

- Activate this table
1.2. CDS View
In the scenario editor we need to reference a CDS view instead of a database table. Therefore, we create such a view, that is based on the database table created above.
Creation of CDS views can be done in eclipse using ABAP Development Tools (ADT). At this point we leave the "old ABAP world" for a short while.
In case you have not yet done it, get, unzip and install an eclipse version, that is suggested on https://tools.hana.ondemand.com/#abap Follow the instructions in Procedure section.
Afterwards:
- Run eclipse and ADT
- Open the ABAP perspective
- Create a new Data Definition, add code similar to the following:
@AbapCatalog.sqlViewName: 'ZCASAUDITTRNSP'

@AbapCatalog.compiler.compareFilter: true

@AbapCatalog.preserveKey: true

@AccessControl.authorizationCheck: #CHECK

@EndUserText.label: 'CDS View including Table ZCAS_AUDIT_TRNSP'

define view ZCAS_AUDIT_TRNSP_CDS as select from zcas_audit_trnsp as tab {

  key tab.reqnr,

      tab.cust_id,

      tab.credat,

      tab.creusr,

      tab.chgdat,

      tab.chgusr,

      tab.decision

}
This creates a new CDS view including all fields of our sample table ZCAS_AUDIT_TRNSP ignoring annotations. Remember the view name as CDS view name, sample ZCAS_AUDIT_TRNSP_CDS. We see the fastest way for testing purposes. For usage in production you should pay more attention to topics like security.
In your eclipse it should look like this:

1.3. Key Structure
For references we need a structure, which holds the key field(s) only. In our scenario this is field and data type REQNR.
In backend system:
- Run transaction SE11
- Create a structure, remember name as key structure, sample ZCAS_AUDIT_KEY
- Add key field(s) of above database table

2. Class
To access data in our environment, we have to store and manage them. This is done with the help of a class. This class is used in the scenario editor, too.
Alternatively, you can use an existing business object, which is implemented via class mechanism (and not via transaction SWO1).
In backend system:
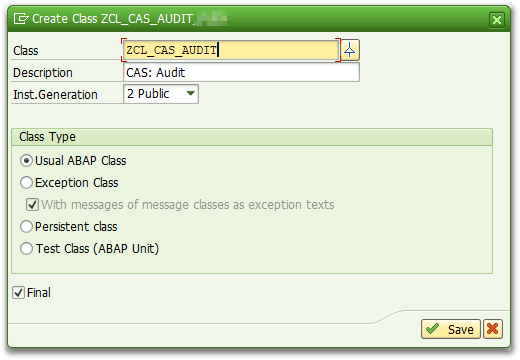
- Run transaction SE24
- Create a new class and remember the classname for later use in scenario editor
2.1. Interfaces
- Add interfaces BI_OBJECT, BI_PERSISTENT, IF_WORKFLOW on the same-named tab for being used in the scenario editor

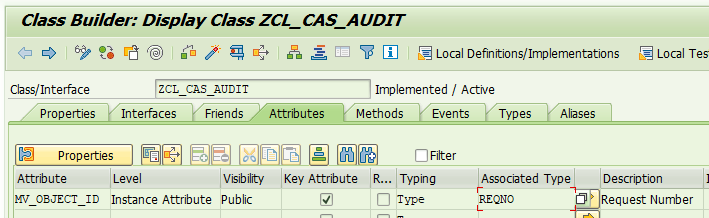
2.2. Attribute
- Add the key attribute, which is used as identifier for this approval request. In the sample we name it MV_OBJECT_ID and declare it as key attribute as shown in the screenshot, remember the key attributes name:
2.3. Events
- Create event CREATED as start event of flexible workflow
- Create events RESTART_WORKFLOW and CANCEL_WORKFLOW

2.4. Methods
- Interface BI_PERSISTENT created methods BI_PERSISTENT~FIND_BY_LPOR, BI_PERSISTENT~LPOR, BI_PERSISTENT~REFRESH
- Interface BI_OBJECT cerated methods BI_OBJECT~DEFAULT_ATTRIBUTE_VALUE, BI_OBJECT~EXECUTE_DEFAULT_METHOD, BI_OBJECT~RELEASE
- Add a constructor method
- Add another method for the flexible workflow for not having only one action. This could be
- sending a notification, sample INFORM_PARTNER()
- adding some values to the database, sample DATABASE_UPDATE()
- sending an email to the requestor, sample INFORM_REQUESTOR()
- and so on...
2.4.1. Method Constructor
Here, we just set the key attribute with the value from import parameter.
Code:
  METHOD constructor.

*   importing: IV_OBJECT_ID TYPE REQNO

    CALL METHOD super->constructor.

    mv_object_id = iv_object_id.

  ENDMETHOD.
2.4.2. Method to Inform Partner
The intention of this method is to be called as step in scenario builder and to send an email to the partner saying that he/she should approve or reject a request in SAP BTP. Sample: Method INFORM_PARTNER()
You can add some or no content in this method, it doesn't matter for the described process. The same is valid for the following two methods.
2.4.3. Method for Database Update
The intention of this method is to be called as step in scenario builder and to store decision of partner into the database holding requests. Sample: Method DATABASE_UPDATE()
2.4.4. Method to Inform the Requestor
The intention of this method is to be called as step in scenario builder and to send an email to the person, who created the request. In this email it is stated, which decision was made by the partner. In case of a rejection the requestor can contact the partner on a different channel outside the workflow getting a clarification about the reason. Sample: Method INFORM_REQUESTOR()
2.4.5. Interface Method BI_PERSISTENT~FIND_BY_LPOR
This method is called by the scenario builder, setting the key attribute and starting to create a new instance of this class.
  METHOD bi_persistent~find_by_lpor.

*   importing LPOR TYPE SIBFLPOR

*   returning RESULT TYPE REF TO BI_PERSISTENT

    DATA: reqno TYPE reqno.

    reqno  = lpor-instid.

    result = NEW zcl_cas_audit( reqno ).

  ENDMETHOD.
2.4.6. Interface Method BI_PERSISTENT~LPOR
This method is called by the scenario builder, returning the local persistent object reference (LPOR)
  METHOD bi_persistent~lpor.

*   returning RESULT TYPE SIBFLPOR

    result-catid  = cl_swf_evt_event=>mc_objcateg_cl. " = 'CL'

    result-typeid = 'ZCL_CAS_AUDIT'.

    result-instid = mv_object_id.

  ENDMETHOD.
None of the other methods were implemented.
3. Business Object
When using a customer business object, one has to maintain some additional values, otherwise the magic of finding related objects in scenario builder will not work (see in next section). When using SAP delivered business objects, all SAP object node type (SONT) information are available already.
In backend system:
3.1. Maintain Business Object Type
- Run transaction SM30
- View name: V_BO_TYPE >> button Maintain
- Add a new entry with
- SAP Object Type: the technical name of your new object, remember name as object type, e.g. ZZCASAUDIT
- SAP Object Type Name: the description of your new object

3.2. Maintain Object Node Type
- Run transaction SM30
- View name: SBO_V_NODETYPE >> button Maintain
- Add a new entry with
- SAP Object Node Type: technical name of the node, sample: ZZCASAUDIT, remember as object node type
- SAP Object Node Type Description: any text describing the node
- SAP Object Type: object type, technical name of the object, which was created before in section 3.1. Maintain Business Object Type
- SAP Object Root Node Indicator: set
- Workflow Class Representation: classname from above section 2. Class
- Key Structure for Workflow SAP Object: key structure, which was created in former section 1.3. Key Structure

3.3. Maintain CDS View
- Run transaction SM30
- View name: V_SBO_NODE_CDS
- Add a new entry with
- SAP Object Node Type: object node type, this is the new entry from section 3.2. Maintain Object Node Type
- CDS View Type: Representative View
- CDS View Name: CDS view name, which was created in section 1.2. CDS View

4. Tasks
Each task in the workflow should be implemented via appropriate method in our just created class.
We have 3 methods, see sections 2.4.2. - 2.4.4.
- Method to Inform Partner
- Method for Database Update
- Method to Inform the Requestor
Do the same for each of the above three methods in backend system:
- Run transaction PFTS
- Create a new task via Create button
- Fill the following fields on tab Basic data:
- Abbreviation: a meaningful technical name
- Name: a meaningful description for this task
- Release status: Released
- Work item text: a text, which is shown in workflow protocol after starting this task; eventually add variables in this text, e.g. request number
- Object Category: ABAP Class
- Object Type: classname from above section 2. Class, sample ZCL_CAS_AUDIT
- Method: choose the method you want to use for implementation of this task
- Section Execution: use checkboxes as needed
- After saving, set checkbox Synchronous object method; remember the task ID ("TS" + field Standard task), sample TS99900028 - TS99900030

- Add container element(s) on tab Container:
- Element: give it a technical element name
- Name: this is the user friendly element name
- Short Descript.: element description
- Tab D. Type
- Object Type: ABAP Class
- (second line) classname
- Tab Properties: make this element a mandatory importing parameter, because it is the objects key:
- Import: set
- Mandatory: set


This way we create tasks in our scenario.
5. Scenario
In backend system:
- Run transaction SWDD_SCENARIO
- Eventually you need to go one step back via using the green hook icon until the create icon is accessible:
- Push create button:

- Afterwards you see a screen with lots of empty fields, which will be filled in this section:

5.1. Context
First of all we need a context element, which references the class classname, that was created above. This container element will be the central object of this scenario.
- On the left side double click in scenario context section on "<Double-Click to Create>"
- Insert the values below, refer to the class, which was created before and remember the element name, sample Request

- Set flags for Import and Mandatory in the same popup as before in tab Properties:

- Save
5.2. Process Data
On tab Process Data we will maintain values that will describe and trigger the workflow.
- Abbreviation: insert a meaningful abbreviation, which is a technical name
- Description: enter a meaningful description
- Scenario Type: Standard
- Leading Object: element name >> then, 3 fields related SAP Object Node Type, related SAP Object Type and related CDS View are filled. Pay attention: the magic behind this will find your CDS view created in first section
- Add start event
- Category: CL
- Object Type: classname
- Event of the Object: remember as start event, sample CREATED
- Save (add package and transport request)
- Now, you can push the buttons Activate and Binding in Start Events table
- Binding: follow the suggestion
Now, this tab should look like this:

5.3. Activation
- Save, Check and Activate the scenario

Outcome should be a success-popup, remember the scenario ID for later usage:
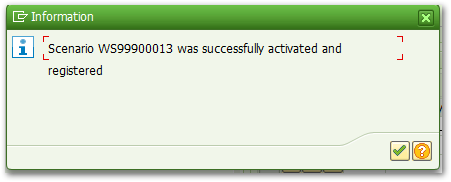
- Check messages at the bottom in section Result of Syntax Check:

5.4. Activities
5.4.1. Normal Activities
On tab Activities we maintain an activity for each method, which we have forseen as activity-related methods in the class (section 2. Class)
- Method to Inform Partner
- Method for Database Update
- Method to Inform the Requestor
Do the same for each of the above 3 methods:
- Push button Create (white sheet icon)
- Add values to the popup:
- Unique name: any meaningful technical name
- Short Text: describe shorty, what this step is doing
- Description: here you can describe more detailed the things done by this activity
- What Do You Want to Create?
- Activity radiobutton
- Task: task ID

- Cointinue (green hook icon)
- After closing the popup, the activity details screen is shown. Fill the values:
- Task: prefilled from popup value
- Step Name: prefilled from popup value, you can change it
- Step Classification: Unclassified Step - choose whatever suits your scenario
- Binding: send request variable to activity

- Since we have background steps only, no agents have to be maintained.
- You can add a task description
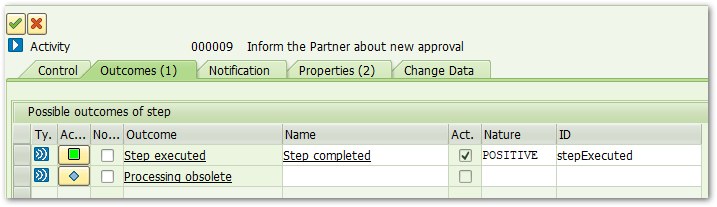
Afterwards, this screen should look like this:

Please recognize the automatically created data in tabs Outcomes and Properties.

Repeat the steps for remaining activities.
5.4.2. SAP Workflow Service Task
Now we add the external step, which integrates BTP workflow into our scenario.
- Push button Create (white sheet icon)
- Fill values in popup Unique name, Short Text and Description
- Instead of Activity, choose Extension (SAP Workflow Service)
- Continue (green hook icon)
After closing the popup, the activity details screen is shown. It slightly differs from above shown activity details screen.
- Tab Control
- Everything is prefilled. You see Task TS77408476 Generic SAP Workflow Service task. We will copy this task to be able inserting own values, texts, bindings.
- Push button Copy and Edit Task:

- The next step is similar to creation of a task as described in section 4. Tasks. Enter a meaningful abbreviation and name of this task:

- Push button Copy task (Enter)
- Afterwards, we see the details of this task via transaction PFTS, which is automatically opened. Save.
- You are back in the workflow activity details display.
- Unfortunately the generic task TS77408476 is still there. To change it to your task, follow those steps:
- Run value help (F4) for task number
- In tab Obj. type and method enter ABAP Class CL_SWF_FLEX_RUN_CPWF_HANDLE, Method START_WORKFLOW
- Push button Find
- Pick your newly created task (sample: TS99900031), double-click
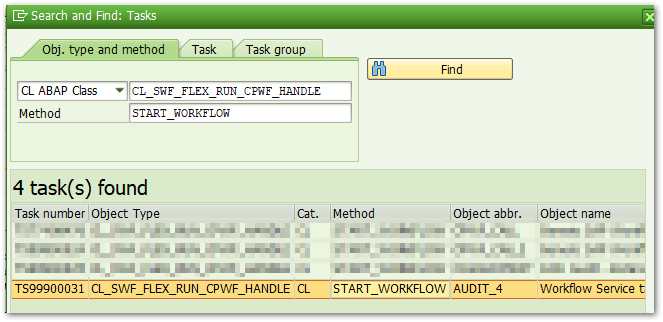
- When coming back to activity details the generic task number is still available. Press Enter - this will switch to your choosen task.
- Save
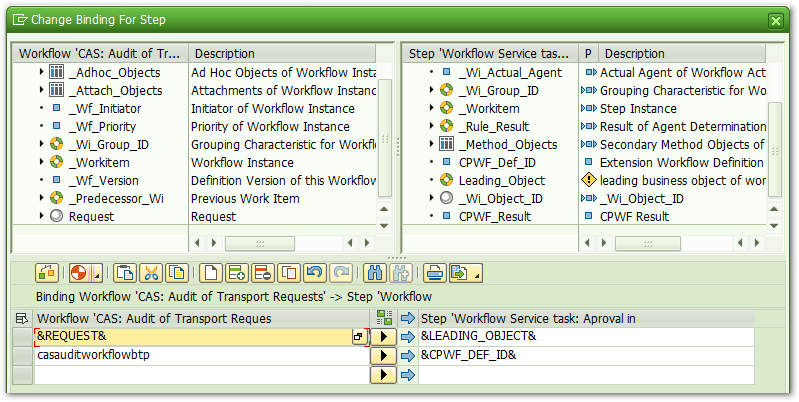
Let's figure out the binding:
- Workflow >> Task
- Your Business Object (sample: &REQUEST&) >> &LEADING_OBJECT&
- Name of BTP workflow (sample: casauditworkflowbtp) >> &CPWF_DEF_ID&
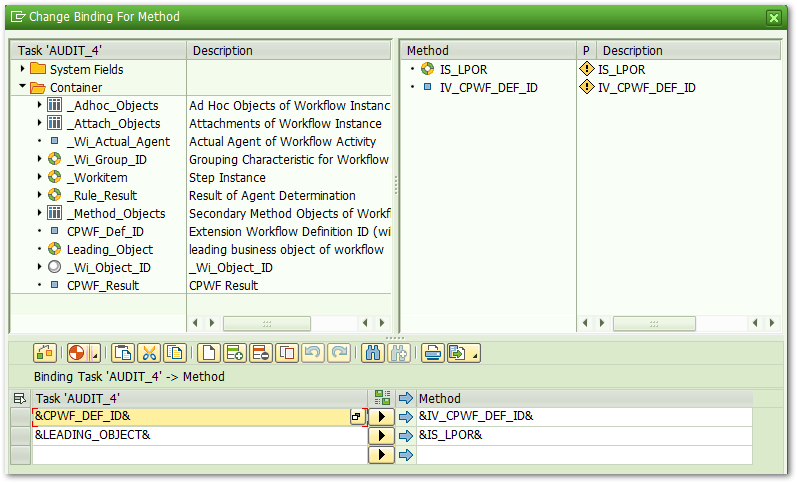
- Task >> Method:
- &CPWF_DEF_ID& >> &IV_CPWF_DEF_ID&
- &LEADING_OBJECT& (mandatory importing parameter) >> &IS_LPOR&
This means, we later have to create a BTP workflow with the name: Name of SAP BTP workflow.
Click buttons Save, Check and Activate as usual. Always keep an eye on the Result of Syntax Check at the bottom of Scenario Editor.
6. Consumer Connectivity
Our Scenario is considered as a consumer type and has to be assigned to an external server destination and an OAuth 2.0 client configuration. Otherwise it would not be clear, which system must be called, when using the external step in a flexible workflow based on this scenario.
Customize in backend system as follows:
- Run transaction SWF_CPWF_DEST or SPRO, section Maintain Consumer Connectivity below the path, which was used in Part 3: SAP S/4HANA Backend Configuration to Communicate with SAP BTP.
- Insert the following values:
- Consumer Type: scenario ID
- Destination: destination name (see Part 3: SAP S/4HANA Backend Configuration to Communicate with SAP BTP, section 3.3. Maintain Destination to External Server)
- Configuration: configuration name (see Part 3: SAP S/4HANA Backend Configuration to Communicate with SAP BTP, section 3.4. Maintain OAuth 2.0 Client)

=> Conclusion: The main work concerning the things, which the workflow has to do is done now. We should celebrate this milestone! For the moment we will leave the SAP S/4HANA backend system and switch to the frontend (SAP Fiori launchpad).
- SAP Managed Tags:
- SAP Workflow Management,
- SAP Business Workflow
Labels:
You must be a registered user to add a comment. If you've already registered, sign in. Otherwise, register and sign in.
Labels in this area
-
ABAP CDS Views - CDC (Change Data Capture)
2 -
AI
1 -
Analyze Workload Data
1 -
BTP
1 -
Business and IT Integration
2 -
Business application stu
1 -
Business Technology Platform
1 -
Business Trends
1,661 -
Business Trends
87 -
CAP
1 -
cf
1 -
Cloud Foundry
1 -
Confluent
1 -
Customer COE Basics and Fundamentals
1 -
Customer COE Latest and Greatest
3 -
Customer Data Browser app
1 -
Data Analysis Tool
1 -
data migration
1 -
data transfer
1 -
Datasphere
2 -
Event Information
1,400 -
Event Information
64 -
Expert
1 -
Expert Insights
178 -
Expert Insights
273 -
General
1 -
Google cloud
1 -
Google Next'24
1 -
Kafka
1 -
Life at SAP
784 -
Life at SAP
11 -
Migrate your Data App
1 -
MTA
1 -
Network Performance Analysis
1 -
NodeJS
1 -
PDF
1 -
POC
1 -
Product Updates
4,577 -
Product Updates
324 -
Replication Flow
1 -
RisewithSAP
1 -
SAP BTP
1 -
SAP BTP Cloud Foundry
1 -
SAP Cloud ALM
1 -
SAP Cloud Application Programming Model
1 -
SAP Datasphere
2 -
SAP S4HANA Cloud
1 -
SAP S4HANA Migration Cockpit
1 -
Technology Updates
6,886 -
Technology Updates
402 -
Workload Fluctuations
1
Related Content
- Top Picks: Innovations Highlights from SAP Business Technology Platform (Q1/2024) in Technology Blogs by SAP
- SBPA - How to handle Intermediate Message Event requirement in Technology Q&A
- How to build SOAP service in SAP Cloud Integration in Technology Blogs by Members
- Consume Ariba APIs using Postman in Technology Blogs by SAP
- Overview: SAP Ariba SSO with SAP Cloud Identity Services - Identity Authentication in Technology Blogs by SAP
Top kudoed authors
| User | Count |
|---|---|
| 12 | |
| 9 | |
| 7 | |
| 7 | |
| 7 | |
| 7 | |
| 6 | |
| 6 | |
| 6 | |
| 4 |