
- SAP Community
- Products and Technology
- Supply Chain Management
- SCM Blogs by SAP
- Risk and Criticality Assessment- Blog Series Part ...
Supply Chain Management Blogs by SAP
Expand your SAP SCM knowledge and stay informed about supply chain management technology and solutions with blog posts by SAP. Follow and stay connected.
Turn on suggestions
Auto-suggest helps you quickly narrow down your search results by suggesting possible matches as you type.
Showing results for
Employee
Options
- Subscribe to RSS Feed
- Mark as New
- Mark as Read
- Bookmark
- Subscribe
- Printer Friendly Page
- Report Inappropriate Content
04-10-2020
10:19 AM
This blog is a continuation on creating various assessment in ASPM application.
First blog provides details on the application and master data creation required for the risk and criticality assessment. Let's start with understanding what is risk and criticality assessment and how it can be achieved in ASPM.
Risk & Criticality Assessment, in its simplest form, is defined as “the effect of uncertainty on objectives”. The risk assessment process starts by first identifying risk events. In turn, these risk events have two main dimensions:
Risk & criticality assessment helps in quantifying the probability of undesirable event and consequence of such event. It further helps in classifying these risks in various performance measures like safety, environment, operational loss, impact on companies’ brand etc.
Key Elements to perform a Risk and Criticality Assessment:
Example:
In my pervious blog, I have already created two equipment namely “Dewatering Pump” & “Fire Fighting Pump”.
In this blog, I will be doing risk and criticality assessment on both the equipment.
Since the usage of both the equipment is different, I will be doing two separate risk and criticality assessment. Risk and criticality assessment can be done together for similar set of equipment or different kind of asset. Based on the result of the assessment, the next steps will be triggered. The functionality is based on 2002, with future releases further enhancement can be available.

In my example I want to understand the risk and criticality value for “Safety” and “Environment” category. Hence I have created two impacts as the below:


In my example, I have created three scale object which will be associated with three different dimensions.


I have created three dimension which I will be using in the assessment template creation:


As a reliability engineer of the nuclear site, I would like to do risk and criticality assessment of two main equipment:
As admin, the corresponding equipment template as assigned to the RC AT, hence any equipment derived out of the ET will be shown as pending assessment by the system if there is no earlier assessment done with the particular RC AT. As a reliability engineer you can trigger the RC assessment from the pending assessment HC in the particular equipment or directly create a RC assessment and assign the equipment to it manually.
Once the RC assessment is published, the same is updated in the asset indicators dedicated for ASPM scores. Below mentioned indicators are updated from RC assessment
Option 1: Creating RC from Pending Assessment HC:


With my example, “Dewatering Pump” is calculated as “A – High” shown in the equipment header and the next steps is mentioned as FMEA assessment. Also, based on FMEA result, further RCM assessment will be triggered. Hence as a reliability engineer, I will trigger the FMEA assessment in my next series.

Option 2: Creating RC Assessment directly:


With my example, “Fire Fighting Pump” is calculated as “B – Medium” shown in the equipment header and the next steps is mentioned as daily checklist, hence as a reliability engineer, I will trigger the checklist assessment in my upcoming series.
In my next blog series I will cover FMEA assessment:
Series 1: Brief Overview of ASPM and Master data setup
Series 2: Risk and Criticality (RC)
Series 3: Failure Mode Effect Analysis (FMEA)
Series 4: Checklist Assessment
Series 5: Reliability Centered Maintenance (RCM)
Series 6: Recommendation
Series 7: Preventive Maintenance Review (PMR)
First blog provides details on the application and master data creation required for the risk and criticality assessment. Let's start with understanding what is risk and criticality assessment and how it can be achieved in ASPM.

Risk & Criticality Assessment, in its simplest form, is defined as “the effect of uncertainty on objectives”. The risk assessment process starts by first identifying risk events. In turn, these risk events have two main dimensions:
- The consequence of an event / severity of the untoward outcome
- The likelihood of an event / how often such uncertain event could happen
Risk & criticality assessment helps in quantifying the probability of undesirable event and consequence of such event. It further helps in classifying these risks in various performance measures like safety, environment, operational loss, impact on companies’ brand etc.
Key Elements to perform a Risk and Criticality Assessment:
- Impacts – This is the business goal for which you want to identify the risk score and criticality value. For example, if the dewatering pump is not working properly, it might not affect the production of the site, however it might affect the safety and human life. Hence based on the business goal, an asset can have different criticality values.
- Scale - This defines the answer options which the user will get once linked with the question.
- Dimension – This defines the dimension on which the risk and criticality will be done. It also contains the question which the reliability engineer will answer during the risk and criticality assessment. For example, you can do risk and criticality on “Probability of Failure” and “Consequence of Failure”. Also, you can add one more dimension to it “Severity of Failure”
- Assessment Template - This defines which all parameters will be included in the risk and criticality assessment. This is defined by the company admin using Impacts/ Scale/Dimension.
Example:
In my pervious blog, I have already created two equipment namely “Dewatering Pump” & “Fire Fighting Pump”.
In this blog, I will be doing risk and criticality assessment on both the equipment.
Since the usage of both the equipment is different, I will be doing two separate risk and criticality assessment. Risk and criticality assessment can be done together for similar set of equipment or different kind of asset. Based on the result of the assessment, the next steps will be triggered. The functionality is based on 2002, with future releases further enhancement can be available.
1.1 Create Impacts/Sections
- From the FLP, click on the “Assessment Templates” tile. Once routed to the Assessment Templates page you will need to additionally route to the Impacts/Sections card.
- At this point, you create a new impact/section by clicking ‘new’ and providing a description and category.
- Click Publish, so that it can be consumed while creating the assessment template.
In my example I want to understand the risk and criticality value for “Safety” and “Environment” category. Hence I have created two impacts as the below:
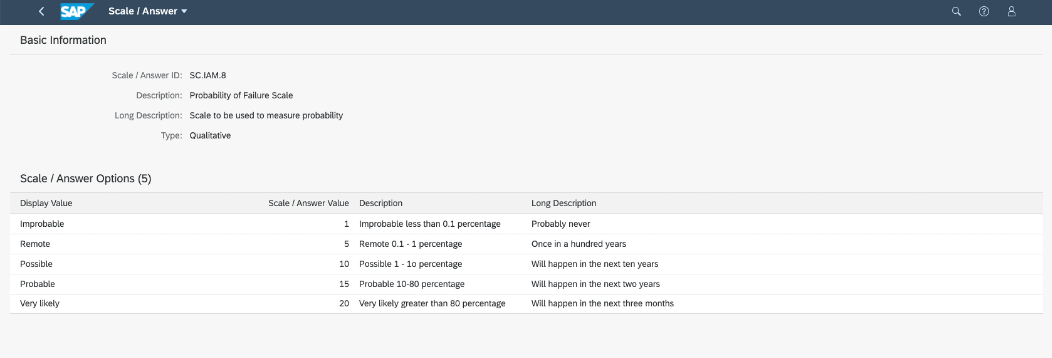
1.2 Create Scales/Answers
- From the FLP, click on the “Assessment Templates” tile. Once routed to the Assessment Templates page you will need to additionally route to the Scales/Answers card.
- At this point, you can either create a new scale/answer by clicking ‘new’ and providing a description and scale options. Only alpha-numeric type will be allowed in alphanumeric assessment template. With this setting, the heat map will show display values instead scale values.
- Click Manage->Publish. Only published scale can be consumed in “Dimension”.
In my example, I have created three scale object which will be associated with three different dimensions.
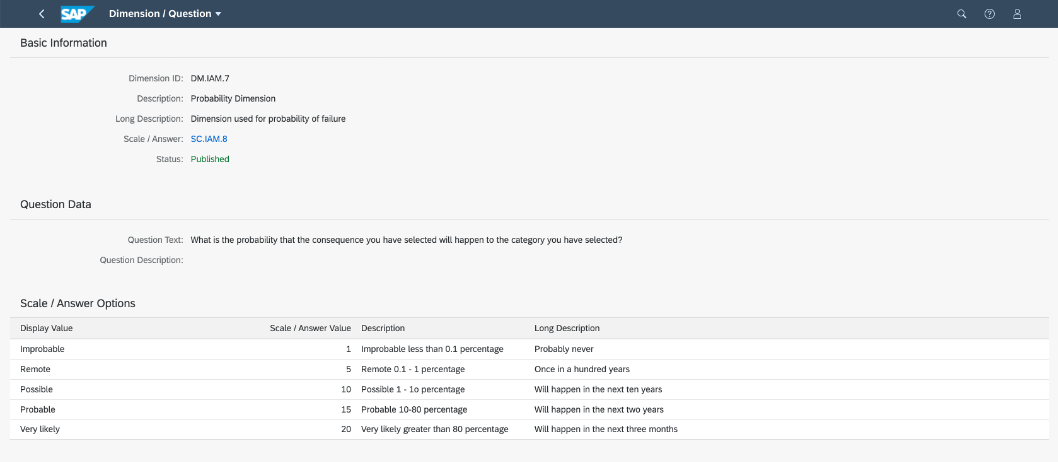
1.3 Create Dimensions/Questions
- From the Operator FLP, click on the “Assessment Templates” tile. Once routed to the Assessment Templates page you will need to additionally route to the Dimensions/Questions card.
- At this point, you can create a new dimension/question by clicking ‘new’ and providing a description, question and scale created earlier. Note, each question needs to relate to an answer. You can create the scale/answer from the dimension/question page also by clicking on ‘new’ to be redirected to the question / answer creation page.
- Click Manage->Publish.
I have created three dimension which I will be using in the assessment template creation:
1.4 Create a Risk and Criticality Template
- From the Operator FLP, click on the “Assessment Templates” tile. Once routed to the assessment template page, click on ‘Risk and Criticality’ card. After being routed to the Risk and Criticality view, please click new and fill in the details. Different calculation options are provided for the admin, based on the company requirements, admin can select the best calculation method required. If alphanumeric is marked as true in the assessment template, the dimension associated with alphanumeric scale type is only allowed. With this setting, the heat map will show display values instead scale values. Details on calculation method are available at SAP Help Portal.
- In Information Section, you can select roles as ‘Mandatory’ or ‘Optional’. The roles selected here will be available during assessment.

- In Assignment section, you can assign equipment templates, location templates, model templates, system templates, class, subclass. Using this information, pending assessment details for the equipment will be identified. Assign both the equipment template using which equipment were created. With this assignment, admin ensures that all equipment derived out of the particular equipment template follows the same RC AT and does atleast once the RC assessment of the equipment.

- Assign the both the impacts which was created earlier
- Assign set of dimensions based on which risk and criticality will be assessed.

- On click of edit, you can change the axis of the dimension and weightage if it is required.
- Select the threshold and define the next steps. In my example, for criticality „B-Medium“, The suggested action is to create daily checklist assessment. For criticality value „A-High“ FMEA is suggested.
- Publish the assessment template so that you can create assessment using it.
Perform a Risk & Criticality Assessment
As a reliability engineer of the nuclear site, I would like to do risk and criticality assessment of two main equipment:
- Fire Fighting Pump
- Dewatering Pump
As admin, the corresponding equipment template as assigned to the RC AT, hence any equipment derived out of the ET will be shown as pending assessment by the system if there is no earlier assessment done with the particular RC AT. As a reliability engineer you can trigger the RC assessment from the pending assessment HC in the particular equipment or directly create a RC assessment and assign the equipment to it manually.
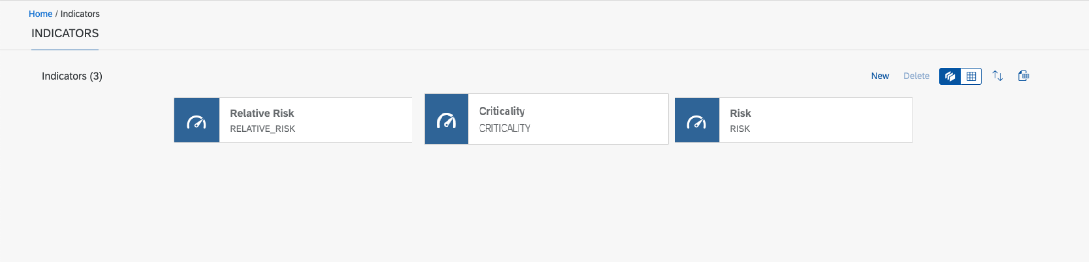
Once the RC assessment is published, the same is updated in the asset indicators dedicated for ASPM scores. Below mentioned indicators are updated from RC assessment
Option 1: Creating RC from Pending Assessment HC:
- From the FLP, click on ‘Equipment’ tile. Once navigated to the Equipment List view . Search “Dewatering Pump”. Navigate to the equipment object page by clicking the row.
- Navigate to ‘Assessment’ section. And select the highlights section. Under the ‘Pending Assessment’ card, system will be proposing one pending assessment for risk and criticality.
- Select the ‘risk and criticality’ link in the card, it will show the details on which RC AT the risk and criticality is pending. Select on the RC AT and provide RC assessment details. It will create a RC with the particular RC AT and the equipment assigned.

- Navigate ‘Questions and Answer’ section in the newly created assessment object page. Based on the usage of the ‘Dewatering pump’, reliability engineer will answer the questions selected in the respective RC AT. In My example, I have selected the below answers.
- On Publish of the RC assessment, the final score is calculated and based on the threshold defined in the RC AT, the colour is determined, and the next steps are shown for the reliability engineer. “Dewatering Pump Equipment template” also contains global indicators (Mentioned in series 1), hence on publish of the RC assessment, the asset indicator are also updated in the equipment object page. Indicator - Risk, Relative Risk, Criticality is updated during risk and criticality assessment. Risk priority number is updated during the FMEA assessment.

- Also, the same information is updated in ABC indicator if SAP ERP system is connected to ASPM and the equipment is sync with SAP ERP.
With my example, “Dewatering Pump” is calculated as “A – High” shown in the equipment header and the next steps is mentioned as FMEA assessment. Also, based on FMEA result, further RCM assessment will be triggered. Hence as a reliability engineer, I will trigger the FMEA assessment in my next series.
Option 2: Creating RC Assessment directly:
- From the FLP, click on ‘Assessment’ tile. Once navigated to the Assessment view click the ‘Risk and Criticality’ card. Then click new button.
- Click information section and roles section, and maintain roles if selected in the assessment template.
- Maintain the scope of the risk and criticality.
- Click the information header and select the ‘Assignments’ card. Assign equipment “Fire Fighting Pump” by clicking the ‘Assign’ button in the equipment table.
- Now find the ‘Questions and Answers’ Header and select it. Provide answers to the questions and ‘Save’. You can toggle between the heat map and text view to assess the risk. Below screenshot shows the heat map view whereas a user you can select the answers from the drop down and view the score in the heat map. User can swap axis also.
- On Publish of the RC assessment, the final score is calculated and based on the threshold defined in the RC AT, the colour is determined, and the next steps are shown for the reliability engineer. “Fire Fighting Pump Equipment template” didn’t contain any of the asset indicators (Mentioned in series 1), hence on publish of the RC assessment, no indicators are updated in the equipment object page
- Also, the same information is updated in ABC indicator if SAP ERP system is connected to ASPM and the equipment is sync with SAP ERP.
- The Risk and Criticality Assessment is now completed, and information is updated in the equipment page
With my example, “Fire Fighting Pump” is calculated as “B – Medium” shown in the equipment header and the next steps is mentioned as daily checklist, hence as a reliability engineer, I will trigger the checklist assessment in my upcoming series.
In my next blog series I will cover FMEA assessment:
Series 1: Brief Overview of ASPM and Master data setup
Series 2: Risk and Criticality (RC)
Series 3: Failure Mode Effect Analysis (FMEA)
Series 4: Checklist Assessment
Series 5: Reliability Centered Maintenance (RCM)
Series 6: Recommendation
Series 7: Preventive Maintenance Review (PMR)
Note – For any abbreviations, please refer the blog series 1
- SAP Managed Tags:
- SAP Asset Strategy and Performance Management
Labels:
27 Comments
You must be a registered user to add a comment. If you've already registered, sign in. Otherwise, register and sign in.
Labels in this area
-
Business Trends
169 -
Business Trends
24 -
Catalog Enablement
1 -
Event Information
47 -
Event Information
4 -
Expert Insights
12 -
Expert Insights
38 -
intelligent asset management
1 -
Life at SAP
63 -
Product Updates
500 -
Product Updates
66 -
Release Announcement
1 -
SAP Digital Manufacturing for execution
1 -
Super Bowl
1 -
Supply Chain
1 -
Sustainability
1 -
Swifties
1 -
Technology Updates
187 -
Technology Updates
17
Related Content
- What's New in SAP Asset Performance Management 2403 in Supply Chain Management Blogs by SAP
- SAP Asset Performance Management – FMEA (Failure Mode and Effects Analysis) in Supply Chain Management Blogs by SAP
- The 5 Pitfalls to Avoid in Adverse Media Monitoring in Supply Chain Management Blogs by Members
- What's new in SAP Asset Performance Management 2402 in Supply Chain Management Blogs by SAP
- Visualize Your Assets in 3D with SAP Asset Performance Management and Product Lifecycle Management in Supply Chain Management Blogs by SAP
Top kudoed authors
| User | Count |
|---|---|
| 11 | |
| 8 | |
| 5 | |
| 4 | |
| 4 | |
| 3 | |
| 3 | |
| 3 | |
| 3 | |
| 2 |