
- SAP Community
- Products and Technology
- Supply Chain Management
- SCM Blogs by SAP
- Checklist Assessment- Blog Series Part 4
Supply Chain Management Blogs by SAP
Expand your SAP SCM knowledge and stay informed about supply chain management technology and solutions with blog posts by SAP. Follow and stay connected.
Turn on suggestions
Auto-suggest helps you quickly narrow down your search results by suggesting possible matches as you type.
Showing results for
Employee
Options
- Subscribe to RSS Feed
- Mark as New
- Mark as Read
- Bookmark
- Subscribe
- Printer Friendly Page
- Report Inappropriate Content
06-13-2020
5:05 PM
In continuation with ASPM solution overview, we will continue with "Analyse" step and cover checklist assessment
In my second blog, I did a risk and criticality assessment for equipment “Fire Fighting Pump” and the assessment result suggested the next step as checklist assessment. Hence as a reliability engineer I will trigger a daily checklist and a monthly checklist assessment for the equipment. The daily checklist assessment can be done by the maintenance technician where as I as a reliability engineer will perform the monthly assessment.
Daily checklist will ensure that the equipment is up and running for the next day. Monthly checklist will ensure that the equipment is rectified or replaced on time.
Usage of checklist assessment has many sides like, it can be used to make a decision of purchasing or ensuring all steps of installation is done. For purchasing scenario, you can create a set of questions based on which you would like to make your purchasing decision and evaluate the product. Based on the answers to the question, you can determine which product suits your need more appropriately.
Checklist assessment has two flavours - simple and advanced. Simple checklist assessment offers you a set of questions which you can answer and determine the result of the assessment. Advanced checklist assessment offers you a set of flexible question set in which based on your previous answer, the next question is determined.
In my scenario, I will create the daily checklist as a simple checklist assessment where as monthly checklist will be created as advanced checklist assessment. Similar to other assessment, for a checklist assessment we will create a set of sections, scales and questions and tie them together to create a checklist assessment template.
To create a simple checklist assessment template, follow the below steps-
Moving ahead I will start with the daily checklist assessment. Similar to other assessment, you can trigger it from various places. Since daily checklist is done by the maintenance technician, I will trigger the checklist assessment from the equipment page.
I will proceed with advanced checklist assessment template. The steps are same like simple checklist assessment template, only to have an additional step of configuring the answer and question flow. In advance checklist assessment template, marking a question as mandatory and result indicator is not available.
I created the monthly checklist for the equipment using the previously mentioned steps and answered the questions based on the flow defined in the checklist template.
We have made a wonderful progress and completed checklist assessment. I will now go back to my other equipment "Dewatering pump" to complete the RCM assessment and subsequently proceed with PMR.
In my next blog series I will cover RCM assessment for “Dewatering Pump”.
Series 1: Brief Overview of ASPM and Master data setup
Series 2: Risk and Criticality (RC)
Series 3: Failure Mode Effect Analysis (FMEA)
Series 4: Checklist Assessment
Series 5: Reliability Centered Maintenance (RCM)
Series 6: Recommendation
Series 7: Preventive Maintenance Review (PMR)

In my second blog, I did a risk and criticality assessment for equipment “Fire Fighting Pump” and the assessment result suggested the next step as checklist assessment. Hence as a reliability engineer I will trigger a daily checklist and a monthly checklist assessment for the equipment. The daily checklist assessment can be done by the maintenance technician where as I as a reliability engineer will perform the monthly assessment.
Daily checklist will ensure that the equipment is up and running for the next day. Monthly checklist will ensure that the equipment is rectified or replaced on time.
Usage of checklist assessment has many sides like, it can be used to make a decision of purchasing or ensuring all steps of installation is done. For purchasing scenario, you can create a set of questions based on which you would like to make your purchasing decision and evaluate the product. Based on the answers to the question, you can determine which product suits your need more appropriately.
Checklist assessment has two flavours - simple and advanced. Simple checklist assessment offers you a set of questions which you can answer and determine the result of the assessment. Advanced checklist assessment offers you a set of flexible question set in which based on your previous answer, the next question is determined.
In my scenario, I will create the daily checklist as a simple checklist assessment where as monthly checklist will be created as advanced checklist assessment. Similar to other assessment, for a checklist assessment we will create a set of sections, scales and questions and tie them together to create a checklist assessment template.
- Create a section– In checklist assessment, I will use the impact which was created earlier as a section.-“Environmental Consequence”
- Create scale with below options -Weighing measure of the fire fighting equipment
 Scale to determine the functioning of the nozzle
- I have created two questions using the dimension object and the above scales are assigned to them. These questions will be used in the checklist assessment template

To create a simple checklist assessment template, follow the below steps-
- The checklist type should be simple in the new checklist template dialog

- In checklist template, assignment of equipment template requires additional information. To assign a equipment template, you will need to give details on what is the estimated cost to complete this checklist template. Along with that, I have added the frequency of the checklist template as one day which means using this template, a checklist assessment should be done at the frequency of once a day. The third vital information required is how long it takes to complete the checklist assessment using this template, in my example since I have only two questions I have considered 1 hour as the appropriate time to complete the checklist assessment. The fourth information required is the confirmation whether the attributes/indicator updated during the checklist assessment will be updated at the equipment master data too. With this flag you can control how much information you want to push to the master data back during the checklist assessment.

- Continue with adding sections and questions like other assessment template. Along with adding questions, I can determine which question is mandatory during checklist assessment. I can also assign the attributes of the equipment which can be maintained during the checklist assessment. I have assigned one attribute (weight of fire fighting equipment) which will be maintained during the checklist assessment.

- I have also maintained the result indicators in the checklist template so that when I complete the checklist assessment, the overall and section level result is updated at the respective indicator at the equipment level.

- Like other assessment template, threshold is also to be defined. Once all the data is maintained in the assessment template, I will go ahead to publish the assessment template to create my daily checklist assessment.
Moving ahead I will start with the daily checklist assessment. Similar to other assessment, you can trigger it from various places. Since daily checklist is done by the maintenance technician, I will trigger the checklist assessment from the equipment page.
- Create a new checklist assessment. You can add the type of the checklist assessment, it defines the business goal of the checklist assessment. In checklist assessment, the checklist templates are not selected for the entire assessment. The checklist template is selected individually for each object assigned. This gives a flexibility to include different kinds of objects in the same checklist assessment as you can maintain the template separately for each of them. You can also maintain relevant dates after the checklist assessment is created.

- You can maintain different roles in the checklist assessment. unlike other assessment where it is dependent on the assessment template, in checklist assessment all the roles are shown .

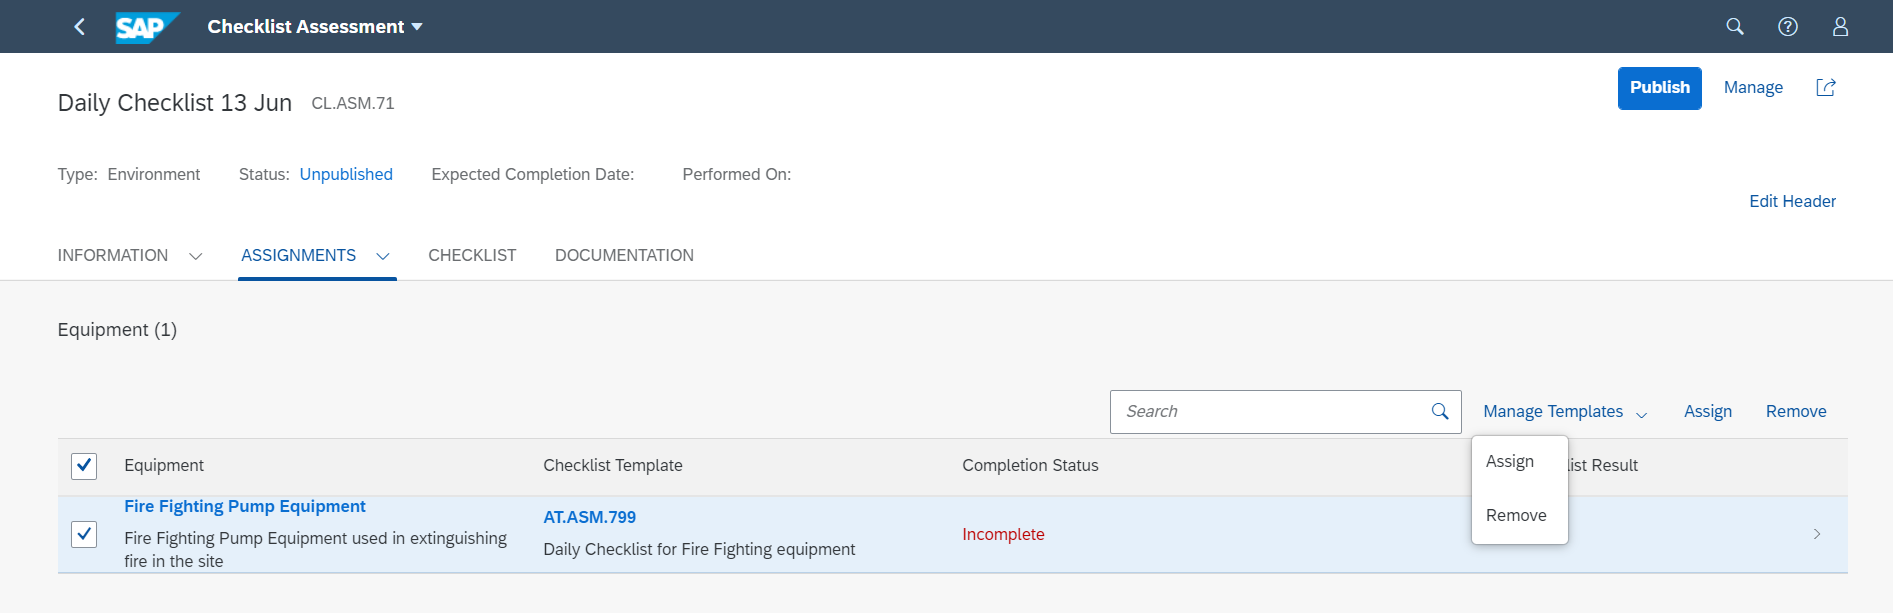
- In the assignment section, you will notice the checklist template is auto assigned by the application. This helps the technician as he/she doesnt need to repeat the same step everyday. The logic behind auto assignment is based on the equipment template. The "Fire Fighting Equipment Template" is used to create the equipment "Fire Fighting Pump Equipment". The same "Fire Fighting Equipment Template" is also assigned to checklist template "Daily Checklist for Fire Fighting equipment", hence it got auto assigned by the application. If required, technician can assign more checklist template.
- To further carry on with the checklist assessment, navigate to the next tab "Checklist", where the technician can see all the objects and corresponding checklist template assigned to them. All the configuration done in the checklist template is visible in the checklist assessment like the number of sections, questions and attributes maintained are shown in the assessment.

- As you answer the questions and maintain the attributes details in the checklist assessment, there are various other features which helps in making the checklist assessment a usable software for the technician.
- Technician gets an option to view only the unanswered questions, this helps her/him to navigate through the process faster. Technician also can collapse or expand all the questions at one go which enables her/him to see all the details of the questions easily. The overall and section results are shown to the technician and she/he can navigate through each question and section with next/previous button. Once all the questions are answered, technician can mark it as complete, with this step the master data update is also triggered.
- However in case, technician wants to change any further questions that is also possibly till the time the entire checklist assessment is not published. If you have multiple objects assigned to the checklist assessment, all the object and the respective AT should be marked as completed before publishing the assessment.

- On complete, the respective result indicator is also updated in the equipment page.

I will proceed with advanced checklist assessment template. The steps are same like simple checklist assessment template, only to have an additional step of configuring the answer and question flow. In advance checklist assessment template, marking a question as mandatory and result indicator is not available.
- Once all the sections and questions are assigned, you can define the flow of the questions in the "Answer Configuration". For each answer options, you can define the primary and secondary step. The flow of the questions happen with the question you assign in the primary step. You also get an option to add a secondary action.

- Also it is important to mark the trigger question. The trigger question becomes the first question which the technician will answer and the next set of question is determined from its answer.

- Once the entire flow is configured, you can validate the same in the "Simulate". It shows you the entire flow and you can highlight the flow based on individual answer too.

- Continue with publishing the advanced checklist template and using this, the monthly checklist assessment for the equipment will be created.
I created the monthly checklist for the equipment using the previously mentioned steps and answered the questions based on the flow defined in the checklist template.
- With my assessment, the extinguishing gas is half filled, hence based on the checklist template, I will create a notification for filling it up. Since the nozzle is working fine, I decide to do a followup monthly checklist assessment and till then "Wait and See".

- Once checklist assessment is completed and subsequently published, all the information is updated in the equipment page which will give the entire history of the checklist assessment done on the equipment.

We have made a wonderful progress and completed checklist assessment. I will now go back to my other equipment "Dewatering pump" to complete the RCM assessment and subsequently proceed with PMR.
In my next blog series I will cover RCM assessment for “Dewatering Pump”.
Series 1: Brief Overview of ASPM and Master data setup
Series 2: Risk and Criticality (RC)
Series 3: Failure Mode Effect Analysis (FMEA)
Series 4: Checklist Assessment
Series 5: Reliability Centered Maintenance (RCM)
Series 6: Recommendation
Series 7: Preventive Maintenance Review (PMR)
Note – For any abbreviations, please refer the blog series 1
- SAP Managed Tags:
- SAP Asset Strategy and Performance Management
Labels:
18 Comments
You must be a registered user to add a comment. If you've already registered, sign in. Otherwise, register and sign in.
Labels in this area
-
Business Trends
169 -
Business Trends
23 -
Catalog Enablement
1 -
Event Information
47 -
Event Information
3 -
Expert Insights
12 -
Expert Insights
36 -
intelligent asset management
1 -
Life at SAP
63 -
Product Updates
500 -
Product Updates
60 -
Release Announcement
1 -
SAP Digital Manufacturing for execution
1 -
Super Bowl
1 -
Supply Chain
1 -
Sustainability
1 -
Swifties
1 -
Technology Updates
187 -
Technology Updates
15
Related Content
- The 5 Pitfalls to Avoid in Adverse Media Monitoring in Supply Chain Management Blogs by Members
- Condition Based Maintenance with SAP Asset Performance Management (SAP APM) and SAP Data Intelligence - Concept and Use Case in Supply Chain Management Blogs by SAP
- From Chaos to Clarity: Master Data Management (MDM) role in Digital Transformation success in Supply Chain Management Blogs by Members
- Working with APM GraphQL APIs - Extending SAP Asset Performance Management in Supply Chain Management Blogs by SAP
- Extending SAP Asset Performance Management: Consume Standard API in Supply Chain Management Blogs by SAP
Top kudoed authors
| User | Count |
|---|---|
| 11 | |
| 7 | |
| 4 | |
| 3 | |
| 3 | |
| 3 | |
| 3 | |
| 2 | |
| 2 | |
| 2 |