
- SAP Community
- Products and Technology
- Technology
- Technology Blogs by SAP
- Whats New for Planning Area Optimization Within SA...
Technology Blogs by SAP
Learn how to extend and personalize SAP applications. Follow the SAP technology blog for insights into SAP BTP, ABAP, SAP Analytics Cloud, SAP HANA, and more.
Turn on suggestions
Auto-suggest helps you quickly narrow down your search results by suggesting possible matches as you type.
Showing results for
Advisor
Options
- Subscribe to RSS Feed
- Mark as New
- Mark as Read
- Bookmark
- Subscribe
- Printer Friendly Page
- Report Inappropriate Content
11-30-2023
3:57 PM
Introduction
Since the Plannng Area’s introduction nearly two years ago, our customers have taken advantage of this capability to reduce the size of their public version start edits and private version to conserve system resources and accelerate planning performance. For this blog post, we will be reviewing the configuration steps required to take advantage of the new capabilities introduced in QRC4 for 2023 related to the Planning Area:
- Table Context for planning area definition (released in QRC4.2023)
- Story API for planning area definition (released in QRC4.2023)
For the purposes of this discussion, it is assumed the planning area has been configured within the modeler based on data locking. Ideally, the planning area would also take Data Access Controls (DAC) into consideration. However, based on modest number of records in the model, this added unnecessary complexity to showcase these enhancements and was thus not configured. For more information about how to configure these in the model, see Configuring Data Locking and Set Up Data Access Control. For more information to optimize the planning area holistically, see Optimize Planning Models Using the Planning Area from our online help.
Table Context for Planning Area Definition
We have greatly simplified our ability to scope the public version start edit based on the table context at the time of the public edit creation. To configure this strategy, the story designer simply needs to enable a toggle in the builder panel of the table within the story designer as shown below.

Table context configuration within a story
By default, the toggle is deselected when a table is created for a story. Once enabled, the public versions start edits will use this strategy when creating the planning area for the public version. This strategy considers story filters, input controls and explicit table filters, along with the planning area configuration strategy defined in the model (i.e. DAC and data locking). The strategy make it very easy for the planner to update the plan in the table without needing to worry about the various public version start edit modes that are available for selection by the planner.
Story API for Public Start Edits and Private Version Definitions
For the purposes of this example, we are going to work with a very simple model that only contains a handful of records to illustrate the basic strategies. While there are many ways to trigger a script within a story, we are going to create simple buttons within our story to showcase the scripting to make this work. Depending on your scenarios, you may need to adjust the script to fit your business objectives and accommodate your data models.
Model Design
The design of the model is intentionally simple. We have only four dimensions and two measures. There are only 34 records for the plan we will be using in our model.

Definition of the planning model used for examples
We have enabled the planning area for this model via model preferences, along with enabling Data Access Control (DAC) and Data Locking to be taken into consideration when creating the planning area.
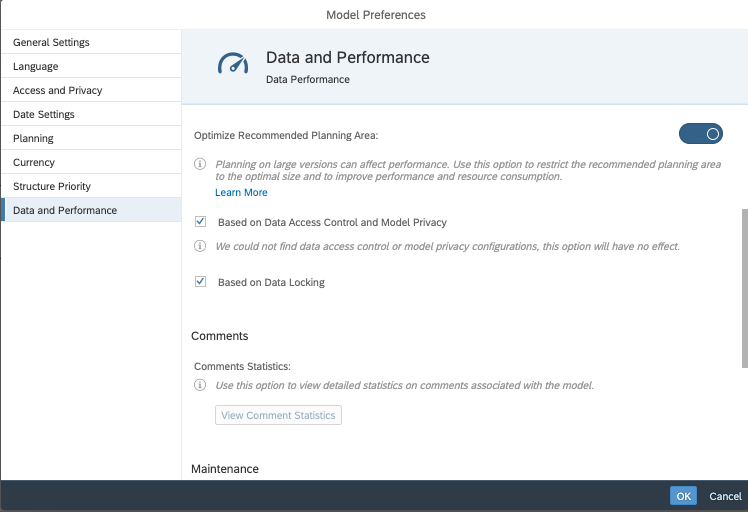
Model preference configuration
While we have not configured Data Access Control for this model, we have configured Data Locking on version and time and have locked Actuals for all time periods and locked the Plan for 2022. This will become an important fact as we look at the various scenarios in more detail.

Data locking definition for the planning model
Story Layout
For this scenario, we will set the technical name of the table to “MarketingSpend” so we can reference this table in the script. Although we have DAC access to all Products, we will set the input control for Product to “Accessories” unless otherwise called out to illustrate a point.

Table ID used in the scripting scenarios
For context of the scenarios we will be exploring, we are showing the mapping of story buttons to the version management options for the start edit mode in the following screenshot. With scripting, we will not only be able to re-create these public start edits strategies but will be able to create the table context option previously described as well.
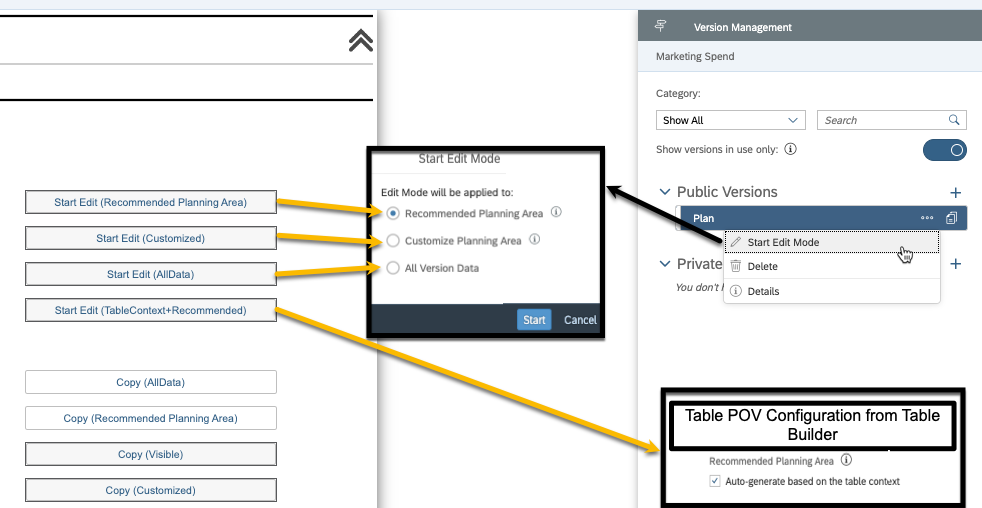
Scenario mappings to start edit mode and table POV within the story
Story Button
To create a simple button in your story, simply add a button to the story and then select the ‘onClick’ menu item to initiate the script when the button is selected. The following screenshot is intended to help orient the reader for where the code will be included in the story that will be used for this example.

Scripting for scenarios tied to a button
Story API for Planning Area Definition
Story APIs have been enhanced to help automate the start edit of a public version and creation of a private version. These automations can be triggered via scripting with the overall intention to reduce the feature gap between scripting API and the story experience. The areas we will be covering include:
- API for startEditMode()
- API for getPlanningAreaInfo()
- removeFilter()
- changeFilter()
- getFilters()
- Additional options for the copy() to flexibly define private versions
To explore these enhancements, we will be looking at how we may include these scripts as simple buttons to explore these capabilities.
Public Edit Script Scenarios
In this section, we will show how easy it is to instantiate the public version start edit modes via scripting. Please note that if you already have a public start edit initiated, these scripting options will not re-instantiate the start edit mode based on the code provided, which is the same behaviour a planner would experience using our Version Management tools.
Start Edit Mode (Recommended Planning Area)
To replicate the start edit mode (Recommended Planning Area) from the version management within a script, we can use the following script shown below. Using the .startEditMode method, we can pass the “PlanningPublicEditOption.PlanningArea” value that sets this strategy for this creating the start edit mode for the public version.
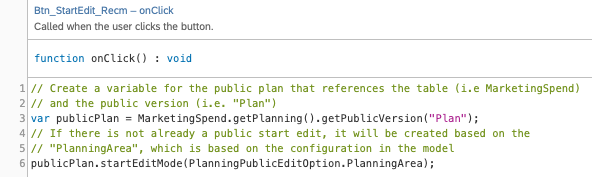
Scripting for the Recommended Planning Area scenario
From the version management pane, we can look at the details of the start edit mode for our “Plan” version. Here we see that the planning area is 19 records in the Initial Planning Area. With this strategy, we are applying DAC and Data Locking based on our model preferences for the planning area. Looking at the applied filters, we can see that the date does not include 2022. This calendar year was excluded from the planning area based on our data locking definition in the model, which shows calendar year 2022 locked for this version.

Version details for the Recommended Planning Area scenario
Start Edit Mode (Customized Planning Area)
For the next scenario, we are going to look at how we can customize the planning area via script. This strategy is identical to the “Customized Planning Area” option that is available from the version management menu when manually creating a public start edit. When creating via version management, all the filters are returned for the table for the planner to manually adjust these selections as needed. We have similar capabilities via scripting.
Here we are looking at some sample coding that can be used to test this feature in a story. We have introduced three new methods to work with the filters for the customized planning area, which are:
- .getFilters()
- .removeFilter() and
- .changeFilter()
Examples of these commands are provided in the code. To view what filters have been set for the table, you can simply write the .getFilter() to the console log for viewing when designing the story and later perhaps use these filter values as a basis for creating more comprehensive planning area filter logic. For our example, the results of the .getFilter() method has been written to the console log, which are basically all explicitly defined filters applied to the table.

Console log entries based on Customized Planning Area scenario script
Please note that when changing filters, such as Account and Date in this case, we can navigate to the hierarchy when writing the script to select specific values to make scripting much easier. Comments have been added to the script to provide additional context for the syntax.

Scripting for the Customized Planning Area scenario
Based on our new filters selections we adjusted in the script, we have restricted our Planning area to 14 records. You can see there are no filters on Product in the version details pane, which is filtered via an input control to “Accessories.” For Account, we have limited the filter to just Revenue and Date, which is filtered to 2023. Please notice that changing the filter for the planning area does not change filters applied to the table. With this strategy, the planning area model configurations (i.e DAC and Data Locking) are not taken into consideration when the planning area filters are created and applied).
Version details for the customized planning area scenario
This strategy provides some additional flexibility for the planner who may want to optimize the planning area for performance but still wants to accommodate filter changes after the public start edit has been created. In the case above, having removed the filter on the Product dimension, we could change the filter on the Product input control to other members, such as “Clothing” or “Equipment” and plan on them immediately without having to publish/revert the edit to re-define the planning area to accommodate these changes to the input control selections.
Start Edit (All Data)
In this next scenario, we are going to look at how we can include all data in a planning area. While this strategy may seem to be ideal to many customers, there is a performance tradeoff that occurs for very large public start edits that can be created. This strategy is identical to the “All Version Data” option that is available from the Version Management menu when one manually creates a public edit.
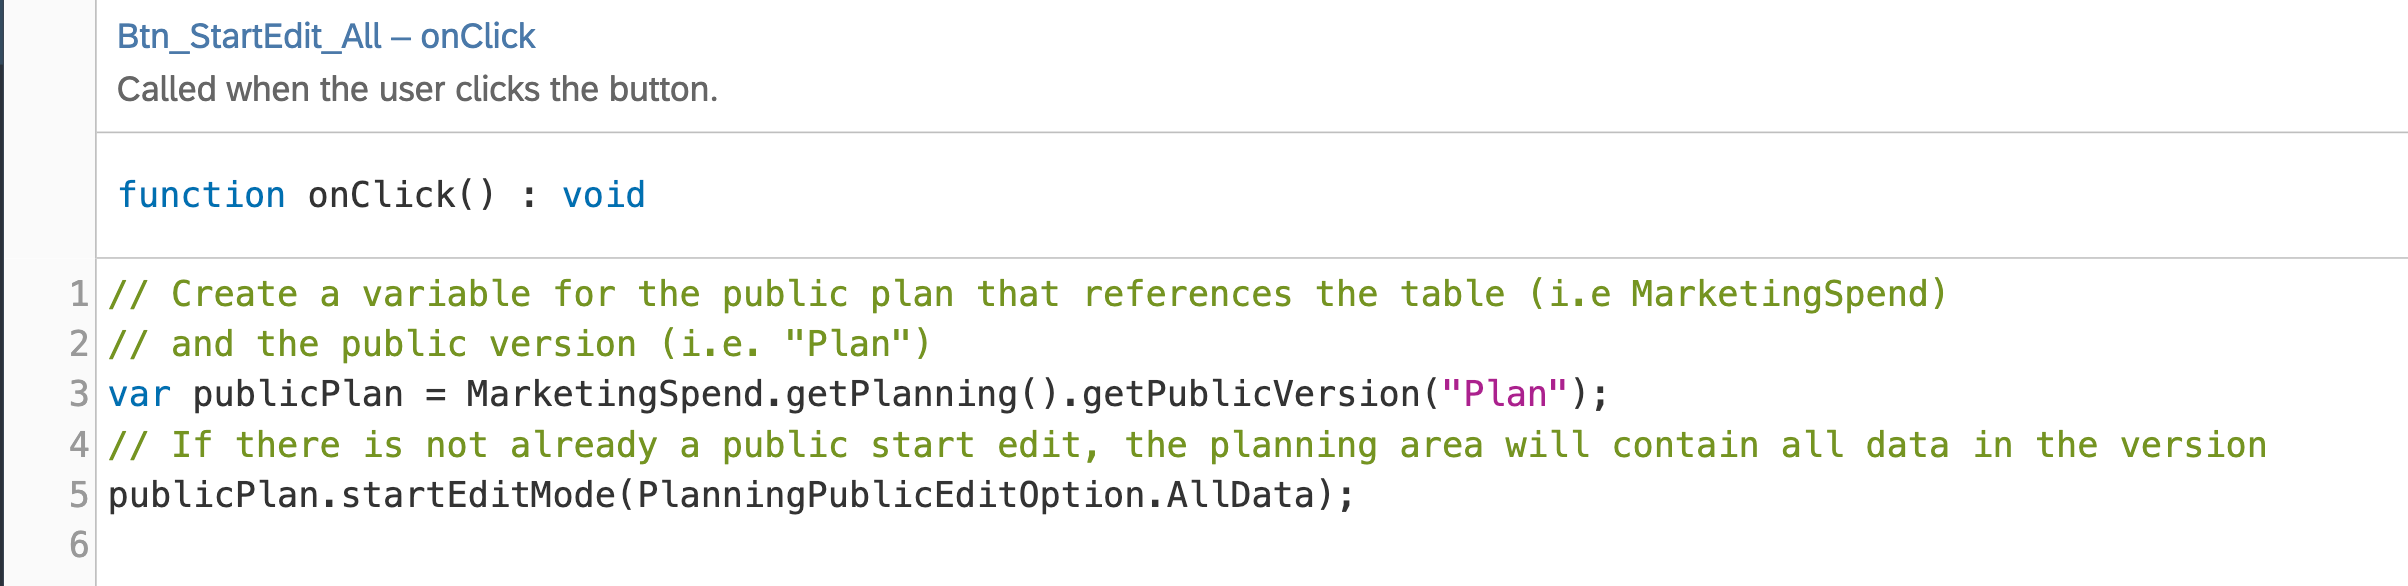
Scripting for All Data scenario
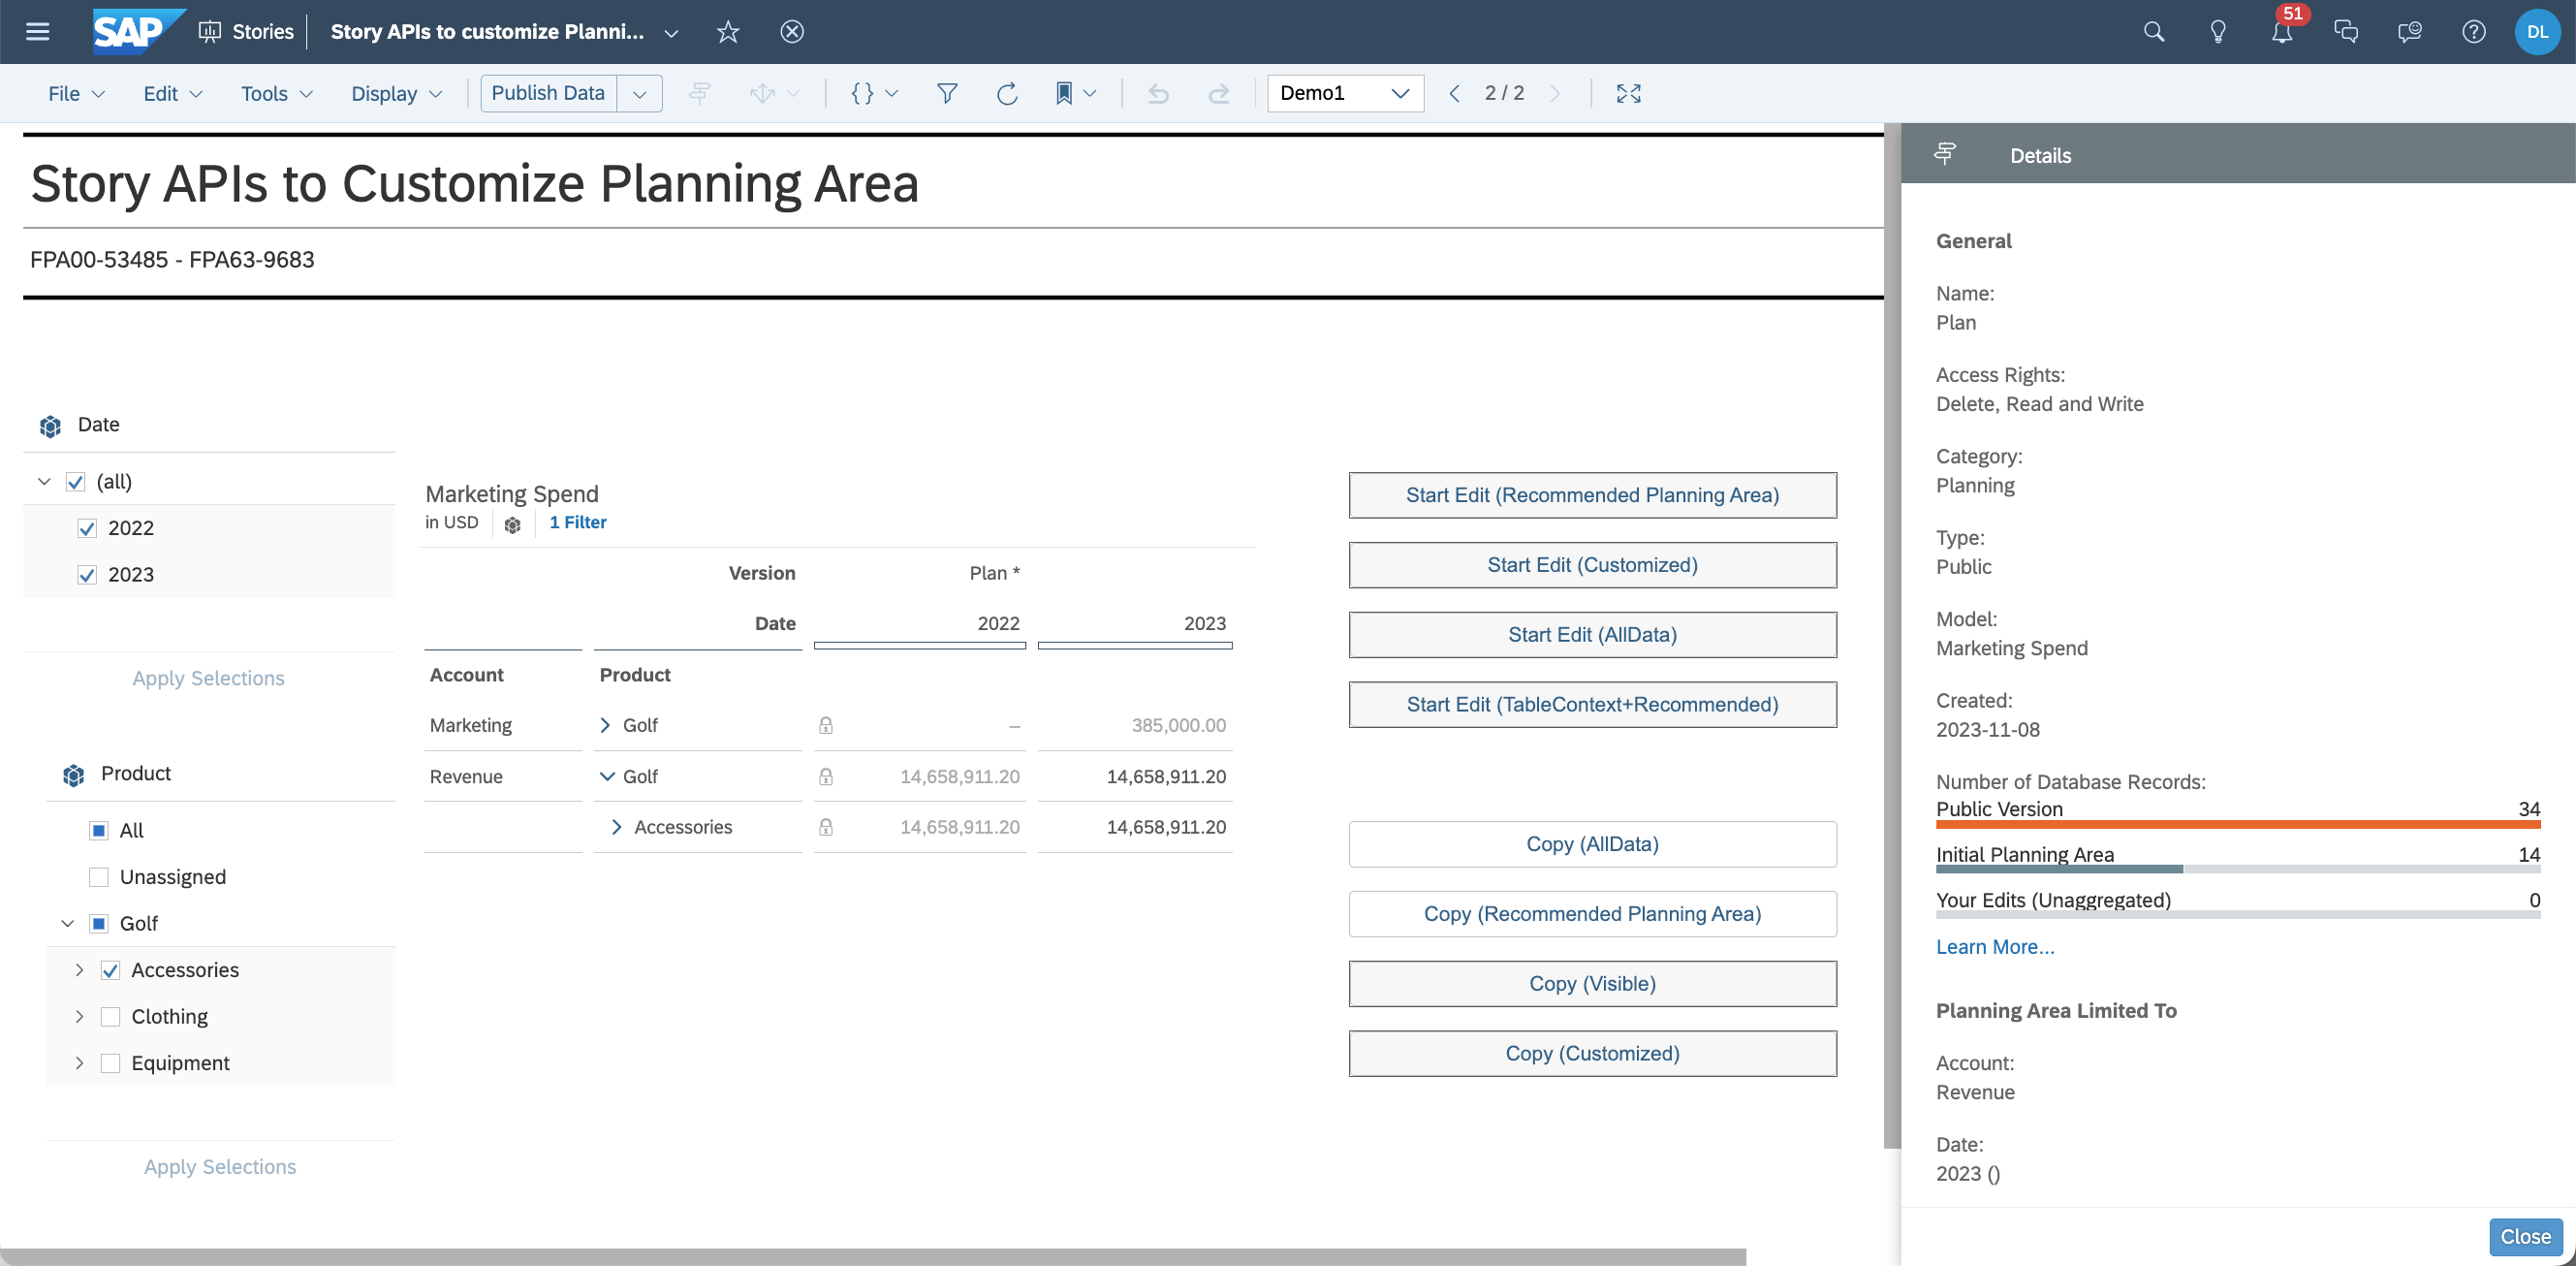
For the script, the first line indicates the table and version we will be using in this scenario. The second line starts the edit mode and uses the “PlanningPublicEditOption.All Data” option, which is essentially the same as the “All Version Data” from the Version Management popup.

Versions Details for the All Data scenario
On the version management detail’s pane, we see the planning area contains all the records in the public version as the record count for the public version and the initial planning area are the same.
Start Edit (Table Context and Recommended)
This scenario mirrors the table POV option that we discussed at the start of this paper, which requires planning area to be configured in the model and “Auto-generated based on table content” flag to be enabled for this table in the story. Here we set the start edit mode with the script shown in the following screenshot the table POV and planning area modeling configuration options into consideration.

Script for Table Context scenario
Based on the table context, we would expect filters to match the input controls for Date and Product and take the table filters for Account into consideration as well. As we are taking data locking (and DAC) into consideration with this strategy based on our model configuration, we exclude 2022 in this case as the data is locked.
New Private Version Script Scenarios
In this section, we will be showing how we can create these private versions using scripting. As we have already had these capabilities to create a private version to copy “All Data” and from the “Recommended Planning Area”. If one were to create a private version from a public version in Version Management, we would see the following options.

Private versions scenarios that will be covered
For these scenarios, we will continue to use our same model and story that we used for the Story API for Planning Area Definition. Although we will copy a public version to create the private version, we would also create a private version from a private version as well. To do this, we would simply substitute the .getPublicVersion() with .getPrivateVersion().
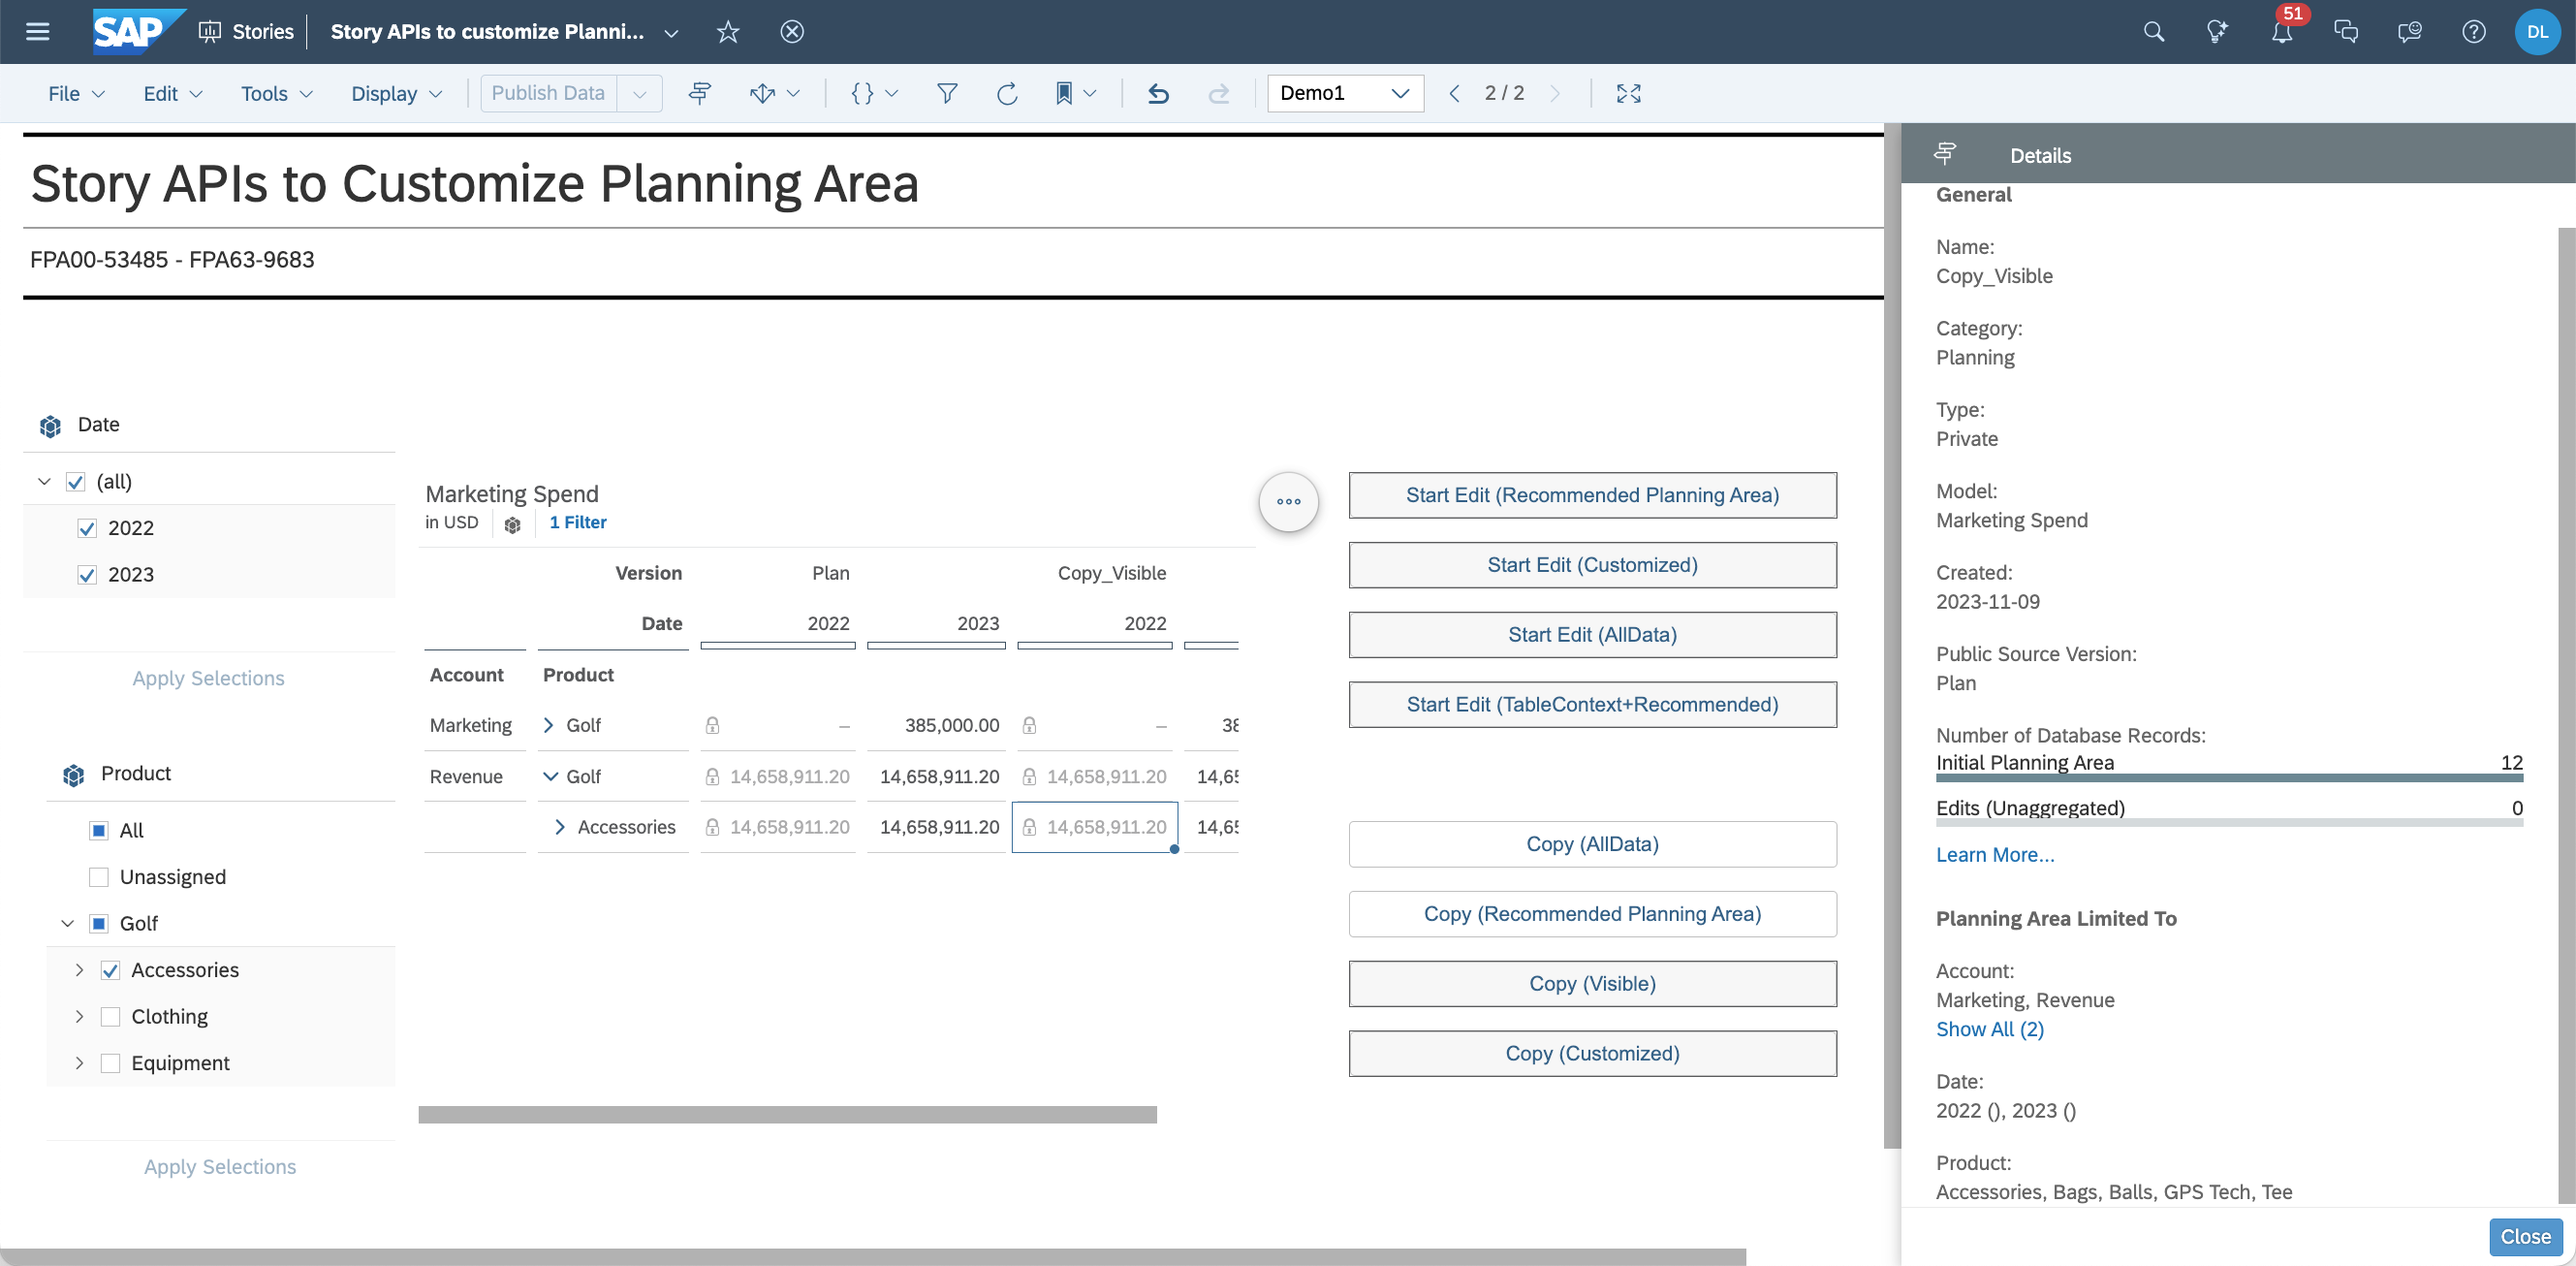
Copy Visible
This scenario mirrors the “Copy the visible data” option from the Version Management screen when copying a public version to a private version. We will create a copy of this plan to a private version called “Copy_Visible” for the visible data that is included in the table for the “Plan” version in this example. A sample script based on this model and story are shown below.

Script to copy visible data to private version
There are 12 records in this private planning version, which will correspond to the using this option within version management.
Copy Customized
This scenario mirrors the “Choose which data to copy” option from the version management screen when copying a public version to a private version. The flow of this script is like the script created for the start edit (Customized Planning Area) scenario. Instead of initiating the start edit mode of the public version, we create a copy (line 16 below) as we give the new private version a name (“Copy_Customized”) where we also pass along the planning category and filters.

Script to copy customized filter setting to planning area
Based on our new filters, we have restricted our Planning area to 14 records. You can see there are no filters on Product in the version details pane, which is expected based on line 4 of our script above. For Account, we have limited the filter to Revenue (see line 7 above) and for Date, we are just filtering on 2023 (see line 10 above). Please notice that changing the filter for the planning area does not change filters applied to the table. With this strategy, the planning area model configurations (i.e DAC and Data Locking) are not taken into consideration when the filters are created or applied.

Private version details for copy customized scenario
Conclusion
With the enhancements introduced in QRC4.2023, we have made it even easier to manage the public edit start mode in the story with the introduction of the table context strategy. This strategy makes it easy for the story designer to steer the public start edit mode strategy for the planner based on the explicit table filters so that planners can focus on planning activities. Likewise, we have also extended these strategies via scripting to streamline the creation of public start edits and private versions for the planner to streamline execution of these activities.
- SAP Managed Tags:
- SAP Analytics Cloud for planning
Labels:
You must be a registered user to add a comment. If you've already registered, sign in. Otherwise, register and sign in.
Labels in this area
-
ABAP CDS Views - CDC (Change Data Capture)
2 -
AI
1 -
Analyze Workload Data
1 -
BTP
1 -
Business and IT Integration
2 -
Business application stu
1 -
Business Technology Platform
1 -
Business Trends
1,658 -
Business Trends
93 -
CAP
1 -
cf
1 -
Cloud Foundry
1 -
Confluent
1 -
Customer COE Basics and Fundamentals
1 -
Customer COE Latest and Greatest
3 -
Customer Data Browser app
1 -
Data Analysis Tool
1 -
data migration
1 -
data transfer
1 -
Datasphere
2 -
Event Information
1,400 -
Event Information
67 -
Expert
1 -
Expert Insights
177 -
Expert Insights
301 -
General
1 -
Google cloud
1 -
Google Next'24
1 -
GraphQL
1 -
Kafka
1 -
Life at SAP
780 -
Life at SAP
13 -
Migrate your Data App
1 -
MTA
1 -
Network Performance Analysis
1 -
NodeJS
1 -
PDF
1 -
POC
1 -
Product Updates
4,577 -
Product Updates
346 -
Replication Flow
1 -
REST API
1 -
RisewithSAP
1 -
SAP BTP
1 -
SAP BTP Cloud Foundry
1 -
SAP Cloud ALM
1 -
SAP Cloud Application Programming Model
1 -
SAP Datasphere
2 -
SAP S4HANA Cloud
1 -
SAP S4HANA Migration Cockpit
1 -
Technology Updates
6,873 -
Technology Updates
430 -
Workload Fluctuations
1
Related Content
- Creating a Custom Navigation Side Panel in SAP Analytics Cloud (Optimized Story Experience) in Technology Blogs by SAP
- 入門!SAP Analytics Cloud for planning 機能紹介シリーズ - 通貨換算 in Technology Blogs by SAP
- SAP Analytics Cloud for planning - Set Advanced Filters on Date and Version in Technology Q&A
- 入門!SAP Analytics Cloud for planning 機能紹介シリーズ - データアクションとマルチアクション in Technology Blogs by SAP
- IoT - Ultimate Data Cyber Security - with Enterprise Blockchain and SAP BTP 🚀 in Technology Blogs by Members
Top kudoed authors
| User | Count |
|---|---|
| 26 | |
| 17 | |
| 15 | |
| 13 | |
| 11 | |
| 9 | |
| 8 | |
| 8 | |
| 8 | |
| 7 |