
- SAP Community
- Products and Technology
- Technology
- Technology Blogs by SAP
- Single Sign On to SAP Integration Suite / SAP API ...
Technology Blogs by SAP
Learn how to extend and personalize SAP applications. Follow the SAP technology blog for insights into SAP BTP, ABAP, SAP Analytics Cloud, SAP HANA, and more.
Turn on suggestions
Auto-suggest helps you quickly narrow down your search results by suggesting possible matches as you type.
Showing results for
Advisor
Options
- Subscribe to RSS Feed
- Mark as New
- Mark as Read
- Bookmark
- Subscribe
- Printer Friendly Page
- Report Inappropriate Content
08-15-2023
4:52 AM
Objective:
In this blog post, we will enable users to log in to SAP API Business Hub Enterprise (a.k.a the Developer Portal), one of the capabilities of the API Management in SAP Integration Suite by setting up SSO via SAP IAS that acts as a proxy to corporate identity providers, namely Azure AD and Okta based on Open ID Connect (OIDC) federation capabilities.
In theory, the steps that will be demonstrated in this blog apply generically to any SAP BTP SaaS App. However, there are nuances to the API Business Hub Enterprise (ABHE) where additional claims are mandatory (first name, last name & email) in a user's assertion. This makes ABHE an excellent showcase of the OIDC concepts at play. Here is a blog post that my colleague had written in the past that applied to the SAP BTP Neo platform.
Introduction:
A topic we often encounter in our customer conversations in the SAP Integration Suite fold is that of being able to login to the SAP Integration Suite home page with users that can be authenticated against external Identity Providers.
SAP BTP cockpit has a 'Trust Configuration' tab that lets administrators set up Identity Providers by exchanging metadata configurations of various SAML2.0-based Identity Providers either directly or indirectly by putting SAP IAS as an identity proxy layer. This feature has existed over the years and there are ample resources with a detailed explanation of the setup involved. Here are some examples:
- Murali's blog series based on Azure AD and SAP IAS.
- SAP HANA Academy did a walkthrough here.
- Lucas' blog - based on SAP BTP multi-cloud.
- My previous post - Logging into Integration Suite using IAS as the IDP.
- Murali demonstrated a direct trust between SAP BTP and Okta here.
So, what's new now?
Like all good things, this approach has its limits. For one, the fact that the trust exchange is based on SAML makes it ideal for use cases where a browser is involved and/or based on SOAP Web Service standards (remember BTP Destinations in Neo had an 'AppToApp' SSO type ?). This is of course by design, given that SAML standards have been around for a while and the handshake between the Identity Provider and the Service Provider involves multiple steps / HTTP redirects / POST bindings, etc.
Nothing wrong here so far, just that modern applications are no longer browser-based but are mostly API-centric and that means that authentication and authorization based on OAuth2.0 framework has a greater utility where Apps can access resources on-behalf of users.
Of course, these are long-tailed security discussions and I do not intend to get into the depth here. Suffice to say that SAP has rightfully positioned SAP Cloud Identity Services to solve this problem, particularly by investing in Open ID Connect-based approach with SAP Identity and Authentication Serivice (SAP IAS).
What makes SAP IAS and OIDC exciting?
Again, it is beyond the scope of this blog post to get into the details of each of these aspects. But I will encourage you to go over some of these linked resources if you want to learn more:
- Marko Sommer's blog.
- Carsten's blog.
- Martin Raepple's excellent resource on piecing together with the SAP BTP App layer.
For the purpose of this blog post, there are two primary reasons that make Open ID Connect (OIDC) based approach in SAP IAS exciting :
- It promotes a true federation of Identities across multiple Identity Providers and decouples the relying party (clients) with the Service Provider (SAP Integration Suite). This makes it easy for administrators to configure one unified experience to log into the platform. The platform will determine which system to authenticate against. This is the feature that we will explore in this blog.
- Services deployed in SAP BTP via 'cf push' can be natively ‘bound’ to SAP Cloud Identity Services as an Application, thereby making it simple for your service to specify where to get authenticated from. We will not be delving into this feature. Look at Martin's blog to learn more.
Putting it all together:
Here is a summary of the flows we will put together in this post -
Cluster. | Description | Steps |
| 1. | Couple your BTP subaccount and your SAP IAS tenant. | 1 - 6 |
| 2. | Configure applications (relying party) in Azure AD and Okta IDP based on OpenID Connect and SAP IAS as the callback URI. | 7 - 25 |
| 3. | Configure application in Okta with SAML Trust to SAP IAS. | 26 - 33 |
| 4. | Onboard the above Corporate Identity Provider configurations into SAP IAS. | 34 - 46 |
| 5 | Switch the responsibilities - configure IAS as the proxy Identity Provider and SAP BTP as the Service Provider. | 47 - 52 |
| 6. | Test the setup. | 53 - 60 |
Set up Trust between your BTP subaccount and the SAP IAS tenant:
This step no longer relies on the exchange of metadata between your BTP and IAS tenants. As long as the system is able to determine that your global account license for BTP cockpit and SAP IAS match, it is able to set up the Trust for you.
Step | Description | Screenshot |
| 1. | Head to your 'tenant settings' section within your SAP Cloud Identity Service tenant (this will be referred to as SAP IAS in this blog post) and review the 'Global Account' that has been assigned. |  |
| 2. | Now, head to your BTP Cockpit and verify that the Global Account here matches with that of the IAS tenant's. If not,you may have to get in touch with Product Support that helped with your provisioning request, and have this sorted out. You will not be able to link the two entities and proceed further if you do not meet this pre-requisite! |  |
| 3. | Click on the 'Enable Trust' button from the Trust Configuration section. Note: we do not click on import SAML Metadata! |  |
| 4. | If all prerequisites were met, you will be presented with a dialog that identifies your IAS tenant. Go through the wizard and finish the steps. |  |
| 5. | Once created, notice that the 'protocol' will be set to OpenID Connect. |  |
| 6. | As a final step, head back to the 'Applications' section in your IAS tenant and you should be able to review that the system automatically created an Application with the needed configurations, on your behalf. Change the 'Subject Name Identifier' to 'email'. We will come back to this 'Application' after completing the other steps in the flow. |  |
Setup SAP IAS as the Relying Party to the Identity Provider:
The sequence of steps now pertains to the portion of the flow where SAP IAS acts as a relying party (client app) to the external Identity Provider. In order to understand the concept of identity federation (which we will discuss in the upcoming steps), we will register IAS as the client app both in Azure AD and Okta.
Step | Description | Screenshot |
| 7. | Login to the Azure Portal (e.g. with your Microsoft 365 E5 developer subscription’s admin account) and select Azure Active Directory from the Azure Services. Select App registriations from the left-hand navigation and click on New registration. |  |
| 8. | Enter “APIBusinessHubEnterprise” for the Name of the new application registration. Select “Web” from the dropdown list in the Redirect URI section. Enter your IAS tenant’s redirect URI in the Redirect URI section’s text field: https://<IAS tenant name>.accounts.ondemand.com/oauth2/callback. Replace <IAS tenant name> with your tenant’s name. Click Register. |  |
| 9. | Keep a note of the client identifier (Application ID). We will need it later during the corporate Identity Provider registration step in SAP IAS. |  |
| 10. | Go to 'Certificate and Secrets' section and generate a new client secret. |  |
| 11. | Make a note of the generated client secret. Be mindful that this value will not be displayed again. |  |
| 12. | Go to the 'Token configuration' section and click on 'Add optional claim'. This step is needed because the BTP Application (API Business Hub Enterprise) needs these additional claim attributes mandatorily in order to complete the user registration step (not covered in this blog post). More on this step later as we get to 'Test'. |  |
| 13. | Select the token type as 'ID'. (i.e. the claim will be available within id_token). Check 'family_name' and 'given_name' as the claim attributes to add. |  |
| 14. | Enable any additional scopes and permissions, as sought. |  |
| 15. | Optionally, you may add group claims. This will enable XSUAA to leverage the values of the group claims and map them into 'RoleCollections'. |  |
Next, we repeat the same set of steps, but now with Okta as the Identity Provider.
Step | Description | Screenshot |
| 16. | Login to your Okta account, if you have one. If not, the Okta developer account is a great place to start. Go to the Applications tab from your dashboard and 'Create a new App Integration'. |  |
| 17. | Select 'OIDC - OpenID Connect' for the Sign-In method and select 'Web Application' for the Application type. |  |
| 18. | You can proceed by selecting most of the presented defaults here. Enter your IAS tenant’s redirect URI in the Redirect URI section’s text field: https://<IAS tenant name>.accounts.ondemand.com/oauth2/callback. Replace <IAS tenant name> with your actual tenant’s name. |  |
| 19. | To keep things simple, let us allow everyone in the organization to sign into the app. You can always change this later. |  |
| 20. | Make a note of the client ID and client secret. We will use this later. |  |
| 21. | Next, we will create a few users in this organization. Go to Directory -> People -> Add person. Make sure you assign the 'First Name', 'Last Name' and 'Email' attributes. I will be adding my @Sap.com user here to keep things simple. |  |
| 22. | Similar to step 12, we need to enable the Authorization Server to dispense the user's first name and last name as JWT Claims. To do so, go to the 'API' tab within the Security group on the left, and go to the 'Default' authorization server. | 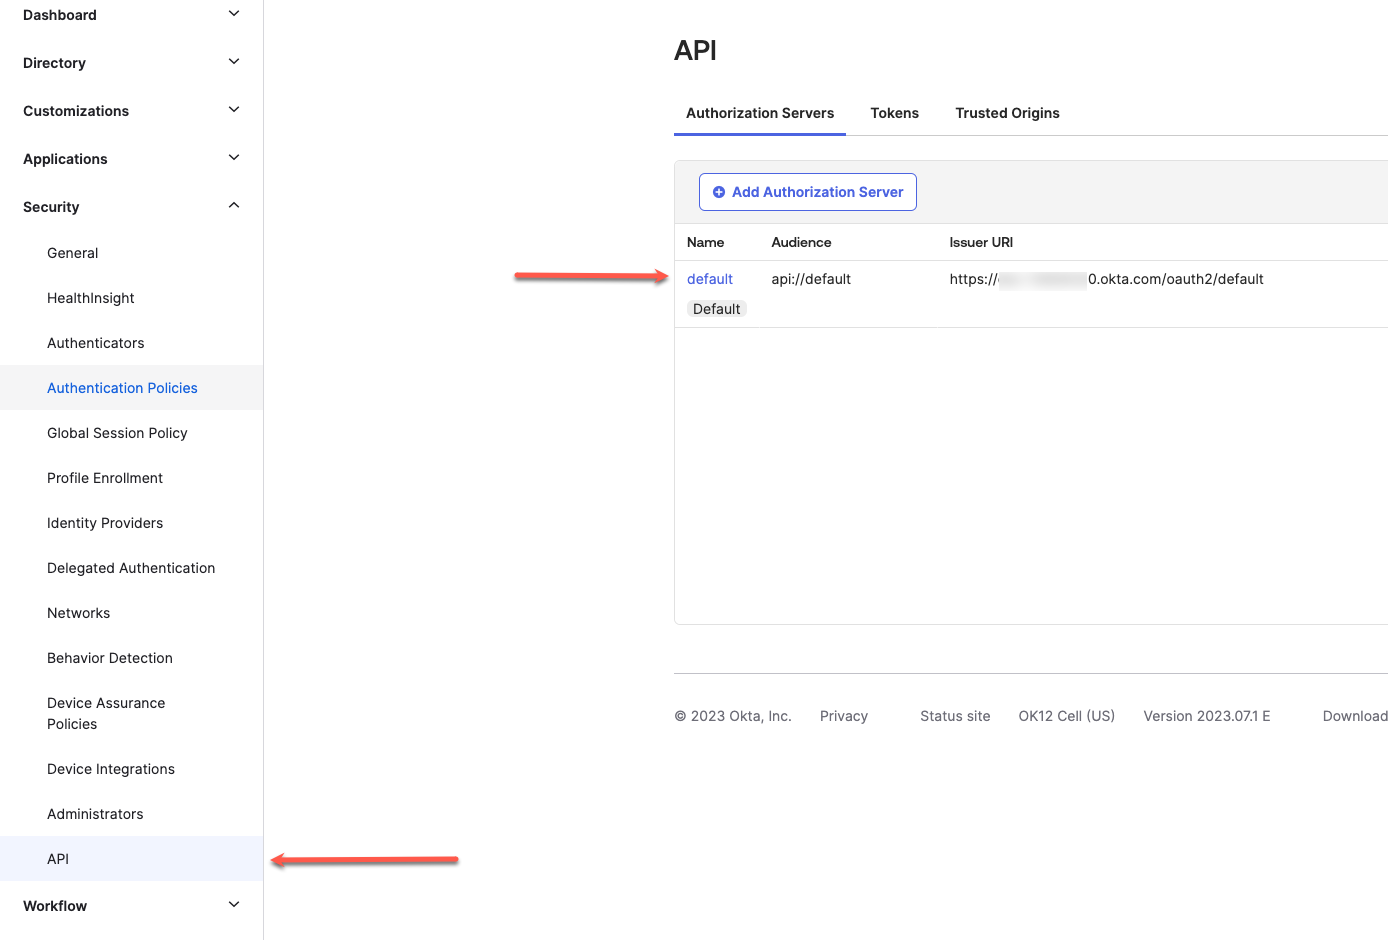 |
| 23. | Go to the Claims tab and click 'Add Claim'. |  |
| 24. | Call the claim as 'last_name', we need to add this to the ID Token claim (SAP IAS expects so). The value this attribute maps to is 'user.LastName'. |  |
| 25. | Repeat the same step as above. We will call this claim 'first_name' and enter 'user.firstName' as the value this maps to. | 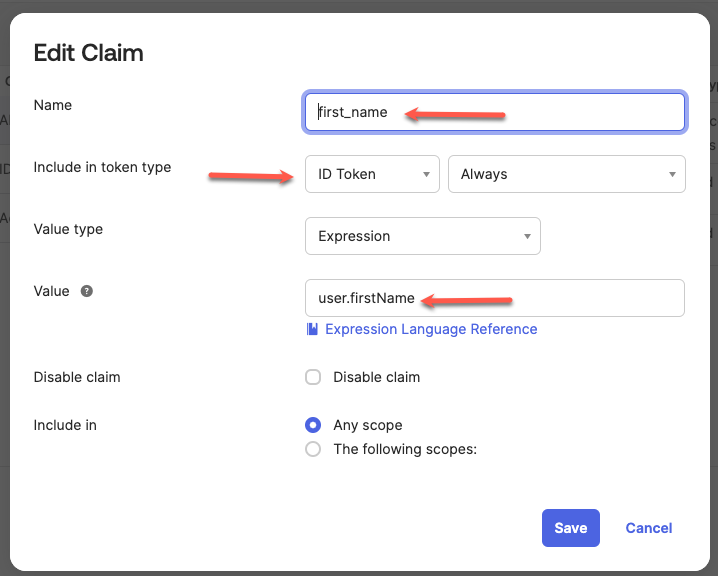 |
These steps complete the configurations we need to dial in Okta OIDC as a corporate identity provider in SAP IAS.
At this point, we will go ahead and configure yet another identity provider that is based on SAML 2.0. This is entirely optional. The objective of doing so would be to demonstrate the Identity Federation capability of IAS and make a point that the federation works across SAML and OIDC, both.
Since we already have established Okta as an identity provider, let us use Okta to set up SAML 2.0 as well. You may be already familiar with the steps to do so. I'm using Istvan's blog post as the basis to set up SAML. You may refer to his blog post for deeper insights.
Step | Description | Screenshot |
| 26. | Create a new app integration and select 'SAML 2.0' for the Sign-In method. |  |
| 27. | Give the application a meaningful name and proceed. |  |
| 28. | At this juncture, we will need the SAML URLs from the IAS tenant. Let us jump back to our IAS tenant to do so. Go to Home -> Tenant Settings -> SAML 2.0 Configuration. | 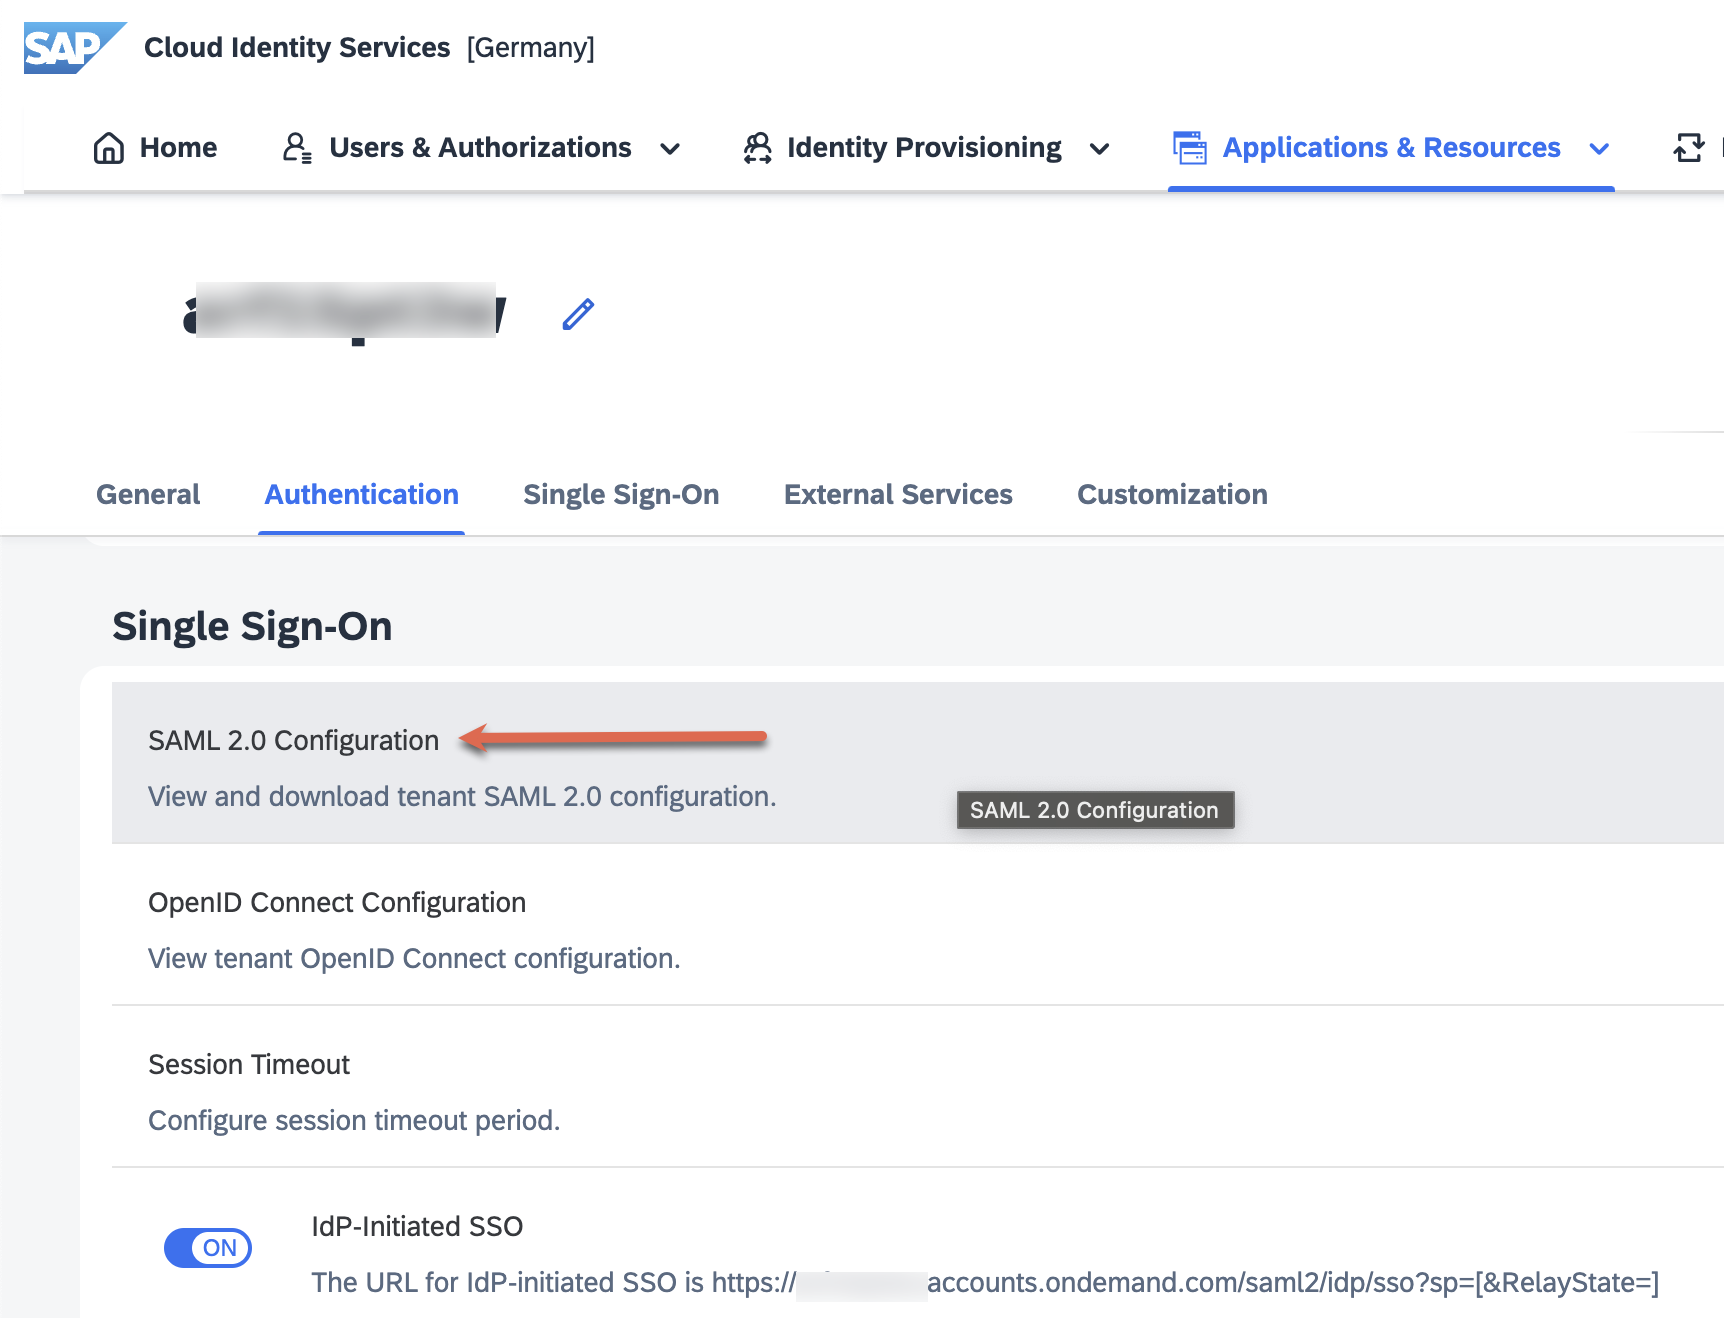 |
| 29. | Make a note of the Identity Provider Name and the Assertion Consumer Service (ACS) Endpoint URL. We will need this in the steps that follow. |  |
| 30. | Head back to Okta, get into SAML configuration tab. Enter 'https://<IAS tenant name>.accounts.ondemand.com/saml2/idp/acs/<IAS tenant name>.accounts.ondemand.com'. This is basically the value of the ACS URL we copied from the step above. Check 'Use this for Recipient URL and Destination URL'. Enter 'https://<IAS tenant name>.accounts.ondemand.com' for the Audience URI (the 'Name' property that we copied in the step above, EmailAddress for the Name ID format. Enter mail, first_name, and last_name as additional SAML attributes with the same mapped values as in step 25. |  |
| 31. | Let us add 'Groups' with Group Attributes and .* as the regex pattern. Click on the Preview button to have the actual values populated. | 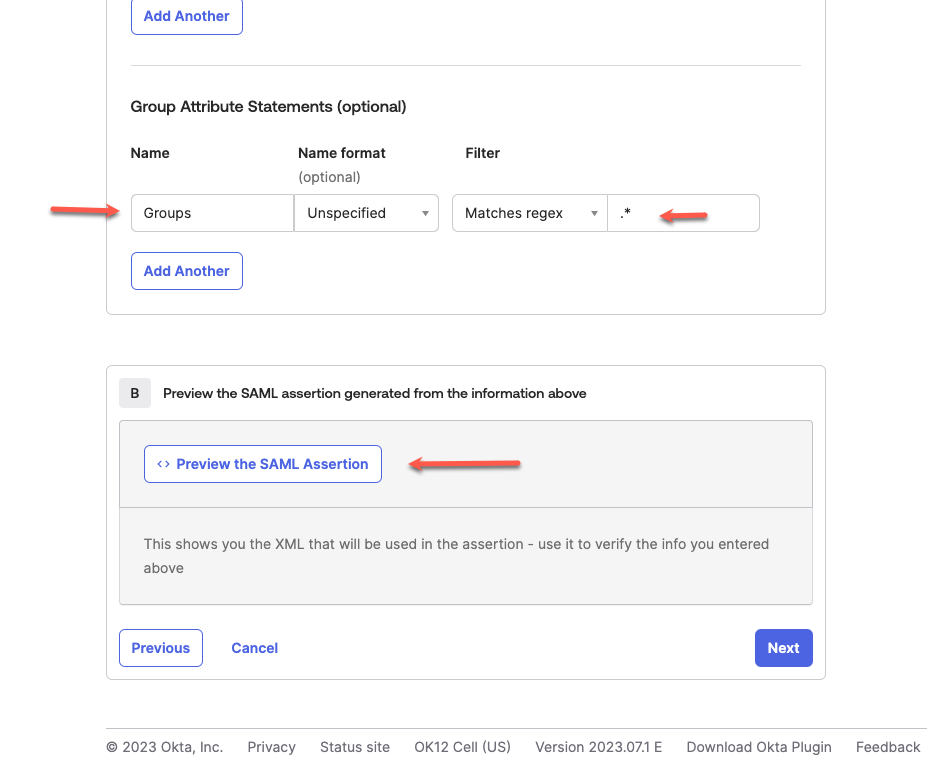 |
| 32. | Verify that the attributes are populated as you would expect. |  |
| 33. | We will need the SAML Metadata URL later during the IAS configuration (in order to set up mutual Trust between Okta and IAS). Go to the Sign On section and copy the Metadata URL. |  |
We are done with the Identity Provider settings. Let us head back to SAP IAS ( https://<IAS tenant name>.accounts.ondemand.com/admin) to perform the rest of the steps.
Step | Description | Screenshot |
| 34. | Go to 'Corporate Identity Providers' from the 'Identity Providers' tab. |  |
| 35. | Click 'Create', let's call this Azure AD, and select 'OpenID Connect compliant' for the type. |  |
| 36. | Enter your Azure AD tenant’s OIDC Discovery URL (https://login.microsoftonline.com/<AAD tenant ID>/v2.0) Click Load. Many required fields will be pre-filled from the Azure AD tenant’s OIDC metadata. |  |
| 37. | Enter the 'Client ID' and 'Client Secret' with the values we retrieved in Steps 9 & 11. Within the 'Scopes' section, click on Add and enter 'email' and 'profile'. We need these scopes to fetch the user's first name, last name claim values from the id_token. Click Validate. |  |
| 38. | This step will have you authenticate to Azure Active Directory. Sign in with the user who has access to the Application we created in step 9. |  |
| 39. | Upon successful validation, verify that the id_token indeed presents the family_name, given_name and groups claims. If this is not the case, inspect your configurations. |  |
| 40. | Repeat step 35, this time to onboard Okta as the corporate identity provider. Within the OpenID Connection configuration section, enter 'https://<okta account>.okta.com/oauth2/default/.well-known/openid-configuration' as the discovery URL and Load the rest of the endpoints based on this. Enter the client credentials from step 20, email and profile scopes and 'Validate'. |  |
| 41. | Similar to step 39, inspect the id_token and verify that the first_name, last_name and Groups are populated as expected. | 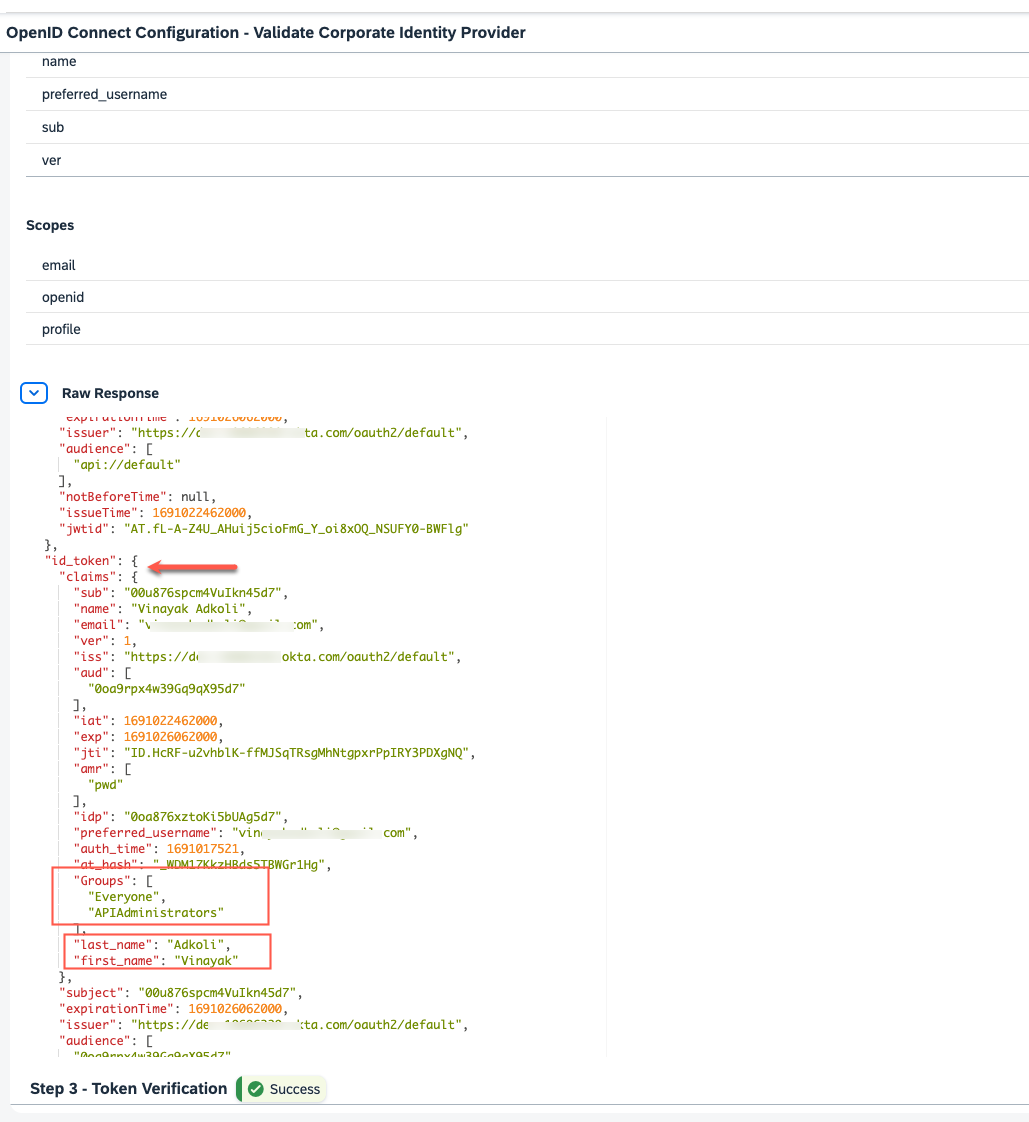 |
| 42. | Next, head over to 'Subject Name Identifier' settings in the main section and select 'Email'. Within the Single Sign-On section, toggle the 'Forward all SSO request to Corporate IDP' to ON. |  |
| 43. | Next, we will process the additional attributes coming from the Identity Provider. Go to the Identity Provider settings that correspond to your 'Okta' IDP, go to Enrich Token Claims and map $(last_name) and $(first_name) to family_name and given_name respectively. Note that this step is not required for the Azure AD IDP, as the names of the claim attributes already were set to the ones that IAS understands (i.e. family_name and given_name) |  |
| 44. | Go to the Identity Federation section and Turn On the User Store and User Access toggle switches. What this means is that the assertion is being massaged by IAS before it can be forwarded to downstream Applications. You can switch these OFF at a later point to inspect this behavior too. |  |
| 45. | Repeat step 34, this time we will register a corporate Identity Provider to register the SAML IDP we created in Step 26. Let's call this Identity Provider as 'okta-developer-account-saml' and set the identity provider type as 'SAML 2.0 compliant'. | 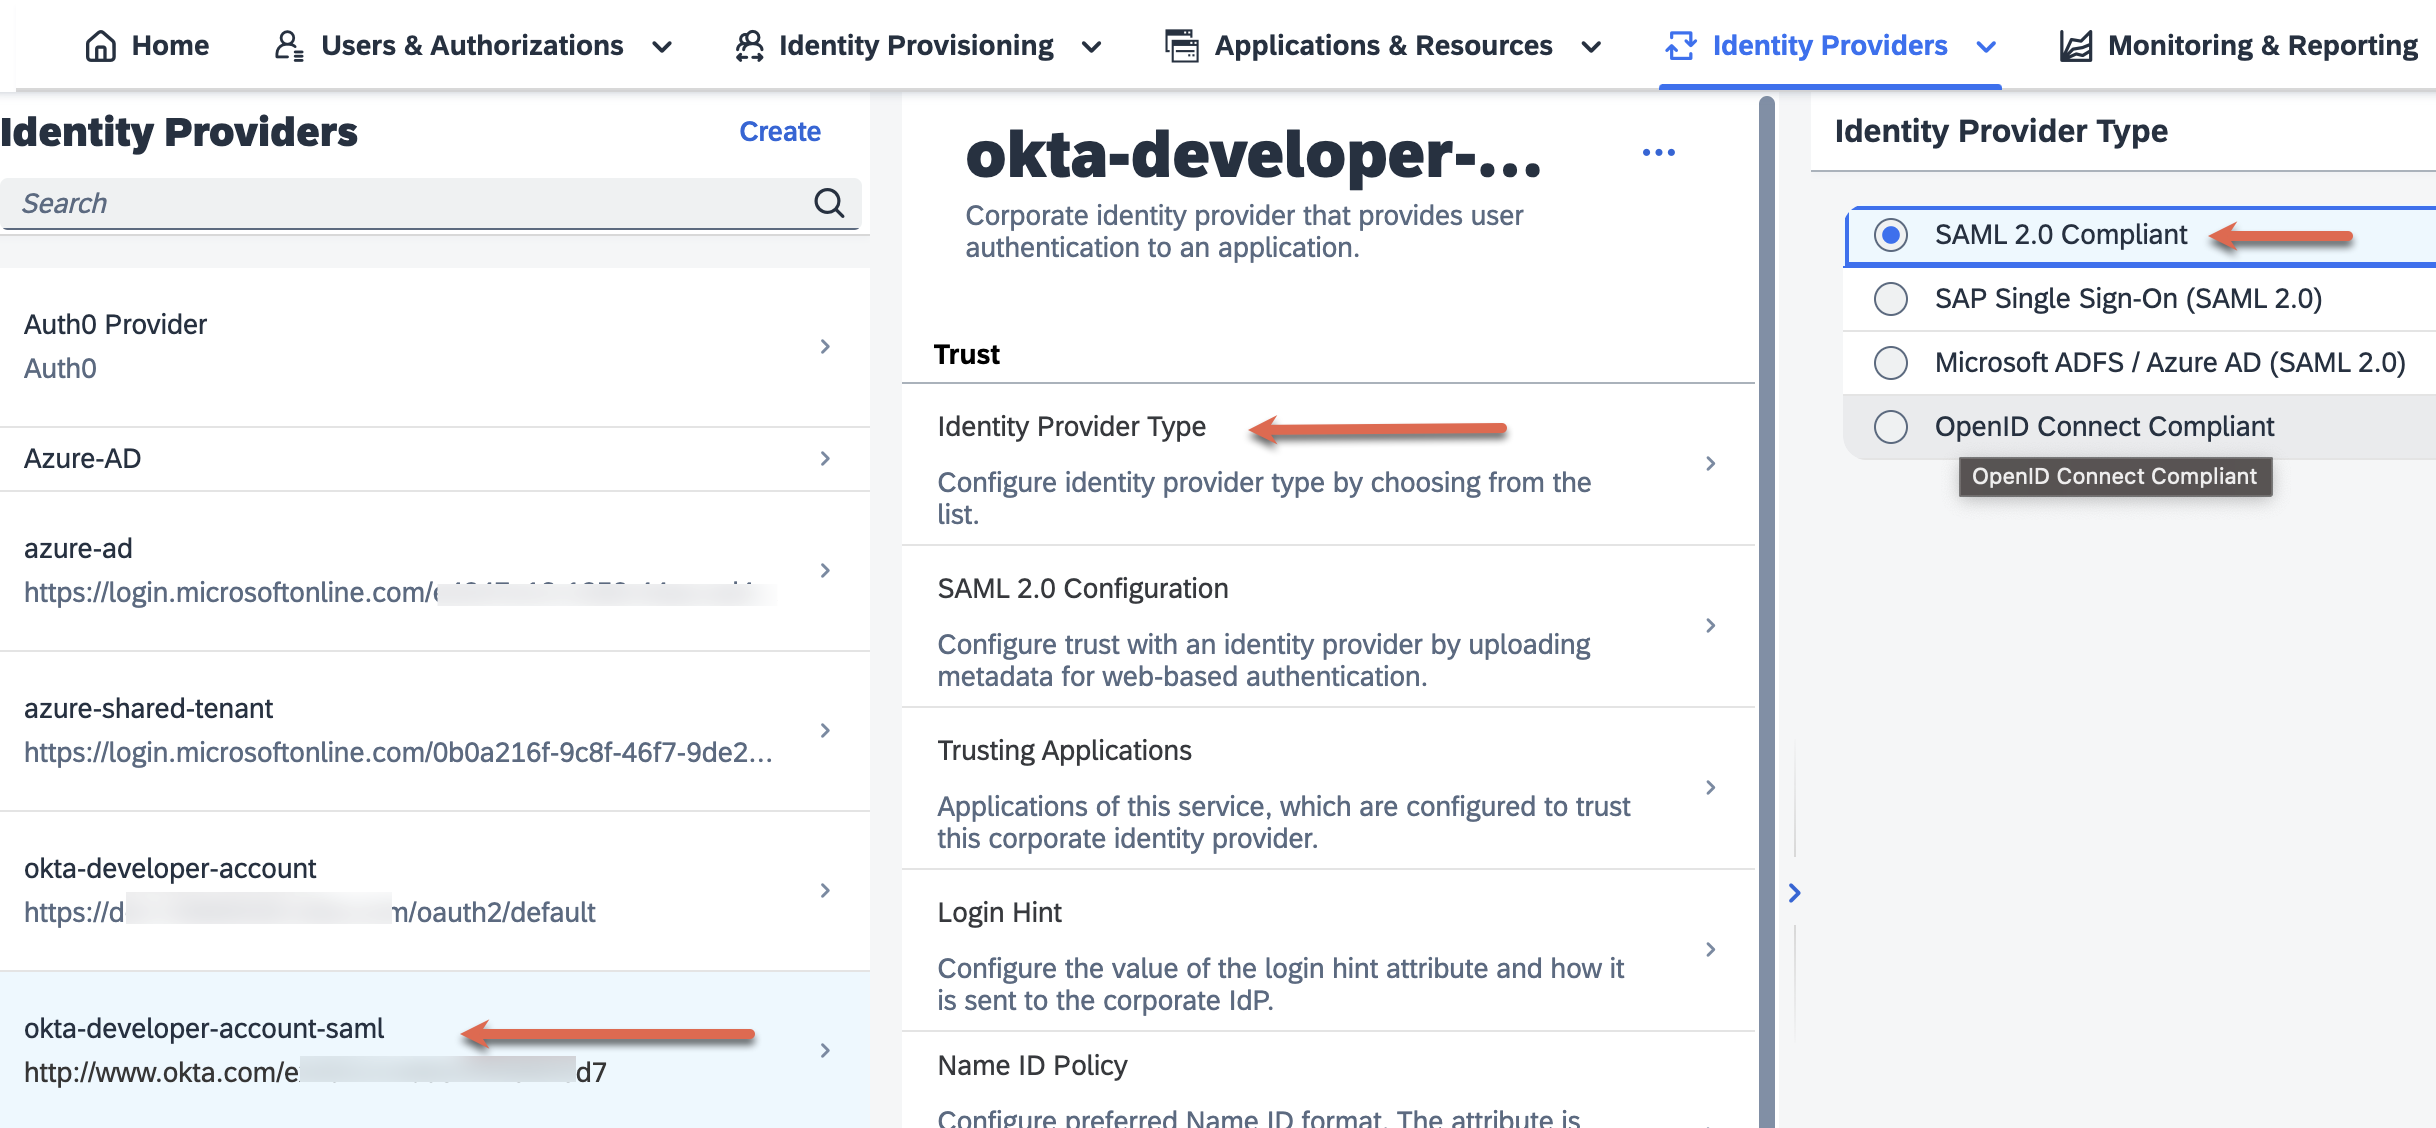 |
| 46. | In the SAML 2.0 configuration tab, load the metadata with the URL we copied in step 33. Make sure that 'Single Sign On' forward all requests to corporate IDP is turned On. This completes the setup of the 'Corporate Identity Providers'. |  |
| 47. | In the next few steps, we will set up the configurations needed for the handshake between IAS and BTP (XSUAA). To do this, go to 'Application and Resources' in the main IAS Tab and go to the Application that represents your BTP Sub Account. (see step 6) |  |
| 48. | Go to the 'Assertion Attributes' section. Here we will create a mapping between the assertion attributes that were processed from the corporate identity provider and the user attributes that the application will propagate to BTP (user attributes). Enter all the values of the claims that we have dealt with so far ( e.g. first_name, last_name that came in from Okta etc.) |  |
| 49. | Now, to the most important step. We need to configure conditional authentication that will determine the order and logic to forward user requests to the right identity Provider. The screenshot depicts the settings that work for me. You are free to define your criteria. For example - users from the *.sap.com domain will be forwarded to 'okta-developer-account' identity provider, provided the user does not have the 'APIAdmnistrator' user group assignment, else it will use IAS as the default IDP. |  |
| 50. | Lastly, we need to enable SAML on this Application as well so that SAML-based federation can be leveraged. Go to 'Configure SAML 2.0 Requests to Corporate Identity Providers' and select 'Service Provider Authentication Context'. |  |
| 51. | Here is an example of User Groups management in SAP IAS. Go to 'Users and Authorizations' from the main tab and go to 'User Groups'. As an example, I've created a group called 'Supplier' and have a user assigned. A similar assignment for a group named 'APIAdministrators' exists, as well. You are free to make your own group assignments. |  |
| 52. | Our final step is to review the Trust Configuration setting in SAP BTP Cockpit and ensure that this IAS Application is accurately marked as the Trusted IDP that the Application will use to log users into. It is ok to have multiple IDPs active here, I will demonstrate having just one active and focus my attention on the API Business Hub Enterprise application (within Integration Suite) |  |
Finally, we are done with all the configuration steps. Let us now get down to the most exciting part. Testing this and watching it all unfold!
Step | Description | Screenshot |
| 53. | Enter the 'API Business Hub Enterprise' URL (in this case: https://<account identifier>.apibhubenterprise. cfapps.us10.hana.ondemand.com/). I am not showing the steps to log in to Integration Suite to keep the narrative simple. You will notice here that you are forwarded to your IAS Application. I'm signing in with my *.sap.com user. |  |
| 54. | Based on the conditional authentication set (step 49 ), the system has determined that I need to be challenged to Okta. I am prompted to enter my Okta username and password. |  |
| 55. | Our Okta OIDC App (step ) attempts to sign us in. |  |
| 56. | Lo and behold! After the handshake successfully completes, I am taken to my ABHE home page, where I can see the published APIs and Products. Note that I was already registered as a user in ABHE. The user registration step itself is not a subject described in this blog. |  |
| 57. | Let us look behind the scenes to see what exactly is happening here. Head back to your IAS tenant and within the 'Monitoring & Reporting' tab, go to 'Troubleshooting Logs'. |  |
| 58. | Apply the selected filter, and search for the term 'jwt'. Of the many entries that show up, look for the ones that have the keywords 'recieveJwtToken' and 'issueJwtToken'. |  |
| 59. | Take a closer look at each of these log entries, the 'receiveJwtToken' is basically the token IAS receives from the Identity Provider. Note the first_name and last_name attributes here with their corresponding values. | 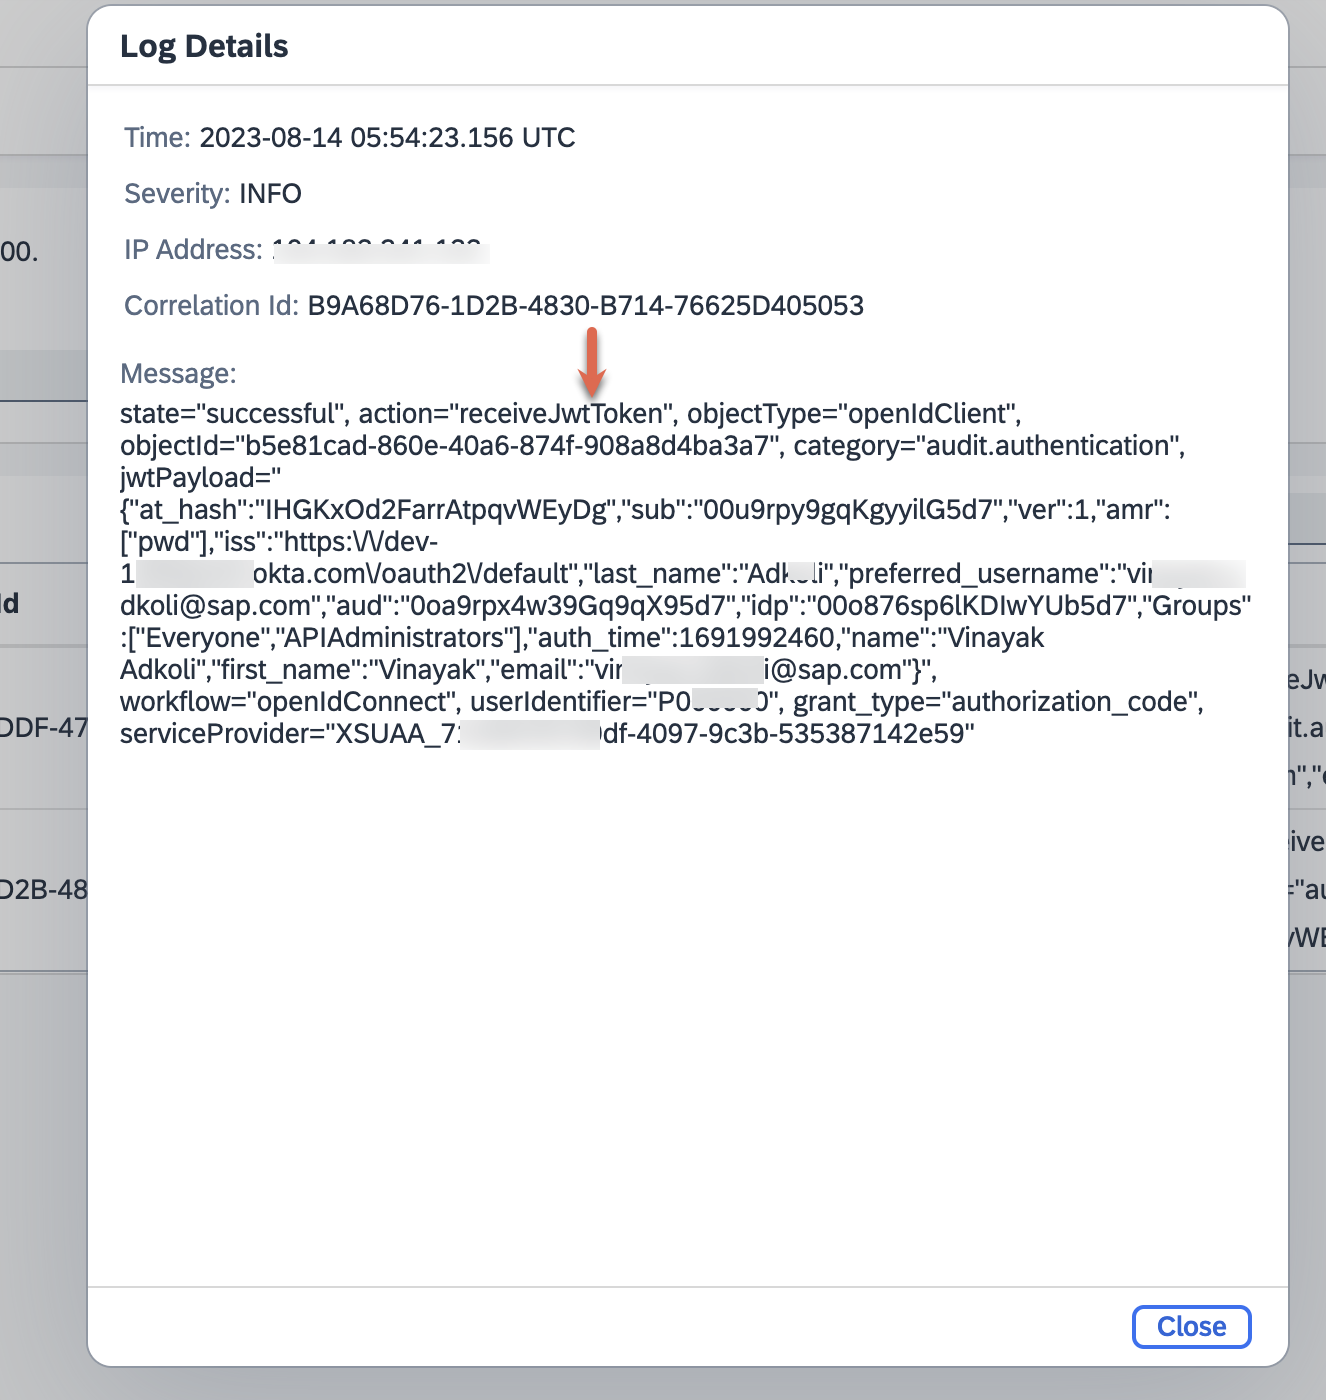 |
| 60. | The 'issueJwtToken' is basically the token that IAS issues to BTP, you will notice here the given_name and family_name attributes being relayed. |  |
| 61. | I will not cover the screenshots here, but you can try logging in with your Azure AD user, with SAML identity provider and you will notice that it works seamlessly. Go back to the 'Identity Federation' setting in the 'Corporate Identity Provider', and you can switch off 'Use Identity Authentication user store', leave a comment in the blog to let me know if you see any different behavior. | |
A big shout-out to Husaj, Deniz for having helped me with a big chunk of the OIDC settings here.
I hope you found this rather long post interesting and were able to learn a thing or two about the Open ID Connect features supported by SAP Cloud Identity Service and ways to leverage them in SAP Integration Suite.
Labels:
2 Comments
You must be a registered user to add a comment. If you've already registered, sign in. Otherwise, register and sign in.
Labels in this area
-
ABAP CDS Views - CDC (Change Data Capture)
2 -
AI
1 -
Analyze Workload Data
1 -
BTP
1 -
Business and IT Integration
2 -
Business application stu
1 -
Business Technology Platform
1 -
Business Trends
1,658 -
Business Trends
112 -
CAP
1 -
cf
1 -
Cloud Foundry
1 -
Confluent
1 -
Customer COE Basics and Fundamentals
1 -
Customer COE Latest and Greatest
3 -
Customer Data Browser app
1 -
Data Analysis Tool
1 -
data migration
1 -
data transfer
1 -
Datasphere
2 -
Event Information
1,400 -
Event Information
74 -
Expert
1 -
Expert Insights
177 -
Expert Insights
348 -
General
1 -
Google cloud
1 -
Google Next'24
1 -
GraphQL
1 -
Kafka
1 -
Life at SAP
780 -
Life at SAP
14 -
Migrate your Data App
1 -
MTA
1 -
Network Performance Analysis
1 -
NodeJS
1 -
PDF
1 -
POC
1 -
Product Updates
4,575 -
Product Updates
391 -
Replication Flow
1 -
REST API
1 -
RisewithSAP
1 -
SAP BTP
1 -
SAP BTP Cloud Foundry
1 -
SAP Cloud ALM
1 -
SAP Cloud Application Programming Model
1 -
SAP Datasphere
2 -
SAP S4HANA Cloud
1 -
SAP S4HANA Migration Cockpit
1 -
Technology Updates
6,871 -
Technology Updates
483 -
Workload Fluctuations
1
Related Content
- Unlocking the Potential of Business AI: Engineering Best Practices in Technology Blogs by SAP
- How to Connect a Fieldglass System to SAP Start in Technology Blogs by SAP
- 10+ ways to reshape your SAP landscape with SAP BTP - Blog 7 Interview in Technology Blogs by SAP
- Integrating SAP S/4HANA with Kafka via SAP Advanced Event Mesh: Part1 – Outbound connection in Technology Blogs by Members
- RingFencing & DeCoupling S/4HANA with Enterprise Blockchain and SAP BTP - Ultimate Cyber Security 🚀 in Technology Blogs by Members
Top kudoed authors
| User | Count |
|---|---|
| 14 | |
| 11 | |
| 10 | |
| 10 | |
| 9 | |
| 8 | |
| 7 | |
| 7 | |
| 7 | |
| 7 |