
- SAP Community
- Products and Technology
- Technology
- Technology Blogs by SAP
- Quickly create a native mobile app using SAP Mobil...
Technology Blogs by SAP
Learn how to extend and personalize SAP applications. Follow the SAP technology blog for insights into SAP BTP, ABAP, SAP Analytics Cloud, SAP HANA, and more.
Turn on suggestions
Auto-suggest helps you quickly narrow down your search results by suggesting possible matches as you type.
Showing results for
former_member20
Explorer
Options
- Subscribe to RSS Feed
- Mark as New
- Mark as Read
- Bookmark
- Subscribe
- Printer Friendly Page
- Report Inappropriate Content
12-14-2018
7:53 PM
In this post, I would like to show you how you can quickly create a native mobile app using the SAP Mobile Development Kit (MDK) and the new SAP Mobile Backend Generator.
One of the challenges to building an offline mobile app is having a backend data service that supports CRUD operations and is delta enabled for synchronizing the data on the device with the backend. While you can always create an MDK app using the sample data service, it’s almost always preferred to build an app using data that more closely resembles your actual use case. With the SAP Mobile Backend Generator, you can now create a backend service quickly based on your data structure that includes CRUD operations and delta support. For more information about the service, check out these other blog posts.
To follow along you will need an SAP Cloud Platform Account. You can sign up for a trial account here. Once you have confirmed your account, go ahead and log in. To create the backend data service, we will need both a Cloud Foundry Trial Account (to generate the Backend Service) and a Neo Trial Account (to create and run the service, along with the MDK app). Begin by selecting the Cloud Foundry Trial.

When prompted for the Region select either Europe (Frankfurt) AWS or US East (VA) AWS. I will select Europe AWS and click OK. A Cloud Foundry Instance will be created for you.

When complete, return to your SAP Cloud Platform Trial Cockpit landing page and select the Neo Trial.

When it opens, select Services in the left Navigator and scroll down to Mobile Services and enable it. We will come back to this later when we are ready to start our MDK app.


Next, switch Services to SAP WebIDE Full-Stack and click Go to Service.

When it opens we need to make a few configuration changes. Select the Configuration icon, then Features, then Enable the Mobile Services App Development Tools and Save your changes. Refresh the editor if prompted.

Next, we need to enter our Cloud Foundry credentials. Select Cloud Foundry, then under API Endpoint select https://api.cf.eu10.hana.ondemand.com if you selected Europe (Frankfurt) AWS for your Cloud Foundry Instance, then enter your username (email) and password.

NOTE: If you selected a different Cloud Foundry Region and you’re unsure what your Cloud Foundry API URL is, you can find it by going back to your Cloud Foundry Trial Instance.

The Organization and Space fields should then get populated. Save the configuration and then click the Install Builder button to install your Service Builder.
We are now ready to build our backend service!
Go to the home page of WebIDE Full-Stack and select New Project from Template

Change the Category Filter to All Categories and Select the Mobile OData Service Project Template, then click Next.

Give it a Project Name of ContactService and click Next.

Set the following field values:
Service App Name: ContactBackendService
Service App Version: 1.0.0
Use in Memory Database
Deployment Target: Neo
Authentication: None
Then click Next and Finish. We chose to use an In-Memory Database and no Authentication to keeps things simple in this demo.

Once the project is completed, expand it, then Right Click on the Project and select New, then click OData CSDL Document so we can create our data model.

Complete the following fields and click Save.
OData Version: 2.0
Namespace Alias: Contact
Filename: Default based on the Schema Namespace
Scheme Namespace: com.XXX.mobile.backend.contact (XXX use your company)
NOTE: The OData Version must be 2.0 as MDK currently only supports 2.0 for an offline app.

Double Click on the newly created document to open it in the visual editor. Check the box to Track Changes.
NOTE: This is VERY important for syncing our offline app with the backend data service. If you do not select this your offline store will not be able to sync with the backend.
Now click the + button on Entity and add a new entity called Contact.

After the Contact Entity is added to your canvas you will notice that it created an ID property called ContactID. Let’s go ahead and add a few more properties.
Name: Firstname Type: String Max Length: 50
Name: Lastname Type: String Max Length: 50
Name: Phone Type: String Max Length: 20

This completes our entity model for this demo. You could certainly add more entities and define relationships between them. You could even import an entity model from another project, as long as it is using the appropriate OData V2 attributes, but let’s move on for now.
Save your document (File Dropdown, then Save).
Next, let's generate the OData Service based on the model we just created. Right click on the csdl document we just created and select Generate Mobile OData Service.

Once it completes successfully, right click on ContactService and select Build. This will generate a .war file for our service which we can then install on our Cloud Platform Instance.
Expand the newly created target folder and export the odata-service-1.0.0.war file to your computer. Rename it to contact-odata-service-1.0.0.war.

Next, we will install the java app on our SAP Cloud Platform instance. Open your SAP Cloud Platform Cockpit (Neo) and navigate to Java Applications. Click Deploy Application and select the .war file you just exported from WebIDE Full-Stack, change the Runtime to Java EE 7 Web Profile TomEE 7, then Deploy.

When its done, click Start to start the service. Once it starts, click on the service name to get the Service URL so we can test it out.
NOTE: In the trial environment you can only have 1 Java Application running at a time. Stop any other Java Application before attempting to start a new one.


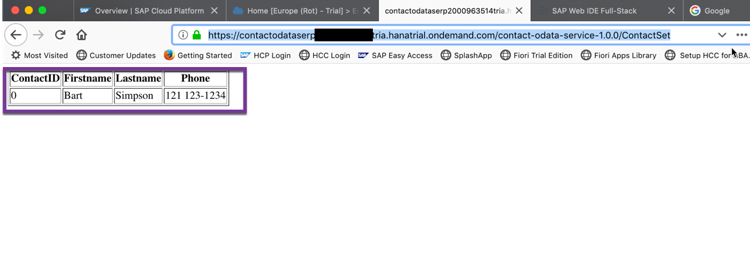
Click on the Application URL which should open the Meta Data Doc in a new tab.

Now add /ContactSet to the end of the Meta-Data Doc URL and you should get the actual Contact Data Set..

which should be blank since we haven’t added any data yet. Let’s now add a record. Open a Rest Client such as Postman. In the Postman URL paste in the Application URL (including the /ContactSet appended to the end), set the Method to Post, select Raw and JSON Application, and add some JSON in the body for the contact like this:

then, click Send. If all is successful you should get a return record set with a ContactID of 0. Go back to the empty dataset in the browser and you should now see your newly added record (after a reload).
We now have a working backend OData Service. Let’s now create our MDK App!
NOTE: As long as the Service is running the data added will persist, since we selected the In-Memory Data option. Restarting the service will clear all data and reset the ContactID. If you need to persist the data beyond this, then you should use the backend database option when creating the service.
From within the SAP Cloud Platform Cockpit (Neo), go to Services, then Mobile Service and click Go to Service to open the Mobile Services Cockpit.

First, we will need to create a Destination to our newly created OData Service.
Click on Destinations, then New.

Select Type as Mobile Destination and give it a Name ContactService, then click Next.

Set the following:
URL: Your New Service URL (without /ContactSet appended)
Proxy Type: Internet
Rewrite Mode: No Rewriting
Then Next.

Skip the next 2 screens, then set SSO Mechanism to No Authentication.

Then Next and Finish.
Next, we will create our Mobile App Definition. Under Mobile Applications select Native/Hybrid, then New.

Select Mobile Development Kit for the Config Template, then give it a unique ID and Name, and Save.

Now that we have defined the app, we need to make a few configuration changes. Start by clicking on the Security Feature and make sure the Security Configuration is set to OAuth, then click the Save Button (it will create your OAuth Client Settings if none exist that we will use when building the MDK Client).

Return to the Info Screen and click on the Connectivity Feature.

Click on the + Button and then find the Destination that we created and add it.

Once added, click on the Preview Button to verify that we can access the OData Entities.

You should see the ContactSet and the one Contact we that we added.


Finally, we need to verify the Security Settings for Cross Domain Access. If the Origin does not contain https://*.ondemand.com then please add it.

Go back to Web IDE Full-Stack. Select New Project from the Template.

Change the Category to All and select the Mobile Development Kit Application, then select Next.
Enter a Project Name (ContactsApp) and click Next.

Enter a Display Name and Finish.

The 1st order of business is to create a Service Definition for our Mobile Service, so we can work with our OData Service. Close the ContactService Project and expand the new ContactApp Project. Right Click on Services and select New MDK Service.

Give it a Name, select the Service URL, the Mobile Services URL (should default), enter the Application ID as defined in the App Definition in Mobile Services, and enter the Name of the Destination we created in Mobile Services to access the backend OData Service, then click Next.

NOTE: The Application ID and Destination Name MUST match the names in the Mobile Services Cockpit exactly.
If everything works, you will see some meta-data on the next screen and you can click Finish.

If you receive an error or are unable to view the objects, verify the previous steps and try again.
Go ahead and close the newly created Service. Next, we will create a few Actions for initializing, uploading, and downloading data to the Offline OData store in the app, as well as their respective success and failure messages.
Right Click on Actions, then select New MDK Action. Select the Offline Action and click Next.

Enter the following:
Action Name: InitializeOfflineOdata
Type: Initialize
Service: ContactService
then click Next. In Defining Requests, we need to select the OData Entities that we wish to store locally on the device. This includes entities that we want to create or perhaps reference, such as values for a dropdown field. In our case we only have one – the ContactSet. Use the Query Selector to select it from the OData Collections and assign it the Name ContactSet.


Click Next and then Finish.
Repeat for the 2 following Offline Actions.
Action Name: DownloadOfflineOdata
Type: Download
Service: ContactService
Defining Requests: ContactSet
Action Name: UploadOfflineOdata
Type: Upload
Service: ContactService
(No Defining Requests Needed)
Now let’s create some success and failure messages to display after the Offline Odata Actions are triggered.
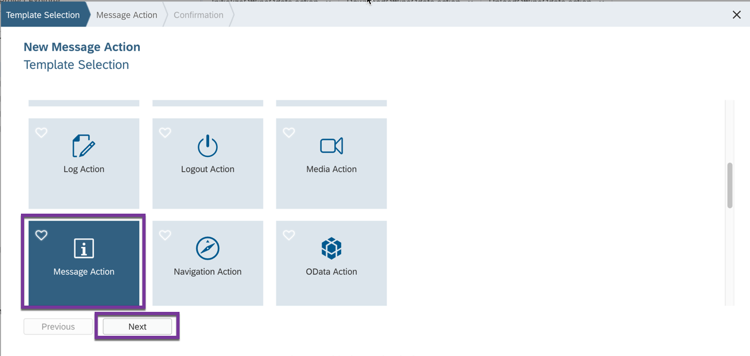
Right Click on Actions again, then select New MDK Action. This time select Message Action.
We will now create a Success Message to let the user know that the offline data store has successfully initialized. Enter the Following:
Action Name: InitializeOfflineOdataSuccess
Type: ToastMessage
Message: Offline Data Initialized!
Animate: Yes
Click Next, then Finish.

Now, let’s create a failure message.
Right Click on Actions, then select New MDK Action. Select the Message Template again and click Next.

This time we will set the following values:
Action Name: InitializeOfflineOdataFailure
Type: Message
Message: Offline Data Initialization Failed!
Title: Error
OK Caption: Ok

We now have a success and failure message defined for our initialization action. Let’s now create a success and failure message for our download action with the following values:
Action Name: DownloadOfflineOdataSuccess
Type: ToastMessage
Message: Data Synced!
Animate: Yes
Action Name: DownloadOfflineOdataFailure
Type: Message
Message: Data Download Failed!
Title: Error
OK Caption: Ok
And finally, let’s create one more message for any upload failures. The reason we aren’t going to create a success message is that we will link the upload and download actions together into one “sync” operation (so we can upload any new or changed records to the backed, then download any changes from the backend). If the upload is successful, we will skip showing a success message and just trigger the download. When the download finishes successfully we will then show a success message. If any action fails, we will stop and show a failure message.
Create a failure message with the following values:
Action Name: UploadOfflineOdataFailure
Type: Message
Message: Data Upload Failed!
Title: Error
OK Caption: Ok
Before moving forward, go ahead and close all the open Action objects before proceeding (to clear up space). Now, we need to reference these Message Actions from within the Odata Actions.
Open the InitializeOfflineOdata Action. Expand the Common Action Properties and set the Success and Failure Actions to the Success and Failure Message Actions we just created.

Scroll down to the bottom of the Action and select Show Activity Indictor and add some text to display while the initialization is occurring.

Save your changes and close the action. Next, open up the UploadOfflineOdata Action. Expand the Common Action Properties Section and set the Success Action to DownloadOfflineOdata Action and the Failure Action to UploadOfflineOdataFailure.

Scroll down to the bottom, enable Show Activity Indicator, and enter Uploading Changes.. for the text to display when the action runs.

Save your changes. And finally, open the DownloadOfflineOdata Action and set the following properties:
Success Action: DownloadOfflineOdataSuccess
Failure Action: DownloadOfflineOdataFailure
Show Activity Indicator: True
Activity Indicator Text: Downloading Updates..
Now, we will trigger the Offline Odata Actions. Open the Application.app file and scroll down to the Application Lifecycle Events. Add the InitializeOfflineOdata Action to the OnLaunch Event and OnDidUpdate Event. Save your changes. Now whenever the app is launched or when the app meta-data is updated, the offline data store will (re)initialize.

Next, we need to add a sync button, so we can trigger an upload/download on demand. Expand the Pages folder and open the Main.Page file. Click and drag 2 Toolbar Items to the bottom Toolbar in the canvas from the available Controls.

Next, set the LEFT Toolbar Item Control Properties to the following:
Name: ToolbarLeftSpace
SystemItem: FlexibleSpace
Set the RIGHT Toolbar Item Control Properties to the following:
Name: ToolbarSyncButton
SystemItem: Refresh
And finally, set the OnClick Event of the right Toolbar Control to the UploadOfflineOdata Action, and then save your changes.

Now is a good time to make sure our offline store gets created on launch and that there aren’t any errors by building and deploying our app to the MDK Client in the simulator or test device.
Right click on your Project and select MDK Deploy and Activate.

Make sure Download bundle to local machine is unchecked, then click Next and then Next again.


You can then check Cloud Platform Mobile Services Cockpit and verify the version 1 is deployed.

Now, that the app is deployed, setup the client using your OAuth Settings from Mobile Service and see what you have so far.

For more info on how to build your client, click here. When you launch the app for the first time you will need to complete a few configuration steps before the app opens and the offline OData store is initialized.


Click the Refresh button and it should perform the upload/download successfully.

Great. We can now initialize the offline data store as well as sync the offline data store with the backend data service. Now, let’s add a way to display the data as well as pages to add, update, and delete contacts.
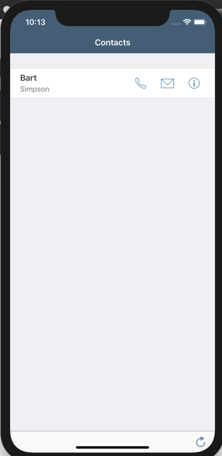
Go back to WebIDE Full-Stack and open the Main.page. Begin by changing the page caption from Main to Contacts.

Then, click and drag the Contact Cell Table from the Compound Section of the Controls Tab. On the Properties Tab set the following values:
Service: select the ContactSet under the /ContactApp/Services/ContactService.service
Description: Select Phone
Headline: Select Firstname
Subheadline: Select Lastname
SearchEnabled: True

Save your changes. Now let’s create a page to edit a Contact. Right click on Pages and select New MDK Page. Use the Form Cell Page Template then click Next.

For the Page name call it Edit. Click Next and Finish.
Click and Drag 3 Simple Property Controls on to the Page and set the following properties:
Name: FormCellSimplePropertyFirstname
Caption: Firstname
IsEditable: true
Value: Select Firstname
Name: FormCellSimplePropertyLastname
Caption: Lastname
IsEditable: true
Value: Select Lastname
Name: FormCellSimplePropertyPhone
Caption: Phone
IsEditable: true
Value: Select Phone

Next, drag 3 Toolbar Items to the bottom Toolbar. These will serve as a Delete Button, spacer, and Save Button for the record. Set the properties as follows:
Name: ToolbarDelete
SystemItem: Trash
Name: ToolbarSpace
SystemItem: FlexibleSpace
Name: ToolbarSave
SystemItem: Save
NOTE: if you have trouble selecting the last Toolbar Item switch to the Outline Tab and select the control from the outline.

Save your changes. Now we need to create the action to execute when we click on the Save and Delete Buttons. Right click on the Actions folder and select New MDK Action. For the template select OData Action then Next.

Set the following Properties:
Name: ContactSetUpdate
Type: Update Entity
Target: /ContactApp/Services/ContactService.service


Then click Next. Select the Firstname, Lastname, and Phone and deselect ContactID. Map the appropriate UI Control Value to each OData Property.


Click Next and Finish. If you encounter an error after completing, perform the following:

Right click on the newly created UpdateContactSet Action and open it using the Code Editor and Add the following to the Target Section:

then Save. The error should go away.
Let’s now add an Action for Deleting. Use the OData Action template with the following:
Name: ContactSetDelete
Type: Delete Entity
Target: /ContactApp/Services/ContactService.service
Click Next and Finish. If you encounter the same error, open the Action in the Code Editor and add the following entry to the Target
"ReadLink": "{@odata.readLink}",
As before. Save your changes. Now let’s add some success and failure messages for the Update and Delete. Create 4 Message Actions with the following details:
Action Name: UpdateContactSetSuccess
Type: ToastMessage
Message: Contact Saved!
Animate: Yes
Action Name: UpdateContactSetFailure
Type: Message
Message: Unable to Save Contact!
Title: Error
OK Caption: Ok
Action Name: DeleteContactSetSuccess
Type: ToastMessage
Message: Contact Deleted!
Animate: Yes
Action Name: DeleteContactSetFailure
Type: Message
Message: Unable to Delete Contact!
Title: Error
OK Caption: Ok
We now have our Update, Delete, and supporting Message Actions. Go back into the UpdateContactSet Action and set the Success and Failure Actions to the Message Actions we just created.

Repeat for the DeleteContactSet Action.
Now, we need one more Action before we can complete the Edit Page. We need to be able to navigate from the Main Page to the Edit Page to edit a record.
Right click on Actions and select New MDK Action. Select Navigation Action as the Template then Next.

Give it the name OpenEditPage and make sure the Edit.Page is selected as the page to open.

Click Next and Finish. Now go back to the Edit Page. Click on the Save Button and select the Events Tab. In the OnPress Event select the UpdateContactSet Action.

Next, click on the Delete Button and set the OnPress Event to the DeleteContactSet Action. Save your changes. Close the Edit Page and return to the Main Page.
Select the Contacts Cell Table, then the Events Tab and for the OnPress Event select the OpenEditPage Action.

Save your changes and perform an MDK Deploy and Activate. Test it on your device or simulator. Try changing the Contact on the device, Save it, then Sync it with the backend. You should see your change appear in your backend.


Now, we need to be able to create a new Contact. Go back to WebIDE Full-Stack and let’s create a new page. Right click on Pages and select New MDK Page, then the Form Cell Page Template.

Give it a name of New, then click Next and Finish. Click and drag 3 Simple Property Controls on to the page like you did for the Edit Page and set the following properties:
Name: FormCellSimplePropertyFirstname
Caption: Firstname
IsEditable: true
Value:
Name: FormCellSimplePropertyLastname
Caption: Lastname
IsEditable: true
Value:
Name: FormCellSimplePropertyPhone
Caption: Phone
IsEditable: true
Value:
Save your changes. Since we will be creating a new Contact record, we should add some field validation to make sure that all the fields are completed and that the field lengths don’t exceed the lengths specified in our backend service. To do handle this, we will use a Rule.
Right click on Rules and select New MDK Rule. Give it a Name of NewFieldValidation then click Next and Finish.

The default rule editor uses Blockly for creating your rule logic. If you don’t want to use Blockly you can just create your Rule using old fashioned Javascript. Close the NewFieldValidation Rule that we just created. Expand the Rules Folder and you will notice two files associated with our Rule – one js file and one non-js file. Go ahead and delete the non-js file.

Then, double click on the NewFieldValidation.rule.js file.

Copy and Paste the following Javascript into the main function:

Looking at the code you can see that we are first checking for blank or null values in all 3 fields. Next we are verifying that the Firstname and Lastname don’t exceed 50 characters, and finally we are verifying that the Phone doesn’t exceed 20 characters. We are returning a false if it fails and true if it succeeds. Notice how we can reference UI Components, their values, as well as call Actions directly from within the Rule. Since we are referencing 3 Action Messages that currently don’t exist, let’s create those next.
Create 3 Action Messages with the following properties:
Action Name: RequiredFieldValidationMessage
Type: Message
Message: All Fields are Required.
Title: Validation Error
OK Caption: Ok
Action Name: FieldLength50ValidationMessage
Type: Message
Message: Name Fields Cannot Exceed 50 Characters.
Title: Validation Error
OK Caption: Ok
Action Name: FieldLength20ValidationMessage
Type: Message
Message: Phone Field Cannot Exceed 20 Characters.
Title: Validation Error
OK Caption: Ok
Now that we have our field validation, we need to create our OData Create Action that we will call when we click the Save Button. Create an OData Action with the following Properties:
Action Name: CreateContactSet
Type: CreateEntity
Target: select ContactSet under /ContactApp/Services/ContactService.service

Then click Next. Map the Firstname, Lastname, and Phone to their respective UI Control Values from the New Page.

Click Next and then Finish. Now, create the Success and Failure Message Actions with the following properties:
Action Name: CreateContactSetSuccess
Type: Toast
Message: Unable to Save Contact.
Animate: Yes
Action Name: CreateContactSetFailure
Type: Message
Message: Unable to Save Contact.
Title: Error
OK Caption: Ok
Now assign the Success and Failure Message Actions to their respective Action Properties within the CreateContactSet Action. Also, within the Action Properties, assign the NewFieldValidation Rule to the Validation Property and Save your changes.

Now we have the Create Contact Action, Validation, and Message Actions. Now we need a Navigation Action to Open the New Contact Page. Right click on Action and select New MDK Action. Select Navigation Action Template, then Next. Give it name of OpenNewPage, select the New Page to open, and click the Modal Page checkboxes (we want the New Page to appear as a modal window vs. slide sideways). Click Next and Finish.

So now we have an Action to Open the New Page in a Modal Window. Because we are using a Modal Window, there won’t be a default Back Button added, so we will need to add an Action to Close the Modal.
Right click on Action and select New MDK Action. This time select the Close Page Action, then Next. Name it CloseModal, set the DismissModal to Cancelled, then click Next and Finish.

Now let’s add these Actions to our New and Main Page.
Go back to the New Page first. Add 2 Toolbar Items to the bottom and set the following properties/events:
Name: ToolbarItemLeftSpace
SystemItem: FlexibleSpace
Name: ToolbarItemSave
SystemItem: Save
Clickable: true
Enabled: true
OnPress Event: CreateContactSet Action
Next, drag an Action Bar Item to the top left corner and set the following Properties:
SystemItem: Done
OnPress Event: CloseModal
Save your changes.

This completes the New Page. Now we need to be able to open the New Page from the Main Page. Open the Main Page and add an Action Bar Item to the top right and set the following properties/events:
SystemItem: Add
OnPress Event: OpenNewPage
Save your changes and let’s test it out. Deploy and Activate your changes and try adding a New Contact. Don’t forget to sync the app with the backend.


Now let’s verify that we can delete a Contact as well.


So now we have verified that we can create, update and delete a Contact. One thing we didn’t do was add some field validation to our Edit Page, so let’s do that now.
First, we will create a validation rule similar to the rule we created for the create. Right click on Rules and select New MDK Rule. Give it a name of EditFieldValidation. Delete the non-JavaScript (Blockly) file, then open the EditFieldValidation.js file and the NewFieldValidation.js file. Copy the contents of the main function from the NewFieldValidation.js file over to the EditFieldValidation.js file. Once copied, replace all instances of “#Page:New” with “#Page:Edit”. If you named all three field controls the same on each Page then you are done; otherwise, you will also need to update the control names as well.

Save your changes, then open the UpdateContactSet Action and set the Validation Event to this new Rule.

Save and Deploy your changes and test. Verify that the field must not be blank.
This completes our simple offline mobile app with backend data service!
I hope you enjoyed this blog and find it helpful!
Steve
One of the challenges to building an offline mobile app is having a backend data service that supports CRUD operations and is delta enabled for synchronizing the data on the device with the backend. While you can always create an MDK app using the sample data service, it’s almost always preferred to build an app using data that more closely resembles your actual use case. With the SAP Mobile Backend Generator, you can now create a backend service quickly based on your data structure that includes CRUD operations and delta support. For more information about the service, check out these other blog posts.
To follow along you will need an SAP Cloud Platform Account. You can sign up for a trial account here. Once you have confirmed your account, go ahead and log in. To create the backend data service, we will need both a Cloud Foundry Trial Account (to generate the Backend Service) and a Neo Trial Account (to create and run the service, along with the MDK app). Begin by selecting the Cloud Foundry Trial.
When prompted for the Region select either Europe (Frankfurt) AWS or US East (VA) AWS. I will select Europe AWS and click OK. A Cloud Foundry Instance will be created for you.
When complete, return to your SAP Cloud Platform Trial Cockpit landing page and select the Neo Trial.
When it opens, select Services in the left Navigator and scroll down to Mobile Services and enable it. We will come back to this later when we are ready to start our MDK app.
Next, switch Services to SAP WebIDE Full-Stack and click Go to Service.
When it opens we need to make a few configuration changes. Select the Configuration icon, then Features, then Enable the Mobile Services App Development Tools and Save your changes. Refresh the editor if prompted.
Next, we need to enter our Cloud Foundry credentials. Select Cloud Foundry, then under API Endpoint select https://api.cf.eu10.hana.ondemand.com if you selected Europe (Frankfurt) AWS for your Cloud Foundry Instance, then enter your username (email) and password.
NOTE: If you selected a different Cloud Foundry Region and you’re unsure what your Cloud Foundry API URL is, you can find it by going back to your Cloud Foundry Trial Instance.
The Organization and Space fields should then get populated. Save the configuration and then click the Install Builder button to install your Service Builder.
We are now ready to build our backend service!
Part 1 – Create a Backend OData Service
Go to the home page of WebIDE Full-Stack and select New Project from Template
Change the Category Filter to All Categories and Select the Mobile OData Service Project Template, then click Next.
Give it a Project Name of ContactService and click Next.
Set the following field values:
Service App Name: ContactBackendService
Service App Version: 1.0.0
Use in Memory Database
Deployment Target: Neo
Authentication: None
Then click Next and Finish. We chose to use an In-Memory Database and no Authentication to keeps things simple in this demo.
Once the project is completed, expand it, then Right Click on the Project and select New, then click OData CSDL Document so we can create our data model.
Complete the following fields and click Save.
OData Version: 2.0
Namespace Alias: Contact
Filename: Default based on the Schema Namespace
Scheme Namespace: com.XXX.mobile.backend.contact (XXX use your company)
NOTE: The OData Version must be 2.0 as MDK currently only supports 2.0 for an offline app.
Double Click on the newly created document to open it in the visual editor. Check the box to Track Changes.
NOTE: This is VERY important for syncing our offline app with the backend data service. If you do not select this your offline store will not be able to sync with the backend.
Now click the + button on Entity and add a new entity called Contact.
After the Contact Entity is added to your canvas you will notice that it created an ID property called ContactID. Let’s go ahead and add a few more properties.
Name: Firstname Type: String Max Length: 50
Name: Lastname Type: String Max Length: 50
Name: Phone Type: String Max Length: 20
This completes our entity model for this demo. You could certainly add more entities and define relationships between them. You could even import an entity model from another project, as long as it is using the appropriate OData V2 attributes, but let’s move on for now.
Save your document (File Dropdown, then Save).
Next, let's generate the OData Service based on the model we just created. Right click on the csdl document we just created and select Generate Mobile OData Service.
Once it completes successfully, right click on ContactService and select Build. This will generate a .war file for our service which we can then install on our Cloud Platform Instance.
Expand the newly created target folder and export the odata-service-1.0.0.war file to your computer. Rename it to contact-odata-service-1.0.0.war.
Next, we will install the java app on our SAP Cloud Platform instance. Open your SAP Cloud Platform Cockpit (Neo) and navigate to Java Applications. Click Deploy Application and select the .war file you just exported from WebIDE Full-Stack, change the Runtime to Java EE 7 Web Profile TomEE 7, then Deploy.
When its done, click Start to start the service. Once it starts, click on the service name to get the Service URL so we can test it out.
NOTE: In the trial environment you can only have 1 Java Application running at a time. Stop any other Java Application before attempting to start a new one.
Click on the Application URL which should open the Meta Data Doc in a new tab.
Now add /ContactSet to the end of the Meta-Data Doc URL and you should get the actual Contact Data Set..
which should be blank since we haven’t added any data yet. Let’s now add a record. Open a Rest Client such as Postman. In the Postman URL paste in the Application URL (including the /ContactSet appended to the end), set the Method to Post, select Raw and JSON Application, and add some JSON in the body for the contact like this:
{


"Firstname" : "Bart",


"Lastname" : "Simpson",


"Phone" : "121 123-1234"


}
then, click Send. If all is successful you should get a return record set with a ContactID of 0. Go back to the empty dataset in the browser and you should now see your newly added record (after a reload).
We now have a working backend OData Service. Let’s now create our MDK App!
NOTE: As long as the Service is running the data added will persist, since we selected the In-Memory Data option. Restarting the service will clear all data and reset the ContactID. If you need to persist the data beyond this, then you should use the backend database option when creating the service.
Part 2 – Create an MDK App
From within the SAP Cloud Platform Cockpit (Neo), go to Services, then Mobile Service and click Go to Service to open the Mobile Services Cockpit.
First, we will need to create a Destination to our newly created OData Service.
Click on Destinations, then New.
Select Type as Mobile Destination and give it a Name ContactService, then click Next.
Set the following:
URL: Your New Service URL (without /ContactSet appended)
Proxy Type: Internet
Rewrite Mode: No Rewriting
Then Next.
Skip the next 2 screens, then set SSO Mechanism to No Authentication.
Then Next and Finish.
Next, we will create our Mobile App Definition. Under Mobile Applications select Native/Hybrid, then New.
Select Mobile Development Kit for the Config Template, then give it a unique ID and Name, and Save.
Now that we have defined the app, we need to make a few configuration changes. Start by clicking on the Security Feature and make sure the Security Configuration is set to OAuth, then click the Save Button (it will create your OAuth Client Settings if none exist that we will use when building the MDK Client).
Return to the Info Screen and click on the Connectivity Feature.
Click on the + Button and then find the Destination that we created and add it.
Once added, click on the Preview Button to verify that we can access the OData Entities.
You should see the ContactSet and the one Contact we that we added.
Finally, we need to verify the Security Settings for Cross Domain Access. If the Origin does not contain https://*.ondemand.com then please add it.
Go back to Web IDE Full-Stack. Select New Project from the Template.
Change the Category to All and select the Mobile Development Kit Application, then select Next.
Enter a Project Name (ContactsApp) and click Next.
Enter a Display Name and Finish.
The 1st order of business is to create a Service Definition for our Mobile Service, so we can work with our OData Service. Close the ContactService Project and expand the new ContactApp Project. Right Click on Services and select New MDK Service.
Give it a Name, select the Service URL, the Mobile Services URL (should default), enter the Application ID as defined in the App Definition in Mobile Services, and enter the Name of the Destination we created in Mobile Services to access the backend OData Service, then click Next.
NOTE: The Application ID and Destination Name MUST match the names in the Mobile Services Cockpit exactly.
If everything works, you will see some meta-data on the next screen and you can click Finish.
If you receive an error or are unable to view the objects, verify the previous steps and try again.
Go ahead and close the newly created Service. Next, we will create a few Actions for initializing, uploading, and downloading data to the Offline OData store in the app, as well as their respective success and failure messages.
Right Click on Actions, then select New MDK Action. Select the Offline Action and click Next.
Enter the following:
Action Name: InitializeOfflineOdata
Type: Initialize
Service: ContactService
then click Next. In Defining Requests, we need to select the OData Entities that we wish to store locally on the device. This includes entities that we want to create or perhaps reference, such as values for a dropdown field. In our case we only have one – the ContactSet. Use the Query Selector to select it from the OData Collections and assign it the Name ContactSet.
Click Next and then Finish.
Repeat for the 2 following Offline Actions.
Action Name: DownloadOfflineOdata
Type: Download
Service: ContactService
Defining Requests: ContactSet
Action Name: UploadOfflineOdata
Type: Upload
Service: ContactService
(No Defining Requests Needed)
Now let’s create some success and failure messages to display after the Offline Odata Actions are triggered.
Right Click on Actions again, then select New MDK Action. This time select Message Action.
We will now create a Success Message to let the user know that the offline data store has successfully initialized. Enter the Following:
Action Name: InitializeOfflineOdataSuccess
Type: ToastMessage
Message: Offline Data Initialized!
Animate: Yes
Click Next, then Finish.
Now, let’s create a failure message.
Right Click on Actions, then select New MDK Action. Select the Message Template again and click Next.
This time we will set the following values:
Action Name: InitializeOfflineOdataFailure
Type: Message
Message: Offline Data Initialization Failed!
Title: Error
OK Caption: Ok
We now have a success and failure message defined for our initialization action. Let’s now create a success and failure message for our download action with the following values:
Action Name: DownloadOfflineOdataSuccess
Type: ToastMessage
Message: Data Synced!
Animate: Yes
Action Name: DownloadOfflineOdataFailure
Type: Message
Message: Data Download Failed!
Title: Error
OK Caption: Ok
And finally, let’s create one more message for any upload failures. The reason we aren’t going to create a success message is that we will link the upload and download actions together into one “sync” operation (so we can upload any new or changed records to the backed, then download any changes from the backend). If the upload is successful, we will skip showing a success message and just trigger the download. When the download finishes successfully we will then show a success message. If any action fails, we will stop and show a failure message.
Create a failure message with the following values:
Action Name: UploadOfflineOdataFailure
Type: Message
Message: Data Upload Failed!
Title: Error
OK Caption: Ok
Before moving forward, go ahead and close all the open Action objects before proceeding (to clear up space). Now, we need to reference these Message Actions from within the Odata Actions.
Open the InitializeOfflineOdata Action. Expand the Common Action Properties and set the Success and Failure Actions to the Success and Failure Message Actions we just created.
Scroll down to the bottom of the Action and select Show Activity Indictor and add some text to display while the initialization is occurring.
Save your changes and close the action. Next, open up the UploadOfflineOdata Action. Expand the Common Action Properties Section and set the Success Action to DownloadOfflineOdata Action and the Failure Action to UploadOfflineOdataFailure.
Scroll down to the bottom, enable Show Activity Indicator, and enter Uploading Changes.. for the text to display when the action runs.
Save your changes. And finally, open the DownloadOfflineOdata Action and set the following properties:
Success Action: DownloadOfflineOdataSuccess
Failure Action: DownloadOfflineOdataFailure
Show Activity Indicator: True
Activity Indicator Text: Downloading Updates..
Now, we will trigger the Offline Odata Actions. Open the Application.app file and scroll down to the Application Lifecycle Events. Add the InitializeOfflineOdata Action to the OnLaunch Event and OnDidUpdate Event. Save your changes. Now whenever the app is launched or when the app meta-data is updated, the offline data store will (re)initialize.
Next, we need to add a sync button, so we can trigger an upload/download on demand. Expand the Pages folder and open the Main.Page file. Click and drag 2 Toolbar Items to the bottom Toolbar in the canvas from the available Controls.
Next, set the LEFT Toolbar Item Control Properties to the following:
Name: ToolbarLeftSpace
SystemItem: FlexibleSpace
Set the RIGHT Toolbar Item Control Properties to the following:
Name: ToolbarSyncButton
SystemItem: Refresh
And finally, set the OnClick Event of the right Toolbar Control to the UploadOfflineOdata Action, and then save your changes.
Now is a good time to make sure our offline store gets created on launch and that there aren’t any errors by building and deploying our app to the MDK Client in the simulator or test device.
Right click on your Project and select MDK Deploy and Activate.
Make sure Download bundle to local machine is unchecked, then click Next and then Next again.
You can then check Cloud Platform Mobile Services Cockpit and verify the version 1 is deployed.
Now, that the app is deployed, setup the client using your OAuth Settings from Mobile Service and see what you have so far.
For more info on how to build your client, click here. When you launch the app for the first time you will need to complete a few configuration steps before the app opens and the offline OData store is initialized.
Click the Refresh button and it should perform the upload/download successfully.
Great. We can now initialize the offline data store as well as sync the offline data store with the backend data service. Now, let’s add a way to display the data as well as pages to add, update, and delete contacts.
Go back to WebIDE Full-Stack and open the Main.page. Begin by changing the page caption from Main to Contacts.
Then, click and drag the Contact Cell Table from the Compound Section of the Controls Tab. On the Properties Tab set the following values:
Service: select the ContactSet under the /ContactApp/Services/ContactService.service
Description: Select Phone
Headline: Select Firstname
Subheadline: Select Lastname
SearchEnabled: True
Save your changes. Now let’s create a page to edit a Contact. Right click on Pages and select New MDK Page. Use the Form Cell Page Template then click Next.
For the Page name call it Edit. Click Next and Finish.
Click and Drag 3 Simple Property Controls on to the Page and set the following properties:
Name: FormCellSimplePropertyFirstname
Caption: Firstname
IsEditable: true
Value: Select Firstname
Name: FormCellSimplePropertyLastname
Caption: Lastname
IsEditable: true
Value: Select Lastname
Name: FormCellSimplePropertyPhone
Caption: Phone
IsEditable: true
Value: Select Phone
Next, drag 3 Toolbar Items to the bottom Toolbar. These will serve as a Delete Button, spacer, and Save Button for the record. Set the properties as follows:
Name: ToolbarDelete
SystemItem: Trash
Name: ToolbarSpace
SystemItem: FlexibleSpace
Name: ToolbarSave
SystemItem: Save
NOTE: if you have trouble selecting the last Toolbar Item switch to the Outline Tab and select the control from the outline.
Save your changes. Now we need to create the action to execute when we click on the Save and Delete Buttons. Right click on the Actions folder and select New MDK Action. For the template select OData Action then Next.
Set the following Properties:
Name: ContactSetUpdate
Type: Update Entity
Target: /ContactApp/Services/ContactService.service
Then click Next. Select the Firstname, Lastname, and Phone and deselect ContactID. Map the appropriate UI Control Value to each OData Property.
Click Next and Finish. If you encounter an error after completing, perform the following:
Right click on the newly created UpdateContactSet Action and open it using the Code Editor and Add the following to the Target Section:
"ReadLink": "{@odata.readLink}",then Save. The error should go away.
Let’s now add an Action for Deleting. Use the OData Action template with the following:
Name: ContactSetDelete
Type: Delete Entity
Target: /ContactApp/Services/ContactService.service
Click Next and Finish. If you encounter the same error, open the Action in the Code Editor and add the following entry to the Target
"ReadLink": "{@odata.readLink}",
As before. Save your changes. Now let’s add some success and failure messages for the Update and Delete. Create 4 Message Actions with the following details:
Action Name: UpdateContactSetSuccess
Type: ToastMessage
Message: Contact Saved!
Animate: Yes
Action Name: UpdateContactSetFailure
Type: Message
Message: Unable to Save Contact!
Title: Error
OK Caption: Ok
Action Name: DeleteContactSetSuccess
Type: ToastMessage
Message: Contact Deleted!
Animate: Yes
Action Name: DeleteContactSetFailure
Type: Message
Message: Unable to Delete Contact!
Title: Error
OK Caption: Ok
We now have our Update, Delete, and supporting Message Actions. Go back into the UpdateContactSet Action and set the Success and Failure Actions to the Message Actions we just created.
Repeat for the DeleteContactSet Action.
Now, we need one more Action before we can complete the Edit Page. We need to be able to navigate from the Main Page to the Edit Page to edit a record.
Right click on Actions and select New MDK Action. Select Navigation Action as the Template then Next.
Give it the name OpenEditPage and make sure the Edit.Page is selected as the page to open.
Click Next and Finish. Now go back to the Edit Page. Click on the Save Button and select the Events Tab. In the OnPress Event select the UpdateContactSet Action.
Next, click on the Delete Button and set the OnPress Event to the DeleteContactSet Action. Save your changes. Close the Edit Page and return to the Main Page.
Select the Contacts Cell Table, then the Events Tab and for the OnPress Event select the OpenEditPage Action.
Save your changes and perform an MDK Deploy and Activate. Test it on your device or simulator. Try changing the Contact on the device, Save it, then Sync it with the backend. You should see your change appear in your backend.
Now, we need to be able to create a new Contact. Go back to WebIDE Full-Stack and let’s create a new page. Right click on Pages and select New MDK Page, then the Form Cell Page Template.
Give it a name of New, then click Next and Finish. Click and drag 3 Simple Property Controls on to the page like you did for the Edit Page and set the following properties:
Name: FormCellSimplePropertyFirstname
Caption: Firstname
IsEditable: true
Value:
Name: FormCellSimplePropertyLastname
Caption: Lastname
IsEditable: true
Value:
Name: FormCellSimplePropertyPhone
Caption: Phone
IsEditable: true
Value:
Save your changes. Since we will be creating a new Contact record, we should add some field validation to make sure that all the fields are completed and that the field lengths don’t exceed the lengths specified in our backend service. To do handle this, we will use a Rule.
Right click on Rules and select New MDK Rule. Give it a Name of NewFieldValidation then click Next and Finish.
The default rule editor uses Blockly for creating your rule logic. If you don’t want to use Blockly you can just create your Rule using old fashioned Javascript. Close the NewFieldValidation Rule that we just created. Expand the Rules Folder and you will notice two files associated with our Rule – one js file and one non-js file. Go ahead and delete the non-js file.
Then, double click on the NewFieldValidation.rule.js file.
Copy and Paste the following Javascript into the main function:
//Check for empty fields


if (clientAPI.evaluateTargetPath('#Page:New/#Control:FormCellSimplePropertyFirstname/#Value') == '' || clientAPI.evaluateTargetPath('#Page:New/#Control:FormCellSimplePropertyFirstname/#Value') == null ||  clientAPI.evaluateTargetPath('#Page:New/#Control:FormCellSimplePropertyLastname/#Value') == '' ||  clientAPI.evaluateTargetPath('#Page:New/#Control:FormCellSimplePropertyLastname/#Value') == null ||


clientAPI.evaluateTargetPath('#Page:New/#Control:FormCellSimplePropertyPhone/#Value') == '' ||  clientAPI.evaluateTargetPath('#Page:New/#Control:FormCellSimplePropertyPhone/#Value') == null) {


clientAPI.executeAction('/ContactTest/Actions/RequiredFieldValidationMessage.action');


return false;


}


//Check for fields > 50 Characters


else if (clientAPI.evaluateTargetPath('#Page:New/#Control:FormCellSimplePropertyFirstname/#Value').length > 50 || clientAPI.evaluateTargetPath('#Page:New/#Control:FormCellSimplePropertyLastname/#Value').length > 50 ) {


//VS Debugger Stop if needed


debugger;


clientAPI.executeAction('/ContactApp/Actions/FieldLength50ValidationMessage.action');


return false;


}


//Check for fields > 20 Characters


else if (clientAPI.evaluateTargetPath('#Page:New/#Control:FormCellSimplePropertyPhone/#Value').length > 20 ) {


clientAPI.executeAction('/ContactApp/Actions/FieldLength20ValidationMessage.action');


return false;


}


else {


//Success


return true;


}
Looking at the code you can see that we are first checking for blank or null values in all 3 fields. Next we are verifying that the Firstname and Lastname don’t exceed 50 characters, and finally we are verifying that the Phone doesn’t exceed 20 characters. We are returning a false if it fails and true if it succeeds. Notice how we can reference UI Components, their values, as well as call Actions directly from within the Rule. Since we are referencing 3 Action Messages that currently don’t exist, let’s create those next.
Create 3 Action Messages with the following properties:
Action Name: RequiredFieldValidationMessage
Type: Message
Message: All Fields are Required.
Title: Validation Error
OK Caption: Ok
Action Name: FieldLength50ValidationMessage
Type: Message
Message: Name Fields Cannot Exceed 50 Characters.
Title: Validation Error
OK Caption: Ok
Action Name: FieldLength20ValidationMessage
Type: Message
Message: Phone Field Cannot Exceed 20 Characters.
Title: Validation Error
OK Caption: Ok
Now that we have our field validation, we need to create our OData Create Action that we will call when we click the Save Button. Create an OData Action with the following Properties:
Action Name: CreateContactSet
Type: CreateEntity
Target: select ContactSet under /ContactApp/Services/ContactService.service
Then click Next. Map the Firstname, Lastname, and Phone to their respective UI Control Values from the New Page.
Click Next and then Finish. Now, create the Success and Failure Message Actions with the following properties:
Action Name: CreateContactSetSuccess
Type: Toast
Message: Unable to Save Contact.
Animate: Yes
Action Name: CreateContactSetFailure
Type: Message
Message: Unable to Save Contact.
Title: Error
OK Caption: Ok
Now assign the Success and Failure Message Actions to their respective Action Properties within the CreateContactSet Action. Also, within the Action Properties, assign the NewFieldValidation Rule to the Validation Property and Save your changes.
Now we have the Create Contact Action, Validation, and Message Actions. Now we need a Navigation Action to Open the New Contact Page. Right click on Action and select New MDK Action. Select Navigation Action Template, then Next. Give it name of OpenNewPage, select the New Page to open, and click the Modal Page checkboxes (we want the New Page to appear as a modal window vs. slide sideways). Click Next and Finish.
So now we have an Action to Open the New Page in a Modal Window. Because we are using a Modal Window, there won’t be a default Back Button added, so we will need to add an Action to Close the Modal.
Right click on Action and select New MDK Action. This time select the Close Page Action, then Next. Name it CloseModal, set the DismissModal to Cancelled, then click Next and Finish.
Now let’s add these Actions to our New and Main Page.
Go back to the New Page first. Add 2 Toolbar Items to the bottom and set the following properties/events:
Name: ToolbarItemLeftSpace
SystemItem: FlexibleSpace
Name: ToolbarItemSave
SystemItem: Save
Clickable: true
Enabled: true
OnPress Event: CreateContactSet Action
Next, drag an Action Bar Item to the top left corner and set the following Properties:
SystemItem: Done
OnPress Event: CloseModal
Save your changes.
This completes the New Page. Now we need to be able to open the New Page from the Main Page. Open the Main Page and add an Action Bar Item to the top right and set the following properties/events:
SystemItem: Add
OnPress Event: OpenNewPage
Save your changes and let’s test it out. Deploy and Activate your changes and try adding a New Contact. Don’t forget to sync the app with the backend.
Now let’s verify that we can delete a Contact as well.
So now we have verified that we can create, update and delete a Contact. One thing we didn’t do was add some field validation to our Edit Page, so let’s do that now.
First, we will create a validation rule similar to the rule we created for the create. Right click on Rules and select New MDK Rule. Give it a name of EditFieldValidation. Delete the non-JavaScript (Blockly) file, then open the EditFieldValidation.js file and the NewFieldValidation.js file. Copy the contents of the main function from the NewFieldValidation.js file over to the EditFieldValidation.js file. Once copied, replace all instances of “#Page:New” with “#Page:Edit”. If you named all three field controls the same on each Page then you are done; otherwise, you will also need to update the control names as well.
Save your changes, then open the UpdateContactSet Action and set the Validation Event to this new Rule.
Save and Deploy your changes and test. Verify that the field must not be blank.
This completes our simple offline mobile app with backend data service!
I hope you enjoyed this blog and find it helpful!
Steve
Labels:
7 Comments
You must be a registered user to add a comment. If you've already registered, sign in. Otherwise, register and sign in.
Labels in this area
-
ABAP CDS Views - CDC (Change Data Capture)
2 -
AI
1 -
Analyze Workload Data
1 -
BTP
1 -
Business and IT Integration
2 -
Business application stu
1 -
Business Technology Platform
1 -
Business Trends
1,658 -
Business Trends
102 -
CAP
1 -
cf
1 -
Cloud Foundry
1 -
Confluent
1 -
Customer COE Basics and Fundamentals
1 -
Customer COE Latest and Greatest
3 -
Customer Data Browser app
1 -
Data Analysis Tool
1 -
data migration
1 -
data transfer
1 -
Datasphere
2 -
Event Information
1,400 -
Event Information
69 -
Expert
1 -
Expert Insights
177 -
Expert Insights
322 -
General
1 -
Google cloud
1 -
Google Next'24
1 -
GraphQL
1 -
Kafka
1 -
Life at SAP
780 -
Life at SAP
13 -
Migrate your Data App
1 -
MTA
1 -
Network Performance Analysis
1 -
NodeJS
1 -
PDF
1 -
POC
1 -
Product Updates
4,576 -
Product Updates
367 -
Replication Flow
1 -
REST API
1 -
RisewithSAP
1 -
SAP BTP
1 -
SAP BTP Cloud Foundry
1 -
SAP Cloud ALM
1 -
SAP Cloud Application Programming Model
1 -
SAP Datasphere
2 -
SAP S4HANA Cloud
1 -
SAP S4HANA Migration Cockpit
1 -
Technology Updates
6,873 -
Technology Updates
454 -
Workload Fluctuations
1
Related Content
- Fiori PO Approver app Accept and Reject button customization from ECC backend in Technology Blogs by Members
- SAP BTP Innobytes – April 2024 in Technology Blogs by SAP
- Extract blob data (PDF) from CAPM using python library of Document information extraction service. in Technology Blogs by Members
- Consuming SAP with SAP Build Apps - Mobile Apps for iOS and Android in Technology Blogs by SAP
- Developing & Deploying the UI5 App to Cloud Foundry and Accessing from App-router End-to-End Steps in Technology Blogs by Members
Top kudoed authors
| User | Count |
|---|---|
| 23 | |
| 11 | |
| 8 | |
| 7 | |
| 7 | |
| 7 | |
| 6 | |
| 6 | |
| 6 | |
| 6 |