
- SAP Community
- Products and Technology
- Spend Management
- Spend Management Blogs by SAP
- SAP Ariba Extensibility: Download Sourcing Events ...
Spend Management Blogs by SAP
Stay current on SAP Ariba for direct and indirect spend, SAP Fieldglass for workforce management, and SAP Concur for travel and expense with blog posts by SAP.
Turn on suggestions
Auto-suggest helps you quickly narrow down your search results by suggesting possible matches as you type.
Showing results for
Product and Topic Expert
Options
- Subscribe to RSS Feed
- Mark as New
- Mark as Read
- Bookmark
- Subscribe
- Printer Friendly Page
- Report Inappropriate Content
10-02-2023
9:29 PM
Summary: In this post I will teach you how to download the recent created events using SAP Integration Suite and SAP Ariba APIs, in this case we will use the Operational Reporting for Sourcing API, because we can define the select and filter fields, and we can use pagination.
You can review more about SAP Integration Suite in the documentation of the product here and you can review this post from gayathri.narayana to have an overview of SAP Ariba Integration: SAP Ariba Integration Approach.
If you are new using Ariba APIs or Ariba Developer Portal, please review this post from ajmaradiaga: SAP Ariba developer portal – How to create applications and consume the SAP Ariba APIs.
Before to start we will need the following information:
I will use the View Management endpoint of Operational Reporting for Sourcing to create the new view. We can use the GET /metadata endpoint, to explore the available documents, filters and fields:
Only realm and product are mandatory, if you don't include document type it will get all available document types
We have to use the endpoint POST /viewTemplates/{viewTemplateName} to create our view:
Some notes about the filters:
If all is ok we should have a result like this:
From SAP Integration Suite home page, navigate to Monitor -> Integrations:
Open the tile Security Material:
Let's create a new OAuth2 Client Credentials, we will need 1 for test realm and 1 for production realm:
Now we will use OAuth credentials generated from developer.ariba.com, we need the OAuth Client Id and the OAuth Secret:
From Monitor -> Integrations, open the tile JDBC Material:
Now we will use our BTP Hana Cloud database, we need the host URL, user and password:
From SAP Integration Home navigate to Design -> Integrations:
Create a new package integration:
Move to Artifacts tab and create a new Integration flow:
Add Name and Description, and click Ok:
Before to start with iFlow creation, let's review the design of Integration Flow:
We will have 3 Integration process:
Let's open the integration flow, change to Edit mode and remove the sender and receiver:
This will be the content for the main integration process:
We will remove the classic Start and we will add a Timer, this allows to schedule the time of the execution or run once by default.
We will use the Content Modifier, to add properties to the integration flow and we can define the value as externalized parameters, this allows update only the configuration if we move our package from test to production:
We will use the a Groovy Script, to add the date range and event type filters, we will define variables to control the loop and also some variables for logging:
We will use the Looping Process Call, to call all pages in the OR API result, when the property hasPageToken is '0' the loop ends:
Finally we will use a Groovy Script to log the total of inserted events and attach the log in the execution:
Now, let's create a new Local Integration Process and we will add these elements, this process will call every page result in the date range defined, the maximum records per page is 50. Reference: Usages of the Operational Reporting API for Strategic Sourcing.
In the Content Modifier, we will add the apiKey for the Operational Reporting API, in header section:
In the UpdateFilters script we have to add empty pageToken for the first execution and if the result has more 50 records it will use the new pageToken in the 2nd execution:
We have to use HTTP Adapter between the Request Reply and Receiver:
In the HTTP details we use global parameters in order to change these in configuration mode:
After the API Call we will use a Groovy Script to read if the page has results and if it has a next Page:
We will use the Router element to decide if we need to call a new looping process or not:
The Read Event looping process will call the last looping process, Insert Event:
The last step for this flow is update the sentinel value to continue or exit the first looping process:
This will be last Local Integration process:
We will use the GetEventId script to write the Select statement to database, because we want to check if the record is already inserted:
We will use the Request Reply, JDBC adapter and Receiver to read our Hana database:
We will use the Xml to JSON Converter to parse the SELECT result:
We will use a Groovy script to check if the response has rows:
We will use the Router to insert the event in database if hasResults is false:
In the PrepareInsert script we will add this code, if you need more information about the supported statements, review this: Payload and Operation
We will use again a RequestReply, Receiver and JDBC adapter to execute the INSERT statement.
Finally we will use a Groovy script to increase the count:
Before to save the Integration Flow, we need to externalize the Timer, so we can change it in Configuration mode:
Set a name and click Ok, if you need more information about Timer options, check this post from deepakgovardhanrao.deshpande: SAP Integration Suite – Advanced Scheduler Configuration
When the Integration Flow is complete we have Save as version and return to the package:
In the Package actions we can click on Configure:
In Timer configuration, select "Run Once" for testing, later you can schedule the execution every 10 minutes, you should consider the rate limit before to Schedule the timer, the current rate limit for Operational Reporting is: 1/second, 3/minute, 50/hour, 300/day.
In JDBC Receiver we have to enter our JDBC connection:
In HTTP Receiver we have to enter the credential for Operational Reporting, in Address we have to use our created view: https://openapi.ariba.com/api/sourcing-reporting-details/v1/prod/views/createdEventsView
In more we can enter the global parameters:
We can save and deploy.
If we want review the execution we can go to Monitor -> Integrations -> Manage Integration Content:
We have to click on Monitor Message Processing:
In the Completed flow you can review the attachments and open the ExecutionLog:
And we can see the ExecutionLog result:
In this post we show how SAP Integration Suite allow to connect to Ariba APIs, we can focus on the business logic and data validations, and SAP Integration Suite will be easy the OAuth authentication, the DB connection management, the Integration Flow configuration and deployment.
In this post we use the SAP Integration Suite as Job to download the information from SAP Ariba Sourcing, but you can also use SAP Integration as middleware between SAP ERP and SAP Ariba APIs, please explore here other tutorials: SAP Tutorials - Integration Suite.
You can review more about SAP Integration Suite in the documentation of the product here and you can review this post from gayathri.narayana to have an overview of SAP Ariba Integration: SAP Ariba Integration Approach.
If you are new using Ariba APIs or Ariba Developer Portal, please review this post from ajmaradiaga: SAP Ariba developer portal – How to create applications and consume the SAP Ariba APIs.
Before to start we will need the following information:
- API Credentials for Operational Reporting for Sourcing
- Ariba Sourcing realm information
- SAP Integration Suite account
- BTP Hana Cloud database
Architecture Design

BTP - Architecture Design
Setup - Ariba APIs
Create my own view to get last created events in the last day
I will use the View Management endpoint of Operational Reporting for Sourcing to create the new view. We can use the GET /metadata endpoint, to explore the available documents, filters and fields:
Only realm and product are mandatory, if you don't include document type it will get all available document types

Result from postman for Metadata endpoint
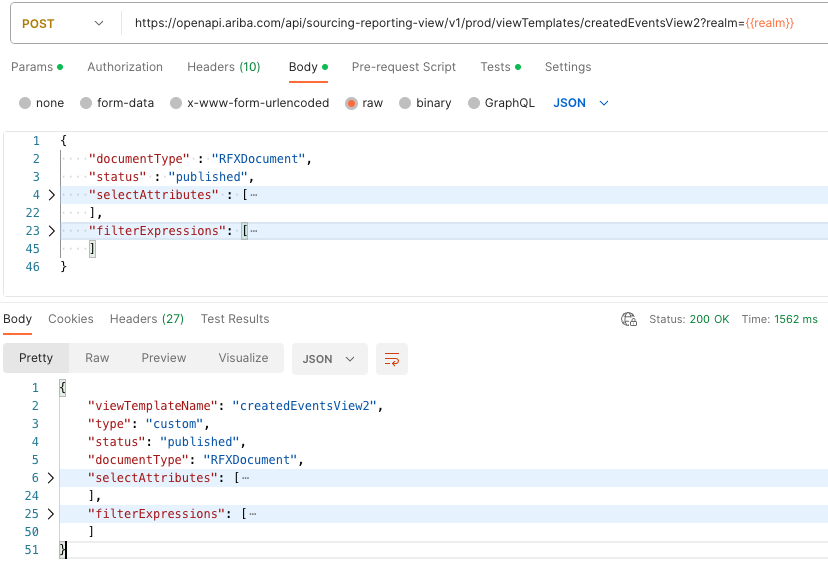
We have to use the endpoint POST /viewTemplates/{viewTemplateName} to create our view:
{

    "documentType" : "RFXDocument",

    "status" : "published",

    "selectAttributes" : [

        "EventType",

        "DocumentId",

        "LastModified",

        "TimeCreated",

        "Status",

        "InternalId",

        "Active",

        "NextVersion",

        "Description",

        "DocumentVersion",

        "EventState",

        "Title",

        "TimeUpdated",

        "IsTest",

        "Owner",

        "TemplateObject",

        "ParentWorkspace"

    ],

    "filterExpressions": [

        {

            "name" : "createdDateFrom",

            "field": "TimeCreated",

            "op": ">="

        },

        {

            "name" : "createdDateTo",

            "field": "TimeCreated",

            "op": "<="

        },

        {

            "name": "eventTypeInList",

            "field": "EventType",

            "op": "IN"

        },

        {

            "name": "nextVersionIsNull",

            "field": "NextVersion",

            "op": "IS NULL",

            "defaultValue": true

        }

    ]

}
Some notes about the filters:
- For date filters we need both from and to limit
- We can use IN for lists
- We can use default value for filters
If all is ok we should have a result like this:
Create a new view using Operational Reporting
Setup - SAP Integration Suite
Create Authentication credentials
From SAP Integration Suite home page, navigate to Monitor -> Integrations:

SAP Integration Suite - Monitor - Integrations
Open the tile Security Material:

SAP Integration Suite - Security Material
Let's create a new OAuth2 Client Credentials, we will need 1 for test realm and 1 for production realm:

Create OAuth2 Client Credentials
Now we will use OAuth credentials generated from developer.ariba.com, we need the OAuth Client Id and the OAuth Secret:

Create a new OAuth2 Client Credentials
Create Database credentials
From Monitor -> Integrations, open the tile JDBC Material:

SAP Integration Suite - JDBC Material
Now we will use our BTP Hana Cloud database, we need the host URL, user and password:

Add JDBC Data Source
SAP Integration Suite - Create a new Integration Flow
From SAP Integration Home navigate to Design -> Integrations:

SAP Integration Suite - Design - Integration
Create a new package integration:

Create a new package integration
Move to Artifacts tab and create a new Integration flow:

Create Integration Flow
Add Name and Description, and click Ok:

Integration Flow creation
Before to start with iFlow creation, let's review the design of Integration Flow:

Integration Flow - Design
We will have 3 Integration process:
- We will need a main integration process to start the flow.
- We will need 1 integration process to call the Operational Reporting API for each page in result
- We will need 1 integration process to insert the event in database for each result in page
Let's open the integration flow, change to Edit mode and remove the sender and receiver:

Remove Sender and Receiver
This will be the content for the main integration process:
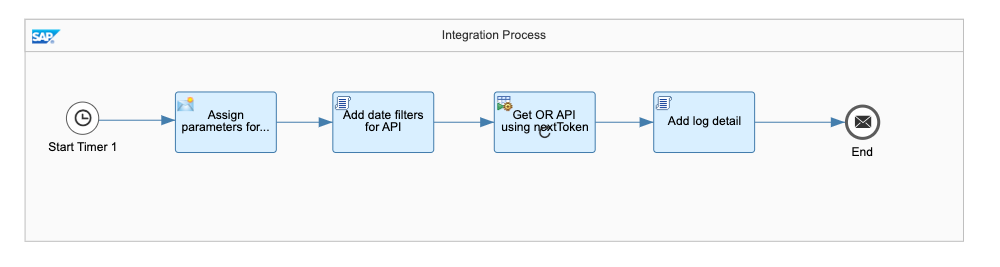
Main integration process
We will remove the classic Start and we will add a Timer, this allows to schedule the time of the execution or run once by default.
We will use the Content Modifier, to add properties to the integration flow and we can define the value as externalized parameters, this allows update only the configuration if we move our package from test to production:

Content Modifier - Properties
We will use the a Groovy Script, to add the date range and event type filters, we will define variables to control the loop and also some variables for logging:
import com.sap.gateway.ip.core.customdev.util.Message;

import java.util.HashMap;


def Message processData(Message message) {


    //Properties

    def properties = message.getProperties();


    def last_days = properties.get('EventListFromLastDays') as Integer;


    def today = new Date();

    def createdFrom = today.minus(last_days);

    def createdTo = today.next();


    allFilters = String.format("{\"createdDateFrom\":\"%s\", \"createdDateTo\":\"%s\",\"eventTypeInList\":[\"1\",\"2\"]}",

                            createdFrom.format("yyyy-MM-dd'T'HH:mm:ss'Z'"), createdTo.format("yyyy-MM-dd'T'HH:mm:ss'Z'"));

    message.setProperty('filters', URLEncoder.encode(allFilters, 'UTF-8'));


    message.setProperty("executionLog", 'Date Filters: ' + allFilters + '. ');

    message.setProperty("insertedCount", 0);


    //Call the API the 1st time and assing the token = 1

    message.setProperty("hasPageToken", '1');

    message.setProperty("firstExecution", 1);

    message.setProperty("countApiCalls", 0);


    return message;


}
We will use the Looping Process Call, to call all pages in the OR API result, when the property hasPageToken is '0' the loop ends:

Looping process for OR API Call
Finally we will use a Groovy Script to log the total of inserted events and attach the log in the execution:
import com.sap.gateway.ip.core.customdev.util.Message;

import java.util.HashMap;


def Message processData(Message message) {

    //Body

    def body = message.getBody();


    //Headers

    def headers = message.getHeaders();


    //Properties

    def properties = message.getProperties();

    def valueInsertedCount = properties.get("insertedCount");


    def executionLog = properties.get('executionLog');

    executionLog = executionLog + 'Inserted events: ' + valueInsertedCount + '. ';


    def messageLog = messageLogFactory.getMessageLog(message);

    messageLog.addAttachmentAsString('ExecutionLog', executionLog, 'text/plain');


    return message;

}
Now, let's create a new Local Integration Process and we will add these elements, this process will call every page result in the date range defined, the maximum records per page is 50. Reference: Usages of the Operational Reporting API for Strategic Sourcing.

OR API call
In the Content Modifier, we will add the apiKey for the Operational Reporting API, in header section:

apiKey for Operational Reporting
In the UpdateFilters script we have to add empty pageToken for the first execution and if the result has more 50 records it will use the new pageToken in the 2nd execution:
/* Refer the link below to learn more about the use cases of script.

https://help.sap.com/viewer/368c481cd6954bdfa5d0435479fd4eaf/Cloud/en/148851bf8192412cba1f9d2c17f4bd...


If you want to know more about the SCRIPT APIs, refer the link below

https://help.sap.com/doc/a56f52e1a58e4e2bac7f7adbf45b2e26/Cloud/en/index.html */

import com.sap.gateway.ip.core.customdev.util.Message;

import java.util.HashMap;


def Message processData(Message message) {


    //Properties

    def properties = message.getProperties();


    //get dateFilters

    def pageToken = properties.get("pageToken");


    def firstExecution = properties.get("firstExecution");

    if (firstExecution == 1) {

        pageToken = '';

        message.setProperty("pageToken", pageToken);

        message.setProperty("firstExecution", 0);

    }


    //countApiCalls

    def countApiCalls = properties.get("countApiCalls");

    countApiCalls = countApiCalls + 1;

     message.setProperty("countApiCalls", countApiCalls);


    return message;


}
We have to use HTTP Adapter between the Request Reply and Receiver:

HTTP Adapter
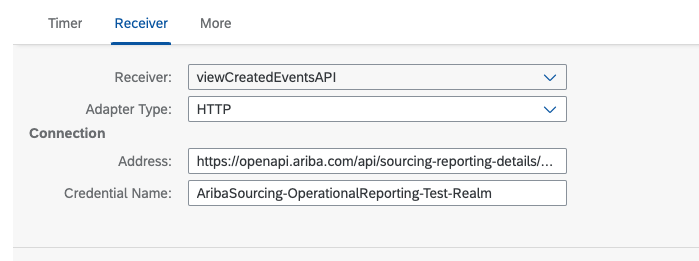
In the HTTP details we use global parameters in order to change these in configuration mode:
- Address: We will use our created view in postman, we will update the final value in configuration mode.
- Query: In realm and filters we are using the properties defined in the main process, for PageToken it will be different for each page result
- Authentication: We have to use our OAuth2 created in a previous step, but the Credential Name will be a global parameter: {{AribaSourcing-OperationalReporting-Test-Realm}}, so we change it for test and production.
- Request Headers: We have to write the apiKey.

Http Adapter details
After the API Call we will use a Groovy Script to read if the page has results and if it has a next Page:
/* Refer the link below to learn more about the use cases of script.

https://help.sap.com/viewer/368c481cd6954bdfa5d0435479fd4eaf/Cloud/en/148851bf8192412cba1f9d2c17f4bd...


If you want to know more about the SCRIPT APIs, refer the link below

https://help.sap.com/doc/a56f52e1a58e4e2bac7f7adbf45b2e26/Cloud/en/index.html */


import com.sap.gateway.ip.core.customdev.util.Message;

import java.util.HashMap;

import groovy.json.JsonSlurper;

import groovy.xml.MarkupBuilder;


def Message processData(Message message) {

    //Body

    def body = message.getBody();


    // get results

    def jsonSlurper = new JsonSlurper();

    def apiResult = jsonSlurper.parse(body);


    //Properties

    def properties = message.getProperties();

    message.setProperty("count", 0);

    message.setProperty("totalResult", apiResult.Records.size);

    message.setProperty("resultRecords", apiResult.Records);


    //validate if there are Results

     message.setProperty("hasResults", apiResult.Records.size > 0 ? '1' : '0');


    def executionLog = properties.get('executionLog');

    def pageToken = properties.get("pageToken");

    executionLog = executionLog + 'Total Results in API-Token-' + pageToken + ': ' + apiResult.Records.size + '. ';

    message.setProperty("executionLog", executionLog);


    if (apiResult.PageToken) {

        message.setProperty("pageToken", apiResult.PageToken);

    }

    else {

        message.setProperty("pageToken", '');

    }


    return message;

}
We will use the Router element to decide if we need to call a new looping process or not:

Router - Has Results
The Read Event looping process will call the last looping process, Insert Event:

Read event looping process call
The last step for this flow is update the sentinel value to continue or exit the first looping process:
/* Refer the link below to learn more about the use cases of script.

https://help.sap.com/viewer/368c481cd6954bdfa5d0435479fd4eaf/Cloud/en/148851bf8192412cba1f9d2c17f4bd...


If you want to know more about the SCRIPT APIs, refer the link below

https://help.sap.com/doc/a56f52e1a58e4e2bac7f7adbf45b2e26/Cloud/en/index.html */

import com.sap.gateway.ip.core.customdev.util.Message;

import java.util.HashMap;


def Message processData(Message message) {

    //Body

    def body = message.getBody();


    //Headers

    def headers = message.getHeaders();


     //Properties

    def properties = message.getProperties();


    //increase count

    def pageToken = properties.get("pageToken");


    if (pageToken == '') {

        //set hasPageToken to false

        message.setProperty("hasPageToken", '0');

    }

    else {

        message.setProperty("hasPageToken", '1');

    }


    return message;

}
This will be last Local Integration process:

Insert Event process
We will use the GetEventId script to write the Select statement to database, because we want to check if the record is already inserted:
/* Refer the link below to learn more about the use cases of script.

https://help.sap.com/viewer/368c481cd6954bdfa5d0435479fd4eaf/Cloud/en/148851bf8192412cba1f9d2c17f4bd...


If you want to know more about the SCRIPT APIs, refer the link below

https://help.sap.com/doc/a56f52e1a58e4e2bac7f7adbf45b2e26/Cloud/en/index.html */

import com.sap.gateway.ip.core.customdev.util.Message;

import java.util.HashMap;

import groovy.xml.MarkupBuilder;


def Message processData(Message message) {

    //Body

    def body = message.getBody();


    //Headers

    def headers = message.getHeaders();


    //Properties

    def properties = message.getProperties();

    def count = properties.get("count");

    def resultRecords = properties.get("resultRecords");

    message.setProperty("eventId", resultRecords[count].InternalId);


    //get db schema

    def db_schema = properties.get('DatabaseSchemaName');


     // create SQL statement

    def writer = new StringWriter();

    def sqlStatement = new MarkupBuilder(writer);


    sqlStatement.root {

        sqlStatement.SelectStatement {

            sqlStatement.arb_sourcing_event(action: 'SELECT') {

                sqlStatement.table(db_schema + '.ARB_SOURCING_EVENT')

                sqlStatement.access {

                    sqlStatement.INTERNAL_ID()

                }

                sqlStatement.key {

                    sqlStatement.INTERNAL_ID(resultRecords[count].InternalId)

                }

            }

        }

    };


    //set body

    message.setBody(writer.toString());


    return message;

}
We will use the Request Reply, JDBC adapter and Receiver to read our Hana database:

JDBC Adapter
We will use the Xml to JSON Converter to parse the SELECT result:

XML to JSON converter
We will use a Groovy script to check if the response has rows:
/* Refer the link below to learn more about the use cases of script.

https://help.sap.com/viewer/368c481cd6954bdfa5d0435479fd4eaf/Cloud/en/148851bf8192412cba1f9d2c17f4bd...


If you want to know more about the SCRIPT APIs, refer the link below

https://help.sap.com/doc/a56f52e1a58e4e2bac7f7adbf45b2e26/Cloud/en/index.html */

import com.sap.gateway.ip.core.customdev.util.Message;

import java.util.HashMap;

import groovy.json.JsonSlurper;


def Message processData(Message message) {

    //Body

    def body = message.getBody();


    //Headers

    def headers = message.getHeaders();


    //Properties

    def properties = message.getProperties();


    // get results

    def jsonSlurper = new JsonSlurper();

    def dbResult = jsonSlurper.parse(body);


    def hasResults = '0';


    if (dbResult && dbResult.SelectStatement_response && dbResult.SelectStatement_response.row) {

        hasResults = '1';

    }


    message.setProperty("hasResults", hasResults);


    return message;

}
We will use the Router to insert the event in database if hasResults is false:

Router - Has Result
In the PrepareInsert script we will add this code, if you need more information about the supported statements, review this: Payload and Operation
/* Refer the link below to learn more about the use cases of script.

https://help.sap.com/viewer/368c481cd6954bdfa5d0435479fd4eaf/Cloud/en/148851bf8192412cba1f9d2c17f4bd...


If you want to know more about the SCRIPT APIs, refer the link below

https://help.sap.com/doc/a56f52e1a58e4e2bac7f7adbf45b2e26/Cloud/en/index.html */

import com.sap.gateway.ip.core.customdev.util.Message;

import java.util.HashMap;

import groovy.xml.MarkupBuilder;


def Message processData(Message message) {

    //Body

    def body = message.getBody();


    //Headers

    def headers = message.getHeaders();


    //Properties

    def properties = message.getProperties();


    //incrementar contador

    def resultRecords = properties.get("resultRecords");

    def valueCount = properties.get("count");

    def rfxEvent = resultRecords[valueCount];


    //count insertion

    def valueInsertedCount = properties.get("insertedCount");

    valueInsertedCount = valueInsertedCount + 1;

    message.setProperty("insertedCount", valueInsertedCount);


     // create SQL statement

    def writer = new StringWriter();

    def sqlStatement = new MarkupBuilder(writer);


    def db_schema = properties.get('DatabaseSchemaName');


    //eventState:

    //  - PendingSelectionState -> 6

    //  - ClosedState -> 7

    //  - CancelledState -> 8

    def extensionState = 'DRAFT';

    if (rfxEvent.EventState == 6) {

        extensionState = 'READY';

    }

    else if (rfxEvent.EventState == 7) {

        extensionState = 'CLOSED';

    }

    else if (rfxEvent.EventState == 😎 {

        extensionState = 'CANCELLED';

    }


    sqlStatement.root {

        sqlStatement.InsertStatement {

            sqlStatement.arb_sourcing_event(action: 'INSERT') {

                sqlStatement.table(db_schema + '.ARB_SOURCING_EVENT')

                sqlStatement.access {

                    sqlStatement.INTERNAL_ID(rfxEvent.InternalId)

                    sqlStatement.TITLE(rfxEvent.Title)

                    sqlStatement.STATUS(rfxEvent.Status)

                    sqlStatement.EVENT_STATE(rfxEvent.EventState)

                    sqlStatement.DESCRIPTION(rfxEvent.Description)

                    sqlStatement.EVENT_TYPE(rfxEvent.EventType)

                    if (rfxEvent.DocumentId) {

                        sqlStatement.DOCUMENT_ID(rfxEvent.DocumentId.InternalId)

                    }

                    if (rfxEvent.Owner) {

                        sqlStatement.OWNER_NAME(rfxEvent.Owner.Name)

                    }

                    sqlStatement.IS_TEST(rfxEvent.IsTest)

                    sqlStatement.ACTIVE(rfxEvent.Active)

                    sqlStatement.TIME_UPDATED(rfxEvent.TimeUpdated)

                    sqlStatement.LAST_MODIFIED(rfxEvent.LastModified)

                    sqlStatement.TIME_CREATED(rfxEvent.TimeCreated)

                    sqlStatement.CREATEDAT((new Date()).format( 'yyyy-MM-dd HH:mm:ss' ))

                    sqlStatement.CREATEDBY(properties.get('ExtensionUser'))

                    sqlStatement.EXTENSION_STATE(extensionState)

                    sqlStatement.HAS_TEMPLATE_OBJECT(rfxEvent.TemplateObject != null)

                }

            }

        }

    };


    message.setBody(writer.toString());


    return message;

}
We will use again a RequestReply, Receiver and JDBC adapter to execute the INSERT statement.
Finally we will use a Groovy script to increase the count:
/* Refer the link below to learn more about the use cases of script.

https://help.sap.com/viewer/368c481cd6954bdfa5d0435479fd4eaf/Cloud/en/148851bf8192412cba1f9d2c17f4bd...


If you want to know more about the SCRIPT APIs, refer the link below

https://help.sap.com/doc/a56f52e1a58e4e2bac7f7adbf45b2e26/Cloud/en/index.html */

import com.sap.gateway.ip.core.customdev.util.Message;

import java.util.HashMap;


def Message processData(Message message) {

    //Body

    def body = message.getBody();


    //Headers

    def headers = message.getHeaders();


     //Properties

    def properties = message.getProperties();


    //incrementar contador

    valueCount = properties.get("count");

    valueCount = valueCount + 1;

    message.setProperty("count", valueCount);


    return message;

}
Before to save the Integration Flow, we need to externalize the Timer, so we can change it in Configuration mode:

Timer - Externalize
Set a name and click Ok, if you need more information about Timer options, check this post from deepakgovardhanrao.deshpande: SAP Integration Suite – Advanced Scheduler Configuration

Timer - Advanced timer
When the Integration Flow is complete we have Save as version and return to the package:

iFlow - Save as version
SAP Integration Suite - Configure and Deploy
In the Package actions we can click on Configure:

Integration Flow - Configure
In Timer configuration, select "Run Once" for testing, later you can schedule the execution every 10 minutes, you should consider the rate limit before to Schedule the timer, the current rate limit for Operational Reporting is: 1/second, 3/minute, 50/hour, 300/day.

Timer - Configuration mode
In JDBC Receiver we have to enter our JDBC connection:

DB Receiver - Configuration
In HTTP Receiver we have to enter the credential for Operational Reporting, in Address we have to use our created view: https://openapi.ariba.com/api/sourcing-reporting-details/v1/prod/views/createdEventsView
HTTP Receiver Configuration
In more we can enter the global parameters:

Global parameters
We can save and deploy.
If we want review the execution we can go to Monitor -> Integrations -> Manage Integration Content:

Manage Integration Content
We have to click on Monitor Message Processing:

Monitor Message Processing
In the Completed flow you can review the attachments and open the ExecutionLog:
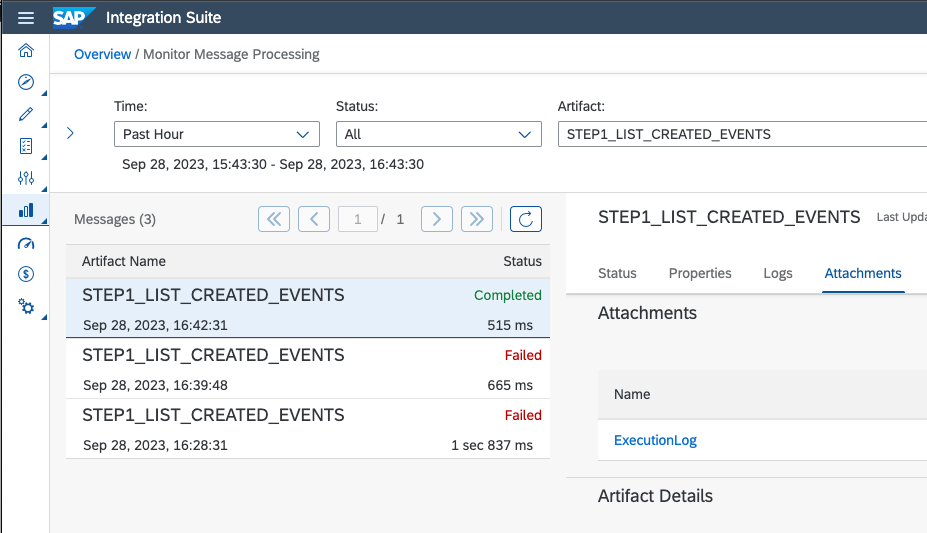
Integration Flow - Attachments
And we can see the ExecutionLog result:

Execution Log
Conclusion
In this post we show how SAP Integration Suite allow to connect to Ariba APIs, we can focus on the business logic and data validations, and SAP Integration Suite will be easy the OAuth authentication, the DB connection management, the Integration Flow configuration and deployment.
In this post we use the SAP Integration Suite as Job to download the information from SAP Ariba Sourcing, but you can also use SAP Integration as middleware between SAP ERP and SAP Ariba APIs, please explore here other tutorials: SAP Tutorials - Integration Suite.
- SAP Managed Tags:
- SAP Integration Suite,
- SAP Ariba Extensibility,
- SAP Ariba Sourcing
Labels:
1 Comment
You must be a registered user to add a comment. If you've already registered, sign in. Otherwise, register and sign in.
Labels in this area
-
Business Trends
113 -
Business Trends
13 -
Event Information
44 -
Event Information
3 -
Expert Insights
18 -
Expert Insights
25 -
Life at SAP
32 -
Product Updates
253 -
Product Updates
28 -
Technology Updates
82 -
Technology Updates
14
Related Content
- SAP Ariba 2405 Release Key Innovations Preview in Spend Management Blogs by SAP
- SAP Ariba Supplier Management 2405 Release Key Innovations Preview in Spend Management Blogs by SAP
- SAP Ariba Source to Contract 2405 Release Key Innovations in Spend Management Blogs by SAP
- SAP Ariba Integration scenarios with SAP S/4HANA Public Cloud system in Spend Management Blogs by SAP
- The Procurement Monthly - March 2024 in Spend Management Blogs by SAP
Top kudoed authors
| User | Count |
|---|---|
| 22 | |
| 1 | |
| 1 | |
| 1 | |
| 1 | |
| 1 | |
| 1 | |
| 1 |