
- SAP Community
- Products and Technology
- Human Capital Management
- HCM Blogs by SAP
- SAP SuccessFactors Employee Central Service Center...
Human Capital Management Blogs by SAP
Get insider info on SAP SuccessFactors HCM suite for core HR and payroll, time and attendance, talent management, employee experience management, and more in this SAP blog.
Turn on suggestions
Auto-suggest helps you quickly narrow down your search results by suggesting possible matches as you type.
Showing results for
Advisor
Options
- Subscribe to RSS Feed
- Mark as New
- Mark as Read
- Bookmark
- Subscribe
- Printer Friendly Page
- Report Inappropriate Content
01-16-2020
8:39 PM
Greetings
This post contains steps to implement SAP SuccessFactors Employee Central Service Center feature.
What is Employee Central Service Center?
Employee Central Service Center is a support solution that provides an interface between employees and the HR within the organization.
For Employees, It provides a faster way to get answers for all the queries for all the HR-related questions. For HR Team, they have consolidated solutions for providing answers to all the employees questions.
How does it work?
Employees can have access to a search, customize, context-sensitive knowledge base to get answers to their questions. If they can’t find the answer in the knowledge base, they can contact their HR service center directly by creating a ticket, over a phone, or sending an email.
Prerequisites
- SAP SuccessFactors Employee Central instance.
- SAP Cloud for Customer tenants
- SAP Cloud Platform account
- SAP Cloud Platform Integration account
Service Center Architecture Overview

Below are the steps to be followed to configure this feature.
Integrating SAP SuccessFactors and SAP Cloud Portal for ASK HR application
Step 1 : Configuring SuccessFactors Extensions
Generating Integration Token
Automated creation of the extension account by using the Integration Token generated from the HCP Account
Generate the Integration Token in the HCP Customer Account -> Integration Tokens -> New SAP SuccessFactors Token

A pop-up appears , Choose “Use SAP SuccessFactors Identity provider” and a warning message appears click on “Yes”.
 Integration Token gets generated as shown below

Step 2: Extension Configuration using Integration Token
Place the token in Provisioning at Extension Package Configuration and Save the settings
Login to provisioning -> Extension package configuration -> Add token -> Click on Add button

Note :
After b1908 release, Once the Integration Token is executed in Extension Configuration it auto-enables “Enable Custom Execution Module Integration” from SF provisioning.
Step 3: Verifying Web Services Permissions
SF Provisioning -> Company settings -> Web Services, Enable the 3 highlighted permissions

Note :
After b1908 release, Once the Integration Token is executed in Extension Configuration it auto fills the URL for Authorized SP Assertion Consumer Service Settings in SF Provisioning.
Step 4 : Extension Permission
Login to SF instance account and search for Manage Permissions Groups

Add the required members searching by username and click done. So now the added members will be the administrators for customer extension module (Extensions admin)
Go to Manage Permissions Roles assigned to ECSC Admin and enable the below permissions

Extension Directory
You will be able to access Extension Directory via people search, as you need to type Extensions as shown below

You need to click on link for accessing Extension Directory

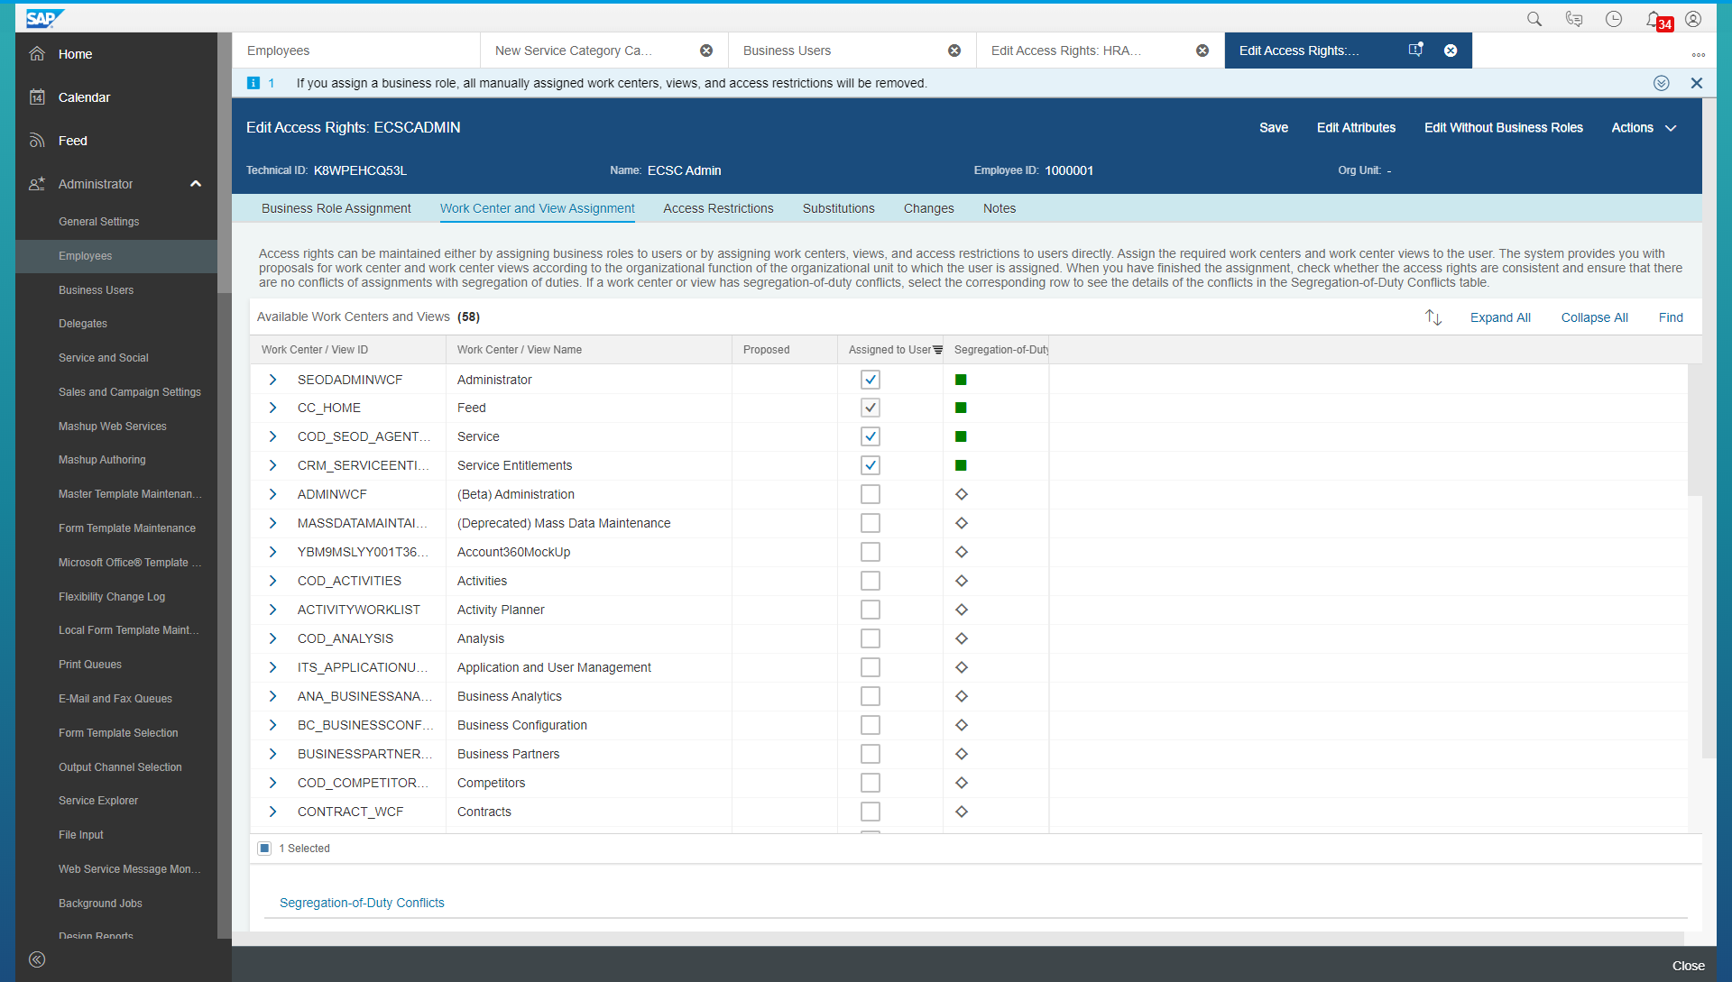
Step 5: Enable RBP permission for Admin and Employee Roles in SuccessFactors for ECSC Admin
Enable the below-mentioned permission in Manage Permission Roles for Admin role


Enable the below mentioned permission in Manage Permission Roles for Employee Role


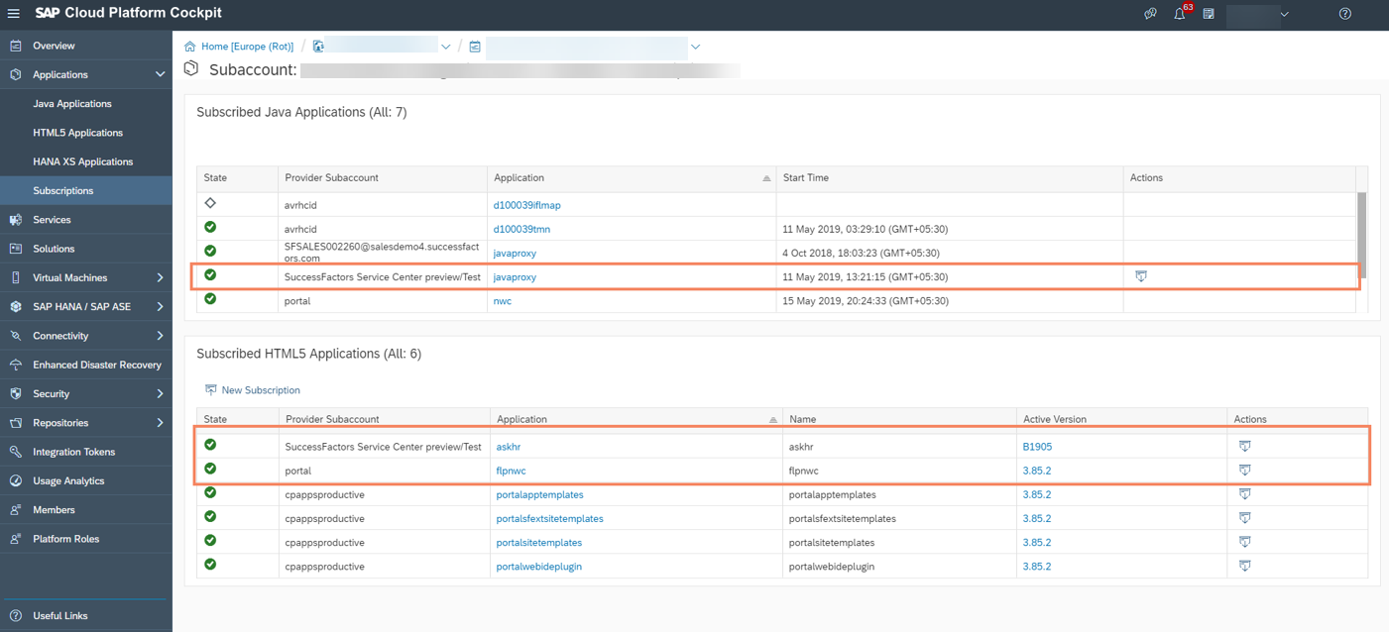
Step 6: Subscribe Ask HR HTML5 application and JAVAPROXY application
After you have established the generic extension between SCP Cloud Platform and your SAP SuccessFactors instance you need to enable the employee workspace application/ASK HR application on your onboarded SAP Cloud Platform extension sub-account.
Procedure
1.Create a ticket in the SAP Support portal ticket on component LOD-SF-EC-SRV as per details in KBA - 2591107 - How do I request Employee Central Service Center (ASK HR) Subscription
2.Our provider account contains 2 applications that are subscribed to your sub-account. One is the JAVAPROXY application that is required to ensure security compliance and the other is the Ask HR application which is the end-user interface. After you have been subscribed to the relevant applications, you can view the application in your extension sub-account.
Subscription Completed
Step 7:Activate EC Service Center/Ask HR application (via the Extension Manager)
Launch the Custom External Module on the Homepage -> Click on the Plus + icon to create an Extension -> Select SF Starter Extension template -> Create

Content Management -> Starter Page

Go to Apps -> Click on + icon -> You can create New App

New App gets creates as highlighted

Once New App is created you can select “askhr” from App Resource and enter the details accordingly.


Note :
- Ensure intent of ASK HR app is Home & show and catalog is added, before publishing.
- If you select the language 'Arabic', ensure that you have upgraded the SAPUI5 version to1.52.
- For other languages upgrade ASK HR to SAPUI5 1.71
Publish the page, Select the askhr app to navigate to the top right corner to push the Publish button.

Click on the “Publish and Open’ button


Step 7: Enable Service Center Add-On application on SF Homepage
SF Provisioning -> Company Settings -> Enable Service Center Add-on
Target URL is taken from the published AskHR template:
https://flpnwc-<Sub-account ID>.dispatcher.hana.ondemand.com/sites?siteId=00afe000-0000-0b00-0000-0cd0dfb000a0

Copy the URL and paste in provisioning

You will be able to see ASK HR hyperlink in the Homepage

Step 8:Configuring Destination in SCP
Go to destinations in your sub-account and click on import
Note :
- OpenSearch or Jam destination must be added only for the Knowledge Base feature.
- BizX_Odata, CloudForCustomer, and javaproxy are mandatory destinations.
Create destination: Bizx_Odata
Note :
After b1908 release, Once the Integration Token is executed in Extension Configuration. Local Provider Name & Signing Certificate is auto integrated to Manage OAuth2 Client Applications in SF BizX instance.
Login to SF BizX instance Admin Center -> search as Manage OAuth2 Client Applications -> Copy the API key

After the registration, the API Key is available. Provide the needed information to finalize the destination:
Client Key: API Key copied from BizX OAuth Client
Assertion Issuer: API Key copied from BizX OAuth Client

Create destination: CloudForCustomer
Kindly add C4C URL
User: C4C username
Password: C4C account password

Create destination: OpenSearch

Create destination: javaproxy
The URL needs to be taken from the Application URL’s from the subscribed javaproxy application


This is how the screen looks once all 4 destinations are added

Navigate back in your Extension account to Applications -> Subscription -> Click on askhr

Verification:
Navigate to SF instance -> Access Home Page ASK HR link and a pop-up appears as per the below screenshots

You can search Knowledge Base here

Access list of tickets

You can maintain Contact HR details

You can create an incident from Employee View

Integrating SAP Cloud for Service for ASK HR application
Step 1:Creating an employee as Business User
Navigate to Administrator -> Employees

Step 2:Create a user to be configured in SPC
Navigate to Administration -> General Settings -> Business User
Log on as an Admin user and navigate to the ‘ADMINISTRATOR’ work center
Go to section Users and click on Business Users(before to this, you should create user ECSC Admin as an employee)
Choose the Business user and assign the corresponding HR Agent role to the user.
Work Center/View ID Work Center View Name
BPM_EMPLOYEES Administrator Employees
SEOD_TICKETMD_SADL_WCVIEW Service Tickets
CRM_SERVICECATEGORIES Service Entitlements Service Categories
Step 3:Scoping
Navigate to Business Configuration Work Center -> Select Implementation Projects -> Select First Implementations -> Select Edit Project Scope (For Example : United States)

Under Scoping -> Select the below elements
Service -> Entitlement Management -> Service Level Agreements
Service -> Employee Support -> Communication Channel - Portal

Step 4:Scope Service Level Agreement
Enable “You have common service level agreements” business option

Navigate to Business Configuration -> Select Implementation Projects -> Select First Implementations -> Select Edit Project Scope-> Select Activity list

Step 4:Document types
Under Document Types -> Select Maintain Document Types

The Document Types need to be configured like this:
Document type = ‘SRRE’ Employee Support Ticket
Process Variant = Employee Support
Status Schema = Employee Support

Step 5:Ticket Status Dictionary
Select Maintain Status Dictionary Entries

The Ticket status codes are hardcoded in the application, therefore the customizing in C4C requires a very specific configuration.


Step 6:Ticket Status Schemas
Select Maintain Status Schemas

Add the below-highlighted employee support schema

Step 7:Configure Attachment Types
Navigate to Business Configuration -> Implementation Projects -> Open Activity List -> Allowed MIME Types for Document Upload

Allowed MIME Types for Document Upload
Filter for MIME Type: text/html
Activate the Basic Settings – MIME Type Check Active
Uncheck the Allowed check box
Press Save and Close

Step 8:Configure the Service Catalog
Navigate to Administration ->Service and Social Settings -> Service Categories
Click on New -> Service Category Catalog -> Under Usage, Select the ticket type as “SRRE-Employee Support” -> Maintain the Service Categories -> Add Service Category, Cause category and Object Category

Step 9:Enabling Employee Support Work Center for your Agents
Navigate to Administration -> General Settings -> Business Roles
Create Business Role for HR Agents
Assign the Work center view ‘Employee Support’ to work center ‘Service’
Assign a Business role for HR Agents to a Business User
Log on as an Admin user and navigate to the ‘ADMINISTRATOR’ work center
Go to section Users and click on Business Users(before to this, you should create HR Agent as an employee)
Choose the Business user and assign the corresponding HR Agent role to the user.
-Work Center View ID: SEOD_EMPLOYEE_SUPPORT_WCVIEW
-Work Center View ID: SEOD_TICKETMD_SADL_WCVIEW
-Work Center View ID: COD_EMPLOYEES

How to Create tickets using ASK HR app in SuccessFactors?
Login as Employee -> Click on ASK HR hyperlink in homepage -> Click on Create Ticket as below & Save

Employee view of the ticket once it’s submitted in SuccessFactors

Agent View in C4C after employee submitting the ticket in SF

Regards,
Arpitha
Labels:
61 Comments
- « Previous
-
- 1
- 2
- Next »
You must be a registered user to add a comment. If you've already registered, sign in. Otherwise, register and sign in.
Labels in this area
-
1H 2023 Product Release
3 -
2H 2023 Product Release
3 -
Business Trends
104 -
Business Trends
4 -
Cross-Products
13 -
Event Information
75 -
Event Information
9 -
Events
5 -
Expert Insights
26 -
Expert Insights
20 -
Feature Highlights
16 -
Hot Topics
20 -
Innovation Alert
8 -
Leadership Insights
4 -
Life at SAP
67 -
Life at SAP
1 -
Product Advisory
5 -
Product Updates
499 -
Product Updates
42 -
Release
6 -
Technology Updates
408 -
Technology Updates
12
Related Content
- Final Review Step in Onboarding 2.0 Process in Human Capital Management Blogs by Members
- Standard integration templates in Talent Intelligence Hub in Human Capital Management Blogs by SAP
- Country Compliance - Configure overrides for US WTPA Form fields in Human Capital Management Blogs by SAP
- AI shaping the future of HR: Is your organisation ready to embrace the change? in Human Capital Management Blogs by Members
- List of Employee Central & Employee Central Payroll Guide Updates for the 1H 2024 Release in Human Capital Management Blogs by SAP
Top kudoed authors
| User | Count |
|---|---|
| 14 | |
| 3 | |
| 2 | |
| 2 | |
| 1 | |
| 1 | |
| 1 | |
| 1 | |
| 1 | |
| 1 |