
- SAP Community
- Products and Technology
- Human Capital Management
- HCM Blogs by SAP
- Custom Tasks in Onboarding and Offboarding
Human Capital Management Blogs by SAP
Get insider info on HCM solutions for core HR and payroll, time and attendance, talent management, employee experience management, and more in this SAP blog.
Turn on suggestions
Auto-suggest helps you quickly narrow down your search results by suggesting possible matches as you type.
Showing results for
Associate
Options
- Subscribe to RSS Feed
- Mark as New
- Mark as Read
- Bookmark
- Subscribe
- Printer Friendly Page
- Report Inappropriate Content
10-24-2023
12:23 AM
What are Custom Tasks?
Until b2305, Onboarding and Offboarding programs support Out-of-box provided activities (tasks) for manager or list of participants to take action on.
Out-of-box provided tasks include:
- Write Welcome Message
- Recommend people
- Assign a buddy
- Suggest Recommended links
- Initiate KT plan
With these Out-of-box provided activities customers are limited to providing/capturing data with limited set of predefined fields that are tightly coupled with the task. They cannot extend the data objects to capture data based on business needs.
Ex: In Welcome Message task a participant of the task will be able to provide message only, they don't have have any way to attach the picture of the team members if they want.
Apart from these customers need ability to create tasks on their need basis with tracking and notification ability in case of Onboarding, Offboarding and Crossboarding.
Examples of custom tasks during Onboarding Process.
1) Access Management
- Ability for the manager / participant to provide the new hire access to specific systems
- Integration (Direct / Indirect link) to corresponding systems to provide access
- Ability to determine when such tasks get triggered (1st day for some new hires or 30th day for others)
2) Agreements and acknowledgements during joining
- Providing consent to non-disclosure agreements during joining
- NDA links can be attached to custom tasks which can be referenced by new hires
Examples of Custom tasks during Offboarding Process.
1) Exit Feedback Questionnaire
- Admin is able to configure a set of exit survey qs as part of the offboarding process
- The questionnaire is based on the offboardee's location/division/legal entity
- Ability to capture both qualitative (text) and quantitative (ratings) feedback
- Flexibility to trigger the exit survey at the right time
- 2 days before the termination date
- Right after the employee review step triggered (based on PVM)
- The survey appears as a to-do on the HP and is also accessible from the dashboard. Due dates and status must be visible
- The offboardee is able read a set of instructions and complete the survey
- The details captured as part of the survey must be accessible to the manager / HR even post the termination date
- Analytics / Reporting on the information collected from offboardees to generate insights on attrition
2) Insurance and Benefits
- As part of the offboarding process, the offboardee is required to mention if they would like to continue with the health / life insurance and other benefits post termination (e.g. COBRA). This would come at a higher premium and hence requires consent from the offboardee
- A document with the details must be generated and the offboardee is required to sign it
- A follow up workflow to enter the document and insurance details (sum assured, premium, nominees) in the benefits software
3) Post termination address
- Capture the offboardee's new address post termination. The address will be used to send W2 and other documents related to payroll
- Acknowledgement from the offboardee to store data
Configuration
Prerequisite: Before going to this step, make sure you have below permissions
- User → Onboarding or Offboarding Object Permissions → Custom Task
- User → Onboarding or Offboarding Object Permissions → Custom Task Definition
- Administrator → Metadata Framework → Configure Object Definitions
Let's take an example "Exit Feedback Questionnaire" which should be completed by an Employee before leaving the company in the form as shown below, and go through the configuration steps involved to create this task.
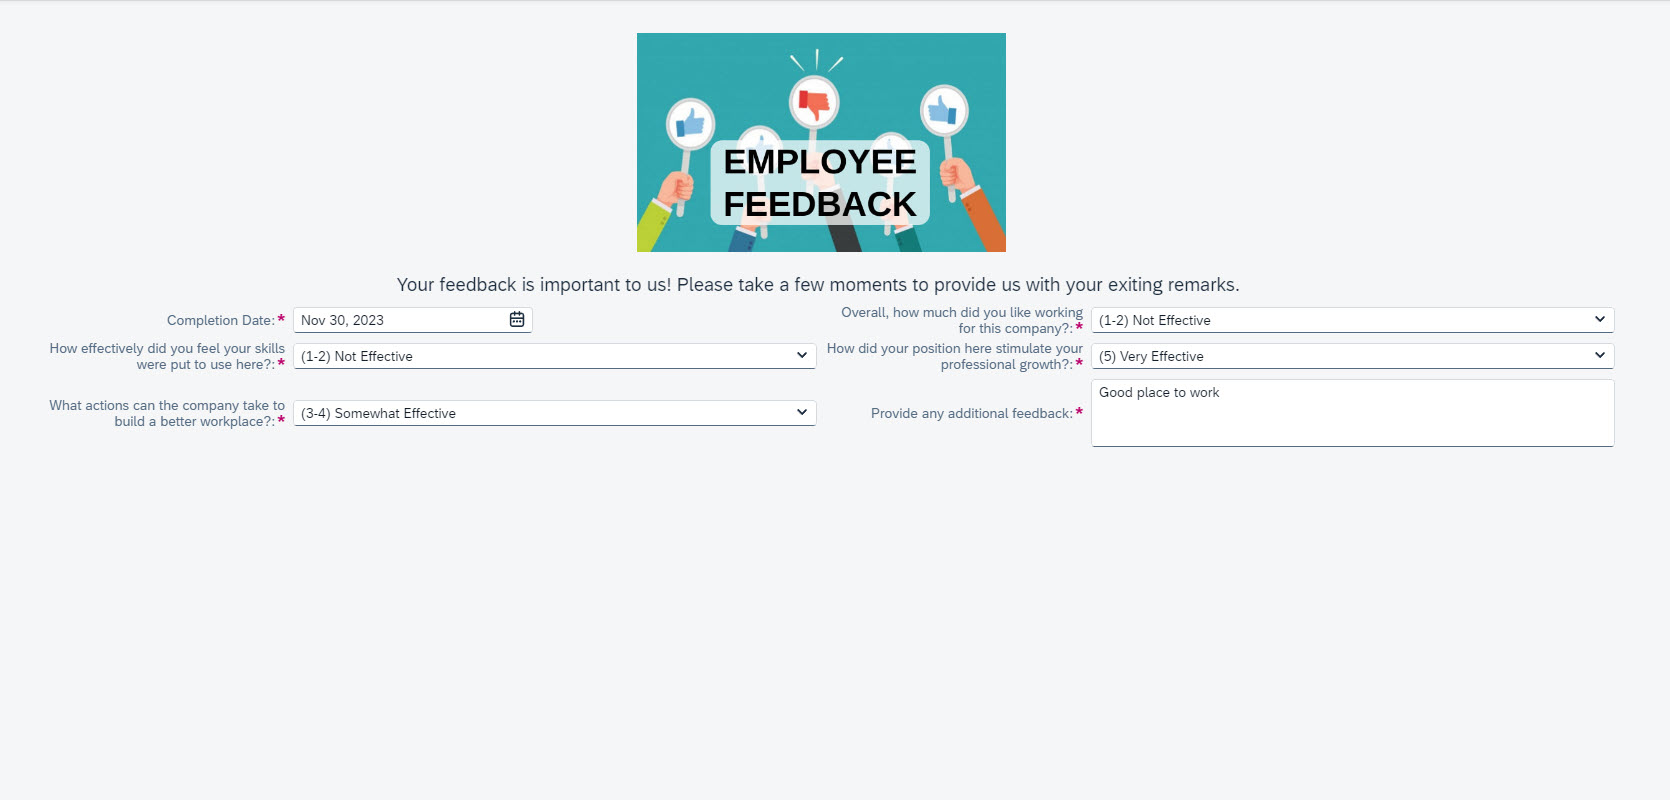
Employee Feedback Form
Step 1: Create Custom Task Definition
Creating custom task definition involves following steps.
1) Creation of Custom MDF object definition
From capturing the data, first we need to come up with detailed design of what fields should be in the form and the type of each field in the form. Once we decide the set of fields needed create a custom mdf object definition associated to it.
For Exit Feedback Questionnaire we need following fields
- Completion Date: This is a Date field
- How effectively did you feel your skills were put to use here: This is a drop down which contains (1-2) Not Effective, (3-4) Somewhat Effective, (5) Verify Effective as values to select.
- What actions can the company take to build a better workplace: This is a drop down which contains (1-2) Not Effective, (3-4) Somewhat Effective, (5) Verify Effective as values to select.
- Overall, how much did you like working for this company: This is a drop down which contains (1-2) Not Effective, (3-4) Somewhat Effective, (5) Verify Effective as values to select.
- How did your position here stimulate your professional growth: This is a drop down which contains (1-2) Not Effective, (3-4) Somewhat Effective, (5) Verify Effective as values to select.
- Provide any additional feedback: A free text box to provide input about any additional feedback needed.
1.a) Prepare Dropdown values - Create Object Definition
Before Creating the Custom MDF object definition for Exit Feedback Questionnaire, as we have few dropdown fields to capture data. We need to create MDF object and data for any of such drop down fields first. Let's create this say "cust_questionnairepicklist" object definition and data for it.
Go to Configure Object Definition and Create New Object Definition as in below screenshot.

For these objects definitions for dropdowns we really don't need to change anything from what was available by default. Just provide Code and Label as needed and Effective Dating as "None".
1.b) Prepare Dropdown values - Provide object permissions
Now that cust_questionnairepicklist object definition is created, provide permissions to it.
Go to Manage Permission Roles and provide View and Edit permissions as needed for all the permission roles needed.

Note: As this form is associated to Offboarding scenario I have provided permissions for this object to ONB Hiring manager, ONB Admin and Employee with Self permission roles.
1.c Prepare dropdown values - Create data for cust_questionnairepicklist
Go to Manage Data and Create New "cust_questionnairepicklist" as shown below.

I have created values for
- (1-2) Not Effective
- (3-4) Somewhat Effective
- (5) Verify Effective
Similar to cust_questionnairepicklist, create object definition and data for all the dropdowns for your use case.
Now that drop downs are created lets create the object definition for "Exit Feedback Questionnaire" as shown in below screenshot.

For this object definition
Provide valid Code and Label.
Effective Dating: None
Subject User Field: externalCode
Secured: Yes
Permission Category: Onboarding or Offboarding Object Permissions (can be anything)
In externalCode field, select Data Type as User and Visibility as Not Visible.
Delete externalName field.
Create all the other fields as shown in below table.
Note: Only String, Number, Boolean, Decimal, Date, DateTime, Time, Generic Object, User type fields are supported so far.
| Name | Maximum Length | Data Type | Valid Values Source | Required | Visibility | Label | Comments |
| externalCode | 100 | User | Yes | Not Visible | externalCode | Make sure external code is of type User | |
| cust_completiondate | 10 | Date | Yes | Editable | Date Of Completion | ||
| cust_question1 | 38 | Generic Object | cust_questionnairepicklist | Yes | Editable | Overall, how much did you like working for this company? | Since all these fields are dropdowns, setting them as Data Type Generic Object and Value Values Source as "cust_questionnairepiclist" |
| cust_question2 | 38 | Generic Object | cust_questionnairepicklist | Yes | Editable | How effectively did you feel your skills were put to use here? | |
| cust_question3 | 38 | Generic Object | cust_questionnairepicklist | Yes | Editable | How did your position here stimulate your professional growth? | |
| cust_question4 | 38 | Generic Object | cust_questionnairepicklist | Yes | Editable | What actions can the company take to build a better workplace? | |
| cust_question5 | 250 | String | No | Editable | Provide any additional feedback | Since its a free text area type of question. Setting length to 250 |
2) Providing permissions to the Custom MDF object
As we have created "Exiting Questionnaire" Custom MDF Object Definition, next step is to provide permissions for this object to respective permission roles based on use case and business need.
In the Security "Exiting Questionnaire" Custom MDF Object Definition I have selected Permission Category as "Onboarding and Offboarding Object Permissions".

Since this questionnaire is associated to Offboarding Process I have provided this object permission to
All Employee with Self permission role, so that offboardees can fill the information.
Onboarding Super Admin and Hiring Managers roles so that the data filled by offboardee can be seen by them.

3) Creation of Custom Task
After creating Custom MDF Object definitions, a Custom Task Definition should be created.
As an admin Go to Manage Onboarding and Offboarding Tasks -> Task Setting (Tab) -> Click on New Task under Manage Custom Tasks Section to open "Add a New Custom Task".
Select Module as Offboarding (as our Task is associated to Offboarding Process)
Custom Task Name: Exiting Questionnaire
Description: Questionnaire to be filled by Offboardee in Exit Process
Custom MDF Object: Select Exiting Questionnaire from the dropdown.

Next click on Open Template Editor to update field properties to be displayed in the form.
Initially it shows only default visible/editable fields we have added in Exiting Questionnaire Custom MDF object definition as shown here.

But we want to add a little banner with "Employee Feedback" image and some additional text. To do that click on the right most settings gear icon -> Add Element -> Select Rich Text type in the drop down. In the content section Past the image and add the additional text in the next line. Center Align all of this content so that everything is Center aligned. After all the content is provided, click on Add button to Add this Rich Text element to the form. Initially this new element may be added to the bottom of the form by default, to move it to the top simply click the three blue dots next to the element -> Move within Layout -> Position 1. By doing this we will be able to achieve the form as shown below.

Finally click on the Save button in this popup and Click Done on Edit Your Custom Task Popup also to save the custom task definition. You should get "Custom Task saved." Success Dialog.

Step 2: Assigning the Custom Task to Onboarding or Offboarding Programs
In Step 1 we have created the Custom Task Definition for Exiting Questionnaire. Next is to assign this to Onboarding or Offboarding Programs needed.
Since Exiting Questionnaire belongs to Offboarding program, we need add it to an existing Offboarding Program that we need. If there are no Offboarding Programs available create a new programs.
For that in Manage Onboarding and Offboarding Tasks page. Go To Offboarding Programs and click pencil icon next to the program to edit the program.

In my instance I have only one Offboarding Program, I will edit that program and Add a Custom Task to it.

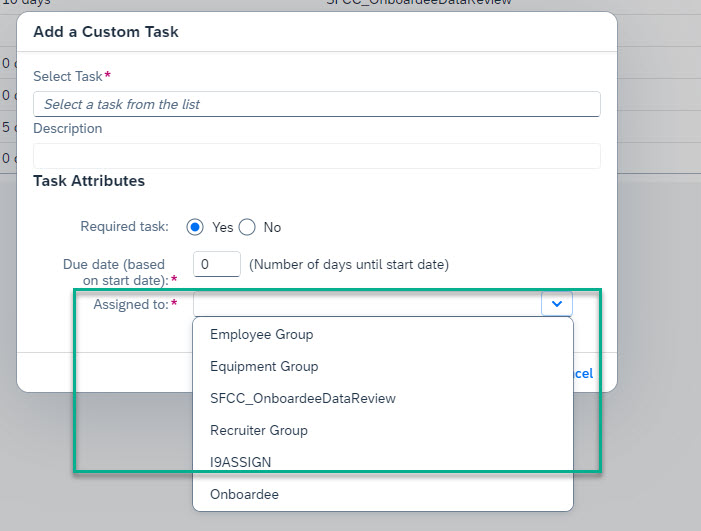
In the Add a Custom Task Popup
Select Task -> Type the name of the Custom Task definition created in Step 1 "Please give us your feedback". Description will be pre populated.
Under Task Attributes
Select Required Task "Yes". Select Yes will allow us to provide Due Date and Assigned To.
Give a positive number in Due Date.
Since this task is supposed to be filled by Offboardee, Select Offboardee from drop down so that the task will be assigned to Employee who is going through Offboarding Process.
After all the fields are filled Click Done on this popup and click Submit on main page.
Refer below screenshot for my example.

By doing these two steps Custom Task Configuration is complete.
Submitting the Custom Task During Onboarding and Offboarding Process
To take action on Custom tasks, they will be created along with New Hire Activities and Offboarding Activities.
In the Default Onboarding Process New Hire Activities (including Onboarding Custom Tasks) are created after "New Hire Data Review" step is completed by Onboardee. If there is any PVM defined New Hire Activities will be triggered based on where they are positioned.
In Offboarding Process, Offboarding Tasks (including Offboarding Custom Tasks) will be created after "Review Your Offboarding Information" step is completed by the employee.
Complete Task From Card:
In our example "Exiting Questionnaire" will be available to Employee as "My Offboarding Tasks" Card under For you Today Section on home page.
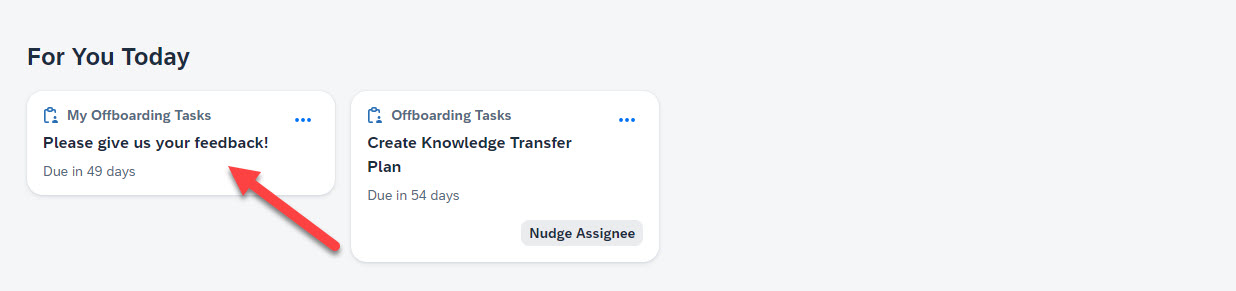
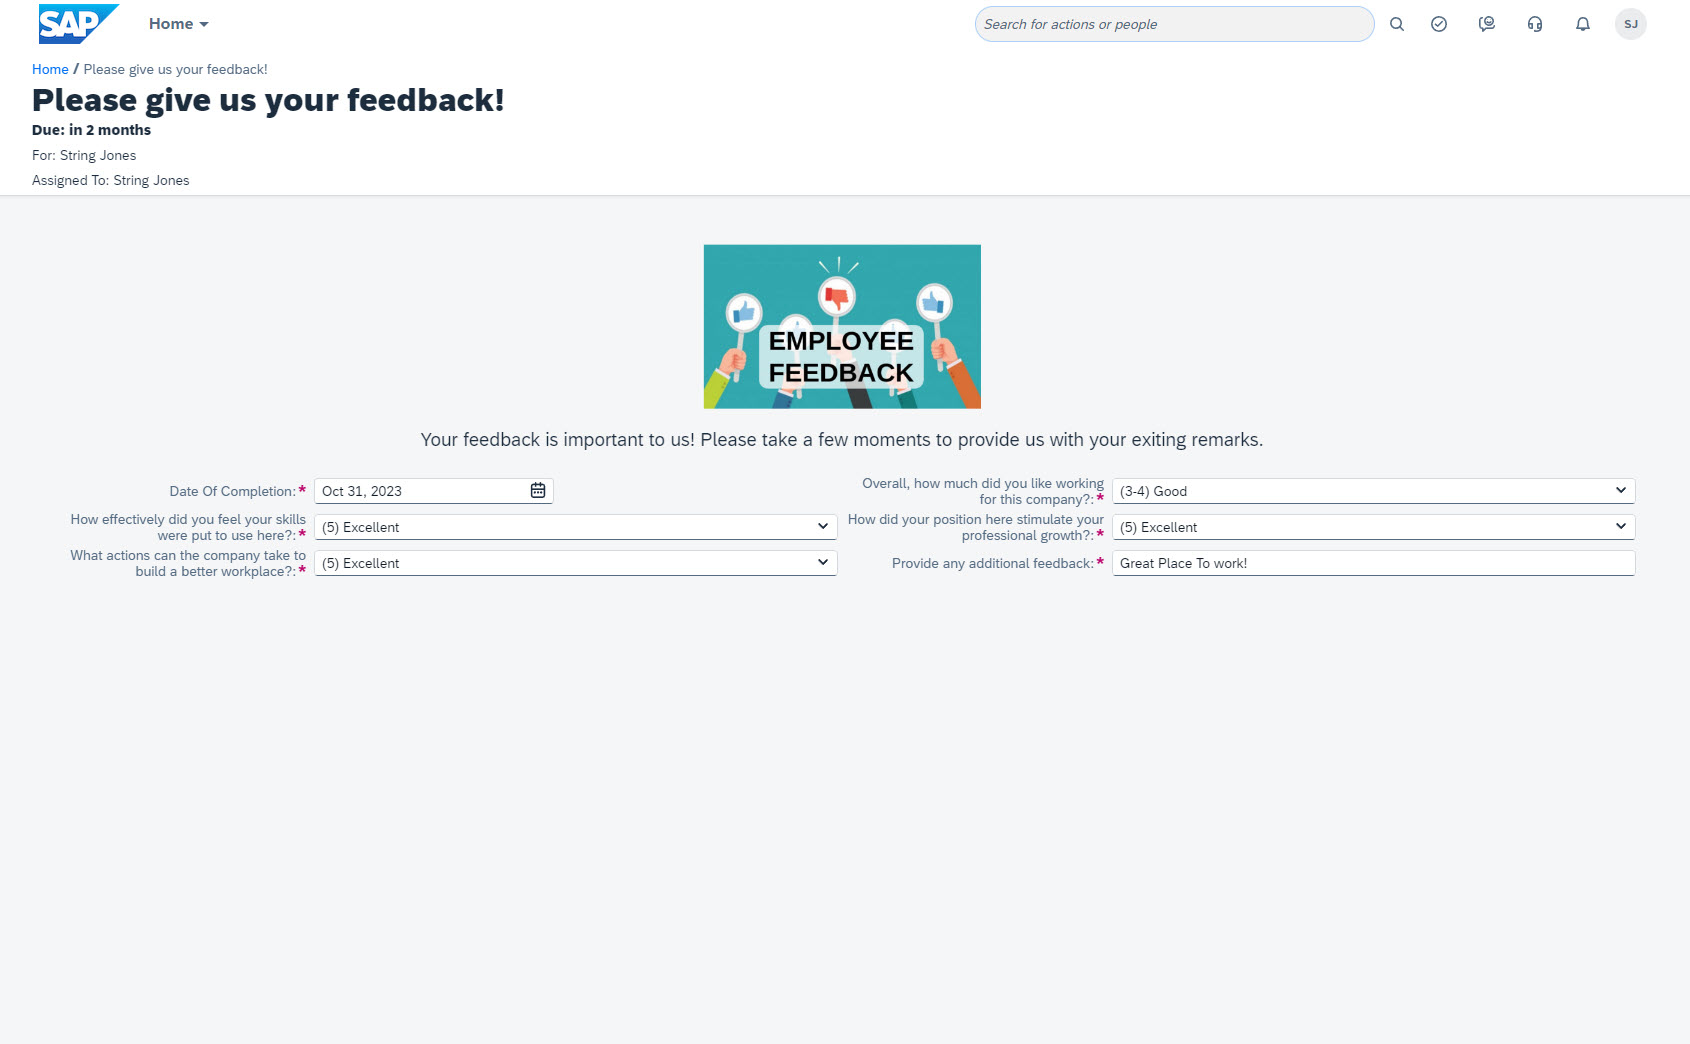
Clicking on this card will open the page to open the Exititng Questionnaire form. Fill all the details and Submit.
Complete Task From Dashboard Details Page:
Manager or Responsible participant can view/complete Custom Task from Onboarding Or Offboarding Dashboard Details page.
For Exiting Questionnaire, go to Offboarding Dashboard and Go to Offboardee details page in Question.
Click on Nudge to Nudge Offboardee reminding to complete task.
Click View Details -> Edit Task button to complete Exiting Questionnaire on behalf of Offboardee (if needed)

After completion of the task, you will get a success message and the status of the task will be marked Completed in Dashboard Details Page.
Viewing Submitting Custom Tasks
The data submitted in custom tasks can be viewed under user profile page, by configuring the custom MDF object as a Live Profile MDF Information block in Configure People Profile page. Follow this document for the same.
Following the document Exiting Questionnaire can data can be viewed under Employees profile page as shown below.

Additional Examples
So far we have discussed on how to configure and submit an Offboarding Custom Task. We will go about how to configure Onboarding Custom Task and a custom Task for Participant either in Onboarding or Offboarding Process.
Onboarding Custom Task for Onboardee
We will take "Tell us about your health benefit needs" as example for Onboarding Custom Task.
The form should like like this.

It has following fields:
- Are you planning to enroll in the benefits program provided by us? - Boolean field type
- What is your start date? - Date field type.
- What type of plan will you be enrolling in? - Drop down to show following plan types.

- # of dependents on Plan - String field type.
Prepare cust_healthplantype dropdown object definition

Note: Since this task is associated to Onboardee, the healthplantypes drop down values also should be visible for Onboardee to submit the form. To achieve this we need to create a rule as shown below screenshot and should be set as Initialize Rule for cust_healthplantype object.
Go to Configure Business Rules -> + to create new -> select Rules for MDF Based Objects.
Provide Rule Name, ID, Start Date, Base Object as cust_healthplantypes and Purpose as Initialize.

Create Data for healthplantypes values
Health Benefits Enrollment Object Definition
Fields List
| Name | Maximum Length | Data Type | Valid Values Source | Required | Visibility | Label | Comments |
| externalCode | 100 | User | Yes | Not Visible | externalCode | Make sure external code is of type User | |
| cust_Planning | 5 | Boolean | Yes | Editable | Are you planning to enroll in the benefits program provided by us? | ||
| cust_date | 10 | Date | Yes | Editable | What is your start date? | ||
| cust_typeofplan | 38 | Generic Object | cust_healthplantype | Yes | Editable | What type of plan will you be enrolling in? | |
| cust_numberofdependents | 38 | Number | No | Editable | # of dependents on plan |
Object Definition

Creation of Custom Task
Go to Manage Onboarding and Offboarding Tasks -> Task Settings -> New Task

Open Template Editor
Open Template Editor and edit it as shown below
Provide Permissions
Since this task is associated to Onboarding Process, I have provided these permissions for ONB Hiring Manager Role.
And since the task is suppose to be completed by Onboardee, OnboardingExternalUser permission role also has been provided cust_healtplantypes and Health Enrollment Objects.
Assign to Onboarding Program
Add the Health Enrollment Benefits Custom Task to existing or new Onboarding Program.
Note: As the task should be completed by Onboardee, make sure to select Onboardee in Assigned to field.

Onboardee Completes Custom Task
Onboardee gets to complete the custom task from "Your Onboarding Tasks" cards created under For You Today section.

Hiring Manager Completes From Dashboard
Hiring Manager Or Responsible Participant Nudge Or Complete the task from Dashboard

Custom Task for Manager or Responsible Participants
Onboarding or Offboarding Custom Tasks can be assigned to Hiring Manager or Participants. To do so all the configuration remains the same but while adding custom task to Onboarding or Offboarding programs page, just select Assigned To to any of the Responsible Groups thats are needed as shown below.
Manager or Responsible Participants Completes the tasks
For Managers or Responsible Participants cards for Onboarding Custom Tasks are created under "Onboarding" tab in "Manager Activities" Cards.
For Managers or Responsible Participants cards for Offboarding Custom Tasks are created under "Offboarding" tab in "Manager Activities" Cards.
- SAP Managed Tags:
- SAP SuccessFactors Onboarding
Labels:
23 Comments
You must be a registered user to add a comment. If you've already registered, sign in. Otherwise, register and sign in.
Labels in this area
-
1H 2023 Product Release
3 -
2H 2023 Product Release
3 -
Business Trends
104 -
Business Trends
4 -
Cross-Products
13 -
Event Information
75 -
Event Information
9 -
Events
5 -
Expert Insights
26 -
Expert Insights
19 -
Feature Highlights
16 -
Hot Topics
20 -
Innovation Alert
8 -
Leadership Insights
4 -
Life at SAP
67 -
Life at SAP
1 -
Product Advisory
5 -
Product Updates
499 -
Product Updates
40 -
Release
6 -
Technology Updates
408 -
Technology Updates
10
Related Content
- Final Review Step in Onboarding 2.0 Process in Human Capital Management Blogs by Members
- Explore the Enhanced New Hire Experience in SAP SuccessFactors Onboarding in Human Capital Management Blogs by SAP
- First Half 2024 Release: What’s New in SAP SuccessFactors HCM in Human Capital Management Blogs by SAP
- Global filter definition for Country Compliance WTPA forms in Human Capital Management Blogs by SAP
- Onboarding 2.0 - How do I trigger an email when a custom task has been completed? in Human Capital Management Q&A
Top kudoed authors
| User | Count |
|---|---|
| 13 | |
| 3 | |
| 3 | |
| 2 | |
| 2 | |
| 2 | |
| 2 | |
| 2 | |
| 2 | |
| 1 |