
- SAP Community
- Products and Technology
- Financial Management
- Financial Management Blogs by SAP
- Building a New No-Code App for SAP TRM/PSCD with S...
Financial Management Blogs by SAP
Get financial management insights from blog posts by SAP experts. Find and share tips on how to increase efficiency, reduce risk, and optimize working capital.
Turn on suggestions
Auto-suggest helps you quickly narrow down your search results by suggesting possible matches as you type.
Showing results for
Product and Topic Expert
Options
- Subscribe to RSS Feed
- Mark as New
- Mark as Read
- Bookmark
- Subscribe
- Printer Friendly Page
- Report Inappropriate Content
08-29-2023
10:19 AM
This is part 2 of the blog series "Building a New No-Code App for SAP TRM/PSCD with SAP Build Apps". You can find part 1 here.
At the end of part 1, we successfully displayed the business partners linked to our user.
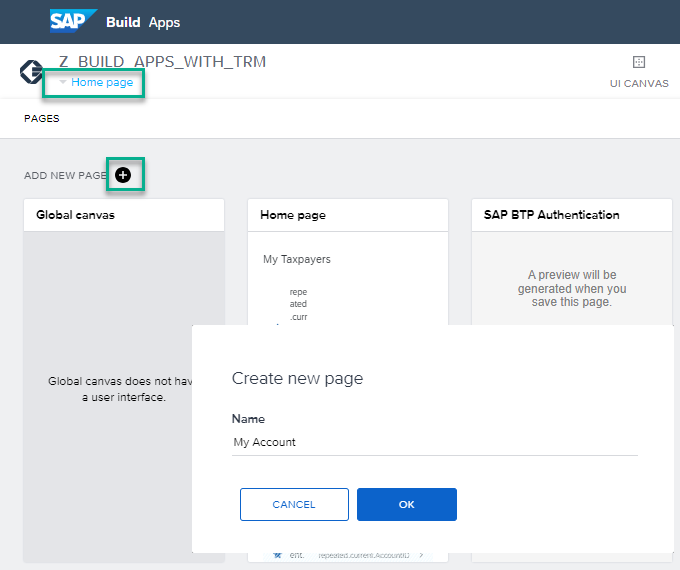
Let's now create a second page and list some information about the business partner selected on the first page.
Currently, the newly-created page is not 'connected' to the first page, it does not know which business partner has been selected on the first page.
We need to
Let's tell Page 2 to expect a business partner to be provided by page 1
Let now tell Page 1 to share the selected business partner number with Page 2
You can try your app as explained in Part 1 and check that the navigation from Page 1 to Page 2 works properly.
First, let's create a data variable for the record of the AccountID
You can see that the logic has automatically been generated in the Logic Canvas of the Data Variable "Account".
Let's now display the Full Name of the taxpayer on Page 2.
You should now get the full name of the taxpayer displayed in the app
Let's now display the account balance of the taxpayer on Page 2.
Then
Now
You can use the formula below to format the amount and add the currency
Let's now fetch and display the list of contract accounts assigned to the business partner.
First, let's add two fields, one title "Contract Accounts" and one item list, by drag and drop. Page 2 now looks like the one below.
Now
Now let's use the Expand feature of the "Accounts" OData service to set the content of the "ContractAccounts" data variable.
Note: The formula may be highlighted in red as if there was an error, but that is not the case. You can find further information in this blog post of my colleague Daniel Wroblewski.
Now let's display the contract accounts in our item list.
The App now displays the list of contract accounts.
With these basic navigation and logic hints it's then possible to leverage several CRUD capabilities of the OData services of SAP MCF.
Note that, with a bit of experience with SAP Build Apps and the right technical setup, you can have this simple app built in less than one hour.
You can find below the recording of an App where more TRM/PSCD features are shown.
At the end of part 1, we successfully displayed the business partners linked to our user.
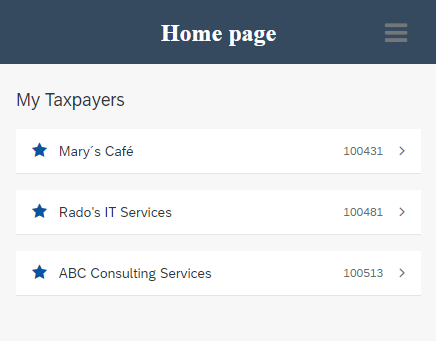
List of taxpayers linked to my SAP user
Step 1 - Creating a New Page
Let's now create a second page and list some information about the business partner selected on the first page.
- Click on the name of the page "Home Page"
- Click on "Add new page"
- Enter the name of the new page "My Account"
- Click OK
- Save your work
Creating the new page My Contract Accounts
Currently, the newly-created page is not 'connected' to the first page, it does not know which business partner has been selected on the first page.
We need to
- Tell page 2 to expect a parameter to be provided by the first page, i.e. the selected business partner
- Tell page 1 to provide page 2 with the selected business partner
Let's tell Page 2 to expect a business partner to be provided by page 1
- Switch from the “View” to the “Variables” display on Page 2
- Click on "Page Parameters"
- Click on “Add Parameter”
- Rename your Data Variable from “Parameter1” to “AccountID”
- Save

Adding a page parameter for the AccountID on Page 2
Let now tell Page 1 to share the selected business partner number with Page 2
- Go to Page 1 (Homepage) in "View" mode
- Select the first item of the repeated list
- Click on the "Add Logic" to "Icon List Item 1" at the bottom right of your screen (a panel opens)
- Select the "Open Page" component in the Logic Canvas (right side of the panel) and drop it in the panel
- Connect the Event "Component tap" with the Navigation component "Open Page"
- Click on the "Open Page" component
- Edit the binding for "Open Page" to "My Account"
- Edit the binding for "Page ID" to the formula "repeated.current.AccountID"
- Save

Providing the selected business partner to Page 2
You can try your app as explained in Part 1 and check that the navigation from Page 1 to Page 2 works properly.
Step 2 - Fetching simple data (Full name and Account Balance)
First, let's create a data variable for the record of the AccountID
- Go to Page 2 (My Account)
- Switch from the “View” to the “Variables” display
- Click on "Data Variables"
- Click on “Add Data Variable” and select “Accounts”
- Rename your Data Variable from “Accounts1” to “Account”
- Set the Data variable type to "Single Data Record"
- Bound the AccountId value with the page parameter "AccountID" that you have defined as a page parameter in Step 1
- Save
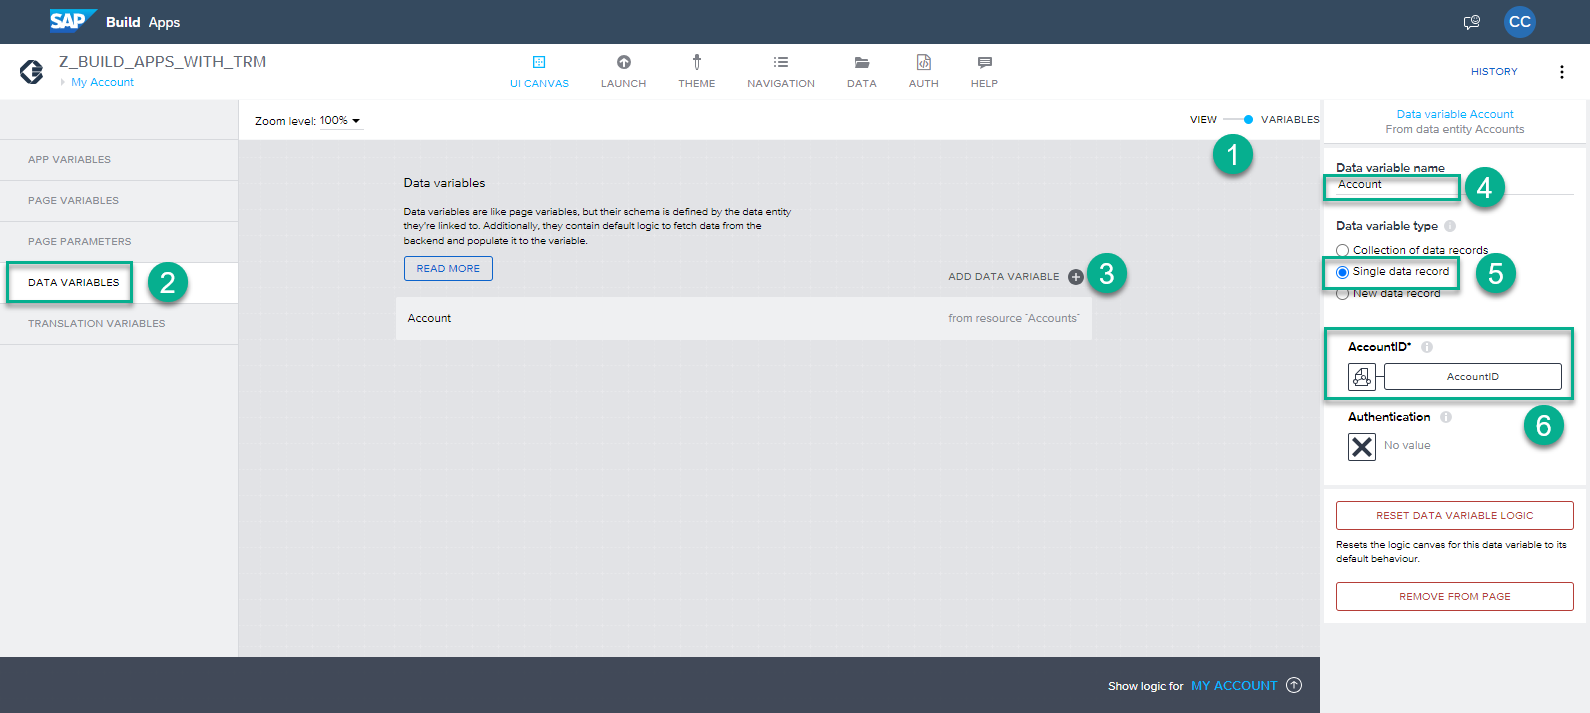
Defining the Single Data Record for the AccountID
You can see that the logic has automatically been generated in the Logic Canvas of the Data Variable "Account".

Logic is generated in the canvas of the Data Variable
Let's now display the Full Name of the taxpayer on Page 2.
- Rename the "Lorem ipsum dolor sit amet, consetetur sadipscing elitr." Text to "Full Name".
- Click on the button "ABC" in the Text Content
- Select "Data and Variables"
- Select "Data Variable"
- Select "Full Name" in the dropdown list of data variable "Account"
- Save
You should now get the full name of the taxpayer displayed in the app

The Full Name of the Taxpayer is displayed in the app
Let's now display the account balance of the taxpayer on Page 2.
- First, you need to add the integration with the OData service "AccountBalances" in the Data section of your app (see Part 1 of this blog, where we added the OData service "Accounts").
Then
- Go to Page 2 (My Account)
- Switch from the “View” to the “Variables” display
- Click on "Data Variables"
- Click on “Add Data Variable” and select “AccountBalances”
- Rename your Data Variable from “AccountBalances1” to “AccountBalance”
- Set the Data variable type to "Single Data Record"
- Bound the AccountId value with the page parameter "AccountID" that you have defined as a page parameter in Step 1

Defining the Data Variable for the AccountBalance
Now
- Switch from the “Variables” to the “View” display
- Drag and drop a Title field and a Text field
- Rename the Title field to "Account Balance"
- Set the Text field to display the account balance of the taxpayer (Data Variable - AccountBalance - Current Balance)

The Account Balance of the Taxpayer is displayed in the app
You can use the formula below to format the amount and add the currency
FORMAT_LOCALIZED_DECIMAL(NUMBER(data.AccountBalance.CurrentBalance), "fr", 2) + " " + data.AccountBalance.Currency
The Current Account Balance is now formatted properly
Step 3 - Fetching a set of records with the Expand feature
Let's now fetch and display the list of contract accounts assigned to the business partner.
First, let's add two fields, one title "Contract Accounts" and one item list, by drag and drop. Page 2 now looks like the one below.

Preparing the layout of Page 2 to display the contract accounts
The objective is now to define the data variable structure "ContractAccounts", based on the resource "ContractAccounts" AND have the content provided by the "Accounts" OData Service with the Expand feature "ContractAccounts"!
- As a prerequisite, you need to add the integration with the OData service "ContractAccounts" in the Data section of your app (see Part 1 of this blog, we did it for the OData service "Accounts").

Enabling Data Entity ContractAccounts
Now
- Go to Page 2 (My Account)
- Switch from the “View” to the “Variables” display
- Click on "Data Variables"
- Click on “Add Data Variable” and select “ContractAccounts”
- Rename your Data Variable from “ContractAccounts1” to “ContractAccounts”
- Set the Data variable type to "Collection of Data Records"
- Open the logic canvas of the data variable "Contract Account" and delete the defaulted logic

Creating Data Variable for ContractAccounts and Deleting Logic
Now let's use the Expand feature of the "Accounts" OData service to set the content of the "ContractAccounts" data variable.
- Go to Page 2 (My Account)
- Switch from the “View” to the “Variables” display
- Click on "Data Variables"
- Select the data variable “Account”
- Open the logic canvas
- Drag and Drop a "Set data variable" element

Setting the Logic of the AccountBalance in the Canvas
- Click on the newly added "Set Data Variable" and go to the "Properties" tab
- Set the Data Variable Name to "ContractAccounts"
- Set the formula below to have the contract accounts fetched by the Expand feature of the OData service "Accounts"
- Save
outputs["Get record"].record.ContractAccounts.results
Fetching the Contract Accounts and Storing Them in the Data Variable
Note: The formula may be highlighted in red as if there was an error, but that is not the case. You can find further information in this blog post of my colleague Daniel Wroblewski.
Now let's display the contract accounts in our item list.
- Switch from the “Variables” to the “View” display
- Select the item list component
- Set the "Repeat with" parameter to "ContractAccounts"
- Set the Primary label to the formula "repeated.current.Description"
- Set the Secondary label to the formula "repeated.current.AccountID"

Setting the Primary and Secondary labels
The App now displays the list of contract accounts.

The list of contract accounts with description and reference are displayed
With these basic navigation and logic hints it's then possible to leverage several CRUD capabilities of the OData services of SAP MCF.
Note that, with a bit of experience with SAP Build Apps and the right technical setup, you can have this simple app built in less than one hour.
You can find below the recording of an App where more TRM/PSCD features are shown.
Labels:
You must be a registered user to add a comment. If you've already registered, sign in. Otherwise, register and sign in.
Labels in this area
-
Business Trends
145 -
Business Trends
15 -
Event Information
35 -
Event Information
9 -
Expert Insights
8 -
Expert Insights
29 -
Life at SAP
48 -
Product Updates
521 -
Product Updates
63 -
Technology Updates
196 -
Technology Updates
11
Related Content
- SAP Sustainability for Financial Services - Portfolio and Solutions in Financial Management Blogs by SAP
- Field Status Variant & Field Status Group in Financial Management Blogs by Members
- Get peace of mind for evolving compliance requirements with SAP advanced compliance automation in Financial Management Blogs by SAP
- CLM in SAP S/4HANA Public Cloud in Financial Management Blogs by Members
- Update from SAP FC 10.1 SP09 Patch08 (Build 2121) to SAP FC10.1 SP09 Patch22 (Built 3096) in Financial Management Q&A
Top kudoed authors
| User | Count |
|---|---|
| 3 | |
| 2 | |
| 2 | |
| 2 | |
| 1 | |
| 1 | |
| 1 | |
| 1 | |
| 1 | |
| 1 |