
- SAP Community
- Products and Technology
- Enterprise Resource Planning
- ERP Blogs by SAP
- Part VIII: Custom Business Object exposure as Exte...
Enterprise Resource Planning Blogs by SAP
Get insights and updates about cloud ERP and RISE with SAP, SAP S/4HANA and SAP S/4HANA Cloud, and more enterprise management capabilities with SAP blog posts.
Turn on suggestions
Auto-suggest helps you quickly narrow down your search results by suggesting possible matches as you type.
Showing results for
Advisor
Options
- Subscribe to RSS Feed
- Mark as New
- Mark as Read
- Bookmark
- Subscribe
- Printer Friendly Page
- Report Inappropriate Content
05-17-2017
10:20 AM
Summary: Regarding Bonus Plan, so far we created its custom business object with a data structure, logic for data initialization and checks and an application UI.
Task: Expose the custom business object as web service for integration of your solution with other systems.
Example: All Bonus Plan data shall be exported to an Excel file.
A communication scenario is the basis definition for a communication between systems. It defines a solution to be made available for external systems.
1. Open Custom Communication Scenario Application

2. Start creating a new scenario by executing the "New" action.

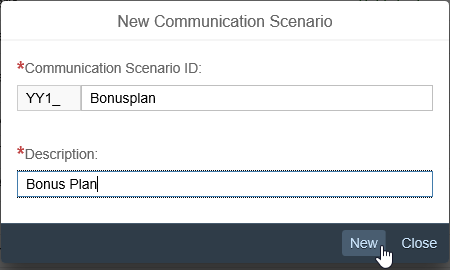
3. Give following data to the new custom communication scenario ...
... and create the scenario by executing the "New" action
4. Start adding an inbound communication service by executing the "Add" action

5. Choose service YY1_BONUSPLAN_CDS and execute the "OK" action.

Background: That service had been created during Custom Business Object "Bonus Plan" publishing as in its definition the OData Service Generation flag was set for UI creation already.

6. Publish the Custom Communication Scenario.
We'll create one Communication System for all systems that want to use our service as well as the user that they'll have to use.
1. Open "Communication Systems" Application
2. Start creating a new system by executing the "New" action.
3. Give following data to the new custom communication scenario ...

... and create the system by executing the "Create" action.
4. In the Opening Details view, fill the Host Name with "External System" as well.
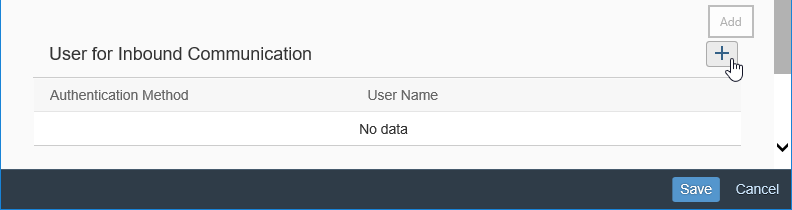
5. Scroll down to "User for Inbound Communication" and start adding one by executing the "Add" action.
6. In the opening Pop Up, start creating a new User by executing the "New User" action.

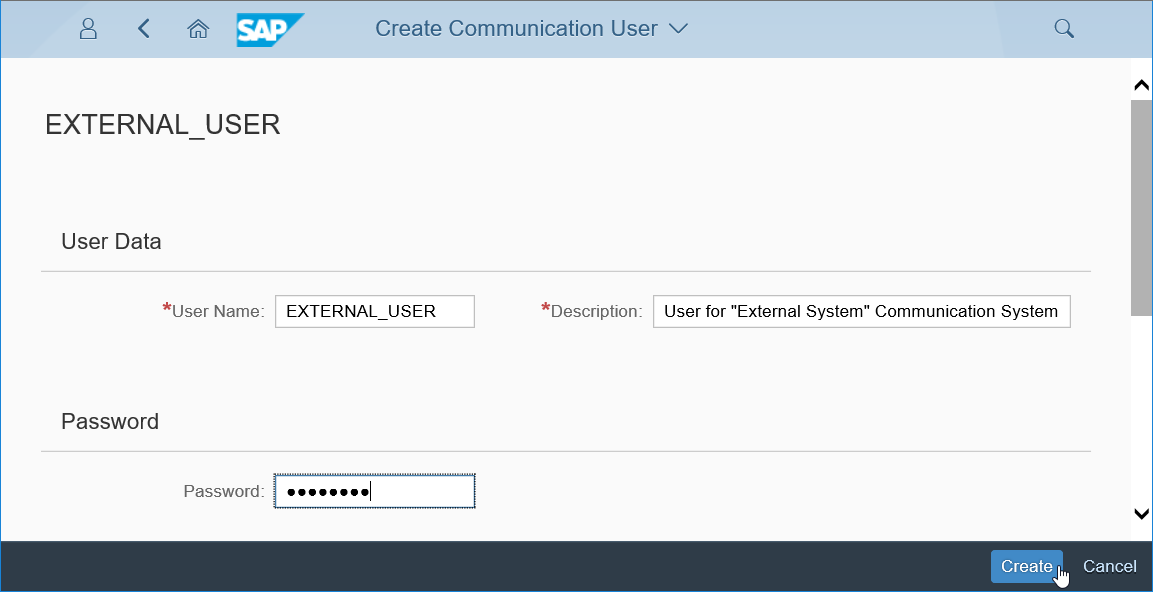
7. This will lead to an automatic switch to the "Create Communication User" application, where you enter User Name "EXTERNAL_USER", Description "User for "External System" Communication System" and a password before you execute the "Create" action.
8. This will switch you back to the Pop Up, where the User Name is filled now and you can confirm to add the Inbound Communication User with action "OK".
The just created user will be needed by callers to make use of the services.
9. Back in the Communication System details you finish its creation with action "Save".
Finally, a communication arrangement links the solution's scenario with the Communication system and its user and exposes the Service to be used.
1. Open "Communication Arrangements" Application
2. Start creation by executing the "New" action.

3. A pop up opens in that you use the value help for Scenario first.
4. Select the YY1_BONUSPLAN Scenario.

5. This will set the Scenario and default the Arrangement Name, so that you can continue the creation via "Create" action.

6. In the opening Arrangement details you only need to set the "Communication System" to "EXTERNAL_SYSTEM", which will automatically set the related User Name "EXTERNAL_USER" as well.
Execute "Save" to finish creation.

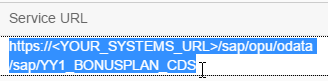
7. Copy the Service URL for the next step
POSTMAN application is there to test Web services by sending requests and receiving responses.
All included postman screenshots are reprinted with permission © Postdot Technologies Inc. All rights reserved.
The general testing is done with the standalone postman application. All screenshots of postman application are reprinted with permission of © Postdot Technologies Inc. All rights reserved.
1. Start the POSTMAN application
2. Ensure that you have disabled "SSL certificate verification" (File > Settings > General)
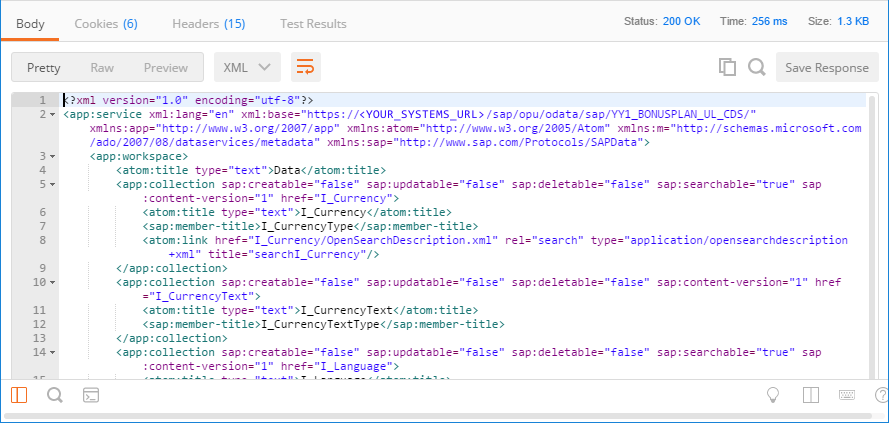
3. Enter the Service URL and execute "Send" action.

You will get a Login Error as response in the response section, but this already shows that the system as such is reachable.

4. Change authorization type to "Basic Auth" now, enter Username "external_user" and the Password that you set in point 7 of Step 2

4. Send the service request again.
5. Now you will get a successful response of the service
6. This way you can test, if the service is working in general.
Whenever you want to do a change to the Custom Business Object's persistence, for security reasons you need to send a X-CSRF-Token with that change request. To get such a Token you have to send a get request first, which fetches one.
1. Enter the basic service request URL of Bonus Plans
2. Ensure to be on "Headers" tab.
3. Enter the new header key "X-CSRF-Token" with value "fetch"
4. Send the request.
5. Copy the returned X-CSRF-Token to clipboard.
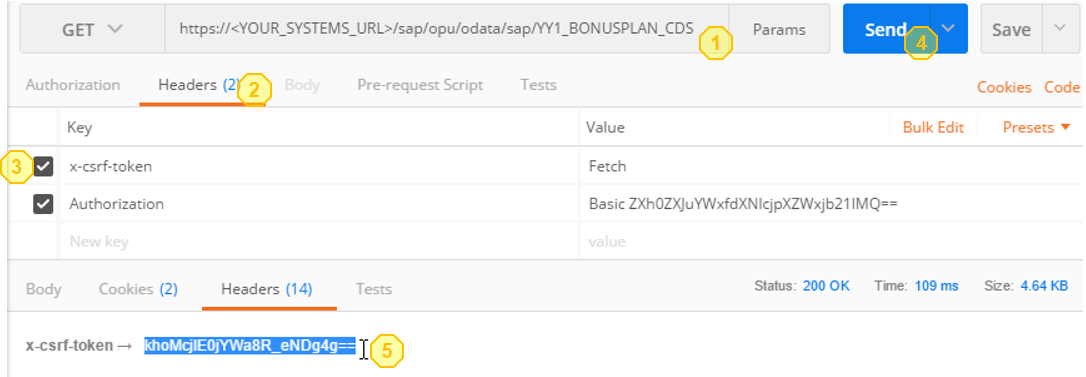
The gotten token will be valid for 30 minutes and fetching a token will return the same as long as validity has not ended yet.
To create a new bonus plan via the service, do the following in postman.
1. Change the request method to "Post"
2. As the basic service URL returns only the overview of all reachable Entity Sets (= Collections), you have to narrow it down for Bonus Plans by appending their Entity Set name "/YY1_BONUSPLAN"
3. Paste the before gotten X-CSRF-Token as value to the corresponding header key
4. Add new header key "Accept" with value "application/json", this will ensure that the response will be gotten in JSON format, which is easier to work with than XML.

5. Switch to the Body tab
6. Set the body type to "raw"
7. Now you additionally set the editor type "JSON", which will enable correct syntax highlighting and header key for Content-Type
8. Enter the initial data for the to be created bonus plan in JSON format to the editor
EmployeeID <any> should in best case be the user ID of a sales person that created sales orders with a Net Amount of more than 3000.00 EUR in 2016 and that are completed.
For testing purpose regarding creation of an instance only a valid string is needed, but of course a bonus calculation later would fail with this inexistent user.
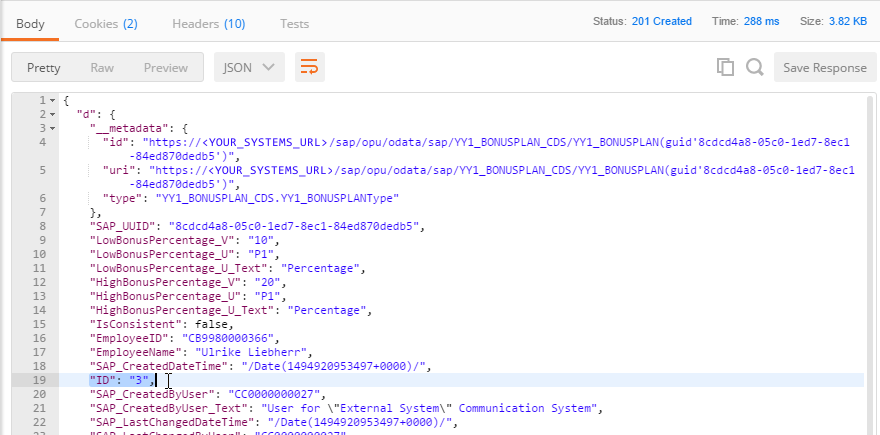
9. Send the request.

The response will show the new instance's data. From the ID you can see, that it's a new one and that the logic to fill data automatically also worked successfully.
To update an instance, you have to use the internal SAP_UUID as technical key. To get this unique key, do the following steps
1. Switch the request method to "GET" and enter the request URL for bonus plan entities with the parameters
The request will look like "https://<YOUR_SYSTEMS_URL>/sap/opu/odata/sap/YY1_BONUSPLAN_CDS/YY1_BONUSPLAN?$filter=ID eq '3'&$select=SAP_UUID"
2. Send the request.
3. Copy SAP_UUID to clipboard.

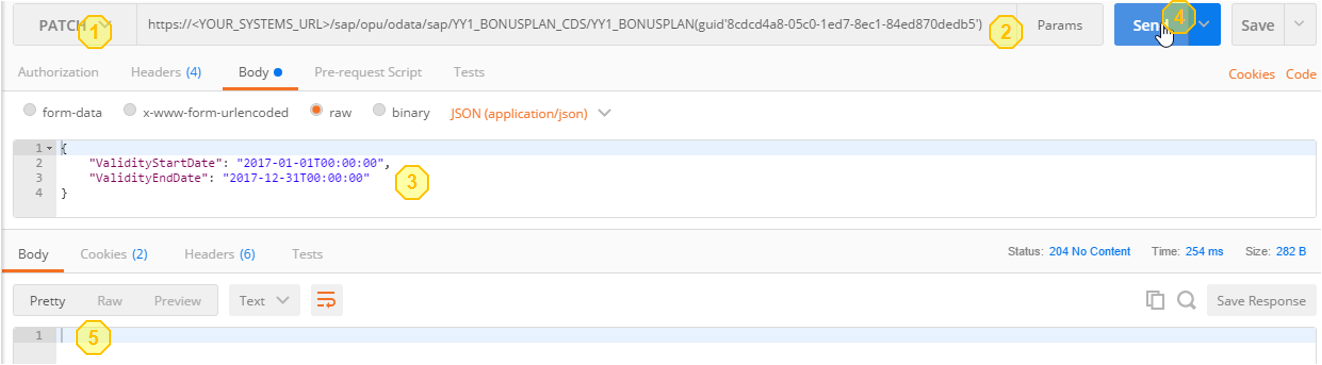
1. Switch the request method to "PATCH".
2. Enter the request URL for a bonus plan entity and add the before gotten guid to its end following this syntax "(guid'<guid_value>')", for example */YY1_BONUSPLAN(guid'8cdcd4a8-05c0-1ed7-8ec1-84ed870dedb5')
3. Enter following JSON to the body
4. Send the request
5. You will see that the update worked as you do get an empty body as response.
1. Open Microsoft Excel with a new "Book" (= excel file)
2. Go to "Data" tab > "New Query" > "From Other Sources" > "From OData Feed"

3. A pop up opens in that you enter the service URL and execute "OK".

4. In the next Pop Up for Access to the Service (= OData feed) switch on the left side from "Anonymous" to "Basic", then enter Username "dummy" and its Password on the right side, before executing the "Connect" action.
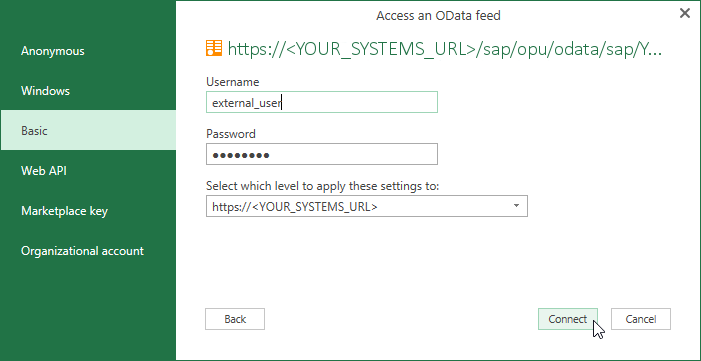
5. In the next screen select the item YY1_BONUSPLAN and execute "Load".

As result the excel workbook will be filled with the current Bonus Plan entities' data.

How to consume the service from SAP Cloud Platform is explained in the Blog https://blogs.sap.com/2016/10/19/s4hana-extensibility-connect-sap-s4hana-cloud-sap-hana-cloud-platfo... as third and last step "Use the Service in HCP".
SAP S/4HANA Extensibility Tutorial
Task: Expose the custom business object as web service for integration of your solution with other systems.
Example: All Bonus Plan data shall be exported to an Excel file.
Prerequisites
- Having completed at least all parts up to and including Part II: Custom Business Object – Logic (Bonus Plan) of this tutorial series
- To be able to use the Communication Management Applications, your user needs Business Catalog SAP_CORE_BC_COM
- Having some REST client (we make use of standalone POSTMAN application from https://www.getpostman.com with disabled "SSL certificate verification"
All Postman Screenshots are reprinted with permission of © Postdot Technologies Inc. All rights reserved.) - Having Microsoft Excel installed.
Step 1: Creating a Custom Communication Scenario
A communication scenario is the basis definition for a communication between systems. It defines a solution to be made available for external systems.
1. Open Custom Communication Scenario Application
2. Start creating a new scenario by executing the "New" action.
3. Give following data to the new custom communication scenario ...
| Field Caption | Field Value |
| ID | YY1_Bonusplan |
| Description | Bonus Plan |
... and create the scenario by executing the "New" action
4. Start adding an inbound communication service by executing the "Add" action
5. Choose service YY1_BONUSPLAN_CDS and execute the "OK" action.
Background: That service had been created during Custom Business Object "Bonus Plan" publishing as in its definition the OData Service Generation flag was set for UI creation already.
6. Publish the Custom Communication Scenario.
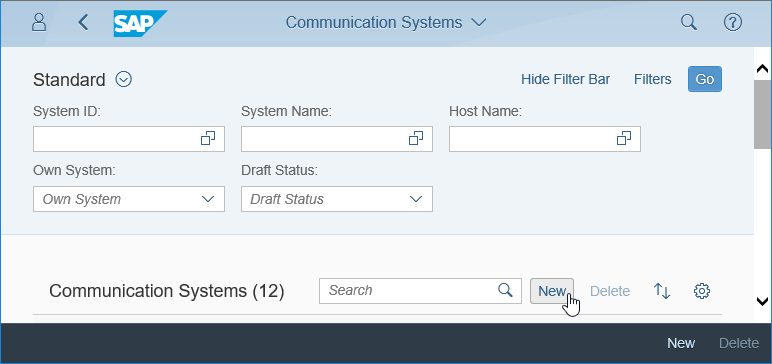
Step 2: Creating a Communication System and User
To enable secure communication between different systems you have to register these systems and define the user which is authorized to use the connection.
The communication system represents the communication partner within a communication. For inbound communication, this is the external system that calls our Bonus Plan service.
We'll create one Communication System for all systems that want to use our service as well as the user that they'll have to use.
1. Open "Communication Systems" Application
2. Start creating a new system by executing the "New" action.
3. Give following data to the new custom communication scenario ...
| Field Caption | Field Value |
| System ID | EXTERNAL_SYSTEM |
| System Name | External System |
... and create the system by executing the "Create" action.
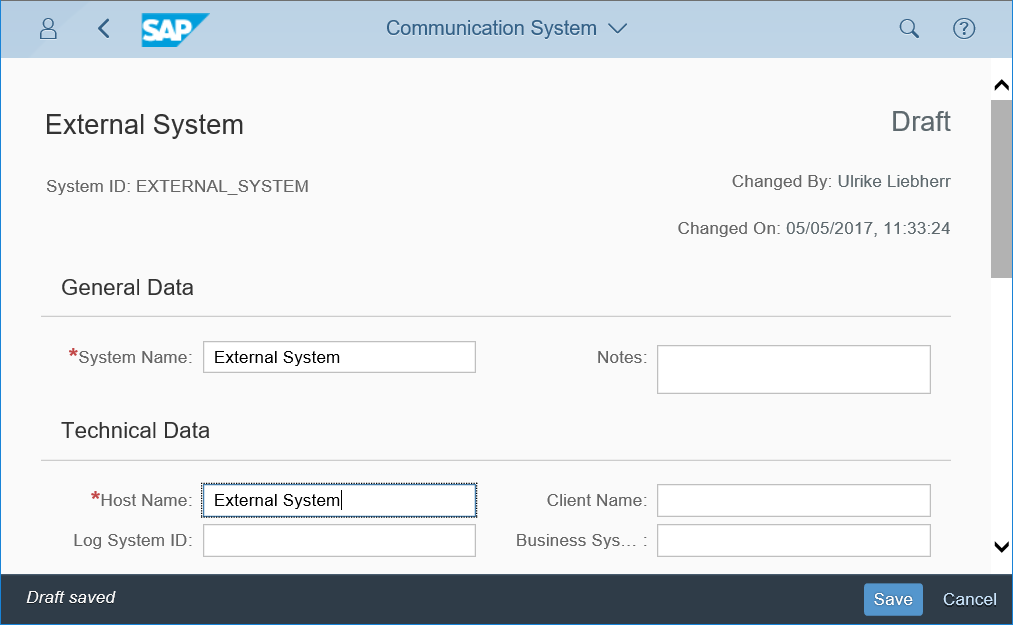
4. In the Opening Details view, fill the Host Name with "External System" as well.
5. Scroll down to "User for Inbound Communication" and start adding one by executing the "Add" action.
6. In the opening Pop Up, start creating a new User by executing the "New User" action.
7. This will lead to an automatic switch to the "Create Communication User" application, where you enter User Name "EXTERNAL_USER", Description "User for "External System" Communication System" and a password before you execute the "Create" action.
8. This will switch you back to the Pop Up, where the User Name is filled now and you can confirm to add the Inbound Communication User with action "OK".
The just created user will be needed by callers to make use of the services.
9. Back in the Communication System details you finish its creation with action "Save".
Step 3: Creating a Communication Arrangement
Finally, a communication arrangement links the solution's scenario with the Communication system and its user and exposes the Service to be used.
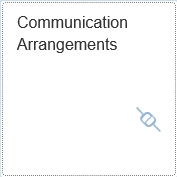
1. Open "Communication Arrangements" Application
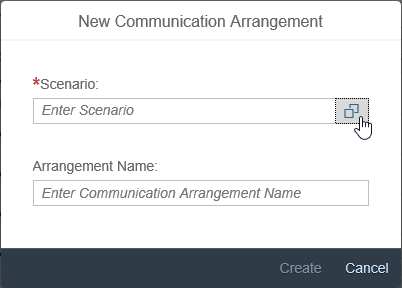
2. Start creation by executing the "New" action.
3. A pop up opens in that you use the value help for Scenario first.
4. Select the YY1_BONUSPLAN Scenario.
5. This will set the Scenario and default the Arrangement Name, so that you can continue the creation via "Create" action.
6. In the opening Arrangement details you only need to set the "Communication System" to "EXTERNAL_SYSTEM", which will automatically set the related User Name "EXTERNAL_USER" as well.
Execute "Save" to finish creation.
7. Copy the Service URL for the next step
Step 4: Testing/ Calling the service
POSTMAN application is there to test Web services by sending requests and receiving responses.
All included postman screenshots are reprinted with permission © Postdot Technologies Inc. All rights reserved.
4.1 General test
The general testing is done with the standalone postman application. All screenshots of postman application are reprinted with permission of © Postdot Technologies Inc. All rights reserved.
1. Start the POSTMAN application
2. Ensure that you have disabled "SSL certificate verification" (File > Settings > General)
3. Enter the Service URL and execute "Send" action.
You will get a Login Error as response in the response section, but this already shows that the system as such is reachable.
4. Change authorization type to "Basic Auth" now, enter Username "external_user" and the Password that you set in point 7 of Step 2
4. Send the service request again.
5. Now you will get a successful response of the service
6. This way you can test, if the service is working in general.
4.2 Create a Bonus Plan instance
Get X-CSRF-Token
Whenever you want to do a change to the Custom Business Object's persistence, for security reasons you need to send a X-CSRF-Token with that change request. To get such a Token you have to send a get request first, which fetches one.
1. Enter the basic service request URL of Bonus Plans
2. Ensure to be on "Headers" tab.
3. Enter the new header key "X-CSRF-Token" with value "fetch"
4. Send the request.
5. Copy the returned X-CSRF-Token to clipboard.
The gotten token will be valid for 30 minutes and fetching a token will return the same as long as validity has not ended yet.
Create Instance
To create a new bonus plan via the service, do the following in postman.
1. Change the request method to "Post"
2. As the basic service URL returns only the overview of all reachable Entity Sets (= Collections), you have to narrow it down for Bonus Plans by appending their Entity Set name "/YY1_BONUSPLAN"
3. Paste the before gotten X-CSRF-Token as value to the corresponding header key
4. Add new header key "Accept" with value "application/json", this will ensure that the response will be gotten in JSON format, which is easier to work with than XML.
5. Switch to the Body tab
6. Set the body type to "raw"
7. Now you additionally set the editor type "JSON", which will enable correct syntax highlighting and header key for Content-Type
8. Enter the initial data for the to be created bonus plan in JSON format to the editor
{

        "LowBonusPercentage_V": "10",

        "HighBonusPercentage_V": "20",

        "EmployeeID": <any>,

        "TargetAmount_V": "1000.00",

        "TargetAmount_C": "EUR",

        "LowBonusAssignmentFactor": "1.00",

        "HighBonusAssignmentFactor": "3.00"

}
EmployeeID <any> should in best case be the user ID of a sales person that created sales orders with a Net Amount of more than 3000.00 EUR in 2016 and that are completed.
For testing purpose regarding creation of an instance only a valid string is needed, but of course a bonus calculation later would fail with this inexistent user.
9. Send the request.
The response will show the new instance's data. From the ID you can see, that it's a new one and that the logic to fill data automatically also worked successfully.
4.3 Update a Bonus Plan instance
Get SAP_UUID
To update an instance, you have to use the internal SAP_UUID as technical key. To get this unique key, do the following steps
1. Switch the request method to "GET" and enter the request URL for bonus plan entities with the parameters
| Parameter Name | Parameter Value | Description |
| filter | ID eq '2' | filters for bonus plan of which the semantic key "ID" has value 3 |
| select | SAP_UUID | restricts response data for the chosen bonus plan to its SAP_UUID |
The request will look like "https://<YOUR_SYSTEMS_URL>/sap/opu/odata/sap/YY1_BONUSPLAN_CDS/YY1_BONUSPLAN?$filter=ID eq '3'&$select=SAP_UUID"
2. Send the request.
3. Copy SAP_UUID to clipboard.
Update
1. Switch the request method to "PATCH".
2. Enter the request URL for a bonus plan entity and add the before gotten guid to its end following this syntax "(guid'<guid_value>')", for example */YY1_BONUSPLAN(guid'8cdcd4a8-05c0-1ed7-8ec1-84ed870dedb5')
3. Enter following JSON to the body
{

    "ValidityStartDate": "2017-01-01T00:00:00",

    "ValidityEndDate": "2017-12-31T00:00:00"

}
4. Send the request
5. You will see that the update worked as you do get an empty body as response.
Step 5: Using the service
1. Open Microsoft Excel with a new "Book" (= excel file)
2. Go to "Data" tab > "New Query" > "From Other Sources" > "From OData Feed"
3. A pop up opens in that you enter the service URL and execute "OK".
4. In the next Pop Up for Access to the Service (= OData feed) switch on the left side from "Anonymous" to "Basic", then enter Username "dummy" and its Password on the right side, before executing the "Connect" action.
5. In the next screen select the item YY1_BONUSPLAN and execute "Load".
As result the excel workbook will be filled with the current Bonus Plan entities' data.
Consumption from SAP Cloud Platform
How to consume the service from SAP Cloud Platform is explained in the Blog https://blogs.sap.com/2016/10/19/s4hana-extensibility-connect-sap-s4hana-cloud-sap-hana-cloud-platfo... as third and last step "Use the Service in HCP".
SAP S/4HANA Extensibility Tutorial
- SAP Managed Tags:
- ABAP Extensibility,
- SAP S/4HANA Public Cloud
2 Comments
You must be a registered user to add a comment. If you've already registered, sign in. Otherwise, register and sign in.
Labels in this area
-
Artificial Intelligence (AI)
1 -
Business Trends
363 -
Business Trends
24 -
Customer COE Basics and Fundamentals
1 -
Digital Transformation with Cloud ERP (DT)
1 -
Event Information
461 -
Event Information
24 -
Expert Insights
114 -
Expert Insights
164 -
General
1 -
Governance and Organization
1 -
Introduction
1 -
Life at SAP
415 -
Life at SAP
2 -
Product Updates
4,684 -
Product Updates
236 -
Roadmap and Strategy
1 -
Technology Updates
1,502 -
Technology Updates
89
Related Content
- Recap of SAP S/4HANA 2023 Highlights Webinar: Research and Development in Enterprise Resource Planning Blogs by SAP
- Business Role or Business Catalog to Application / Fiori ID Assignment - API in Enterprise Resource Planning Q&A
- ISAE 3000 for SAP S/4HANA Cloud Public Edition - Evaluation of the Authorization Role Concept in Enterprise Resource Planning Blogs by SAP
- Advance Return Management complete configuration(SAP ARM) in Enterprise Resource Planning Blogs by Members
- SAP Fiori for SAP S/4HANA - Composite Roles in launchpad content and layout tools in Enterprise Resource Planning Blogs by SAP
Top kudoed authors
| User | Count |
|---|---|
| 11 | |
| 11 | |
| 7 | |
| 7 | |
| 6 | |
| 5 | |
| 5 | |
| 4 | |
| 4 | |
| 4 |