
- SAP Community
- Products and Technology
- Enterprise Resource Planning
- ERP Blogs by SAP
- SAP Fiori Elements - Initial Filter values
Enterprise Resource Planning Blogs by SAP
Get insights and updates about cloud ERP and RISE with SAP, SAP S/4HANA and SAP S/4HANA Cloud, and more enterprise management capabilities with SAP blog posts.
Turn on suggestions
Auto-suggest helps you quickly narrow down your search results by suggesting possible matches as you type.
Showing results for
former_member19
Contributor
Options
- Subscribe to RSS Feed
- Mark as New
- Mark as Read
- Bookmark
- Subscribe
- Printer Friendly Page
- Report Inappropriate Content
08-15-2020
10:41 PM
Hello everyone,
As you may know, most of the gaps gathered during FitGap sessions in an S/4HANA project, can be solved using Fiori Elements. SAP Fiori Elements have several templates available that can help us covered most of business requirements. Some of these templates are List Report, Analytical List Report, Overview Pages, Object Pages. You can refer to this link if you want to know more about these templates.
Most of the applications built using these templates (List Report, ALP, Overview pages), generally contains a Filter bar at the top, which we can use it to filter the values shown in the tables or graphics the application may have.
These filter bar is rendered using the Smart Filter Bar component. All the filters that appear in this bar, should be previously defined as Filters using the UI Annotation UI.SelectionFields either in the Core Data Service or a local annotation file.
When building fiori applications using these templates, there is a common requirement that is to add Initial values to the filters provided by the applications. This requirement can be solved in two different ways:
In this blog, I am going to explain how to populate filters with initial data using the second approach previously mentioned.
In order to be able to add javascript logic to a fiori application, you need a controller file. So the first step is to add a Controller to the project.
You can achieve this by creating the controller folder and file manually, and then adding it to the manifest file, or you can do it in an easier way using the extension wizard as I am going to explain next.
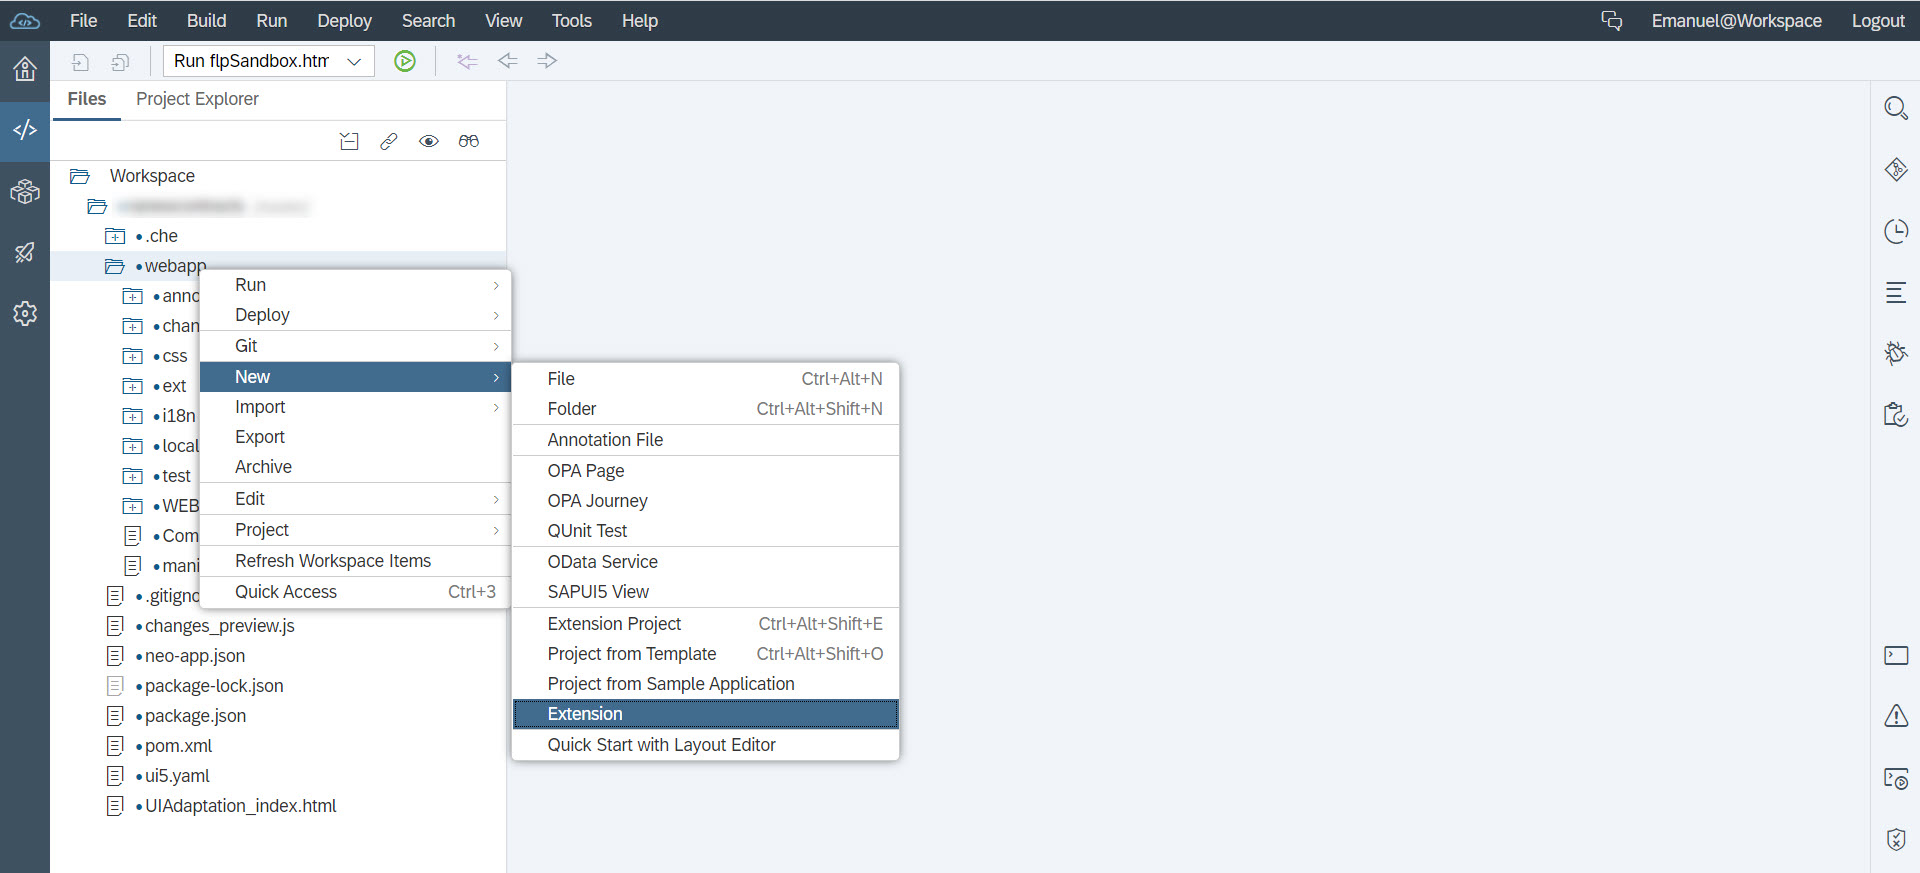
First, right click on the project folder, and select: New > Extension
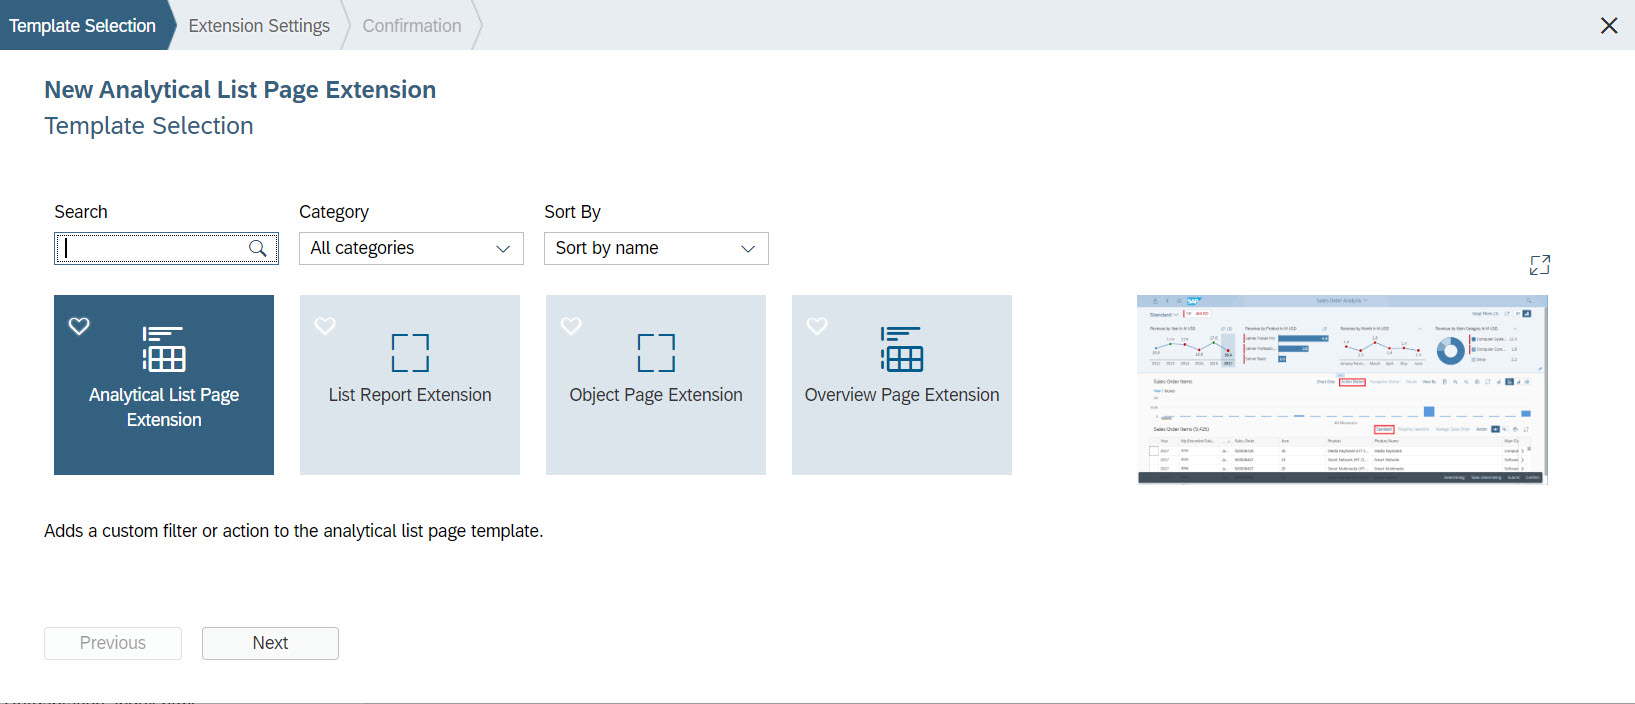
After selecting the extension button from the menu, a pop up will appear with different extension options depending on the Floorplan you are using. In this case I am going to select Analytical List Page, but you should select the Floorplan that you are currently using in your project.
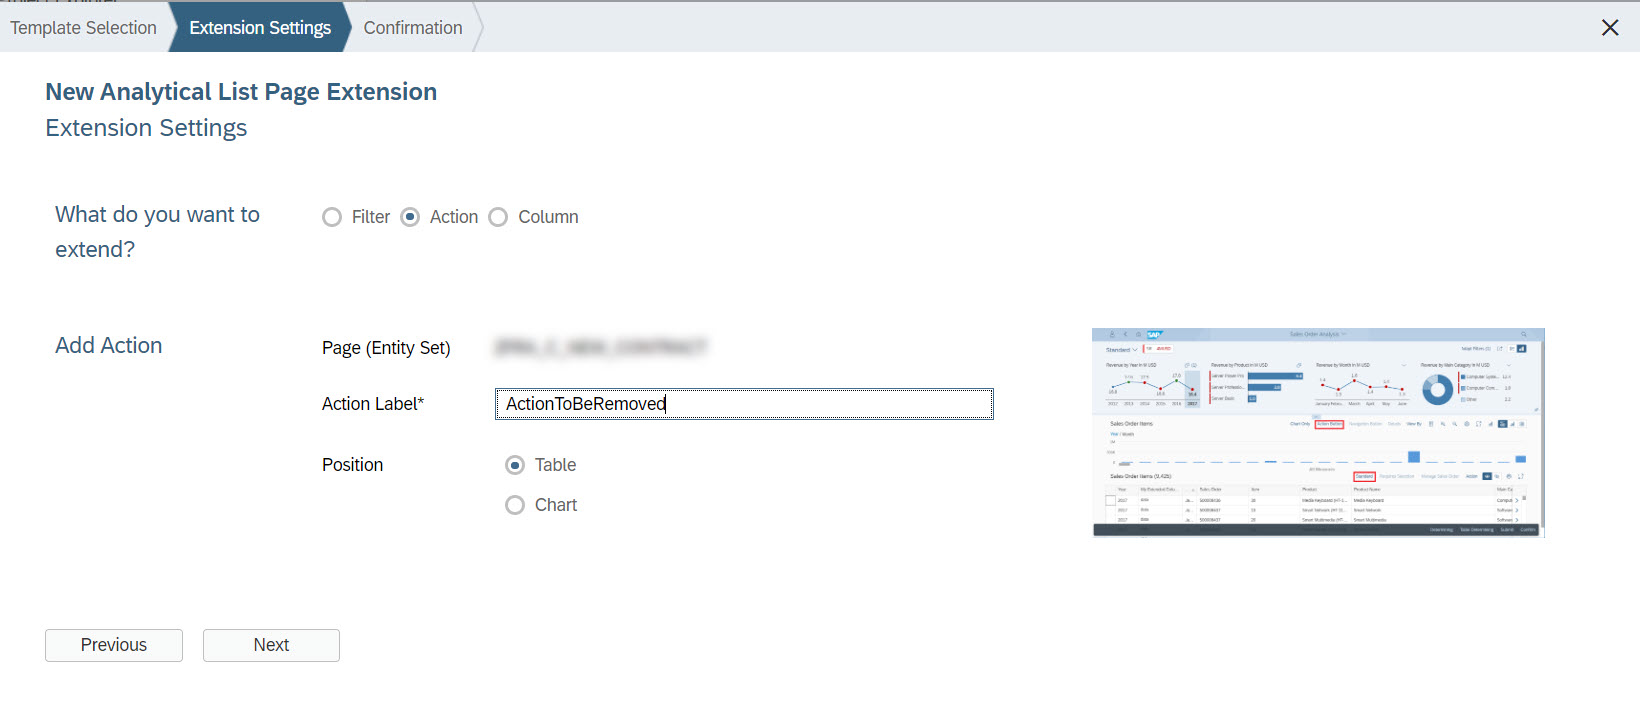
Then you have to select the kind of extension you are going to execute. In this case, we need to add a Controller to our application, so we are going to select "Action".
The name you defined in the "Action Label" is not important, because in this case we are going to delete it afterwards.
Finally, you have to confirm your selections, and the wizard will take care of creating the necessary files automatically.
Once you have finished with the wizard, you will see that a new folder named "ext" was created.
This folder contains the controller file as we are going to see later, but first, let's go to the manifest.json file.
Here you are going to find under the "extensions" object, the configuration of the controller and the action that has been created by the wizard.
As we mentioned at the beginning of this blog, we are only going to need the controller, so we are going to remove all the unnecessary information from the manifest file.
Below you can find how you manifest.json "extensions" object should look like after removing all the unnecessary information.
Once we have finished with the modifications in the manifest.json, we are going to move to the controllers file. This is the file where we are going to allocate the logic we want to apply to our filters.
The controller file is located under the folders "ext > controller" that were created automatically by the wizard.
This file will have by default an empty method, created to handle the action you defined in the wizard. As we are not going to use that method, we can remove it.
Then, we are going to add the standard method onInitSmartFilterBarExtension. This method is executed just before the smart table is rendered for the first time, so it is the right place to write the logic to set the initial value to the filter. All the values set to the filters in this method, are going to be used to filter the information that is going to be shown in the smart table. We are going to set the values in the Smart Filter bar using the standard methods this controller has available as explained here.
In this particular case, I am going to set a filter value of type range, but you can also add single values to a filter.
As I mentioned previously, in case you want to setup a single value to a filter, you could use for example the following logic:
And if you would like to setup both values at the same time, you could also achieve that by using the following code:
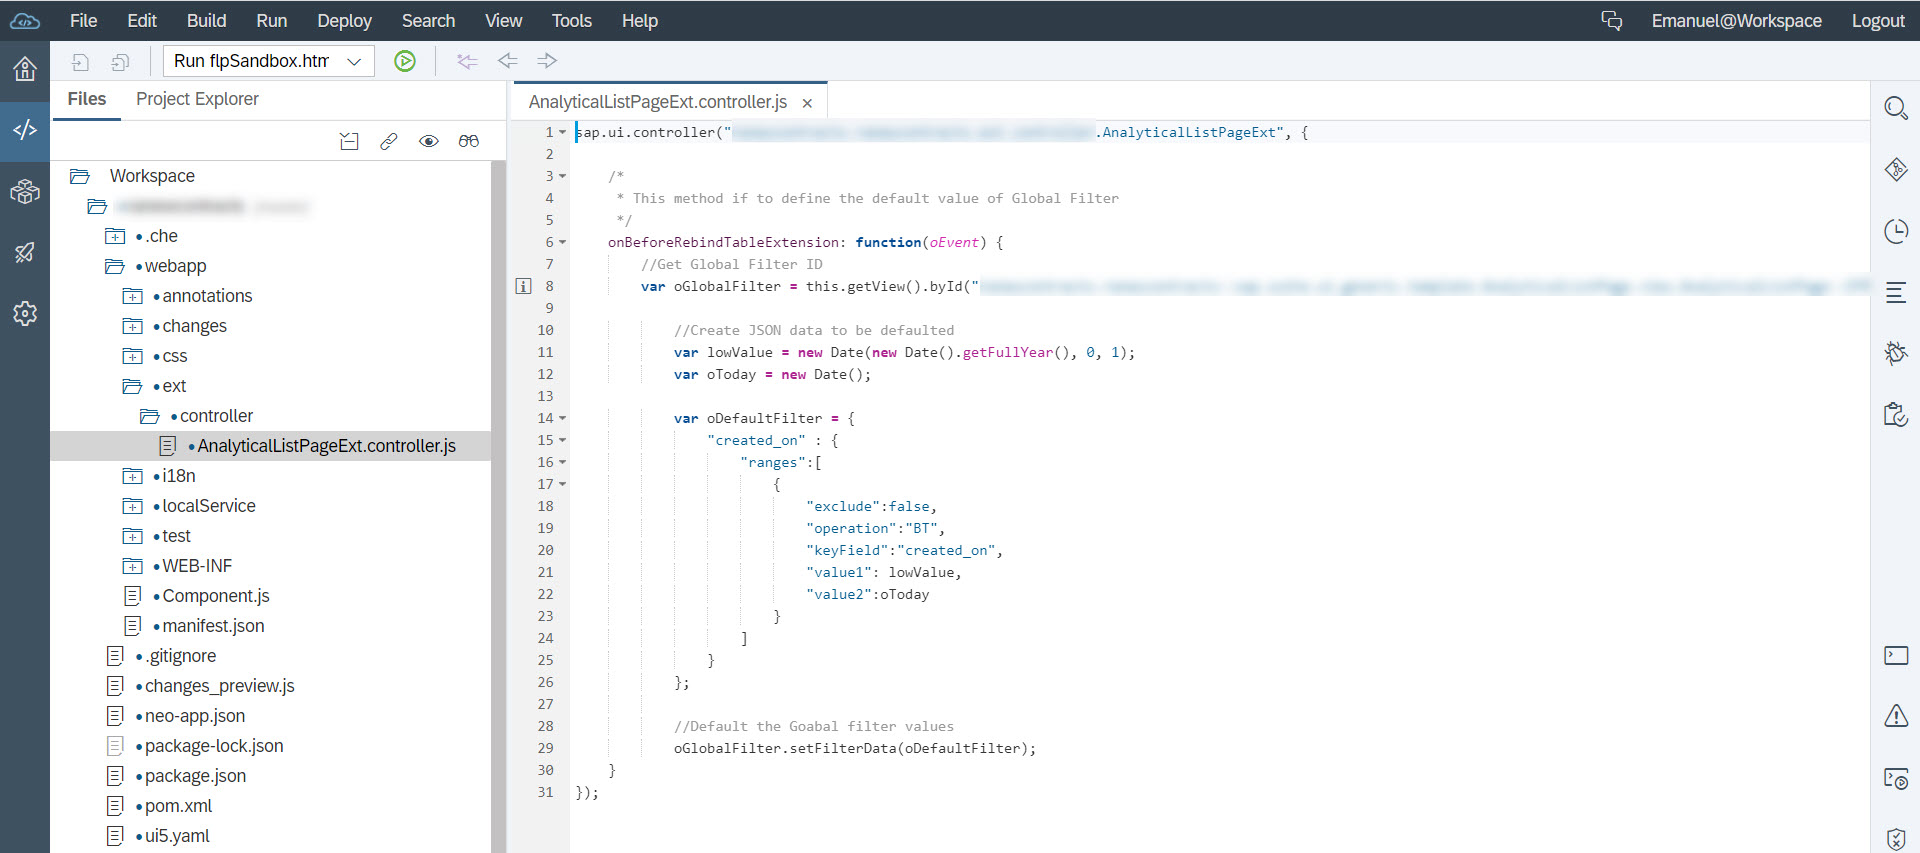
Below you can see how the code looks like in the WebIde editor.
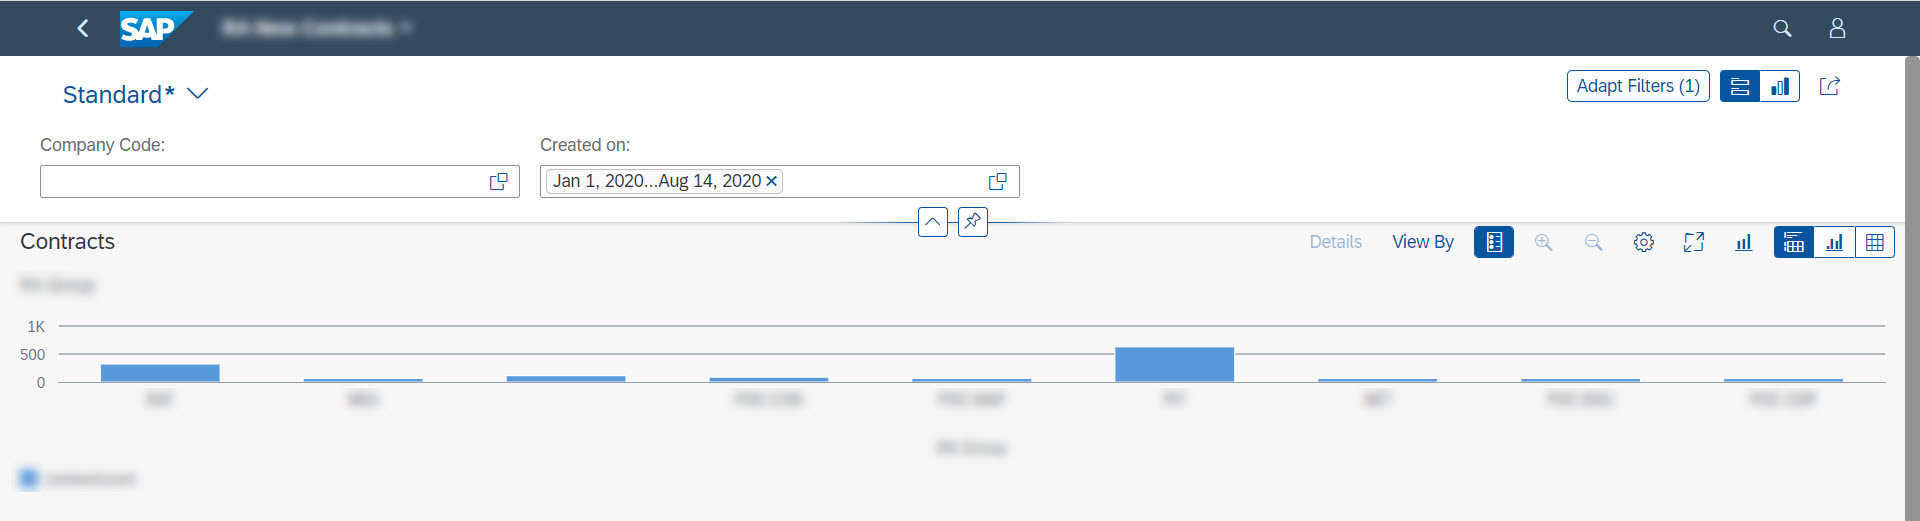
Finally, we are going to execute the application to see how it looks like.
As you can see, when running the report we get the selection field "Created On" populated with the values defined in the controller.
There is other event available where you can setup filter values. It is the method OnBeforeRebindTableExtension. This method is executed before the smart table is rendered each time the report is run, so it can be used to populate, for example, the values of a filter that needs to have a static value through the different report executions. Since this filter is going to have a static value, it could be a great idea to hide it from the user, but that is the content of another blog.
In case you are building a free style app, you have to use a different event to populate filter with initial values. You have to add the parameter "initialise" and give a function name that you have already created in the app controller.
Then, on the app controller, you have to define the functions with the needed logic.
Have in mind that if you don't the add liveMode="true" property in the smartfilterbar definition, the GO button is shown but the table/graphs are not automatically rendered.
You have to make them render again in the onInitSmartFilterBar method.
Well I hope this blog is useful for you.
Thanks.
Best regards,
Emanuel Affatati
As you may know, most of the gaps gathered during FitGap sessions in an S/4HANA project, can be solved using Fiori Elements. SAP Fiori Elements have several templates available that can help us covered most of business requirements. Some of these templates are List Report, Analytical List Report, Overview Pages, Object Pages. You can refer to this link if you want to know more about these templates.
Most of the applications built using these templates (List Report, ALP, Overview pages), generally contains a Filter bar at the top, which we can use it to filter the values shown in the tables or graphics the application may have.
These filter bar is rendered using the Smart Filter Bar component. All the filters that appear in this bar, should be previously defined as Filters using the UI Annotation UI.SelectionFields either in the Core Data Service or a local annotation file.
When building fiori applications using these templates, there is a common requirement that is to add Initial values to the filters provided by the applications. This requirement can be solved in two different ways:
- The first way is by using S/4HANA user default values. This is the best way to do it, because you can achieve it by using only configurations that have to be made in the fiori catalogs. This process is clearly explained in the following article written by Jocelyn Dart.
- In case the process to populate these filters could not be achieved by using the User default values, we have the possibility to use javascript logic. Some possible use cases where this method should be chosen, could be if you have to populate the filters with values from other systems, if the values to be set should be processed with some complex logic or if the initial values should be read from an external Identity Provider (i.e. SAML Attributes).
In this blog, I am going to explain how to populate filters with initial data using the second approach previously mentioned.
Fiori Application Extension
In order to be able to add javascript logic to a fiori application, you need a controller file. So the first step is to add a Controller to the project.
You can achieve this by creating the controller folder and file manually, and then adding it to the manifest file, or you can do it in an easier way using the extension wizard as I am going to explain next.
First, right click on the project folder, and select: New > Extension
After selecting the extension button from the menu, a pop up will appear with different extension options depending on the Floorplan you are using. In this case I am going to select Analytical List Page, but you should select the Floorplan that you are currently using in your project.
Then you have to select the kind of extension you are going to execute. In this case, we need to add a Controller to our application, so we are going to select "Action".
The name you defined in the "Action Label" is not important, because in this case we are going to delete it afterwards.
Finally, you have to confirm your selections, and the wizard will take care of creating the necessary files automatically.

Adapt Manifest.json file
Once you have finished with the wizard, you will see that a new folder named "ext" was created.
This folder contains the controller file as we are going to see later, but first, let's go to the manifest.json file.
Here you are going to find under the "extensions" object, the configuration of the controller and the action that has been created by the wizard.
As we mentioned at the beginning of this blog, we are only going to need the controller, so we are going to remove all the unnecessary information from the manifest file.

Below you can find how you manifest.json "extensions" object should look like after removing all the unnecessary information.

Controllers logic
Once we have finished with the modifications in the manifest.json, we are going to move to the controllers file. This is the file where we are going to allocate the logic we want to apply to our filters.
The controller file is located under the folders "ext > controller" that were created automatically by the wizard.
This file will have by default an empty method, created to handle the action you defined in the wizard. As we are not going to use that method, we can remove it.
Then, we are going to add the standard method onInitSmartFilterBarExtension. This method is executed just before the smart table is rendered for the first time, so it is the right place to write the logic to set the initial value to the filter. All the values set to the filters in this method, are going to be used to filter the information that is going to be shown in the smart table. We are going to set the values in the Smart Filter bar using the standard methods this controller has available as explained here.
In this particular case, I am going to set a filter value of type range, but you can also add single values to a filter.
onInitSmartFilterBarExtension: function (oEvent) {

	//Get SmartFilterBar

	var oGlobalFilter = oEvent.getSource();


	//Create JSON data that contains the Inital value of the filter

	var lowValue = new Date(new Date().getFullYear(), 0, 1);

	var oToday = new Date();

	//"created_on" is the name of the filter field. You should put your own field ID.

	var oDefaultFilter = {

		"created_on": {

			"ranges": [{

				"exclude": false,

				"operation": "BT",

				"keyField": "created_on",

				"value1": lowValue,

				"value2": oToday

			}]

		}

	};


	//Set SmartFilterBar initial values

	oGlobalFilter.setFilterData(oDefaultFilter);


	//In case you want to hide a Filter

	oGlobalFilter.determineFilterItemByName("company_code").setVisibleInFilterBar(false);

}
As I mentioned previously, in case you want to setup a single value to a filter, you could use for example the following logic:
onInitSmartFilterBarExtension: function (oEvent) {

		//Get SmartFilterBar

		var oGlobalFilter = this.getView().byId("<your SmartFilterBar ID>--template::SmartFilterBar"

		);


		//Create JSON data that contains the Inital value of the filter

		//"company_code" is the name of the filter field. You should put your own field ID.

		var oDefaultFilter = {

			"company_code": "Test"

		};


		//Set SmartFilterBar initial values

		oGlobalFilter.setFilterData(oDefaultFilter);

}
And if you would like to setup both values at the same time, you could also achieve that by using the following code:
onInitSmartFilterBarExtension: function (oEvent) {

		//Get SmartFilterBar

		var oGlobalFilter = this.getView().byId("<your SmartFilterBar ID>--template::SmartFilterBar"

		);


		//Create JSON data that contains the Inital values of the filters

		var lowValue = new Date(new Date().getFullYear(), 0, 1);

		var oToday = new Date();

		//"company_code" and "created_on" are the names of the filter bar fields. You should put your own field IDs.

		var oDefaultFilter = {

			"company_code": "Test",

			"created_on": {

				"ranges": [{

					"exclude": false,

					"operation": "BT",

					"keyField": "created_on",

					"value1": lowValue,

					"value2": oToday

				}]

			}

		};


		//Set SmartFilterBar initial values

		oGlobalFilter.setFilterData(oDefaultFilter);

}
Below you can see how the code looks like in the WebIde editor.
Finally, we are going to execute the application to see how it looks like.
As you can see, when running the report we get the selection field "Created On" populated with the values defined in the controller.
There is other event available where you can setup filter values. It is the method OnBeforeRebindTableExtension. This method is executed before the smart table is rendered each time the report is run, so it can be used to populate, for example, the values of a filter that needs to have a static value through the different report executions. Since this filter is going to have a static value, it could be a great idea to hide it from the user, but that is the content of another blog.
Free Style apps
In case you are building a free style app, you have to use a different event to populate filter with initial values. You have to add the parameter "initialise" and give a function name that you have already created in the app controller.
<smartFilterBar:SmartFilterBar id="smartFilterBar" persistencyKey="UniqueAndStablePersistencyKey" entitySet="DisptabSet" filterBarExpanded="true" enableBasicSearch="true" showClearButton="true" initialise="onInitSmartFilterBar">

</smartFilterBar:SmartFilterBar>
Then, on the app controller, you have to define the functions with the needed logic.
Have in mind that if you don't the add liveMode="true" property in the smartfilterbar definition, the GO button is shown but the table/graphs are not automatically rendered.
You have to make them render again in the onInitSmartFilterBar method.
onInitSmartFilterBar: function (oEvent) {

	var currentYear = new Date().getFullYear();

	var oGlobalFilter = this.getView().byId("smartFilterBar");

	var oDefaultFilter = {

		"Year": currentYear

	};

	oGlobalFilter.setFilterData(oDefaultFilter);

	var that = this;

	oGlobalFilter.addContent(new sap.m.Button({

		text: "Show Table",

		press: function () {

			that.onDefaultDialogPress();

		}

	}));

        //These lines refresh the tables/charts you have in your fiori app

	this.getView().byId("smartChart1").rebindChart();

	this.getView().byId("smartTable1").rebindTable();

},


onDefaultDialogPress: function () {

	if (!this.oDefaultDialog) {

		//Dialog Creation

		this.oDefaultDialog = new Dialog({

			title: "Exchange Rates",

			closed: function (oEvent) {

				oEvent.getSource().destroy();

			}

		});


		//To get access to the controller's model

		this.getView().addDependent(this.oDefaultDialog);

		//If you don't want to use the previous statement, you can assign the model to the table

		/*

		var oModel = this.getOwnerComponent().getModel("myModel");

		oTable.setModel(oModel);

		*/

		//Create Table

		var oTable = new sap.m.Table("idPobList", {

			//headerText: "Example",

			inset: true

		});

		//Column Headers

		var col1 = new sap.m.Column("col1", {

			header: new sap.m.Label({

				text: "Column 1 Label"

			})

		});

		oTable.addColumn(col1);

		var col2 = new sap.m.Column("col2", {

			header: new sap.m.Label({

				text: "Column 2 Label"

			})

		});

		oTable.addColumn(col2);

		//Table binding

		var colItems = new sap.m.ColumnListItem("colItems", {

			type: "Active"

		});

		oTable.bindAggregation("items", "/oDataEntitySet", colItems);

		//Cells

		var txtNAME = new sap.m.Text("txtNAME1", {

			text: "{Field1}"

		});

		colItems.addCell(txtNAME);

		var txtNAME2 = new sap.m.Text("txtNAME2", {

			text: "{Field2}"

		});

		colItems.addCell(txtNAME2);


		//Dialog Buttons

		var that = this;

		this.oDefaultDialog.addButton(new sap.m.Button({

			text: "Close",

			press: function () {

				that.oDefaultDialog.close();

			}

		}));

		this.oDefaultDialog.addContent(oTable);

	}


	this.oDefaultDialog.open();

}
Well I hope this blog is useful for you.
Thanks.
Best regards,
Emanuel Affatati
- SAP Managed Tags:
- SAP Fiori,
- SAP Fiori Elements,
- SAP S/4HANA
Labels:
9 Comments
You must be a registered user to add a comment. If you've already registered, sign in. Otherwise, register and sign in.
Labels in this area
-
Artificial Intelligence (AI)
1 -
Business Trends
363 -
Business Trends
28 -
Customer COE Basics and Fundamentals
1 -
Digital Transformation with Cloud ERP (DT)
1 -
Event Information
461 -
Event Information
26 -
Expert Insights
114 -
Expert Insights
171 -
General
1 -
Governance and Organization
1 -
Introduction
1 -
Life at SAP
415 -
Life at SAP
2 -
Product Updates
4,683 -
Product Updates
247 -
Roadmap and Strategy
1 -
Technology Updates
1,501 -
Technology Updates
91
Related Content
- SAP Subscription Billing, SAP S/4HANA Cloud Clarification in Enterprise Resource Planning Q&A
- SAP Activate methodology Prepare and Explore phases in the context of SAFe. in Enterprise Resource Planning Blogs by SAP
- Advance Return Management complete configuration(SAP ARM) in Enterprise Resource Planning Blogs by Members
- Portfolio Management – Enhanced Financial Planning integration in Enterprise Resource Planning Blogs by SAP
- Enterprise Portfolio and Project Management in SAP S/4HANA Cloud, Private Edition 2023 FPS1 in Enterprise Resource Planning Blogs by SAP
Top kudoed authors
| User | Count |
|---|---|
| 31 | |
| 6 | |
| 5 | |
| 5 | |
| 5 | |
| 4 | |
| 4 | |
| 3 | |
| 3 | |
| 3 |