
- SAP Community
- Products and Technology
- Technology
- Technology Blogs by SAP
- Part 1B: Using your Custom HTML5 application as Us...
Technology Blogs by SAP
Learn how to extend and personalize SAP applications. Follow the SAP technology blog for insights into SAP BTP, ABAP, SAP Analytics Cloud, SAP HANA, and more.
Turn on suggestions
Auto-suggest helps you quickly narrow down your search results by suggesting possible matches as you type.
Showing results for
Product and Topic Expert
Options
- Subscribe to RSS Feed
- Mark as New
- Mark as Read
- Bookmark
- Subscribe
- Printer Friendly Page
- Report Inappropriate Content
10-12-2017
7:57 PM
In this part of the blog, you will see how you can integrate your SAPUI5 application as Task UI in workflow.
Before we start the learning, there are few things you must know about the user task of SAP Cloud Platform Workflow.
This means that your existing custom application needs to be modified so that it can (a) access the task-data, (b) bind the task data with the UI elements of the application and (c) implement code for the task actions like complete, cancel etc.
Let us now learn how can you do that.
But why did the context data did not get loaded?
Let us now see how to update the user interface to show the task data and workflow context in Part 1C: Working with Task APIs in your Custom HTML5 application
Previous Blogs on Neo Environment
Understanding Custom UI Integration with SAP Cloud Platform Workflow
Part1A: Build your Custom HTML5 application in SAP WebIDE for Workflow
Before we start the learning, there are few things you must know about the user task of SAP Cloud Platform Workflow.
The task associated with user-task activity in the workflow are available under the Tasks list in My Inbox application. The user interface configured for the user task is rendered as task UI when an end user opens the task in My Inbox. Application developer is, thus, given the flexibility to integrate any custom UI with the user task of workflow
This means that your existing custom application needs to be modified so that it can (a) access the task-data, (b) bind the task data with the UI elements of the application and (c) implement code for the task actions like complete, cancel etc.
Let us now learn how can you do that.
- Open the SAP Web IDE Full-Stack.Refer section Part 1A to ensure the you open with correct URL parameter
Note: Ensure that you have Workflow Editor feature enabled in the Web IDE.Follow the guide to do so:
https://help.sap.com/viewer/f63bbdc234ce4211ab2cdb44564a0acd/Cloud/en-US/5e058cf1333b4e18bfa6431a52e...

- Create a new Workflow Project if you do not have one.Follow the guide to do so:
https://help.sap.com/viewer/f63bbdc234ce4211ab2cdb44564a0acd/Cloud/en-US/2b6375d9a80945ff852142b9543....If you already have a workflow project, then you can create a new workflow in <your project>/workflows folder


- Click on the start event and from the speed buttons, select User Task

- Select the User Task and configure the task from the User Properties sectionIn General section, provide the name of the task
- Open the SAP Web IDE Full-Stack.Refer section Part 1A to ensure the you open with correct URL parameter

In Details section, fill in the following details of the user interface that would be seen when the task is opened in My Inbox.
Subject
This is the name of the task that would be seen in list of tasks when this task is available in the My Inbox.
Receivers
You can give comma-separated users or a group of users who will be able to see these tasks in their My Inbox. This is a way to control the access of confidential information and enables the access of information to the right set of people.
User Interface
Enter the details of the SAPUI5 application that you want to show when this task is opened in My Inbox.
HTML5 App: Name of the HTML5 application [Mandatory Field]
Component URL: Location of <Component.js> in the HTML5 project.
SAPUI5 Component: SAPUI5 component name without <.component> suffix
If you have doubts, then refer Step9 in the official documentation:
https://help.sap.com/viewer/f63bbdc234ce4211ab2cdb44564a0acd/Cloud/en-US/5e058cf1333b4e18bfa6431a52e...
Note: Carefully enter the required details as this is most crucial part of the configuration, especially the Component URL which is non-mandatory field.
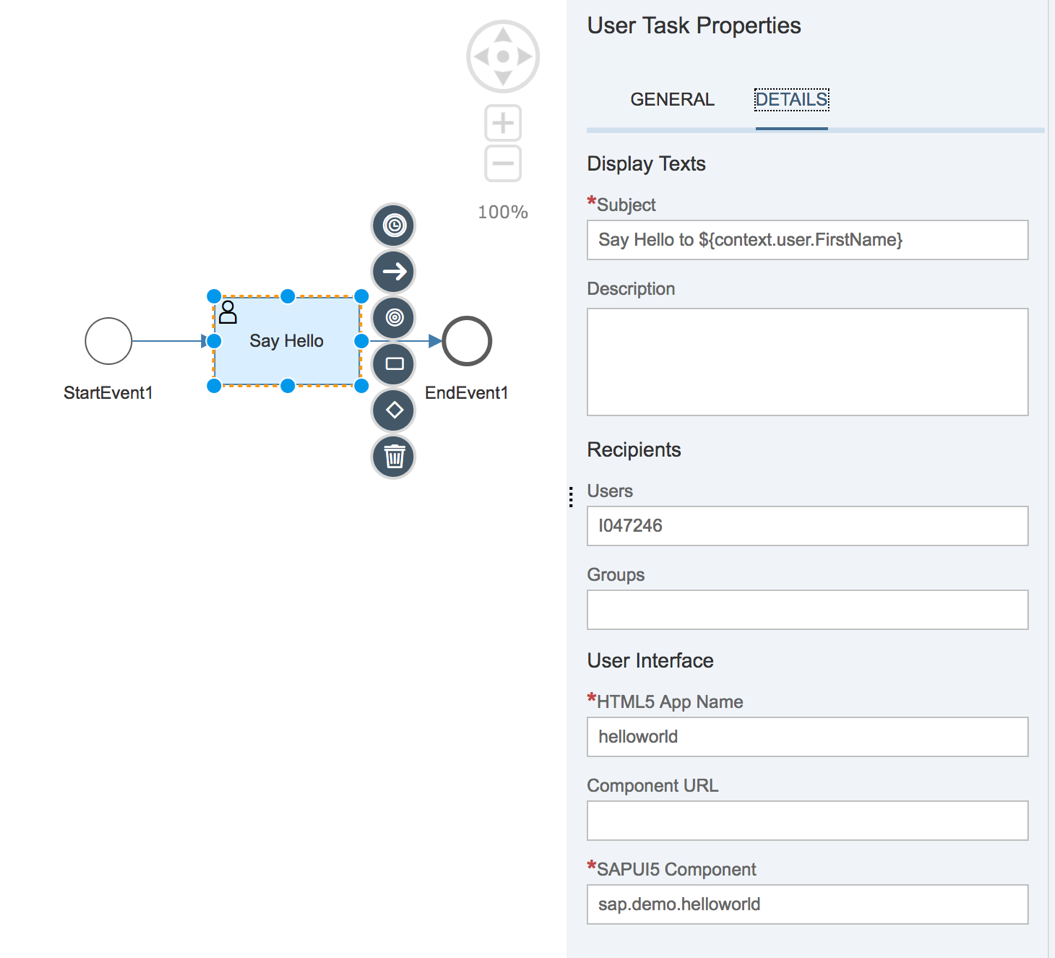
With this, you are done with the User Task configuration.
- Click on the empty space in the editor and change the Workflow Properties as shown.This means that the subject of the workflow, when seen from Workflow Monitoring application, would pick up the FirstName and LastName fields from the workflow context

- Finally, deploy the workflow
 Now let us see how the user task looks in the My Inbox application.
 - Open the Workflow Monitor App from Fiori Launchpad.If you do not know the URL, then open the Fiori Launchpad URL from the Workflow service – Overview page in the cockpit

- Click on Workflow Definitions tile, and you will see your workflow

- Click on Start New Instance and enter the following initial payload to start the workflow
{
"user":{
"FirstName":"Kate",
"LastName":"Beckett",
"city":"London",
"country":"United Kingdom"
}
}
- Click on Show Instances button to see all the running instances of the workflow.Observe the name of the workflow. The first-name (i.e. Kate) and last-name (i.e. Beckett) is picked from the initial payload that is being sent while starting the workflow.Also notice the EXECUTION LOG, you see that a new task is created in MyInbox of list of recipients

- Logon to the My Inbox with the recipient username and password.You can find the tile of MyInbox app in the Fiori Launchpad URL seen in the workflow overview page (-in SAP Cloud Platform cockpit-)

- Open MyInbox and click on the task

But why did the context data did not get loaded?
Let us now see how to update the user interface to show the task data and workflow context in Part 1C: Working with Task APIs in your Custom HTML5 application
Previous Blogs on Neo Environment
Understanding Custom UI Integration with SAP Cloud Platform Workflow
Part1A: Build your Custom HTML5 application in SAP WebIDE for Workflow
Related Blogs on Cloud Foundry Environment
Labels:
49 Comments
You must be a registered user to add a comment. If you've already registered, sign in. Otherwise, register and sign in.
Labels in this area
-
ABAP CDS Views - CDC (Change Data Capture)
2 -
AI
1 -
Analyze Workload Data
1 -
BTP
1 -
Business and IT Integration
2 -
Business application stu
1 -
Business Technology Platform
1 -
Business Trends
1,658 -
Business Trends
93 -
CAP
1 -
cf
1 -
Cloud Foundry
1 -
Confluent
1 -
Customer COE Basics and Fundamentals
1 -
Customer COE Latest and Greatest
3 -
Customer Data Browser app
1 -
Data Analysis Tool
1 -
data migration
1 -
data transfer
1 -
Datasphere
2 -
Event Information
1,400 -
Event Information
66 -
Expert
1 -
Expert Insights
177 -
Expert Insights
301 -
General
1 -
Google cloud
1 -
Google Next'24
1 -
GraphQL
1 -
Kafka
1 -
Life at SAP
780 -
Life at SAP
13 -
Migrate your Data App
1 -
MTA
1 -
Network Performance Analysis
1 -
NodeJS
1 -
PDF
1 -
POC
1 -
Product Updates
4,577 -
Product Updates
346 -
Replication Flow
1 -
REST API
1 -
RisewithSAP
1 -
SAP BTP
1 -
SAP BTP Cloud Foundry
1 -
SAP Cloud ALM
1 -
SAP Cloud Application Programming Model
1 -
SAP Datasphere
2 -
SAP S4HANA Cloud
1 -
SAP S4HANA Migration Cockpit
1 -
Technology Updates
6,873 -
Technology Updates
429 -
Workload Fluctuations
1
Related Content
- Deployment of Seamless M4T v2 models on SAP AI Core in Technology Blogs by SAP
- Show Loading indicator while the Ui5 App loads! in Technology Blogs by Members
- PM Notification Configuration from DMC to ERP in Technology Blogs by Members
- SAP Fiori for SAP S/4HANA - Empowering Your Homepage: Enabling My Home for SAP S/4HANA 2023 FPS01 in Technology Blogs by SAP
- Dealy in updating custom values for Visibility Scenario SAP BUILD AUTOMATION in Technology Q&A
Top kudoed authors
| User | Count |
|---|---|
| 44 | |
| 25 | |
| 17 | |
| 15 | |
| 11 | |
| 7 | |
| 7 | |
| 7 | |
| 7 | |
| 6 |