
- SAP Community
- Products and Technology
- Technology
- Technology Blogs by SAP
- Starting Workflow from Custom Fiori Application in...
Technology Blogs by SAP
Learn how to extend and personalize SAP applications. Follow the SAP technology blog for insights into SAP BTP, ABAP, SAP Analytics Cloud, SAP HANA, and more.
Turn on suggestions
Auto-suggest helps you quickly narrow down your search results by suggesting possible matches as you type.
Showing results for
Product and Topic Expert
Options
- Subscribe to RSS Feed
- Mark as New
- Mark as Read
- Bookmark
- Subscribe
- Printer Friendly Page
- Report Inappropriate Content
08-27-2020
8:03 AM
I often see developers' having difficulty in coding their SAPUI5 application to start SAP Cloud Platform Workflow from their custom application. In one of my previous blog I have explained how to achieve this in Neo environment but with cloud foundry there are few significant differences which need to be understood to ensure that you successfully achieve starting the workflow in CF as well.
Disclaimer: I do not intent to explain about cloud foundry concepts in this blog and how to create SAPUI5 application in CF. There are 2 sections in this blog, you can choose based on your app-router configuration (standalone or managed).
<<<< STANDALONE APP-ROUTER BASED FIORI APPLICATION >>>>>>>>>>>>>>
I assume the following:
So, let us now see what all changes are needed in your MTA project to start workflow.
Next update the route in your Fiori Module application. For that, open xs-app.json file of your fiori module and add this route. Make sure you add this route before the generic routes.
Update Controller.js file to call workflow start APIs. Before calling the workflow instance APIs to start the workflow, you need to first get the xsrf-token and then call the API.
These are the 3 simple steps you need to do in your application to start workflow from any of your custom application.
I have also created a sample project that will help you identify the needed changes in your custom application to start the workflow.
>>>>>>>>>>>>>>>>>>>>>>>>>>>>>>>>>>>>>>>>>>>>>>>>>>>>>>>>>>>>>>>>>>>>>
<<<< SAP MANAGED APP-ROUTER BASED FIORI APPLICATION >>>>>>>>>>>>>>
I assume the following:
Locate the destination module with the destination-content suffix and Change the scope of the destination by replacing "instance:" with "subaccount"
Next update the route in your Fiori Module application. For that, open xs-app.json file of your fiori module and add this route. Make sure of the following:
Update Controller.js file to call workflow start APIs. Before calling the workflow instance APIs to start the workflow, you need to first get the xsrf-token and then call the API.
>>>>>>>>>>>>>>>>>>>>>>>>>>>>>>>>>>>>>>>>>>>>>>>>>>>>>>>>>>>>>>>>>>>>>>
>>>>>>>>>>>>>>>>>>>>>>>>>>>>>>>>>>>>>>>>>>>>>>>>>>>>>>>>>>>>>>>>>>>>>>
This is the first blog of the series where I intend to provide answers to all your queries on using custom application with workflow in cloud foundry. In upcoming blogs, I will guide you:
Disclaimer: I do not intent to explain about cloud foundry concepts in this blog and how to create SAPUI5 application in CF. There are 2 sections in this blog, you can choose based on your app-router configuration (standalone or managed).
<<<< STANDALONE APP-ROUTER BASED FIORI APPLICATION >>>>>>>>>>>>>>
I assume the following:
- you have an account in SAP Cloud Platform Cloud Foundry environment.
- you have enabled Business Application Studio subscription
- you have Developer role assigned to your user to access application studio
- you have created a Fiori application in studio which will have input fields and a button to start the workflow (learn more how to do it from here)
- you have Workflow entitlement (learn more about setup from here)
- you have created workflow service instance in your cloud account with minimum scope of WORKFLOW_INSTANCE_START.
- you have WorkflowDeveloper, WorkflowInitiator and WorkflowAdmin roles assigned to your user which will be used to access the workflow editor in app-studio, start the workflow using APIs and access the Monitor Workflow apps respectively.
- You have already created and deployed a workflow in your account. (learn more from our blog or from the help portal)
- you know how to work with Workflow API (here is the link)
So, let us now see what all changes are needed in your MTA project to start workflow.
Step 1 : Basic Checks
- First check if you have xs-security.json file in your app-router based MTA project. This will be used to authenticate your application via xsuaa while calling Workflow APIs. Usually while creating the Fiori Module from Business Application Studio, you should choose to add authentication to the Fiori Module which will automatically create this xs-security.json file and associate this xsuaa resource to app-router.

- If you have not done that, then you can manually add this file in your MTA project with the given content and update the resources and app-router module section of the mta.yaml file as shown.

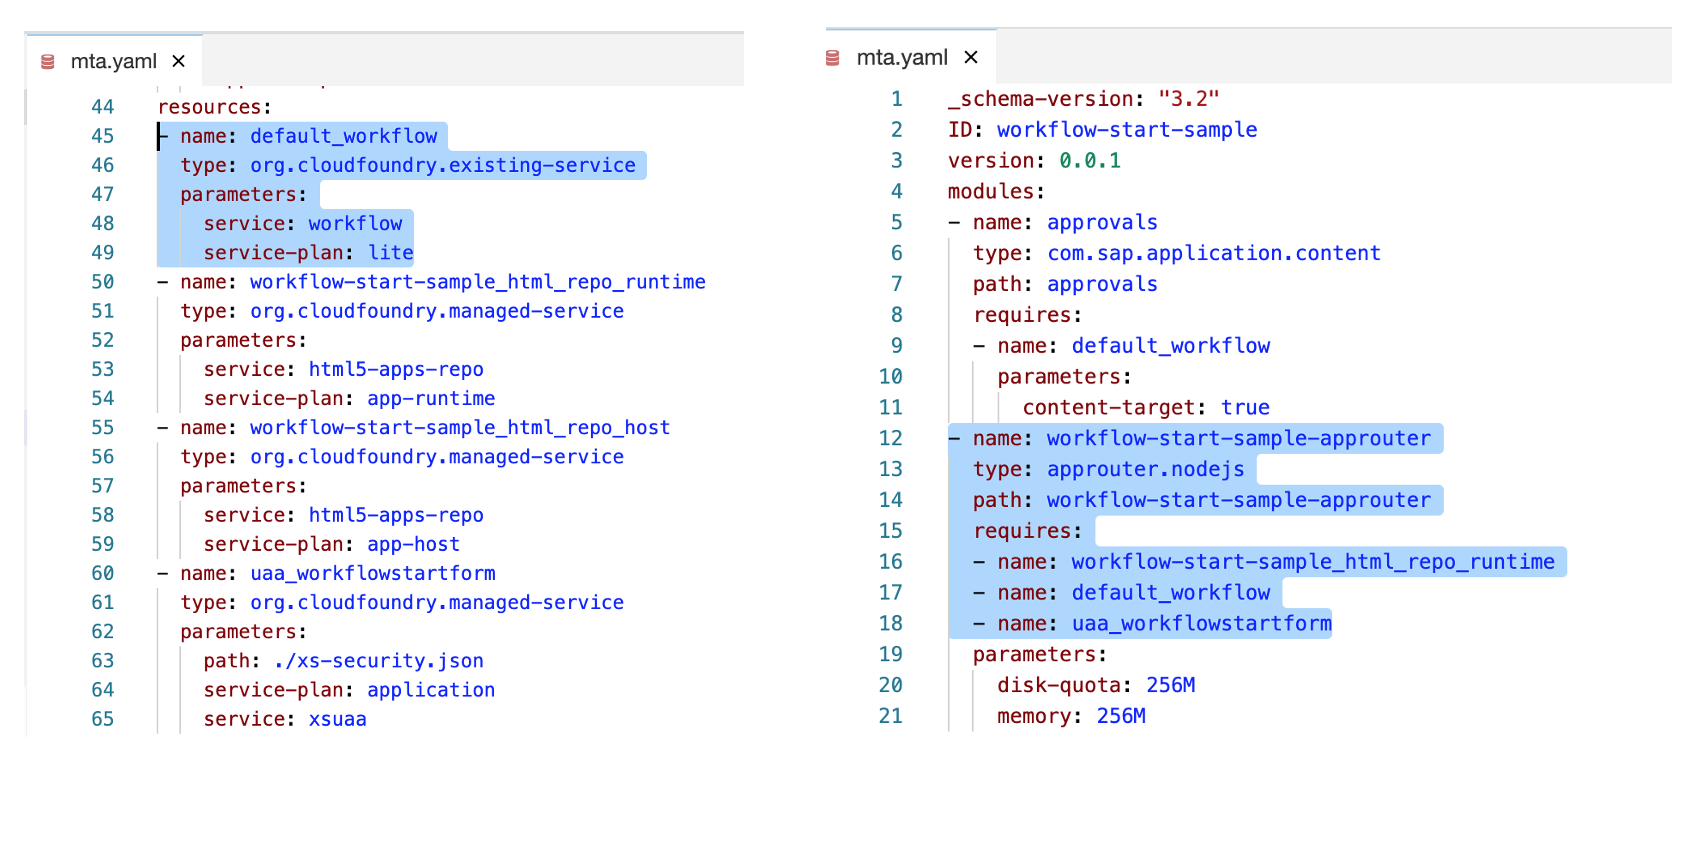
- If you have workflow module created in different MTA project than the custom application, then you also need to add the workflow service instance resource in mta.yaml file (see line 45 in screenshot below) and then add the dependency of the workflow instance to app-router in module section (see line 17 in the screenshot below)
Step 2 : Update xs-app.json of Fiori Module
Next update the route in your Fiori Module application. For that, open xs-app.json file of your fiori module and add this route. Make sure you add this route before the generic routes.
- Also ensure that the “authenticationMethod” is “route” (check line 3 in screenshot)
{

    "source": "^/bpmworkflowruntime/(.*)$",

    "target": "/$1",

    "service": "com.sap.bpm.workflow",

    "endpoint": "workflow_rest_url",

    "authenticationType": "xsuaa"

},
Step 3: Update Controller.js of Fiori Module to call Workflow APIs
Update Controller.js file to call workflow start APIs. Before calling the workflow instance APIs to start the workflow, you need to first get the xsrf-token and then call the API.
- To do so, you will also need information of the application ID that will be prefixed with API host URL. This is needed because your custom application will be routed via the app-router application. You can get this information from the manifest.json file inside your fiori module as sap.app --> id. Application ID is the ID without dot.
For Example: In below example the sap.app --> id is sap.demo.bpm.startworkflow so the application ID becomes sapdemobpmstartworkflow

- Now you need to update the code in Controller.js to first make a GET API call for XSRF token
/<applicationID>/bpmworkflowruntime/v1/xsrf-token


For Example:

/sapdemobpmstartworkflow/bpmworkflowruntime/v1/xsrf-token- Next, you will use this xsrf-token to make the POST API call to instantiate workflow. You will need to pass the body which contains the information of workflow definition Id and the initial context. (know more about the APIs from here)
/<applicationID>/bpmworkflowruntime/v1/workflow-instances


For Example:

/sapdemobpmstartworkflow/bpmworkflowruntime/v1/workflow-instances
These are the 3 simple steps you need to do in your application to start workflow from any of your custom application.
Quick summary of all the steps:
- Create MTA Project.
- Create Workflow Module in your project and design your workflow.
- Create Fiori Module with standalone app-router and add authentication.
- Update the xs-app.json of the Fiori Module to add the bpmworkflowruntime route.
- Design your Fiori application with the needed input fields and a start button.
- Update the Controller.js of your Fiori application to code the start button by calling the workflow APIs to first get xsrf-token and then instantiate the workflow.
- Don’t forget to prefix the API URL with application ID.
- Build and deploy the application.
- Finally access the application from cloud cockpit. Click to start the application and prefix the index.html with application ID. For Example:
https://mytrial-dev-workflow-start-sample-approuter.cfapps.us10.hana.ondemand.com/sapdemobpmstartworkflow/index.html
I have also created a sample project that will help you identify the needed changes in your custom application to start the workflow.
- Download the project.
- extract the zip and import the tar file in your business application studio.
- open mta.yaml file and adjust the workflow instance name and the plan based on the cloud tenant you are going to deploy the application (line numbers 9 and 45 to 49 in sample application),
- build & deploy the application.
>>>>>>>>>>>>>>>>>>>>>>>>>>>>>>>>>>>>>>>>>>>>>>>>>>>>>>>>>>>>>>>>>>>>>
<<<< SAP MANAGED APP-ROUTER BASED FIORI APPLICATION >>>>>>>>>>>>>>
I assume the following:
- you have an account in SAP Business Technology Platform.
- you have enabled Business Application Studio subscription
- you have Developer role assigned to your user to access application studio
- you have created a Fiori application in studio, based on standard SAP Managed based app-router which will have input fields and a button to start the workflow (learn more how to do it from here)
- While creating the application project, ensure that you select these options:
- Do you want to add authentication? - Yes
- Do you want to add a data service? - No
- While creating the application project, ensure that you select these options:
- You have a Workflow Service Instance based destination created.
- you have Workflow entitlement (learn more about setup from here)
- you have created workflow service instance in your cloud account with minimum scope of WORKFLOW_INSTANCE_START.
- you have WorkflowDeveloper, WorkflowInitiator and WorkflowAdmin roles assigned to your user which will be used to access the workflow editor in app-studio, start the workflow using APIs and access the Monitor Workflow apps respectively.
- You have already created and deployed a workflow in your account. (learn more from our blog or from the help portal)
- you know how to work with Workflow API (here is the link)
Step 1 : Update mta.yaml
Locate the destination module with the destination-content suffix and Change the scope of the destination by replacing "instance:" with "subaccount"

Step 2 : Update xs-app.json of Fiori Module
Next update the route in your Fiori Module application. For that, open xs-app.json file of your fiori module and add this route. Make sure of the following:
- you add this route before the generic routes.
- “authenticationMethod” is “route” (check line 3 in screenshot)
{

    "source": "^/bpmworkflowruntime/(.*)$",

    "target": "/$1",

    "service": "com.sap.bpm.workflow",

    "endpoint": "workflow_rest_url",

    "authenticationType": "xsuaa"

},
Step 3: Update Controller.js of Fiori Module to call Workflow APIs
Update Controller.js file to call workflow start APIs. Before calling the workflow instance APIs to start the workflow, you need to first get the xsrf-token and then call the API.
- To do so, you will also need information of the application ID, service name and application version that will be prefixed with API host URL. This is needed because your custom application will be routed via the app-router application. You can get this information from the manifest.json file
You can use this code to get the module path:
var appId = this.getOwnerComponent().getManifestEntry("/sap.app/id");

var appPath = appId.replaceAll(".", "/");

var appModulePath = jQuery.sap.getModulePath(appPath);
>>>>>>>>>>>>>>>>>>>>>>>>>>>>>>>>>>>>>>>>>>>>>>>>>>>>>>>>>>>>>>>>>>>>>>
Troubleshooting:
- You get 403 forbidden and a response header x-csrf-token: Required while calling the API:
- If you have developed Managed AppRouter based application,
- and have used authenticationType as xsuaa in xsapp.json
- and have not disabled csrfProtection
- If you have developed Managed AppRouter based application,
Solution: Add an XSRF token call in your application before calling the main API.
- If you get 403 forbidden without response header in browser logs, and 500 Internal Server error in the application logs similar to below example:
GET request to /c5a6cd3.-startwfui-0.0.1/bpmworkflowruntime/v1/xsrf-token completed with status 500 Failed to find credentials for service com.sap.bpm.workflow for request url: /c5a6cd3.-startwfui-0.0.1/bpmworkflowruntime/v1/xsrf-token stack: Error: Failed to find credentials for service com.sap.bpm.workflow for request url: /c5a6cd3.-startwfui-0.0.1/bpmworkflowruntime/v1/xsrf-token at applyRewriteRule
Solution: Create a Destination in BTP cockpit using workflow service-instance
Reason: Managed AppRouter looks for destination with property “sap.cloud.service” that matches the xs-app.json value and picks up the credentials from this destination while calling the API.
>>>>>>>>>>>>>>>>>>>>>>>>>>>>>>>>>>>>>>>>>>>>>>>>>>>>>>>>>>>>>>>>>>>>>>
This is the first blog of the series where I intend to provide answers to all your queries on using custom application with workflow in cloud foundry. In upcoming blogs, I will guide you:
- how to add start workflow custom UI as a tile in Portal Fiori Launchpad,
- how to use custom task UI as user task in your workflow
- how to call external service in the custom task UI
Labels:
45 Comments
You must be a registered user to add a comment. If you've already registered, sign in. Otherwise, register and sign in.
Labels in this area
-
ABAP CDS Views - CDC (Change Data Capture)
2 -
AI
1 -
Analyze Workload Data
1 -
BTP
1 -
Business and IT Integration
2 -
Business application stu
1 -
Business Technology Platform
1 -
Business Trends
1,658 -
Business Trends
91 -
CAP
1 -
cf
1 -
Cloud Foundry
1 -
Confluent
1 -
Customer COE Basics and Fundamentals
1 -
Customer COE Latest and Greatest
3 -
Customer Data Browser app
1 -
Data Analysis Tool
1 -
data migration
1 -
data transfer
1 -
Datasphere
2 -
Event Information
1,400 -
Event Information
66 -
Expert
1 -
Expert Insights
177 -
Expert Insights
296 -
General
1 -
Google cloud
1 -
Google Next'24
1 -
Kafka
1 -
Life at SAP
780 -
Life at SAP
13 -
Migrate your Data App
1 -
MTA
1 -
Network Performance Analysis
1 -
NodeJS
1 -
PDF
1 -
POC
1 -
Product Updates
4,577 -
Product Updates
342 -
Replication Flow
1 -
RisewithSAP
1 -
SAP BTP
1 -
SAP BTP Cloud Foundry
1 -
SAP Cloud ALM
1 -
SAP Cloud Application Programming Model
1 -
SAP Datasphere
2 -
SAP S4HANA Cloud
1 -
SAP S4HANA Migration Cockpit
1 -
Technology Updates
6,873 -
Technology Updates
420 -
Workload Fluctuations
1
Related Content
- How to use AI services to translate Picklists in SAP SuccessFactors - An example in Technology Blogs by SAP
- IoT - Ultimate Data Cyber Security - with Enterprise Blockchain and SAP BTP 🚀 in Technology Blogs by Members
- Embracing TypeScript in SAPUI5 Development in Technology Blogs by Members
- Switch on gCTS (for existing packages) in Technology Blogs by SAP
- When to Use Multi-Off in 3SL in Technology Blogs by SAP
Top kudoed authors
| User | Count |
|---|---|
| 36 | |
| 25 | |
| 17 | |
| 13 | |
| 8 | |
| 7 | |
| 7 | |
| 6 | |
| 6 | |
| 6 |