
- SAP Community
- Products and Technology
- Technology
- Technology Blogs by SAP
- Step 9 with SAP Cloud SDK: Implement and Deploy a ...
Technology Blogs by SAP
Learn how to extend and personalize SAP applications. Follow the SAP technology blog for insights into SAP BTP, ABAP, SAP Analytics Cloud, SAP HANA, and more.
Turn on suggestions
Auto-suggest helps you quickly narrow down your search results by suggesting possible matches as you type.
Showing results for
Advisor
Options
- Subscribe to RSS Feed
- Mark as New
- Mark as Read
- Bookmark
- Subscribe
- Printer Friendly Page
- Report Inappropriate Content
09-09-2017
2:22 AM
This tutorial will show how to create a SAPUI5 frontend based on the services of the earlier blog posts. In particular, it will show how to:
The resulting application will show a list of business partners from the ERP that is connected to the backend.
Note: This post is part of a series. For a complete overview visit the SAP Cloud SDK Overview.

The easiest way to start developing a SAPUI5 application is to utilize the project templates of the WebIDE (https://www.sap.com/developer/topics/sap-webide.html). To access it, you need to create an account on SAP Cloud Platform as described in Step 2 of the SAP Cloud SDK Overview. After creating an account, you can activate and go to the WebIDE from the services tab. To create a new template-based project, select File > New > Project from Template and select SAPUI5 Application and create a new project using the wizard. For the purposes of the tutorial, all the default settings are fine. In the following code snippets, we will assume that the project was named sdk-tutorial-frontend. If you copy the code and have used a different project name, make sure to replace sdk-tutorial-frontend with the project name you have chosen during the wizard
The project will automatically have the following structure:
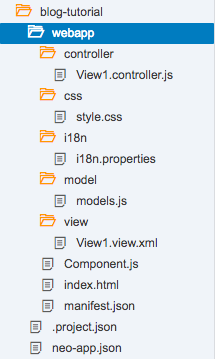
The webapp folder contains the actual application which follows the Model View Controller pattern and therefore is split into the View1.view.xml, models.js, and View1.controller.js. Also, there is a separate style.css file, which can be used to customize the look of your app (by default all controls will be Fiori compliant). Finally, there is the i18n.properties file. I18n stands for internationalization and the file itself will serve as a base for translation of your app. For the sake of simplicity, we will not use i18n to define the UI texts in this tutorial. You can read more about it in the SAPUI5 documentation.
The other files contain configuration or are responsible for loading and initializing SAPUI5. Before touching the actual app, it is recommended to update the index.html to fetch the SAPUI5 sources from the official CDN. To do that, you need to change it in the script tag in line 11 as follows:
You can use this link to the latest stable version of SAPUI5 for the tutorial or for testing purposes, but avoid it for productive use. In an actual app, you always should specify an SAPUI5 version explicitly.
When opening the view, the WebIDE gives 2 options, the layout editor, and the code editor. The code editor is the more powerful tool which gives you the ability to change your code directly, while the layout editor shows you a visual editor, providing an approximated preview of your changes, and uses drag and drop of a control catalog to edit your view. You can use either editor to follow this tutorial, but we will show the actual code as you would see in the code editor since it is easier to compare and avoid mistakes this way.
To get an overview of what controls SAPUI5 provides, you can use the SAPUI5 Explored website to see a searchable list with interactive examples.
For our app, we want to display a list of business partners, so a quick search in Explored suggests that we should use sap.m.List control. Controls are organized in libraries and in the beginning, you will mostly use controls from sap.m and sap.ui.core. These controls are by default responsive and will adjust to fit the device that displays the website.
When you open the View1.view.xml, it will already contain the basic structure needed for a SAPUI5 application. In the following code, you only need to copy the List tag and the StandardListItem and put it between the content tag in your own View1.view.xml.
This will already create the list we want to display, but of course, there is no data loaded yet. This will be explained in the next part.
In the previous steps of this tutorial series, we already created a REST Service that requests and returns a list of business partners from SAP S/4HANA. To call this service and connect its data to our list, we use jQuery and SAPUI5's JSONModel.
This business logic will be implemented as part of the controller. As with the view, the template already provides some basic structure.
To add the functionality, we need to use jQuery.get() to retrieve the data. Because of the asynchronous nature of the call, we need to use the done callback to put the data in a JSONModel and connect it with the view. Additionally, we need to include the JSONModel by adding it as the first parameter of the sap.ui.define() function. You can also add jQuery there, but SAPUI5 already guarantees that jQuery is included everywhere. Adapt the controller View1.controller.js as follows.
Now, this simple app is already completed. To try it out, we can use the WebIDE's deployment or follow the rest of the tutorial to deploy the app on Cloud Foundry. To use the WebIDE deployment, just right-click the project folder on the left and select Run > Run As > Web Application. If we use this method, it will not be connected to our REST Service as they are in different environments that can't communicate. Instead of looking at an empty list, we can replace the .done() callback with the code below which uses dummy data so you can verify the functionality of the app without a backend. Just make sure to revert this change once you deploy on Cloud Foundry.
After you implemented these steps, the application should look like this:

Make sure to replace the .always() callback with .done() from the previous snippet once you deploy on Cloud Foundry. Afterwards, download the project files by right-clicking the project and selecting Export. It will download a .zip archive, that can be easily extracted.
Using the SAP Cloud Platform Cloud Foundry for your deployment gives several benefits. One of these benefits is the flexibility to structure the project as a monolith or split it into several micro services. In previous blog posts, we already showed how to develop and deploy an API service to Cloud Foundry as well as Neo. If you have not setup the backend yet, you can follow the other tutorials in this series which are linked in the SAP Cloud SDK Overview.
In the following, we want to explore how to deploy a full web application that uses data provided by our service. We will show both the monolithic approach as well as a more micro service oriented architecture.
Deploying the whole application including backend and frontend in a monolithic approach can be very easy. In order to have a better understanding of our final goal look at the picture:
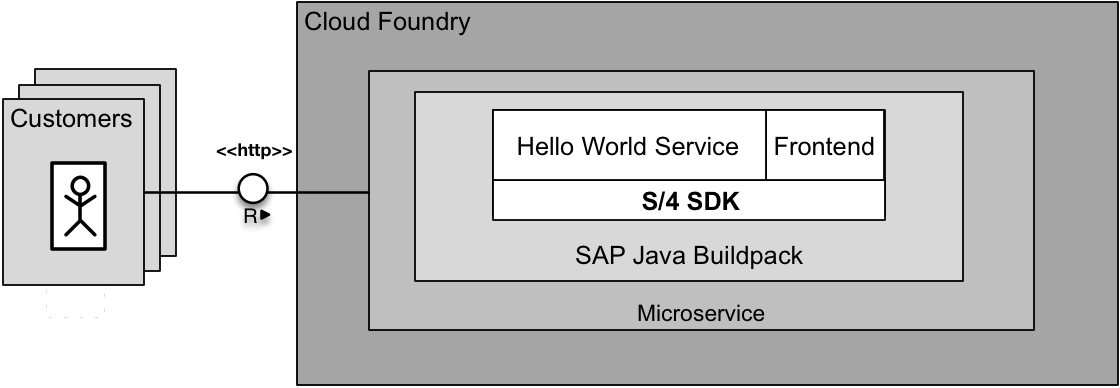
We utilize the same server to serve both the service URL's as well as the frontend files. To do this we extract the downloaded archive and copy theses files to the webapps folder of the backend.
To deploy the application to CloudFoundry, a proper manifest.yml is needed, as well as other configuration outlined in step 4.
Finally, we build the application and deploy to CloudFoundry:
If your deployment was successful, the Cloud Foundry CLI will show you information about the deployment, that looks like the following snippet.
To verify that the deployment was successful, you can enter the URL in your browser and see the application showing the list of business partners.
This approach allows for a quick initial deployment and a simple deployment process. For small applications like this business partner explorer, this approach will be preferable, but as the application grows and needs to scale it will get progressively harder and more expensive. Frontend and backend cannot be decoupled and scaled individually, also to make changes to either you need to deploy both which will result in more downtime unless you use blue green deployments.
We assume that you know what the Approuter is for and know the basics of how to configure it.
The micro service approach decouples the separate components and allows scaling them individually. To do this separation, we need to run the frontend in its own container. We deploy the frontend application completely separate in its own container. For that, we use the staticfile_buildpack which is provided by default in Cloud Foundry. In the following, we will show how this can be done.
As in the monolithic approach, here is a picture of our final setup:

As the frontend will be its own service now, it should be in a separate folder from the backend (instead of being part of the backend as with the monolithic approach). Once you moved the code to a separate folder, you need to add a manifest.yml as it will need a different Cloud Foundry configuration than the backend now.
Like in the monolithic step we start with unpacking the downloaded zip.
Now create here a new manifest.yml with the following content:
Push the frontend to CloudFoundry:
When you point your browser to firstapp-frontend-USERNAME.cfapps.sap.hana.ondemand.com you should see the application running but without data. To connect the frontend to our previous deployed backend we need a proper configured approuter.
Install the AppRouter like in step 7 or just reuse your existing installation.
As for all application that you want to deploy on CloudFoundry, we need a manifest file. You also need to add two routes to the AppRouter. The achieve this, adjust the manifest.yml and xs-app.json of the AppRouter. Make sure that the destination names and URLs match your own deployment. The name for the destinations is arbitrary. You can choose them on your own. We will use them in the next step to point our wished URL to the actual one.
Within the xs-app.json we configure which URL path shall be handled and resolves to what destination. For instance: url.to.router/businesspartners resolves to url.in.CF/businesspartners. If you want to know more on that go back to step 7 and read there.
Finally, just run the Cloud Foundry CLI to deploy the AppRouter, the backend, and the frontend.
After you deployed all 3 components, the application should be available just like before.
Since we didn't touch the deployed backend from the monolithic step it should run right away. You can safely remove the frontend code from the webapps folder in the backend and redeploy.
To summarize, the micro service approach allows you to independently develop, deploy and scale the applications but also introduced operational complexity. A monolithic approach has lower operational complexity and is faster to setup initially but can run into scaling issues later. To choose the right way for you, you will have to evaluate the size and scope of your project and how the different approaches will help you achieve your goal.

- Create a new SAPUI5 project using the template
- Use SAPUI5 controls to create the view
- Consume the REST service
- Deploy the application to Cloud Foundry
- Using a monolithic approach
- Using a micro service approach
The resulting application will show a list of business partners from the ERP that is connected to the backend.
Note: This post is part of a series. For a complete overview visit the SAP Cloud SDK Overview.
Create a new SAPUI5 Project Using the Template
The easiest way to start developing a SAPUI5 application is to utilize the project templates of the WebIDE (https://www.sap.com/developer/topics/sap-webide.html). To access it, you need to create an account on SAP Cloud Platform as described in Step 2 of the SAP Cloud SDK Overview. After creating an account, you can activate and go to the WebIDE from the services tab. To create a new template-based project, select File > New > Project from Template and select SAPUI5 Application and create a new project using the wizard. For the purposes of the tutorial, all the default settings are fine. In the following code snippets, we will assume that the project was named sdk-tutorial-frontend. If you copy the code and have used a different project name, make sure to replace sdk-tutorial-frontend with the project name you have chosen during the wizard
The project will automatically have the following structure:
The webapp folder contains the actual application which follows the Model View Controller pattern and therefore is split into the View1.view.xml, models.js, and View1.controller.js. Also, there is a separate style.css file, which can be used to customize the look of your app (by default all controls will be Fiori compliant). Finally, there is the i18n.properties file. I18n stands for internationalization and the file itself will serve as a base for translation of your app. For the sake of simplicity, we will not use i18n to define the UI texts in this tutorial. You can read more about it in the SAPUI5 documentation.
The other files contain configuration or are responsible for loading and initializing SAPUI5. Before touching the actual app, it is recommended to update the index.html to fetch the SAPUI5 sources from the official CDN. To do that, you need to change it in the script tag in line 11 as follows:
<script id="sap-ui-bootstrap"

	src="https://sapui5.hana.ondemand.com/resources/sap-ui-core.js"

	data-sap-ui-libs="sap.m"

	data-sap-ui-theme="sap_belize"

	data-sap-ui-compatVersion="edge"

	data-sap-ui-resourceroots='{"sdk-tutorial-frontend": ""}'>

</script>
You can use this link to the latest stable version of SAPUI5 for the tutorial or for testing purposes, but avoid it for productive use. In an actual app, you always should specify an SAPUI5 version explicitly.
How to use SAPUI5 Controls to Create the View
When opening the view, the WebIDE gives 2 options, the layout editor, and the code editor. The code editor is the more powerful tool which gives you the ability to change your code directly, while the layout editor shows you a visual editor, providing an approximated preview of your changes, and uses drag and drop of a control catalog to edit your view. You can use either editor to follow this tutorial, but we will show the actual code as you would see in the code editor since it is easier to compare and avoid mistakes this way.
To get an overview of what controls SAPUI5 provides, you can use the SAPUI5 Explored website to see a searchable list with interactive examples.
For our app, we want to display a list of business partners, so a quick search in Explored suggests that we should use sap.m.List control. Controls are organized in libraries and in the beginning, you will mostly use controls from sap.m and sap.ui.core. These controls are by default responsive and will adjust to fit the device that displays the website.
When you open the View1.view.xml, it will already contain the basic structure needed for a SAPUI5 application. In the following code, you only need to copy the List tag and the StandardListItem and put it between the content tag in your own View1.view.xml.
This will already create the list we want to display, but of course, there is no data loaded yet. This will be explained in the next part.
<mvc:View controllerName="sdk-tutorial-frontend.controller.View1"

          xmlns:html="http://www.w3.org/1999/xhtml" xmlns:mvc="sap.ui.core.mvc"

          displayBlock="true" xmlns="sap.m">

    <App>

        <pages>

            <Page title="Business Partner Explorer">

                <content>

                    <!-- Add this between the content tags -->

                    <List headerText="Business Partners"

                          items="{businessPartner>/}">

                        <StandardListItem

                                title="{businessPartner>LastName}, {businessPartner>FirstName}"

                                description="ID: {businessPartner>BusinessPartner}"/>

                    </List>

                </content>

            </Page>

        </pages>

    </App>

</mvc:View>
Consuming the REST Service
In the previous steps of this tutorial series, we already created a REST Service that requests and returns a list of business partners from SAP S/4HANA. To call this service and connect its data to our list, we use jQuery and SAPUI5's JSONModel.
This business logic will be implemented as part of the controller. As with the view, the template already provides some basic structure.
To add the functionality, we need to use jQuery.get() to retrieve the data. Because of the asynchronous nature of the call, we need to use the done callback to put the data in a JSONModel and connect it with the view. Additionally, we need to include the JSONModel by adding it as the first parameter of the sap.ui.define() function. You can also add jQuery there, but SAPUI5 already guarantees that jQuery is included everywhere. Adapt the controller View1.controller.js as follows.
sap.ui.define([

    "sap/ui/core/mvc/Controller",

    "sap/ui/model/json/JSONModel"

], function(Controller, JSONModel) {

    "use strict";

    return Controller.extend("sdk-tutorial-frontend.controller.View1", {

        onInit: function () {

            var view = this.getView();


            jQuery.get("/businesspartners")

                .done(function (data) {

                    var model = new JSONModel(data);

                    view.setModel(model, "businessPartner");

                });

        }

    });

});
Now, this simple app is already completed. To try it out, we can use the WebIDE's deployment or follow the rest of the tutorial to deploy the app on Cloud Foundry. To use the WebIDE deployment, just right-click the project folder on the left and select Run > Run As > Web Application. If we use this method, it will not be connected to our REST Service as they are in different environments that can't communicate. Instead of looking at an empty list, we can replace the .done() callback with the code below which uses dummy data so you can verify the functionality of the app without a backend. Just make sure to revert this change once you deploy on Cloud Foundry.
sap.ui.define([

    "sap/ui/core/mvc/Controller",

    "sap/ui/model/json/JSONModel"

], function(Controller, JSONModel) {

    "use strict";

    return Controller.extend("sdk-tutorial-frontend.controller.View1", {

        onInit: function () {

            var view = this.getView();


            jQuery.get("/businesspartners")

                .always(function () {

                    var data = [{

                        "BusinessPartner": "1",

                        "FirstName": "John",

                        "LastName": "Doe"

                    }, {

                        "BusinessPartner": "2",

                        "FirstName": "Jane",

                        "LastName": "Roe"

                    }, {

                        "BusinessPartner": "3",

                        "FirstName": "John",

                        "LastName": "Smith"

                    }, {

                        "BusinessPartner": "4",

                        "FirstName": "Carla",

                        "LastName": "Coe"

                    }];

                    var model = new JSONModel(data);

                    view.setModel(model, "businessPartner");

                });

        }

    });

});
After you implemented these steps, the application should look like this:
Make sure to replace the .always() callback with .done() from the previous snippet once you deploy on Cloud Foundry. Afterwards, download the project files by right-clicking the project and selecting Export. It will download a .zip archive, that can be easily extracted.
Deploy the Application to Cloud Foundry
Using the SAP Cloud Platform Cloud Foundry for your deployment gives several benefits. One of these benefits is the flexibility to structure the project as a monolith or split it into several micro services. In previous blog posts, we already showed how to develop and deploy an API service to Cloud Foundry as well as Neo. If you have not setup the backend yet, you can follow the other tutorials in this series which are linked in the SAP Cloud SDK Overview.
In the following, we want to explore how to deploy a full web application that uses data provided by our service. We will show both the monolithic approach as well as a more micro service oriented architecture.
Deploy the Application to Cloud Foundry Using a Simple Monolith Approach
Prerequisites
- You finished step 4 in the series https://blogs.sap.com/2017/05/21/step-4-with-sap-s4hana-cloud-sdk-calling-an-odata-service/
Deploying the whole application including backend and frontend in a monolithic approach can be very easy. In order to have a better understanding of our final goal look at the picture:
We utilize the same server to serve both the service URL's as well as the frontend files. To do this we extract the downloaded archive and copy theses files to the webapps folder of the backend.
cd <PATH_TO_DOWNLOADED_ZIP>

unzip ui5-webapp.zip

cp -a ui5-webapp/webapp/* /path/to/java/application/application/src/main/webapp/
To deploy the application to CloudFoundry, a proper manifest.yml is needed, as well as other configuration outlined in step 4.
Finally, we build the application and deploy to CloudFoundry:
mvn clean install

cf push
If your deployment was successful, the Cloud Foundry CLI will show you information about the deployment, that looks like the following snippet.
requested state: started

instances: 1/1

usage: 512M x 1 instances

urls: firstapp-USERNAME.cfapps.sap.hana.ondemand.com

last uploaded: Fri Jul 28 12:00:36 UTC 2017

stack: cflinuxfs2

buildpack: sap_java_buildpack
To verify that the deployment was successful, you can enter the URL in your browser and see the application showing the list of business partners.
This approach allows for a quick initial deployment and a simple deployment process. For small applications like this business partner explorer, this approach will be preferable, but as the application grows and needs to scale it will get progressively harder and more expensive. Frontend and backend cannot be decoupled and scaled individually, also to make changes to either you need to deploy both which will result in more downtime unless you use blue green deployments.
Deploy the Application to Cloud Foundry Micro Service Approach
Prerequisites
- you have finished and understood step 7 in the series: https://blogs.sap.com/2017/07/18/step-7-with-sap-s4hana-cloud-sdk-secure-your-application-on-sap-clo...
We assume that you know what the Approuter is for and know the basics of how to configure it.
The micro service approach decouples the separate components and allows scaling them individually. To do this separation, we need to run the frontend in its own container. We deploy the frontend application completely separate in its own container. For that, we use the staticfile_buildpack which is provided by default in Cloud Foundry. In the following, we will show how this can be done.
As in the monolithic approach, here is a picture of our final setup:
As the frontend will be its own service now, it should be in a separate folder from the backend (instead of being part of the backend as with the monolithic approach). Once you moved the code to a separate folder, you need to add a manifest.yml as it will need a different Cloud Foundry configuration than the backend now.
Like in the monolithic step we start with unpacking the downloaded zip.
cd <PATH_TO_DOWNLOADED_ZIP>

unzip ui5-webapp.zip

cd ~

mkdir firstapp-frontend


cd firstapp-frontend

cp -a <PATH_TO_DOWNLOADED_ZIP>ui5-webapp/webapp/* .
Now create here a new manifest.yml with the following content:
---

applications:

- name: firstapp-frontend

  memory: 64M

  host: firstapp-frontend-USERNAME

  buildpack: staticfile_buildpack
Push the frontend to CloudFoundry:
cf pushWhen you point your browser to firstapp-frontend-USERNAME.cfapps.sap.hana.ondemand.com you should see the application running but without data. To connect the frontend to our previous deployed backend we need a proper configured approuter.
Install the AppRouter like in step 7 or just reuse your existing installation.
As for all application that you want to deploy on CloudFoundry, we need a manifest file. You also need to add two routes to the AppRouter. The achieve this, adjust the manifest.yml and xs-app.json of the AppRouter. Make sure that the destination names and URLs match your own deployment. The name for the destinations is arbitrary. You can choose them on your own. We will use them in the next step to point our wished URL to the actual one.
---

applications:

- name: approuter

  host: approuter-p1942765239trial

  memory: 128M

  path: approuter

  buildpack: nodejs_buildpack

  env:

    TENANT_HOST_PATTERN: 'approuter-(.*).cfapps.sap.hana.ondemand.com'

    destinations: '[

        {

          "name":"business-partner-api",

          "url" :"https://firstapp-USERNAME.cfapps.sap.hana.ondemand.com/",

          "forwardAuthToken": true

        }, {

          "name":"business-partner-frontend",

          "url" :"https://firstapp-frontend-USERNAME.cfapps.sap.hana.ondemand.com/"

        }

      ]'

  services:

  - my-xsuaa
Within the xs-app.json we configure which URL path shall be handled and resolves to what destination. For instance: url.to.router/businesspartners resolves to url.in.CF/businesspartners. If you want to know more on that go back to step 7 and read there.
{

  "welcomeFile": "index.html",

  "routes": [{

    "source": "^/businesspartners",

    "destination": "business-partner-api"

  },

  {

    "source": "/",

    "destination": "business-partner-frontend"

  }]

}
Finally, just run the Cloud Foundry CLI to deploy the AppRouter, the backend, and the frontend.
cd approuter/

cf push

cd ../firstapp-frontend

cf push
After you deployed all 3 components, the application should be available just like before.
Since we didn't touch the deployed backend from the monolithic step it should run right away. You can safely remove the frontend code from the webapps folder in the backend and redeploy.
To summarize, the micro service approach allows you to independently develop, deploy and scale the applications but also introduced operational complexity. A monolithic approach has lower operational complexity and is faster to setup initially but can run into scaling issues later. To choose the right way for you, you will have to evaluate the size and scope of your project and how the different approaches will help you achieve your goal.
- SAP Managed Tags:
- SAPUI5,
- SAP Cloud SDK,
- SAP S/4HANA,
- SAP S/4HANA Public Cloud
Labels:
22 Comments
You must be a registered user to add a comment. If you've already registered, sign in. Otherwise, register and sign in.
Labels in this area
-
ABAP CDS Views - CDC (Change Data Capture)
2 -
AI
1 -
Analyze Workload Data
1 -
BTP
1 -
Business and IT Integration
2 -
Business application stu
1 -
Business Technology Platform
1 -
Business Trends
1,658 -
Business Trends
93 -
CAP
1 -
cf
1 -
Cloud Foundry
1 -
Confluent
1 -
Customer COE Basics and Fundamentals
1 -
Customer COE Latest and Greatest
3 -
Customer Data Browser app
1 -
Data Analysis Tool
1 -
data migration
1 -
data transfer
1 -
Datasphere
2 -
Event Information
1,400 -
Event Information
67 -
Expert
1 -
Expert Insights
177 -
Expert Insights
301 -
General
1 -
Google cloud
1 -
Google Next'24
1 -
GraphQL
1 -
Kafka
1 -
Life at SAP
780 -
Life at SAP
13 -
Migrate your Data App
1 -
MTA
1 -
Network Performance Analysis
1 -
NodeJS
1 -
PDF
1 -
POC
1 -
Product Updates
4,577 -
Product Updates
346 -
Replication Flow
1 -
REST API
1 -
RisewithSAP
1 -
SAP BTP
1 -
SAP BTP Cloud Foundry
1 -
SAP Cloud ALM
1 -
SAP Cloud Application Programming Model
1 -
SAP Datasphere
2 -
SAP S4HANA Cloud
1 -
SAP S4HANA Migration Cockpit
1 -
Technology Updates
6,873 -
Technology Updates
430 -
Workload Fluctuations
1
Related Content
- Show Loading indicator while the Ui5 App loads! in Technology Blogs by Members
- SAP LICENSE RENEWAL FROM BASIS END #ATR in Technology Blogs by Members
- Onboarding Users in SAP Quality Issue Resolution in Technology Blogs by SAP
- How to use AI services to translate Picklists in SAP SuccessFactors - An example in Technology Blogs by SAP
- Dynamic Approver based on dynamic task determination. in Technology Q&A
Top kudoed authors
| User | Count |
|---|---|
| 30 | |
| 17 | |
| 15 | |
| 13 | |
| 11 | |
| 9 | |
| 8 | |
| 8 | |
| 8 | |
| 7 |