
- SAP Community
- Products and Technology
- Technology
- Technology Blogs by SAP
- Step 7 with SAP Cloud SDK: Secure your Application...
Technology Blogs by SAP
Learn how to extend and personalize SAP applications. Follow the SAP technology blog for insights into SAP BTP, ABAP, SAP Analytics Cloud, SAP HANA, and more.
Turn on suggestions
Auto-suggest helps you quickly narrow down your search results by suggesting possible matches as you type.
Showing results for
Employee
Options
- Subscribe to RSS Feed
- Mark as New
- Mark as Read
- Bookmark
- Subscribe
- Printer Friendly Page
- Report Inappropriate Content
07-18-2017
1:09 PM
Disclaimer:
This blog post is only applicable for the latest version 2 of the SAP Cloud SDK. You can find an updated tutorial for version 3 over at our tutorial page.
The following steps will explain how to secure applications in SAP Cloud Platform, CloudFoundry which are built based on the SAP Cloud SDK.
Note: This post is part of a series. For a complete overview visit the SAP Cloud SDK Overview.
Goal of this blog post
This tutorial will cover how to protect your Java-based Hello World microservice with authenticated and authorized users. To achieve this the tutorial covers the following aspects:
- Setting up and configuring the App Router component as a central entry point to your microservice landscape to handle authentication and authorization for you.
- Protect your Java microservice so that it only accepts requests based on a valid JSON Web Token (JWT) that is received from the App Router.
- Assign roles and scopes to your application users and let your backend deal with authorization information.
Prerequisites
- You did at least all steps until Step 3 with SAP Cloud SDK: HelloWorld on SCP CloudFoundry.
- If you created already a Cloud Foundry Trial account in the past, please verify that the global account is not a standalone (account created before Mai 2017) as we have at the moment a small bug with standalone accounts. We are working on it and I will update the blog as soon as this is perfectly working. In the meantime, I would suggest you to create a new Trial Account if you want to test it now (cf. https://blogs.sap.com/2017/07/09/how-to-use-the-sap-cloud-platform-connectivity-and-the-cloud-connec....
- To make the examples a bit more plastic, I created a completely new trial using a P-User with a throw-away e-mail address.
Concepts
Before we dive deeper into the real setup of the architecture, let's quickly review the architecture we intend to go for.
Figure 1 presents the final setup. First, we still have our existing "Hello World" or "Business Partner" Java-based microservice that we have created in the previous tutorials. However, instead of letting the customer access this application directly, we will use the so-called Application Router (App Router) that serves two purposes.
On the one hand, the App Router is a general entry point into the world of microservices. The main idea is that you can split an application into multiple microservices with independent deployability, polyglot runtimes & persistence and independent teams. Therefore, a central entry component is required that hides the complexity of the microservice landscape from the end customer.
On the other hand, the App Router is mainly responsible for managing authentication flows. The App Router takes incoming, unauthenticated requests from users and initiates an OAuth2 flow with the XSUAA service. The XSUAA service is an SAP-specific fork of CloudFoundry's UAA service to deal with authentication and authorization (it may again delegate this aspect to other providers such as external Identity Providers, see later in this tutorial). If the user authenticates at the XSUAA, it will respond with a JSON Web Token (JWT) containing the authenticated users as well as all scopes that he or she has been granted.

Figure 1: Authentication Flow during Runtime
The JWT is passed by the App Router to the underlying microservices so that they are freed up from this task. At the same time, these microservices can only be accessed with a valid JWT, hence, are protected from unauthenticated traffic.
The JWT contains a signature that needs to be verifiable by every microservice to establish trust. Hence, every service require a key (client-secrets or public keys) to verify this signature and reject any requests with non-valid JWTs. Therefore, every service has to maintain a service binding to the XSUAA that provides this information for runtime verification (Figure 2). To enable this, every microservice binds to a dedicated XSUAA instance which writes this information into the VCAP_SERVICES environment variable which the microservices can use to verify any token's validity.
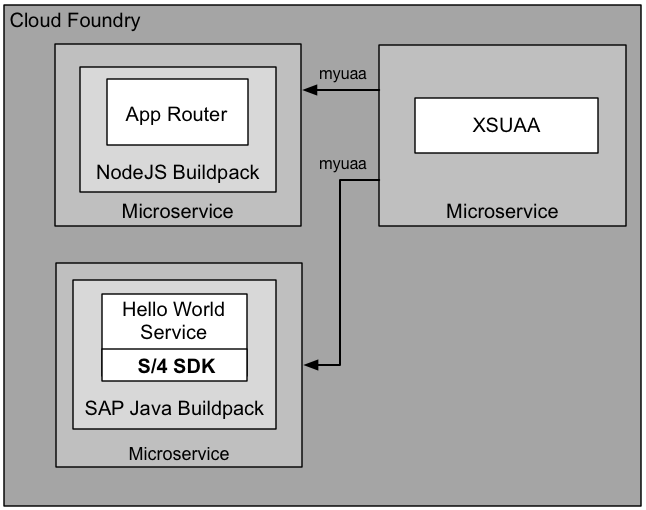
Figure 2: Provisioning view with XSUAA binding
With these basics in mind, let's create the picture of Figure 1 and Figure 2 by setting up the App Router, XSUAA and backend microservices to enable full application security.
Setup the App Router to authenticate your users.
We will let Cloud Foundry retrieve the App Router automatically on deployment. To achieve this, we will first setup the necessary structure.
- Go to your favourite <destLocation> and create the approuter directory
cd <destLocation>

mkdir approuter

cd approuter
- Place the following package.json in your approuter directory
{

  "name": "approuter",

  "dependencies": {

    "@sap/approuter": "*"

  },

  "scripts": {

    "start": "node node_modules/@sap/approuter/approuter.js"

  }

}
- Within <destLocation>/approuter create a new file called xs-app.json with the following content:
{

  "welcomeFile": "index.html",

  "routes": [{

    "source": "/",

    "target": "/",

    "destination": "app-destination"

  }]

}
- Last but not least create a new manifest.yml file within <destLocation> for the AppRouter microservice with the following content:
---
applications:
- name: approuter
routes:
- route: approuter-<subdomain>.cfapps.<region_id>.hana.ondemand.com
path: approuter
memory: 128M
buildpacks:
- nodejs_buildpack
env:
TENANT_HOST_PATTERN: 'approuter-(.*).cfapps.<region_id>.hana.ondemand.com'
destinations: '[{"name":"app-destination", "url" :<APPLICATION_URL>, "forwardAuthToken": true}]'
services:
- my-xsuaa
Adapt the file as follows:
- Replace <subdomain> with your subdomain. You will find your subdomain in the CF cockpit by heading to the overview page of your sub-account:

- Swap out both instances of <region_id> with your specific region (e.g. eu10). You can find it for instance included in the API endpoint (also listed in the image above) just before hana.ondemand.com. More details on the region specific URLs can be found here.
- In destinations replace <APPLICATION_URL> with the actual URL of your previously deployed app. Again you can find it in the CF cockpit or by listing all existing routes via routes.
Understanding the AppRouter's manifest.yml and xs-app.json:
On Cloud Foundry every sub-account is assigned exactly one subdomain which is associated to exactly one tenant. In a multi-tenant scenario the app router needs to know which tenant to forward to the XSUAA service. This is achieved by including the subdomain in the host, from which the app router will extract it. That is where the TENANT_HOST_PATTER comes into play. It is a variable that declares the pattern how tenants in the URL are identified and handled. For this tutorial we expect the host to conform to approuter-<subdomain>. If you desire different URL patterns, you need to change the route and TENANT_HOST_PATTERN accordingly.
Note that the TENANT_HOST_PATTER variable is only required in real multi-tenant application, i.e, applications where a physical deployment serves multiple clients from the same deployment. We assume in this tutorial series that we want to build multi-tenant applications, as we aim towards cloud-native development. However, this variable is not necessary if you have a single-tenant application. To realize this, the xs-security.json security descriptor may declare "tenant-mode": "dedicated" (see step 5 below).
Moving on to the destinations entry. It is a variable that declares the internal routes from the App Router to the underlying backend microservices. As we only have one microservice yet, we define only one destination called app-destination here. This app-destination is referenced by the previously created xs-app.json file.
Last but not least the services section declares to bind our own XSUAA service instance to the App Router. This binding will ensure a corresponding VCAP_SERVICES entry that holds the client ID, client secret and public key that is required to validate any incoming OAuth token/JWT from the XSUAA service:

Bind the XSUAA Service
Now we need to create a service binding to the XSUAA service. As a prerequisite we require a xs-security.json (security descriptor) file that contains a declaration about authorization scopes we intend to use in our application. In our case, we simply declare a DISPLAY scope that we will use later on to authorize our users. In addition, we declare a so-called role template called "Viewer" that references our DISPLAY scope. We put this file to <destLocation>/xs-security.json. For a more detailed explanation on scopes and role templates, see the appendix of this tutorial. More details on the syntax of the xs-security.json can be found here.
Note 1: that the xsappname has to be unique within the entire XSUAA instance. We follow here the same pattern using our <app-name>-<subdomain>.
Note 2: As explained above: tenant-mode: shared assumes a multi-tenant application and will require the TENANT_HOST_PATTERN variable to be declared. You may also use "tenant-mode": "dedicated" if you develop a single-tenant application.
{

  "xsappname": "firstapp-<subdomain>",

  "tenant-mode": "shared",

  "scopes": [

    {

      "name": "$XSAPPNAME.Display",

      "description": "display"

    }

  ],

  "role-templates": [

    {

      "name": "Viewer",

      "description": "Required to view things in our solution",

      "scope-references"     : [

        "$XSAPPNAME.Display"

      ]

    }

  ]

}
Create the file and change the app name just like before.
We then create a service instance called my-xsuaa of the XSUAA service by issuing the following command and using the xs-security.json file:
cf create-service xsuaa application my-xsuaa -c xs-security.json
If you have created this instance of the XSUAA service before without the xs-security.json parameter, you can unbind and delete the existing instance with these commands before creating it with the above command:
cf unbind-service firstapp my-xsuaa
cf delete-service my-xsuaa
After you have created the XSUAA service instance, deploy the app router using the following (with the appropriate API endpoint of your Cloud Foundry region):
cd <destLocation>

cf api https://api.cf.eu10.hana.ondemand.com

cf login

cf push
Afterwards you should be able to locate the App Router from within your browser using the host name of your deployment, which should face you with the following login page where you can use your user e-mail and password:

After logging in you should see the HelloWorld servlet which is now served by the App Router as a proxy to your Java application:
Protect your backend microservice
After authentication works with the App Router, your java backend service is still fully visible in the web and not protected. We, therefore, need to protect our java microservices as well so that they accept requests with valid JWTs for the current user only. In addition, we will setup the microservice in a way that it deals with authorization, i.e., understands the OAuth scopes from the JWT that we have configured previously using the xs-security.json file.
In the following, we will use the Spring Security framework to protect the microservices. You can also use standard mechanisms of the SAP Java buildpack to achieve the same. If you do not want to use Spring Security please follow the steps here, nonetheless, the concepts described hereinafter apply for both methods.
Install XS Security libs to your local Maven repository:
The first step is to get some additional Java libs from Service Marketplace. To get them, do the following steps:
- Download additional XS security libs from service marketplace:https://launchpad.support.sap.com/#/softwarecenter/search/XS_JAVA
- At the time of writing the latest package is XS_JAVA_4-70001362.ZIP.
- Unzip <destLocation>
- Install XS Security Libs to your local maven repo using:
cd <destLocation>

mvn clean install
Enhance your project's pom.xml
In the second step, we go back to our HelloWorld or Business Partner application and open the main application/pom.xml which looks similar to this structure:

In the <dependencies> section of the application/pom.xml, we enhance the following additional dependencies to our project:
<!-- Authentication and Authorization imports with Spring Security -->

<dependency>

    <groupId>com.sap.xs2.security</groupId>

    <artifactId>security-commons</artifactId>

    <version>0.28.6</version>

</dependency>

<dependency>

    <groupId>com.sap.xs2.security</groupId>

    <artifactId>java-container-security</artifactId>

    <version>0.28.6</version>

</dependency>

<dependency>

    <groupId>com.sap.xs2.security</groupId>

    <artifactId>java-container-security-api</artifactId>

    <version>0.28.6</version>

</dependency>

<dependency>

    <groupId>org.springframework.security</groupId>

    <artifactId>spring-security-jwt</artifactId>

    <version>1.0.9.RELEASE</version>

</dependency>

<dependency>

    <groupId>org.springframework.security.oauth</groupId>

    <artifactId>spring-security-oauth2</artifactId>

    <version>2.2.3.RELEASE</version>

</dependency>

<dependency>

    <groupId>com.sap.cloud.security.xsuaa</groupId>

    <artifactId>api</artifactId>

    <version>1.6.0</version>

</dependency>

<dependency>

    <groupId>com.sap.security.nw.sso.linuxx86_64.opt</groupId>

    <artifactId>sapjwt.linuxx86_64</artifactId>

    <version>1.1.19</version>

</dependency>
This dependency section contains three main parts of dependencies:
- The org.springframework.security packages add certain aspects of the Spring security framework to our application, in particular the OAuth framework of Spring security.
- The com.sap.xs2.security packages contain specific security adaptations for the CloudFoundry environment.
- The com.sap.security packages contain platform-specific native implementations for the JWT validation and support OAuth2 authentication.
Add Spring as Servlet Listener to your web.xml
Afterwards you need to go to your web.xml in src/main/webapp/WEB-INF and add the following lines. If you have used the Archetype in Step 3 of the Tutorial: https://blogs.sap.com/2017/05/19/step-3-with-sap-s4hana-cloud-sdk-helloworld-on-scp-cloudfoundry/ these lines should be already there and you can simply uncomment them.
<listener>

    <listener-class>org.springframework.web.context.ContextLoaderListener</listener-class>

</listener>

<context-param>

    <param-name>contextConfigLocation</param-name>

    <param-value>/WEB-INF/spring-security.xml</param-value>

</context-param>

<filter>

    <filter-name>springSecurityFilterChain</filter-name>

    <filter-class>org.springframework.web.filter.DelegatingFilterProxy</filter-class>

</filter>

<filter-mapping>

    <filter-name>springSecurityFilterChain</filter-name>

    <url-pattern>/*</url-pattern>

</filter-mapping>
This configuration introduces the Spring Security Filter Chain on all incoming routes of your Java microservice and declares that the entire security configuration can be found in a file called spring-security.xml.
Introducing spring-security.xml
In the next step we need to protect our routes on a more fine-grained basis by introducing the file spring-security.xml to our /src/main/webapp/WEB-INF directory. If you have used the Archetype in Step 3 of the Tutorial: https://blogs.sap.com/2017/05/19/step-3-with-sap-s4hana-cloud-sdk-helloworld-on-scp-cloudfoundry/ this file should be already there.
To protect all your routes so that users have to be at least authenticated you have to uncomment or introduce the following line to spring-security.xml:
<sec:intercept-url pattern="/**" access="isAuthenticated()" method="GET" />
This code says that all users which access all URLs under / with the GET method have to be at least authenticated. You can find the full reference for access management here: https://docs.spring.io/spring-security/site/docs/current/reference/html/el-access.html
The full spring-security.xml should look like this:
<?xml version="1.0" encoding="UTF-8" ?>

<beans xmlns="http://www.springframework.org/schema/beans"

   xmlns:xsi="http://www.w3.org/2001/XMLSchema-instance"

   xmlns:oauth="http://www.springframework.org/schema/security/oauth2"

   xmlns:sec="http://www.springframework.org/schema/security"


   xsi:schemaLocation="http://www.springframework.org/schema/security/oauth2

       http://www.springframework.org/schema/security/spring-security-oauth2-1.0.xsd

        http://www.springframework.org/schema/security

        http://www.springframework.org/schema/security/spring-security-3.2.xsd

        http://www.springframework.org/schema/beans

        http://www.springframework.org/schema/beans/spring-beans-3.1.xsd">


   <!-- protect secure resource endpoints ================================================ -->


   <sec:http pattern="/**" create-session="never"

      entry-point-ref="oauthAuthenticationEntryPoint"

      access-decision-manager-ref="accessDecisionManager"

      authentication-manager-ref="authenticationManager"

      use-expressions="true">

      <sec:anonymous enabled="false" />


      <!-- section to protect your endpoints -->


      <!-- Example: Check a specific OAuth Scope (i.e., authorization) on a resource -->

      <!--<sec:intercept-url pattern="/hello" access="#oauth2.hasScope('${xs.appname}.Display')" method="GET" />-->


      <!-- Example: Check only authentication on a resource -->

      <sec:intercept-url pattern="/**" access="isAuthenticated()" method="GET" />


      <sec:custom-filter ref="resourceServerFilter" before="PRE_AUTH_FILTER" />

      <sec:access-denied-handler ref="oauthAccessDeniedHandler" />

   </sec:http>


   <bean id="oauthAuthenticationEntryPoint"

      class="org.springframework.security.oauth2.provider.error.OAuth2AuthenticationEntryPoint">

   </bean>


   <bean id="oauthWebExpressionHandler"

      class="org.springframework.security.oauth2.provider.expression.OAuth2WebSecurityExpressionHandler">

   </bean>


   <bean id="accessDecisionManager"

      class="org.springframework.security.access.vote.UnanimousBased">

      <constructor-arg>

         <list>

            <bean class="org.springframework.security.web.access.expression.WebExpressionVoter">

               <property name="expressionHandler" ref="oauthWebExpressionHandler" />

            </bean>

            <bean class="org.springframework.security.access.vote.AuthenticatedVoter"  />

         </list>

      </constructor-arg>

   </bean>


    <sec:authentication-manager alias="authenticationManager"/>


   <oauth:resource-server id="resourceServerFilter"

      resource-id="springsec" token-services-ref="offlineTokenServices" />


   <bean id="offlineTokenServices"

         class="com.sap.xs2.security.commons.SAPOfflineTokenServices">

         <property name="verificationKey" value="${xs.uaa.verificationkey}" />

         <property name="trustedClientId" value="${xs.uaa.clientid}" />

         <property name="trustedIdentityZone" value="${xs.uaa.identityzone}" />

    </bean>


   <bean id="oauthAccessDeniedHandler"

      class="org.springframework.security.oauth2.provider.error.OAuth2AccessDeniedHandler" />


   <!-- define properties file =========================================================== -->

   <bean class="com.sap.xs2.security.commons.SAPPropertyPlaceholderConfigurer">

      <property name="location"  value="classpath:/application.properties" />

   </bean>

</beans>
Modify your backend manifest.yml to bind XSUAA and trust for all identity zones
Now we need to modify the manifest.yml a bit to interpret the JWT sufficiently. To do this add the following lines to your backend microservice's manifest.yml file:
SAP_JWT_TRUST_ACL: '[{"clientid" : "*", "identityzone" : "*"}]'
In addition, we need to bind our my-xsuaa instance to our java backend service as well so that we have the OAuth secret to validate the JWT's signature
services:

- my-xsuaa
Deploy and test the application
Now we are ready to build and deploy the application to try all our changes with
mvn clean install

cf push
After deployment, accessing your backend service should not be possible anymore and will quit with the following message:

However, you should be still able to access your application using the App Router as the entrypoint:

Recommended Changes with Usage of AppRouter
Removed Mocked Auth User
If you have previously enabled the mocking of tenant and user information via the environment variableALLOW_MOCKED_AUTH_HEADERas mentioned in Step 5 of this tutorial series, you should now remove this setting. Execute the following command:
cf unset-env firstapp ALLOW_MOCKED_AUTH_HEADER
Removed CSRF Token protection from backing service
If you have previously exposed the backing service directly to the end user, you have used the RestCsrfPreventionFilter on the backend to protect against Cross-Site-Request-Forgery. As this is now in the responsibility of the App Router, we should remove it. For this remove the following lines from your web.xml:
<filter>

  <filter-name>RestCsrfPreventionFilter</filter-name>

  <filter-class>org.apache.catalina.filters.RestCsrfPreventionFilter</filter-class>

</filter>

<filter-mapping>

  <filter-name>RestCsrfPreventionFilter</filter-name>

  <url-pattern>/*</url-pattern>

</filter-mapping>
Use OAuth scope to authorize users
Now that we saved the backend microservice from unauthenticated users, we also want to make sure that certain endpoints can be called only when users have specific authorizations. In the following example, we want to use our Display OAuth scope.
Enhance spring-security.xml to protect routes with OAuth scopes
The backend itself can be easily adapted based on the spring-security.xml. In this case, we protect the /hello route with our Display OAuth Scope. Introduce (or uncomment) the following line within the <sec:http> element:
<sec:intercept-url pattern="/hello" access="#oauth2.hasScope('${xs.appname}.Display')" method="GET" />
Afterwards you need to redeploy the application with
mvn clean install

cf push
Assign users to scopes
Furthermore, the user accessing the application, needs to be assigned the Display OAuth scope. This is done using the SCP cockpit.
First, go to your trial account on Cloud Foundry and find the role collections menu under the Security module:

Second, create a new role collection which you can give an arbitrary name. In our case, we call the role collection Business Partner Manager.

Afterwards, select the role collection "Business Partner Manager" and select "Add Role". From the menu, select your application and the corresponding role template and role as shown below:

Afterwards, the user has to be assigned to the newly created Business Partner Manager in order to receive the Display scope. In order to do this, select the trust configuration from the security menu and select the SAP ID Service from the list:
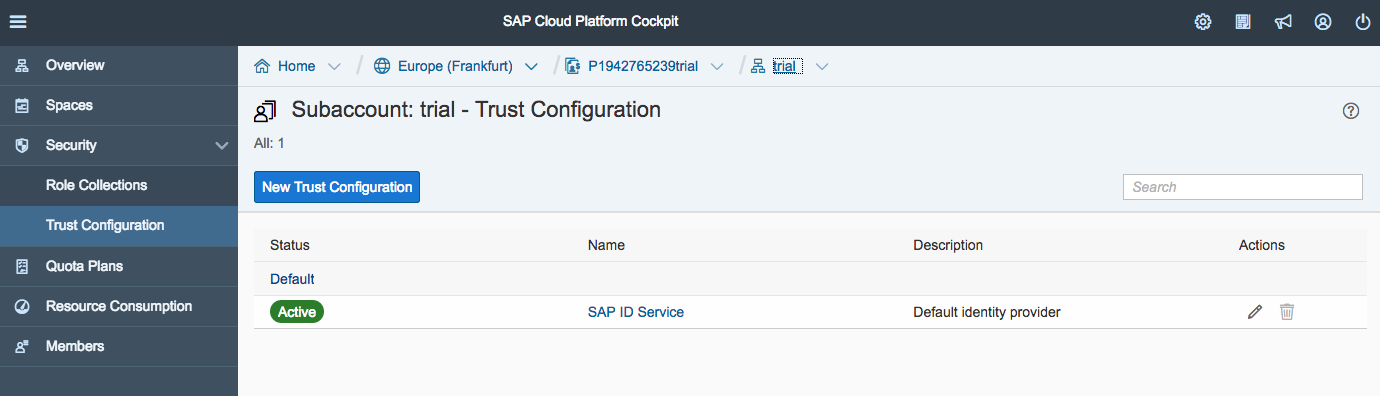
In the opening dialog, enter your User ID as e-mail into the user field and click "Show Assignments" followed by "Add Assignments":

Select the "Business Partner Manager" role collection from the menu to assign it to your user:

Afterwards you have a route that is protected by the Display OAuth scope which you can still access because the user has now the corresponding role.
That's it for today. Now you have learned the basics to protect your application on SAP Cloud Platform, CloudFoundry based on the SAP Cloud SDK. Stay tuned for upcoming blog posts about more advanced usages of the SAP Cloud SDK.
Appendix
Understanding Roles, Role Collections and Scopes
The following picture explains how the various concepts are related to each other.
Gray Box: As a SCP developer (e.g., SAP, partner, customer) of the business application (gray box), you define role templates which may contain multiple OAuth scopes. The developer here define the scope, role templates and additional attributes within the xs-security.json as explained in this tutorial which is used when creating the service instantiation to the XSUAA.
Orange Box: As an SCP tenant administrator of the business application (customer) can create a role collection which is spanning multiple roles reflecting the role templates. This way you can achieve, on the one hand, a fine-granular authorization control for the microservices and, on the other hand, compose them very flexibly in coarse-grained role collections. The idea behind this is, that, for example, the Business Partner Manager role collection may span multiple applications and microservices all having individual scopes. The role collections resolves the roles and scopes and returns a union of all scopes which are composed by the role collection.
Green Box: As an administrator of the users (customer), the role collection can then be assigned to the final user using the SAML attribute "Groups".

Troubleshooting Json Web Tokens
Sometimes it might be necessary to investigate the JWT on the backend microservice during development to check for potential errors. Here is an example Servlet that prints the token out.
 @WebServlet("/debug")

public class JwtDebugServlet extends HttpServlet {


    @Override

    protected void doGet(final HttpServletRequest request, final HttpServletResponse response )

            throws ServletException, IOException

    {

        response.setContentType("text/plain");

        Enumeration headerNames = request.getHeaderNames();

        while (headerNames.hasMoreElements()) {

            String key = (String) headerNames.nextElement();

            String value = request.getHeader(key);


            response.getOutputStream().println(key+" : "+value);

        }

    }

}
Afterwards you may use https://jwt.io/ to decode the token. Note: You should never use this with any productive JWT as these tokens are shared on a public website. Fallback to local solutions.
Troubleshooting OAuth Scopes from XSUAA
In addition, you may use the XSUAA to see which current scopes and roles a particular users has. You could do this with your XSUAA tenant-specific URL:
https://<subdomain>.authentication.<region_id>.hana.ondemand.com/config?action=who
It will return something similar to this:

Setting up your own Identity Provider
So far, we have used the XSUAA service itself as the user provider. However, in production scenarios customer's may want to use their own Identity Provider (IdP) as a user provider or delegate into on-premise user stores such as LDAP or ActiveDirectory. In the following, we quickly show how the XSUAA service can delegate requests to such an external IdPs.
To make this happen, the IdP and the service provider (SP) have to exchange security metadata, i.e., the IdP has to import the metadata of the SP and vice versa.
You can retrieve the metadata from your XSUAA tenant by following the pattern https://<subdomain>.authentication.<region_id>.hana.ondemand.com/saml/metadata. This downloads the metatdata to your local computer.
Second, you need to import the metadata into your IdP. In the following, we use an own SAP Cloud Identity tenant to do this.
- Within the IdP, we have to create a new application called MyApp where we select the SAML 2.0 Configuration
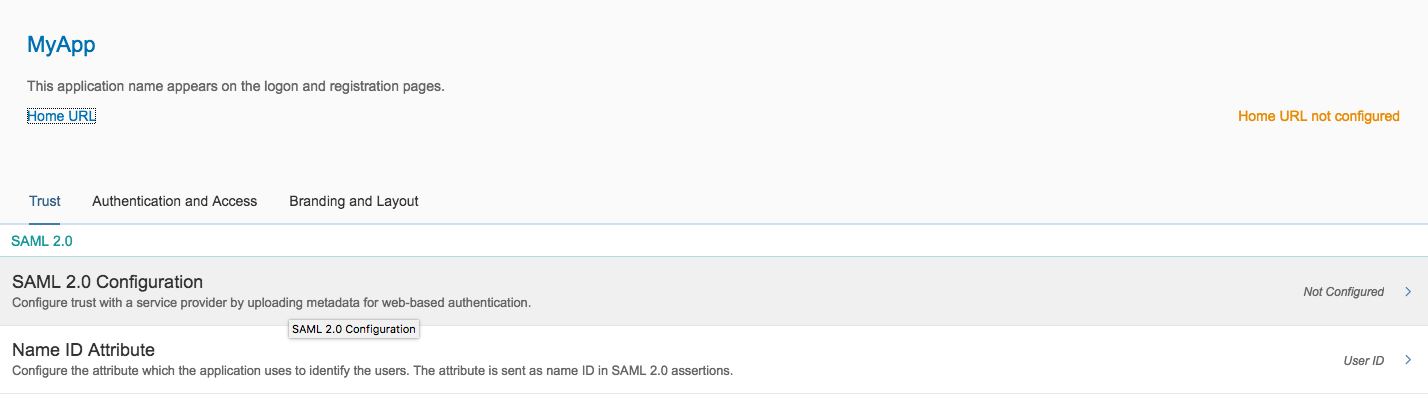
- Import the SP's metadata and click "Save".
- Back in the SCP account cockpit we need to add the IdP's metadata in the same manner

- Click "New Trust Configuration" and add the metadata from the IdP and click "Save"

- Replace <subdomain> with your subdomain. You will find your subdomain in the CF cockpit by heading to the overview page of your sub-account:
- SAP Managed Tags:
- SAP Cloud SDK,
- SAP S/4HANA,
- SAP S/4HANA Public Cloud
Labels:
119 Comments
- « Previous
-
- 1
- 2
- 3
- Next »
You must be a registered user to add a comment. If you've already registered, sign in. Otherwise, register and sign in.
Labels in this area
-
ABAP CDS Views - CDC (Change Data Capture)
2 -
AI
1 -
Analyze Workload Data
1 -
BTP
1 -
Business and IT Integration
2 -
Business application stu
1 -
Business Technology Platform
1 -
Business Trends
1,658 -
Business Trends
93 -
CAP
1 -
cf
1 -
Cloud Foundry
1 -
Confluent
1 -
Customer COE Basics and Fundamentals
1 -
Customer COE Latest and Greatest
3 -
Customer Data Browser app
1 -
Data Analysis Tool
1 -
data migration
1 -
data transfer
1 -
Datasphere
2 -
Event Information
1,400 -
Event Information
66 -
Expert
1 -
Expert Insights
177 -
Expert Insights
299 -
General
1 -
Google cloud
1 -
Google Next'24
1 -
Kafka
1 -
Life at SAP
780 -
Life at SAP
13 -
Migrate your Data App
1 -
MTA
1 -
Network Performance Analysis
1 -
NodeJS
1 -
PDF
1 -
POC
1 -
Product Updates
4,577 -
Product Updates
345 -
Replication Flow
1 -
RisewithSAP
1 -
SAP BTP
1 -
SAP BTP Cloud Foundry
1 -
SAP Cloud ALM
1 -
SAP Cloud Application Programming Model
1 -
SAP Datasphere
2 -
SAP S4HANA Cloud
1 -
SAP S4HANA Migration Cockpit
1 -
Technology Updates
6,873 -
Technology Updates
425 -
Workload Fluctuations
1
Related Content
- Supporting Multiple API Gateways with SAP API Management – using Azure API Management as example in Technology Blogs by SAP
- SAP LICENSE RENEWAL FROM BASIS END #ATR in Technology Blogs by Members
- Configuring SAP CI/CD pipeline for Deploying ReactJS application in Cloud Foundry in Technology Q&A
- SAP Build Process Automation Pre-built content for Finance Use cases in Technology Blogs by SAP
- Consuming SAP with SAP Build Apps - Mobile Apps for iOS and Android in Technology Blogs by SAP
Top kudoed authors
| User | Count |
|---|---|
| 40 | |
| 25 | |
| 17 | |
| 14 | |
| 8 | |
| 7 | |
| 7 | |
| 7 | |
| 6 | |
| 6 |