
- SAP Community
- Products and Technology
- Technology
- Technology Blogs by SAP
- Step 2 with SAP Cloud SDK: HelloWorld on SCP Neo
Technology Blogs by SAP
Learn how to extend and personalize SAP applications. Follow the SAP technology blog for insights into SAP BTP, ABAP, SAP Analytics Cloud, SAP HANA, and more.
Turn on suggestions
Auto-suggest helps you quickly narrow down your search results by suggesting possible matches as you type.
Showing results for
Advisor
Options
- Subscribe to RSS Feed
- Mark as New
- Mark as Read
- Bookmark
- Subscribe
- Printer Friendly Page
- Report Inappropriate Content
05-21-2017
7:45 PM
Disclaimer:
This blog post is only applicable for the latest version 2 of the SAP Cloud SDK. You can find an updated tutorial for version 3 over at our tutorial page.
The following steps will explain how to create the very first HelloWorld example on SCP Neo using the SAP Cloud SDK. If you want to follow this tutorial, we highly recommend checking out the first part of this blog series. You will not need any additional software as the server will run on your local machine.
Note: This post is part of a series. For a complete overview visit the SAP Cloud SDK Overview.

Goal of this blog post
The tutorial will show you the first steps when developing applications for the SCP Neo using the SAP Cloud SDK. To be precise, we will cover the following steps:
- Generate a project stub using a Maven Archetype
- Understand the project structure and its artifacts
- Implement and understand the Hello World Servlet
- Implement and understand the integration test
- Deployment

Generate Project from Archetype
Since you have already installed Maven, you can use it to generate a project stub from the SAP Cloud SDK Maven archetype. Just use your console (e.g. IDE, OS, navigate to a parent directory for your project and run the following command.
mvn archetype:generate -DarchetypeGroupId=com.sap.cloud.s4hana.archetypes -DarchetypeArtifactId=scp-neo-javaee7 -DarchetypeVersion=RELEASEOnce the generation process is started, Maven will ask you for the usual module parameters:
| groupId | an identifier representing your group, company or organization (e.g. com.sap.cloud.sdk.tutorial) |
| artifactId | an identifier for your application (e.g. firstapp). For the tutorials we suppose you have chosen "firstapp". |
| version | the version of your application (e.g. 1.0-SNAPSHOT) |
| package | the name of the top-level package your source code will reside in (typically equal to your groupId, e.g. com.sap.cloud.sdk.tutorial). Please pay attention to package and directory names in any upcoming source code when using a different package name than suggested here. |
After the required values are provided, Maven will generate the new project from the Cloud SDK archetype:

Now you can work with it just like any other Maven project.
cd /path/to/firstapp

mvn clean install
Understand the project structure and its artifacts
Once the Maven project is generated, you can open your favorite IDE and load the project as "Maven Project". After importing the project into your IDE, the overall structure will look like this:

The first thing you will notice, is the different directories:
applicationcx-serverintegration-testsunit-tests
These are Maven sub-modules and they serve different aspects of your code application, test and deployment environment. The following separation of modules makes it possible to run dedicated unit tests and sensitive integration tests without deploying the application.
Multiple-modules project
The advantage of operating a multiple-modules project for your application becomes apparent as soon as the software complexity rises. Then it gets convenient to dedicate code distribution and responsibility to developers for either application or test environment. In terms of reliability and continuance, you will see, that front-end testing and test-automation are as important as classic backend-testing of your project. These fields of expertise require different programming paradigms, and such different kinds of development life cycles. To ensure the overall software stability and liability, a multiple-modules setup is the best practice solution.
To get you started, we take a look into the conventional application project, as well as the classic unit tests. Then the integration tests follow, used for code tests with external servers and resources. Once software testing is covered, we briefly introduce the Cx server for continuous integration and delivery.
applicationcontains the source code and configuration of your actual web application.

src/main/java
Here goes your production code, nothing else. As you can see, there's already the HelloWorldServlet, which we will look at in more detail soon.
src/main/resources
Anything that you require in your production code but is no compilable code goes here (typically things like API definition files for RAML or OpenAPI, Database Migration Files for Flyway or Liquibase)
src/main/webapp
contains the deployment descriptor for your web application - the infamous web.xml, as well as a starter web page inindex.html.
src/test/resources
Additional resources for attached test classes.
pom.xml
This is your project management file for Maven where you can maintain other open source dependencies or use plugins that ease your build Environment.
unit-testscontains the unit tests for your application. Its structure is similar toapplicationbut it exclusively holds test classes and resources. The purpose of this module is to test and validate single aspects of data flow and computational operations in theapplicationproject.

src/test/java
This is the place for your automated tests.
src/test/resources
Tests may also require additional resources to work properly such as configuration files. This is their place.
integration-testscontains the integration tests for your application. Its structure is similar toapplication.
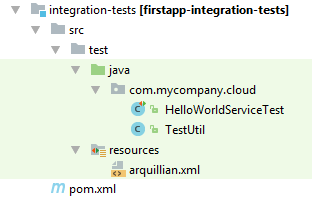
src/test/java
Here you can put all your integration tests. As you can see, there's already the HelloWorldServiceTestcorresponding to theHelloWorldServlet.
src/test/resources
Here are all the resources needed for the integration tests to run or validate.
cx-servercontains the script and configuration file to manage your best practice continuous integration and delivery software environment (Cx). The including files allow Linux users to simply create your very own Cx server as part of a Docker deployment. The server, which will be run, is Jenkins. This automation server helps to manage all technical steps of a software development process.

cx-server
This Unix bashscript allows you to start and stop the Jenkins server on your local machine, as part of a Docker container.
server.cfg
This is the configuration file for the server parameters.
Once a Jenkins server is configured for your personal needs, the files in the project root directory become useful:
Jenkinsfile
This text file contains the definition of a Jenkins Pipeline and stays part of your project source code. It defines what steps are run specifically for your application.
pipeline_config.yml
This is the configuration file for your specific application.
Unit tests and integration tests
This separation of test modules makes it possible to just run unit tests and integrations test without deploying, as well as deploying the application without running time consuming tests. Unit tests can either be kept publicly inside the application module, or in the separate
unit-tests folder, that's part of the archetype. For that topic we highly recommend the articles and educational videos from Martin Fowler. For a start we advice reading his post about Unit Tests.During development it becomes important to test newly implemented code to external services, i.e. logic running in a distributed environment. This is where an integration test is an important tool to ensure correctness and stability over the whole internal and external deployment. Since the integration tests may contain confidential information, like business logic and test access tokens, it can be helpful to maintain its operation inside a dedicated Maven sub module. That way the runnable application itself can be later shipped without tests and their dependency.
HelloWorldServlet
Now that you understand the project structure, take a closer look at the HelloWorldServlet.java
package com.sap.cloud.sdk.tutorial;


import org.slf4j.Logger;


import javax.servlet.ServletException;

import javax.servlet.annotation.WebServlet;

import javax.servlet.http.HttpServlet;

import javax.servlet.http.HttpServletRequest;

import javax.servlet.http.HttpServletResponse;

import java.io.IOException;


import com.sap.cloud.sdk.cloudplatform.logging.CloudLoggerFactory;


@WebServlet("/hello")

public class HelloWorldServlet extends HttpServlet

{

    private static final long serialVersionUID = 1L;

    private static final Logger logger = CloudLoggerFactory.getLogger(HelloWorldServlet.class);


    @Override

    protected void doGet( final HttpServletRequest request, final HttpServletResponse response )

        throws ServletException, IOException

    {

        logger.info("I am running!");

        response.getWriter().write("Hello World!");

    }

}
The
HelloWorldServlet extends HttpServlet, so this will be a HTTP endpoint that we can visit. We map this endpoint to the /hello route using @WebServlet("/hello").By overriding the function
doGet, we define what happens when a client performs an HTTP GET request on the /hello route. in this case we simply write a response containing "Hello World!".Integration test
Let's take a look into the integration test project. It already contains a test for our simple HelloWorldServlet:
package com.sap.cloud.sdk.tutorial;


import com.jayway.restassured.RestAssured;

import org.jboss.arquillian.container.test.api.Deployment;

import org.jboss.arquillian.junit.Arquillian;

import org.jboss.arquillian.test.api.ArquillianResource;

import org.jboss.shrinkwrap.api.spec.WebArchive;

import org.junit.Before;

import org.junit.BeforeClass;

import org.junit.Test;

import org.junit.runner.RunWith;

import java.net.URL;


import com.sap.cloud.sdk.testutil.MockUtil;


import static com.jayway.restassured.RestAssured.given;

import static org.assertj.core.api.Assertions.assertThat;


@RunWith( Arquillian.class )

public class HelloWorldServiceTest

{

    private static final MockUtil mockUtil = new MockUtil();


    @ArquillianResource

    private URL baseUrl;


    @Deployment

    public static WebArchive createDeployment()

    {

        return TestUtil.createDeployment(HelloWorldServlet.class);

    }


    @BeforeClass

    public static void beforeClass()

    {

        mockUtil.mockDefaults();

    }


    @Before

    public void before()

    {

        RestAssured.baseURI = baseUrl.toExternalForm();

    }


    @Test

    public void testService()

    {

        final String body = given().get("/hello").body().asString();

        assertThat(body).isEqualToIgnoringCase("Hello World!");

    }

}
As you can see,
HelloWorldServiceTest uses JUnit to define the test.- It declares
BeforeClassandDeploymentfor the general test setup. - The
MockUtilprovides easy access to mocked backend systems, e.g. preconfigured ERP connections for the test cases. - A
WebArchiveis deployed as a test run setup, including predefined additional classes, here:HelloWorldServlet.class - The integration test features
RestAssuredto easily run WebService calls over HTTP. Later you will see the advantages of having this library on hand, when dealing with more sophisticated examples. Here it runs an assertion test on the result of a GET request to the local /hello route.
Deployment
It is time to finally deploy the application.
Local deployment
To run all required Maven goals, you can use the following commands in the project root path, i.e. parent module:
mvn clean install

mvn scp:clean scp:push -pl application
The first command will cascade the goal execution of
clean and install to both Maven sub modules. It will break in case of any compilation errors or test failures.The second command will run a cleanup and startup for the SCP Neo application. The
-pl argument defines the project location in which the Maven goals are being executed. If there is already a previously started instance of the application running, the goal scp:clean will try to stop it on localhost:8080 and will remove the cached server files of the application. scp:push will start the application on localhost:8080. The web server is started as background process and will take additional seconds to initialize.The second command will also ask for URL, user and password for the destination "ErpQueryEndpoint". Since this destination is not used at this point of the tutorial, any arbitrary value can be entered here, e.g. "dummy".

Once a couple of seconds have passed, you can open a browser and go to http://localhost:8080/firstapp-application/
- You will be greeted with a login screen.
- Enter
test/test


Follow the link to the HelloWorldServlet:

Hello world!
That's it.
When you are done and want to close the local SCP deployment, please use the
scp:clean command for the application project. It will close any connection and stop the server.mvn scp:clean -pl applicationRemote deployment
As a requirement make sure to have the Neo CLI for the Java EE 6 Web Profile available. The tool is downloaded as part of the local deployment described above (see folder application/scp/sdk-<version>/tools), but you can also download it separately. A traditional installation is not required:
The Neo CLI comes packaged with the SAP Cloud Platform Neo Environment SDK
- Go to https://tools.hana.ondemand.com/#cloud
- Download and unzip the latest neo-javaee7-wp-sdk-######.zip alias "Java EE 7 Web Profile"
- Go into the directory "tools" and find the neo.bat (Windows) or neo.sh (Mac/Linux)
Please consider the documentation or readme.txt file in case you use a proxy server for connecting to the host. Also we recommend adding this tools directory to yourPATHvariable, in order to run its executables from any location.
Once you open your Neo platform website, you will see your account name as well as the hostname of the service.

The hostname is usually depending on your general location:
| Europe (Rot) - Trial | hanatrial.ondemand.com |
| Europe (Rot) | eu1.hana.ondemand.com |
| US West (Chandler) | us2.hana.ondemand.com |
| US East (Ashburn) | us1.hana.ondemand.com |
| US East (Sterling) | us3.hana.ondemand.com |
| Japan (Tokyo) | jp1.hana.ondemand.com |
| China (Shanghai) | cn1.hana.ondemand.com |
| Australia (Sydney) | ap1.hana.ondemand.com |
- Now run the required Maven goals in the project root path and use
neoto deploy the packaged application to the remote Neo instance.
mvn clean install

/path/to/neo deploy --host HOST --account ACCOUNT --user USER --application firstapp --source application/target/firstapp-application.war

/path/to/neo start --host HOST --account ACCOUNT --user USER --application firstapp

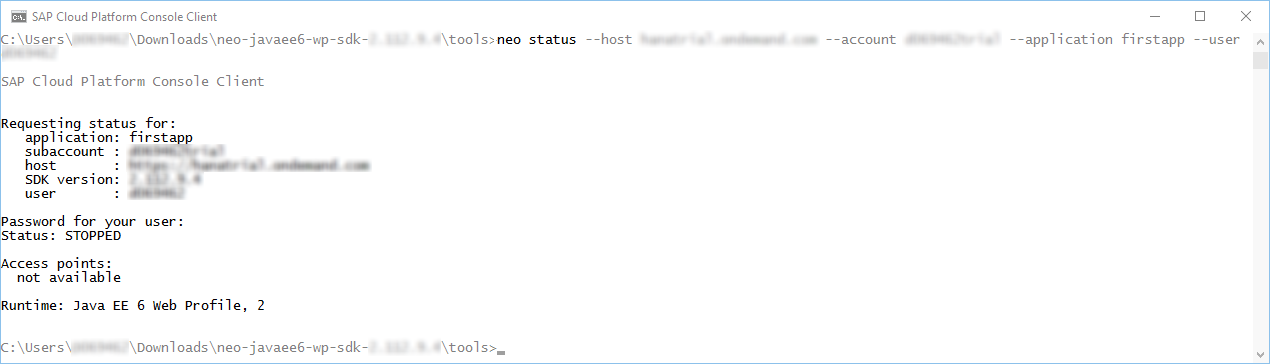
- You can check the status of your deployment with the
statuscommand:
/path/to/neo status --host HOST --account ACCOUNT --user USER --application firstapp
- If you want to list all running applications use the
list-applicationscommand:
/path/to/neo list-applications --host HOST --account ACCOUNT --user USER

- On the Neo website you will find the corresponding URL, where your application is reachable. It will be listed in the application's details page and might follow the following pattern:
https://[application][subaccount].[host]/[application]-application/from the values above. Hello world!
That's it.
To find additional Neo commands, e.g. for stopping and undeploying applications, please take a look into the official lists of Neo Console Client Commands.
See the next tutorial in the series here: Step 3 with SAP Cloud SDK: HelloWorld on SCP CloudFoundry.
Troubleshooting
Force application shutdown
In case the Mavenscp:cleangoal does not shutdown the application background process, even after the second execution, we recommend terminating it by hand. First you need to detemine the process id by the public port. Then terminate the process.
# Windows

netstat -o -n -a | findstr 0.0:8003

taskkill /F /PID <PID>
# OSX

lsof -i :8003

kill -9 <PID>
Windows PowerShell
If you are using Powershell on Windows, always put Maven arguments (supplied with-D) in quotes, for example:
mvn archetype:generate "-DarchetypeGroupId=com.sap.cloud.s4hana.archetypes" "-DarchetypeArtifactId=scp-neo-javaee6" "-DarchetypeVersion=RELEASE"
- SAP Managed Tags:
- SAP Cloud SDK,
- SAP Business Technology Platform
Labels:
41 Comments
You must be a registered user to add a comment. If you've already registered, sign in. Otherwise, register and sign in.
Labels in this area
-
ABAP CDS Views - CDC (Change Data Capture)
2 -
AI
1 -
Analyze Workload Data
1 -
BTP
1 -
Business and IT Integration
2 -
Business application stu
1 -
Business Technology Platform
1 -
Business Trends
1,658 -
Business Trends
114 -
CAP
1 -
cf
1 -
Cloud Foundry
1 -
Confluent
1 -
Customer COE Basics and Fundamentals
1 -
Customer COE Latest and Greatest
3 -
Customer Data Browser app
1 -
Data Analysis Tool
1 -
data migration
1 -
data transfer
1 -
Datasphere
2 -
Event Information
1,400 -
Event Information
75 -
Expert
1 -
Expert Insights
177 -
Expert Insights
350 -
General
1 -
Google cloud
1 -
Google Next'24
1 -
GraphQL
1 -
Kafka
1 -
Life at SAP
780 -
Life at SAP
14 -
Migrate your Data App
1 -
MTA
1 -
Network Performance Analysis
1 -
NodeJS
1 -
PDF
1 -
POC
1 -
Product Updates
4,575 -
Product Updates
393 -
Replication Flow
1 -
REST API
1 -
RisewithSAP
1 -
SAP BTP
1 -
SAP BTP Cloud Foundry
1 -
SAP Cloud ALM
1 -
SAP Cloud Application Programming Model
1 -
SAP Datasphere
2 -
SAP S4HANA Cloud
1 -
SAP S4HANA Migration Cockpit
1 -
Technology Updates
6,871 -
Technology Updates
487 -
Workload Fluctuations
1
Related Content
- Open Cloud Portal site in MDK Page and pass user’s identity in Technology Q&A
- Develop with Joule in SAP Build Code in Technology Blogs by SAP
- Connect the SAP HANA CLOUD database with SAP IRPA with a custom script in Technology Q&A
- WSAECONNRESET: Connection reset by peer. Multiple users, multiple locations, can't pinpoint.. in Technology Q&A
- What’s New in SAP Analytics Cloud Release 2024.10 in Technology Blogs by SAP
Top kudoed authors
| User | Count |
|---|---|
| 19 | |
| 12 | |
| 11 | |
| 9 | |
| 8 | |
| 8 | |
| 7 | |
| 7 | |
| 7 | |
| 6 |