
- SAP Community
- Products and Technology
- Technology
- Technology Blogs by SAP
- Web Page with Hyperlink to SAP GUI Transaction
Technology Blogs by SAP
Learn how to extend and personalize SAP applications. Follow the SAP technology blog for insights into SAP BTP, ABAP, SAP Analytics Cloud, SAP HANA, and more.
Turn on suggestions
Auto-suggest helps you quickly narrow down your search results by suggesting possible matches as you type.
Showing results for
Advisor
Options
- Subscribe to RSS Feed
- Mark as New
- Mark as Read
- Bookmark
- Subscribe
- Printer Friendly Page
- Report Inappropriate Content
01-10-2022
7:41 PM
Companies are currently implementing web based applications as side-by-side extensions to their core SAP Business Suite or SAP S/4HANA system in order to enhance or substitute legacy SAP GUI base processes. In some cases it might be beneficial to embed a link to a SAP GUI transaction into a HTML page, either to gap a functionality that is not yet available within the web application or to provide the end users with an alternative, familiar way to perform a specific action.
The following steps explain two alternative methods to add a hyperlink to your web page, which, when clicked, starts the SAP GUI and runs a transaction with parameters.
First determine the ok-code that runs the SAP GUI transaction. If a transaction is supposed to be called without parameter, the ok-code is equal to the transaction code. In that case you can skip this step.
The ok-code must comply with the following syntax:
where <fieldN> is a dynpro fieldname of a selection screen field that should be filled in advanced with <valueN>.
The asterisk skips the initial screen. If you cannot specify all mandatory fields or you do not want to skip the initial screen or the transaction does not have an initial screen, leave the asterisk out.
If you do not know the dynpro fieldnames of the selection screen fields that are supposed to be filled, proceed as follows:
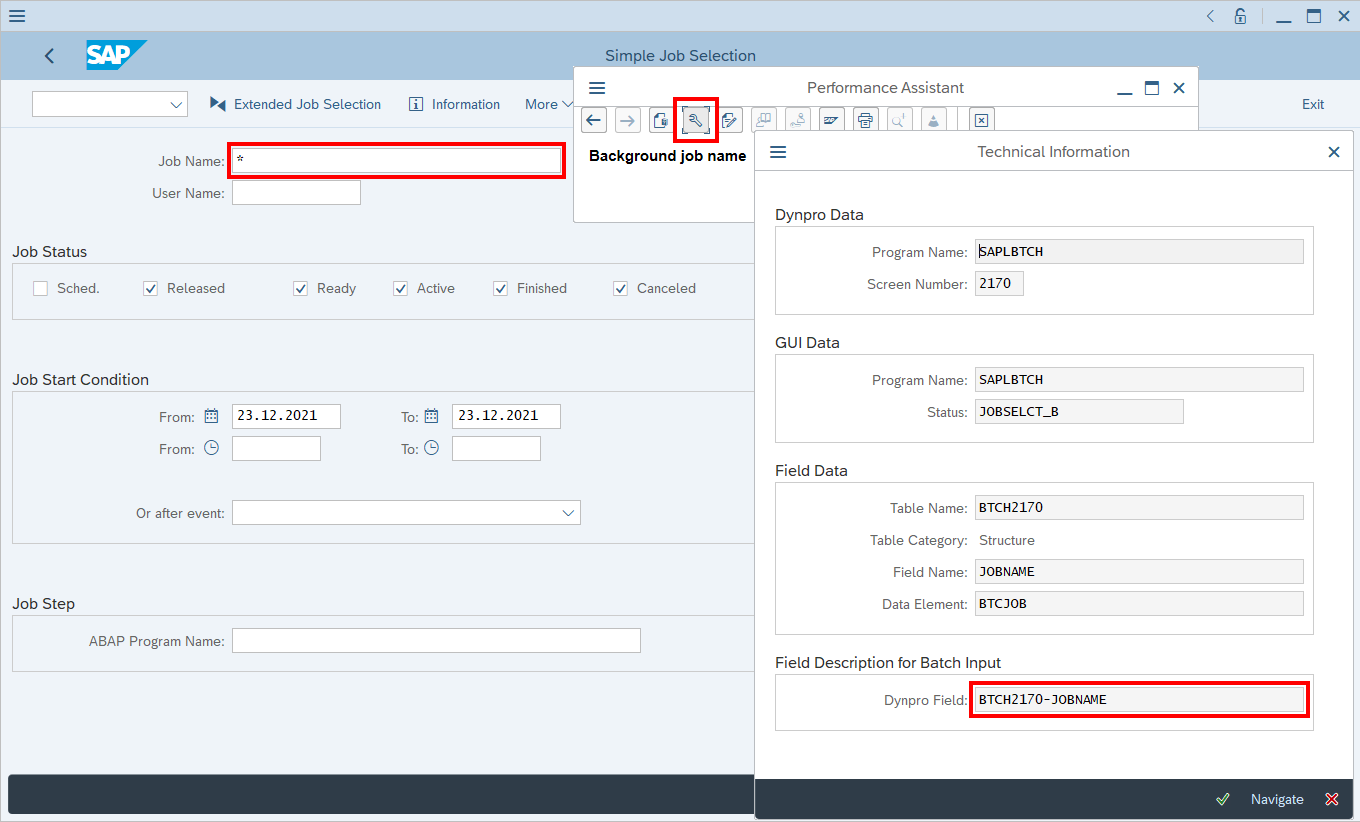
As an example, all batch jobs should be displayed that start with letter Z and that are owned by user HUGO. The appropriate transaction for that task is SM37.
In order to find the dynpro fieldname that correspond to parameter Job Name, click on the input field and press F1. The Performance Assistant pops up. Click on icon Technical Information (screw wrench). You find the dynpro fieldname under section Field Description, e.g. BTCH2170-JOBNAME.
Repeat this procedure to also find the dynpro fieldname for User Name.
Eventually, you can compile the ok-code as follows:
This example will be used throughout this blog post.
Create a download link to an SAP shortcut file. This methods works on all front end PCs where an SAP GUI is installed without further setup activity. However, a file may be downloaded every time a user clicks the link and the user must explicitly allow execution of the downloaded file.
In order to create an SAP shortcut file (extension *.sap), logon to the SAP GUI and run the transaction. Then select menu item
More → SAP GUI settings and actions → Create Shortcut...
Add parameters to the Transaction and specify the Location where the file should be stored. Afterwards, click Finish.

Next you must create a download link to a SAP shortcut file. Considering the example above, assuming that the transaction should be run on SAP System PRD in client 100, the file content should look like shown below.
Usually you would implement a HTML GET method on the server that sends the file as response with a HTTP header like:
For a HTML only solution it is not sufficient to store the SAP shortcut file on the server and put a hyperlink on the HTML page that references that file, because the browser will render the file content as text without actually downloading it. To get around this, add the file content as data URL to your hyperlink tag.
If the SAP shortcut file is "PRD Job Overview.sap" and resides in the current directory, you can generate a data URL using the following Windows PowerShell command.
Add a hyperlink to your HTML page with the generated data URL as reference as shown in the code snippet below. The user can use the hyperlink to navigate to the SAP GUI job overview screen.
When the user clicks the link, the behavior depends on the web browser and its settings.
Either the SAP shortcut file SAPshortcut.sap is downloaded and afterwards the user must trigger execution of that file.
Or a popup window appears giving the user the option to select an application that should be used to open the file. The user has to select executable sapshcut.exe, which (on Windows) most likely resides in folder C:\Program Files (x86)\SAP\FrontEnd\SAPgui\.
In both cases the user should mark option "Do this from now on."
A security message appears where the user must allow execution of the displayed ok-code.
If an SAP GUI session for the user and client is already active, the SAP GUI transaction is brought up immediately. Otherwise the user must provide a password first.
This second method to add a hyperlink that starts a SAP GUI works on Windows front end PCs only and needs some setup work. It implements a custom URL that can be used to navigate to the SAP GUI transaction the same way one can navigate to any web resource.
Program sapshcut.exe is part of the SAP GUI installation and can be used to run an SAP GUI transaction. You can skip this step. However, is is recommended to run SAPshortcut from Windows PowerShell once to verify that all SAP GUI components have been installed correctly.
Start Windows PowerShell and change directory to the SAP GUI installation directory on your local PC.
Assuming you want to run the transaction of the example above on system PRD in client 100, execute the following command from Windows PowerShell:
Parameter -COMMAND holds the ok-code (without prefix /n) that you want to run.
If the ok-code contains a whitespace, it must be specified as a quoted string. To pass a quoted string as command parameter inside the Windows PowerShell, you must quote that quoted string, where the inner quotes must be prefixed by the escape character, which is also a quote. Thus, you end up with triple quotes.
Next you must register protocol handler sapgui for custom URLs that comply to the following scheme:
For example, with the transaction from the previous step:
To register a protocol handler and assign it to a shell command, open the Windows registry editor (regedit) and proceed as follows:
Next you need to add the command as a Windows Registry key as follows:
where #1 is the argument that contains the encoded custom URL including the protocol prefix, for example
You can use Windows PowerShell commands to convert the URL-encoded string to a list of arguments for executable sapshcut.exe.
First decode the URL. Use method WebUtility.UrlDecode of .NET assembly System.Net to do so.
Afterwards remove prefix sapgui: from the URL by calling method replace. You may also want to remove double slashes in order to allow URLs starting with sapgui://
Convert the string into an argument list by splitting at character & and pass it to executable sapshcut.exe
The command sequence above must be run within a Windows PowerShell instance. Start powershell.exe with options -NonInteractive -NoProfile and -WindowStyle Hidden, see https://docs.microsoft.com/en-us/powershell/module/microsoft.powershell.core/about/about_powershell_....
Finally you should compile everything into a Windows registry file (extension *.reg) with the content below. All relevant keys are added to the Windows registry when the file gets executed.
Now you are ready to use custom URLs with protocol sapgui:
By using such a custom URL you can add a hyperlink to your HTML page that can be used to navigate to the filtered job overview screen in SAP GUI, as indicated by the following snippet.
Two alternative methods to add a hyperlink to your web page for navigation to a parameterized SAP GUI transaction have been given. Method 1 works on all front end PCs without additional setup. Method 2 might be more convenient for the user, but requires setup work on the front end PC.
The latter method runs on Windows only. However, it should be possible to implement a similar approach on other operating systems that support custom URLs, in particular macOS.
If you need help with the SAP GUI or on another topic, Ask a Question on the SAP Community Q&A resource page.
The following steps explain two alternative methods to add a hyperlink to your web page, which, when clicked, starts the SAP GUI and runs a transaction with parameters.
Step 1: Find the correct ok-code
First determine the ok-code that runs the SAP GUI transaction. If a transaction is supposed to be called without parameter, the ok-code is equal to the transaction code. In that case you can skip this step.
The ok-code must comply with the following syntax:
*<transaction code> <field1>=<value1>;<field2>=<value2>;where <fieldN> is a dynpro fieldname of a selection screen field that should be filled in advanced with <valueN>.
The asterisk skips the initial screen. If you cannot specify all mandatory fields or you do not want to skip the initial screen or the transaction does not have an initial screen, leave the asterisk out.
If you do not know the dynpro fieldnames of the selection screen fields that are supposed to be filled, proceed as follows:
As an example, all batch jobs should be displayed that start with letter Z and that are owned by user HUGO. The appropriate transaction for that task is SM37.
In order to find the dynpro fieldname that correspond to parameter Job Name, click on the input field and press F1. The Performance Assistant pops up. Click on icon Technical Information (screw wrench). You find the dynpro fieldname under section Field Description, e.g. BTCH2170-JOBNAME.
Repeat this procedure to also find the dynpro fieldname for User Name.
Eventually, you can compile the ok-code as follows:
/nSM37 BTCH2170-JOBNAME=Z*;BTCH2170-USERNAME=HUGO;This example will be used throughout this blog post.
Method 1: Download an SAP shortcut file
Create a download link to an SAP shortcut file. This methods works on all front end PCs where an SAP GUI is installed without further setup activity. However, a file may be downloaded every time a user clicks the link and the user must explicitly allow execution of the downloaded file.
Step 2.1: Create SAP shortcut file
In order to create an SAP shortcut file (extension *.sap), logon to the SAP GUI and run the transaction. Then select menu item
More → SAP GUI settings and actions → Create Shortcut...
Add parameters to the Transaction and specify the Location where the file should be stored. Afterwards, click Finish.
Step 3.1: Create download link to SAP shortcut file
Next you must create a download link to a SAP shortcut file. Considering the example above, assuming that the transaction should be run on SAP System PRD in client 100, the file content should look like shown below.
[System]

Name=PRD

Description=PRD - Production

Client=100

[User]

Name=HUGO

Language=EN

[Function]

Title=Job Overview

Command=SM37 BTCH2170-JOBNAME=Z*;BTCH2170-USERNAME=HUGO;

[Configuration]

WorkDir=C:\Users\Hugo\Documents\SAP\SAP GUI

[Options]

Reuse=1
Usually you would implement a HTML GET method on the server that sends the file as response with a HTTP header like:
Content-Disposition: attachment; filename=SAPShortcut.sapFor a HTML only solution it is not sufficient to store the SAP shortcut file on the server and put a hyperlink on the HTML page that references that file, because the browser will render the file content as text without actually downloading it. To get around this, add the file content as data URL to your hyperlink tag.
If the SAP shortcut file is "PRD Job Overview.sap" and resides in the current directory, you can generate a data URL using the following Windows PowerShell command.
&{$b=Get-Content -Encoding Byte -Path ".\PRD Job Overview.sap"; "data:text/plain;base64," + [Convert]::ToBase64String($b)}Add a hyperlink to your HTML page with the generated data URL as reference as shown in the code snippet below. The user can use the hyperlink to navigate to the SAP GUI job overview screen.
<html>

<head>

<title>Link to SAP GUI transaction (download SAP shortcut file)</title>

</head>

<body>


<a href='data:text/plain;base64,W1N5c3RlbV0NCk5hbWU9UFJE ... xVzZT0xDQo=' download='SAPshortcut.sap'>

Job Overview

</a>


</body>

</html>
When the user clicks the link, the behavior depends on the web browser and its settings.
Either the SAP shortcut file SAPshortcut.sap is downloaded and afterwards the user must trigger execution of that file.
Or a popup window appears giving the user the option to select an application that should be used to open the file. The user has to select executable sapshcut.exe, which (on Windows) most likely resides in folder C:\Program Files (x86)\SAP\FrontEnd\SAPgui\.
In both cases the user should mark option "Do this from now on."
A security message appears where the user must allow execution of the displayed ok-code.
If an SAP GUI session for the user and client is already active, the SAP GUI transaction is brought up immediately. Otherwise the user must provide a password first.
Method 2: Configure a Custom URL
This second method to add a hyperlink that starts a SAP GUI works on Windows front end PCs only and needs some setup work. It implements a custom URL that can be used to navigate to the SAP GUI transaction the same way one can navigate to any web resource.
Step 2.2: Start SAP GUI transaction via SAPshortcut
Program sapshcut.exe is part of the SAP GUI installation and can be used to run an SAP GUI transaction. You can skip this step. However, is is recommended to run SAPshortcut from Windows PowerShell once to verify that all SAP GUI components have been installed correctly.
Start Windows PowerShell and change directory to the SAP GUI installation directory on your local PC.
cd "C:\Program Files (x86)\SAP\FrontEnd\SAPgui"Assuming you want to run the transaction of the example above on system PRD in client 100, execute the following command from Windows PowerShell:
sapshcut -SYSTEM=PRD -CLIENT=100 -LANGUAGE=EN -REUSE=1 -TYPE=TRANSACTION -COMMAND="""SM37 BTCH2170-JOBNAME=Z*;BTCH2170-USERNAME=HUGO;"""Parameter -COMMAND holds the ok-code (without prefix /n) that you want to run.
If the ok-code contains a whitespace, it must be specified as a quoted string. To pass a quoted string as command parameter inside the Windows PowerShell, you must quote that quoted string, where the inner quotes must be prefixed by the escape character, which is also a quote. Thus, you end up with triple quotes.
Step 3.2: Register protocol handler in Windows registry
Next you must register protocol handler sapgui for custom URLs that comply to the following scheme:
sapgui:<sapshcut.exe arguments separated by &>For example, with the transaction from the previous step:
sapgui:-SYSTEM=PRD&-CLIENT=100&-LANGUAGE=EN&-REUSE=1&-COMMAND="""SM37 BTCH2170-JOBNAME=Z*;BTCH2170-USERNAME=HUGO;"""To register a protocol handler and assign it to a shell command, open the Windows registry editor (regedit) and proceed as follows:
- Add key HKEY_CLASSES_ROOT\sapgui
- Add string "URL Protocol" to key HKEY_CLASSES_ROOT\sapgui
Next you need to add the command as a Windows Registry key as follows:
HKEY_CLASSES_ROOT\sapgui\shell\open\command = <path>\sapshcut.exe <arguments derived from "#1">where #1 is the argument that contains the encoded custom URL including the protocol prefix, for example
sapgui:-SYSTEM=PRD&-CLIENT=100&-USER=HUGO&-LANGUAGE=EN&-REUSE=1&-COMMAND=%22%22%22SM37%20BTCH2170-JOBNAME=Z*;BTCH2170-USERNAME=HUGO;%22%22%22You can use Windows PowerShell commands to convert the URL-encoded string to a list of arguments for executable sapshcut.exe.
First decode the URL. Use method WebUtility.UrlDecode of .NET assembly System.Net to do so.
Add-Type -AssemblyName System.Net

$args=[System.Net.WebUtility]::UrlDecode('%1')
Afterwards remove prefix sapgui: from the URL by calling method replace. You may also want to remove double slashes in order to allow URLs starting with sapgui://
$args.replace('sapgui:','').replace('//','')Convert the string into an argument list by splitting at character & and pass it to executable sapshcut.exe
sapshcut.exe $args.split('&')The command sequence above must be run within a Windows PowerShell instance. Start powershell.exe with options -NonInteractive -NoProfile and -WindowStyle Hidden, see https://docs.microsoft.com/en-us/powershell/module/microsoft.powershell.core/about/about_powershell_....
Finally you should compile everything into a Windows registry file (extension *.reg) with the content below. All relevant keys are added to the Windows registry when the file gets executed.
Windows Registry Editor Version 5.00


[HKEY_CLASSES_ROOT\sapgui]

@="Launch SAP GUI"

"URL Protocol"=""


[HKEY_CLASSES_ROOT\sapgui\shell]

@=""


[HKEY_CLASSES_ROOT\sapgui\shell\open]

@=""


[HKEY_CLASSES_ROOT\sapgui\shell\open\command]

@="powershell -NonInteractive -NoProfile -WindowStyle Hidden -Command \"& {Add-Type -AssemblyName System.Net; $args=[System.Net.WebUtility]::UrlDecode('%1').replace('sapgui:','').replace('//',''); &'C:\\Program Files (x86)\\SAP\\FrontEnd\\SAPgui\\sapshcut' $args.split('&')}\""
Step 4.2: Create a HTML page
Now you are ready to use custom URLs with protocol sapgui:
By using such a custom URL you can add a hyperlink to your HTML page that can be used to navigate to the filtered job overview screen in SAP GUI, as indicated by the following snippet.
<html>

<head>

<title>Link to SAPGUI transaction (follow custom URL)</title>

</head>

<body>


<a href='sapgui:-SYSTEM=PRD&-CLIENT=100&-USER=HUGO&-LANGUAGE=EN&-REUSE=1&-COMMAND="""SM37 BTCH2170-JOBNAME=Z*;BTCH2170-USERNAME=HUGO;"""'>

Job Overview

</a>


</body>

</html>
Conclusion
Two alternative methods to add a hyperlink to your web page for navigation to a parameterized SAP GUI transaction have been given. Method 1 works on all front end PCs without additional setup. Method 2 might be more convenient for the user, but requires setup work on the front end PC.
The latter method runs on Windows only. However, it should be possible to implement a similar approach on other operating systems that support custom URLs, in particular macOS.
If you need help with the SAP GUI or on another topic, Ask a Question on the SAP Community Q&A resource page.
- SAP Managed Tags:
- HTML5,
- SAP S/4HANA,
- UI SAP GUI for Windows
Labels:
3 Comments
You must be a registered user to add a comment. If you've already registered, sign in. Otherwise, register and sign in.
Labels in this area
-
ABAP CDS Views - CDC (Change Data Capture)
2 -
AI
1 -
Analyze Workload Data
1 -
BTP
1 -
Business and IT Integration
2 -
Business application stu
1 -
Business Technology Platform
1 -
Business Trends
1,658 -
Business Trends
94 -
CAP
1 -
cf
1 -
Cloud Foundry
1 -
Confluent
1 -
Customer COE Basics and Fundamentals
1 -
Customer COE Latest and Greatest
3 -
Customer Data Browser app
1 -
Data Analysis Tool
1 -
data migration
1 -
data transfer
1 -
Datasphere
2 -
Event Information
1,400 -
Event Information
67 -
Expert
1 -
Expert Insights
177 -
Expert Insights
307 -
General
1 -
Google cloud
1 -
Google Next'24
1 -
GraphQL
1 -
Kafka
1 -
Life at SAP
780 -
Life at SAP
13 -
Migrate your Data App
1 -
MTA
1 -
Network Performance Analysis
1 -
NodeJS
1 -
PDF
1 -
POC
1 -
Product Updates
4,576 -
Product Updates
349 -
Replication Flow
1 -
REST API
1 -
RisewithSAP
1 -
SAP BTP
1 -
SAP BTP Cloud Foundry
1 -
SAP Cloud ALM
1 -
SAP Cloud Application Programming Model
1 -
SAP Datasphere
2 -
SAP S4HANA Cloud
1 -
SAP S4HANA Migration Cockpit
1 -
Technology Updates
6,873 -
Technology Updates
436 -
Workload Fluctuations
1
Related Content
- Managed Systems Setup Check for On-Premise ABAP systems connected to SAP Cloud ALM in Technology Blogs by SAP
- DML Logs at database level in Technology Q&A
- Certificate file content disappeared from the ICM trace level 3 in ABAP 7.58 in Technology Q&A
- FM or BAPI for VF03, FB03 attachment list download in Technology Q&A
- SAP Fiori for SAP S/4HANA - Empowering Your Homepage: Enabling My Home for SAP S/4HANA 2023 FPS01 in Technology Blogs by SAP
Top kudoed authors
| User | Count |
|---|---|
| 24 | |
| 16 | |
| 11 | |
| 10 | |
| 10 | |
| 9 | |
| 9 | |
| 8 | |
| 8 | |
| 7 |