
- SAP Community
- Products and Technology
- Technology
- Technology Blogs by SAP
- Using SAP Build Apps and SAP Build Process Automat...
Technology Blogs by SAP
Learn how to extend and personalize SAP applications. Follow the SAP technology blog for insights into SAP BTP, ABAP, SAP Analytics Cloud, SAP HANA, and more.
Turn on suggestions
Auto-suggest helps you quickly narrow down your search results by suggesting possible matches as you type.
Showing results for
Employee
Options
- Subscribe to RSS Feed
- Mark as New
- Mark as Read
- Bookmark
- Subscribe
- Printer Friendly Page
- Report Inappropriate Content
10-12-2023
10:06 PM
Prerequisites:
Introduction:
By leveraging the power of SAP Build, customers and partners can overcome customization challenges and stay competitive in the ever-evolving market. By creating customer-specific solutions, they can streamline the collection of supplier-provided carbon emission data and its seamless integration into the SFM system. This blog outlines a three-stage approach that utilizes SAP Build Apps and SAP Build Process Automation to standardize data collection, automate approval process and upload approved data to SAP Sustainability Footprint Management (henceforth referred to here as SFM), ensuring a seamless flow of information for footprint calculations:

For simplicity, let's start with the creation of the approval process and automation to upload the approved data from suppliers, using SAP Build Process Automation. This enabled us to establish the entire workflow, which would be integrated and leveraged within SAP Build Apps later.
Below is the step-by-step guide detailing the implementation of our solution:
To create the approval process, I created a Business Process project using SAP Build Process Automation. Then, create the data type which is used an input parameter in the process.
API trigger should be created and configured to enable us to integrate the Approval Process with SAP Build Apps. The configured inputs will then be used as input fields in the approval form.
Approvals can be performed manually or automatically based on the process conditions. In our Scenario, SFM admins needs to review and approve/reject the supplier data.
With SAP Build Process Automation, approvals could be managed by creating and adding an approval form to a business process.
Then, adding the Subject & Recipient’s Email & configuring the inputs of the Approval Form by navigating to Inputs and map the fields accordingly:
An approval confirmation form, which will be sent as notification to the supplier if the supplier form is approved is created and configured as follows:
In case it is rejected, an email notification would be sent to the supplier, as follows:
Create an Automation to aggregate the data of the approved form in an excel sheet which will be uploaded to the SFM:
Configure/Edit the Automation as shown below:

Release and deploy the business process project. After deploying ‘View’ the workflow API trigger to get payload (API call)
Copy & paste the payload into a Notepad as it is needed to run the process. Then, Navigate to Monitor > Manage > Process and Workflow Definitions & ‘Start New Instance’ to add the payload
To monitor the running instances of the process, go to Process and Workflow Instances under the Monitor section.
Create a new app project, then design the supplier submission form by dragging and dropping the title, containers, text, input fields & button components. The background color, theme & shadowing effect of the container layout could be maintained in the Style tab. Adjusting the alignment of the components could be maintained in the Layout tab.
Your app will appear as depicted below:
To trigger the workflow, an SAP BTP destination that connects to SAP Build Process Automation API should be created through the BTP Cockpit
To set up the connection from the app to that BTP destination, open the Data tab, at the top and under SAP Build Apps classic data entities, click Create Data Entity > SAP BTP Destination REST API Integration. Then, select the BTP destination name:
Under Resource schema, add the configured fields of our sustainability use case, as shown below:
For Request headers, click the binding X, then List of values and add the following key-value pair:
To create data variable, go to on the UI canvas (click the UI Canvas tab at the top), select Variables > click Data Variables on the left > add Data Variable > SAP DEST1
Then go back to the view mode to Bind data variable to UI elements, Click on the first input field (for SupplierName). In the Properties tab, click the X next to the Value field, and select Data and Variables > Data Variables > SAP DEST1 > SupplierName. Then, Save.
Repeat this step for all the fields.
Once the Submit button is clicked, we need to send the supplier order details to our SAP Build Process Automation workflow using the data resource we previously created.
To set up this logic, click on the Submit button, and open the logic canvas by clicking Add logic to Button1 at the bottom right. Then,
For Resource name, this should already be set to SAP DEST, since this is the only one data resource.
For Record, we need to bind each of the data variable fields to the appropriate record field through adding the following formula:
2. Drag a Toast flow function onto the canvas, and connect the top output of the Create record flow function to it.
configure it in the Properties pane on the right. For Toast message, click on the ABC, then select and add the following formula:
Watch the following video to learn about the end-to-end process of automating the emission data import using SAP Build:
Summary:
Using SAP Build Apps and SAP Build Process Automation brings numerous benefits to the businesses. It reduces manual efforts during data collection and integration, leading to faster and more accurate footprint calculations. The automation of the moderation and import processes increases data reliability, improving the overall quality of the sustainability data.
By harnessing the potential of SAP Build Apps and SAP Build Process Automation, businesses can create tailor-made solutions to streamline data collection and integration processes. This approach not only boosts efficiency and accuracy but also paves the way for a more sustainable future by enabling better-informed decisions to reduce carbon footprints.
- For customers/partners who are unfamiliar with SAP Build, I highly recommend you to complete the Low code /No code learning journey which will equip you with the fundamental concepts necessary for building applications and automations without the need for coding expertise.
- For detailed step-by-step guide on deploying Process Automation project and triggering the process via APIs, refer to the specific section of the learning journey here.
Introduction:
By leveraging the power of SAP Build, customers and partners can overcome customization challenges and stay competitive in the ever-evolving market. By creating customer-specific solutions, they can streamline the collection of supplier-provided carbon emission data and its seamless integration into the SFM system. This blog outlines a three-stage approach that utilizes SAP Build Apps and SAP Build Process Automation to standardize data collection, automate approval process and upload approved data to SAP Sustainability Footprint Management (henceforth referred to here as SFM), ensuring a seamless flow of information for footprint calculations:
- Building a Custom App for Sustainability Data Entry and Workflow Triggering with SAP Build Apps
- Creating an approval process flow using SAP Build Process Automation
- Upload the approved data collected from suppliers to the SFM solution manually or automatically through creating an automation within SAP Build Process Automation
For simplicity, let's start with the creation of the approval process and automation to upload the approved data from suppliers, using SAP Build Process Automation. This enabled us to establish the entire workflow, which would be integrated and leveraged within SAP Build Apps later.
Below is the step-by-step guide detailing the implementation of our solution:
- Creation of an automated approval Process:
To create the approval process, I created a Business Process project using SAP Build Process Automation. Then, create the data type which is used an input parameter in the process.

API trigger should be created and configured to enable us to integrate the Approval Process with SAP Build Apps. The configured inputs will then be used as input fields in the approval form.

Approvals can be performed manually or automatically based on the process conditions. In our Scenario, SFM admins needs to review and approve/reject the supplier data.
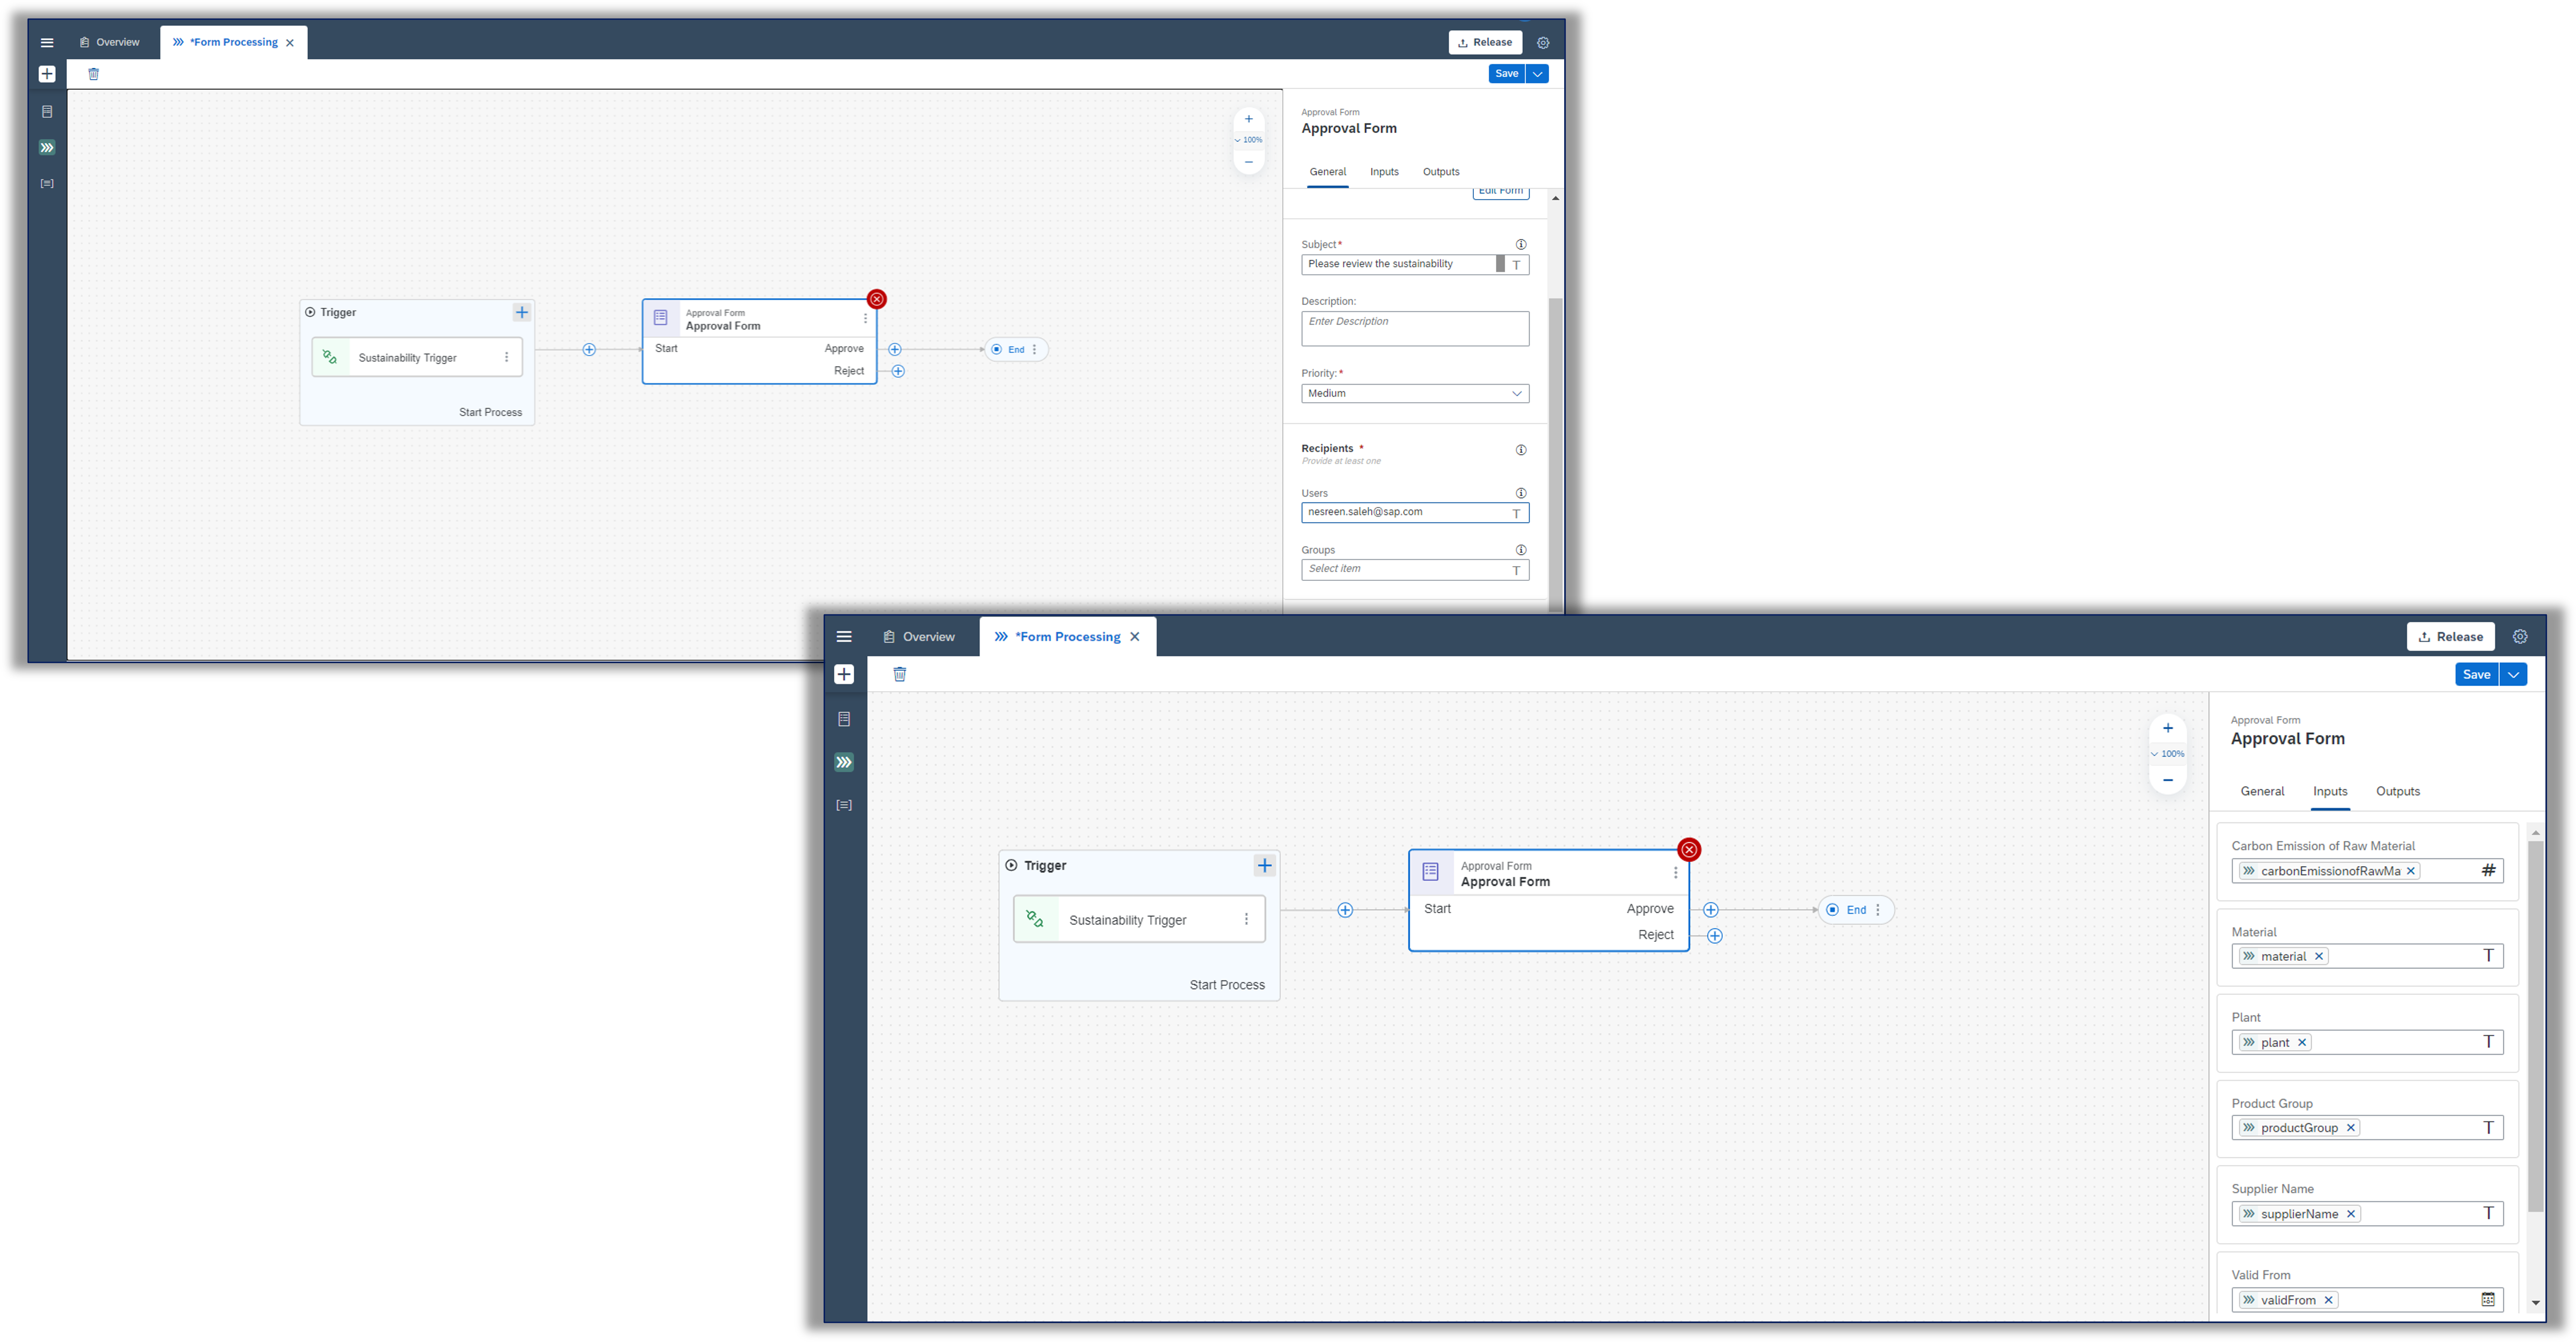
With SAP Build Process Automation, approvals could be managed by creating and adding an approval form to a business process.

Then, adding the Subject & Recipient’s Email & configuring the inputs of the Approval Form by navigating to Inputs and map the fields accordingly:
An approval confirmation form, which will be sent as notification to the supplier if the supplier form is approved is created and configured as follows:


In case it is rejected, an email notification would be sent to the supplier, as follows:

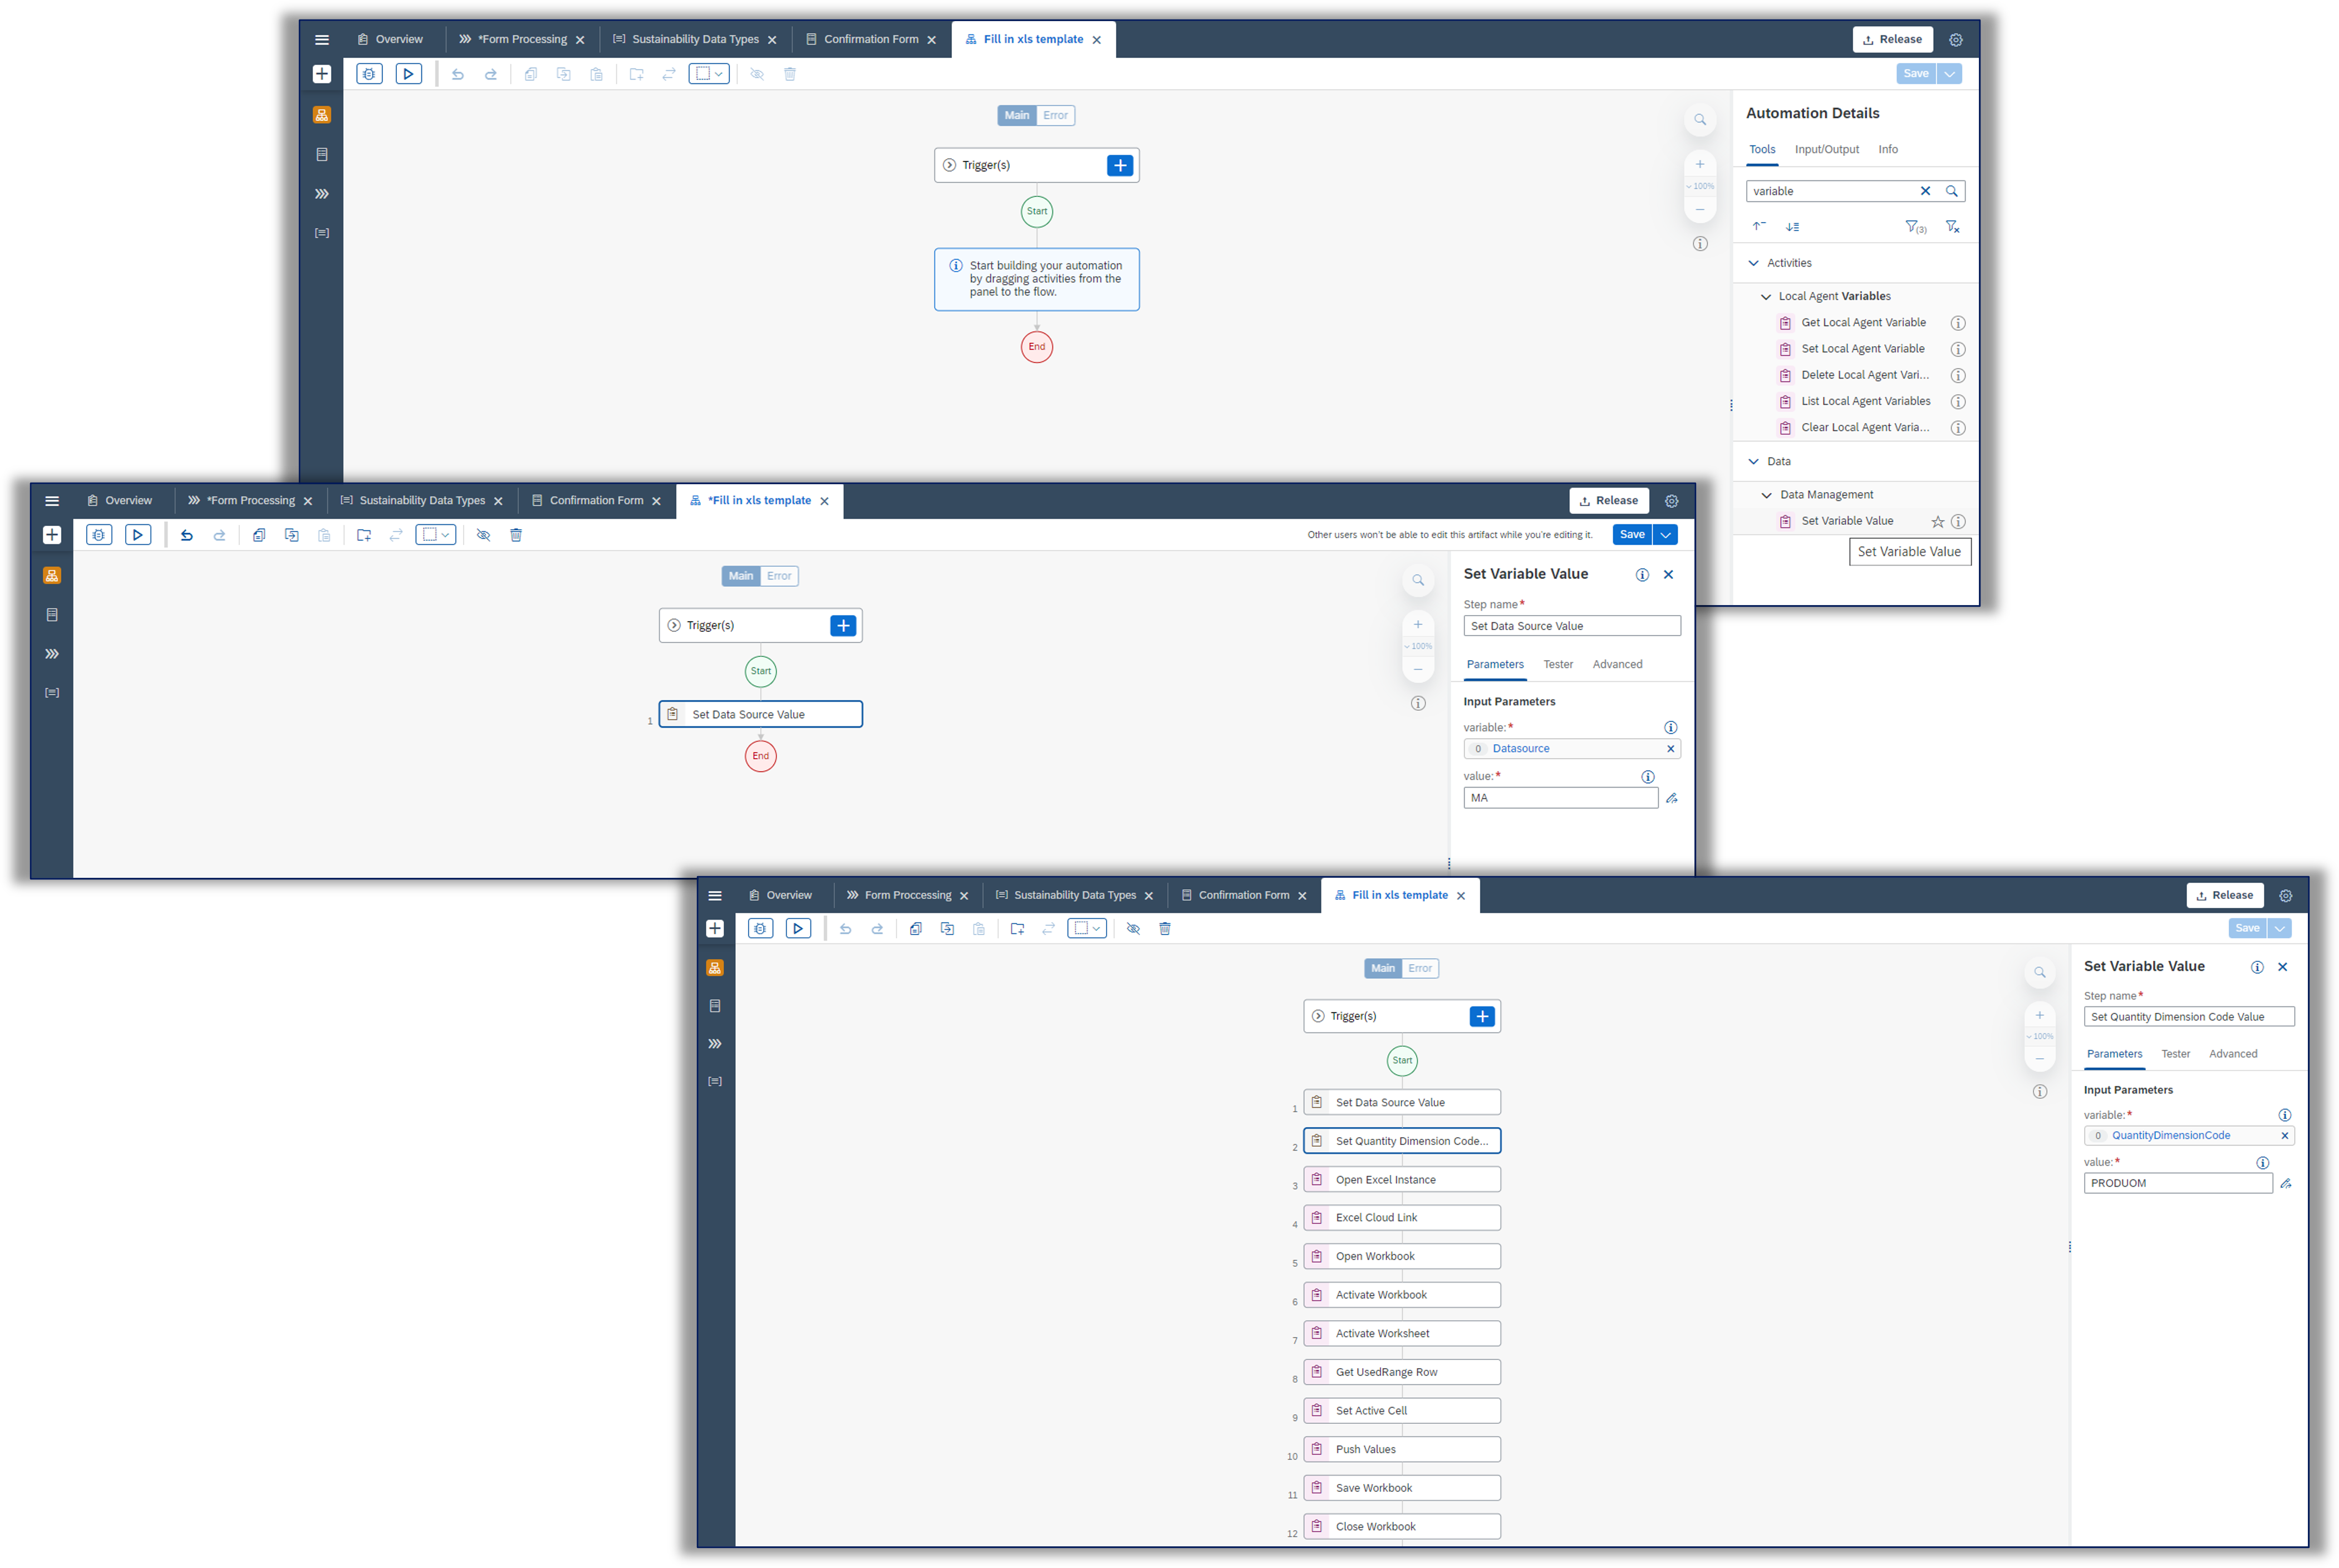
Create an Automation to aggregate the data of the approved form in an excel sheet which will be uploaded to the SFM:

Configure/Edit the Automation as shown below:
- Set static Values for Data Source and Quantity Dimension codes as required in the xls as these generally don’t change based on user inputs and can be statically designed.
Login to the SFM system and open Fiori App “Manage Purchased Product Footprints” to get the Template used to upload Emission Factors into SFM. Then, go to Import and click on 'Download template' to download an empty template and save it to your desktop. This template and file location will be used to create the Automation and fill in data:


In the Automation, use “Excel Cloud Link” to open the template and read the fields.
- Open the Workbook, Activate the workbook and Activate the worksheet.
- Before, writing into the template, use “Get Used Range Row” to get the next available free cell.
- Use “Set Active Cell” with the following formula to set the active cell for write action:
“"A" + (Step8.usedRangeRowIndex + 1)”
- Use “Push Values” to add the parameters which is obtained from the process. Arrange the columns in a manner that ensures they appear in the correct sequence within the Excel file:
“[Step0.ProductUnit, Step0.PlantId, Step0.MaterialName, Step0.SupplierName, Step0.DataSource, Step0.QuantityDimensionCode, Step0.ValidFrom, Step0.ValidTo, Step0.PurchasedProductFootprints]”
- Save, Close the workbook and close the Excel Link. Now, your Automation is ready!
Release and deploy the business process project. After deploying ‘View’ the workflow API trigger to get payload (API call)

Copy & paste the payload into a Notepad as it is needed to run the process. Then, Navigate to Monitor > Manage > Process and Workflow Definitions & ‘Start New Instance’ to add the payload
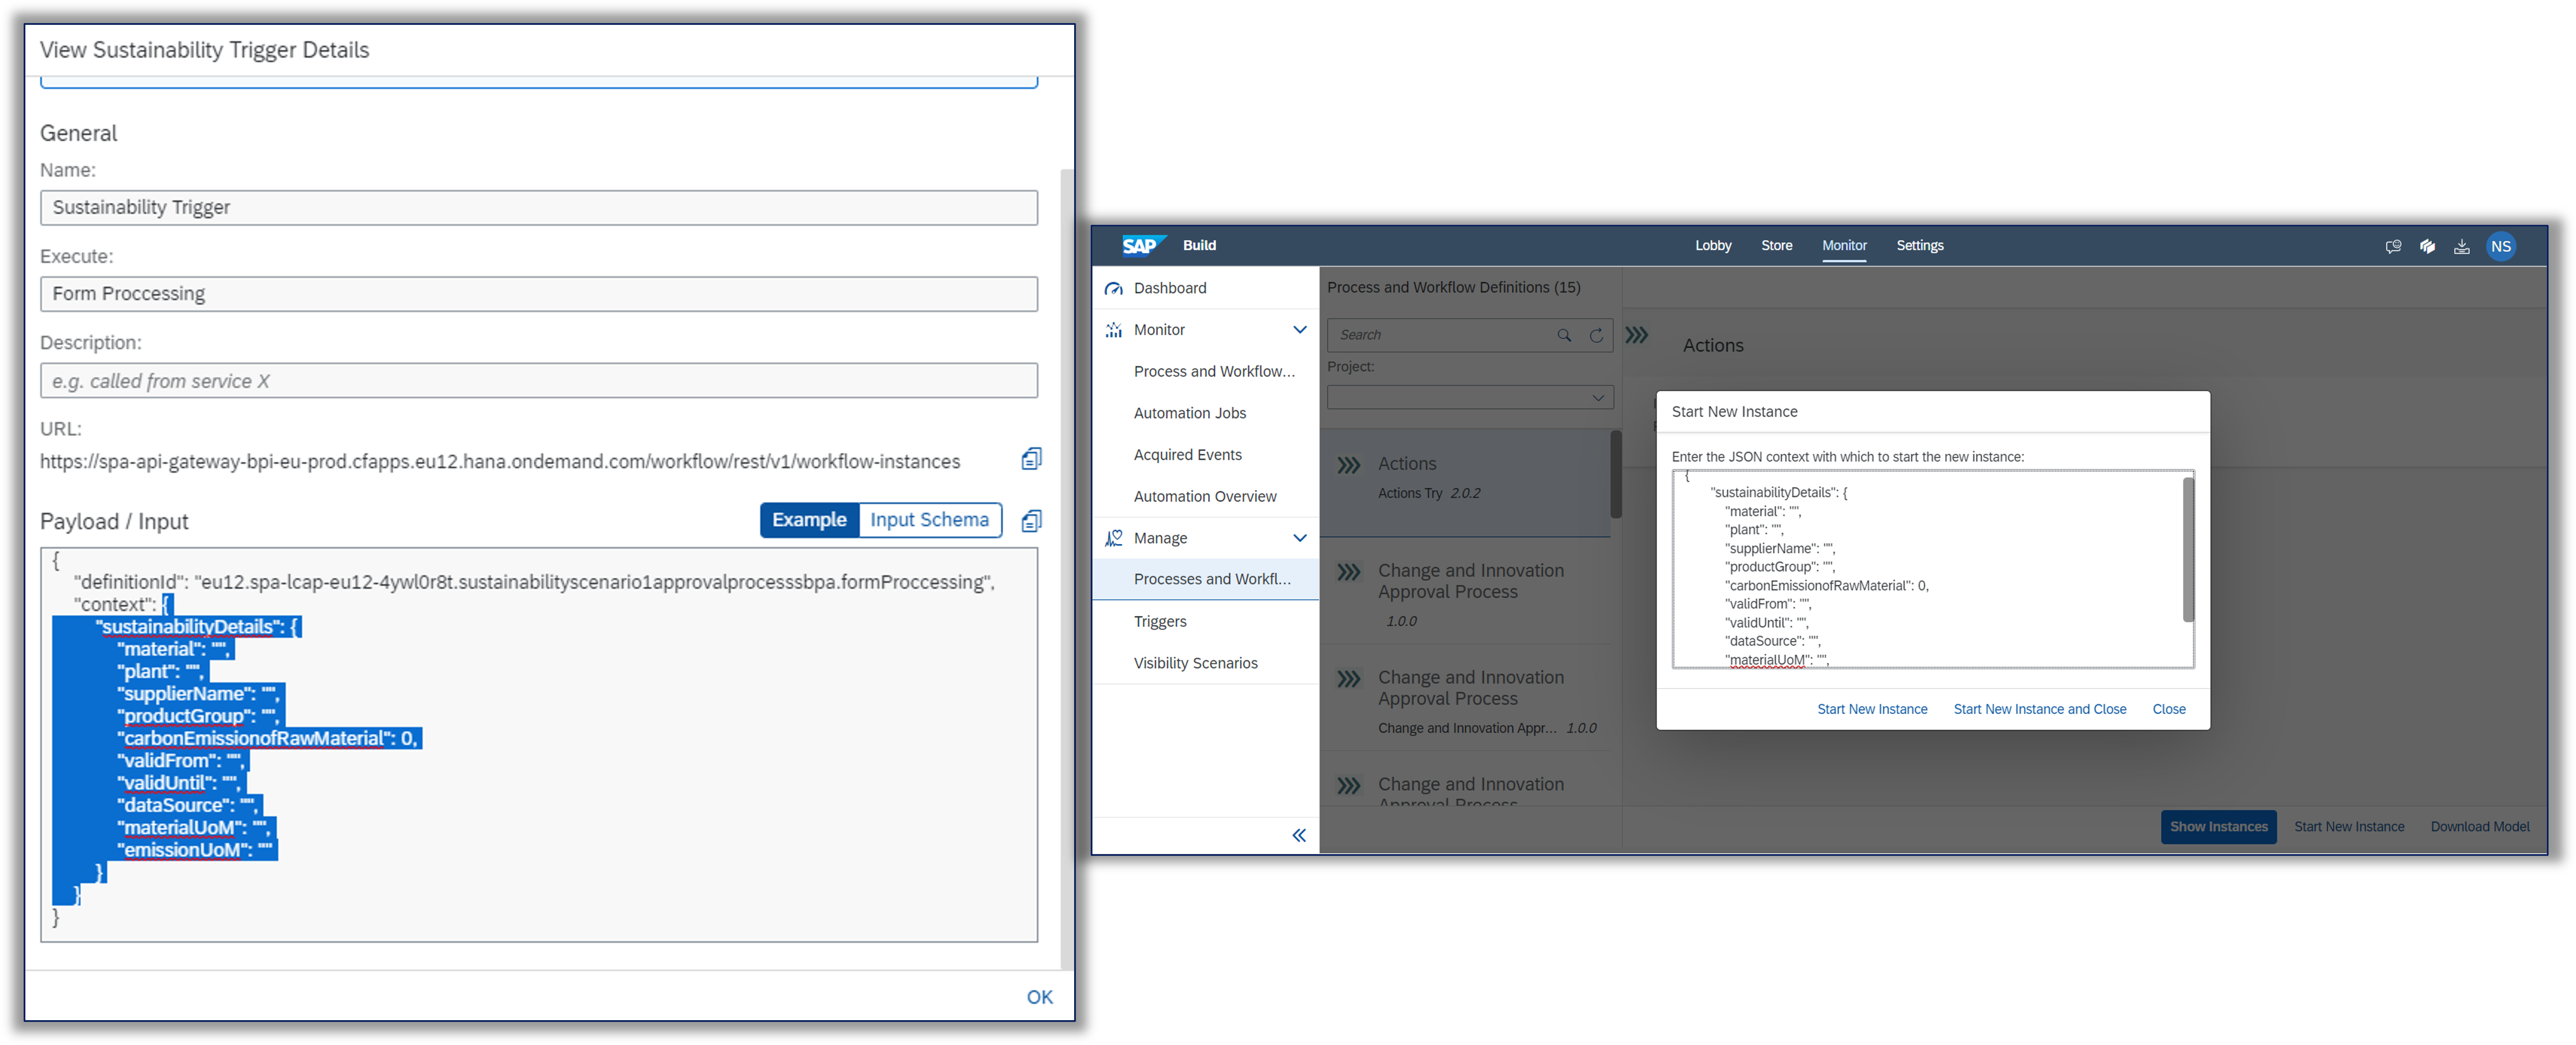
To monitor the running instances of the process, go to Process and Workflow Instances under the Monitor section.

- Creation of an app to collect supplier data & trigger workflow:
Create a new app project, then design the supplier submission form by dragging and dropping the title, containers, text, input fields & button components. The background color, theme & shadowing effect of the container layout could be maintained in the Style tab. Adjusting the alignment of the components could be maintained in the Layout tab.

Your app will appear as depicted below:

To trigger the workflow, an SAP BTP destination that connects to SAP Build Process Automation API should be created through the BTP Cockpit
- Add the API URL from the Process Automation that was created.
- Add the Client ID, Client Secret & Token Service URL from Service Instance.
- Set the parameters of the 'Additional Properties' to 'true'.

To set up the connection from the app to that BTP destination, open the Data tab, at the top and under SAP Build Apps classic data entities, click Create Data Entity > SAP BTP Destination REST API Integration. Then, select the BTP destination name:

Under Resource schema, add the configured fields of our sustainability use case, as shown below:

For Request headers, click the binding X, then List of values and add the following key-value pair:

To create data variable, go to on the UI canvas (click the UI Canvas tab at the top), select Variables > click Data Variables on the left > add Data Variable > SAP DEST1

Then go back to the view mode to Bind data variable to UI elements, Click on the first input field (for SupplierName). In the Properties tab, click the X next to the Value field, and select Data and Variables > Data Variables > SAP DEST1 > SupplierName. Then, Save.
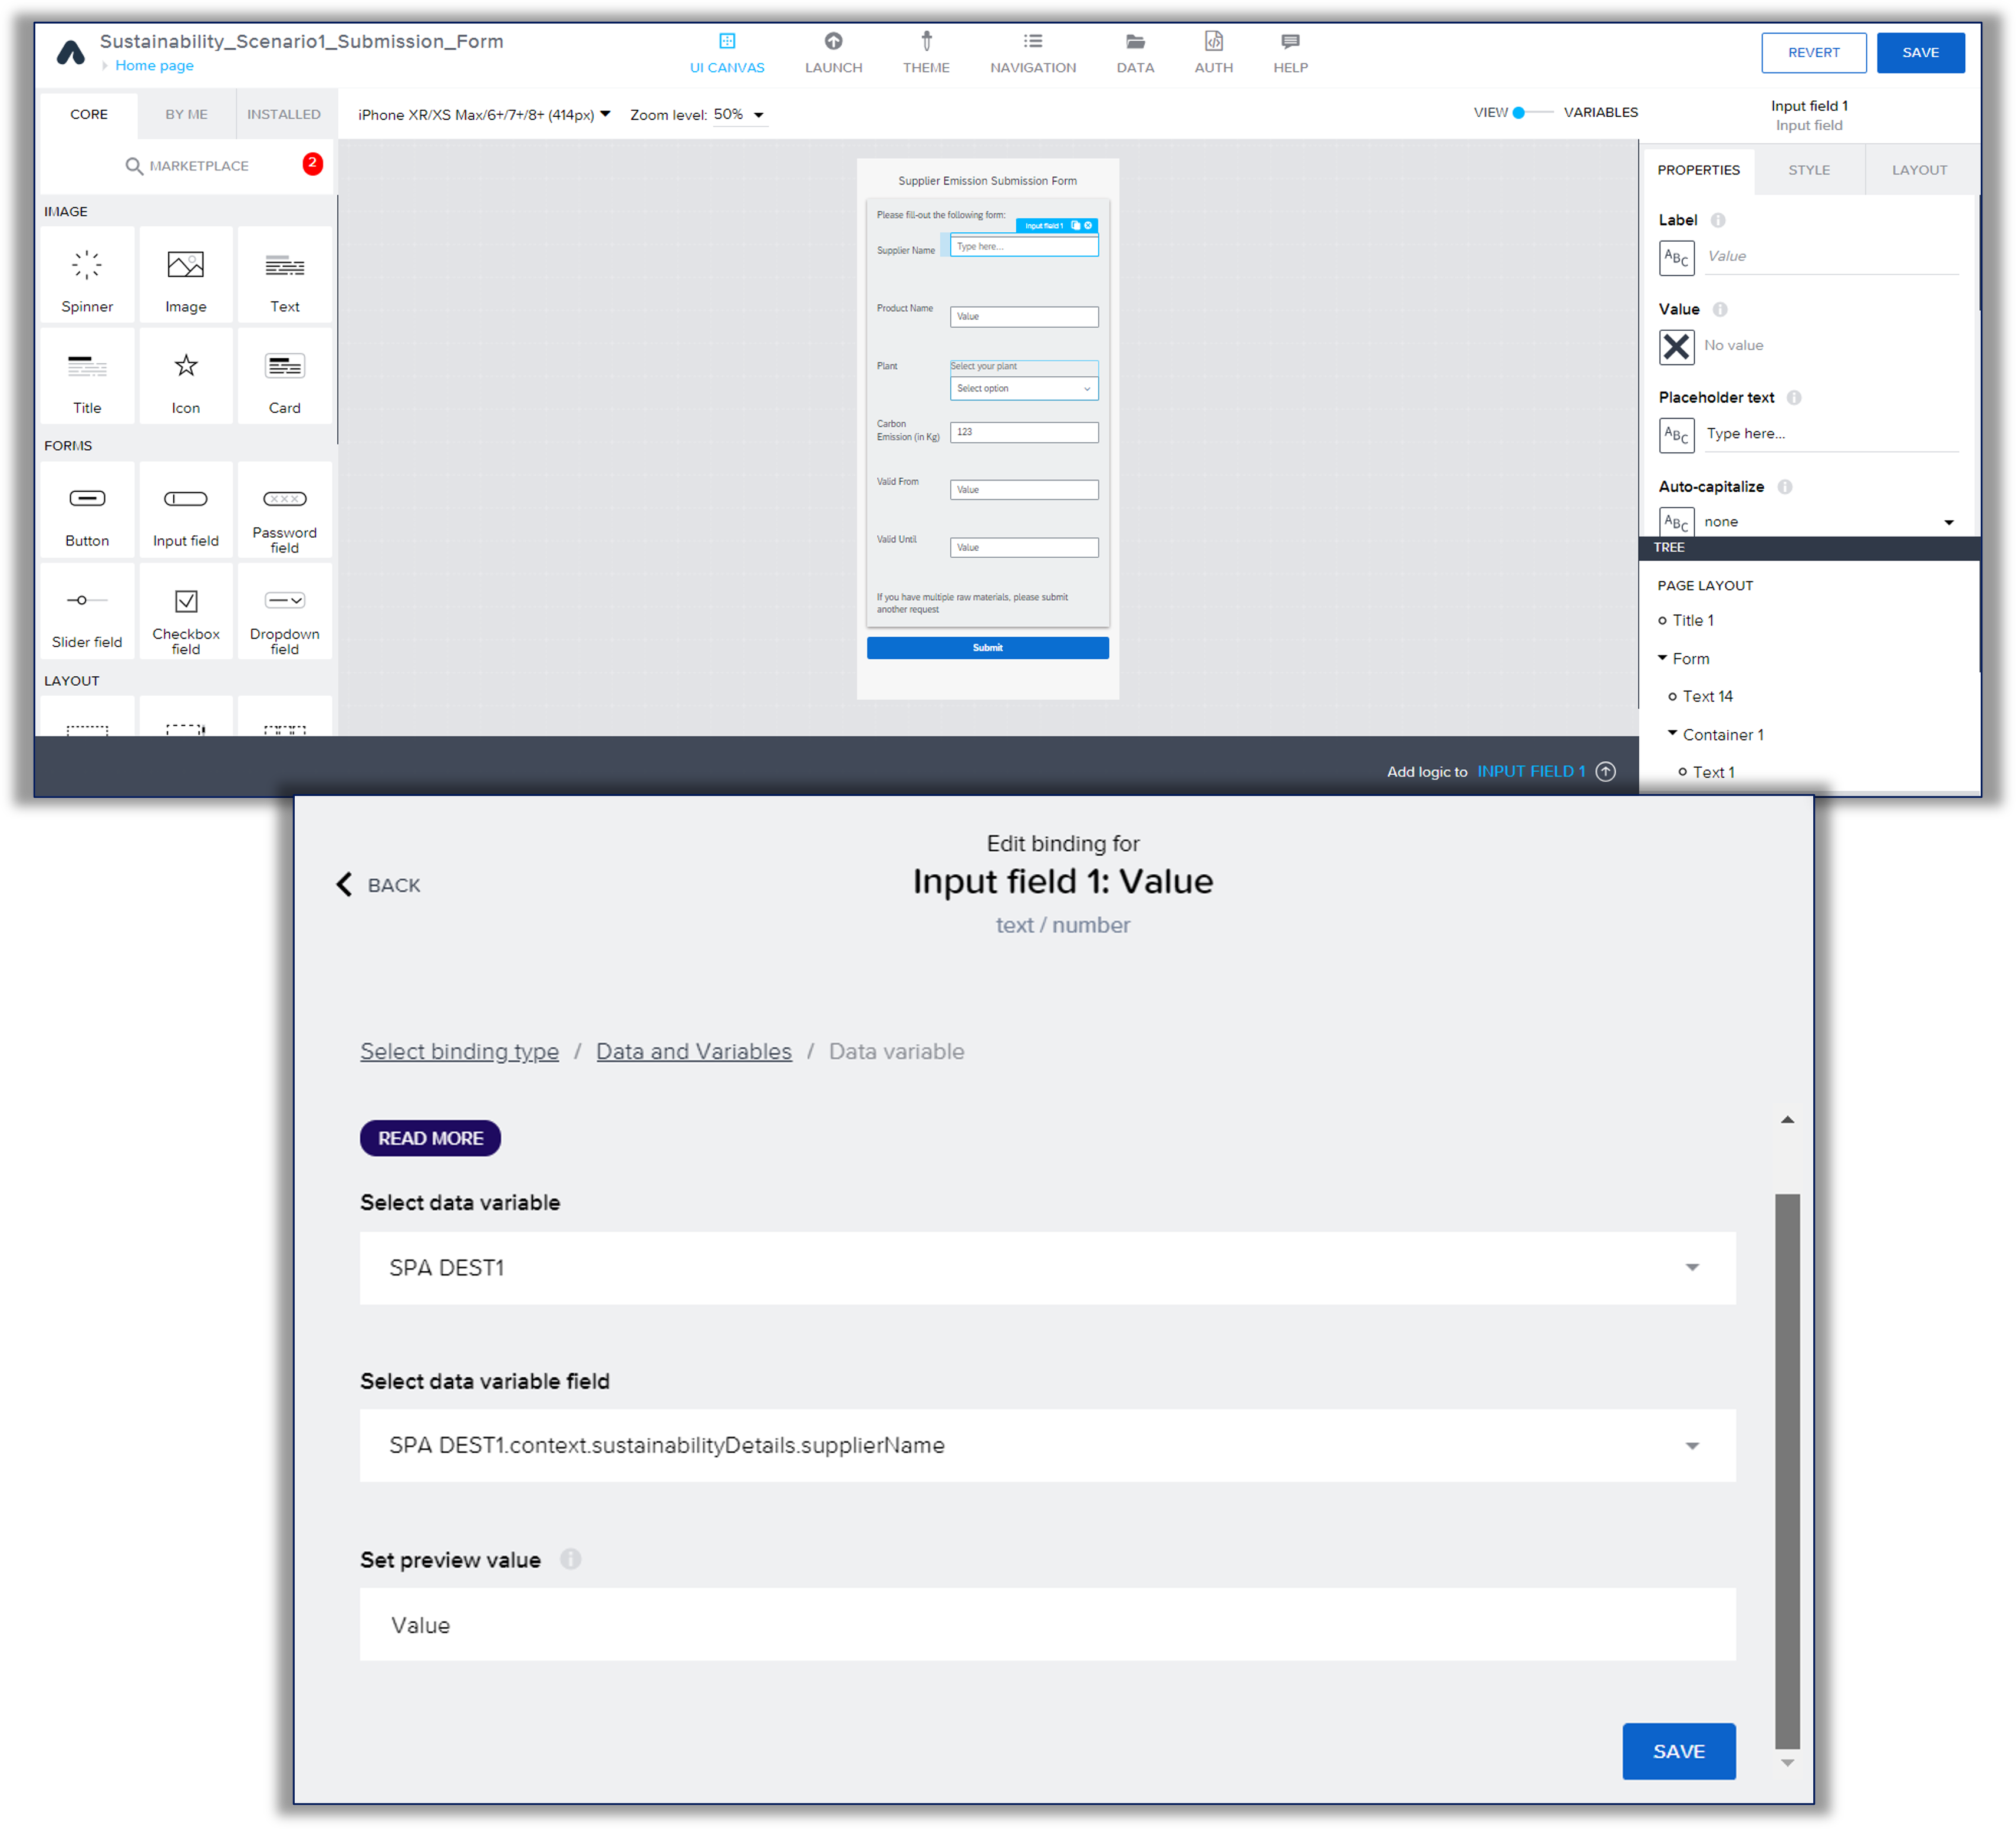
Repeat this step for all the fields.
Once the Submit button is clicked, we need to send the supplier order details to our SAP Build Process Automation workflow using the data resource we previously created.
To set up this logic, click on the Submit button, and open the logic canvas by clicking Add logic to Button1 at the bottom right. Then,
- Drag a Create record flow function onto the canvas, and connect the component tap event to it. Click on the Create record flow function and configure it in the Properties pane on the right
For Resource name, this should already be set to SAP DEST, since this is the only one data resource.
For Record, we need to bind each of the data variable fields to the appropriate record field through adding the following formula:
{context: {sustainabilityDetails: {plant: data["SPA DEST1"].context.sustainabilityDetails.plant, material: data["SPA DEST1"].context.sustainabilityDetails.material, validFrom: data["SPA DEST1"].context.sustainabilityDetails.validFrom, dataSource: "DS", validUntil: data["SPA DEST1"].context.sustainabilityDetails.validUntil, emissionUoM: "TON", materialUoM: "KG", productGroup: "01", supplierName: data["SPA DEST1"].context.sustainabilityDetails.supplierName, carbonEmissionofRawMaterial: NUMBER(data["SPA DEST1"].context.sustainabilityDetails.carbonEmissionofRawMaterial)}}}2. Drag a Toast flow function onto the canvas, and connect the top output of the Create record flow function to it.
configure it in the Properties pane on the right. For Toast message, click on the ABC, then select and add the following formula:
"Updated Sustainability Record for Material: " + data["SPA DEST1"].context.sustainabilityDetails.material"
Watch the following video to learn about the end-to-end process of automating the emission data import using SAP Build:
Summary:
Using SAP Build Apps and SAP Build Process Automation brings numerous benefits to the businesses. It reduces manual efforts during data collection and integration, leading to faster and more accurate footprint calculations. The automation of the moderation and import processes increases data reliability, improving the overall quality of the sustainability data.
By harnessing the potential of SAP Build Apps and SAP Build Process Automation, businesses can create tailor-made solutions to streamline data collection and integration processes. This approach not only boosts efficiency and accuracy but also paves the way for a more sustainable future by enabling better-informed decisions to reduce carbon footprints.
- SAP Managed Tags:
- SAP Build Apps,
- SAP Build,
- SAP Build Process Automation
Labels:
1 Comment
You must be a registered user to add a comment. If you've already registered, sign in. Otherwise, register and sign in.
Labels in this area
-
ABAP CDS Views - CDC (Change Data Capture)
2 -
AI
1 -
Analyze Workload Data
1 -
BTP
1 -
Business and IT Integration
2 -
Business application stu
1 -
Business Technology Platform
1 -
Business Trends
1,658 -
Business Trends
93 -
CAP
1 -
cf
1 -
Cloud Foundry
1 -
Confluent
1 -
Customer COE Basics and Fundamentals
1 -
Customer COE Latest and Greatest
3 -
Customer Data Browser app
1 -
Data Analysis Tool
1 -
data migration
1 -
data transfer
1 -
Datasphere
2 -
Event Information
1,400 -
Event Information
67 -
Expert
1 -
Expert Insights
177 -
Expert Insights
301 -
General
1 -
Google cloud
1 -
Google Next'24
1 -
GraphQL
1 -
Kafka
1 -
Life at SAP
780 -
Life at SAP
13 -
Migrate your Data App
1 -
MTA
1 -
Network Performance Analysis
1 -
NodeJS
1 -
PDF
1 -
POC
1 -
Product Updates
4,577 -
Product Updates
346 -
Replication Flow
1 -
REST API
1 -
RisewithSAP
1 -
SAP BTP
1 -
SAP BTP Cloud Foundry
1 -
SAP Cloud ALM
1 -
SAP Cloud Application Programming Model
1 -
SAP Datasphere
2 -
SAP S4HANA Cloud
1 -
SAP S4HANA Migration Cockpit
1 -
Technology Updates
6,873 -
Technology Updates
430 -
Workload Fluctuations
1
Related Content
- Start page of SAP Signavio Process Insights, discovery edition, the 4 pillars and documentation in Technology Blogs by SAP
- SAP Signavio is the highest ranked Leader in the SPARK Matrix™ Digital Twin of an Organization (DTO) in Technology Blogs by SAP
- Accelerate Business Process Development with SAP Build Process Automation Pre-Built Content in Technology Blogs by SAP
- Hack2Build on Business AI – Highlighted Use Cases in Technology Blogs by SAP
- 10+ ways to reshape your SAP landscape with SAP Business Technology Platform – Blog 4 in Technology Blogs by SAP
Top kudoed authors
| User | Count |
|---|---|
| 26 | |
| 17 | |
| 15 | |
| 13 | |
| 11 | |
| 9 | |
| 8 | |
| 8 | |
| 8 | |
| 7 |