
- SAP Community
- Products and Technology
- Technology
- Technology Blogs by SAP
- Surviving and Thriving with the SAP Cloud Applicat...
Technology Blogs by SAP
Learn how to extend and personalize SAP applications. Follow the SAP technology blog for insights into SAP BTP, ABAP, SAP Analytics Cloud, SAP HANA, and more.
Turn on suggestions
Auto-suggest helps you quickly narrow down your search results by suggesting possible matches as you type.
Showing results for
Product and Topic Expert
Options
- Subscribe to RSS Feed
- Mark as New
- Mark as Read
- Bookmark
- Subscribe
- Printer Friendly Page
- Report Inappropriate Content
01-16-2023
2:03 PM
If you're anything like me, you've probably been working with the SAP Cloud Application Programming Model (CAP) for Node.js for a while now, but you may still feel like you're only scratching the surface.
Well, fear not – in this series of blog posts, I'll be sharing some tips and tricks on a variety of topics. Whether you're interested in Unit or Integration tests, enable debugging for your app that contains a Cloud Connector, using TypeScript for CAP, or working with metadata for SAP S/4HANA APIs properly, I've (hopefully) got you covered.
I have created a custom tag on the SAP Community, which serves as a marker for all blog posts in my series: #CAPTricks.
I work in a team called Platform Adoption & Advisory that produces lots of sample repositories for github.com/sap-samples, which showcase and combine various SAP Business Technology Platform (SAP BTP) services to extend and integrate SAP solutions, non-SAP solutions or 3rd party software like Stripe or Twilio. While our focus is often on showcasing these services in context, I often find myself neglecting to deliver beautiful and stable code. Let's be real, we've (hopefully, again) all been there.
In this series of blog posts, I'll be sharing some of my experiences that might help you and who knows, they might help you too (even if you're already a seasoned Node.js/JavaScript dev). In this series, we'll cover topics ranging from the basic setup of a project that can improve your code to common challenges developers may face when working with CAP extensions for SAP systems, such as using on-premise APIs during development.
We'll delve into the general hurdles of working with full-stack CAP applications locally, whether you prefer to work in SAP Business Application Studio or Visual Studio Code. We'll explore how to make your applications as production-ready as possible, including the use of automatic tests with tools like Mocha, Chai, and WDI5. This is one of my favorite topics, and I'm excited to share my experiences and insights with you.
So, to make things a little easier on you (and mainly for me), I've broken up the content into more manageable chunks. That way, you can enjoy the ride without having to wade through a sea of tips & tricks at once. So, buckle up for a few more blog posts. I have no idea how many I'll end up with, but hey, at least you won't have to digest everything at once and I don't have to write everything at once 😉.
Disclaimer: This series is not intended to be a comprehensive guide to best practices or anything groundbreaking, but rather a collection of personal experiences and insights that have helped me to be more productive.
Why I'm writing this blog post series
As a self-proclaimed quick-and-dirty JavaScript developer (I'm not even sure I'm qualified to call myself a JavaScript developer), I struggled with CAP Node.js when it came to building samples. In an effort to improve my productivity and the maturity of the content I produce, I decided to dig deeper into some areas beyond the usual sample content. This series of blog posts is the result of that journey.
For experienced devs in these areas, it's not rocket science - it's just a piece of cake (or should I say, daily bread)! If you have any additional insights or perspectives, I'd be thrilled to have a discussion and learn from your feedback and remarks!
Jump to the end of this blog post and find a long version of why I’m writing this series.
TypeScript for CAP
I really appreciate the simplicity and ease of use of JavaScript compared to Java (lots of boilerplate) but my life has been full of these errors:
Uncaught TypeError: service.callFunction is not a functionThat won't happen with TypeScript, most likely. You don't know anything about TypeScript yet? TypeScript is a programming language that is designed to be used with JavaScript. It takes your TypeScript code and converts it, or "transpiles" it, into regular JavaScript code that can be run in any JavaScript runtime environment. One of the main benefits of using TypeScript is that it allows developers to add optional static typing to their code, which can help catch errors and typos before the code is even executed.
This can save time and effort by catching mistakes early on in the development process, rather than having to debug issues (read more about why I love debugging though 😉) that only surface at runtime. In contrast, JavaScript is a dynamically-typed language, which means that the data type of a variable is determined at runtime and can hold values of any data type. This can make it more prone to runtime errors, as the code is not checked for correctness until it is actually executed. Features such as code completion, parameter info, quick info, and member lists, are the primary benefit of using TypeScript for me.
CAP now (for quite some time) also offers support for TypeScript, which makes it more convenient and stable to use.
Getting started with TypeScript in CAP is not difficult, and the process can be summarised in a few simple steps:
1) Install TypeScript packages for node globally:
npm i -g typescript ts-node2) Add a tsconfig.json to the root of your CAP project. A tsconfig.json file is a configuration file for TypeScript that specifies the compiler options and files that should be included in a project. It allows you to customize the TypeScript compilation process for your project. The file is typically located in the root of your project and is used by the TypeScript compiler to understand how your project is structured, what files should be included, and how those files should be compiled.
The tsconfig.json file is needed because TypeScript is a typed superset of JavaScript and the compiler needs the configuration to understand how to handle the types and how to compile the code. It allows you to tailor the compilation process to your specific project needs, such as specifying the version of ECMAScript you want to target, enabling strict type checking, and more.
3) If you also want to have type definitions for your CDS definitions (either and/or for your models and services):
npm install cds2types --save-dev

cds2types --cds ./service.cds --output ./ --prefix IVoila! You are good to go to build your CAP project entirely with TypeScript support. There's a few things that you need to keep in mind:
- running cds in your terminal wouldn't take your TypeScript (.ts) files into account. Make sure to use cds-ts for development purposes.
- if you want to deploy your application to SAP BTP, Cloud Foundry Runtime or SAP BTP, Kyma Runtime, make sure you have transpiled your TypeScript files to JavaScript files using the TypeScript compiler using tsc: Example
- Running your tests (Unit / Integration / E2E) with Mocha might change slightly. I don't want to compile my code first to JavaScript only for the sole purpose of running my tests. That's why I'm using ts-mocha to directly use my TypeScript sources for testing.
The concepts of CAP itself remain unchanged. While learning the nuts & bolts of TypeScript may require some effort, the benefits of using TypeScript, such as increased code reliability and improved maintainability, make it a valuable addition to my toolkit as a developer and hopefully to yours too.
Migrating your SAP Cloud Application Programming Model (CAP) project to TypeScript doesn't have to be a concern as TypeScript is a superset of JavaScript, meaning any JavaScript code is also valid TypeScript. Gradually convert your files to TypeScript as needed, one piece at a time. And if you are still worried, lenahammerer has written a comprehensive blog post on building a "Full Stack TypeScript App with CAP and SAPUI5 that covers many of the initial concepts and steps involved in using TypeScript."
As an added bonus, SAPUI5/OpenUI5 also provides TypeScript definitions, making it a perfect fit for leveling up your development game.
Official Documentation: SAP Cloud Application Programming Model using TypeScript
Sample Apps: Build an invoicing feature for SAP API Management with SAP BTP, Kyma Runtime and Stripe and https://github.com/SAP-samples/btp-full-stack-typescript-app
ESLint and Prettier - Standards to the rescue!
While it may not be a revolutionary concept, using ESLint and Prettier in JavaScript projects has been a valuable experience for me and has helped me feel more confident in the quality of my code.
In a nutshell:
- "ESLint is a static code analysis tool for identifying problematic patterns found in JavaScript code." (source: wikipedia.com)
- "Prettier is an opinionated code formatter. It enforces a consistent style by parsing your code and re-printing it with its own rules that take the maximum line length into account, wrapping code when necessary." (source: github.com)
So, in short: whenever I mention linting in this blog post, it refers to the process of performing static code analysis.
Using ESLint and Prettier in TypeScript projects can be especially beneficial for beginners, as they help enforce a consistent coding style and catch potential errors before they become issues. ESLint is a tool that checks your code for potential errors and enforces a set of coding standards, while Prettier is a code formatter that helps ensure that your code adheres to a specific style guide. Together, these tools can help you write cleaner, more reliable code, and can save you time by automating tasks that you might otherwise have to do manually. Additionally, using these tools can help you learn good coding practices and improve your skills over time.
Installation & Usage of ESLint
To get started with ESLint and Prettier in a TypeScript project, you will need to perform the following steps:
- To use ESLint, you will need to install the eslint package as well as the @typescript-eslint/parser and @typescript-eslint/eslint-plugin packages:
npm install --save-dev eslint @typescript-eslint/parser @typescript-eslint/eslint-plugin
- Create an .eslintrc configuration file:
In your project's root directory, create a file called.eslintrc.
- Inside this file, specify the configuration options for your ESLint setup. You will need to specify the parser to use (@typescript-eslint/parser), the plugins to use (@typescript-eslint/eslint-plugin and eslint-plugin-prettier), and the rules to enforce (e.g. no-unused-vars, semi, etc.).
- You can also specify the extends property to use the recommended configuration for TypeScript projects (@typescript-eslint/eslint-config-recommended).
- For more information on configuring ESLint, you can refer to the documentation at https://eslint.org/docs/user-guide/configuring.
Add a new line to your scripts section in the package.json to trigger eslint for TypeScript files only. That script can be executed when needed. For instance, colleagues using editors without linting support can benefit from this script even though.
...
"scripts": {
...
"lint": "eslint . --ext .ts",
}
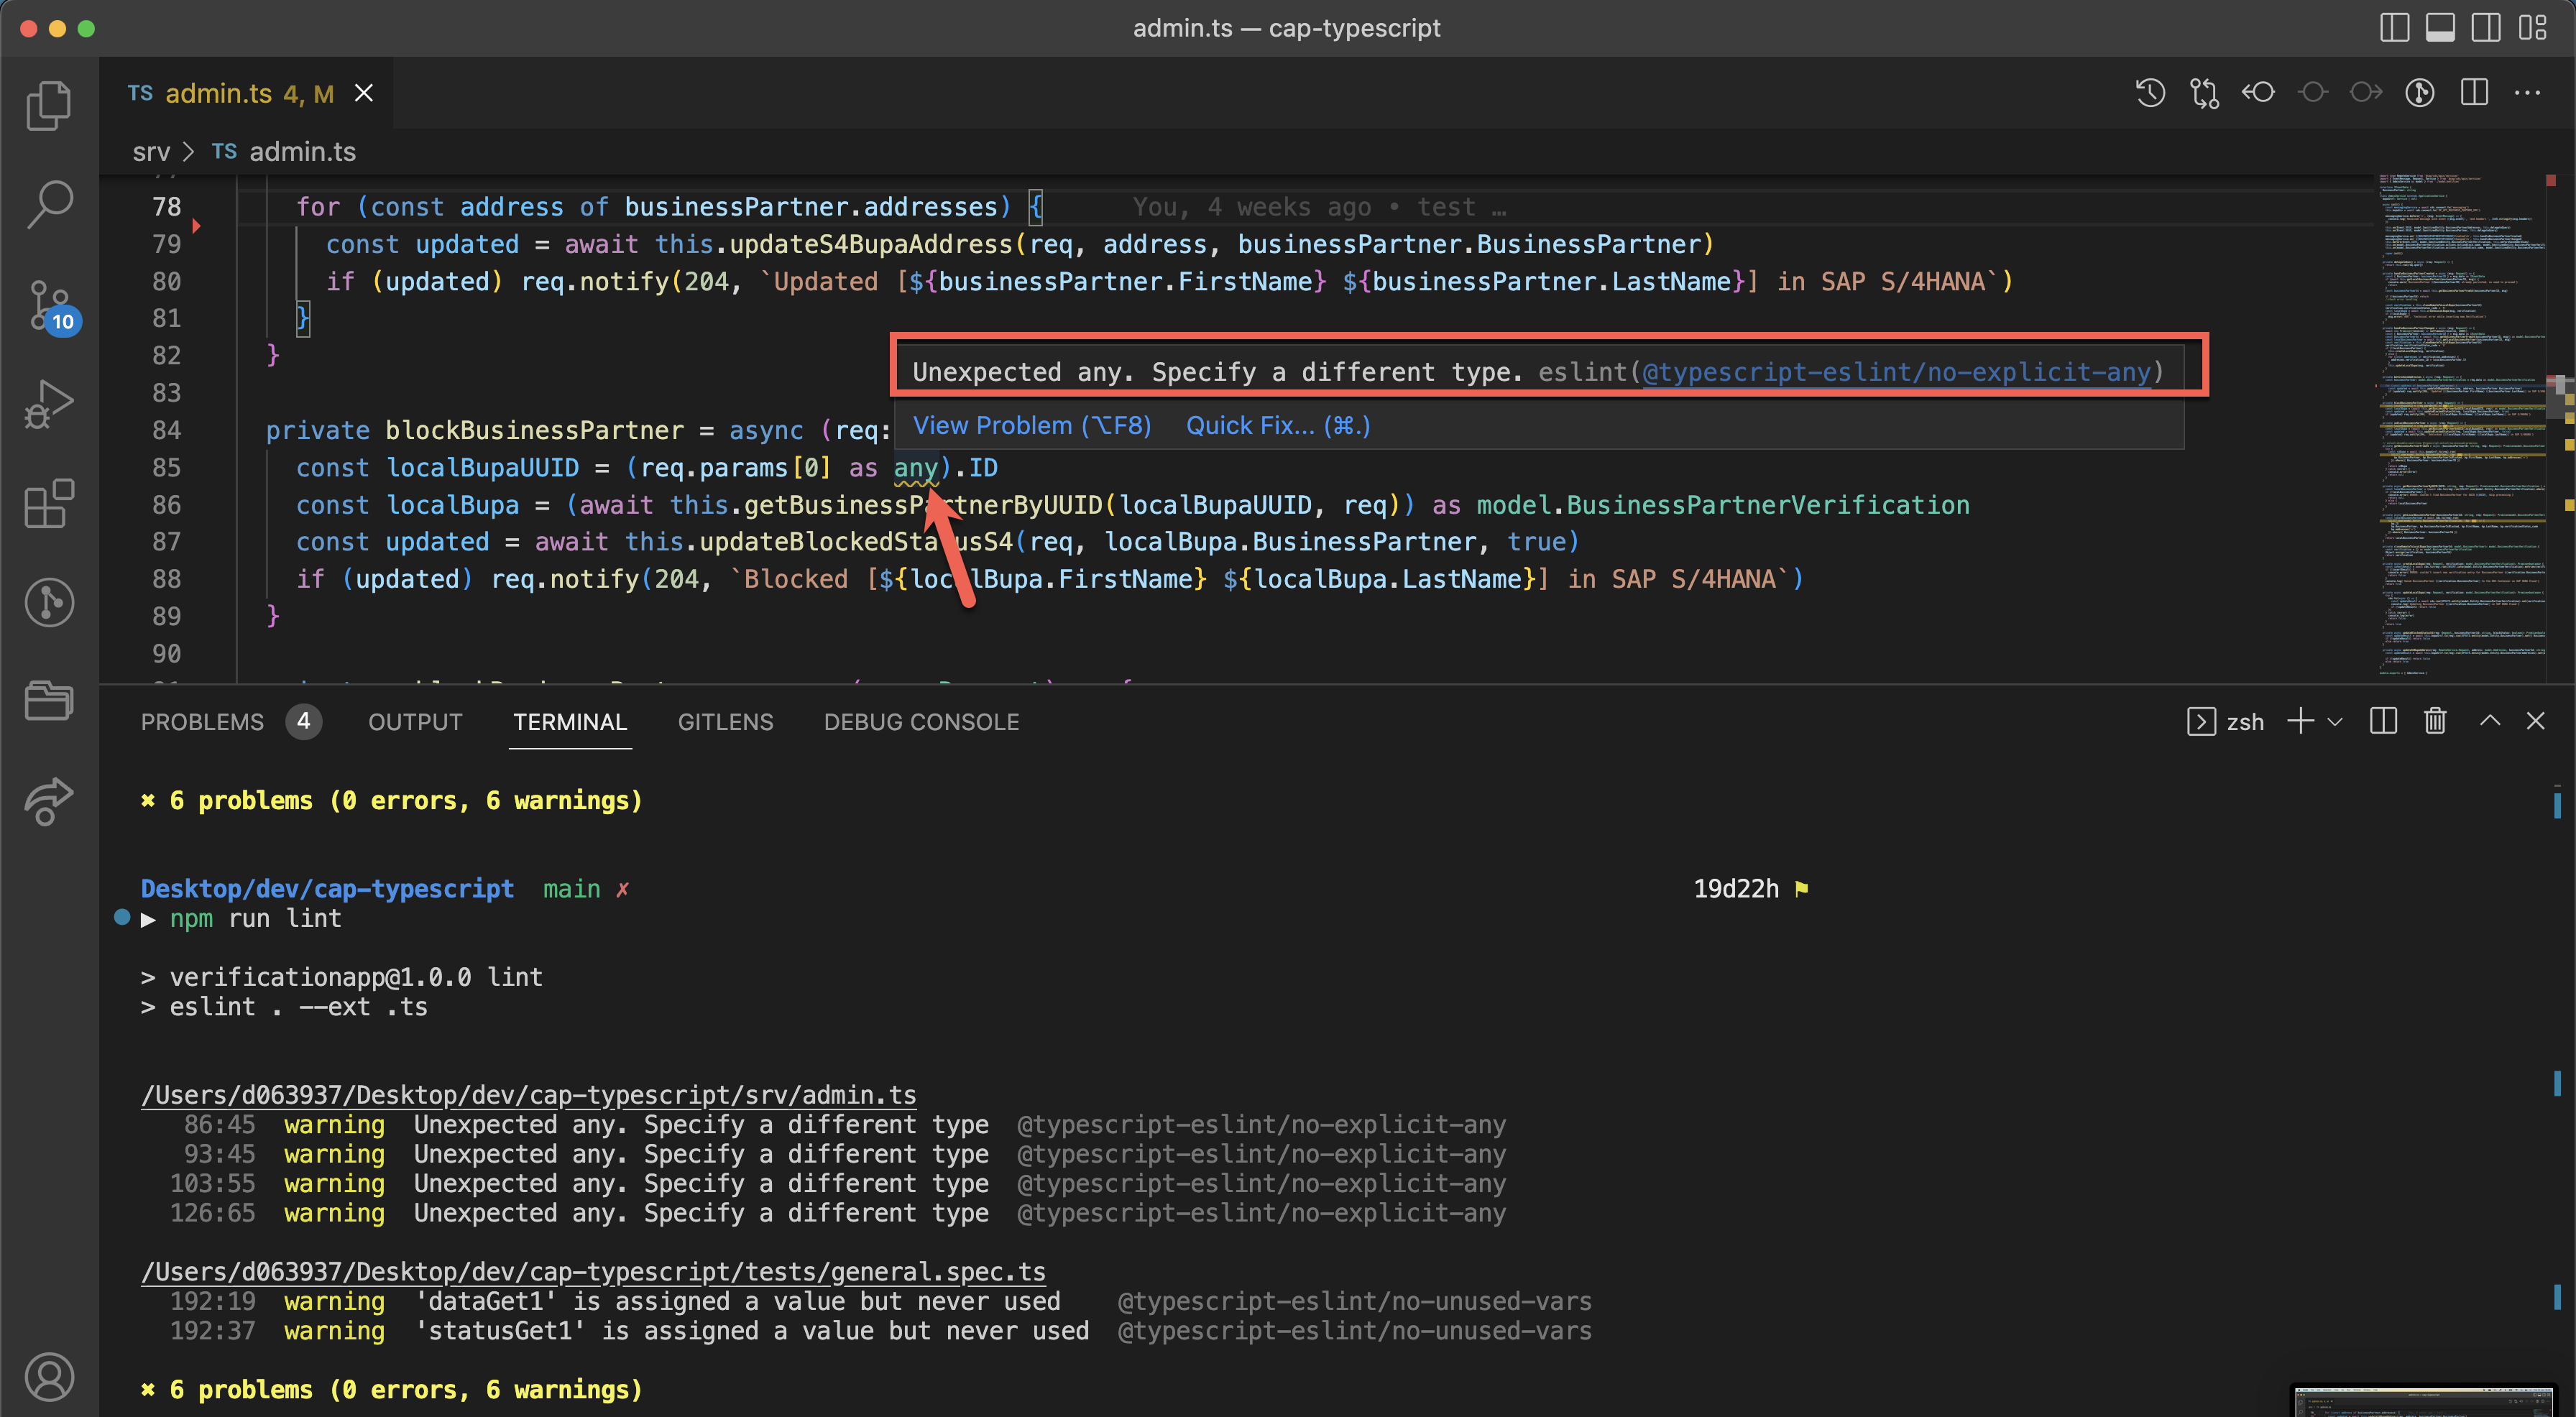
....If you now execute the recently added npm script, you would get the following result:

If you are using the ESLint extension for SAP Business Application Studio or VS Code, you would immediately get the information already while editing your TypeScript files:
Installation & Usage of Prettier:
- Install the npm package:
npm install --save-dev prettier
- Make sure that ESLint and Prettier work best together by installing the following packages:
npm install --save-dev eslint-config-prettier eslint-plugin-prettier
eslint-config-prettier: Turns off all rules that are unnecessary or might conflict with Prettier
eslint-plugin-prettier: Runs Prettier as an ESLint rule and reports differences as individual ESLint issues. - In your project's root directory, create a file called .prettierrc
- Inside this file, specify the configuration options for your Prettier setup. You can specify options such as the tab width, the print width, and the quotes to use.
- For more information on configuring Prettier, you can refer to the documentation at https://prettier.io/docs/en/configuration.html.
- Install the Prettier extension in SAP Business Application Studio / VS Code to enable automatic formatting of your code based on the configuration set in the .prettierrc file.
- Create a directory named .vscode and within it add a file called settings.json with the following content:
{
"[javascript]": {
"editor.formatOnSave": false
},
"[typescript]": {
"editor.formatOnSave": false
}
}
This would allow any developer working on the project to automatically format their code when they save it. This will ensure any changes they make are compliant with the project's formatting standards - in our case defined in the .prettierrc file.
Once you have completed these steps, you should be ready to use ESLint and Prettier in your TypeScript project. These tools will help you enforce a consistent coding style and catch potential errors, making it easier for you to write clean, reliable code.
Here's an example of using Prettier. You can see a basic JavaScript file (could also be a TypeScript file), containing double quotes, semicolons at the end of statements and relatively long lines.

JavaScript file before formatting with Prettier
As you can see, you can trigger formatting your document also on-demand using the "Format Document" option in the context-menu in various IDEs. Let's assume you have the following .prettierrc configuration:
{

  "trailingComma": "none",

  "singleQuote": true,

  "printWidth": 80,

  "semi": false

}
The result looks as follows. Double quotes are turned into single quotes, you won't find any semicolons anymore and the length of lines... quote obvious and self-explaining, (hopefully) right?
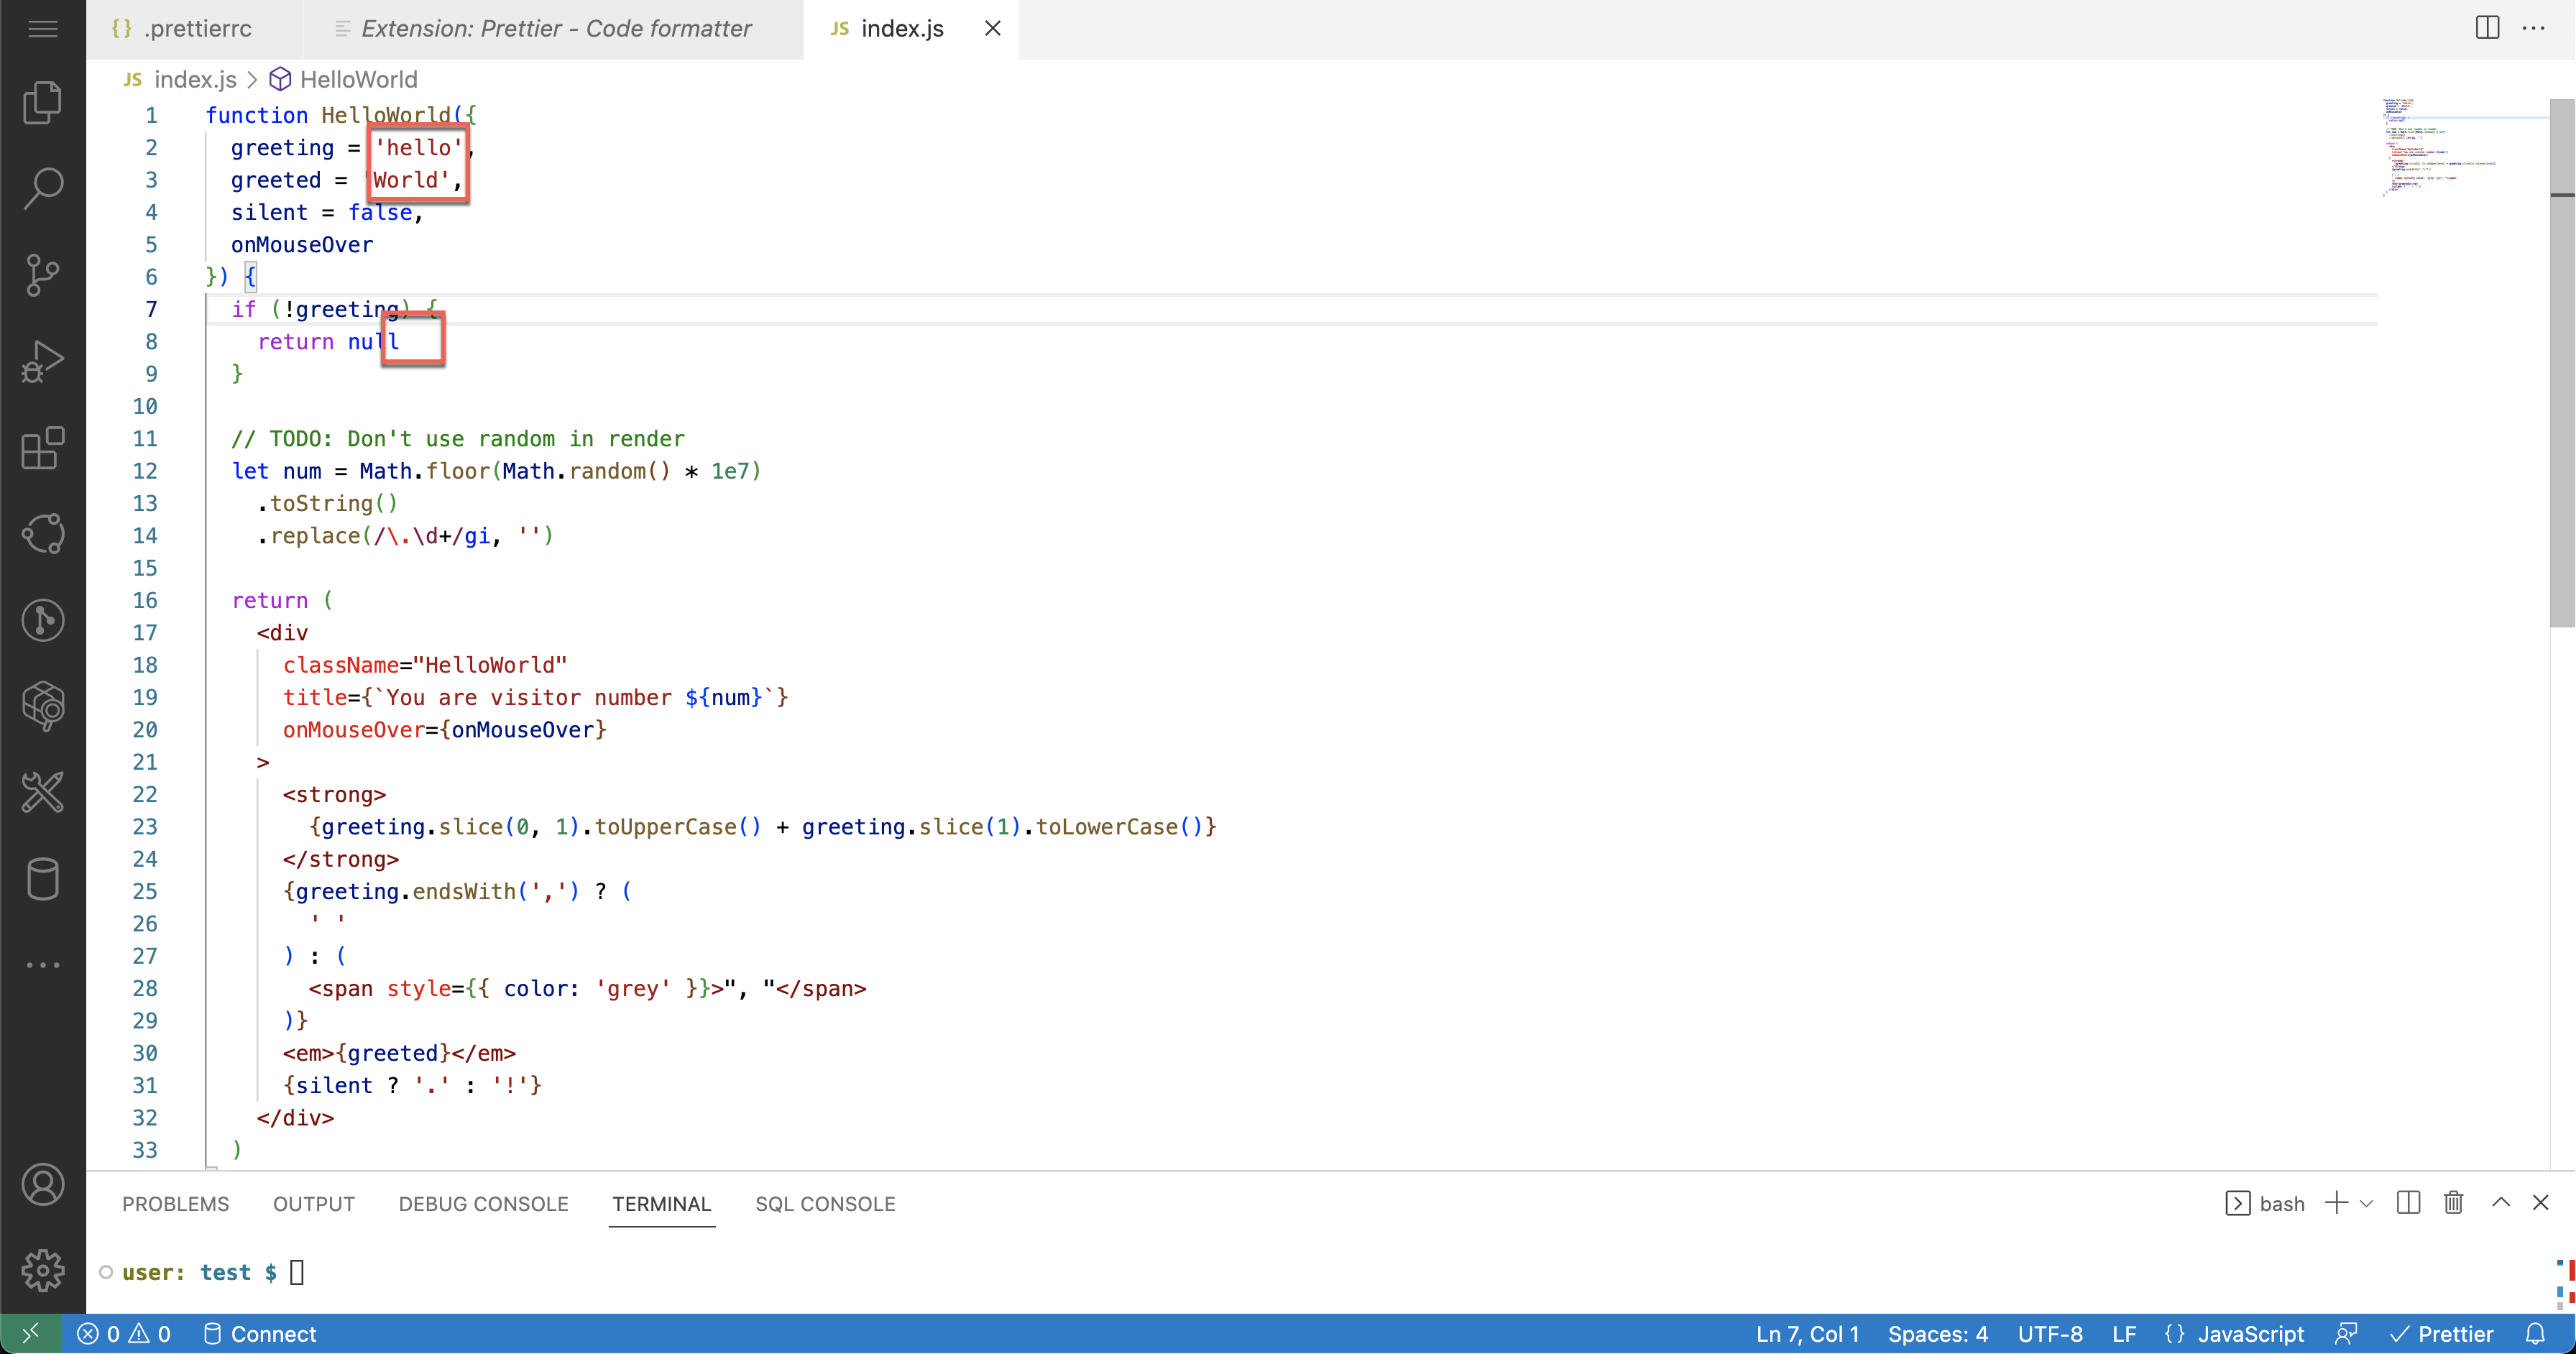
JavaScript file after formatting with Prettier
Prettier is an easy to use code formatter and can be used with various IDEs via extensions. For those using IDEs that do not support extensions, you can use the Prettier command in your npm scripts to enforce the code formatting. In the next section, we will cover how you can use husky to set up pre-commit hooks to ensure that Prettier is always used when committing your code to a git repository.
There's an excellent repository with lots of configs and plugins that you can reuse in your eslint config that I'd recommend to have a look at: https://github.com/dustinspecker/awesome-eslint
Automation with husky
Scripts and automation can help developers achieve streamlined workflows by taking advantage of Git hooks. These hooks allow developers to automate tasks and enforce standards across all stages of a Git repository's lifecycle. This includes commits, branching, merging, and other various operations. With the help of these scripts, developers can make the most of their automation strategies.
Let's make it tangible: A team has committed to ensuring only the highest quality code enters our repository. To achieve this, all code must be tested, linted, and made pretty automatically before any commit.
Husky is an additional tool that makes it easy to add Git hooks that execute scripts prior to the actual Git command. A pre-commit hook for instance: The Git commit command will only be executed if the scripts executed through the pre-commit hook have been completed without errors, ensuring that any errors detected in tests or linting do not lead to a commit. Your Git repo will never contain code that doesn't work or doesn't comply to your standards.
Linting as part of a pre-commit hook is a little special since you should only lint files that are already in the staging area (Git add adds file to the staging area) and not your entire project. There's a npm package called lint-staged that would only consider files in the staging area.

git commit workflow (source: git-scm.com)
By the way: husky isn't any rocket science. It only adds a convenient layer on top of Git hooks, you could theoretically do it all with plain Git hooks.
Get your husky running!
To set up husky in your project, take the following steps:
Ensure that your project is already a Git repository. In your project's root directory, execute the following command:
npx husky-init && npm installThis installs husky, updates your package.json file, and automatically configures a pre-commit hook that can be edited. By default, it will run npm test when you commit. You can customize the scripts/commands to be executed for each hook by editing the corresponding file located in .husky/<hookname>.
To add additional hooks, use the command npx husky add .husky/<hookname> 'command-to-be-executed'. For example:
npx husky add .husky/pre-commit 'npm run pre-commit'The following is an example of what that script could look like:
"scripts": {

  ...

  "pre-commit": "npx lint-staged && npm run test",

  ...

}
Every time someone attempts to commit changes, the pre-commit script is triggered. This script calls lint-staged and the test cases. To properly enable and use lint-staged, you'll need to add a new section to your package.json file:
"scripts": {

...

},

"lint-staged": {

  "*.ts": [

      "eslint",

      "prettier --check --config .prettierrc --write"

    ]

}
For all .ts files in the staged environment, the npm lint script and npm prettier-format should be executed. Additionally, don't forget to install lint-staged:
npm install --save-dev lint-staged
In order to test your lint-staged configuration in the package.json, make sure to have some staged files in git by using the command git add <file> and then try:
npx lint-stagedNow, let's test the pre-commit npm script that will be triggered by husky, independently from husky.
npm run pre-commitNow, let's finally check the chain of commands and the implicit execution triggered by husky and the corresponding git hook using the following command:
git add . && git commit -m "husky should trigger npm run pre-commit containing lint-staged (lint + prettier) and run the tests"husky triggers npm run pre-commit.
pre-commit triggers npx lint-staged and npm run test
lint-staged config runs: eslint and prettier
Here's all of that in action, triggered implicitly when you want to do a Git commit:

If you really want to see it in action: asciinema.org
If you wish to intentionally bypass husky, simply add --no-verify to the end of your Git command.
To enable the automation to take full effect, commit and push the following files to your repository so that all members have the same configuration
- .eslintrc
- .eslintignore
- .prettierrc
- entire .husky directory
- entire .vscode directory
- package.json
For an overview of all git hooks, refer to the official documentation available at https://git-scm.com/docs/githooks.
Official documentation of husky: https://github.com/typicode/husky
Why I'm writing this blog post (Long version)
I may have started as a Java developer 14 years ago, but I've had my fair share of ABAP code too. However, I've never really gotten the hang of writing proper and stable JavaScript. That's why most of the code I've published has been more of a "quick and dirty" nature, rather than being production ready.
However, I quickly realized that "quick and dirty" code isn't actually quick in the long run, but often very dirty. Whenever code was modified in any way, I had to manually test everything - inevitably, concentration starts to wane. All the UIs, APIs, permissions, static data via CSV, etc.. - this always led to bugs creeping in, which increased the effort in the long run.
In addition, there was the immense effort that I had to debug the code only in the deployed version on Cloud Foundry, as an API is called that is made available through the Cloud Connector. You cannot simply run the app locally from your machine without additional effort, since the Cloud Connector is by design only reachable from within SAP BTP. The cycle of implementing the supposed fix, building the CAP app, building the MTA archive, deploying to Cloud Foundry, connecting to the app via SSH and then connecting the debugger was extremely time-consuming.
All of this was because I wanted to do everything with my local VS Code installation. This can be difficult when using a service that is connected through the Cloud Connector. Thats why I had a look into what could help me to get there besides the required practice and learning exercises. On the one hand looking into what could make my code more stable on the other what could help me make in general with my development cycle with regards to applications leveraging the SAP Cloud Application Programming Model.
Overall, my journey with the SAP Cloud Application Programming Model has been full of challenges and valuable lessons. Through trial and error, I've learned a lot and am excited to share my insights with you in this blog post series. While it's by no means comprehensive, I hope it provides some useful tips and experiences for your own journey with the SAP Cloud Application Programming Model.
I'd love to hear your thoughts on the topic. Are there any alternative approaches or additional tools you use to improve your development workflow? Your comments and feedback are greatly appreciated, especially if you don't agree with any of my statements!
- SAP Managed Tags:
- SAP Cloud Application Programming Model
Labels:
9 Comments
You must be a registered user to add a comment. If you've already registered, sign in. Otherwise, register and sign in.
Labels in this area
-
ABAP CDS Views - CDC (Change Data Capture)
2 -
AI
1 -
Analyze Workload Data
1 -
BTP
1 -
Business and IT Integration
2 -
Business application stu
1 -
Business Technology Platform
1 -
Business Trends
1,658 -
Business Trends
93 -
CAP
1 -
cf
1 -
Cloud Foundry
1 -
Confluent
1 -
Customer COE Basics and Fundamentals
1 -
Customer COE Latest and Greatest
3 -
Customer Data Browser app
1 -
Data Analysis Tool
1 -
data migration
1 -
data transfer
1 -
Datasphere
2 -
Event Information
1,400 -
Event Information
67 -
Expert
1 -
Expert Insights
177 -
Expert Insights
301 -
General
1 -
Google cloud
1 -
Google Next'24
1 -
GraphQL
1 -
Kafka
1 -
Life at SAP
780 -
Life at SAP
13 -
Migrate your Data App
1 -
MTA
1 -
Network Performance Analysis
1 -
NodeJS
1 -
PDF
1 -
POC
1 -
Product Updates
4,577 -
Product Updates
346 -
Replication Flow
1 -
REST API
1 -
RisewithSAP
1 -
SAP BTP
1 -
SAP BTP Cloud Foundry
1 -
SAP Cloud ALM
1 -
SAP Cloud Application Programming Model
1 -
SAP Datasphere
2 -
SAP S4HANA Cloud
1 -
SAP S4HANA Migration Cockpit
1 -
Technology Updates
6,873 -
Technology Updates
430 -
Workload Fluctuations
1
Related Content
- Extract blob data (PDF) from CAPM using python library of Document information extraction service. in Technology Blogs by Members
- SAP Fiori for SAP S/4HANA - Empowering Your Homepage: Enabling My Home for SAP S/4HANA 2023 FPS01 in Technology Blogs by SAP
- Improving Time Management in SAP S/4HANA Cloud: A GenAI Solution in Technology Blogs by SAP
- Embracing TypeScript in SAPUI5 Development in Technology Blogs by Members
- ABAP Cloud Developer Trial 2022 Available Now in Technology Blogs by SAP
Top kudoed authors
| User | Count |
|---|---|
| 26 | |
| 17 | |
| 15 | |
| 13 | |
| 11 | |
| 9 | |
| 8 | |
| 8 | |
| 8 | |
| 7 |