
- SAP Community
- Products and Technology
- Technology
- Technology Blogs by SAP
- SAP Cloud Integration: How to use mTLS for calling...
Technology Blogs by SAP
Learn how to extend and personalize SAP applications. Follow the SAP technology blog for insights into SAP BTP, ABAP, SAP Analytics Cloud, SAP HANA, and more.
Turn on suggestions
Auto-suggest helps you quickly narrow down your search results by suggesting possible matches as you type.
Showing results for
Product and Topic Expert
Options
- Subscribe to RSS Feed
- Mark as New
- Mark as Read
- Bookmark
- Subscribe
- Printer Friendly Page
- Report Inappropriate Content
11-28-2023
8:30 PM
SAP Cloud Integration (aka CPI) provides support for calling OAuth-protected service endpoints via HTTP Receiver channel.
Using “Credentials” artifacts (e.g. "Client Credentials"), CPI is able to automatically fetch JWT tokens that are sent to the target endpoint. To do so, clientid and clientsecret have to be provided.
However, if the target is configured to require client certificate instead of client secret, we cannot use such artifact.
This blog post shows how to manually fetch a JWT token via mTLS.
In addition, it provides a Linux script for automatically rotate credentials.
This post is based on
🔸SAP BTP Cloud Foundry environment
🔸XSUAA / OAuth 2.0
🔸Groovy / Node.js
🔸Linux
0.1. The Prerequisites
0.2. The Introduction
1. The Target Application
2. The Certificate
3. The Destination
4. The iFlow
5. The Test
6. Optional: The "cnf" validation
7. Optional: The Credentials Rotation
Appendix 1: The Sample Code Target Application
Appendix 2: The Groovy Script
Appendix 3: The Linux Script for Credentials Rotation
We have a scenario where we want to call a target application from our iFlow (Outbound via HTTP Receiver adapter).
The target application is protected with OAuth 2.0 which means that it requires a valid JWT token.
This is not a problem, as CPI provides support for automatically fetching a JWT token when sending a request.
We only need to get the credentials of the token service and upload to CPI
good
However…
sigh
The target application is now switching to mTLS.
OMG
Don't worry, it’s not that scary, just requires some helpful blog post
What is "mTLS"?
It stands for "mutual Transport Layer Security".
This means that not only the server, but also the client have to present a certificate to guarantee trustworthiness.
See more detailed explanations in this cool blog post.
More concrete:
We as an OAuth client fire a request to the authorization server in order to fetch a JWT token.
Usually we send client-id and client-secret (user / password)
In case of mTLS, we send client-id and client-certificate.
Where do we get the certificate from?
As usual, we get the credentials in the binding (or service key).
Instead of a secret we get the certificate.
To be more concrete, we get the certificate chain plus the corresponding private key.
The private key is required to prove the validity of the certificate.
The chain is required because a certificate must proof that is is signed by a trustworthy authority (CA).
This is a very short summary.
How do we proceed in an iFlow?
We need to manually fetch a JWT token which is then sent to the target application.
Isn’t that tedious?
It is.
So I’ve thought of using the Destination Service in SAP BTP.
The Destination Service is capable of
🔸Fetching a JWT token
🔸using mTLS for fetching the token
🔸storing certificates
But how can we use BTP-services from iFlow?
The Destination Service provides a REST API, such that we can programmatically ask the Destination Service to fetch a JWT token for us.
How can we call the REST API?
The API itself is protected with OAuth.
We get the credentials for the API in the binding or service key of a service instance of Destination Service.
Isn’t that tedious?
It is.
(sigh again)
But less tedious than before.
Because for calling the REST API, normal client-credentials flow can be used, so we can leverage the capabilities of CPI.
What if we cannot access BTP?
In that case, it can be done manually, see this blog post(chapter 1 and 2)
The diagram shows:
The Destination Service REST API itself is protected with OAuth by an internal instance of xsuaa.
The JWT token, required for calling the REST API, can be fetched with “client credentials”.
That can be done with the help of CPI ”Credentials” artifact.
Means:
In CPI, we upload the credentials of the Destination Service in a “Security Materials” artifact.
CPI is then able to fetch a token for Destination Service.
From an iFlow, we use a “Request Reply” step to call the REST API endpoint of Destination Service.
The “Request Reply” step is configured with the "Credentials" artifact created before.
After calling the REST API endpoint, we get the info of the desired “Destination Configuration” in the response body.
The “Destination Configuration” has to be created beforehand in the BTP Cockpit and it contains the info for calling our Backend Application.
This app (not in the diagram) is protected with OAuth, so the destination configuration contains the OAuth credentials for fetching the JWT token.
When we use the REST API for fetching the destination configuration, we not only get the info which was entered in the BTP Cockpit.
In addition, the destination service does the OAuth flow for us and adds a JWT token (for calling the Backend app) to the response of the API call.
More details in the next diagram:
The diagram above summarizes the steps:
1. The iFlow uses a “Request Reply” step to call the destination service REST API
1a) The “Request Reply” step uses a “Credentials” artifact created in CPI
1b) The credentials artifact fetches a JWT token for the REST API.
2 The REST API is called.
2a) The REST API is called with the token that was fetched before
2b) The destination configuration fetches a JWT token for Backend app
3. The JWT token for Backend app is used for calling the Backend app
The "HTTP Receiver" adapter does not require credentials for the target app.
What about the "Destination Configuration"?
When creating a destination configuration for a target app, we have to enter the credentials required by the target app.
That can be a technical user and his password.
Or, in case of OAuth, it can be the clientid, secret and url, required for fetching a token that would be accepted by the target app.
The Destination Service takes care of fetching the token for us.
If the target app (-XSUAA) requires mTLS, then it can be specified in the destination configuration:
In this case, a client secret is not available, but a client certificate along with its private key.
This needs to be made available to the Destination Service.
To do so, the Destination Service offers a kind of key store, to which we upload certificates.
The Destination Service will then fetch a JWT token by sending the uploaded client certificate.
Below diagram tries to illustrate the high-level usage of Destination Service:
Ummm: Destination Service or Configuration??
We need to distinguish:
🔸Destination Configuration:
Basically a piece of paper containing info about target application and its credentials
🔸Destination Service REST API
Allows to programmatically read the info contained in the configuration
Additional functionality available:
Fetch JWT token, create destination configurations, upload certificates...
🔸Destination Service
All together, the offering that supports calling targets with many different credential types
The SAP Cloud Integration products itself provides similar support, via some “Credentials” artifacts, but usage of mTLS is missing in the “Client Credentials” artifact.
So now we get started with a tutorial that shows how to use the Destination Service from inside an iFlow.
What’s in this tutorial?
We create a sample target application that is protected with OAuth.
For protection, we create an instance of XSUAA, configured with mTLS.
We use the certificate/key to create a Destination Configuration, pointing to the target app.
This app is called by an iFlow which uses the Destination Service to fetch a token via mTLS.
Disclaimer
This is not an official documentation, nor a recommendation, just describing my way of solving the requirement
In our scenario, we have a target application that is protected with OAuth and it requires mTLS for fetching a JWT token.
This app is called from the iFlow.
We create a very simple Node.js application.
The app is bound to an instance of XSUAA service which we need to create first.
This instance is used by the target application to protect its endpoint.
The procedure in the iFlow would be pretty much the same for any other OAuth Authorization server, or IAS.
Before we create our service instance of XSUAA, we have a look at the configuration file:
The relevant part is the credential-types which set to x509 which means that only mTLS is supported.
As usual, and best practice, we define a scope.
The authorities statement is responsible to get the scope added to the token when using "client credentials" flow.
Following command can be used to create the service instance on command line:
cf cs xsuaa application backendXsuaa -c xs-security.json
Note:
If you use the BTP Cockpit to create the service instance, make sure to use the same name for the instance "backendXsuaa", as it is used in the target application in next section.
The app is very simple and provides an endpoint that is meant to be called with POST request.
It receives any message from an iFlow and prints it to the log.
It is protected with OAuth, with the help of passport middleware
It requires a scope which is enforced by the @sap/xssec library
That’s all for the moment.
🔷 server.js
The full project, which can be found in the appendix 1 , can be deployed with cf push.
1.3.1. View credentials
After deploy, we can access the credentials of the XSUAA instance.
These are provided in the service binding and we can view them in the environment of the application.
Can be done in the Cockpit or via this command:
cf env backend
We need the System-Provided VCAP_SERVICES variable with name xsuaa.
We take a note of the following 4 properties which we’ll need later, for creating a "Destination Configuration".
In my example:
clientid: sb-backendxsuaa!t78007
certificate: ...
key: ...
certurl: https://subd.authentication.eu12.hana.ondemand.com/oauth/token
Note
When using the certificate to fetch a JWT token, we must use the certificate URL, not the “normal” URL.
The relevant property is the certurl.
Note:
we need to append the segments /oauth/token to the certurl property
Before we continue, are there any questions?
How to do that: use certificate/key to fetch a JWT token?
First of all, we don't do it, we let the destination service fetch a JWT token.
Second of all: it is still a valid question:
What to do with certificate information which we’ve seen in the binding?
We need to arrange the text and then upload it to the destination-key-store in BTP.
This chapter will help simple-minded users (like me) to get a slow insight into this cryptic certificate world.
Towards the end of this tutorial, there’ll be a linux script for handling the certificate stuff automatically.
We open the empty file <project>\certificates\privateKey.txt with a very simple text editor (e.g. Notepad or VS Code text editor).
We copy the value of the key property from app-env (see chapter 1.3.1.) and paste it into the file.
It looks like this:
It is one long line full with silly characters.
Silly characters?
Yes, but not all.
There’s the BEGIN block and also an END block. These are simple to understand and are extremely important.
They say that anything begins and ends, and they say what it contains in between.
OK.
And they must be separated from the rest by a line feed. That’s why we see the \n.
In the binding, everything comes in one long line, the line feeds are indicated by \n.
To make everything work, we need to manually adjust the content of the file:
Instead of \n we need real line feeds.
OK, the adjustments typically are done by machines or tools or libraries or (Linux) commands.
Today we do it manually, it makes things more clear.
Apologies.
We need to do just 2 adjustments:
2.2.1. Separate BEGIN and END blocks
Let’s manually add line feeds after the BEGIN block and before the END block, including hyphens, such that afterwards we have 3 lines:
2.2.2. Remove \n
We need to remove all the \n from the file content.
These \n are formatting information, have nothing to do with the key.
The reason why we have them:
The spec requires that each line contains exactly 64 characters (except last line).
So the \n in the text indicate the line break.
To remove those characters, we can do Ctrl + H in the editor and replace the \n with an empty string.
Looks better:
Note:
Linux users might wish to use this command:
awk '{gsub(/\\n/,"\n")}1' privateKey.txt | tee privateKey_new.txt
Note:
If you copy this command, you might need to manually type the special characters ' and "
Once done, we can save and close the file.
Now we repeat the same procedure with the certificate.
We open the empty file <project>\certificates\certificate.cer with a very simple editor and copy the value of the certificate property into it.
This time, the content is longer.
The reason is that it actually contains a chain of certificates:
The actual certificate, the intermediate certificate(s) and the root certificate.
All separated by BEGIN and END sections and the line breaks indicated with \n.
Again we need to adjust the file content, this time we have more blocks.
2.4.1. Separate BEGIN and END blocks
After searching for all BEGIN blocks, we can see we have 3 (or 4) certificate blocks:
2.4.2. Remove \n
Again, we need to delete all occurrences of \n.
What order?
A certificate has to be issued (signed) by somebody.
This somebody has to be trustworthy, otherwise nobody would trust the certificate.
To demonstrate that somebody is trustworthy, he shows a certificate himself.
Now what about this (intermediate) certificate? Is it trustworthy?
Yes, if it is as well signed by trustworthy authority.
This chain of trusting/signing certificates is called chain.
The last certificate is the root, it is trusted because it is a commonly accepted authority.
The order of the certificates in the chain is relevant.
The root certificate must come at the end.
How can we see that the last crowd of silly characters is a root certificate?
We can decode it and read the info in the header.
How to decode?
We can use any certificate decoder tool in the internet.
So we could copy the last certificate, including dashes and BEGIN and END and dashes, into clipboard.
Then paste into a certificate decoder tool, e.g. SSL Certificate Decoder at sslchecker.com/certdecoder
Note that it is not safe to upload sensible content in the internet.
So this is not a recommendation, it is just an example how easy it can be verified.
What is the alternative?
Alternatively, and obviously the better approach:
Use the command line tool openssl.
How to use it?
We copy and paste the bottom certificate (only) from file certificate.cer into a separate file bottomCert.cer.
Then run the command in the same folder:
openssl x509 -in bottomCert.cer -text -noout
The result shows that the issuer is the "Root CA"
Note:
"CA" stands for "certificate authority"
In addition, in case of root certificate, the subject and the issuer are the same, because (only) the root is allowed to sign its own certificate (because root is already root, there's no root which would be rooter than root...)
So after this check, we’re safe to go: the chain has correct order.
What now?
We need both, the private key and the certificate chain in one file.
Why?
We want to upload the bundled certificate-and_private-key into the destination dashboard.
This is necessary for configuring a destination with client certificate.
Such bundles can have different formats, and some of them are supported by the destination dashboard. See documentation: OAuth with X.509 Client Certificates.
The easiest way to go is a .pem file.
Ehmmm....Easy?
Really.
As easy, as anything in the cryptography world?
That sounds tricky.
I would say: it is as easy as copy&paste.
In fact, we only need to do the following:
We have private key and certificate chain in proper (text) format.
We have an empty file with file extension .pem in our certificate folder.
I’ve called the pem file mtlsXsuaa_client_certificate.pem, because it contains the credentials that a client needs to call the instance of XSUAA.
So we just copy the content of both the key and chain files into the empty .pem file.
With other words: we're merging the private key file and the certificate file.
That’s it?
Don’t forget to save.
Only one note:
Again, the order is relevant.
The private key block must be at the beginning of the file.
Afterwards the certificate chain in the existing correct order, ending with root.
In fact, that has been simple.
Note about file extensions:
All the files that we're dealing with, are just text files, the file extensions are not really relevant.
What is the meaning of pem?
pem stands originally for “Privacy Enhanced Mail”.
It describes a format.
It is in fact the most common format for X.509 certificates etc.
A .pem file is a text file containing one or more items in Base64 ASCII encoding, each with plain-text headers and footers
(e.g. -----BEGIN CERTIFICATE----- and -----END CERTIFICATE-----)
PEM is a container format for digital certificates and keys.
Finally, it is a file extension of a file that contains a bunch of certificate files.
And...?
Yes, you might wish to bookmark this security glossary blog post
So today, we use the .pem file as container that can be uploaded to destination dashboard.
The container is identified by its name and it contains the access certificate for connecting to XSUAA.
It is required for the destination service to fetch a JWT token via mTLS.
Now that we've reformatted the certificate data that was contained in the binding of our backend application, we can go ahead and create a destination.
More precisely: a destination configuration.
We want to specify our destination configuration to use mTLS.
Our destination will require that certificate, so let’s first upload it.
As mentioned, we upload a container file which contains the certificate and corresponding private key.
Note:
It is necessary to upload both certificate and corresponding private key.
It is required by the handshake, to create trust.
The private key is not sent over the net.
After login to our subaccount, we navigate to the destination dashboard:
Subaccount -> Connectivity -> Destinations
We press the “Certificates” button.
In the dialog, press “Upload Certificate”.
We browse to our pem file at
<project>\certificate\mtlsXsuaa_client_certificate.pem
After short time, we get a green success message
We press “Cancel” to close the dialog.
Now that the destination dashboard has stored our certificate container file, we can go ahead and use it in a new destination.
Note:
The destination dashboard stores the certificate in encoded form.
This is because certificates can be accessed via REST API (see below)
Now we create the “Destination Configuration”.
This is a lightweight artifact which does nothing than store URL and credentials that are required for calling some target.
In addition, some more features are offered that include automatic token request.
To create a Destination Configuration, we go to the subaccount (same in which we’ve created the Destination service instance), then
Connectivity -> Destinations -> New Destination
🔸Name
This name will be used later by the REST request from iFlow, for fetching the JWT token.
As such, the name entered here must match the configuration in iFlow
In my example: "destination_to_mtlsapp"
🔸Type
HTTP
🔸Description
Any text of our choice
🔸URL
This field is not relevant in the iFlow scenario, because the URL is configured in the adapter.
So we can enter any nonsense, we won't use it.
🔸Proxy Type
This setting is required, If the target application is onPremise and a Cloud Connector is used.
Otherwise, like in our example, we leave the default, which is "Internet".
🔸Authentication
Here we choose "OAuth2ClientCredentials"
🔸User
Nothing here.
🔸Password
Nothing here.
🔸Use mTLS
Yes, enabled.
If the checkbox is not editable, try entering the Token Service URL first.
After enabling the checkbox, the fields are dynamically changed, as we need to specify the keystore in case of mTLS.
🔸Client ID
The value of the property "clientid" from the binding of backend app, see step 1.3.1
In my example:
"sb-backendxsuaa!t12345"
🔸Token Service Key Store Location
Here we use the dropdown to select the name of the certificate which we’ve uploaded in the previous step.
In my example: "mtlsXsuaa_client_certificate.pem"
🔸Token Service Key Store Password
We leave it empty, as the pem file doesn’t require a password (required e.g. in case of password-protected jks keystore files, or p12 or pfx files)
🔸Token Service URL Type
We leave the default “Dedicated”.
The other one is used in case of multitenant applications.
🔸Token Service URL
The value from the "certurl" property in step 1.3.1.
Don’t forget to append the token endpoint segments (/oauth/token).
Make sure it contains the "cert" segment
In my example:
https://mysubdomain.authentication.cert.eu12.hana.ondemand.com/oauth/token
🔸Token Service User
Empty
🔸Token Service Password
Empty
That’s it.
Don’t forget to press “Save”
In my example, it looks like this:
Alternatively, a destination configuration can be imported from a file containing content like this:
Make sure to adapt after import
The docu can be found here.
We want to use the REST API of Destination Service, so we need a service instance.
Furthermore, we need access to the credentials required for calling the service.
We're not binding any app to the service instance, we use the destination service from an iFlow.
As such we need to create a service key, to view the credentials.
3.3.1. Create service instance
Creating service instance and service key can be easily done from the BTP Cockpit, given that the required permissions are available.
No parameters for instance required.
Go to BTP Cockpit -> Subaccount -> Services -> Marketplace
Find “Destination Service” and press “Create”
Enter a name like “cpiDestination” and finish the wizard.
3.3.2. Create service key
After creation, view the instance (Services -> Instances) and choose “Create Service Key”.
Enter a name like “cpiKey” and finish the dialog.
Afterwards, press “View” for the service key and take a note of the following 4 properties.
We’ll need this data in CPI, when it comes to calling the Destination service.
In my example:
clientid: sb-clone123!b789|destination-xsappname!b9
clientsecret: 123ABC=
url: https://mysubdomain.authentication.eu12.hana.ondemand.com
uri: https://destination-configuration.cfapps.eu12.hana.ondemand.com
To create the artifacts on command line, the following commands can be used:
cf cs destination lite cpiDestination
cf csk cpiDestination cpiKey
cf service-key cpiDestination cpiKey
After creating service instance and destination configuration in BTP, we head over to CPI.
The credentials which we received in the service key of the destination service, must be made available in CPI.
To do so, we create a “Client Credentials” artifact for the Destination Service:
We go to Monitor -> Integrations -> Manage Security -> Security Material
Then Create -> OAuth2 Client Credentials
🔸Name
We enter a name for the “Credentials” artifact which will be used in the iFlow configuration below.
In my example:
BACKEND_DESTINATION_CLIENT
🔸Client ID
We enter the clientid from the service key of the destination service instance created in chapter 3.3.1.
🔸Client Secret
We enter the client secret from the same service key
🔸Client Authentication
We choose “Body Parameter”
🔸Content Type
Must be set accordingly to “application/x-www-form-urlencoded”
Coming to the iFlow itself.
The iFlow uses a “Request Reply” step to call the Destination Service.
The response contains the JWT token in a JSON payload.
So we use a Groovy Script to parse the JSON structure.
Important to note:
The Destination service REST API is designed to return all the configuration data that was entered in the destination configuration, in the BPT Cockpit.
Including sensitive data like passwords, certificates, secrets.
This can be viewed in the CPI monitor.
However, it can be hidden by using a parameter offered by the REST API.
It allows to omit the credentials from the response.
This query parameter has to be configured in the HTTP channel
Documentation:
Destination Service REST API
API Reference of this REST API on SAP Business Accelerator Hub.
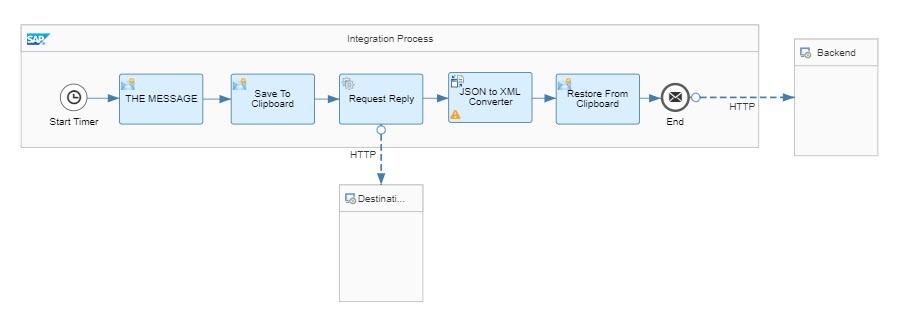
Let’s go through the steps
🔷Timer
🔸 We define a start event via Timer with default properties, i.e. run once
🔷Content Modifier
🔸Name
Optional, to make clear that we define a fake message content her.
E.g. "THE MESSAGE"
🔸Message Body
We enter any dummy message content.
In my example:
"Original message body in iFlow"
Note:
The content must match the "content-type" header in the iFlow and the body parser in the target app.
🔷Content Modifier
We define another Content Modifier which has to take care of storing the original message content in a variable (exchange property).
This is necessary because we will overwrite the message body with the content required for the token request and response.
🔸Name
"Save To Clipboard"
🔸Exchanger Property
Name: "clipboard"
Source Type: Expression
Source Value: ${in.body}
🔷Request Reply
This step from Call -> External Call -> Request Reply doesn’t need to be configured
🔷HTTP channel
The HTTP channel for the destination service call is configured with the data which we stored from the service key in step 3.3.2.
🔸Address
Here we enter the URL of the destination service endpoint.
It is composed as follows:
<uri>/destination-configuration/v1/destinations/<name>
Where uri is the uri property from the service key (3.3.2.) and name is the name of the destination configuration (chapter 3.2.)
In my example:
https://destination-configuration.cfapps.eu12.hana.ondemand.com/destination-configuration/v1/destina...
🔸Query
We enter the important flag which results in credentials being omitted from the response
$skipCredentials=true
🔸Method
GET
🔸Authentication
OAuth2 Client Credentials
🔸Credential Name
BACKEND_DESTINATION_CLIENT
🔸HEADER DETAILS
Request Headers: Authorization
🔷Groovy Script
This script runs after the token request.
It is used to prepare the final call to the Backend.
We need to read the response of the Destination-Service-request and compose the "Authorization" header for the call to the backend.
We have to know the structure of the response of the Destination-Service.
And, BTW, we assume that the current content of the iFlow message body contains the response of the "Request Reply" step, we skip any error handling, as usual.
The message body contains the response from Destination service, formatted as JSON with following structure:
owner
destinationConfiguration
authTokens [
{
value: <theJWT>
http_header
key: "Authorization"
value: "Bearer <theJWT>"
On root level, there is the authTokens element which contains an array which usually contains 1 entry.
Such an authToken entry contains the JWT token.
However, as a convenience, the Destination service sends us a ready-to-use header in the element http_header which we can directly pass to our header in our iFlow.
I mean, it contains the “Bearer” plus <blank> plus JWT.
As such, the job of the Groovy script is clear:
Get body -> parse -> access http_header -> set iFlow-headers
See appendix 2 for full script.
🔷Content Modifier
At the end of the iFlow, we have to restore the original message payload which we had stored in an exchange property.
We’re doing this in another Content Modifier step.
🔸Name
"Restore From Clipboard"
🔸Message Body:
Type: Expression
Body: ${property.clipboard}
🔷HTTP channel
After all these preparation steps, we can call our target application via HTTP Receiver adapter.
🔸Authentication
Thanks to our preparation, we can set the “Authentication” option to “None”.
🔸Address
According to our target application deployment, we set the Address
In my example:
https://backend.cfapps.eu12.hana.ondemand.com/endpoint
🔸Method:
As implemented in our app: "POST"
🔸HEADER DETAILS
And of course, we need to allow to send the "Authorization" header
We’re done with the iFlow and don’t forget to save.
Note
I created a similar blog post with few alternatives for similar challenge, see the password credentials blog post.
At this point, we have the iFlow, the target app and the destination.
So nothing hinders us from deploying the iFlow and run the scenario.
In the CPI designer, we press “Deploy”.
To view the result, we check the Cloud foundry logs with
cf logs backend --recent
We should see the dummy message text sent by the iFlow.
Then we check the CPI logs at Overview -> Monitor Message Processing
The status should be shown as a green “Completed”.
For the sake of curiosity, and for the sake of security, let’s have a look at the “cnf”.
What is “cnf”?
It is a claim that is added to a JWT token, if the token was requested via mTLS.
What is a “claim”?
This is a property in a JWT token.
What is a “cnf” claim?
It stands for “confirmation”
It contains the fingerprint of the certificate that was used to fetch the JWT token.
Why?
This is the mechanism of “binding” a JWT token to a certificate.
Or binding the token to the client which requested the token.
See: a JWT token is a “bearer” token, which means that anyone who gets a hold of it, can access the protected resource.
By adding the “fingerprint” of a certificate, the receiver (resource server) can check if the JWT (in addition to being valid) is presented by a bearer who has the correct certificate.
This is also called “Proof of Possession” (PoP).
What is a fingerprint?
This is a short code that represents a longer public key.
Can we see?
Here's an example:
How to create it?
To create a fingerprint (or "thumbprint" or even "hash" or "digest"), a hash function is applied to the public key.
As such, the public key is short enough to be added to a "cnf" claim.
Why?
The client has a certificate and uses it to fetch a JWT token.
The token contains the fingerprint.
The receiver can verify that the fingerprint corresponds to the certificate.
To do so, the receiver needs the original certificate.
In our scenario, we have it in the binding of our receiving app.
Why?
Because it was generally specified in rfc7800.
The specification that is more specific to OAuth is described In rfc8705.
How to validate the cnf?
We create our own fingerprint of the client certificate.
Then compare it to the fingerprint in the "cnf" claim.
They must be equal.
How to create own fingerprint?
Good question:
The method is described in the "cnf" claim.
The cnf contains both the fingerprint and the method for creating it.
How does a "cnf" look like?
Example:
What does it mean?
"x5t#S256" means:
A thumbprint (-> t) of a X.509 certificate (-> x5) was created.
Algorithm SHA-256 was used (-> S256).
"x5t#S256" is specified in section 3.1 of rfc8705.
Too lazy to read
It says:
"The value of the x5t#S256 member is a base64url-encoded SHA-256 hash of the DER encoding of the X.509 certificate."
How can we do it?
See below code.
In our sample backend application, we introduce a helper method which is responsible of validating the cnf claim.
1. cnf
First we extract the fingerprint from the JWT token that is sent to our backend app.
Below code assumes that the JWT token is already decoded from base64 to a JSON object:
We can see that the value of the cnf claim is a JSON object with an element named "x5t#S256"
That’s it.
The value looks like this:
As we know from the spec, it is base64url-encoded (similar to base64-encoded).
2. Client Certificate
Now we have to generate the same value based on the given client certificate.
Getting the client certificate is easy: it is contained in the binding of our app.
Remember?
We used the cf env command to view the credentials of the XSUAA-binding.
Then we copied the certificate and converted it and uploaded to destination.
To read the XSUAA-credentials in our app, we use the convenience library @sap/xsenv
Then we use the native node.js "crypto" library to obtain the fingerprint:
Note that we have to use the correct property to get the SHA256 value (which is required by the spec and written in the "cnf").
Unfortunately, that’s not enough.
The fingerprint looks like this:
We can see, it is not the same as the example above.
The spec requires to encode with base64url.
The tricky thing here: before encoding it, we have to first remove the colons, as they are only added for better readability:
And even more tricky: we have to convert the string to binary format, before base64url-encoding it:
So finally, we get the following result:
We can see with our eyes that it looks same like the value of the "cnf" claim.
That’s it.
We’ve secured our app endpoint against ppl who manipulate bearer tokens
The full code can be found in the appendix.
An important security requirement is regular credential rotation.
What does it mean?
Use a new password or new certificate.
Isn’t that tedious?
Yes.
So why do we have to do it?
More secure.
How is it done?
Read this chapter
But it is optional….
That was a typo...
In our example, we’re using SAP-managed certificate.
This means that we let SAP generate a certificate.
More concrete:
in our manifest we’ve declared the credentials-type as X509 in the xsuaa service configuration.
This means that XSUAA will generate a certificate when we deploy our app.
After deployment, we can view it in the binding
More concrete:
The certificate (credentials) is generate during binding.
Alternatively, we could deploy our app without service config and afterwards manually bind a service to the app, including binding parameters.
And?
This is important to know.
Because this means that on each “bind” operation, a new certificate is generated.
As such, to rotate the credentials, we only need to create a new binding.
With other words:
Unbind then rebind
That’s easy.
Alternatively, in case of customer-managed certificates, the certificate is added in the binding parameters.
To rotate, the customer has to come up with a new certificate and supply it during rebind.
With other words:
Unbind then rebind, too.
The commands are bind-service and unbind-service.
Afterwards, the app has to be restarted/restaged
cf us backend backendXsuaa
cf bs backend backendXsuaa
cf restage backend
After generating new credentials, our iFlow execution will fail.
OMG
Sure, because the certificate which was uploaded to Destination Service, and which is used by the iFlow, has become invalid.
So better don't rotate...
Nice try.
The old certificate in certificate store should be deleted and the new certificate should be uploaded.
This can be simplified by uploading the new certificate with the same name.
Hence the destination configuration doesn’t need to be updated, only the certificate renewed.
Isn’t that still tedious?
Yes, a lot.
So why we have to do it?
We don’t have to.
Why?
We can automate it.
The whole procedure can be automated.
Below, I’m listing LINUX commands that should do the following:
Note that I don’t dare to call it script, as all error handling or existence-checks are missing.
In detail.
1. Rotate credentials
As mentioned, we use the unbind-service and bind-service commands
2. Obtain certificate and private key
We use the v3 REST API of the cloud foundry command line client.
It allows to read the environment of an app, but it requires the app guid.
We write the certificate and private key to files.
Then we concatenate the files into one .pem file.
This is the container format the is supported by the Destination Service certificate store
3. Call Destination Service to upload new certificate/key
Now we can read the required data for calling the destination service REST API.
We’re using the service instance and service key created above
Fetch JWT token for Destination Service:
We need to encode the .pem file with base64, as this is required by the Destination Service (and it makes sense).
Note:
The “wrap” parameter is required, otherwise we have short lines for all short lines of the certificate (which has line feeds).
We compose the request body (it is same for CREATE and UPDATE):
Finally, we UPDATE our existing pem entry:
That's it.
Optionally, we can print the fingerprint, so we can compare with logs of backend app:
At the end, we should cleanup the temporary files:
In this blog post we’ve implemented a scenario where an iFlow calls a target application (outbound).
The target app is protected with OAuth 2.0 and XSUAA is configured to required a client certificate for fetching a JWT token (mTLS), instead of clientsecret.
We've leveraged the Destination Service for storing the certificate and fetching the JWT token.
Alternatively, the JWT token could be fetched manually in a Groovy script.
We've also learned about the "cnf" claim which is contained in a JWT token, in case of mTLW, and how to validated it.
Finally, we've created a Linux-script that can be used for automatically renewing the certificate (credentials rotation)
Create XSUAA instance with x509 param, to require mTLS
Create app and deploy.
Extract certificate and key from app-binding (env JSON).
Convert the string with \n to normal format with line feeds.
Merge key and certificate chain to one single pem file.
Upload pem to Destination Dashboard
Create Destination Service (+ Service Key) and Destination Configuration.
Destination Config contains the credentials of app and "use mTLS"
In CPI create ClientCredentials artifact with credentials of Destination Service.
The iFlow uses request/reply step to call Destination Service REST API.
The response-JSON contains the JWT which needs to be extracted.
The iFlow has to store and restore the original message payload.
SAP Help Portal:
CPI Scripting APIs
Destination Configuration docu
Destination Service REST API docu
API Reference for REST API on SAP Business Accelerator Hub
Parameters for x509 in binding.
Reference for xs.security.json parameters.
Node.js
Passport homepage and download.
Node.js package xssec.
Node.js package xsenv.
Node.js Crypto package
Manual for openssl and download the windows version.
Specifications
https://www.rfc-editor.org/rfc/rfc7800
https://datatracker.ietf.org/doc/html/rfc7800
https://datatracker.ietf.org/doc/html/rfc8705
OAuth 2.0
Understanding of OAuth for dummies like me.
OAuth 2.0 spec
Other
Security Glossary Blog.
Cloud Foundry Client V3 API reference
Similar blog posts
How to use mTLS with Destinations
CPI password credentials
Tools
Base64 converter base64.guru
Note that you need to adapt the names of artifacts or content type or body parser, in case you deviated from tutorial description.
Note:
Make sure to change the body parser to express.json() or similar, if you send a message payload that is not text/plain
🔷 server.js
🔷 package.json
🔷 manifest.yml
🔷 xs-security.json
🔷 Groovy Script
🔷 destination_to_mtlsapp
Note:
The script assumes that destination service and instance are already created, as following this tutorial.
Otherwise, please add it to the script.

Using “Credentials” artifacts (e.g. "Client Credentials"), CPI is able to automatically fetch JWT tokens that are sent to the target endpoint. To do so, clientid and clientsecret have to be provided.
However, if the target is configured to require client certificate instead of client secret, we cannot use such artifact.
This blog post shows how to manually fetch a JWT token via mTLS.
In addition, it provides a Linux script for automatically rotate credentials.
This post is based on
🔸SAP BTP Cloud Foundry environment
🔸XSUAA / OAuth 2.0
🔸Groovy / Node.js
🔸Linux
Quicklinks:
Quickguide
Sample Code
For Prasanna
Content
0.1. The Prerequisites
0.2. The Introduction
1. The Target Application
2. The Certificate
3. The Destination
4. The iFlow
5. The Test
6. Optional: The "cnf" validation
7. Optional: The Credentials Rotation
Appendix 1: The Sample Code Target Application
Appendix 2: The Groovy Script
Appendix 3: The Linux Script for Credentials Rotation
0.1. The Prerequisites
- Access to a Cloud Integration tenant.
- Access to BTP and admin permissions in subaccount
- Optional: Familiar with Node.js, although the tutorial can be followed without local Node.js installation.
0.2. The Introduction
We have a scenario where we want to call a target application from our iFlow (Outbound via HTTP Receiver adapter).
The target application is protected with OAuth 2.0 which means that it requires a valid JWT token.
This is not a problem, as CPI provides support for automatically fetching a JWT token when sending a request.
We only need to get the credentials of the token service and upload to CPI
good
However…
sigh
The target application is now switching to mTLS.
OMG
Don't worry, it’s not that scary, just requires some helpful blog post
What is "mTLS"?
It stands for "mutual Transport Layer Security".
This means that not only the server, but also the client have to present a certificate to guarantee trustworthiness.
See more detailed explanations in this cool blog post.
More concrete:
We as an OAuth client fire a request to the authorization server in order to fetch a JWT token.
Usually we send client-id and client-secret (user / password)
In case of mTLS, we send client-id and client-certificate.
Where do we get the certificate from?
As usual, we get the credentials in the binding (or service key).
Instead of a secret we get the certificate.
To be more concrete, we get the certificate chain plus the corresponding private key.
The private key is required to prove the validity of the certificate.
The chain is required because a certificate must proof that is is signed by a trustworthy authority (CA).
This is a very short summary.
How do we proceed in an iFlow?
We need to manually fetch a JWT token which is then sent to the target application.
Isn’t that tedious?
It is.
So I’ve thought of using the Destination Service in SAP BTP.
The Destination Service is capable of
🔸Fetching a JWT token
🔸using mTLS for fetching the token
🔸storing certificates
But how can we use BTP-services from iFlow?
The Destination Service provides a REST API, such that we can programmatically ask the Destination Service to fetch a JWT token for us.
How can we call the REST API?
The API itself is protected with OAuth.
We get the credentials for the API in the binding or service key of a service instance of Destination Service.
Isn’t that tedious?
It is.
(sigh again)
But less tedious than before.
Because for calling the REST API, normal client-credentials flow can be used, so we can leverage the capabilities of CPI.
What if we cannot access BTP?
In that case, it can be done manually, see this blog post(chapter 1 and 2)

The diagram shows:
The Destination Service REST API itself is protected with OAuth by an internal instance of xsuaa.
The JWT token, required for calling the REST API, can be fetched with “client credentials”.
That can be done with the help of CPI ”Credentials” artifact.
Means:
In CPI, we upload the credentials of the Destination Service in a “Security Materials” artifact.
CPI is then able to fetch a token for Destination Service.
From an iFlow, we use a “Request Reply” step to call the REST API endpoint of Destination Service.
The “Request Reply” step is configured with the "Credentials" artifact created before.
After calling the REST API endpoint, we get the info of the desired “Destination Configuration” in the response body.
The “Destination Configuration” has to be created beforehand in the BTP Cockpit and it contains the info for calling our Backend Application.
This app (not in the diagram) is protected with OAuth, so the destination configuration contains the OAuth credentials for fetching the JWT token.
When we use the REST API for fetching the destination configuration, we not only get the info which was entered in the BTP Cockpit.
In addition, the destination service does the OAuth flow for us and adds a JWT token (for calling the Backend app) to the response of the API call.
More details in the next diagram:

The diagram above summarizes the steps:
1. The iFlow uses a “Request Reply” step to call the destination service REST API
1a) The “Request Reply” step uses a “Credentials” artifact created in CPI
1b) The credentials artifact fetches a JWT token for the REST API.
2 The REST API is called.
2a) The REST API is called with the token that was fetched before
2b) The destination configuration fetches a JWT token for Backend app
3. The JWT token for Backend app is used for calling the Backend app
The "HTTP Receiver" adapter does not require credentials for the target app.
What about the "Destination Configuration"?
When creating a destination configuration for a target app, we have to enter the credentials required by the target app.
That can be a technical user and his password.
Or, in case of OAuth, it can be the clientid, secret and url, required for fetching a token that would be accepted by the target app.
The Destination Service takes care of fetching the token for us.
If the target app (-XSUAA) requires mTLS, then it can be specified in the destination configuration:
In this case, a client secret is not available, but a client certificate along with its private key.
This needs to be made available to the Destination Service.
To do so, the Destination Service offers a kind of key store, to which we upload certificates.
The Destination Service will then fetch a JWT token by sending the uploaded client certificate.
Below diagram tries to illustrate the high-level usage of Destination Service:

Ummm: Destination Service or Configuration??
We need to distinguish:
🔸Destination Configuration:
Basically a piece of paper containing info about target application and its credentials
🔸Destination Service REST API
Allows to programmatically read the info contained in the configuration
Additional functionality available:
Fetch JWT token, create destination configurations, upload certificates...
🔸Destination Service
All together, the offering that supports calling targets with many different credential types
The SAP Cloud Integration products itself provides similar support, via some “Credentials” artifacts, but usage of mTLS is missing in the “Client Credentials” artifact.
So now we get started with a tutorial that shows how to use the Destination Service from inside an iFlow.
What’s in this tutorial?
We create a sample target application that is protected with OAuth.
For protection, we create an instance of XSUAA, configured with mTLS.
We use the certificate/key to create a Destination Configuration, pointing to the target app.
This app is called by an iFlow which uses the Destination Service to fetch a token via mTLS.
Disclaimer
This is not an official documentation, nor a recommendation, just describing my way of solving the requirement
1. The Target Application
In our scenario, we have a target application that is protected with OAuth and it requires mTLS for fetching a JWT token.
This app is called from the iFlow.
We create a very simple Node.js application.
The app is bound to an instance of XSUAA service which we need to create first.
1.1. Create instance of XSUAA service
This instance is used by the target application to protect its endpoint.
The procedure in the iFlow would be pretty much the same for any other OAuth Authorization server, or IAS.
Before we create our service instance of XSUAA, we have a look at the configuration file:
    "xsappname": "backendxsuaa",

    "scopes": [{

        "name": "$XSAPPNAME.backendscope"

    }],

    "authorities":["$XSAPPNAME.backendscope"],

    "oauth2-configuration": {

        "credential-types": ["x509"]
The relevant part is the credential-types which set to x509 which means that only mTLS is supported.
As usual, and best practice, we define a scope.
The authorities statement is responsible to get the scope added to the token when using "client credentials" flow.
Following command can be used to create the service instance on command line:
cf cs xsuaa application backendXsuaa -c xs-security.json
Note:
If you use the BTP Cockpit to create the service instance, make sure to use the same name for the instance "backendXsuaa", as it is used in the target application in next section.
1.2. Create Application
The app is very simple and provides an endpoint that is meant to be called with POST request.
It receives any message from an iFlow and prints it to the log.
It is protected with OAuth, with the help of passport middleware
It requires a scope which is enforced by the @sap/xssec library
That’s all for the moment.
🔷 server.js
app.post('/endpoint', passport.authenticate('JWT', {session: false}), async (req, res) => {

    console.log(`===> [BACKENDAPP] received request with body: '${JSON.stringify(req.body)}'`)


    // check authorization

    if (! req.authInfo.checkScope(UAA_CREDENTIALS.xsappname + '.backendscope')) {

        res.status(403).end('Forbidden. Missing authorization.')
1.3. Deploy
The full project, which can be found in the appendix 1 , can be deployed with cf push.
1.3.1. View credentials
After deploy, we can access the credentials of the XSUAA instance.
These are provided in the service binding and we can view them in the environment of the application.
Can be done in the Cockpit or via this command:
cf env backend
We need the System-Provided VCAP_SERVICES variable with name xsuaa.
We take a note of the following 4 properties which we’ll need later, for creating a "Destination Configuration".
In my example:
clientid: sb-backendxsuaa!t78007
certificate: ...
key: ...
certurl: https://subd.authentication.eu12.hana.ondemand.com/oauth/token
Note
When using the certificate to fetch a JWT token, we must use the certificate URL, not the “normal” URL.
The relevant property is the certurl.
Note:
we need to append the segments /oauth/token to the certurl property
2. The Certificate
Before we continue, are there any questions?
How to do that: use certificate/key to fetch a JWT token?
First of all, we don't do it, we let the destination service fetch a JWT token.
Second of all: it is still a valid question:
What to do with certificate information which we’ve seen in the binding?
We need to arrange the text and then upload it to the destination-key-store in BTP.
This chapter will help simple-minded users (like me) to get a slow insight into this cryptic certificate world.
Towards the end of this tutorial, there’ll be a linux script for handling the certificate stuff automatically.
2.1. Copy key from env to file
We open the empty file <project>\certificates\privateKey.txt with a very simple text editor (e.g. Notepad or VS Code text editor).
We copy the value of the key property from app-env (see chapter 1.3.1.) and paste it into the file.
It looks like this:

It is one long line full with silly characters.
Silly characters?
Yes, but not all.
There’s the BEGIN block and also an END block. These are simple to understand and are extremely important.
They say that anything begins and ends, and they say what it contains in between.
OK.
And they must be separated from the rest by a line feed. That’s why we see the \n.
In the binding, everything comes in one long line, the line feeds are indicated by \n.
To make everything work, we need to manually adjust the content of the file:
Instead of \n we need real line feeds.
2.2. Adjust the private key
OK, the adjustments typically are done by machines or tools or libraries or (Linux) commands.
Today we do it manually, it makes things more clear.
Apologies.
We need to do just 2 adjustments:
2.2.1. Separate BEGIN and END blocks
Let’s manually add line feeds after the BEGIN block and before the END block, including hyphens, such that afterwards we have 3 lines:

2.2.2. Remove \n
We need to remove all the \n from the file content.
These \n are formatting information, have nothing to do with the key.
The reason why we have them:
The spec requires that each line contains exactly 64 characters (except last line).
So the \n in the text indicate the line break.
To remove those characters, we can do Ctrl + H in the editor and replace the \n with an empty string.
Looks better:

Note:
Linux users might wish to use this command:
awk '{gsub(/\\n/,"\n")}1' privateKey.txt | tee privateKey_new.txt
Note:
If you copy this command, you might need to manually type the special characters ' and "
Once done, we can save and close the file.
2.3. Copy the certificate to file
Now we repeat the same procedure with the certificate.
We open the empty file <project>\certificates\certificate.cer with a very simple editor and copy the value of the certificate property into it.
This time, the content is longer.
The reason is that it actually contains a chain of certificates:
The actual certificate, the intermediate certificate(s) and the root certificate.
All separated by BEGIN and END sections and the line breaks indicated with \n.
2.4. Adjust the certificate
Again we need to adjust the file content, this time we have more blocks.
2.4.1. Separate BEGIN and END blocks
After searching for all BEGIN blocks, we can see we have 3 (or 4) certificate blocks:

2.4.2. Remove \n
Again, we need to delete all occurrences of \n.
2.5. Check the order of certificates
What order?
A certificate has to be issued (signed) by somebody.
This somebody has to be trustworthy, otherwise nobody would trust the certificate.
To demonstrate that somebody is trustworthy, he shows a certificate himself.
Now what about this (intermediate) certificate? Is it trustworthy?
Yes, if it is as well signed by trustworthy authority.
This chain of trusting/signing certificates is called chain.
The last certificate is the root, it is trusted because it is a commonly accepted authority.
The order of the certificates in the chain is relevant.
The root certificate must come at the end.
How can we see that the last crowd of silly characters is a root certificate?
We can decode it and read the info in the header.
How to decode?
We can use any certificate decoder tool in the internet.
So we could copy the last certificate, including dashes and BEGIN and END and dashes, into clipboard.
Then paste into a certificate decoder tool, e.g. SSL Certificate Decoder at sslchecker.com/certdecoder
Note that it is not safe to upload sensible content in the internet.
So this is not a recommendation, it is just an example how easy it can be verified.
What is the alternative?
Alternatively, and obviously the better approach:
Use the command line tool openssl.
How to use it?
We copy and paste the bottom certificate (only) from file certificate.cer into a separate file bottomCert.cer.
Then run the command in the same folder:
openssl x509 -in bottomCert.cer -text -noout
The result shows that the issuer is the "Root CA"
Note:
"CA" stands for "certificate authority"

In addition, in case of root certificate, the subject and the issuer are the same, because (only) the root is allowed to sign its own certificate (because root is already root, there's no root which would be rooter than root...)
So after this check, we’re safe to go: the chain has correct order.
2.6. Compose .pem file
What now?
We need both, the private key and the certificate chain in one file.
Why?
We want to upload the bundled certificate-and_private-key into the destination dashboard.
This is necessary for configuring a destination with client certificate.
Such bundles can have different formats, and some of them are supported by the destination dashboard. See documentation: OAuth with X.509 Client Certificates.
The easiest way to go is a .pem file.
Ehmmm....Easy?
Really.
As easy, as anything in the cryptography world?
That sounds tricky.
I would say: it is as easy as copy&paste.
In fact, we only need to do the following:
We have private key and certificate chain in proper (text) format.
We have an empty file with file extension .pem in our certificate folder.
I’ve called the pem file mtlsXsuaa_client_certificate.pem, because it contains the credentials that a client needs to call the instance of XSUAA.
So we just copy the content of both the key and chain files into the empty .pem file.
With other words: we're merging the private key file and the certificate file.
That’s it?
Don’t forget to save.
Only one note:
Again, the order is relevant.
The private key block must be at the beginning of the file.
Afterwards the certificate chain in the existing correct order, ending with root.

In fact, that has been simple.
Note about file extensions:
All the files that we're dealing with, are just text files, the file extensions are not really relevant.
What is the meaning of pem?
pem stands originally for “Privacy Enhanced Mail”.
It describes a format.
It is in fact the most common format for X.509 certificates etc.
A .pem file is a text file containing one or more items in Base64 ASCII encoding, each with plain-text headers and footers
(e.g. -----BEGIN CERTIFICATE----- and -----END CERTIFICATE-----)
PEM is a container format for digital certificates and keys.
Finally, it is a file extension of a file that contains a bunch of certificate files.
And...?
Yes, you might wish to bookmark this security glossary blog post
So today, we use the .pem file as container that can be uploaded to destination dashboard.
The container is identified by its name and it contains the access certificate for connecting to XSUAA.
It is required for the destination service to fetch a JWT token via mTLS.
3. The Destination
Now that we've reformatted the certificate data that was contained in the binding of our backend application, we can go ahead and create a destination.
More precisely: a destination configuration.
We want to specify our destination configuration to use mTLS.
3.1. Upload Certificate
Our destination will require that certificate, so let’s first upload it.
As mentioned, we upload a container file which contains the certificate and corresponding private key.
Note:
It is necessary to upload both certificate and corresponding private key.
It is required by the handshake, to create trust.
The private key is not sent over the net.
After login to our subaccount, we navigate to the destination dashboard:
Subaccount -> Connectivity -> Destinations
We press the “Certificates” button.
In the dialog, press “Upload Certificate”.
We browse to our pem file at
<project>\certificate\mtlsXsuaa_client_certificate.pem
After short time, we get a green success message

We press “Cancel” to close the dialog.
Now that the destination dashboard has stored our certificate container file, we can go ahead and use it in a new destination.
Note:
The destination dashboard stores the certificate in encoded form.
This is because certificates can be accessed via REST API (see below)
3.2. Create Destination Configuration
Now we create the “Destination Configuration”.
This is a lightweight artifact which does nothing than store URL and credentials that are required for calling some target.
In addition, some more features are offered that include automatic token request.
To create a Destination Configuration, we go to the subaccount (same in which we’ve created the Destination service instance), then
Connectivity -> Destinations -> New Destination
🔸Name
This name will be used later by the REST request from iFlow, for fetching the JWT token.
As such, the name entered here must match the configuration in iFlow
In my example: "destination_to_mtlsapp"
🔸Type
HTTP
🔸Description
Any text of our choice
🔸URL
This field is not relevant in the iFlow scenario, because the URL is configured in the adapter.
So we can enter any nonsense, we won't use it.
🔸Proxy Type
This setting is required, If the target application is onPremise and a Cloud Connector is used.
Otherwise, like in our example, we leave the default, which is "Internet".
🔸Authentication
Here we choose "OAuth2ClientCredentials"
🔸User
Nothing here.
🔸Password
Nothing here.
🔸Use mTLS
Yes, enabled.
If the checkbox is not editable, try entering the Token Service URL first.
After enabling the checkbox, the fields are dynamically changed, as we need to specify the keystore in case of mTLS.
🔸Client ID
The value of the property "clientid" from the binding of backend app, see step 1.3.1
In my example:
"sb-backendxsuaa!t12345"
🔸Token Service Key Store Location
Here we use the dropdown to select the name of the certificate which we’ve uploaded in the previous step.
In my example: "mtlsXsuaa_client_certificate.pem"
🔸Token Service Key Store Password
We leave it empty, as the pem file doesn’t require a password (required e.g. in case of password-protected jks keystore files, or p12 or pfx files)
🔸Token Service URL Type
We leave the default “Dedicated”.
The other one is used in case of multitenant applications.
🔸Token Service URL
The value from the "certurl" property in step 1.3.1.
Don’t forget to append the token endpoint segments (/oauth/token).
Make sure it contains the "cert" segment
In my example:
https://mysubdomain.authentication.cert.eu12.hana.ondemand.com/oauth/token
🔸Token Service User
Empty
🔸Token Service Password
Empty
That’s it.
Don’t forget to press “Save”
In my example, it looks like this:

Alternatively, a destination configuration can be imported from a file containing content like this:
Type=HTTP

clientId=sb-backendxsuaa\!t12345

Authentication=OAuth2ClientCredentials

Name=destination_to_mtlsapp

tokenServiceURL=https\://subdomain.authentication.cert.eu12.hana.ondemand.com/oauth/token

ProxyType=Internet

URL=https\://nothing

tokenServiceURLType=Dedicated

tokenService.KeyStoreLocation=mtlsXsuaa_client_certificate.pem
Make sure to adapt after import
The docu can be found here.
3.3. Create instance of Destination service
We want to use the REST API of Destination Service, so we need a service instance.
Furthermore, we need access to the credentials required for calling the service.
We're not binding any app to the service instance, we use the destination service from an iFlow.
As such we need to create a service key, to view the credentials.
3.3.1. Create service instance
Creating service instance and service key can be easily done from the BTP Cockpit, given that the required permissions are available.
No parameters for instance required.
Go to BTP Cockpit -> Subaccount -> Services -> Marketplace
Find “Destination Service” and press “Create”
Enter a name like “cpiDestination” and finish the wizard.
3.3.2. Create service key
After creation, view the instance (Services -> Instances) and choose “Create Service Key”.
Enter a name like “cpiKey” and finish the dialog.
Afterwards, press “View” for the service key and take a note of the following 4 properties.
We’ll need this data in CPI, when it comes to calling the Destination service.
In my example:
clientid: sb-clone123!b789|destination-xsappname!b9
clientsecret: 123ABC=
url: https://mysubdomain.authentication.eu12.hana.ondemand.com
uri: https://destination-configuration.cfapps.eu12.hana.ondemand.com
To create the artifacts on command line, the following commands can be used:
cf cs destination lite cpiDestination
cf csk cpiDestination cpiKey
cf service-key cpiDestination cpiKey
4. The iFlow
After creating service instance and destination configuration in BTP, we head over to CPI.
The credentials which we received in the service key of the destination service, must be made available in CPI.
To do so, we create a “Client Credentials” artifact for the Destination Service:
4.1. Create Security Artifact for Destination Service
We go to Monitor -> Integrations -> Manage Security -> Security Material
Then Create -> OAuth2 Client Credentials
🔸Name
We enter a name for the “Credentials” artifact which will be used in the iFlow configuration below.
In my example:
BACKEND_DESTINATION_CLIENT
🔸Client ID
We enter the clientid from the service key of the destination service instance created in chapter 3.3.1.
🔸Client Secret
We enter the client secret from the same service key
🔸Client Authentication
We choose “Body Parameter”
🔸Content Type
Must be set accordingly to “application/x-www-form-urlencoded”

4.2. Create iFlow
Coming to the iFlow itself.
The iFlow uses a “Request Reply” step to call the Destination Service.
The response contains the JWT token in a JSON payload.
So we use a Groovy Script to parse the JSON structure.
Important to note:
The Destination service REST API is designed to return all the configuration data that was entered in the destination configuration, in the BPT Cockpit.
Including sensitive data like passwords, certificates, secrets.
This can be viewed in the CPI monitor.
However, it can be hidden by using a parameter offered by the REST API.
It allows to omit the credentials from the response.
This query parameter has to be configured in the HTTP channel
Documentation:
Destination Service REST API
API Reference of this REST API on SAP Business Accelerator Hub.
Let’s go through the steps
🔷Timer
🔸 We define a start event via Timer with default properties, i.e. run once
🔷Content Modifier
🔸Name
Optional, to make clear that we define a fake message content her.
E.g. "THE MESSAGE"
🔸Message Body
We enter any dummy message content.
In my example:
"Original message body in iFlow"
Note:
The content must match the "content-type" header in the iFlow and the body parser in the target app.
🔷Content Modifier
We define another Content Modifier which has to take care of storing the original message content in a variable (exchange property).
This is necessary because we will overwrite the message body with the content required for the token request and response.
🔸Name
"Save To Clipboard"
🔸Exchanger Property
Name: "clipboard"
Source Type: Expression
Source Value: ${in.body}
🔷Request Reply
This step from Call -> External Call -> Request Reply doesn’t need to be configured
🔷HTTP channel
The HTTP channel for the destination service call is configured with the data which we stored from the service key in step 3.3.2.
🔸Address
Here we enter the URL of the destination service endpoint.
It is composed as follows:
<uri>/destination-configuration/v1/destinations/<name>
Where uri is the uri property from the service key (3.3.2.) and name is the name of the destination configuration (chapter 3.2.)
In my example:
https://destination-configuration.cfapps.eu12.hana.ondemand.com/destination-configuration/v1/destina...
🔸Query
We enter the important flag which results in credentials being omitted from the response
$skipCredentials=true
🔸Method
GET
🔸Authentication
OAuth2 Client Credentials
🔸Credential Name
BACKEND_DESTINATION_CLIENT
🔸HEADER DETAILS
Request Headers: Authorization

🔷Groovy Script
This script runs after the token request.
It is used to prepare the final call to the Backend.
We need to read the response of the Destination-Service-request and compose the "Authorization" header for the call to the backend.
We have to know the structure of the response of the Destination-Service.
And, BTW, we assume that the current content of the iFlow message body contains the response of the "Request Reply" step, we skip any error handling, as usual.
The message body contains the response from Destination service, formatted as JSON with following structure:
owner
destinationConfiguration
authTokens [
{
value: <theJWT>
http_header
key: "Authorization"
value: "Bearer <theJWT>"
On root level, there is the authTokens element which contains an array which usually contains 1 entry.
Such an authToken entry contains the JWT token.
However, as a convenience, the Destination service sends us a ready-to-use header in the element http_header which we can directly pass to our header in our iFlow.
I mean, it contains the “Bearer” plus <blank> plus JWT.
As such, the job of the Groovy script is clear:
Get body -> parse -> access http_header -> set iFlow-headers
def messageBody = message.getBody(java.lang.String) as String


def jsonSlurper = new JsonSlurper();

def jsonResponse = jsonSlurper.parseText(messageBody)

def authHeader = jsonResponse.authTokens[0].http_header.value


message.setHeader("Authorization", authHeader)

message.setHeader("Content-Type", "text/plain")
See appendix 2 for full script.
🔷Content Modifier
At the end of the iFlow, we have to restore the original message payload which we had stored in an exchange property.
We’re doing this in another Content Modifier step.
🔸Name
"Restore From Clipboard"
🔸Message Body:
Type: Expression
Body: ${property.clipboard}
🔷HTTP channel
After all these preparation steps, we can call our target application via HTTP Receiver adapter.
🔸Authentication
Thanks to our preparation, we can set the “Authentication” option to “None”.
🔸Address
According to our target application deployment, we set the Address
In my example:
https://backend.cfapps.eu12.hana.ondemand.com/endpoint
🔸Method:
As implemented in our app: "POST"
🔸HEADER DETAILS
And of course, we need to allow to send the "Authorization" header

We’re done with the iFlow and don’t forget to save.
Note
I created a similar blog post with few alternatives for similar challenge, see the password credentials blog post.
5. The Test
At this point, we have the iFlow, the target app and the destination.
So nothing hinders us from deploying the iFlow and run the scenario.
In the CPI designer, we press “Deploy”.
To view the result, we check the Cloud foundry logs with
cf logs backend --recent
We should see the dummy message text sent by the iFlow.
Then we check the CPI logs at Overview -> Monitor Message Processing
The status should be shown as a green “Completed”.
6. Optional: Validate "cnf"
For the sake of curiosity, and for the sake of security, let’s have a look at the “cnf”.
6.1. The "cnf"
What is “cnf”?
It is a claim that is added to a JWT token, if the token was requested via mTLS.
What is a “claim”?
This is a property in a JWT token.
What is a “cnf” claim?
It stands for “confirmation”
It contains the fingerprint of the certificate that was used to fetch the JWT token.
Why?
This is the mechanism of “binding” a JWT token to a certificate.
Or binding the token to the client which requested the token.
See: a JWT token is a “bearer” token, which means that anyone who gets a hold of it, can access the protected resource.
By adding the “fingerprint” of a certificate, the receiver (resource server) can check if the JWT (in addition to being valid) is presented by a bearer who has the correct certificate.
This is also called “Proof of Possession” (PoP).
What is a fingerprint?
This is a short code that represents a longer public key.
Can we see?
Here's an example:
43:51:43:a1:b5:fc:8b:b7:0a:3a:a9:b1:0f:66:73:a8How to create it?
To create a fingerprint (or "thumbprint" or even "hash" or "digest"), a hash function is applied to the public key.
As such, the public key is short enough to be added to a "cnf" claim.
Why?
The client has a certificate and uses it to fetch a JWT token.
The token contains the fingerprint.
The receiver can verify that the fingerprint corresponds to the certificate.
To do so, the receiver needs the original certificate.
In our scenario, we have it in the binding of our receiving app.
Why?
Because it was generally specified in rfc7800.
The specification that is more specific to OAuth is described In rfc8705.
How to validate the cnf?
We create our own fingerprint of the client certificate.
Then compare it to the fingerprint in the "cnf" claim.
They must be equal.
How to create own fingerprint?
Good question:
The method is described in the "cnf" claim.
The cnf contains both the fingerprint and the method for creating it.
How does a "cnf" look like?
Example:
{

   "x5t#S256":"w6SDxAuTJE5Ppw2lTxiAT5Y2kj7sIp_JK28tGO3LTEY"

}
What does it mean?
"x5t#S256" means:
A thumbprint (-> t) of a X.509 certificate (-> x5) was created.
Algorithm SHA-256 was used (-> S256).
"x5t#S256" is specified in section 3.1 of rfc8705.
Too lazy to read
It says:
"The value of the x5t#S256 member is a base64url-encoded SHA-256 hash of the DER encoding of the X.509 certificate."
How can we do it?
See below code.
6.2. The "cnf" Validation
In our sample backend application, we introduce a helper method which is responsible of validating the cnf claim.
1. cnf
First we extract the fingerprint from the JWT token that is sent to our backend app.
Below code assumes that the JWT token is already decoded from base64 to a JSON object:
const cnf = jwtDecodedJson.cnf

const fingerprint = cnf['x5t#S256']
We can see that the value of the cnf claim is a JSON object with an element named "x5t#S256"
That’s it.
The value looks like this:
$w6SDxAuTJE5Ppw2lTxiAT5Y2kj7sIp_JK28tGO3LTEYAs we know from the spec, it is base64url-encoded (similar to base64-encoded).
2. Client Certificate
Now we have to generate the same value based on the given client certificate.
Getting the client certificate is easy: it is contained in the binding of our app.
Remember?
We used the cf env command to view the credentials of the XSUAA-binding.
Then we copied the certificate and converted it and uploaded to destination.
To read the XSUAA-credentials in our app, we use the convenience library @sap/xsenv
const UAA_CREDENTIALS = xsenv.getServices({myXsuaa: {tag: 'xsuaa'}}).myXsuaaThen we use the native node.js "crypto" library to obtain the fingerprint:
const certificateObject = new crypto.X509Certificate(UAA_CREDENTIALS.certificate)

const finger = certificateObject.fingerprint256  //SHA256
Note that we have to use the correct property to get the SHA256 value (which is required by the spec and written in the "cnf").
Unfortunately, that’s not enough.
The fingerprint looks like this:
C3:A4:83:C4:0B:93:24:4E:4F:A7:0D:A5:4F:18:80:4F:96:36:92:3E:EC:22:9F:C9:2B:6F:2D:18:ED:CB:4C:46We can see, it is not the same as the example above.
The spec requires to encode with base64url.
The tricky thing here: before encoding it, we have to first remove the colons, as they are only added for better readability:
const fingerNoColon = finger.replaceAll(':','')And even more tricky: we have to convert the string to binary format, before base64url-encoding it:
const fingerNoColonB64Url = Buffer.from(fingerNoColon, 'hex').toString('base64url')So finally, we get the following result:
$w6SDxAuTJE5Ppw2lTxiAT5Y2kj7sIp_JK28tGO3LTEYWe can see with our eyes that it looks same like the value of the "cnf" claim.
That’s it.
We’ve secured our app endpoint against ppl who manipulate bearer tokens
The full code can be found in the appendix.
7. Optional: The Credentials Rotation
An important security requirement is regular credential rotation.
What does it mean?
Use a new password or new certificate.
Isn’t that tedious?
Yes.
So why do we have to do it?
More secure.
How is it done?
Read this chapter
But it is optional….
That was a typo...
7.1. Rotate Credentials
In our example, we’re using SAP-managed certificate.
This means that we let SAP generate a certificate.
More concrete:
in our manifest we’ve declared the credentials-type as X509 in the xsuaa service configuration.
This means that XSUAA will generate a certificate when we deploy our app.
After deployment, we can view it in the binding
More concrete:
The certificate (credentials) is generate during binding.
Alternatively, we could deploy our app without service config and afterwards manually bind a service to the app, including binding parameters.
And?
This is important to know.
Because this means that on each “bind” operation, a new certificate is generated.
As such, to rotate the credentials, we only need to create a new binding.
With other words:
Unbind then rebind
That’s easy.
Alternatively, in case of customer-managed certificates, the certificate is added in the binding parameters.
To rotate, the customer has to come up with a new certificate and supply it during rebind.
With other words:
Unbind then rebind, too.
The commands are bind-service and unbind-service.
Afterwards, the app has to be restarted/restaged
cf us backend backendXsuaa

cf bs backend backendXsuaa

cf restage backend
After generating new credentials, our iFlow execution will fail.
OMG
Sure, because the certificate which was uploaded to Destination Service, and which is used by the iFlow, has become invalid.
So better don't rotate...
Nice try.
The old certificate in certificate store should be deleted and the new certificate should be uploaded.
This can be simplified by uploading the new certificate with the same name.
Hence the destination configuration doesn’t need to be updated, only the certificate renewed.
Isn’t that still tedious?
Yes, a lot.
So why we have to do it?
We don’t have to.
Why?
We can automate it.
7.2. Automatically rotate credentials
The whole procedure can be automated.
Below, I’m listing LINUX commands that should do the following:
- Rotate credentials
- Obtain certificate and private key
- Call Destination Service to upload new certificate/key
Note that I don’t dare to call it script, as all error handling or existence-checks are missing.
In detail.
1. Rotate credentials
As mentioned, we use the unbind-service and bind-service commands
cf us backend backendXsuaa
cf bs backend backendXsuaa
cf restage backend2. Obtain certificate and private key
We use the v3 REST API of the cloud foundry command line client.
It allows to read the environment of an app, but it requires the app guid.
APPNAME="backend"

APP_ID=$(cf curl /v3/apps?names=${APPNAME} | jq -r .resources[0].guid)

ENV=$(cf curl /v3/apps/${APP_ID}/env | jq -r .system_env_json.VCAP_SERVICES)
We write the certificate and private key to files.
Then we concatenate the files into one .pem file.
This is the container format the is supported by the Destination Service certificate store
echo ${ENV} | jq -r .xsuaa[0].credentials.certificate > clientChain.crt

echo ${ENV} | jq -r .xsuaa[0].credentials.key > clientPriv.key

cat clientPriv.key clientChain.crt > backend-client-cert.pem
3. Call Destination Service to upload new certificate/key
Now we can read the required data for calling the destination service REST API.
We’re using the service instance and service key created above
DEST_SRV_NAME="cpiDestination"

DEST_SRV_KEY="cpiKey"

DEST_SRV_ID=$(cf curl /v3/service_instances?names=${DEST_SRV_NAME} | jq -r .resources[0].guid)

SRV_BINDING=$(cf curl "/v3/service_credential_bindings?service_instance_guids=${DEST_SRV_ID}&names=${DEST_SRV_KEY}")

echo ${SRV_BINDING}

SRV_BINDING_GUID=$(echo ${SRV_BINDING} | jq -r .resources[0].guid)

DEST_CREDENTIALS=$(cf curl /v3/service_credential_bindings/${SRV_BINDING_GUID}/details)


CLIENTID=$(echo ${DEST_CREDENTIALS} | jq -r .credentials.clientid)

SECRET=$(echo ${DEST_CREDENTIALS} | jq -r .credentials.clientsecret)

URL=$(echo ${DEST_CREDENTIALS} | jq -r .credentials.url)/oauth/token

API=$(echo ${DEST_CREDENTIALS} | jq -r .credentials.uri)
Fetch JWT token for Destination Service:
JWT=$(curl -X POST --url ${URL} -d 'grant_type=client_credentials&client_id='${CLIENTID}'&client_secret='${SECRET} | jq -r '.access_token')
We need to encode the .pem file with base64, as this is required by the Destination Service (and it makes sense).
BASE64=$(cat backend-client-cert.pem| base64 --wrap=0)
Note:
The “wrap” parameter is required, otherwise we have short lines for all short lines of the certificate (which has line feeds).
We compose the request body (it is same for CREATE and UPDATE):
BODY='{"Name":"backend-client-cert.pem","Type":"CERTIFICATE","Content":"'${BASE64}'"}'Finally, we UPDATE our existing pem entry:
curl -s -X PUT --url "${API}/destination-configuration/v1/subaccountCertificates" -H "Authorization: Bearer ${JWT}" -d ${BODY}
That's it.
Optionally, we can print the fingerprint, so we can compare with logs of backend app:
openssl x509 -noout -fingerprint -sha256 -inform pem -in clientChain.crtAt the end, we should cleanup the temporary files:
rm backend-client-cert.pem

rm clientPriv.key

rm clientChain.crt
The Summary
In this blog post we’ve implemented a scenario where an iFlow calls a target application (outbound).
The target app is protected with OAuth 2.0 and XSUAA is configured to required a client certificate for fetching a JWT token (mTLS), instead of clientsecret.
We've leveraged the Destination Service for storing the certificate and fetching the JWT token.
Alternatively, the JWT token could be fetched manually in a Groovy script.
We've also learned about the "cnf" claim which is contained in a JWT token, in case of mTLW, and how to validated it.
Finally, we've created a Linux-script that can be used for automatically renewing the certificate (credentials rotation)
The Quickguide
Create XSUAA instance with x509 param, to require mTLS
Create app and deploy.
Extract certificate and key from app-binding (env JSON).
Convert the string with \n to normal format with line feeds.
Merge key and certificate chain to one single pem file.
Upload pem to Destination Dashboard
Create Destination Service (+ Service Key) and Destination Configuration.
Destination Config contains the credentials of app and "use mTLS"
In CPI create ClientCredentials artifact with credentials of Destination Service.
The iFlow uses request/reply step to call Destination Service REST API.
The response-JSON contains the JWT which needs to be extracted.
The iFlow has to store and restore the original message payload.
The Links
SAP Help Portal:
CPI Scripting APIs
Destination Configuration docu
Destination Service REST API docu
API Reference for REST API on SAP Business Accelerator Hub
Parameters for x509 in binding.
Reference for xs.security.json parameters.
Node.js
Passport homepage and download.
Node.js package xssec.
Node.js package xsenv.
Node.js Crypto package
Manual for openssl and download the windows version.
Specifications
https://www.rfc-editor.org/rfc/rfc7800
https://datatracker.ietf.org/doc/html/rfc7800
https://datatracker.ietf.org/doc/html/rfc8705
OAuth 2.0
Understanding of OAuth for dummies like me.
OAuth 2.0 spec
Other
Security Glossary Blog.
Cloud Foundry Client V3 API reference
Similar blog posts
How to use mTLS with Destinations
CPI password credentials
Tools
Base64 converter base64.guru
The Appendix: Sample Code
Note that you need to adapt the names of artifacts or content type or body parser, in case you deviated from tutorial description.
Appendix 1: The Target Application
Note:
Make sure to change the body parser to express.json() or similar, if you send a message payload that is not text/plain
🔷 server.js
const xsenv = require('@sap/xsenv')

const UAA_CREDENTIALS = xsenv.getServices({myXsuaa: {tag: 'xsuaa'}}).myXsuaa


const crypto = require('crypto')

const express = require('express')

const app = express();

const xssec = require('@sap/xssec')

const passport = require('passport')

const JWTStrategy = xssec.JWTStrategy

passport.use('JWT', new JWTStrategy(UAA_CREDENTIALS))

app.use(passport.initialize())

app.use(express.text())


app.listen(process.env.PORT)


app.post('/endpoint', passport.authenticate('JWT', {session: false}), async (req, res) => {

    console.log(`===> [BACKENDAPP] received request with body: '${JSON.stringify(req.body)}'`)


    // check authorization

    if (! req.authInfo.checkScope(UAA_CREDENTIALS.xsappname + '.backendscope')) {

        res.status(403).end('Forbidden. Missing authorization.')

    }


    // compare CNF of incoming JWT with the fingerprint of certificate in binding

    await validateCNF(req.tokenInfo.getPayload())


    // print certificate info for comparing with CLI result

    await printCertInfo()


    res.end()

})


/* HELPER */


async function validateCNF(jwt){

    console.log('===> [CNF] Validating CNF claim. The value of cnf must be equal to the fingerprint of certificate in binding.')


    const fingerprintJWT = await getFingerprintFromJWT(jwt)

    const fingerprintBinding = await getFingerprintFromBinding()


    console.log(`===> [CNF] Fingerprint in JWT token: $${fingerprintJWT}`)

    console.log(`===> [CNF] Fingerprint from Binding: $${fingerprintBinding}`)


    const result = fingerprintJWT === fingerprintBinding

    console.log(`===> [CNF] Result of cnf-validation: CNF is valid: ${result}`)

}


async function getFingerprintFromJWT(jwtDecodedJson){

    const cnf = jwtDecodedJson.cnf

    const fingerprint = cnf['x5t#S256']

    return fingerprint

}


async function getFingerprintFromBinding(){

    const certificateObject = new crypto.X509Certificate(UAA_CREDENTIALS.certificate)

    const finger = certificateObject.fingerprint256  //SHA256

    const fingerNoColon = finger.replaceAll(':','')

    const fingerNoColonB64Url = Buffer.from(fingerNoColon, 'hex').toString('base64url')

    return fingerNoColonB64Url

}


async function printCertInfo(){

    const certificateObject = new crypto.X509Certificate(UAA_CREDENTIALS.certificate)

    const finger = certificateObject.fingerprint256

    const serialNumber = certificateObject.serialNumber


    console.log(`===> [BACKENDAPP] certificate info: serial number: ${serialNumber}`)

    console.log(`===> [BACKENDAPP] certificate info: fingerprint: ${finger}`)

}
🔷 package.json
{

  "dependencies": {

    "@sap/xsenv": "latest",

    "@sap/xssec": "^3.2.13",

    "express": "^4.17.1",

    "passport": "^0.4.0"

  }

}
🔷 manifest.yml
---

applications:

  - name: backend

    path: app

    memory: 64M

    routes:

    - route: backend.cfapps.eu12.hana.ondemand.com

    services:

      - backendXsuaa
🔷 xs-security.json
{

    "xsappname": "backendxsuaa",

    "tenant-mode": "dedicated",

    "scopes": [{

        "name": "$XSAPPNAME.backendscope"

    }],

    "authorities":["$XSAPPNAME.backendscope"],

    "oauth2-configuration": {

        "credential-types": ["x509"]

    }

}
Appendix 2: Groovy Script and Destination Configuration
🔷 Groovy Script
import com.sap.gateway.ip.core.customdev.util.Message;

import groovy.json.*

import com.sap.it.rt.scc.connectivity.security.IToken


def Message processData(Message message) {

    def messageBody = message.getBody(java.lang.String) as String


    def messageLog = messageLogFactory.getMessageLog(message)

    messageLog.addAttachmentAsString("DEST_RESP", messageBody, "text/plain")


    // parse the JSON content in the message body, the response of the call to destination service

    def jsonSlurper = new JsonSlurper();

    def jsonResponse = jsonSlurper.parseText(messageBody)


    // the property contains the "Bearer" plus space

    def authHeader = jsonResponse.authTokens[0].http_header.value


    // finally, set the JWT token as Authorization header to be used by HTTP Receiver adapter

    message.setHeader("Authorization", authHeader)

    message.setHeader("Content-Type", "text/plain")


    return message;

}
🔷 destination_to_mtlsapp
#tokenService.KeyStorePassword=<< Existing password/certificate removed on export >>

#clientSecret=<< Existing password/certificate removed on export >>

#

#Tue Nov 28 10:14:28 UTC 2023

Type=HTTP

clientId=sb-backendxsuaa\!t78007

Authentication=OAuth2ClientCredentials

Name=destination_to_mtlsapp

tokenServiceURL=https\://rover-subdomain.authentication.cert.eu12.hana.ondemand.com/oauth/token

ProxyType=Internet

URL=https\://aaa/test

tokenServiceURLType=Dedicated

tokenService.KeyStoreLocation=mtlsXsuaa_client_certificate.pem
Appendix 3: Linux Script for Credentials Rotation
Note:
The script assumes that destination service and instance are already created, as following this tutorial.
Otherwise, please add it to the script.
########################

# Credentials Rotation #

########################


# SAP-managed certificate can be rotated by simply unbind and rebind

cf us backend backendXsuaa

cf bs backend backendXsuaa

cf restage backend


# after this step, iFlow will fail


###########################################

# Extract client certificate from binding #

###########################################


# retrieve the guid of our app

# app name copied from manifest

APPNAME="backend"

APP_ID=$(cf curl /v3/apps?names=${APPNAME} | jq -r .resources[0].guid)

# use cloud foundry client v3 REST API to get the env of our app

ENV=$(cf curl /v3/apps/${APP_ID}/env | jq -r .system_env_json.VCAP_SERVICES)

echo ${ENV} | jq -r .xsuaa[0].credentials.certificate > clientChain.crt

echo ${ENV} | jq -r .xsuaa[0].credentials.key > clientPriv.key


# we need container-pem-file for destination service, so now combine key and cert into one container pem

cat clientPriv.key clientChain.crt > backend-client-cert.pem


#######################

# Destination service #

#######################


# the destination service instance and service key are already created with names given below

DEST_SRV_NAME="cpiDestination"

DEST_SRV_KEY="cpiKey"

# retrieve the guid of destination service instance

DEST_SRV_ID=$(cf curl /v3/service_instances?names=${DEST_SRV_NAME} | jq -r .resources[0].guid)

echo ${DEST_SRV_ID}


# now we can find the service-credential-binding object. In V3, the binding and service key are treated as one object (with different type, key or app)

SRV_BINDING=$(cf curl "/v3/service_credential_bindings?service_instance_guids=${DEST_SRV_ID}&names=${DEST_SRV_KEY}")

echo ${SRV_BINDING}

# obtain the guid of the binding

SRV_BINDING_GUID=$(echo ${SRV_BINDING} | jq -r .resources[0].guid)

echo ${SRV_BINDING_GUID}


# use the binding guid to get the details, which are the credentials

DEST_CREDENTIALS=$(cf curl /v3/service_credential_bindings/${SRV_BINDING_GUID}/details)

echo ${DEST_CREDENTIALS}


CLIENTID=$(echo ${DEST_CREDENTIALS} | jq -r .credentials.clientid)

SECRET=$(echo ${DEST_CREDENTIALS} | jq -r .credentials.clientsecret)

URL=$(echo ${DEST_CREDENTIALS} | jq -r .credentials.url)/oauth/token

API=$(echo ${DEST_CREDENTIALS} | jq -r .credentials.uri)


# fetch JWT token for destination service REST API

echo "Fetching JWT token for Destination Service..."

JWT=$(curl -X POST --url ${URL} -d 'grant_type=client_credentials&client_id='${CLIENTID}'&client_secret='${SECRET} | jq -r '.access_token')


# for destination service, the container-pem has to be sent as base4-encoded string

BASE64=$(cat backend-client-cert.pem| base64 --wrap=0)

# note: the wrap parameter is required, otherwise we have short lines for all short lines of the certificate (which has line feeds)


#compose the request body (same for CREATE of UPDATe)

BODY='{"Name":"backend-client-cert.pem","Type":"CERTIFICATE","Content":"'${BASE64}'"}'


# CREATE new pem entry in destination service certificates store

# execute the CREATE command, to upload a pem to destination service

#curl -X POST --url "${API}/destination-configuration/v1/subaccountCertificates"  -H "Authorization: Bearer ${JWT}" -d ${BODY}

# CHECK if creation was successful

#curl -s -H "Authorization: Bearer ${JWT}" --url "${API}/destination-configuration/v1/subaccountCertificates/backend-client-cert.pem"


# UPDATE existing pem entry

echo "Calling Destination Service REST API for updating certificate..."

curl -s -X PUT --url "${API}/destination-configuration/v1/subaccountCertificates"  -H "Authorization: Bearer ${JWT}" -d ${BODY}

# OPTIONAL: check existing entry, to compare if update was successful

curl -s -H "Authorization: Bearer ${JWT}" --url "${API}/destination-configuration/v1/subaccountCertificates/backend-client-cert.pem"


# Optional: print fingerprint, to compare with logs of backend app

echo "Fingerprint of client certificate:"

openssl x509 -noout -fingerprint -sha256 -inform pem -in clientChain.crt


# cleanup: delete created files

rm backend-client-cert.pem

rm clientPriv.key

rm clientChain.crt


########

# DONE #

########


echo "Done with credentials rotation."


# now run iFlow without issues 😉
Labels:
4 Comments
You must be a registered user to add a comment. If you've already registered, sign in. Otherwise, register and sign in.
Labels in this area
-
ABAP CDS Views - CDC (Change Data Capture)
2 -
AI
1 -
Analyze Workload Data
1 -
BTP
1 -
Business and IT Integration
2 -
Business application stu
1 -
Business Technology Platform
1 -
Business Trends
1,658 -
Business Trends
93 -
CAP
1 -
cf
1 -
Cloud Foundry
1 -
Confluent
1 -
Customer COE Basics and Fundamentals
1 -
Customer COE Latest and Greatest
3 -
Customer Data Browser app
1 -
Data Analysis Tool
1 -
data migration
1 -
data transfer
1 -
Datasphere
2 -
Event Information
1,400 -
Event Information
67 -
Expert
1 -
Expert Insights
177 -
Expert Insights
301 -
General
1 -
Google cloud
1 -
Google Next'24
1 -
GraphQL
1 -
Kafka
1 -
Life at SAP
780 -
Life at SAP
13 -
Migrate your Data App
1 -
MTA
1 -
Network Performance Analysis
1 -
NodeJS
1 -
PDF
1 -
POC
1 -
Product Updates
4,577 -
Product Updates
346 -
Replication Flow
1 -
REST API
1 -
RisewithSAP
1 -
SAP BTP
1 -
SAP BTP Cloud Foundry
1 -
SAP Cloud ALM
1 -
SAP Cloud Application Programming Model
1 -
SAP Datasphere
2 -
SAP S4HANA Cloud
1 -
SAP S4HANA Migration Cockpit
1 -
Technology Updates
6,873 -
Technology Updates
429 -
Workload Fluctuations
1
Related Content
- External System Integration in DMC in Technology Blogs by Members
- Supporting Multiple API Gateways with SAP API Management – using Azure API Management as example in Technology Blogs by SAP
- SAP Build Process Automation Pre-built content for Finance Use cases in Technology Blogs by SAP
- How to use AI services to translate Picklists in SAP SuccessFactors - An example in Technology Blogs by SAP
- Magic Numbers : A Solution to Foreign Characters in SAP CPI in Technology Blogs by Members
Top kudoed authors
| User | Count |
|---|---|
| 33 | |
| 17 | |
| 15 | |
| 13 | |
| 11 | |
| 9 | |
| 8 | |
| 8 | |
| 8 | |
| 7 |