- SAP Community
- Products and Technology
- Technology
- Technology Blogs by SAP
- SAP AI Core with pyspark
Technology Blogs by SAP
Learn how to extend and personalize SAP applications. Follow the SAP technology blog for insights into SAP BTP, ABAP, SAP Analytics Cloud, SAP HANA, and more.
Turn on suggestions
Auto-suggest helps you quickly narrow down your search results by suggesting possible matches as you type.
Showing results for
Advisor
Options
- Subscribe to RSS Feed
- Mark as New
- Mark as Read
- Bookmark
- Subscribe
- Printer Friendly Page
- Report Inappropriate Content
07-28-2023
7:02 AM

Introduction
Business challenges
In the bill to cash process, businesses often face several common challenges that can hinder their financial operations. One common challenges that significantly impacts the process is customer payment behavior. Dealing with customers who consistently delay payments or struggle to pay can disrupt the flow of the bill to cash cycle. To solve this business challenge, we can start by asking this question, 'Who will default on payment and why?' When this question can be answered, high value can be identified in this use case across industries. It not only affects the organization’s cash flow but also helps with designing effective strategies to ensure timely payments.
Machine learning
In this blog post, we will apply machine learning on historical payments to predict the level of dunning notice. When payment invoice is generated, if the customer misses the payment, utilities companies send a 1st level dunning notice to customer. If the customer misses the payment again, subsequently a 2nd level dunning notice is sent, which leads to disconnection.
In the field of machine learning, classification plays a crucial role as it involves the classification of data points into distinct classes or groups, depending on their respective features. For this problem, we used a multi-class classification model.
ML with pyspark
Machine Learning (ML) has emerged as a powerful tool for extracting insights and making predictions from vast amounts of data. PySpark, a Python library built on top of Apache Spark, provides a powerful and scalable framework for distributed data processing and machine learning tasks. In this blog post, we will explore how to leverage PySpark to build and deploy machine learning models for classification tasks with SAP AI Core.
MLOps with SAP AI Core
We built an end-to-end ML workflow from data pre-processing to model service using SAP AI Core and started with classification using pyspark. In the following section, we will cover end-to-end steps, from data preprocessing to model inference, to help you get started with classification using PySpark.
Agenda
- preprocessing pipeline with AI Core
- training pipeline with AI Core
- Inferencing pipeline with AI Core
- Reference architecture
- Conclusion
Before starting blog posting, please see the solution approaches and pre-requisites.
SAP Solution Approach
- SAP AI Core & AI Launch Pad
- SAP HANA Cloud
- SAP Analytics Cloud
Pre-requisite
- Object store: AWS S3, SAP HANA Cloud
- Object store secret: You must have an object store secret defined in the target resource group.
Preprocessing pipeline with AI Core
One of the key steps in preparing for machine learning training is extracting operational datasets from SAP S/4 HANA or SAP ECC as tables. However, to ensure meaningful features can be derived from the different table data, it is essential to perform preprocessing including defining schema for datatypes, missing values, replace values, one-hot encoding for categorical variables, and data scaling for imbalance dataset. In addition, features should be created in consultation with business. Features were selected based on the outcome of EDA and statistical tests, feature importance measures, and most importantly domain knowledge of the business users.
Steps
- Data Preparation
- Docker Image
- AI workflow
- Output training dataset
1. Data Preparation
1) Connect your data
We can use cloud storage with SAP AI Core to store AI assets such as datasets and model files. We can use artifacts in SAP AI Core to reference to the AI Assets. SAP AI Core supports multiple hyperscaler object stores, such as SAP HANA Cloud, Data Lake, Amazon S3, Azure Blob storage and OSS (Alicloud Object Storage Service).
1.1) Create cloud storage for datasets and models
1.2) (Optional) Connect local system to cloud storage
1.3) (Optional) Upload datasets to cloud storage
For example, if you’re using aws s3, you can use this command line.
aws s3 cp /data/preprocessing/s3_upload/dataset.csv s3://{{S3 bucket}} /dataset/version1/dataset.csv*If directory, please use aws s3 sync
1.4) Store an object store secret in SAP AI Core
Your cloud storage credentials are managed using secrets, which allows and controls connections across directories and tools, without compromising your credentials. You can find format to register an object store secret using Postman or curl in this links: https://help.sap.com/docs/sap-ai-core/sap-ai-core-service-guide/register-your-object-store-secret?q=...
For example)
{

  "name": "default",

  "type": "webhdfs",

  "pathPrefix": "<path prefix to be appended>",

  "data": {

    // e.g. https://c32727c8-4260-4c37-b97f-ede322dcfa8f.files.hdl.canary-eu10.hanacloud.ondemand.com

    "HDFS_NAMENODE": "https://<file-container-name>.files.hdl.canary-eu10.hanacloud.ondemand.com",

    "TLS_CERT": "-----BEGIN CERTIFICATE-----\nMIICmjCCAYIxxxxxxxxxxxxR4wtC32bGO66D+Jc8RhaIA==\n-----END CERTIFICATE-----\n",

    "TLS_KEY": "-----BEGIN PRIVATE KEY-----\nMIIEvQIBADANBgkqxxxxxxxxxxxxnor+rtZHhhzEfX5dYLCS5Pww=\n-----END PRIVATE KEY-----\n",

    "HEADERS": "{\"x-sap-filecontainer\": \"<file-container-name>\", \"Content-Type\": \"application/octet-stream\"}"

  }

}
For example)

Object store secret
2) Create artifact in SAP AI Core
You can create artifacts in SAP AI Core with Jupyter notebooks, postman or curl. Links to https://help.sap.com/docs/sap-ai-core/sap-ai-core-service-guide/create-artifacts?q=artifacts
2.1) Create artifact to specify folder of dataset
#Create artifacts

artifact = ai_core_client.artifact.create(

name = "blogdataset", # Custom Non-unqiue identifier

kind = Artifact.Kind.DATASET,

url = "ai://default/dataset/version3", #"ai://mldata-secret-model/model/blogmodel"

scenario_id = scenario_id,

description = "create dataset for preprocessing",

labels = [

Label(key="ext.ai.sap.com/dataset", value="mldata"), # any descriptive key-value pair, helps in filtering, key must have the prefix ext.ai.sap.com/

],

resource_group = "blog-demo"

# required to restrict object store secret usage within a resource group)
Result in SAP AI Launchpad:

Results in SAP AI Launchpad: Dataset artifacts
3) Preprocessing.py
from pyspark.sql import SparkSession

from pyspark.sql import functions as F

import pyspark.sql.functions as func


from pyspark.sql import *

from pyspark.sql.functions import *

from pyspark.sql.window import Window


import os

import sys

import numpy as np

import pandas as pd

from itertools import islice

import csv


# PATH Variable

INPUT_PATH = '/app/data/'

OUTPUT_PATH = '/app/dataoutput/training.csv'


path_data = INPUT_PATH + 'before_preprocessing.csv'


# Start a Spark session

spark = SparkSession.builder.getOrCreate()


# read csv

df = spark.read.csv(path_data, header=True, inferSchema=True)


# Preprocessing steps

def preprocessing_consumer(df):

     ....

    return df_preprocessed


# Write Preprocessed file

df_preprocessed.write.option("header", True).csv(OUTPUT_PATH)
2. Docker Image
We need to build docker image and we will connect to AI workflow in Github repository. For the detail steps, please refer to this tutorial (https://developers.sap.com/tutorials/ai-core-code.html#432398b3-cd23-40e4-a471-833e248d5bda).
1) Build docker image
docker build -t sumin/ml-demo:0.1 .DockerFile example)
FROM python:3.9-slim-buster


RUN apt-get update --allow-releaseinfo-change

# # Install Python packages

RUN apt-get update && \

    apt-get install -y python3 python3-pip openjdk-11-jdk-headless wget && \

    apt-get clean && \

    rm -rf /var/lib/apt/lists/*


# Upgrade pip and install PySpark3

RUN pip3 install --upgrade pip && \

    pip3 install pyspark==3.4.0


RUN wget https://archive.apache.org/dist/spark/spark-3.4.0/spark-3.4.0-bin-hadoop3.tgz && \

    tar -zxvf spark-3.4.0-bin-hadoop3.tgz  && \

    mv spark-3.4.0-bin-hadoop3 /usr/local/spark && \

    rm spark-3.4.0-bin-hadoop3.tgz


# Set environment variables for Hadoop

#https://spark.apache.org/docs/latest/

ENV JAVA_HOME /usr/lib/jvm/java-11-openjdk-amd64

ENV JAVA_TOOL_OPTIONS="-Dio.netty.tryReflectionSetAccessible=true"


ENV SPARK_HOME=/usr/local/spark

ENV HADOOP_HOME=/usr/local/spark


# Expose Spark UI port

EXPOSE 4040

# # Creates directory within your Docker image

RUN mkdir -p /app/src/

# # Don't place anything in below folders yet, just create them

RUN mkdir -p /app/data/

RUN mkdir -p /app/dataoutput/


# # # Copies file from your Local system TO path in Docker image

COPY preprocessing.py /app/src/

COPY requirements.txt /app/src/


# # # # Installs dependencies within you Docker image

RUN pip3 install -r /app/src/requirements.txt


# Enable permission to execute anything inside the folder app

RUN chgrp -R 65534 /app && \

    chmod -R 777 /app
2) Push a docker image to the cloud
docker push sumin /ml-demo:0.13) Store Docker credentials in SAP AI core as a Docker registry secret
For this steps, please refer to the detail in Steps7 (Link to tutorial: https://developers.sap.com/tutorials/ai-core-code.html#a249f39c-5094-4e0b-89a0-ae98a29114ac)
3. AI workflow
Workflow templates provides the ability to manage pre-processing, training and serving pipelines at the main tenant level. These templates are stored in git repository, enabling version control. In SAP AI Core, workflows are executed using the Argo Workflows open-source project, which is built for Kubernetes. For the detail steps, please refer to this tutorial:https://developers.sap.com/tutorials/ai-core-helloworld.html
1) Choose a Resource Plan
SAP AI Core enables the selection of various infrastructure resources based on specific demand. SAP AI Core provides several preconfigured infrastructure bundles called “resource plans” for this purpose.(Link to https://help.sap.com/docs/sap-ai-core/sap-ai-core-service-guide/choose-resource-plan-train?q=artifac...)
When creating preprocessing workflow, we select train.l resource plan.
2) Workflow template
Workflow templates provides the ability to manage preprocessing pipeline. In detail explanation, please refer to the pre-processing AI workflow.
2.1) Yaml file format
This is example serving pipeline and please refer and check to the latest official guideline from SAP help portal: https://help.sap.com/docs/AI_CORE/2d6c5984063c40a59eda62f4a9135bee/8a1f91a18cf0473e8689789f1636675a....
apiVersion: argoproj.io/v1alpha1

kind: WorkflowTemplate

metadata:

  name: blog-preprocessing-pipeline # Executable ID (max length 64 lowercase-hyphen-separated), please modify this to any value if you are not the only user of your SAP AI Core instance. Example: `first-pipeline-1234`

  annotations:

    scenarios.ai.sap.com/description: "SAP AI Core-blog demo for preprocessing"

    scenarios.ai.sap.com/name: "blog-prep"

    executables.ai.sap.com/description: "blog-prep"

    executables.ai.sap.com/name: "blog-prep preprocessing pipeline"

    artifacts.ai.sap.com/blogdataset.kind: "dataset"

  labels:

    scenarios.ai.sap.com/id: "blog-prep"

    executables.ai.sap.com/id: "blog-preprocessing-pipeline"

    ai.sap.com/version: "0.0.1"

spec:

  imagePullSecrets:

    - name: credstutorialrepo-i551982 # your docker registry secret

  entrypoint: glog-demo-pipeline

  templates:

    - name: blog-demo-pipeline

      metadata:

        labels:

          ai.sap.com/resourcePlan: train.l

      inputs:

        artifacts: # placeholder for cloud storage attachments

          - name: blogdataraw #a name for the placeholder

            path: /app/data/ #where to copy in the Dataset in the Docker image

      outputs:

        artifacts:

          - name: blogdataprep # name of the artifact generated, and folder name when placed in s3, complete directory will be `../<executaion_id>/housepricemodel`

            globalName: blogdataprep # local identifier name to the workflow, also used above in annotation

            path: /app/dataoutput  # from which folder in docker image (after running workflow step) copy contents to cloud storage

            archive:

                none: {}

      container:

        image: "docker.io/sumin/demo-prep:0.1"  #docker.io/lsm1401/blog-demo:0.5 - scikit lean / docker.io/sumin/blog-demo:0.4 - pyspark

        imagePullPolicy: Always

        command: ["/bin/sh", "-c"] #["sh", "-c"]

        env:

        args:

          - >

            set -e && echo "---Start Preprocessing---" && python /app/src/preprocessing.py && ls -lR /app/dataoutput && echo "---End Preprocessing---"
3) Connect to git repository and create applications
When you have created your workflow referring above tutorials, please connect AI workflow from git repository. For this blog, we need to create three workflows for preprocessing, training and serving templates.
Workspaces > Applications > SAP AI Core Connection

SAP AI Launchpad: AI Core connection
4) Sync AI Core and Git
When you successfully connect yaml workflow files in git repository, you can check the “Synced” status in SAP AI Launchpad.
Before

Before sync to git repository
After: Synced workflow

After sync to git repository
5) Check Scenarios
When applications are synced, we can also find scenarios which is defined from YAML file.

Check Scenarios (source: SAP developer tutorial)
6) Run AI workflow
6.1) Create configurations
In the ML operations App, click Configurations.

MLOps App - Click configuration (source: SAP developer tutorials)
 MLOps App - Create configuration (source: SAP developer tutorials)
6.2) Create execution
When you click execution, you can run your preprocessing pipeline through SAP AI Launchpad.

Create execution
4. Get preprocessed file
After running preprocessing pipeline, now you can get training.csv dataset and output artifacts. We will use this preprocessed file as a training dataset.
Training pipeline with AI Core
After preprocessing and output preprocessed dataset, we can create training pipeline. Let’s start training our model in this section.
Steps
- Docker Image
- AI workflow
- Prepare training code
- Start training
- Metrics to generated model
- Output Model
1. Docker Image
Please refer to the preprocessing steps above as there is not much difference between them. Most of the code is the same as the preprocessing docker image, other parts are mkdir both dataset and model.
# Expose Spark UI port

EXPOSE 4040

# # Creates directory within your Docker image

RUN mkdir -p /app/src/

# # Don't place anything in below folders yet, just create them

RUN mkdir -p /app/data/

RUN mkdir -p /app/model/

RUN mkdir -p /app/model/blogmodel

RUN mkdir -p /app/model/encoder
2. AI workflow
Please refer to the preprocessing steps above as there is not much difference between them.
3. Prepare training
1) Choose resource plan
We set resource plan for training pipeline with train.l (Please refer to the official link to here: https://help.sap.com/docs/sap-ai-core/sap-ai-core-service-guide/choose-resource-plan-train?q=artifac...)
2) Workflow templates
apiVersion: argoproj.io/v1alpha1

kind: WorkflowTemplate

metadata:

  name: blog-training-pipeline # Executable ID (max length 64 lowercase-hyphen-separated), please modify this to any value if you are not the only user of your SAP AI Core instance. Example: `first-pipeline-1234`

  annotations:

    scenarios.ai.sap.com/description: "SAP AI Core-BLOG demo"

    scenarios.ai.sap.com/name: "blog-demo-training"

    executables.ai.sap.com/description: "blog-demo-training"

    executables.ai.sap.com/name: "blog-demo training pipeline"

    artifacts.ai.sap.com/blogdataset.kind: "dataset" # Helps in suggesting the kind of artifact that can be attached. #

    artifacts.ai.sap.com/blogmodel.kind: "model" # Helps in suggesting the kind of artifact that can be generated.

  labels:

    scenarios.ai.sap.com/id: "blog"

    executables.ai.sap.com/id: "blog-training-pipeline"

    ai.sap.com/version: "0.1.8"

spec:

  imagePullSecrets:

    - name: credstutorialrepo-i551982 # your docker registry secret

  entrypoint: blog-demo-pipeline

  arguments:

    parameters: # placeholder for string like inputs

      - name: DT_MAX_DEPTH # identifier local to this workflow

      - name: MAX_BINS
3) Connect to git repository and create applications
This is example workflow templates for training pipeline and
4) Create Configurations
4.1) Enter name and executables
4.2) Input parameters
You can define the input parameters from YAML files.
Yaml file example)
parameters: # placeholder for string like inputs


- name: DT_MAX_DEPTH # identifier local to this workflow


- name: MAX_BINS
In the python file: Training.py, you can set the parameter as follows.
DT_MAX_DEPTH= int(os.getenv('DT_MAX_DEPTH')) # 10

MAX_BINS = int(os.getenv('MAX_BINS')) #5
Setting input parameters allows you to input parameters later. You can define parameters when creating a configuration in the SAP AI launch pad like below.
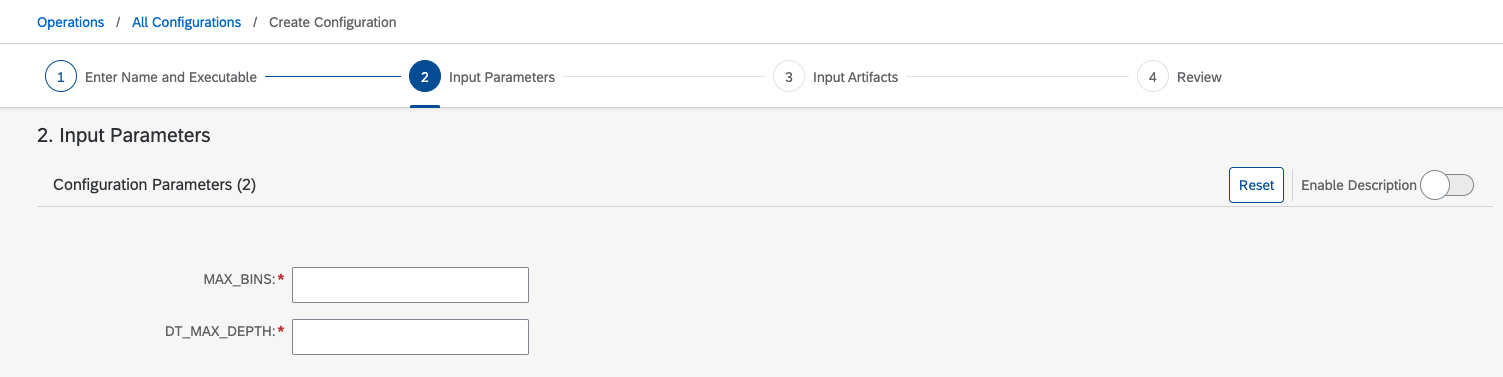
Input Parameters in AI Launchpad
3.3) Input artifacts
Connect artifacts that is created from preprocessing pipeline.
4. Start training
Run AI workflow
5. Output Model
Training model is stored in the AI Core as an artifacts
6. Metrics to generated model
If you like to compare the performance metrics, we can check the values for training performance and alongside customer information like confusion matrix and feature importance as well. It can be customized whatever you want in string types from python code with libraries.
Tutorials: https://developers.sap.com/tutorials/ai-core-metrics.html#6527c7d1-503f-4495-8a09-42d1375beec0
from pyspark.ml.evaluation import MulticlassClassificationEvaluator


# Generate a classification report

evaluator = MulticlassClassificationEvaluator(labelCol="label", predictionCol="prediction")

accuracy = evaluator.evaluate(predictions, {evaluator.metricName: "accuracy"})

precision = evaluator.evaluate(predictions, {evaluator.metricName: "weightedPrecision"})

recall = evaluator.evaluate(predictions, {evaluator.metricName: "weightedRecall"})

f1_score = evaluator.evaluate(predictions, {evaluator.metricName: "f1"})

print("Accuracy = %g" % (accuracy))

print("Precision = %g" % (precision))

print("Recall = %g" % (recall))

print("F1 score = %g" % (f1_score))


from ai_core_sdk.models import Metric, MetricTag, MetricCustomInfo, MetricLabel

from ai_core_sdk.tracking import Tracking


aic_connection = Tracking()


# log the AUC metric using aic_connection.log_metrics()

aic_connection.log_metrics(

metrics = [

Metric(name= "Accuracy",value= float(accuracy),timestamp=datetime.utcnow(), labels= [MetricLabel(name="metrics.ai.sap.com/Artifact.name", value="blogmodel")]),


Metric(name= "Precision",value= float(precision),timestamp=datetime.utcnow(), labels= [MetricLabel(name="metrics.ai.sap.com/Artifact.name", value="blogmodel")]),


Metric(name= "Recall",value= float(recall),timestamp=datetime.utcnow(), labels= [MetricLabel(name="metrics.ai.sap.com/Artifact.name", value="blogmodel")]),


Metric(name= "F1 Score",value= float(f1_score),timestamp=datetime.utcnow(), labels= [MetricLabel(name="metrics.ai.sap.com/Artifact.name", value="blogmodel")])

]

)
Serving / deploying pipeline with AI Core
After training model, we can get deployed model URL for from client applications when completed deployment in SAP AI Core. In the serving pipeline, I integrate with SAP HANA Cloud to ingest inference results and to be written to SAP HANA Cloud. End user report is displayed in SAP Analytics Cloud when consuming inference including analysis using HANA Cloud live connection.
- Deployment serving pipeline
- Inference results to written to SAP HANA Cloud
- Summary of results in SAP Analytics Cloud
Steps
- Docker Image
- AI workflow
- Prepare serving code
- Write to HANA Cloud
- Live connection to SAP Analytics Cloud
1. Docker Image
1) Build docker image
FROM python:3.8

ENV LANG C.UTF-8

RUN apt-get update --allow-releaseinfo-change

# # Install Python packages


RUN apt-get update && \

apt-get install -y python3 python3-pip openjdk-11-jdk openjdk-11-jdk-headless wget && \

apt-get clean && \

rm -rf /var/lib/apt/lists/*


# Upgrade pip and install PySpark3

RUN pip3 install --upgrade pip && \

pip3 install pyspark==3.2.1


RUN wget https://archive.apache.org/dist/spark/spark-3.2.1/spark-3.2.1-bin-hadoop3.2.tgz && \

tar -zxvf spark-3.2.1-bin-hadoop3.2.tgz && \

mv spark-3.2.1-bin-hadoop3.2 /usr/local/spark && \

rm spark-3.2.1-bin-hadoop3.2.tgz


# # Set environment variables for Hadoop

ENV JAVA_HOME=/usr/lib/jvm/java-11-openjdk-amd64

ENV JAVA_TOOL_OPTIONS="-Dio.netty.tryReflectionSetAccessible=true"

ENV SPARK_HOME=/usr/local/spark

ENV PATH $PATH:$SPARK_HOME/bin


# Custom location to place code files


RUN mkdir -p /app/src

COPY hdiconfig.json /app/src/

COPY main.py /app/src/

COPY requirements.txt /app/src/requirements.txt

RUN pip3 install -r /app/src/requirements.txt


# Required to execute script

RUN chgrp -R nogroup /app && \

chmod -R 770 /app
2) Build & Push
docker build -t sumin/ml-demo-serving:0.0.1 .

docker push -t sumin/ml-demo-serving:0.0.1
2. AI workflow
Workflow templates provides the ability to manage serving pipeline. In detail explanation, please refer to the pre-processing AI workflow.
1) Yaml file format
This is example serving pipeline and please refer and check to the latest official guideline from SAP help portal: https://help.sap.com/docs/AI_CORE/2d6c5984063c40a59eda62f4a9135bee/8a1f91a18cf0473e8689789f1636675a....
apiVersion: ai.sap.com/v1alpha1

kind: ServingTemplate

metadata:

  name: demo-classifier-1 #Enter a unique name here

  annotations:

    scenarios.ai.sap.com/description: " demo classification"

    scenarios.ai.sap.com/name: " demo-predict-clf"

    executables.ai.sap.com/description: " demo classification GPU Serving executable"

    executables.ai.sap.com/name: " demo-serve-exectuable"

    artifacts.ai.sap.com/demomodel.kind: "model" # Suggest the kind of artifact to input.

  labels:

    scenarios.ai.sap.com/id: "demo-clf"

    ai.sap.com/version: "0.0.1"

spec:

  inputs:

    artifacts:

      - name: modelArtifact

  template:

    apiVersion: "serving.kubeflow.org/v1beta1"

    metadata:

      labels: |

        ai.sap.com/resourcePlan: basic

    spec: |

      predictor:

        imagePullSecrets:

          - name: credstutorialrepo-{examplenumber}

        containers:

        - name: kfserving-container

          image: "docker.io/sumin/ml-demo-serving:0.0.1"

          ports:

            - containerPort: 9001

              protocol: TCP

          command: ["/bin/sh", "-c"]

          args:

            - >

              set -e && echo "Starting" && gunicorn --chdir /app/src main:app -b 0.0.0.0:9001 # filename `main` flask variable `app`

          env:

            - name: STORAGE_URI

              value: "{{inputs.artifacts.modelArtifact}}"
3) Serving code
3.1) Import library
import os

import json

import numpy as np

import pandas as pd

from flask import Flask, jsonify

from flask import request as call_request

import findspark

findspark.init()


from pyspark import SparkConf, SparkContext

from pyspark.sql import SparkSession

from pyspark.ml import PipelineModel

from pyspark.sql.types import IntegerType, FloatType, StringType, StructType, StructField, DoubleType

from pyspark.ml.classification import DecisionTreeClassificationModel
3.2) Load trained model from object store
3.3) Data loading with json format
We use a REST client to make prediction calls. We need to post dataset for inference using API, please refer to the official API collection of SAP AI Core:
- https://api.sap.com/package/SAPAICore/rest
- https://api.sap.com/api/AI_CORE_API/overview
- https://developers.sap.com/tutorials/ai-core-setup.html
@app.before_first_request
def init():
"""
Load model else crash, deployment will not start
"""
global model
MODEL_PATH = "/mnt/models/blogmodel"
spark = SparkSession.builder.appName("Model").getOrCreate()
model = DecisionTreeClassificationModel.load(MODEL_PATH)
return None
@app.route("/v2/greet", methods=["GET"])
def status():
global model
if model is None:
return "Flask Code: Model was not loaded."
else:
return "Model is loaded."
# You may customize the endpoint, but must have the prefix `/v<number>`
@app.route("/v2/predict", methods=["POST"])
def predict():
"""
Perform an inference on the model created in initialize
Returns:
Predict Classification: Dunning level .
"""
global model
# Data Loading
json_load = call_request.json
spark = SparkSession.builder.getOrCreate()
rdd = spark.sparkContext.parallelize(json_load)
df = spark.read.json(rdd)3.4) Data transformation
Our model requires feature transformations to get inference, such as scaling or one-hot encoding, so we need to apply these transformations using encoder to the new data to make it compatible with the model. This encoder is stored during training process.
PIPELINE_PATH = '/mnt/models/encoder'

featurePipeline = PipelineModel.load(PIPELINE_PATH)

def transfomer(df)

    # Add an index column

    features_vectorized = featurePipeline.transform(preprocessing(df))

    predictions = model.transform(features_vectorized)


    # Use the loaded model to make predictions

    # Change prediction type

    predictions = predictions.withColumn('prediction', col('prediction').cast(IntegerType()))

    result_df = predictions.select('prediction', 'probability')

    # # Convert the result DataFrame to a JSON string

    result_json = result_df.toJSON().collect()


    # Return the JSON response to the API call

    return json.dumps(result_json)
3.5) Making predictions
After the data is preprocessed and transformed, you we can use the pretrained, loaded model to make predictions on transformed data. PySpark provides methods to apply the model to the new dataset and obtain predictions. We can get prediction results using API.

Get prediction using API
4) Write to HANA Cloud
When we get predictions from inference pipeline, we write prediction result to HANA Cloud.
hana_service_key = './hdiconfig.json'


    with open(hana_service_key) as hanaconfig:

        hanaconfig_k = json.load(hanaconfig)


    port_c  = 443

    user_c  = hanaconfig_k['hana'][0]['credentials']['user']

    url_c  = hanaconfig_k['hana'][0]['credentials']['host']

    pwd_c  = hanaconfig_k['hana'][0]['credentials']['password']

    schema = hanaconfig_k['hana'][0]['credentials']['schema']


    print(port_c, user_c)


    conn = dbapi.connect(address=url_c, port=port_c, user=user_c, password=pwd_c,

        ENCRYPT=True,

        sslValidateCertificate=False)


    cc = ConnectionContext(url_c, port_c, user_c, pwd_c,ENCRYPT=True,sslValidateCertificate=False)

    cursor = conn.cursor()


current_datetime = dt.datetime.now()


    for i in range(len(results_pdf)):

        row = results_pdf.loc[i]


        done=cursor.execute("insert into DEMO_PREDICTION_HDI_DB_1.PREDICTION Values (?,?,?,?,?,?,?,?,?,?)",

        (int(ID), row['CAN'], row['BPTYPE'], row['Payment_Mode'], row['POST_CODE'], float(row["FEATURE0"]), float(row["FEATURE1"]),

        float(row["FEATURE2"]),

int(row["prediction"]),str(row["probability"]),str(current_datetime)))

        ID+=1
5) Live connection to SAP Analytics Cloud
End user report is displayed in SAP Analytics Cloud when consuming inference including analysis using HANA Cloud live connection.

SAC dashboard example
Reference Architecture
For your future architecture with your requirements, you can decide data source from multiple hyperscaler’s object stores, such as SAP HANA Cloud, Data Lake, Amazon S3, Azure Blob storage and OSS (Alicloud Object Storage Service).
We can implement preprocessing, training and serving pipeline in the SAP AI Core using pyspark. Another highlight of this architecture is SAP HANA cloud and SAC were considered to consume the prediction results. With SAP Build Apps, under the BTP environment, we can deploy SAP Build apps for mobile devices.

Reference architecture
These following tutorials are referred to write this blog and create demo artifacts and I hope this posting is helpful for your journey ✨
Reference tutorials
- https://developers.sap.com/tutorials/ai-core-data.html
- https://developers.sap.com/tutorials/ai-core-code.html
- https://developers.sap.com/tutorials/ai-core-helloworld.html
- https://help.sap.com/docs/sap-ai-core/sap-ai-core-service-guide/register-your-object-store-secret?q=...
- https://help.sap.com/docs/sap-ai-core/sap-ai-core-service-guide/create-artifacts?q=artifacts
- https://developers.sap.com/tutorials/ai-core-code.html#432398b3-cd23-40e4-a471-833e248d5bda
- https://developers.sap.com/tutorials/ai-core-code.html#a249f39c-5094-4e0b-89a0-ae98a29114ac
Key Takeaways
✅ Business challenges: In the bill-to-cash process, businesses often encounter challenges related to customer payment behavior. Dealing with customers who consistently delay payments or struggle to pay can disrupt the bill-to-cash cycle and impact cash flow. By addressing this challenge and understanding why customers default on payments, organizations can design effective strategies to ensure timely payments.
✅ ML with pyspark: PySpark, a Python library built on Apache Spark, provides a scalable and powerful framework for distributed data processing and machine learning tasks. In this context, PySpark is used to build and deploy the machine learning models for the classification tasks with SAP AI Core.
✅ MLOps with SAP AI Core: MLOps, which stands for Machine Learning Operations, refers to the practices and tools used to streamline the end-to-end machine learning workflow. SAP AI Core provides the infrastructure to create an end-to-end ML workflow, from data preprocessing to model service, enabling the deployment of machine learning models at scale.
I would like to express my special thanks to vriddhishetty, amar.jadhav ,sandeep.rastogi, tanmay.shah and gunteralbrecht whose unwavering support and encouragement have been the driving force behind this journey.
- SAP Managed Tags:
- Machine Learning,
- SAP HANA Cloud,
- Artificial Intelligence,
- SAP AI Core,
- SAP AI Launchpad,
- SAP HANA,
- SAP Business Technology Platform
Labels:
2 Comments
You must be a registered user to add a comment. If you've already registered, sign in. Otherwise, register and sign in.
Labels in this area
-
ABAP CDS Views - CDC (Change Data Capture)
2 -
AI
1 -
Analyze Workload Data
1 -
BTP
1 -
Business and IT Integration
2 -
Business application stu
1 -
Business Technology Platform
1 -
Business Trends
1,658 -
Business Trends
93 -
CAP
1 -
cf
1 -
Cloud Foundry
1 -
Confluent
1 -
Customer COE Basics and Fundamentals
1 -
Customer COE Latest and Greatest
3 -
Customer Data Browser app
1 -
Data Analysis Tool
1 -
data migration
1 -
data transfer
1 -
Datasphere
2 -
Event Information
1,400 -
Event Information
67 -
Expert
1 -
Expert Insights
177 -
Expert Insights
301 -
General
1 -
Google cloud
1 -
Google Next'24
1 -
GraphQL
1 -
Kafka
1 -
Life at SAP
780 -
Life at SAP
13 -
Migrate your Data App
1 -
MTA
1 -
Network Performance Analysis
1 -
NodeJS
1 -
PDF
1 -
POC
1 -
Product Updates
4,577 -
Product Updates
346 -
Replication Flow
1 -
REST API
1 -
RisewithSAP
1 -
SAP BTP
1 -
SAP BTP Cloud Foundry
1 -
SAP Cloud ALM
1 -
SAP Cloud Application Programming Model
1 -
SAP Datasphere
2 -
SAP S4HANA Cloud
1 -
SAP S4HANA Migration Cockpit
1 -
Technology Updates
6,873 -
Technology Updates
429 -
Workload Fluctuations
1
Related Content
- Sapphire 2024 user experience and application development sessions in Technology Blogs by SAP
- Deployment of Seamless M4T v2 models on SAP AI Core in Technology Blogs by SAP
- Lookup logic in Integration suite in Technology Q&A
- Checking HANA Cloud Vector Engine performances in Technology Blogs by SAP
- SAP Build Process Automation Pre-built content for Finance Use cases in Technology Blogs by SAP
Popular Blog Posts
| Subject | Kudos |
|---|---|
|
|
|
|
|
|
|
|
|
|
|
|
|
|
|
|
|
|
|
Top kudoed authors
| User | Count |
|---|---|
| 34 | |
| 17 | |
| 15 | |
| 14 | |
| 11 | |
| 9 | |
| 8 | |
| 8 | |
| 8 | |
| 7 |