
- SAP Community
- Products and Technology
- Technology
- Technology Blogs by SAP
- How to create a simple SUM scenario for the Fiori ...
Technology Blogs by SAP
Learn how to extend and personalize SAP applications. Follow the SAP technology blog for insights into SAP BTP, ABAP, SAP Analytics Cloud, SAP HANA, and more.
Turn on suggestions
Auto-suggest helps you quickly narrow down your search results by suggesting possible matches as you type.
Showing results for
christophe_garc
Discoverer
Options
- Subscribe to RSS Feed
- Mark as New
- Mark as Read
- Bookmark
- Subscribe
- Printer Friendly Page
- Report Inappropriate Content
11-17-2023
5:12 PM
This blog will guide you through the creation of a simple monitoring scenario for Synthetic User Monitoring in SAP Cloud ALM for Operations.
Prerequisites
To create your simple SUM scenario with SAP Cloud ALM, you need to follow these 3 main steps:
In a web browser configured for Selenium IDE:
During the recording, Selenium IDE recorded all the actions you performed on the UI.
It's now time to replay the sequence and, if required, adjust it by:
After modifying the script, it's advised to attempt to replay again the sequence to verify that everything is correct.
During the recording, Selenium IDE tried to figure out the best way to identify the target element for the actions.
It supports may ways to identify elements: id, css selector, xpath, ...
This corresponds to the Target field of the commands.
If during the replay, an element cannot be found despite the fact it is visible in the browser, you may want to adjust the command target.
During the recording, you may have missed some actions. E.g. some Wait for ...
You can edit the sequence to add them.
For instance, you may want to wait for the login screen to be displayed before trying to preform the logon.
You can add the missing commands:
Either manually ...
In Selenium IDE:
... or by recording the missing actions.
In Selenium IDE:
During the recording, you may have performed some useless actions that Selenium IDE recorded.
You may not want to keep them in the sequence. For that:
When the SIDE file is imported in SUM, the scenario name is the one of the Test suite.
By default, Selenium IDE names the Test suites "Default Suite".
To have another name for your script, in Selenium IDE:
During the Scenario execution, SUM captures metrics for all the SUM steps.
By default, the script defines only one step.
Here I would like to have several steps for each functional actions in the recorded sequence:
The first (default) SUM step is named after the name of the Selenium Test. Currently named myTest.
To change the Test name, in Selenium IDE:
For the next SUM steps, you can use the SUM annotation @Sap.sum.step="your step name"
c.f. SAP Cloud ALM for Operations Expert Portal → Synthetic User Monitoring → Creating Synthetic User Monitoring Scripts # Add SUM Steps to Selenium Tests
For instance, to declare a SUM Step for the Login phase:
Do the same operation for the Logout step which, in our case, starts with the click command on the id=meAreaHeaderButton
You may want to have field not hardcoded in the Selenium script but fed by the SUM Scenario configuration.
This is typically the case for the sensitive information like the credentials.
To have a SUM variable for the login password of our example, in Selenium IDE:
For more information about the SUM variables, c.f. SAP Cloud ALM for Operations Expert Portal → Synthetic User Monitoring → Creating Synthetic User Monitoring Scripts # Define SUM Variables in Selenium Tests
Your script is ready, you can save your project.
This creates the SIDE file to import in SUM.
Your Selenium IDE script (SIDE file) was now imported and is visible in the resources.
In the Synthetic User Monitoring Configuration popup:
Your new scenario is now created. You still have to configure it.
In the Scenarios list:
In the Scenario Details:
In the Scenario Details:
In the Scenario Details:
You now learned how to create a simple Synthetic User Monitoring scenario to monitor a SAP Launchpad.
Stay tuned for additional blogs on how to create such a Selenium script.
In the meantime, I look forward to your feedbacks.
For additional information on SAP Application Lifecycle Management, have a look at the dedicated community topics page: https://community.sap.com/topics/application-lifecycle-management
Prerequisites
- Have configured a runner on you Synthetic User Monitoring.
- Have a web browser configured with the Selenium IDE plugin. In this how-to, I'm using Google Chrome. c.f. SUM - How to prepare your script-creation environment for Synthetic User Monitoring
- Have an SAP Cloud ALM user with the role Synthetic User Monitoring Scenario Expert or Synthetic User Monitoring Scenario Administrator.
To create your simple SUM scenario with SAP Cloud ALM, you need to follow these 3 main steps:
- Create the script with Selenium,
- Upload the obtained script in SAP Cloud ALM,
- Create and configure the SUM monitoring scenario in SAP Cloud ALM.
1. Create the script
1.1. Record the sequence
In a web browser configured for Selenium IDE:
- (Recommended to appropriately record the logon) Clean-up the environment to ensure no open session exists.

- Open the Selenium IDE.
This opens the Selenium IDE application and the welcome popup.

- Choose Record a new test in a new project.
- Give a name to the project. (E.g. Fiori Launchpad) and click OK.

- Indicate the URL for your Fiori Launchpad and click START RECORDING.
E.g. https://<host:port>/sap/bc/ui2/flp?#Shell-home
 This opens a new browser page, normally on the logon page of the Launchpad you want to monitor.
If you are directly logged on, likely your script-creation environment is not properly prepared.
For instance: your SSO was automatically applied because your browser session was already connected. - Fill-in the credentials and type <Enter>.
 You are logged on the Launchpad.
And in the Selenium IDE UI, you can see that your actions were recorded.
- Add a wait for element visible to ensure, at runtime, that the logon is successful.
For instance, in the Launchpad:
- Put the mouse cursor over a tile and open the context menu (right click).
- Select Selenium IDE → Wait For → Visible.
This adds a wait for element visible in the Selenium IDE.

- Hint: the added command is not fully valid. It misses to indicate the maximum amount of time to wait (in milliseconds).
In the Selenium IDE, in the wait for element visible command, set 30000 in the Value field.

- (Optionally) record some navigations.
- In the Launchpad, click the profile icon and click Sign out.

- Click OK in the confirmation popup.
 You are now signed out.

- Like in step 7, add a wait for element visible on the goodbye screen.
(Do not forget to manually add the maximum amount of wait time) - In the Selenium IDE, stop the recording.

- Choose a name for the sequence (test) you created.

- (Optional) You may want to save your temporary script.
This will create a SIDE file.
Warning
At this moment, the SIDE file you save still contains the logon credentials in clear.
1.2. Check and adjust the recorded sequence
During the recording, Selenium IDE recorded all the actions you performed on the UI.
It's now time to replay the sequence and, if required, adjust it by:
- Adjusting the commands target,
- Adding missing actions,
- Deleting useless actions.
After modifying the script, it's advised to attempt to replay again the sequence to verify that everything is correct.
1.2.1. Replay the sequence
In Selenium IDE, click the Run current test button.
A browser session is opened and the script is executed.
 It could be that Selenium IDE replay fails on an error like:
"A listener indicated an asynchronous response by returning true, but the message channel closed before a response was received."
 Generally, SUM can handle that properly. In Selenium IDE, you can avoid the error by:
- Setting a breakpoint of the faulty action by clicking on the row number of the corresponding command.
- Executing the script normally by clicking the Run current test button.
- When the execution pauses on the faulty command, wait for the application to display the screen.
Then either:
- Continue the execution automatically by clicking the Resume test execution button.
- Or continue the execution command-by-command by using the Step over current command button.

1.2.2. Adjust the commands targets
During the recording, Selenium IDE tried to figure out the best way to identify the target element for the actions.
It supports may ways to identify elements: id, css selector, xpath, ...
This corresponds to the Target field of the commands.
Generally, Selenium IDE tries to propose several options. The main one is the one you see in the UI. But you can see the others via the Target filed dropdown.

If during the replay, an element cannot be found despite the fact it is visible in the browser, you may want to adjust the command target.
- Option 1 - Have Selenium IDE try to propose another target automatically,
- Option 2 - Define yourself a new target using one of the identification methods supported by Selenium IDE.
1.2.3. Add missing actions
During the recording, you may have missed some actions. E.g. some Wait for ...
You can edit the sequence to add them.
For instance, you may want to wait for the login screen to be displayed before trying to preform the logon.
You can add the missing commands:
Either manually ...
In Selenium IDE:
- Select the command that should follow the missing action
- In the context menu, choose Insert new command
This adds a new empty command.

- Select the new command row and fill-in the Command field.
Choose wait for element visible.

- Then fill-in the Target field.
You can either enter it manually or use the Select target in page button.
In our case, "wait for the login screen to be displayed", we already know a possible target: we can use the same than the one of the type command used to type-in the username.

- (Optionally) You can try the entered target by clicking the Find target in page button.
This will highlight the targeted element.


... or by recording the missing actions.
In Selenium IDE:
- Put a breakpoint on the command that should follow the missing action.
- Execute the sequence by clicking the Run current test button.
The execution will halt just before the execution of the command.

- Stop the execution by clicking the Stop test execution button.

- Click the Start recording button.

- Record the missing actions.

- Stop the recording by click the Stop recording button.
The commands have been inserted in the sequence.
(For the wait for ... commands, do not forget to indicate the maximum wait time in the command Value field)
1.2.4 Delete useless actions
During the recording, you may have performed some useless actions that Selenium IDE recorded.
You may not want to keep them in the sequence. For that:
- Identify the useless commands.
For instance, by replaying sequence step-by-step.
E.g. During the logon phase, the click on the username field is generally useless (like the click on the password field). - Select the command to remove.
- In the context menu, select Delete.

Warning
Selenium IDE does not have "undo" on the command delete. Be careful when deleting commands
1.3. Prepare the script for SUM
1.3.1. Adjust the Test suite name
When the SIDE file is imported in SUM, the scenario name is the one of the Test suite.
By default, Selenium IDE names the Test suites "Default Suite".
To have another name for your script, in Selenium IDE:
- Go to the Test suites section.
You can see the Default Suite Selenium IDE created. - Click the 3 vertical dots to open the context menu (put the mouse cursor above the Default Suite to see them).
- Choose Rename.

- Enter a new name and click RENAME.

1.3.2. Define the SUM steps
During the Scenario execution, SUM captures metrics for all the SUM steps.
By default, the script defines only one step.
Here I would like to have several steps for each functional actions in the recorded sequence:
- Entrance → the opening of the application URL,
- Login,
- Logout.
The first (default) SUM step is named after the name of the Selenium Test. Currently named myTest.
To change the Test name, in Selenium IDE:
- Go back to the Test section.
You can see the test you created at the end of the recording. - Click the 3 vertical dots to open the context menu (put the mouse cursor above the test name to see them).
- Choose Rename.

- Enter a new name and click RENAME.

For the next SUM steps, you can use the SUM annotation @Sap.sum.step="your step name"
c.f. SAP Cloud ALM for Operations Expert Portal → Synthetic User Monitoring → Creating Synthetic User Monitoring Scripts # Add SUM Steps to Selenium Tests
For instance, to declare a SUM Step for the Login phase:
- Select the first command of the Step.
In our case, the type of the user name. - In the command Description field, enter @Sap.sum.step="Login"

Do the same operation for the Logout step which, in our case, starts with the click command on the id=meAreaHeaderButton
Hint It's advised to end a step with a Wait for ... command to ensure that the monitored UI displays the correct information before continuing with the next step (or finishing the script) |
1.3.3. Declare the SUM variables
You may want to have field not hardcoded in the Selenium script but fed by the SUM Scenario configuration.
This is typically the case for the sensitive information like the credentials.
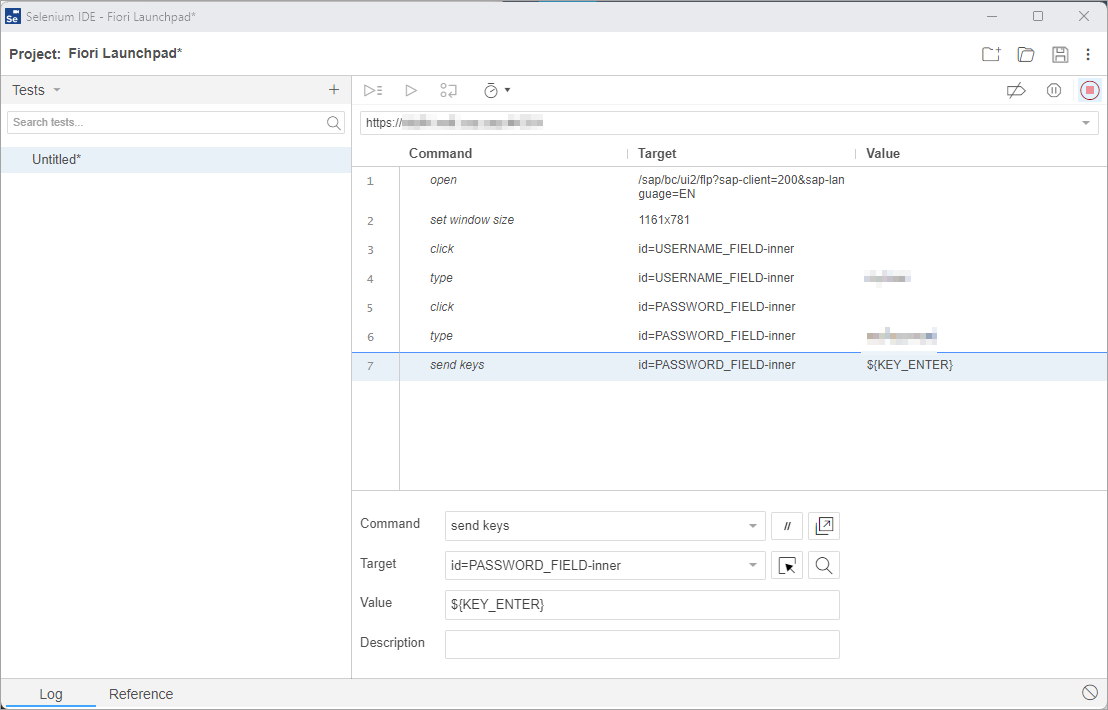
To have a SUM variable for the login password of our example, in Selenium IDE:
- Select the type command where the password is entered.
- Replace the Value field with a dummy value.
Note
If a replay is attempted in Selenium IDE, it will be required to temporarily set again the actual password.
- In the Description field, add the @Sap.sum.secure.variable=password SUM annotation.

For more information about the SUM variables, c.f. SAP Cloud ALM for Operations Expert Portal → Synthetic User Monitoring → Creating Synthetic User Monitoring Scripts # Define SUM Variables in Selenium Tests
Your script is ready, you can save your project.
This creates the SIDE file to import in SUM.
2. Upload the script as a SUM resource
- Logon to your SAP Cloud ALM tenant.
- Start Synthetic User Monitoring.

- Open the configuration panel and, on the Resources section, enter the edit mode.
This opens the SUM configuration popup.

- Click the Upload button.

- Browse to the SIDE file you created.
- Click Upload.

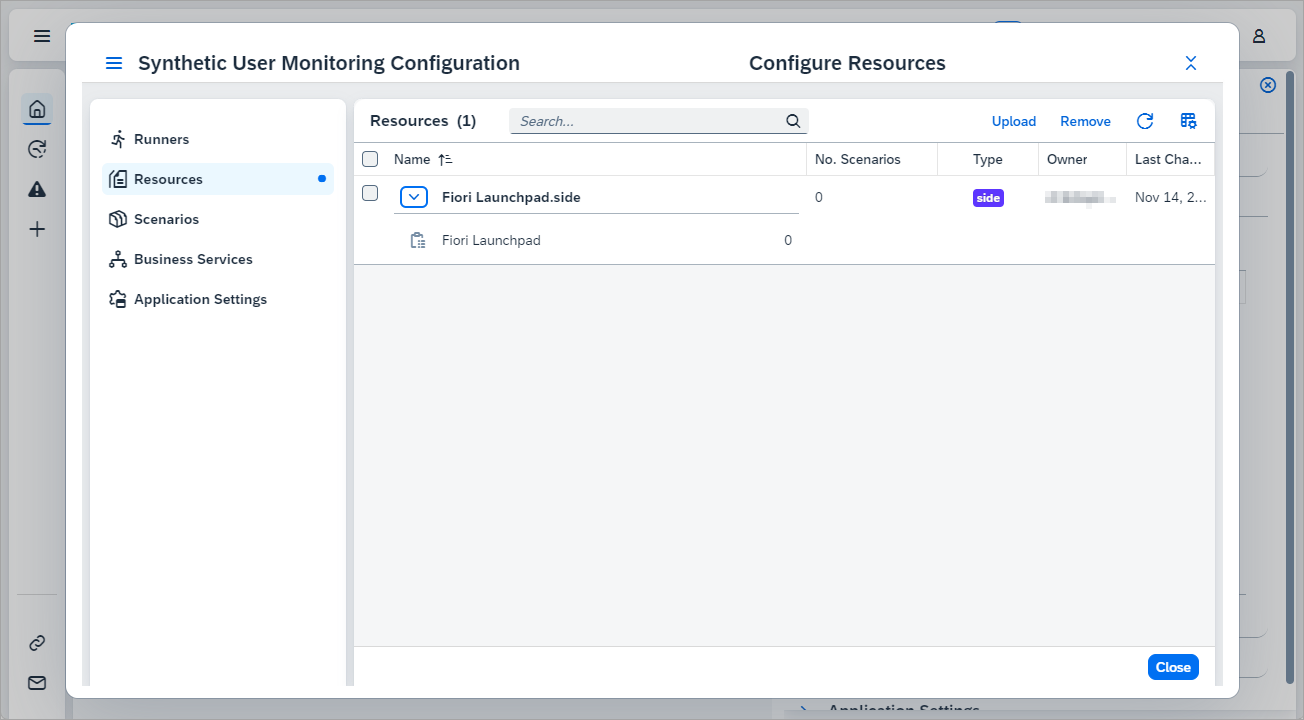
- The Upload Report popup lists the scripts SUM detected in the SIDE file.

Your Selenium IDE script (SIDE file) was now imported and is visible in the resources.
3. Create and configure the SUM monitoring scenario
In the Synthetic User Monitoring Configuration popup:
3.1. Create a new Scenario using the script you previously created
- Go to the Scenarios section.
- Click the Add button.
 This opens the Add Scenario popup.
 - In the General section, choose a name for the scenario and enter a description.
By default, the new scenario will be automatically added to your SUM scope. - In the Execution section, use the drop-down to select the script you imported via the SIDE resource.
- In the Business Services section, select a business service to associate your scenario to.
This is used to indicate which applications are monitored by your scenario.
If you don't have specified business services yet, you can use the SUM default one. - Click the Add button.

Your new scenario is now created. You still have to configure it.
3.2. Configure the SUM variables
In the Scenarios list:
- Click on the scenario you created.
 This opens the Scenario Details.
 - Go to the Variables tab.
- Enter the variable values to use at execution time. For instance, enter the value for the password variable you defined during the script creation.
- Save.

3.3. Associate the Scenario to a Runner
In the Scenario Details:
- Go to the General tab.
- In the Runners section, click the Assign button.
This opens the Assign Runners popup.

- Select one (or several) Runners to assign to the Scenario, then click Assign.
 The popup is closed and the runner is added to the list of Assigned Runners.
 - Activate the Scenario on the Runner.
- Save.

The Scenario is now scheduled to be regularly executed on the Runner.
Because you already added the scenario in your SUM Scope during the scenario creation, the SUM overview displays your new scenario.

3.4. (optional) Adjust the time interval between two executions
In the Scenario Details:
- Go to the Scheduling tab.
- Untick the Use default checkbox.
- Change the Execution Period.
E.g. set 900 (900 seconds interval) for an execution every 15 minutes. - Save.

3.5. (optional) Enable the capture of screenshots during the execution
In the Scenario Details:
- Go to the Selenium tab.
- In the Screenshots section, for the Automatic screenshots field:
- Untick the Use default checkbox.
- Choose At each step in the drop-down.
- Save.

You now learned how to create a simple Synthetic User Monitoring scenario to monitor a SAP Launchpad.
Stay tuned for additional blogs on how to create such a Selenium script.
In the meantime, I look forward to your feedbacks.
For additional information on SAP Application Lifecycle Management, have a look at the dedicated community topics page: https://community.sap.com/topics/application-lifecycle-management
- SAP Managed Tags:
- SAP Cloud ALM
Labels:
1 Comment
You must be a registered user to add a comment. If you've already registered, sign in. Otherwise, register and sign in.
Labels in this area
-
ABAP CDS Views - CDC (Change Data Capture)
2 -
AI
1 -
Analyze Workload Data
1 -
BTP
1 -
Business and IT Integration
2 -
Business application stu
1 -
Business Technology Platform
1 -
Business Trends
1,658 -
Business Trends
95 -
CAP
1 -
cf
1 -
Cloud Foundry
1 -
Confluent
1 -
Customer COE Basics and Fundamentals
1 -
Customer COE Latest and Greatest
3 -
Customer Data Browser app
1 -
Data Analysis Tool
1 -
data migration
1 -
data transfer
1 -
Datasphere
2 -
Event Information
1,400 -
Event Information
67 -
Expert
1 -
Expert Insights
177 -
Expert Insights
308 -
General
1 -
Google cloud
1 -
Google Next'24
1 -
GraphQL
1 -
Kafka
1 -
Life at SAP
780 -
Life at SAP
13 -
Migrate your Data App
1 -
MTA
1 -
Network Performance Analysis
1 -
NodeJS
1 -
PDF
1 -
POC
1 -
Product Updates
4,576 -
Product Updates
353 -
Replication Flow
1 -
REST API
1 -
RisewithSAP
1 -
SAP BTP
1 -
SAP BTP Cloud Foundry
1 -
SAP Cloud ALM
1 -
SAP Cloud Application Programming Model
1 -
SAP Datasphere
2 -
SAP S4HANA Cloud
1 -
SAP S4HANA Migration Cockpit
1 -
Technology Updates
6,873 -
Technology Updates
440 -
Workload Fluctuations
1
Related Content
- Elevate Your SAP Cloud ALM Experience: Introducing the New ‘’Launchpad’’ and ‘’Welcome App’’ in Technology Blogs by SAP
- While I press the Back button(RAP Unmanaged) , The records gets saved in Draft without asking ? in Technology Q&A
- Vectorize your data for Infuse AI in to Business using Hana Vector and Generative AI in Technology Blogs by Members
- Deployment of Seamless M4T v2 models on SAP AI Core in Technology Blogs by SAP
- Show Loading indicator while the Ui5 App loads! in Technology Blogs by Members
Top kudoed authors
| User | Count |
|---|---|
| 22 | |
| 13 | |
| 13 | |
| 11 | |
| 10 | |
| 10 | |
| 9 | |
| 9 | |
| 9 | |
| 8 |