
- SAP Community
- Products and Technology
- Technology
- Technology Blogs by SAP
- Delivery of Business Intelligence Content develope...
Technology Blogs by SAP
Learn how to extend and personalize SAP applications. Follow the SAP technology blog for insights into SAP BTP, ABAP, SAP Analytics Cloud, SAP HANA, and more.
Turn on suggestions
Auto-suggest helps you quickly narrow down your search results by suggesting possible matches as you type.
Showing results for
srinivas_chinta
Explorer
Options
- Subscribe to RSS Feed
- Mark as New
- Mark as Read
- Bookmark
- Subscribe
- Printer Friendly Page
- Report Inappropriate Content
02-08-2010
1:38 PM
BI Content, a quick introduction
SAP developed BI Content (formerly delivered as Business content and Technical content) based on best practices from nearly 10,000 Business Warehouse installations. SAP BI Content is an evolving set of information models. They come standard with BI. Since the first release of BW in 1998, SAP has enhanced these information models to include thousands of objects. SAP BI content delivers virtually all types of BI objects including Queries; InfoObjects (both key figures and characteristics); data targets (InfoCubes and DataStore objects — formerly Operational Data Store [ODS] objects); data mining models; open hub destinations; update and transfer rules; roles; and extractors for SAP products (like Retail, FI, HCM, CRM etc.). But there are gaps when it comes to delivering BI Content for specific industry or specific business requirements. This is when Partner complement SAP delivered BI Content. BI Content that is delivered for this specific industry or business requirement is referred to as “Partner Content” or “Third Party Content”. BI Content delivered that is delivered by SAP Partners or Software Solution Providers (SSPs) can be certified by SAP Integration and Certification Center (ICC) and obtain “SAP Certified” logo. To develop BI Content, Partners and SSPs must follow the guidelines provided by SAP. By following these tips mentioned in this blog, you can develop delivery pakcage for BI Content with ease and avoid serious pitfalls.
Development License
Partners or SSPs should purchase a valid NetWeaver BI development license (inclusive of ABAP development) for developing BI Content.
Namespace
To avoid naming conflicts for BI Content, you must ensure that the delivered content objects lie in a reserved namespace that is unique to your development. You can make sure the namespace is unique by registering the development namespace at SAP Service Marketplace, and then deriving the software component and command file name range for delivery requests from this unique development namespace directly. All the BI Content object(s) developed must start with the reserved namespace. Refer to SAP Note 104010 for further details on namespace and restrictions.
Add-On Assembly Kit
Add-On Assembly Kit or AAK helps you plan and deliver BI Content or ABAP Add-On. AAK allows packaging of BI Content that can delivered to customer. Once development license is purchased, you have to place a request for AAK through ICC. ICC will deliver the AAK. AAK has to be installed on the delivery system. Please refer to SAP Note 921103 for details on installation of AAK. There are many advantages of packaging BI Content using AAK, some of them are:
AAK performs syntax check during packaging, thus ensuring SSPs and Partners deliver error and syntax free content
AAK checks if there are any modifications to core objects
AAK detects customizing actions
AAK guarantees easy installation of content at customer site. Delivery object created by AAK can be easily imported/installed on customer’s system using transaction SAINT. This is the transaction used for importing SAP Support Package or Upgrades.
Determining the Delivery Strategy
Before you create the system landscape you must decide the following to determine your delivery strategy:
In which SAP BI release do you want to develop the content?
Choose the SAP release in which you want to develop the content. Information on the operating system and database is not relevant here, since the content must be developed independently of databases and platforms.
What is your maintenance strategy for the customer delivery?
If you are developing content to modifying existing content, you are dependent on the maintenance cycle of the modifying component. You can either create a Conflict Resolution Transport (CRT) for each SAP Support Package that has conflicts with the content, or create a collective CRT for a series of Support Packages.
Non-modifying content object(s) is/are independent of the SAP maintenance cycle. You can create Support Packages to suit your requirements; however, even then you must define in advance a delivery cycle for your Support Packages.
What is your upgrade strategy?
You must define an upgrade strategy for your content before you start developing it.
You must define how often you want to update your content and how your content responds to an SAP upgrade. Note that your content is always dependent on the SAP release cycle, since it must always react to each new release.
Even if you do not want to update your content in an SAP upgrade, you must make sure that the content is retained, and that it can run in the new release. To guarantee this, you must perform tests for your content for each new SAP release. If you do not support a particular SAP release, it means that your content customers will not be able to upgrade to this release.
In which languages do you want to deliver your content?
You must define the languages in which you want to make the content available. If you require more than one language, then you must organize the translation of the content. Please note that the content has to be developed in English and if need you can support other languages as well.
System Landscape
In order to develop Partner Content, SAP recommends three systems for content development, namely:
Development system: to develop content.
Test system: to import developed content from development system and test the content.
Consolidation/Delivery system: to assemble and package the content for delivery. You install AAK on this system.
Partners need at least two BI systems (development and test/consolidation/delivery system) for content development to deliver BI Content to customers. If there is a necessity to develop extractor or DataSources, then OLTP system (or Source system) is required for BI Content development. Connect content test system to content development system to transport the content and test the content. You can use test system for both testing and packaging the content for delivery.
The following diagram shows a typical system landscape for BI Content development.

Setting Up the System as Content System
Content development system is an OLTP system or BI system which is set as a content system in its system settings. To set BI system as content development system, follow these steps:
Execute transaction RSOCONTENT
In the System Status box, check the field “System is a Content Development System”.

Execute transaction SE16 -> Table Name RSADMINSV
Display view -> Change -> check the field “Content System”.

To activate BI Content after this setting, you need a special user parameter
For this user the system behaves like a normal (non-content) system
- Assign the parameter RSOISCONTENTSYSTEM with value SAPCE to the user (transaction SU01)
We recommend switching on the standard transport organizer. To switch:
Administrator Workbench (BW 3.5)/Data Warehousing Workbench (in BI 7.) -> Transport Connection -> Edit -> Transport -> Switch-on Standard
NOTE: The system must not be switched back after objects have been created.
Development
Once the system is set-up for content development, you can start the development. As mentioned earlier, one can develop any content object that can be delivered in “D” version. Some of the key transactions that can be used for developing content objects are:
Transaction RSA1: Data Warehousing Workbench: Modeling
This is the one of the most important transaction in BI. Using this single transaction, you can create Data targets (like InfoCube, DSOs), InfoObjects (Characteristics and Key Figures), InfoSources, Data Sources, Open Hub Destinations.

Transaction RSD1: Create InfoObjects
To create Characteristics or Key Figures, you can use transaction RSD1 also.
You can create BI Queries using frontend development tool BEx Query Designer.
You can create Web Templates using frontend development tool BEx Web Application Designer
Delivery of BI Content
Creating the delivery is divided into multiple steps:
Flagging and including delivery request.
Performing Object List Checks
Generating the Component Piece List
Generating the Exchange Component Piece List
Registering the Add-On Installation Package
After developing the content, you have to create a delivery type. The following types are possible:
Add-On Installation Package (AOI) - Initial delivery
Use the SAP Add-On Installation Tool (Transaction SAINT) to import content installation, which serves as the first delivery of content.
Add-On Upgrade Package (AOU) - Upgrade of the Add-On Software
Use the SAP Add-On Installation Tool (transaction SAINT) to import content upgrade, which upgrades the content release if the SAP release remains the same.
Conflict Resolution Transport (CRT) - Modification adjustment with SAP Support Packages
Use the Support Package Manager (transaction SPAM) to import a Conflict Resolution Transport. A CRT is used instead of Add-On Support Packages (AOPs) for content that modify the SAP Standard.
Apart from the required modification adjustment for SAP Support Packages, a CRT can also contain corrections to the content itself. If the CRT does contain corrections to the content, it is a CRT with an AOP.
Add-On Support Package (AOP) - New Support Package level of the add-on
Use the Support Package Manager (transaction SPAM) to import an Add-on Support Package, which updates the content Support Package level.
In this document, we will only discuss creation of initial delivery only i.e. AOI only.
The main components of AAK are Software Delivery Composer (transaction SSDC) and Software Delivery Assembler (transaction SSDA).
Software Delivery Composer is used to collect all the parts of your development and check for consistency.
Software Delivery Assembler is used to convert the delivery into an installable package.
Creating a delivery
As mentioned earlier, use Software Delivery Composer (transaction SSDC) to consolidate the delivery content.
Execute transaction SSDC

Choose “Create/Update Namespace” from Environment menu.
Here you can list of all the namespace available in the system. We will use SLO namespace /SLOTEST/ for this document.

To view the details of the namespace, use “Display” option.
You need to assign the namespace role to either P (for Producer) or C (for Recipient). Also enter Development and Repair license, as well as description.
![]()

Create/Update Software Component
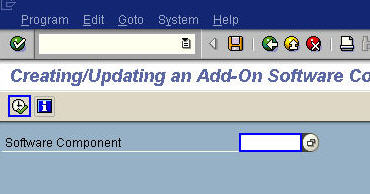
In the same transaction SSDC, under “Environment” menu, choose “Create/Update Add-On Software Component”

Enter the Software Component name and execute
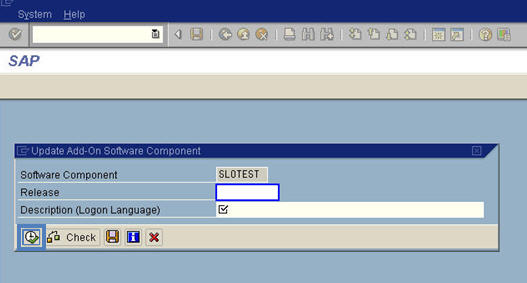
In the following screen, enter the relevant release for the BI Content and give a description in the description filed, choose “Execute” to create Software Component. To be able to transport the information about Software Component, confirm the transport request upon execute.
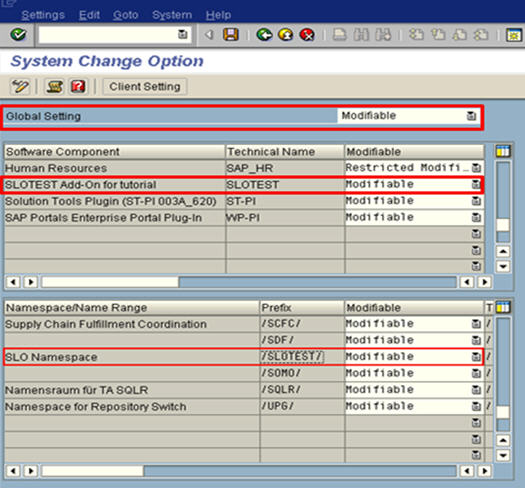
After defining the namespace and the software component, you have to check the system change option in the development system. This determines whether Repository objects and cross client Customizing objects are modifiable or not. To set the system change option, go to Transport Organizer Tools (transaction code SE03).
Under Administration- >Set System Change Option
To be able to create and change objects, the Global Setting, Software Component and Namespace for the development objects must be set to “Modifiable”.
Assigning Development Package to Software Component
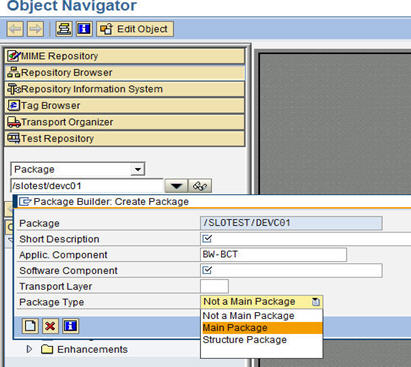
To develop BI Content, you have to create one or more Development Package and assign Package in BI Content to the relevant Software Component. To check if Software Component is assigned to a Development Package, execute transaction SE80. In the Package field enter the name of the Package, display. On the right hand side you will all the attribute and Software Component assigned to the Package

If a Package does not exist, then the system will prompt to create a Package. Select “Yes”.
Short Description -> Enter any meaning description
Application Component -> You have to select an appropriate Application Component. If it’s generic BI Content BW-CNT can be selection, if the content is Industry specific then select Industry specific component like BW-CNT-FI or BW-BCT-AFS etc.
Software Component -> Assign the created Component
Transport Layer -> Enter the transport layer created for the development system
Package Type -> Select Package type from the drop down

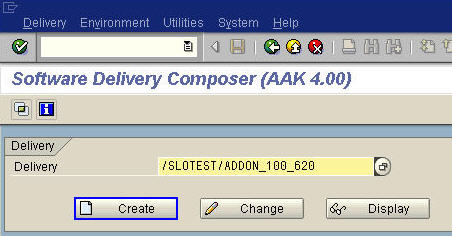
Creating Delivery Request
Execute transaction SSDC. Start creating delivery; enter a name of the delivery. Use your namespace as prefix to your delivery name followed by free text, name of the BI Content with release can be used as free text. e.g. /SLOTEST/BI_120_750 or /SLOTEST/ADDON_100_620
Enter all these details and create
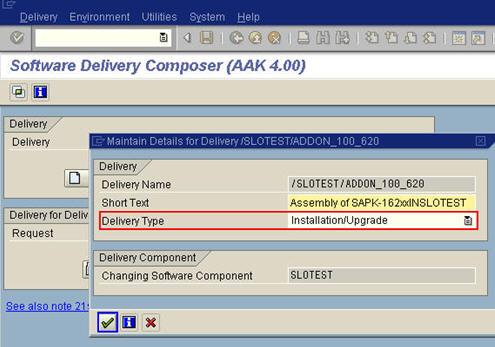
Enter Short text and select Delivery Type to Installation/Upgrade, continue.
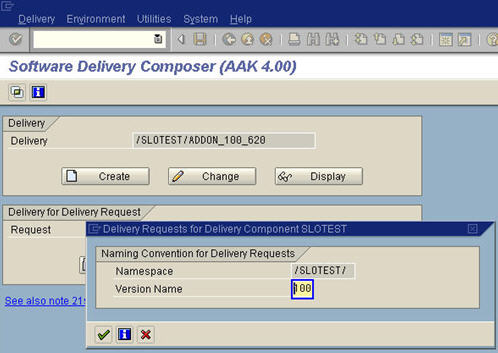
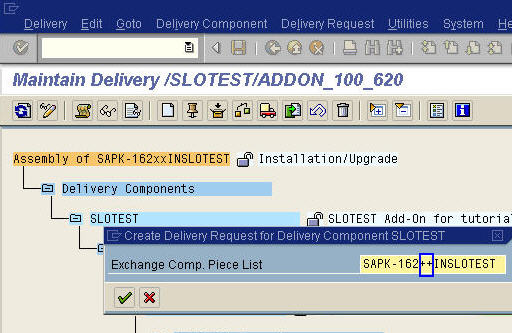
The next dialog box displays the naming conventions for the delivery request of this delivery. The system proposes ‘100’ as the version name for the delivery request. These are the first three numbers of the release that are entered in the Software Component release. If you want to change the version name, can you do so by enter appropriate version. After entering the details, continue.
You have created delivery request for the delivery Change Piece List. According to the naming convention for a delivery request, you have to define two characters in place of ‘++’ and continue. Recommendation is to use CH for Change Piece

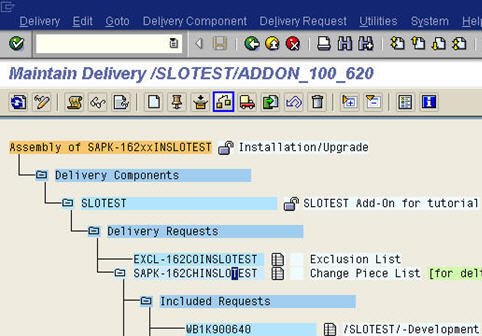
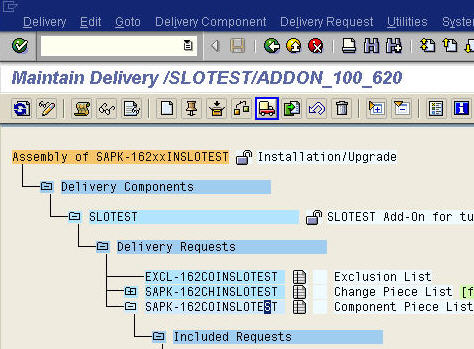
The delivery for the delivery component SLOTEST has been created. The change piece is also created. Before you start composing the delivery, you should check the languages in which the content will be delivered. To this choose ‘Delivery Component”, select “Specify Export Languages”. All the languages that are installed in the system are displayed here. German and English are selected; these are the languages in which the content will be delivered.

To compose the delivery, you can define a pre-configuration for the change request that you want to include in you delivery. Choose “Create/Change Request Selection” from the Delivery Component – Preconfiguration menu.

Confirm that you want to create a pre-configuration in the following dialog box.
Enter Short text, Source system check “Transport of Copies”, and save. Preconfiguration has been created; choose ‘Back’ to return.

If you know that some of the change requests relevant for the delivery contain objects that you do not want to be delivered, you can create an exclusion list for these objects. You can include these objects in change requests in the delivery, but the objects contained in the exclusion list will be excluded from delivery. You need to create and release the exclusion list before you release the change piece list. Choose “Create Exclusion List” from the Delivery Component menu.

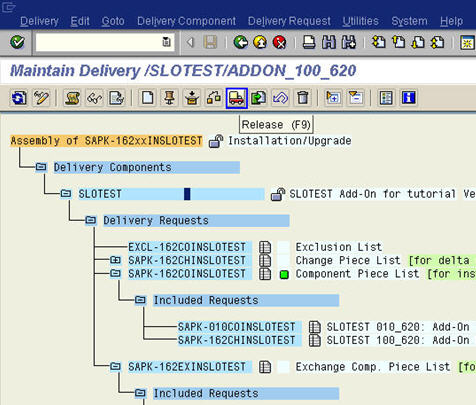
You can start including change requests in the change piece list. The change piece list is used to create an Add-On Upgrade Package. Since this is the first major delivery of your content, you might think that you don’t need to create the change piece list. However, the change piece list us the basis for all other delivery requests that you need to create. Therefore, you must always create it and perform the object list checks very thoroughly. To include change requests, select the change piece list.

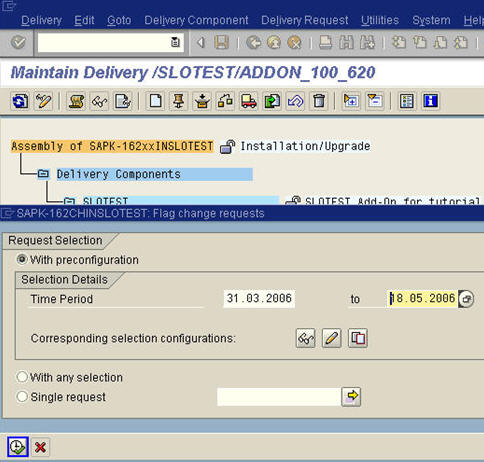
Before including the delivery requests, you need to flag them for the delivery. To do this, choose “Flag Delivery Request”. (as shown above)
Since a preconfiguration is defined, you can use the request selection with preconfiguration. To select a start date and end date, choose the value help and Execute. A message informs the user that requests have been flagged for the change piece list.
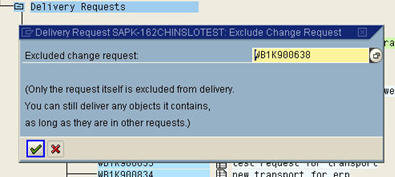
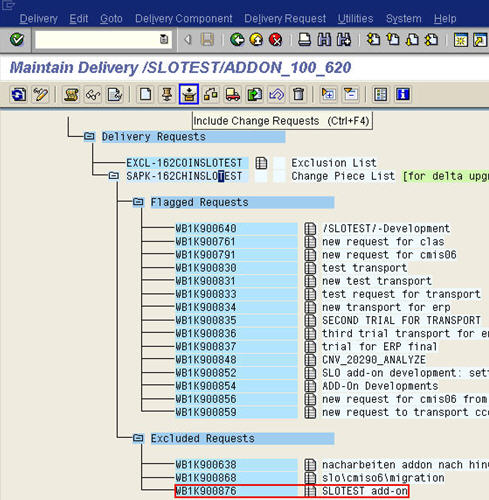
To view the flagged change request, expand the node, the flagged requests are displayed in the list. If you want to exclude a change request from the list, you can do so by selecting the change request and choose “Exclude Change Request” from the Delivery Request menu. The excluded change request is displayed for checking. Confirm the dialog box. The request is displayed under the node Excluded Request. To exclude another change request, you can follow the same.


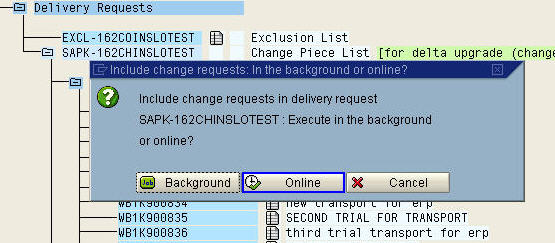
There are few change requests that has now been excluded. You have to include the flagged change requests in the change piece list. To do this, choose “Include Change Requests”. You can include the change requests either in the background or online.
Recommendation: if you have only few change requests, choose “Online” else choose “Background”
You have a look at the delivery log. To do this, choose “Delivery Log” (F5) on the tool bar. This is the action log for the current delivery. All actions are logged here. Double clicking on the messages will provide more details. To close the log, choose “Back”

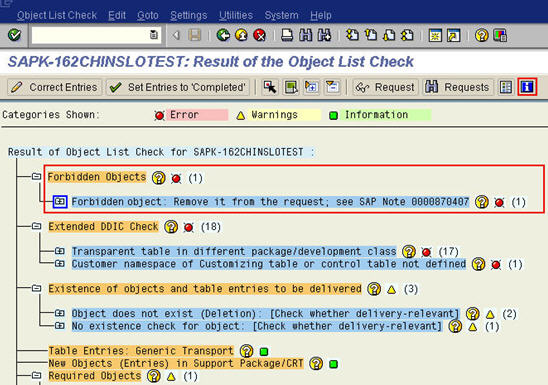
Once you have made sure that you have collected all change requests that are relevant for delivery, you perform the Software Delivery Composer object list checks for the change piece list. These checks help you to avoid any installation and maintenance problems occurring later. To perform the checks, select the change piece list and choose “Object List Check”
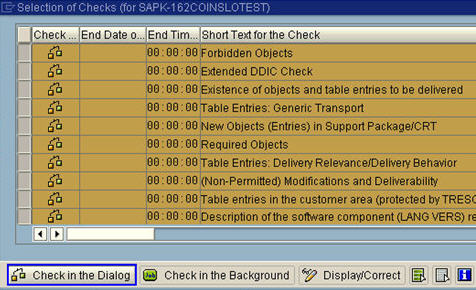
The “Selection of Checks” dialog box displays all checks that are available in Software Delivery Composer, together with end date, end time and checking status. All checks are selected here and choose “Check in the Dialog”

The result screen displays each check, with an overall result indicated by a traffic light icon. Additional messages exist for some checks that further specify the results. There is a question mark icon next to each check and a message that contains additional information about the check or the message. Since the handling of the check results depends very much on the contact of the delivery request that you are checking, so how to correct errors or warning is out of scope of the document.
Since the check results are corrected or have set the entries to ‘completed’, all the check results have turned green. Note that green lights for the object list checks do not guarantee that your delivery is entirely correct. You now return to the delivery by choosing “Cancel”

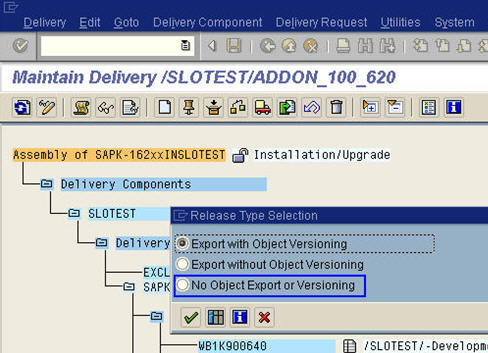
Once you have performed the object list checks and corrected the results, you can release the change piece list. To do this choose “Release” on tool bar and confirm the release of delivery request.

You can choose whether you want to perform an export with or without object versioning or whether you do not want any object export and versioning to take place when the change piece is released. Since we want to create an Add-On Installation Package, we don’t need the change piece list. The change piece list is used to create an Add-On Upgrade Package. There choose “No Object Export or Versioning” and then continue.
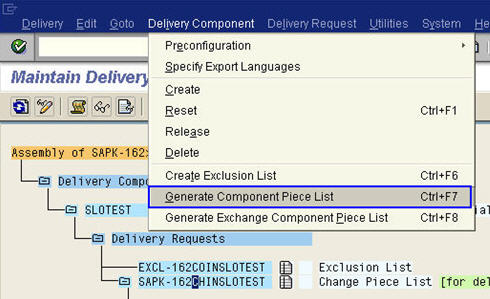
The change piece list has been released. To create the Add-On Installation Package, we need the Component Piece List that contains all the objects in the add-on. To do this, choose “Delivery Component” then choose “Generate Component Piece List”.
As with the change piece list, you can define two characters of the name yourself. The remaining name is taken from the naming conventions for the delivery requests. Select the ‘++’ characters and enter any characters in place of ‘++’ and then continue. We recommend that you use ‘CO’ to characterize the Component Piece List.

The component piece list contains all objects in the add-o. It consists of the current change piece list and the component piece list of the predecessor release. You should select the component piece list of the preshipment release relevant to you as predecessor piece list, continue and confirm the following dialog box

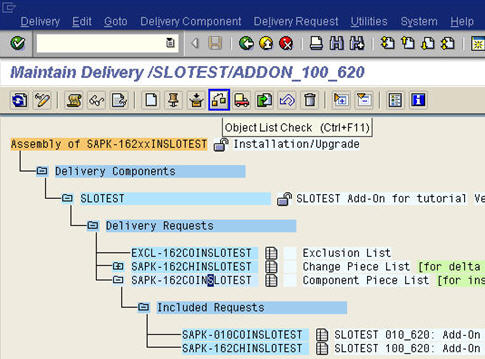
The component piece list now consists of the change piece list of the current content release. You can perform the object list checks for it. To do this, select the component piece list a![]() nd choose “Object List Check”
nd choose “Object List Check”
Choose “Perform Check in Dialog”
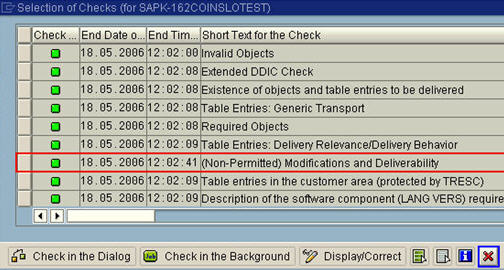
Result of all the check will have green traffic light and red traffic light icons, except for the check for Non-Permitted Modifications and Deliverability. If necessary correct the error and choose “Back” to return to the check selection.
All the checks now have green traffic lights. However note that green traffic lights do not guarantee that your delivery is correct. You must always carefully check the specific situation for your content. Choose “Cancel” to close the dialog box.
Before you release the component piece list, perform the manual syntax check for the Repository objects in the Transport Organizer to make sure that the Repository objects are consistent. To release the delivery request, choose “Release” on the tool bar and confirm the dialog box.
Since you will create the Add-On Installation Package from the component piece list, you can use “Export with Object Versioning” option that is already selected and continue. The component piece list has been released. The green traffic light icon indicates that the export has completed successfully. You need to generate the exchange component piece list for the add-on exchange upgrade, that is, the upgrade of your add-on during a SAP upgrade. Even if you do not need to create an add-on package for the SAP system update, you need to generate the exchange component piece list. Otherwise, Software Delivery Composer cannot continue the delivery creation process. Choose “Delivery Component” and then choose “Generate Exchange Component Piece List”. Replace these two characters ‘++’, we recommend to use ‘EX’ for Exchange Component Piece List and choose “Continue”.

The exchange component piece list contains the component piece list of the current contact release and the component piece list of all predecessor releases that are supported as content start releases. Since you do not need the exchange component piece list, you do not need to make a selection in following dialog box, just continue. You will get information that exchange component list has been created, continue.
Choose the exchange component piece and release the request. You need to confirm the release and choose the “No Object Export for Versioning” and continue.
The exchange component piece has been released. Now that you have created all piece lists that you need for a delivery type “Installation/Upgrade”, you can release the delivery component. To do this select the component and choose “Release” on the toolbar and confirm the release.
The delivery component has been released and icon changes to locked icon. You have just finished composing the delivery with Software Delivery Composer. You can now create a delivery package from the component piece list using Software Delivery Assemble.
2. Creating the delivery package
You perform this step using the Software Delivery Assembler (transaction SSDA). You can call Software Delivery Assembler directly within Software Delivery Composer. Choose “Register Delivery Request (by SDA locally)” for the component piece list.

You can register the delivery request before you confirm the delivery. To continue choose “Yes”
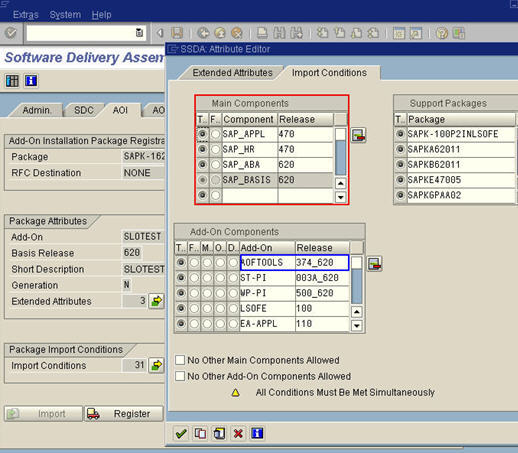
Software Delivery Assembler calls tab page AOI, which is used to create Add-On Installation Packages. It imports some attributes and import conditions from Software Delivery Composer, such as name, release, short description of the Content as well as he underlying SAP Basis release. You need to check the Extended Attributes and if necessary make changes. To look at these, choose “Attribute Editor” for the Extended Attributes

You use the Import Conditions page to specify the conditions that have to be met regarding additional components or packages when installation a package in the target system (customer system). All conditions in the source system are listed here. You must carefully check the conditions and delete the ones that you don’t need.
For example, component SAP_ALL = T (for true) means that this component must be installed in the target system with release 470.
For BI Content use SAP_BW = T, and select appropriate release 350 for BW 3.5 release or 700 for BI 7.0 release in the Main Component area of the screen.
Set package content release BI_CONT appropriately in the Add-On Components area.
If your package requires a certain Support Package level to be installed, you can indicate this in the Support Packages area. If your package does not request any specific Support Package levels, then choose “Delete Row”.
You can close the Attribute Editor now and confirm your entries and continue.
Now the attributes and import conditions have been saved. Now you can register your package by choosing “Register” in the AOI tab. Confirm the dialog screen. You will get an information screen with message “Package registered”. Choose “Enter” to continue.
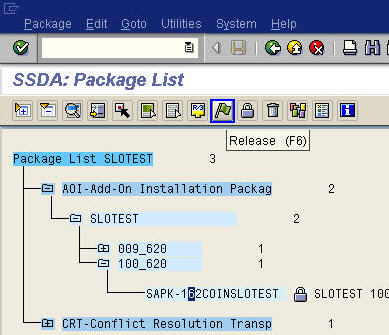
If you want to check the package attributes after registration, you can do this by choosing “Package List” from the Extras menu. If you find that you have to change few attributes or import condition, make the changes to the package. After making the changes you have to register the package. But note that this can only before you confirm the delivery.

You have now finished creating and registering the Add-On Installation Package. You need to test your package. This includes installation tests as well as functional tests. To be able to do this, a temporary test system is necessary to perform your test activities. If you find errors, you can correct the delivery request and register the package again. Once you have made sure that all the problems are solved, confirm the delivery in Software Delivery Composer. To return to the Software Delivery Composer, choose “Back”.
Select the delivery component and confirm the delivery by choosing “Confirm” from the Delivery menu.

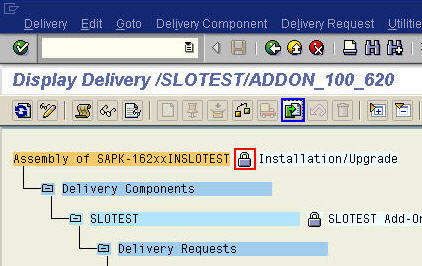
Confirm the dialog box to finish creating the delivery.

The lock icon confirms that the delivery has been confirmed and you can no longer change the delivery, you can no longer change the delivery. You can now release the package in Software Delivery Assembler, choose “Register Delivery Request (by SDA, Locally)
To release the package, choose the “Package List” icon on the toolbar.
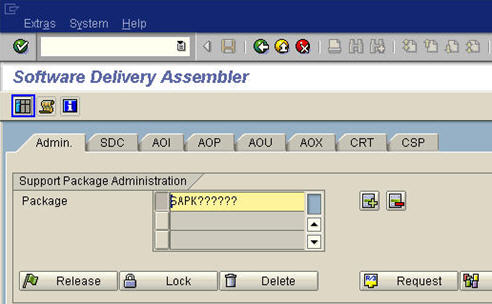
Enter your Software Component and enter.
Select the package and choose “Release”.
Confirm that you want to release the package.
Congratulations! You have successfully created Add-On Installation Package for your BI Content.
For more information on the Web
BI Content certification link on SDN
SAP Business Warehouse - Third-Party Content (BW-CNT)
BI Content development
http://help.sap.com/saphelp_nw70/helpdata/EN/c8/297104f8b4c64182480b014b8c6984/frameset.htm
- SAP Managed Tags:
- SAP BusinessObjects Business Intelligence platform
Labels:
2 Comments
You must be a registered user to add a comment. If you've already registered, sign in. Otherwise, register and sign in.
Labels in this area
-
ABAP CDS Views - CDC (Change Data Capture)
2 -
AI
1 -
Analyze Workload Data
1 -
BTP
1 -
Business and IT Integration
2 -
Business application stu
1 -
Business Technology Platform
1 -
Business Trends
1,658 -
Business Trends
95 -
CAP
1 -
cf
1 -
Cloud Foundry
1 -
Confluent
1 -
Customer COE Basics and Fundamentals
1 -
Customer COE Latest and Greatest
3 -
Customer Data Browser app
1 -
Data Analysis Tool
1 -
data migration
1 -
data transfer
1 -
Datasphere
2 -
Event Information
1,400 -
Event Information
67 -
Expert
1 -
Expert Insights
177 -
Expert Insights
308 -
General
1 -
Google cloud
1 -
Google Next'24
1 -
GraphQL
1 -
Kafka
1 -
Life at SAP
780 -
Life at SAP
13 -
Migrate your Data App
1 -
MTA
1 -
Network Performance Analysis
1 -
NodeJS
1 -
PDF
1 -
POC
1 -
Product Updates
4,576 -
Product Updates
353 -
Replication Flow
1 -
REST API
1 -
RisewithSAP
1 -
SAP BTP
1 -
SAP BTP Cloud Foundry
1 -
SAP Cloud ALM
1 -
SAP Cloud Application Programming Model
1 -
SAP Datasphere
2 -
SAP S4HANA Cloud
1 -
SAP S4HANA Migration Cockpit
1 -
Technology Updates
6,873 -
Technology Updates
440 -
Workload Fluctuations
1
Related Content
- The 2024 Developer Insights Survey: The Report in Technology Blogs by SAP
- Supporting Multiple API Gateways with SAP API Management – using Azure API Management as example in Technology Blogs by SAP
- Partner-2-Partner Collaboration in Manufacturing in Technology Blogs by SAP
- BW Bridge: migration of calculation view, are there any news? in Technology Q&A
- AI Engineering in Technology Q&A
Top kudoed authors
| User | Count |
|---|---|
| 22 | |
| 13 | |
| 13 | |
| 11 | |
| 10 | |
| 10 | |
| 9 | |
| 9 | |
| 9 | |
| 8 |