
- SAP Community
- Products and Technology
- Technology
- Technology Blogs by SAP
- Custom Email Notification Solution in SAP Data War...
Technology Blogs by SAP
Learn how to extend and personalize SAP applications. Follow the SAP technology blog for insights into SAP BTP, ABAP, SAP Analytics Cloud, SAP HANA, and more.
Turn on suggestions
Auto-suggest helps you quickly narrow down your search results by suggesting possible matches as you type.
Showing results for
former_member69
Discoverer
Options
- Subscribe to RSS Feed
- Mark as New
- Mark as Read
- Bookmark
- Subscribe
- Printer Friendly Page
- Report Inappropriate Content
01-27-2022
4:21 AM
Intro
I am an Analytics & Insights Consultant at SAP with a passion for coding. In this case presentation I will show you how we built a Email Notification Solution within SAP Data Warehouse Cloud.
A special Thanks to @hannes.keil who came up with this idea and helped implementing it.
Content
- About this solution
- Prerequisites
- Setup SAP Data Warehouse Cloud Views
- Notification Templates
- Configuration: User Provided Service Instances
- Deployment via SAP Business Application Studio
- Scheduling
- Testing & Messages
1. About this solution
As of beginning of Q1 2022 SAP Data Warehouse Cloud does not provide an email notification service for any kind of logs created by the SAP Data Warehouse Cloud system. For critical tasks businesses need immediate reaction and therefore the system must notify people in charge to react immediately.This solution is built to help SAP Data Warehouse Cloud customers to setup an email notification service for any kind of notification within their SAP Data Warehouse Cloud system.
2. Prerequisites
The solution is based on a node.js client which uses following dependencies:
- @Sap/hana-client ^2.10.13
- express ^4.17.1
- node-json2html ^2.1.0
- nodemailer ^6.6.5
- nodemailer-smtp-transport ^2.7.4
- sap-cf-mailer 0.0.5
Please make sure if these can be used within your IT systems.
You also need a SAP Data Warehouse Cloud tenant and a SAP BTP tenant. Within the SAP BTP tenant you need to enable following services:
- Job Scheduling Service
- SAP Business Application Studio
- Authorization and Trust Management Service
3. Setup SAP Data Warehouse Cloud Views
You need to create the following tables & views:
A) Table Notification Tasks – SAP_TCT_NOTE_TASK_V_01 and/or Table Notification ANY – SAP_TCT_NOTE_ANY_V_01
These tables contain all the logs for which there should be a notification triggered. The tables should look like this:
- Notification_ID (String 100)
- Notification_Type (String 100)
- SPACE_ID (String 64)
- OBJECT_ID (String 256)
- EMAIL (String 256)
- LINK (String 1000)
- VAR_1 (String 5000)
- …
- VAR_5 (String 5000)
B) View Notification Union – SAP_TCT_NOTE_UNION_V_01
Union view of all Notification Tables. Structure:
- Notification_ID (String 100)
- Notification_Type (String 100)
- SPACE_ID (String 64)
- OBJECT_ID (String 256)
- STATUS (String 256)
- EMAIL (String 256)
- LINK (String 1000)
- VAR_1 (String 5000)
- …
- VAR_5 (String 5000)
C) Notification Status Table – SAP_TCT_NOTE_STATUS_O_01 (OpenSQL) and/or Notification Status Table – SAP_TCT_NOTE_STATUS_T_01
Notification status table. Structure:
- Notification_ID (String 100)
- Notification_Type (String 100)
- EMAILSENT (Boolean)
- LAST_CHANGE_AT (Timestamp)
D) View Notification Status Table Union – SAP_TCT_NOTE_STATUS_V_01
Union view of all Notification Tables. Structure:
- Notification_ID (String 100)
- Notification_Type (String 100)
- EMAILSENT (Boolean)
- LAST_CHANGE_AT (Timestamp)
E) Table Notification Type Template Table – SAP_TCT_NOTE_TEMPL_T_01
Table for templates for each notification type. Structure:
- Notification_Type (String 100)
- Template (String 5000)
F) Open Notifications View – SAP_TCT_NOTE_OPEN_V_01
Union view of all Notification Tables. Structure:
- Notification_ID (String 100)
- Notification_Type (String 100)
- SPACE_ID (String 64)
- OBJECT_ID (String 256)
- STATUS (String 256)
- EMAIL (String 256)
- LINK (String 1000)
- VAR_1 (String 5000)
- …
- VAR_5 (String 5000)
- EMAILSENT (Boolean)
- STATUS (String 60)
- LAST_CHANGE_AT (Timestamp)
- Template (String 5000)
4. Notification Templates
All Notification Templates are stored in the table SAP_TCT_NOTE_TEMPL_T_01. In this table you can store layouts for any kind of notification type such as templates for success messages, error messages, warning messages etc. Here is an example how a template can look like for a failed Task within SAP Data Warehouse Cloud:
{ "<>": "div", "style": "margin: 0; padding: 0; text-align: center;", "html": [ { "<>": "li", "style": "width: 80%; margin: 2% .35%; display: inline-flex; box-shadow: 0 2px 4px rgba(0,0,0, .2);", "html": [ { "<>": "ul", "style": "width: 100%; padding: 1% 2%; background: #fff; max-height: 220px; box-sizing: border-box;", "html": [ { "<>": "h3", "style": "text-align: center;", "html": "Failed Task" }, { "<>": "ul", "style": "list-style-type: disc; text-align: left;", "html": [ { "<>": "li", "html": "Where: ${VAR_4} ${OBJECT_ID} in ${SPACE_ID}" }, { "<>": "li", "html": "StartTime: ${VAR_2}" }, { "<>": "li", "html": "Activity: ${VAR_3}" }, { "<>": "li", "html": "Triggered: ${VAR_5}" }, { "<>": "li", "html": [ { "<>": "a", "href": "https://******.eu10.hcs.cloud.sap/dwaas-ui/index.html#/*******&/di/*****${LINK}", "html": "Integration Monitor" } ] } ] } ] } ] } ] }Feel free to design the email templates as per your requirements.
5. Configuration: User Provided Service Instances
You need to create two User Provided Service Instances within your SAP BTP Space which will later be used by the notification solution to get e.g. credentials. Go to your target space where the App will also be deployed on. Go to the instances section and create a User Provided Service Instance.
First Instance “dwc-notification-secret”:
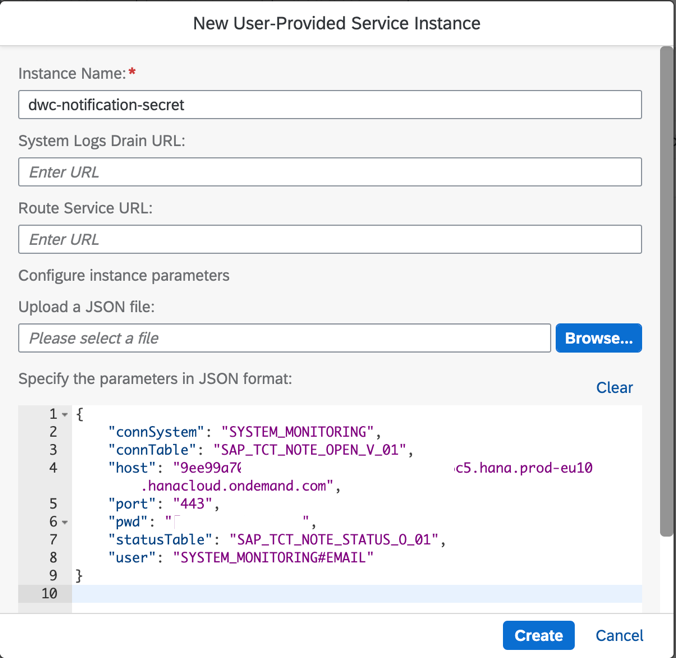
Picture1: User provided Service Instance 1
Second Instance “dwc-notification-mailconfig”:

Picture2: User provided Service Instance 2
After deploying the notification solution, we will bind these two service instances with the node.js app. That is why we need to come back to this section later again.
6. Deployment via SAP Business Application Studio
Open the SAP Business Application Studio Service within your Space. Go to or create a Dev Space (Basic tools and extensions + HTML5 Runner + MTA Tools are enough for the beginning) and clone the repository of the SAP Data Warehouse Cloud Notification Solution.

Picture3: SAP Business Application Studio Dev Space
Clone the notification solution repository. After cloning the app, open the mta.yaml file in the parent directory and check if your instances created in the previous step were named exactly as described in this mta file.
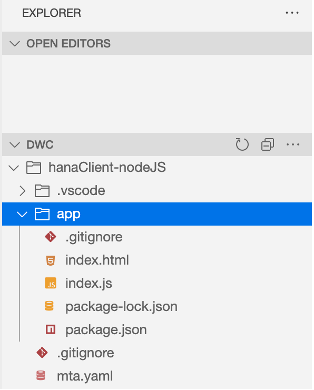
Picture4: Notification solution repository structure
If everything is fine, build the mtar project & deploy the zipped mtar project to your target space.

Picture5: Deployment of mtar project
If successful, you will find a link to the running application in the output of the terminal.
Now we will open the service instance section again an see if the binding of the two User-Provided Service Instances which we created earlier to this running app was successful. When everything looks good, we now can test if the app works.
Open the link to the application and check if it is starting correctly. This is what you see, if everything works fine:

Picture6: Landing page of nodejs backend
After triggering /sendmail you see a success, or error message. All the types of outputs and their meaning you will find later in this document.
7. Scheduling
As the notification solution is running and we prepared the SAP Data Warehouse Cloud views and tables we can now schedule this running application.
Go to your subaccount on the SAP BTP and open the Service Marketplace. Search for the service “Authorization and Trust Management Service”. Create an instance and bind it to the newly deployed app.
Navigate to the Service Marketplace again. Search for the service “Job Scheduling Service” and create one. Give it some instance name + Parameter JSON: { "enable-xsuaa-support": true } and go to the Instances and Subscription section after that where you will find the newly created service. Now click on this instance and bind this Job Scheduling instance to your app. Your instances section should look like this:
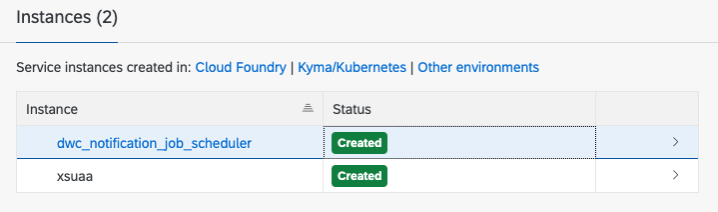
Picture7: Scheduling instance on SAP BTP
Now you can open the Job Scheduler dashboard by expanding the scheduler instance and clicking on the dots-menu on the top right. On the configurations page you can edit the execution timeout. The default is set to 3 hours.
8. Testing & Messages
You can test the app locally by cloning the notification solution on your local machine and running node app in the parent directory. This will serve the solution on your localhost:4004 and you can trigger the execution of the app from there. Please wait minimum 2 minutes after each execution, as any ongoing process could be aborted by a second trigger.
You will see different types of messages. In the following you find some explanation to each of them:
- ANY ERROR CODE => If you see any error code like 400, 5xx, etc. the app does not work properly. You may try to restart the app through the SAP BTP cockpit.
- Emails were sent (…) => This means everything worked fine and the app was successful in terms of sending notification emails to all the recipients.
- No Email Notification to send. => There may be no open notifications to send. If this is wrong, please start/trigger the app again.
In this technical show case you learned how to setup a notification app which consumes SAP Data Warehouse Cloud tables and views and executes notification actions based on incoming information. Furthermore you learned how to deploy this kind of solution and how to manage User Provided Service Instances on the SAP Business Technology Platform which can be used with any backend or frontend.
I am more than happy to receive any kind of feedback, suggestions, questions and ideas to improve this solution. Feel free to comment here on the comment section of this blog with your feedback and questions.
- SAP Managed Tags:
- SAP Datasphere,
- SAP Business Technology Platform
Labels:
You must be a registered user to add a comment. If you've already registered, sign in. Otherwise, register and sign in.
Labels in this area
-
ABAP CDS Views - CDC (Change Data Capture)
2 -
AI
1 -
Analyze Workload Data
1 -
BTP
1 -
Business and IT Integration
2 -
Business application stu
1 -
Business Technology Platform
1 -
Business Trends
1,658 -
Business Trends
95 -
CAP
1 -
cf
1 -
Cloud Foundry
1 -
Confluent
1 -
Customer COE Basics and Fundamentals
1 -
Customer COE Latest and Greatest
3 -
Customer Data Browser app
1 -
Data Analysis Tool
1 -
data migration
1 -
data transfer
1 -
Datasphere
2 -
Event Information
1,400 -
Event Information
67 -
Expert
1 -
Expert Insights
177 -
Expert Insights
308 -
General
1 -
Google cloud
1 -
Google Next'24
1 -
GraphQL
1 -
Kafka
1 -
Life at SAP
780 -
Life at SAP
13 -
Migrate your Data App
1 -
MTA
1 -
Network Performance Analysis
1 -
NodeJS
1 -
PDF
1 -
POC
1 -
Product Updates
4,576 -
Product Updates
352 -
Replication Flow
1 -
REST API
1 -
RisewithSAP
1 -
SAP BTP
1 -
SAP BTP Cloud Foundry
1 -
SAP Cloud ALM
1 -
SAP Cloud Application Programming Model
1 -
SAP Datasphere
2 -
SAP S4HANA Cloud
1 -
SAP S4HANA Migration Cockpit
1 -
Technology Updates
6,873 -
Technology Updates
439 -
Workload Fluctuations
1
Related Content
- SAP BW/4 - revamp and true to the line 2024 in Technology Blogs by Members
- SAP Fiori for SAP S/4HANA - Empowering Your Homepage: Enabling My Home for SAP S/4HANA 2023 FPS01 in Technology Blogs by SAP
- Consuming SAP with SAP Build Apps - Mobile Apps for iOS and Android in Technology Blogs by SAP
- QM Notification Configuration from DMC to ERP in Technology Blogs by Members
- SAP Document and Reporting Compliance - 'Colombia' - Contingency Process in Technology Blogs by SAP
Top kudoed authors
| User | Count |
|---|---|
| 23 | |
| 14 | |
| 13 | |
| 13 | |
| 11 | |
| 10 | |
| 9 | |
| 9 | |
| 8 | |
| 8 |