
- SAP Community
- Products and Technology
- Technology
- Technology Blogs by SAP
- Converting the APIKey URL Parameter to the APIKey ...
Technology Blogs by SAP
Learn how to extend and personalize SAP applications. Follow the SAP technology blog for insights into SAP BTP, ABAP, SAP Analytics Cloud, SAP HANA, and more.
Turn on suggestions
Auto-suggest helps you quickly narrow down your search results by suggesting possible matches as you type.
Showing results for
Product and Topic Expert
Options
- Subscribe to RSS Feed
- Mark as New
- Mark as Read
- Bookmark
- Subscribe
- Printer Friendly Page
- Report Inappropriate Content
06-30-2017
3:51 PM
One of the common requests we have seen is to be able to test SAP API’s in the Business Hub from the browser.
For example to access the Employee Employment info we can call
https://sandbox.api.sap.com/successfactors/odata/v2/EmpEmployment
Which is great but an error will be returned:
“Failed to resolve API Key variable request.header.apikey”
There are two important details to note in this error message. The first is that we require an API key which is obvious if the Business Hub has been used before. Less obvious is the error “request.header.apikey.” The missing request.header.apikey refers to the fact that there is a missing HTTP header called “apikey” that should contain the APIKey for the API’s that are subscribed to in the API Hub. If the particular Business Hub API requires a licence key in the URL query parameters then the error will be “request.queryparam.APIKey” - note the reference to queryparam rather than header in the original request.
To fix this however, will mean that API Management will need to sit in front of the requests to the API Hub and transform the requests into something usable. It will take a query parameter and transform it so that it will be passed to the backend service as a header value.
Before continuing ensure that :
Open the API Management Developer portal from the trial account services panel and a dashboard will open.

From the quick actions click on the API link. Alternatively click on the API’s tile and then click the “Create” button on the subsequent screen.
To simplify this example no proxy is going to be created so the URL that is mapped to the backend is a simple URL. We end up with a 1-1 mapping of front end url to backend url.
The following parameters will need to be entered to create the API:
API Provider: Leave as the default value
URL: https://sandbox.api.sap.com/successfactors/odata/v2/EmpEmployment
Name: SFSF_EmpEmployment
Title: SuccessFactors Employee Information
Description: Employee Employment Information
Host Alias: Leave as the default value
API Base Path: /EmpEmployment
Service Type: Leave as default
The form should look the like the picture below

Click on the “Create” button and the new API will be created.
Some important things to note about the form above are that the URL field above is the link from API Management to the backend service and the caller will never see this link.
The caller will access this API by calling a concatenation of the Host Alias and the API Base Path - in this case it is http:/xxtrial-trail.apim1.hanatrial.ondemand.com/EmpEmployment.
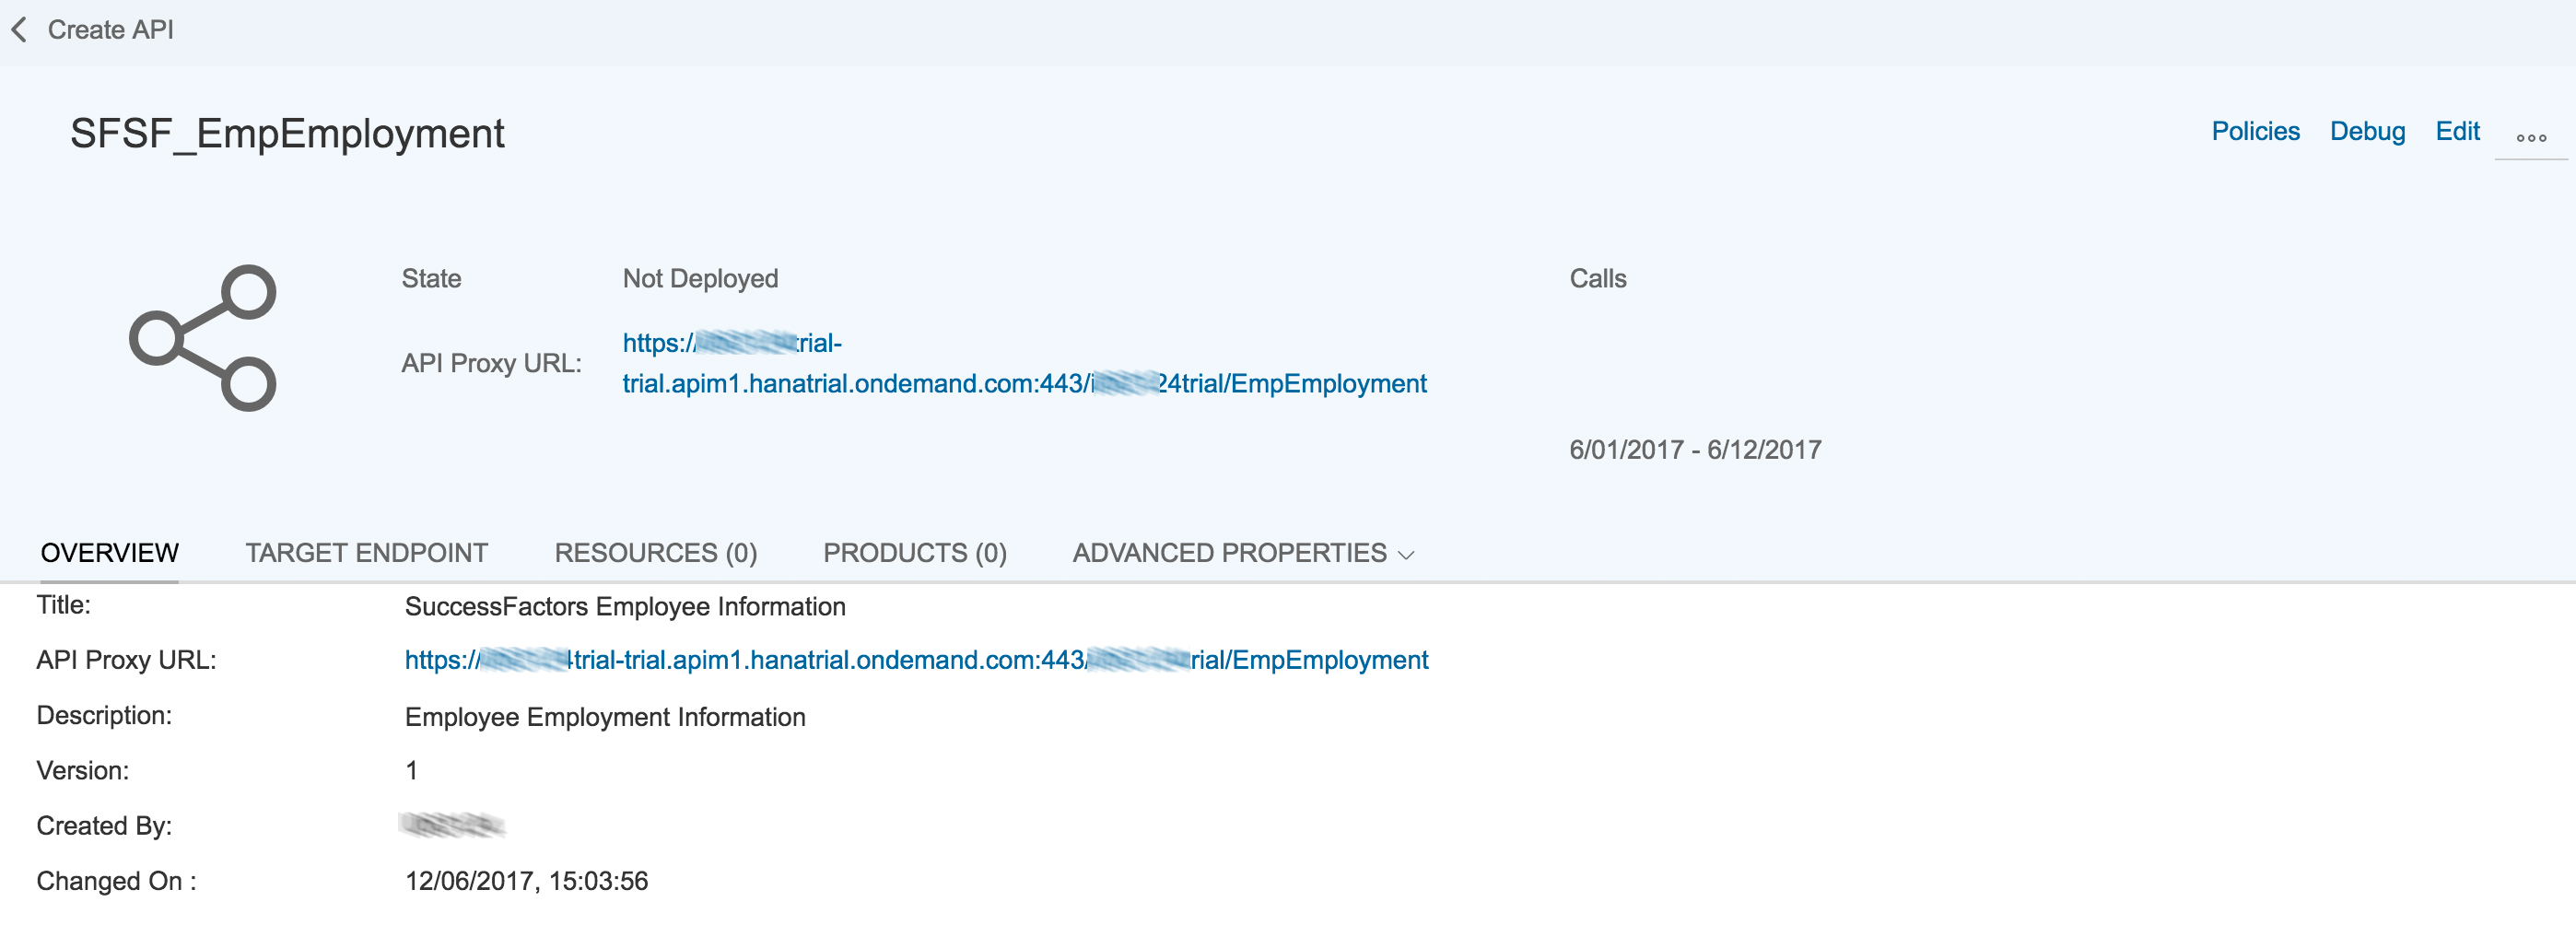
Save the API at this point. The screen should look like the following after saving.
It is important to understand that API management works with HTTP requests. There is also a clear need to distinguish between the API endpoint which is the API that the callers will use and the Target endpoint which is the URL that will be called by API management when a call is made to the API endpoint. For the API and Target endpoints the requests can be modified both before and after via a simple xml fragment in a policy.
For the next step we need to alter the request flow so the API Key can be hard coded into the request or the key can be obtained from a query parameter value. For this we will create what API Management call a "policy" and the policy in the API can be used to extract the key and put it into a header before the call to the backend is made.
Both the options will be developed in the next exercises.
The easiest option if you are only person using the API for the project is to hard code the licence key into the preflow on the target API. That is to say before the request goes to the backend it is modified and the licence key inserted into the HTTP request. Note that the API Hub restricts calls to 10 a second so this is not suitable for any kind of enterprise deployment but its useful for Proof Of Concept type applications.
To hard code the key is relatively straightforward. An outbound preflow policy will be used to add a header to the request going to the business hub. This means that API Management will execute a policy on the HTTP request going to the backend and alter the request with the rules defined in the policy.
Click on Policies and on the newly opened screen click the edit button (on the top right) to enable editing of the policies for this API. Select TargetEndpoint and the PreFlow element. From the policies on the right, select the “Assign Message” policy by clicking the little add button on the right.

If you do not see the little plus buttons on the right against the policies then you need to click the edit button (will be shown where update is in the top right)
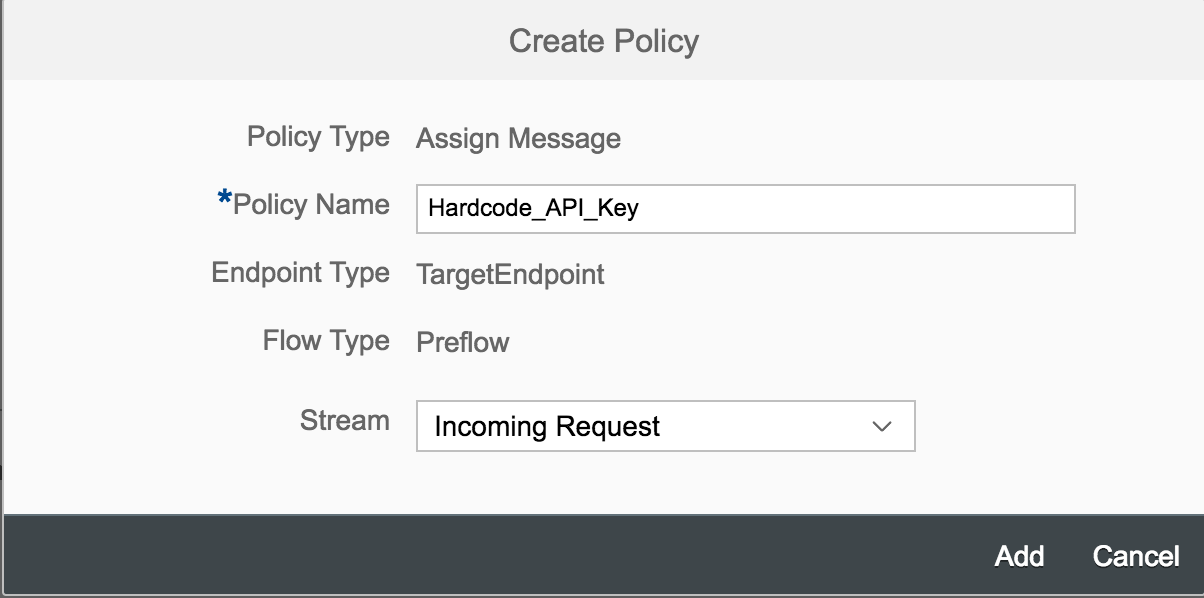
This will open up a form where the details for the policy can be entered.
For this case:
Policy Name: Hardcode_API_Key
Stream: Incoming Request
It is important to understand what is going on here. The end point type is set to TargetEndpoint which is the SuccessFactors API URL that was set when the API definition was created. The stream request is also very important as this is the direction the policy will apply to. For this example policy the policy will apply to the request going into the endpoint. So this means the policy will be applied to the HTTP request before it is made to the API Hub.
Click on the “Add” button to add the policy.
For more details on the “Assign Message” policy please see the SCP APIM Documentation
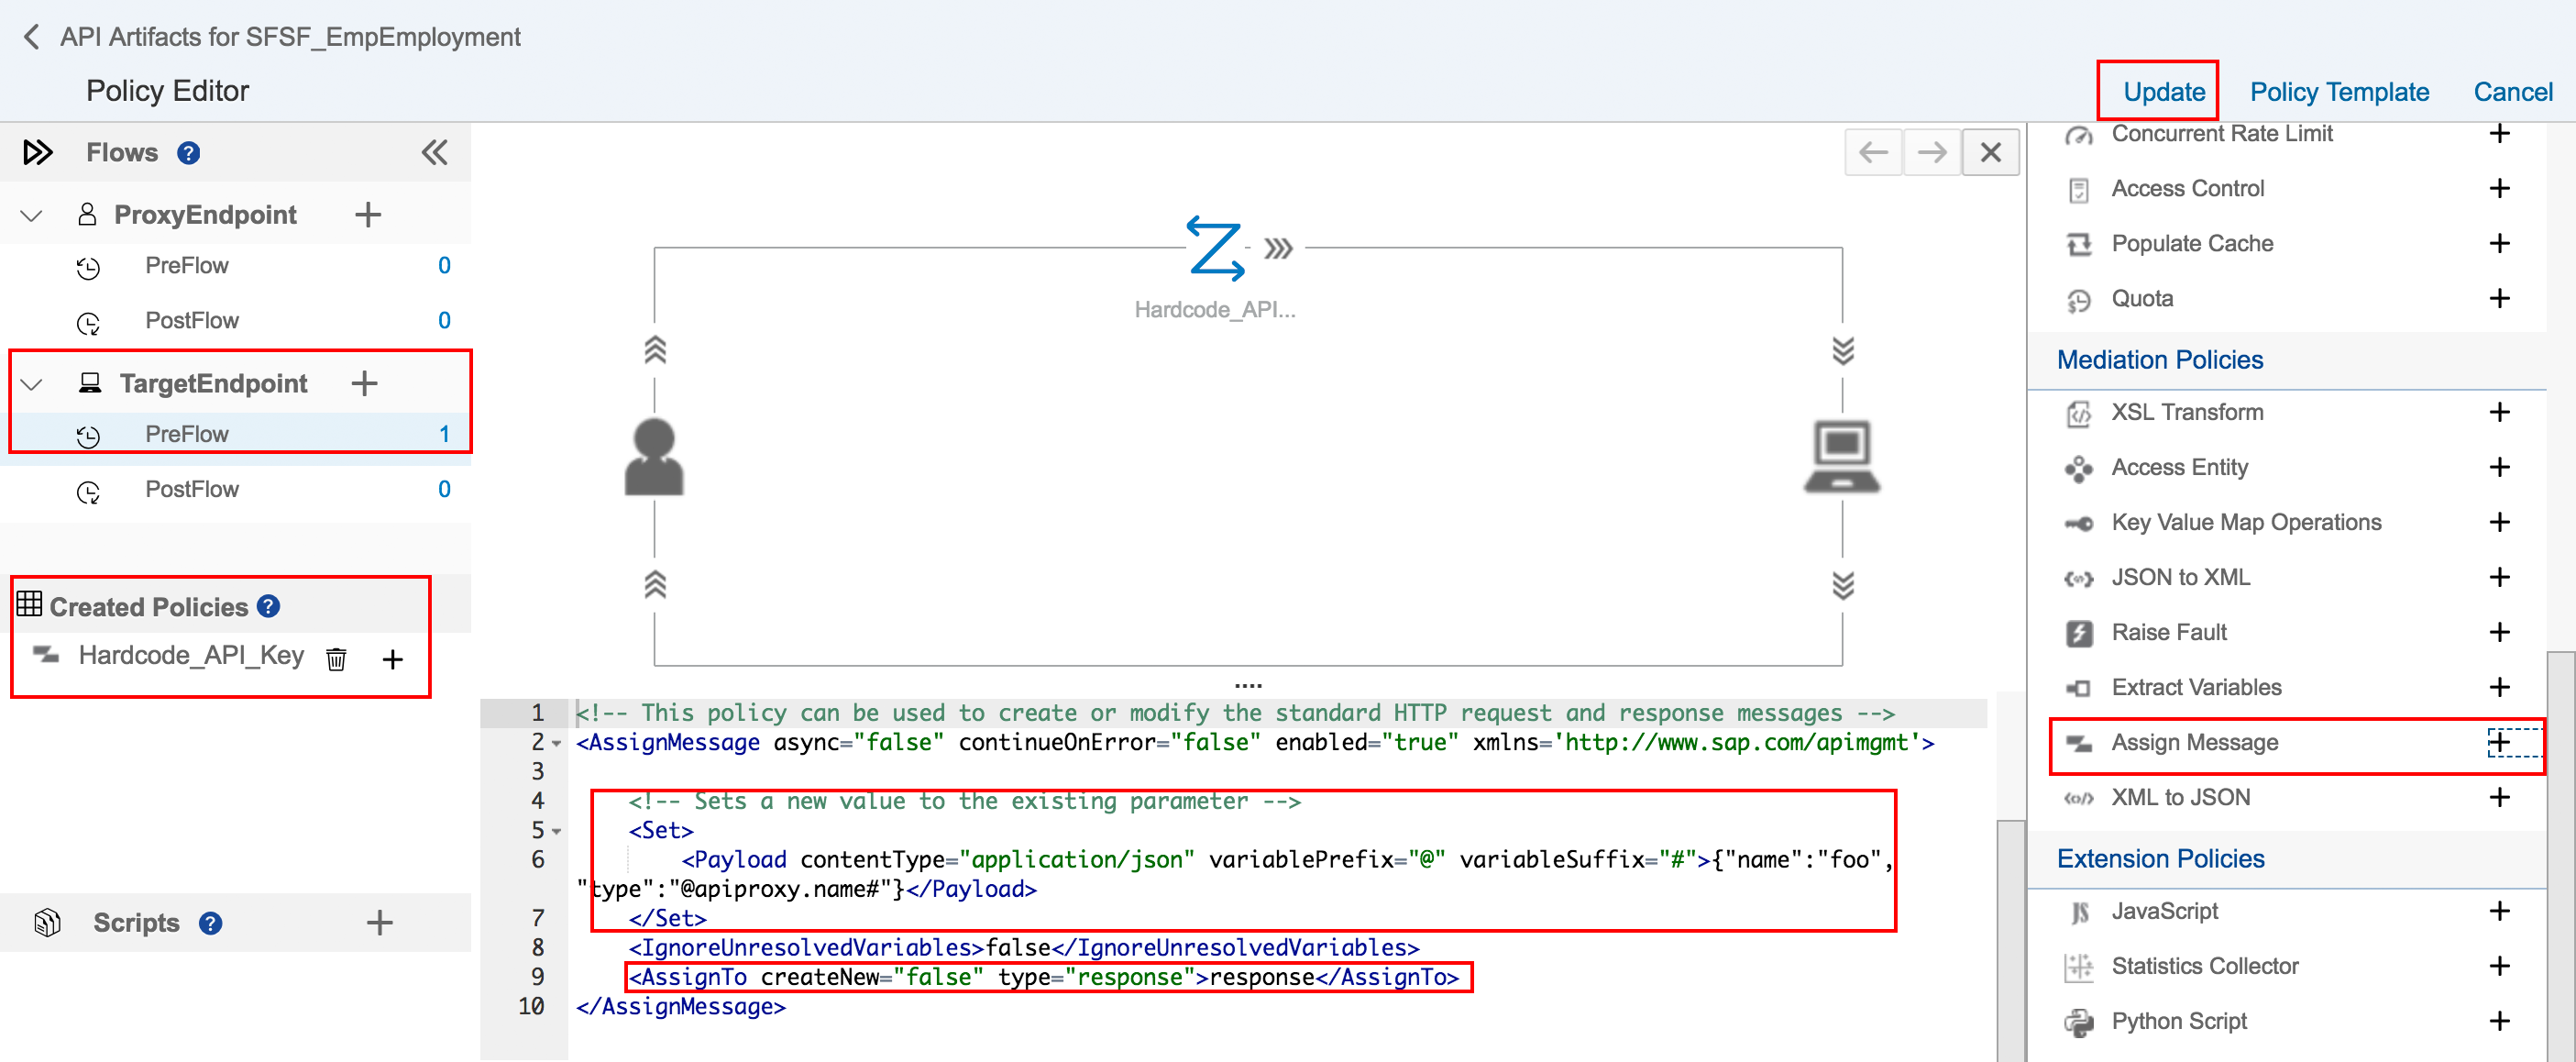
Note how the TargetEndpoint PreFlow now has a policy and the Created Policies also has the same policy name.
To continue, the XML for the policy needs to be customized. Since a new header variable will be created, the “Set” element is not appropriate as we want to create a new header variable, not alter it.
Delete the “Set” element and replace it with the following XML
The XML should look like the above.
The final change that is needed is to alter the *AssignTo* element so it is empty. Even though the documentation says that this is an optional element it is still required as an empty element.
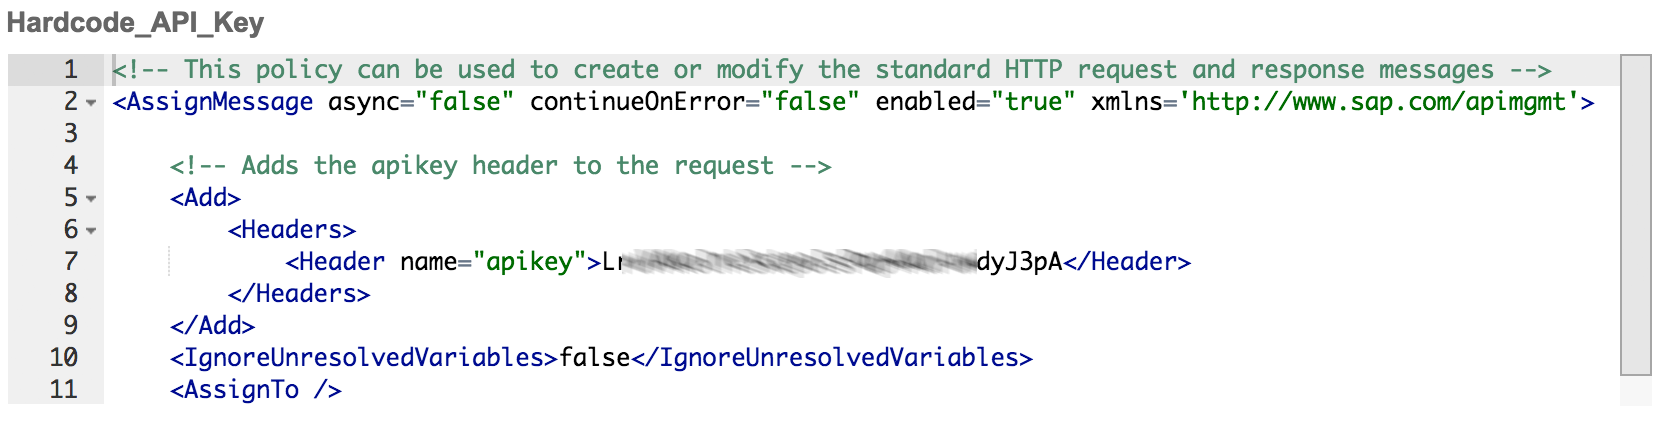
Above is the final XML that is needed for the hard coded policy option.
Click the “Update” button which will update the policy definition and then on the API Screen, click the “Save” button to save the changes to the API.
Finally from the overflow menu in the top right, choose the “Deploy” button to deploy the API to the API Management Server and make it available for callers to consume. The State will then change from "Not Deployed" to "Deployed"

To wrap up, what will happen here is that the caller will make a request to the API Proxy URL and this will execute the “Hardcoded_API_key” policy that adds an “apikey” header to the request and then sends the request to the API Hub.
You can now use the API Proxy URL in the browser to get a list of employee employment information from SuccessFactors.
In the first part the API key was hard coded into the policy and this was passed to the API Hub. However for a more general and extensible approach the API key can be put into a URL query parameter and then this key can be copied into the header going to the API hub as part of a policy.
To do this in general terms an "extract variable" policy will be used to extract the apikey value from the query parameter and store it. This value will then be used in the "AssignMessage" policy that was created in option 1 and passed to the API Hub.
Open up the API Hub and open the API that was created is Option 1. This was the “SFSF_EmpEmployment” API.
Click on the Policies button and choose “Edit” from the buttons on the top left to edit the policies since a new policy will now be added.

Note the the “Created Policies” in the bottom left show our existing policy. Also note that we are editing the policy as there are plus buttons next to each policy.
Click on the Flows on the left and choose “ProxyEndpoint” and “PreFlow”. This is the place new policy will be added. Since the ProxyEndpoint is being modified we know that we will be modifying the incoming request from a caller coming into the API Management server and since the “PreFlow” option has been chosen the incoming request will be modified.
Select the “Extract Variables” Policy on the right under “Mediation Policies” and click the plus button.
To learn more about the ExtractVariables policy consult the online documentation.
A form will open where some values need to be set.
Set the following:
Policy Name: Extract_API_Key
Stream: Incoming Request

Click “Add” to create the new policy.

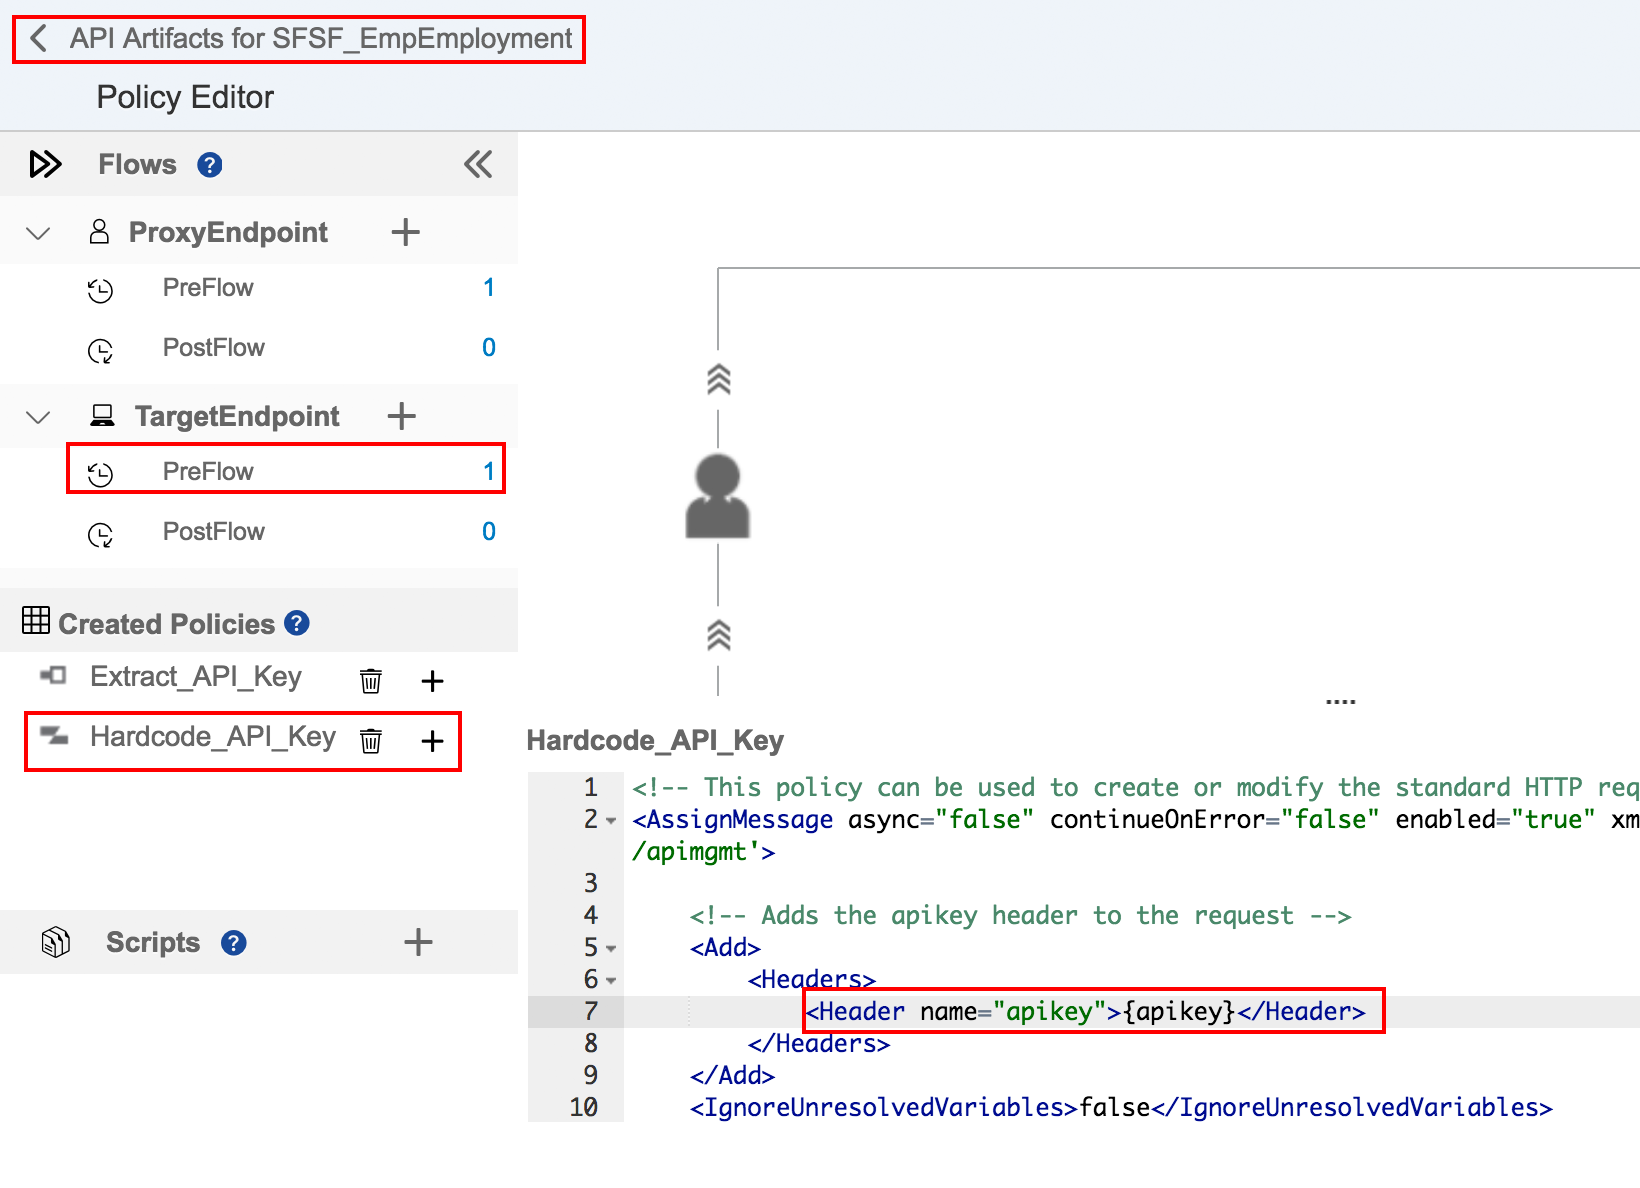
The Policy editor screen should look like the following with the most important items highlighted:
There are two flows on the left with one in the endpoint reflow and one in the target preflow.
Furthermore are two created policies and there is the xml for the ExtractVariables proxy preflow policy in the XML Policy Editor.
The XML now needs to be edited to extract the Query Param for the apikey from the URL.
Replace the contents of the ExtractVariables element with the following XML:
In the above XML this will look for a query parameter called “apikey” and create a new variable called apikey valid for the duration of the request. This variable can be used later when we update the “Hardcoded_API_Key” policy to change it to use this variable.
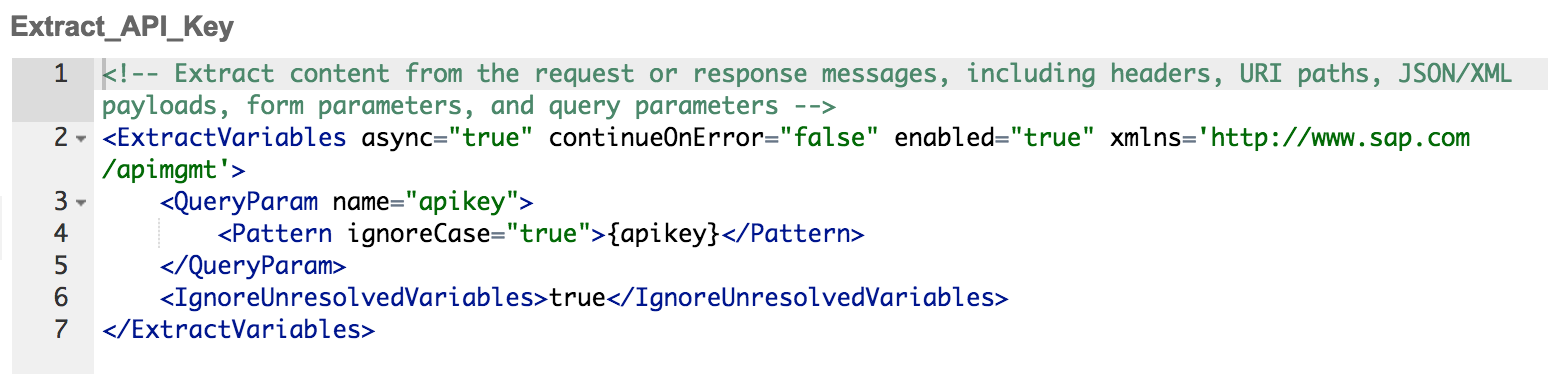
The final XML for the policy should look like the above. Note the curly brackets around the apikey - this creates a variable and assigns the value for the parameter name.
Next the “Hardcoded_API_KEY” policy needs to be changed to use the “apikey” variable instead of the hardcoded API key.
Under “Created Policies” on the bottom left, select the “Hardcoded_API_Key” policy and in the XML replace the key with the value {apikey} - this is the same as variable setup in the Extract Variable policy created earlier. It is import to use the curly braces around the apikey value as this tells API Management that this is a variable and to replace the name with the value assigned to apikey
The policy should now look like the one below
Click “Update” and then on the View API screen, click “Save” to save the changes. Since the API is already deployed it does not need to be deployed again.
Finally test that we can pass our API key on the URL try the following:
https://i063124trial-trial.apim1.hanatrial.ondemand.com/i063124trial/EmpEmployment
This will raise an error at the API Management level
"faultstring":"Unresolved variable : apikey"
informing the caller that the apikey variable is missing. Since the apikey is a query parameter another call can be made with this parameter and the call will succeed.
https://i063124trial-trial.apim1.hanatrial.ondemand.com/i063124trial/EmpEmployment?apikey=<YourAPI key here>
and the SuccessFactors data will load.
this completes the exercise on how API management can be used to quickly transform an API request.
For example to access the Employee Employment info we can call
https://sandbox.api.sap.com/successfactors/odata/v2/EmpEmployment
Which is great but an error will be returned:
“Failed to resolve API Key variable request.header.apikey”
There are two important details to note in this error message. The first is that we require an API key which is obvious if the Business Hub has been used before. Less obvious is the error “request.header.apikey.” The missing request.header.apikey refers to the fact that there is a missing HTTP header called “apikey” that should contain the APIKey for the API’s that are subscribed to in the API Hub. If the particular Business Hub API requires a licence key in the URL query parameters then the error will be “request.queryparam.APIKey” - note the reference to queryparam rather than header in the original request.
To fix this however, will mean that API Management will need to sit in front of the requests to the API Hub and transform the requests into something usable. It will take a query parameter and transform it so that it will be passed to the backend service as a header value.
Before continuing ensure that :
- You have created your free SCP trial account
- API Management is enabled in your services
- An API key has been obtained from the Business Hub.
Open the API Management Developer portal from the trial account services panel and a dashboard will open.
From the quick actions click on the API link. Alternatively click on the API’s tile and then click the “Create” button on the subsequent screen.
To simplify this example no proxy is going to be created so the URL that is mapped to the backend is a simple URL. We end up with a 1-1 mapping of front end url to backend url.
The following parameters will need to be entered to create the API:
API Provider: Leave as the default value
URL: https://sandbox.api.sap.com/successfactors/odata/v2/EmpEmployment
Name: SFSF_EmpEmployment
Title: SuccessFactors Employee Information
Description: Employee Employment Information
Host Alias: Leave as the default value
API Base Path: /EmpEmployment
Service Type: Leave as default
The form should look the like the picture below
Click on the “Create” button and the new API will be created.
Some important things to note about the form above are that the URL field above is the link from API Management to the backend service and the caller will never see this link.
The caller will access this API by calling a concatenation of the Host Alias and the API Base Path - in this case it is http:/xxtrial-trail.apim1.hanatrial.ondemand.com/EmpEmployment.
Save the API at this point. The screen should look like the following after saving.
It is important to understand that API management works with HTTP requests. There is also a clear need to distinguish between the API endpoint which is the API that the callers will use and the Target endpoint which is the URL that will be called by API management when a call is made to the API endpoint. For the API and Target endpoints the requests can be modified both before and after via a simple xml fragment in a policy.
For the next step we need to alter the request flow so the API Key can be hard coded into the request or the key can be obtained from a query parameter value. For this we will create what API Management call a "policy" and the policy in the API can be used to extract the key and put it into a header before the call to the backend is made.
Both the options will be developed in the next exercises.
Option 1: Hard coding the key into the API
The easiest option if you are only person using the API for the project is to hard code the licence key into the preflow on the target API. That is to say before the request goes to the backend it is modified and the licence key inserted into the HTTP request. Note that the API Hub restricts calls to 10 a second so this is not suitable for any kind of enterprise deployment but its useful for Proof Of Concept type applications.
To hard code the key is relatively straightforward. An outbound preflow policy will be used to add a header to the request going to the business hub. This means that API Management will execute a policy on the HTTP request going to the backend and alter the request with the rules defined in the policy.
Click on Policies and on the newly opened screen click the edit button (on the top right) to enable editing of the policies for this API. Select TargetEndpoint and the PreFlow element. From the policies on the right, select the “Assign Message” policy by clicking the little add button on the right.
If you do not see the little plus buttons on the right against the policies then you need to click the edit button (will be shown where update is in the top right)
This will open up a form where the details for the policy can be entered.
For this case:
Policy Name: Hardcode_API_Key
Stream: Incoming Request
It is important to understand what is going on here. The end point type is set to TargetEndpoint which is the SuccessFactors API URL that was set when the API definition was created. The stream request is also very important as this is the direction the policy will apply to. For this example policy the policy will apply to the request going into the endpoint. So this means the policy will be applied to the HTTP request before it is made to the API Hub.
Click on the “Add” button to add the policy.
For more details on the “Assign Message” policy please see the SCP APIM Documentation
Note how the TargetEndpoint PreFlow now has a policy and the Created Policies also has the same policy name.
To continue, the XML for the policy needs to be customized. Since a new header variable will be created, the “Set” element is not appropriate as we want to create a new header variable, not alter it.
Delete the “Set” element and replace it with the following XML
<Add>

   <Headers>

      <Header name="apikey">Enter your APIKEY here</Header>

   </Headers>

</Add>
Do not put quotation marks or curly braces around the API key
Leave it as the value for the Header element.

The XML should look like the above.
The final change that is needed is to alter the *AssignTo* element so it is empty. Even though the documentation says that this is an optional element it is still required as an empty element.
Above is the final XML that is needed for the hard coded policy option.
Click the “Update” button which will update the policy definition and then on the API Screen, click the “Save” button to save the changes to the API.
Finally from the overflow menu in the top right, choose the “Deploy” button to deploy the API to the API Management Server and make it available for callers to consume. The State will then change from "Not Deployed" to "Deployed"
To wrap up, what will happen here is that the caller will make a request to the API Proxy URL and this will execute the “Hardcoded_API_key” policy that adds an “apikey” header to the request and then sends the request to the API Hub.
You can now use the API Proxy URL in the browser to get a list of employee employment information from SuccessFactors.
Option 2 - Passing the API Key in the URL Query Parmameter
In the first part the API key was hard coded into the policy and this was passed to the API Hub. However for a more general and extensible approach the API key can be put into a URL query parameter and then this key can be copied into the header going to the API hub as part of a policy.
To do this in general terms an "extract variable" policy will be used to extract the apikey value from the query parameter and store it. This value will then be used in the "AssignMessage" policy that was created in option 1 and passed to the API Hub.
Open up the API Hub and open the API that was created is Option 1. This was the “SFSF_EmpEmployment” API.
Click on the Policies button and choose “Edit” from the buttons on the top left to edit the policies since a new policy will now be added.
Note the the “Created Policies” in the bottom left show our existing policy. Also note that we are editing the policy as there are plus buttons next to each policy.
Click on the Flows on the left and choose “ProxyEndpoint” and “PreFlow”. This is the place new policy will be added. Since the ProxyEndpoint is being modified we know that we will be modifying the incoming request from a caller coming into the API Management server and since the “PreFlow” option has been chosen the incoming request will be modified.
Select the “Extract Variables” Policy on the right under “Mediation Policies” and click the plus button.
To learn more about the ExtractVariables policy consult the online documentation.
A form will open where some values need to be set.
Set the following:
Policy Name: Extract_API_Key
Stream: Incoming Request
Click “Add” to create the new policy.
The Policy editor screen should look like the following with the most important items highlighted:
There are two flows on the left with one in the endpoint reflow and one in the target preflow.
Furthermore are two created policies and there is the xml for the ExtractVariables proxy preflow policy in the XML Policy Editor.
The XML now needs to be edited to extract the Query Param for the apikey from the URL.
Replace the contents of the ExtractVariables element with the following XML:
<QueryParam name="apikey">

    <Pattern ignoreCase="true">{apikey}</Pattern>

</QueryParam>
In the above XML this will look for a query parameter called “apikey” and create a new variable called apikey valid for the duration of the request. This variable can be used later when we update the “Hardcoded_API_Key” policy to change it to use this variable.
The final XML for the policy should look like the above. Note the curly brackets around the apikey - this creates a variable and assigns the value for the parameter name.
Next the “Hardcoded_API_KEY” policy needs to be changed to use the “apikey” variable instead of the hardcoded API key.
Under “Created Policies” on the bottom left, select the “Hardcoded_API_Key” policy and in the XML replace the key with the value {apikey} - this is the same as variable setup in the Extract Variable policy created earlier. It is import to use the curly braces around the apikey value as this tells API Management that this is a variable and to replace the name with the value assigned to apikey
<!-- This policy can be used to create or modify the standard HTTP request and response messages -->

<AssignMessage async="false" continueOnError="false" enabled="true" xmlns='http://www.sap.com/apimgmt'>

  <!-- Adds the apikey header to the request -->

    <Add>

        <Headers>

 	  <Header name="apikey">{apikey}</Header>

	  </Headers>

     </Add>

<IgnoreUnresolvedVariables>false</IgnoreUnresolvedVariables>
The policy should now look like the one below
Click “Update” and then on the View API screen, click “Save” to save the changes. Since the API is already deployed it does not need to be deployed again.
Finally test that we can pass our API key on the URL try the following:
https://i063124trial-trial.apim1.hanatrial.ondemand.com/i063124trial/EmpEmployment
This will raise an error at the API Management level
"faultstring":"Unresolved variable : apikey"
informing the caller that the apikey variable is missing. Since the apikey is a query parameter another call can be made with this parameter and the call will succeed.
https://i063124trial-trial.apim1.hanatrial.ondemand.com/i063124trial/EmpEmployment?apikey=<YourAPI key here>
and the SuccessFactors data will load.
this completes the exercise on how API management can be used to quickly transform an API request.
- SAP Managed Tags:
- API Management
5 Comments
You must be a registered user to add a comment. If you've already registered, sign in. Otherwise, register and sign in.
Labels in this area
-
ABAP CDS Views - CDC (Change Data Capture)
2 -
AI
1 -
Analyze Workload Data
1 -
BTP
1 -
Business and IT Integration
2 -
Business application stu
1 -
Business Technology Platform
1 -
Business Trends
1,658 -
Business Trends
112 -
CAP
1 -
cf
1 -
Cloud Foundry
1 -
Confluent
1 -
Customer COE Basics and Fundamentals
1 -
Customer COE Latest and Greatest
3 -
Customer Data Browser app
1 -
Data Analysis Tool
1 -
data migration
1 -
data transfer
1 -
Datasphere
2 -
Event Information
1,400 -
Event Information
74 -
Expert
1 -
Expert Insights
177 -
Expert Insights
348 -
General
1 -
Google cloud
1 -
Google Next'24
1 -
GraphQL
1 -
Kafka
1 -
Life at SAP
780 -
Life at SAP
14 -
Migrate your Data App
1 -
MTA
1 -
Network Performance Analysis
1 -
NodeJS
1 -
PDF
1 -
POC
1 -
Product Updates
4,575 -
Product Updates
391 -
Replication Flow
1 -
REST API
1 -
RisewithSAP
1 -
SAP BTP
1 -
SAP BTP Cloud Foundry
1 -
SAP Cloud ALM
1 -
SAP Cloud Application Programming Model
1 -
SAP Datasphere
2 -
SAP S4HANA Cloud
1 -
SAP S4HANA Migration Cockpit
1 -
Technology Updates
6,871 -
Technology Updates
484 -
Workload Fluctuations
1
Related Content
- Adobe form with RAP Based OData Service in Technology Blogs by Members
- Currency Translation in SAP Datasphere in Technology Blogs by Members
- Cache OAuth token using Cache policies in SAP APIM in Technology Q&A
- How to Leverage SAP CI and APIM for Hyperlink with Query Parameters as Input and no Authentication in Technology Blogs by Members
- Certificate file content disappeared from the ICM trace level 3 in ABAP 7.58 in Technology Q&A
Top kudoed authors
| User | Count |
|---|---|
| 15 | |
| 11 | |
| 10 | |
| 9 | |
| 8 | |
| 8 | |
| 7 | |
| 7 | |
| 7 | |
| 7 |