- SAP Community
- Products and Technology
- Technology
- Technology Blogs by SAP
- BTP Mobile Authentication with SAP Build Apps
- Subscribe to RSS Feed
- Mark as New
- Mark as Read
- Bookmark
- Subscribe
- Printer Friendly Page
- Report Inappropriate Content
The most awaited feature BTP Mobile Authentication with SAP Build Apps. In this blog let’s create Build Apps project which does authentication and fetches data from BTP.
Prerequisites:
First, make sure to subscribe to SAP Build Apps.
Project Creation:
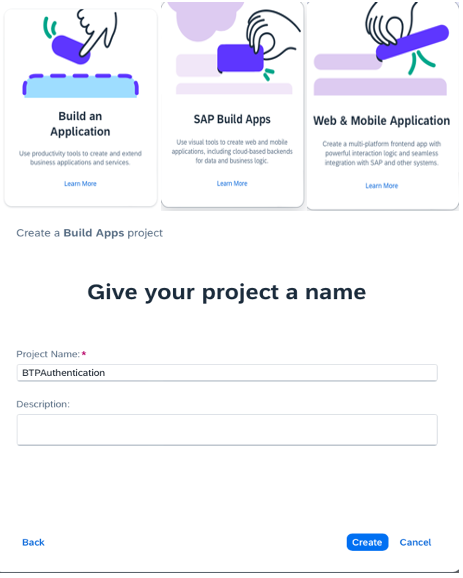
From the Build lobby, create a new project by clicking “Create” button, selecting “Build an Application”, followed by “SAP Build Apps” and “Web & Mobile Application”. Provide a Project Name and click on “Create”.
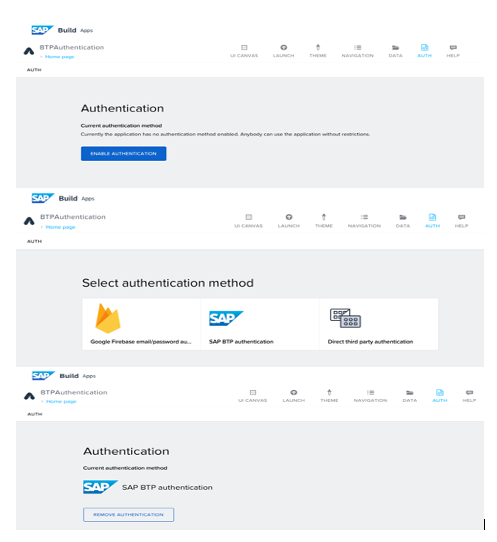
Please select the “Auth” tab
Select “ENABLE AUTHENTICATION” and select “SAP BTP Authentication” and Click “OK”.
This will add SAP BTP Authentication as shown below and this will also add an additional page to our application to handle authentication.
Data Integration:
To test BTP authentication we will add data from BTP Destinations.
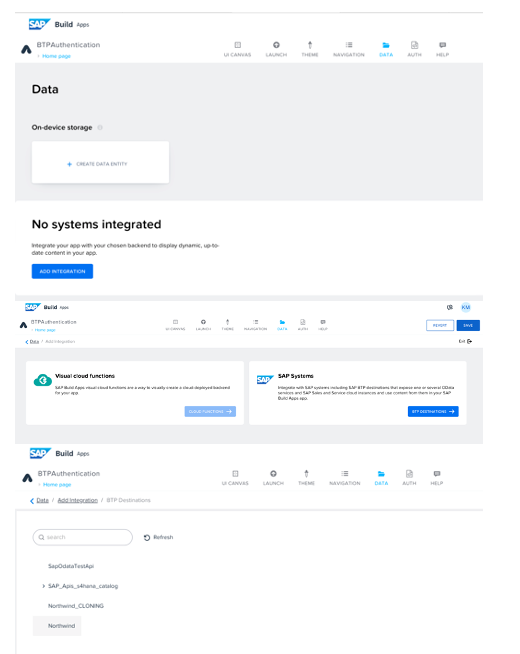
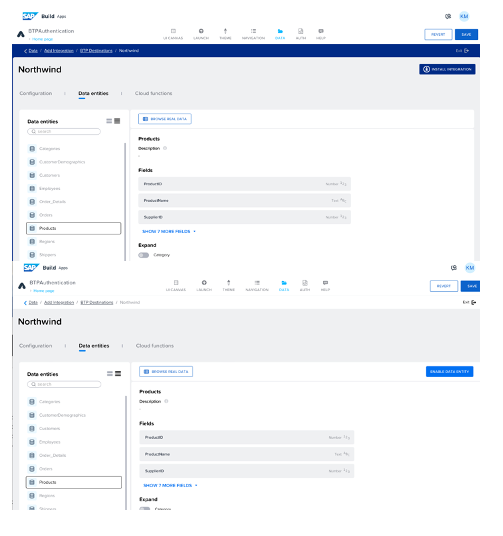
Navigate to “Data” tab, From the “No Systems integrated”, select “ADD INTEGRATION” button. From SAP Systems, Click on “BTP DESTINATIONS”. In the list select “Northwind” destination and we can browse the details. Please select “Products” entity.
To use our destination in the application, select “INSTALL INTEGRATION” and click on “ENABLE DATA ENTITY” button and Click on “SAVE”.
Build Application Creation:
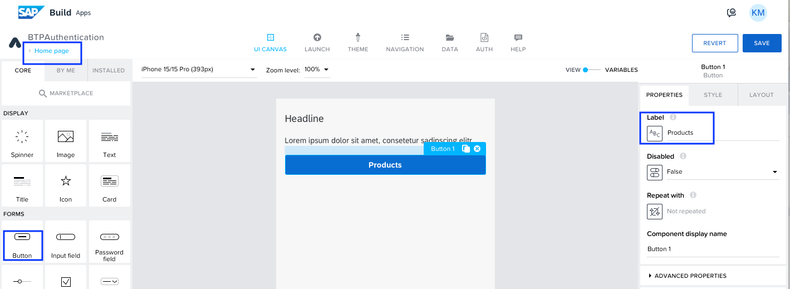
In the Home Page, drag and drop a button. From “PROPERTIES” label it as “Products”.
Click on the “Home page” to add another page to view Product details.
Let’s add a basic list item, for that click on “MARKETPLACE” and select from “Lists”-> “Basic list” and “INSTALL”. Click “SAVE”.
Click on “Configure” and Select “Products” data entity. Drag source data fields to the component fields to the right. Click on “SAVE AND EXIT”.
Go to “Home page” and select “Products” button and add logic for “Navigation”. Drag and drop “Open Page” to the logic panel. Click on “Open page” and configure the page to be opened as “Products.
Click on “Launch” tab and preview the application flow. We have successfully created application to view backend data. Now let’s setup build service.
Build Service:
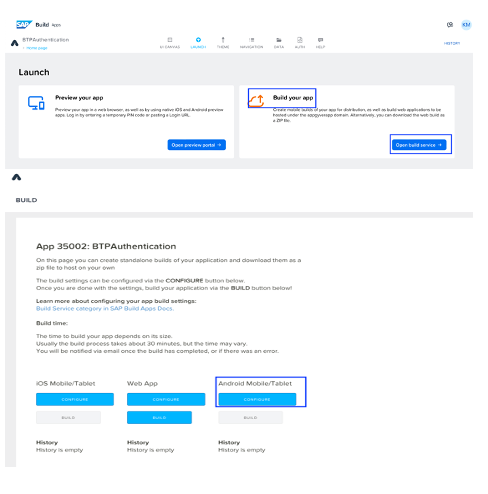
Click on “Launch” tab and Select “Open build service” from “Build your app”.
Let Configure BTP Authentication for Android Mobile device.
Android Build Settings
Add Keystore details and click next and leave the default values for “Bundle Settings”, “Image Assets” and “Permissions”.
To Configure “Mobile Services” , Click on “Enable SAP Mobile Services”.
From drop down fill in the values with the ones from BTP Cockpit Subaccount – API Endpoint, Org Name, and Name of one of the spaces.
After choosing an API Endpoint, make sure to Click on Login button and after successful login, select organization and Space from dropdown and click “SAVE”.
Now let’s do a Android Build.. Click on the “Buiild” button, once the build is succesful we will able to install and run the .apk on Android device
On Android Device
Yay, the app is ready, we have successfully made an Android build and below is the BTP Authentication flow on the device.
- SAP Managed Tags:
- SAP Mobile Services,
- SAP Build Apps
You must be a registered user to add a comment. If you've already registered, sign in. Otherwise, register and sign in.
-
ABAP CDS Views - CDC (Change Data Capture)
2 -
AI
1 -
Analyze Workload Data
1 -
BTP
1 -
Business and IT Integration
2 -
Business application stu
1 -
Business Technology Platform
1 -
Business Trends
1,658 -
Business Trends
93 -
CAP
1 -
cf
1 -
Cloud Foundry
1 -
Confluent
1 -
Customer COE Basics and Fundamentals
1 -
Customer COE Latest and Greatest
3 -
Customer Data Browser app
1 -
Data Analysis Tool
1 -
data migration
1 -
data transfer
1 -
Datasphere
2 -
Event Information
1,400 -
Event Information
67 -
Expert
1 -
Expert Insights
177 -
Expert Insights
301 -
General
1 -
Google cloud
1 -
Google Next'24
1 -
GraphQL
1 -
Kafka
1 -
Life at SAP
780 -
Life at SAP
13 -
Migrate your Data App
1 -
MTA
1 -
Network Performance Analysis
1 -
NodeJS
1 -
PDF
1 -
POC
1 -
Product Updates
4,577 -
Product Updates
346 -
Replication Flow
1 -
REST API
1 -
RisewithSAP
1 -
SAP BTP
1 -
SAP BTP Cloud Foundry
1 -
SAP Cloud ALM
1 -
SAP Cloud Application Programming Model
1 -
SAP Datasphere
2 -
SAP S4HANA Cloud
1 -
SAP S4HANA Migration Cockpit
1 -
Technology Updates
6,873 -
Technology Updates
429 -
Workload Fluctuations
1
- Invalid value of "AppName" in MDKProject.json. It should contain only alphanumeric characters in Technology Q&A
- Govern SAP APIs living in various API Management gateways in a single place with Azure API Center in Technology Blogs by Members
- SAP Build Apps - より簡単になったSAP Build Process Automationとの連携 in Technology Blogs by SAP
- Configuring SAP CI/CD pipeline for Deploying ReactJS application in Cloud Foundry in Technology Q&A
- How to embed SWZ portal into an iFrame? in Technology Blogs by SAP
| User | Count |
|---|---|
| 32 | |
| 17 | |
| 15 | |
| 14 | |
| 11 | |
| 9 | |
| 8 | |
| 8 | |
| 8 | |
| 7 |
