
- SAP Community
- Products and Technology
- Technology
- Technology Blogs by SAP
- Access Policies: Restrict Access to Integration Ar...
Technology Blogs by SAP
Learn how to extend and personalize SAP applications. Follow the SAP technology blog for insights into SAP BTP, ABAP, SAP Analytics Cloud, SAP HANA, and more.
Turn on suggestions
Auto-suggest helps you quickly narrow down your search results by suggesting possible matches as you type.
Showing results for
Product and Topic Expert
Options
- Subscribe to RSS Feed
- Mark as New
- Mark as Read
- Bookmark
- Subscribe
- Printer Friendly Page
- Report Inappropriate Content
12-12-2023
7:36 AM
SAP Integration Suite comes with default role collections that determine which tasks you are entitled to within a specific tenant (e.g. to administer the tenant, to develop integration artifacts, etc.).
The default role collections apply to the tenant in SAP Integration Suite, but do not apply to specific integration artifacts (e.g. integration flows, mappings, script collection, etc.).
For this reason, SAP Integration Suite allows you to create and manage Access Policies that restrict access to specific integration artifacts.
This is often relevant for GDPR-related cases (including protecting customer and employee data), for organizations where tenants are shared among different department or for cases where organizations are using a single tenant as both dev and test environment.
The documentation in the SAP Help Portal explains the scope of protection in detail.
In this blog we will show you how to setup the Access Policies for SAP Integration Suite and SAP CPI on Cloud Foundry. We will demonstrate a simple use case where we protect all integration flows that could potentially process customer information, by restricting access to all flows that contain the word “Customer” or “Account” in their name. In case you are looking for an example for SAP CPI on NEO, I would recommend the following blog post.
Before getting started it is important that you have provisioned SAP Integration Suite within a certain subaccount on SAP BTP, that you are assigned the role collections related to SAP Integration Suite, and that you are an admin in this subaccount.
So, let's get started!
As you see, I can still see the integration flows, but I can no longer create, edit, copy or monitor the content of the integration flows, which is a great way to protect your artifacts and content.
Hope this helps, let me know your thoughts below!
The default role collections apply to the tenant in SAP Integration Suite, but do not apply to specific integration artifacts (e.g. integration flows, mappings, script collection, etc.).
For this reason, SAP Integration Suite allows you to create and manage Access Policies that restrict access to specific integration artifacts.
This is often relevant for GDPR-related cases (including protecting customer and employee data), for organizations where tenants are shared among different department or for cases where organizations are using a single tenant as both dev and test environment.
The documentation in the SAP Help Portal explains the scope of protection in detail.
Please note, with Access Policies, unauthorized users are still able to view protected resources (e.g. they will be able to view a protected integration flow, but will not be able to edit, copy, download, delete or simulate the flow, or monitor the message content of the flow).
In this blog we will show you how to setup the Access Policies for SAP Integration Suite and SAP CPI on Cloud Foundry. We will demonstrate a simple use case where we protect all integration flows that could potentially process customer information, by restricting access to all flows that contain the word “Customer” or “Account” in their name. In case you are looking for an example for SAP CPI on NEO, I would recommend the following blog post.
Before getting started it is important that you have provisioned SAP Integration Suite within a certain subaccount on SAP BTP, that you are assigned the role collections related to SAP Integration Suite, and that you are an admin in this subaccount.
So, let's get started!
- Create a Custom Role in the SAP BTP Cockpit
The first thing you should do is to go your SAP BTP Subaccount where your SAP Integration Suite tenant is deployed, and then you select “Roles” under the tab “Security”.
As we will be making a Custom Role, you should then scroll down to the role template with name “CustomRoleTemplate” under the application name “it” and click on the button “Create Role”.
 Now, give your Custom Role a name and a description, in this example we will call the role “CI_CustomerData” and the description “Restrict customer data in SAP Integration Suite” and click "Next".
 You are then asked to assign values to the role attributes, in this case we are going to select “Static” as a source and enter the value “CustomerData.Access.Grant”. It is important to remember the value of your role attributes, as this will be used as the name of your Access Policy.
 Finally, you are asked to add the Custom Role to a role collection. In case you have already created a Role Collection, you can select a Role Collection and skip to step 3, in the other case you just click “Next” for now.
Now you are presented with a summary of the configured attributes like below, if everything is okay, you just click “Finish”. - Create a Custom Role Collection and assign users
Once you have created the Custom Role, you should add it to a Role Collection. This can be a Role Collection you already created, or a new Role Collection. Adding it to an existing Role Collection has been addressed in step 1 already.
In this step, we will make a new Role Collection, so select “Role Collections” under the tab “Security” in your SAP BTP Subaccount and click on “Create”. Now, give your Role Collection a name, in this example we will call it “PI_CustomerAccess” and as a description we take “Role Collection to maintain restricted access of Cloud Integration Artifacts” and click on "Create".
 Once the Role Collection is created, you can select it in the list of Role Collections and click on “edit”. You can now add your Custom Role and you can also assign your users. Once you have assigned your Custom Role and your users, click on “Save”.
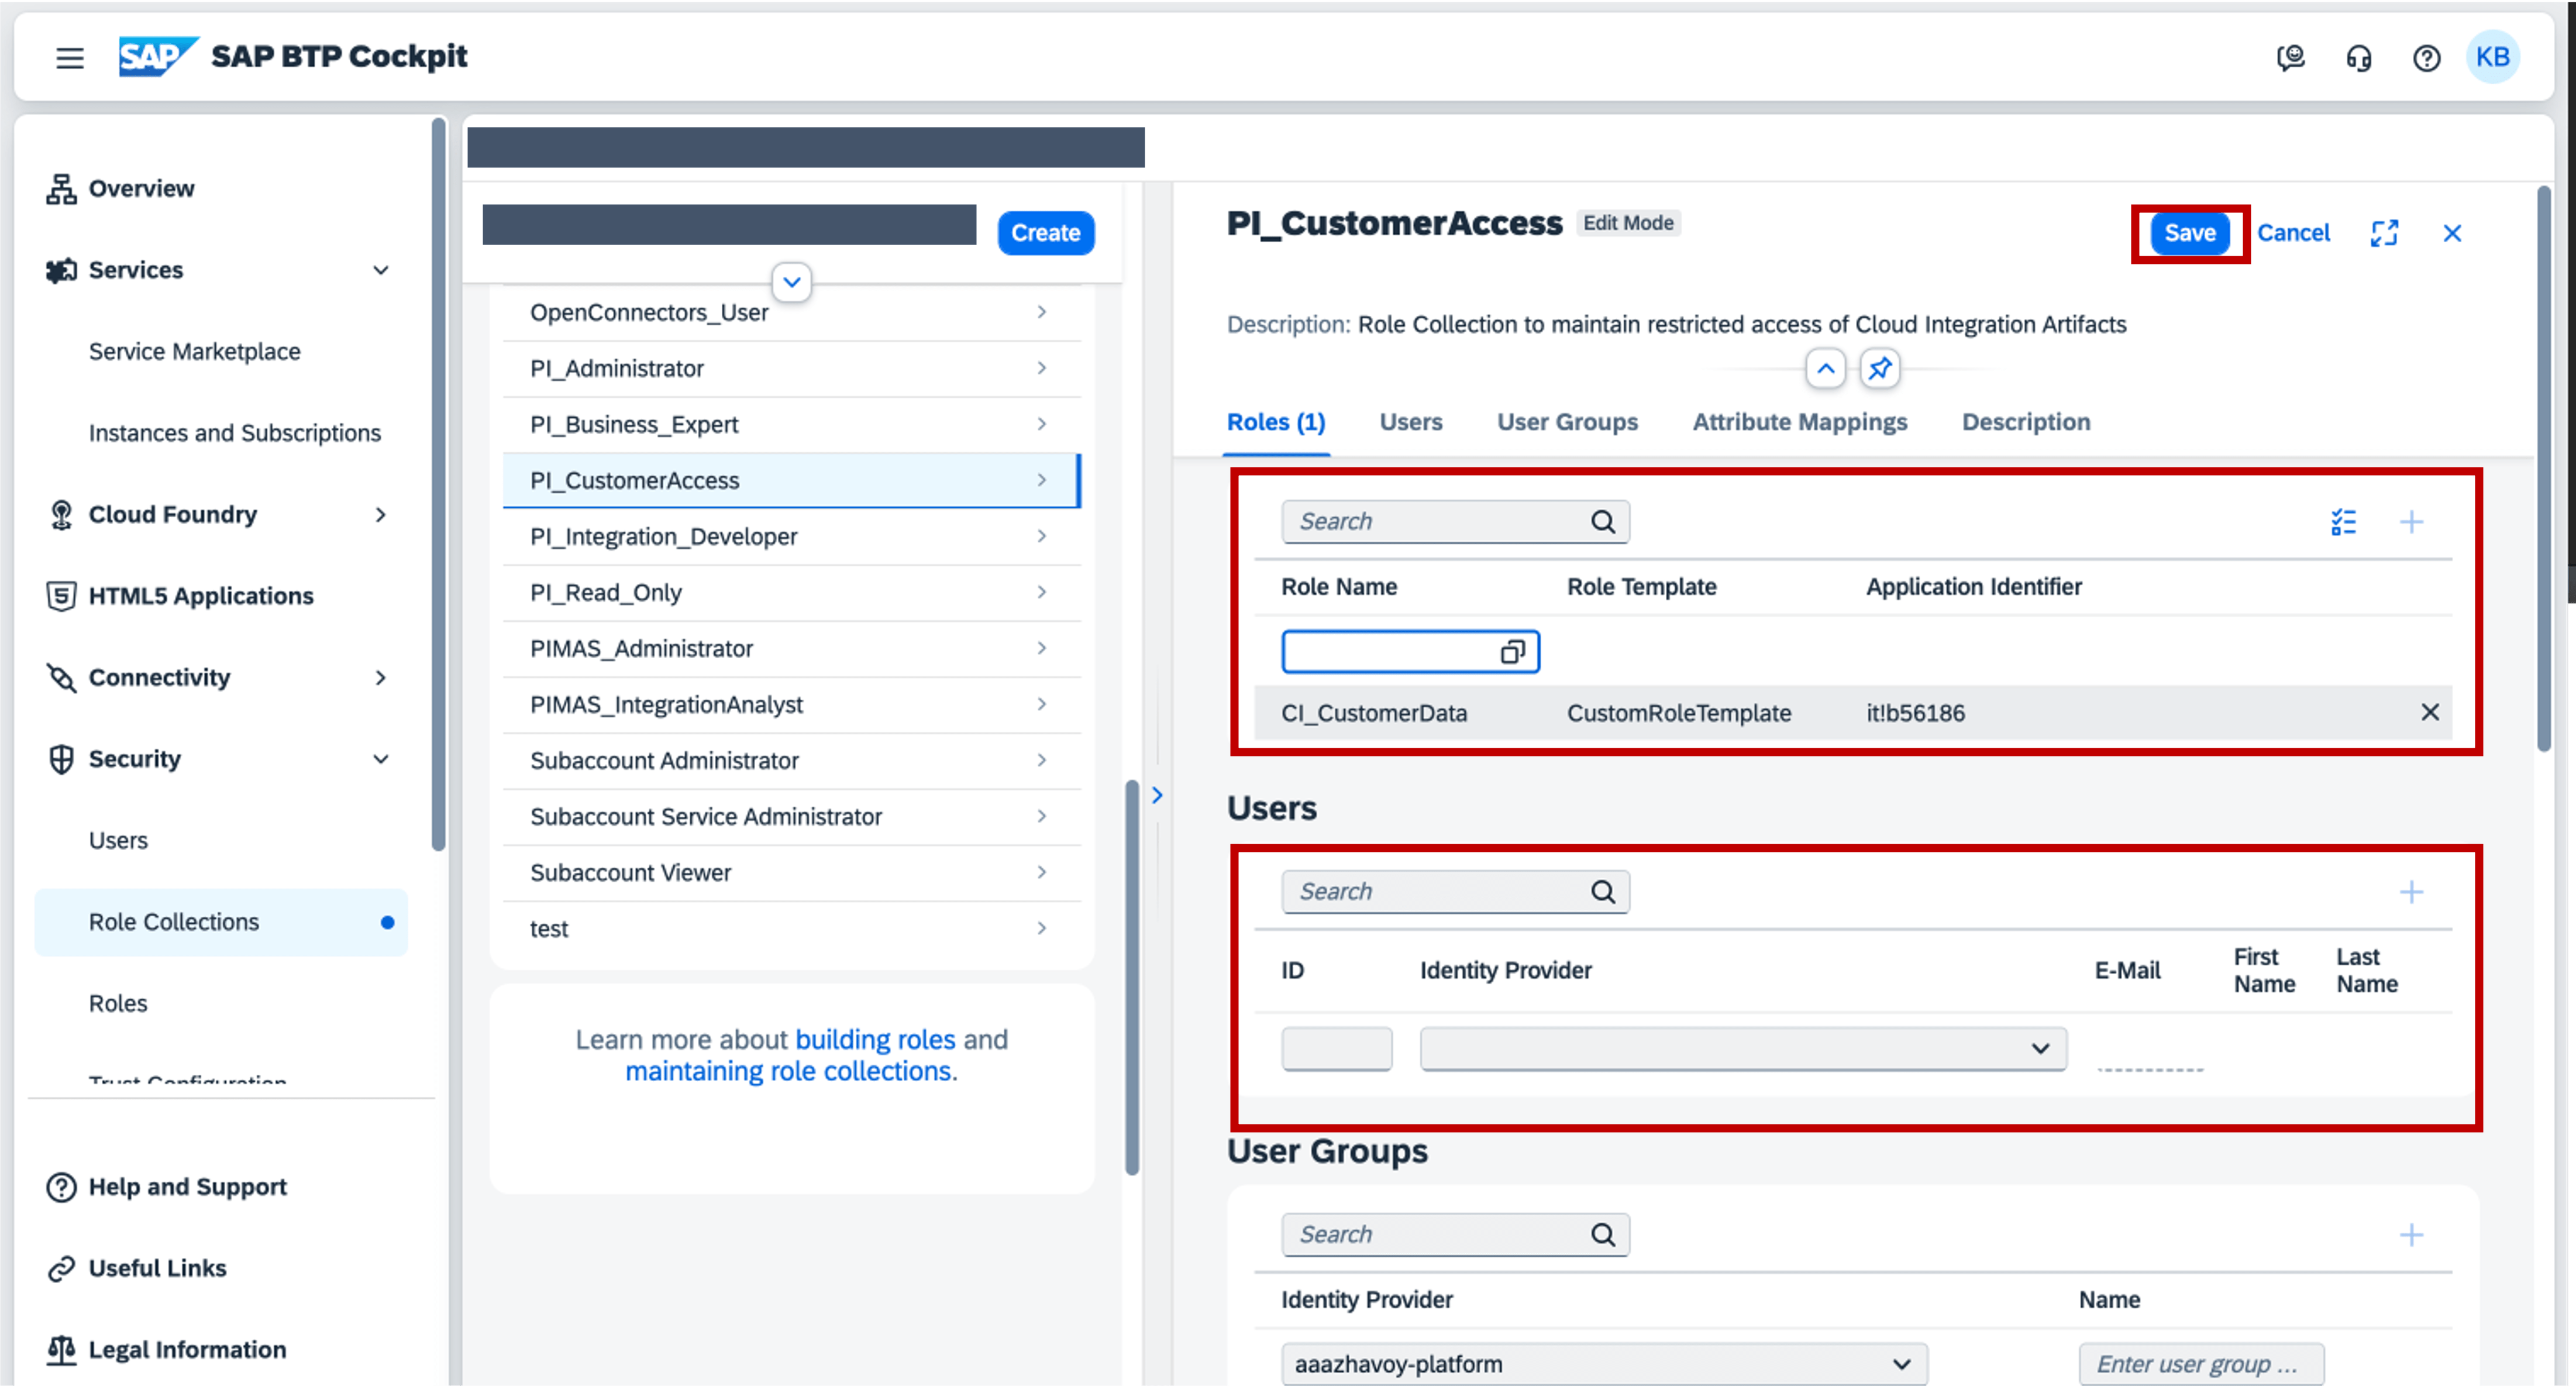
Now, we have created a Custom Role and Role Collection and have added our users to it. - Go to "Manage Access Policies" in SAP Integration Suite
Once the Role Collection is created, and you have added your Custom Role and users, you can create the Access Policy. When in SAP Integration Suite, go to “Monitor” and click on “Integrations and APIs” where you go to the tile “Access Policies” under “Manage Security Material”.

- Create an Access Policy
In “Manage Access Policies” click on the add button at the top of your list of Access Policies.

This opens a pop-up window where you can enter a name and description. It is important that the name of your Access Policy is the same as the name of one of your role attributes specified in the Custom Role in step 1. In this example, we defined “CustomerData.Access.Grant” as a role attribute, this will be the name of the Access Policy. As a description we’ll write: “Grants access to artifacts related to customer data”. Then, click on “Create”.

- Specify Artifact References
Once the Access Policy is created, you can add the Artifact References. This specifies to which integration flow(s), APIs, script collections, mappings, queues, global data stores and variables, data and message types, the Access Policy applies.
So, click on the add button within the list of Artifact References to add a new reference.
 Now, you are asked to enter a name and description, but also artifact type (integration flow, message mapping, OData API, etc), attribute (Name or ID), operator (equals or matches) and a value (in case you chose “Equals”) or expression (in case you chose “Matches”). This specifies the conditions the artifact must comply with to be protected by this Access Policy. In case you choose the operator “equals”, you must specify the exact name of the artifact as value. In case you choose the operator “matches”, you have to enter a valid Java Regular Expression. The attributes of the Artifact References are very well explained in the documentation. Of course, as you protect on name or ID it is important that you enforce good naming conventions in the naming of your artifacts, to ensure they are matching the values and expressions in the Access Policy. In our example, we will protect all integration flows that could contain customer information. Looking at the prebuilt integrations for CRM on the SAP Business Accelerator Hub, a customer is often referred to as customer or account in the title of the iflow. So we’ll restrict access to all flows that contain the word “Customer” or the word “Account”.
This is the Java regex we’ll use for this: ^.*(Account|Customer).*$

Once you click on "Create", the protection of integration flows containing the word “Customer” or “Account” in their name is in place.
- Let's test!
In case you have your Custom Role assigned to your user, you obviously won’t notice a difference once Access Policy are assigned.
Below, some examples of what happens if I try to do the following without the Custom Role assigned to my user:
- Copying Prebuilt Integrations for CRM from the SAP Business Accelerator Hub

- Creating a new Integration Flow containing "Account" in the name

- Editing, copying or deleting an Integration Flow that contains "Customer" in the name

- Monitoring the content of an Integration Flow containing "Customer" in the name (logging content as attachment)

- Copying Prebuilt Integrations for CRM from the SAP Business Accelerator Hub
As you see, I can still see the integration flows, but I can no longer create, edit, copy or monitor the content of the integration flows, which is a great way to protect your artifacts and content.
Hope this helps, let me know your thoughts below!
- SAP Managed Tags:
- SAP Integration Suite,
- Cloud Integration,
- SAP Business Technology Platform
Labels:
8 Comments
You must be a registered user to add a comment. If you've already registered, sign in. Otherwise, register and sign in.
Labels in this area
-
ABAP CDS Views - CDC (Change Data Capture)
2 -
AI
1 -
Analyze Workload Data
1 -
BTP
1 -
Business and IT Integration
2 -
Business application stu
1 -
Business Technology Platform
1 -
Business Trends
1,658 -
Business Trends
93 -
CAP
1 -
cf
1 -
Cloud Foundry
1 -
Confluent
1 -
Customer COE Basics and Fundamentals
1 -
Customer COE Latest and Greatest
3 -
Customer Data Browser app
1 -
Data Analysis Tool
1 -
data migration
1 -
data transfer
1 -
Datasphere
2 -
Event Information
1,400 -
Event Information
67 -
Expert
1 -
Expert Insights
177 -
Expert Insights
301 -
General
1 -
Google cloud
1 -
Google Next'24
1 -
GraphQL
1 -
Kafka
1 -
Life at SAP
780 -
Life at SAP
13 -
Migrate your Data App
1 -
MTA
1 -
Network Performance Analysis
1 -
NodeJS
1 -
PDF
1 -
POC
1 -
Product Updates
4,577 -
Product Updates
346 -
Replication Flow
1 -
REST API
1 -
RisewithSAP
1 -
SAP BTP
1 -
SAP BTP Cloud Foundry
1 -
SAP Cloud ALM
1 -
SAP Cloud Application Programming Model
1 -
SAP Datasphere
2 -
SAP S4HANA Cloud
1 -
SAP S4HANA Migration Cockpit
1 -
Technology Updates
6,873 -
Technology Updates
430 -
Workload Fluctuations
1
Related Content
- Update Public/Private Key in SFTP adapter in Technology Q&A
- Sapphire 2024 user experience and application development sessions in Technology Blogs by SAP
- How to add SAP Datasphere as a datastore in Cloud Integration for data services? in Technology Q&A
- Using Integration Suite API's with Basic Auth in Technology Q&A
- SAP BW/4 - revamp and true to the line 2024 in Technology Blogs by Members
Top kudoed authors
| User | Count |
|---|---|
| 29 | |
| 17 | |
| 15 | |
| 13 | |
| 11 | |
| 9 | |
| 8 | |
| 8 | |
| 8 | |
| 7 |