
- SAP Community
- Products and Technology
- Technology
- Technology Blogs by SAP
- A Tale of Fusion Development with SAP Build: The C...
Technology Blogs by SAP
Learn how to extend and personalize SAP applications. Follow the SAP technology blog for insights into SAP BTP, ABAP, SAP Analytics Cloud, SAP HANA, and more.
Turn on suggestions
Auto-suggest helps you quickly narrow down your search results by suggesting possible matches as you type.
Showing results for
Advisor
Options
- Subscribe to RSS Feed
- Mark as New
- Mark as Read
- Bookmark
- Subscribe
- Printer Friendly Page
- Report Inappropriate Content
01-09-2024
9:54 AM
I'm Chinmaya, an SAP BTP Integration expert, supporting kanishka.raghuraman and evgeniy.gorbunov in building the invoice processing scenario using SAP Build. I am delighted to be a part of this tale.
In a brief recap of the previous blog A Tale of Fusion Development with SAP Build | SAP Blogs, our citizen developer Kanishka explained our invoices scenario and how we are solving it using the offerings of the SAP Business Technology Platform. We are Building an end-to-end solution for the invoice hassle using SAP Build Apps, SAP Build Process Automation, SAP Integration Suite, and SAP Document Management Service.
Now, let's dive into the technical configuration to understand how this integration can be achieved. This scenario is also an example of SAP’s new functionality Enterprise Automation approach by SAP. In this blog Introducing New Capabilities for Enterprise Automation | SAP Blogs, you can know more about this functionality and the purpose using of SAP Build and SAP Integration Suite jointly.
SAP Build is an amazing low-code solution to create automations and apps with drag and drop ease, allowing us to rapidly address process inefficiencies and SAP Integration Suite helps us to reduce the complexity across on-premises and multi-cloud environments and allows us to support end-to-end process optimization.
This invoice processing scenario has three integrations. In this blog post, we can look in details on how to connect SAP Build Apps to SAP Document Management Service (1).
How to connect Build Apps to Build Process Automation (2) is explained in this very detailed guide by Manuel Namyslo: How-to: Combine SAP Build Process Automation with SAP Build Apps – Version 2 | SAP Blogs
How to connect Build PA to Document Management Service (3) is explained in this very detailed guide by Bota Zhatakbayeva: Utilizing BTP DMS in SAP Build Process Automation automations and forms | SAP Blogs
WorkingWithDocManagementServiceAPIs.postman_collection.json
Please subscribe to the Build Apps as described here: Prerequisites | SAP Help Portal
Step-1: Navigate to Instances and Subscription of your BTP Subaccount.
Step-2: Click on Create to create an instance of “Document Management Service- Integration Option”
Step-3: Create service key (say, skey).
Step-4: Download the key json file for future reference.
Please note: Please note the ecmservice endpoint URL, clientid, clientsecret and authentication URL. It will be used in future sections.
For More Info: Configure SAP Document Management Service for Process Attachments | SAP Help Portal
SAP Integration Suite combines the integration capabilities such as Cloud Integration (Process Integration), API Management, Integration Advisor, Trading Partner Management, Integration Assessment, and Open Connectors into a cohesive and simplified toolkit for enterprise integrations. To provide a comprehensive integration experience, these services are available as part of the Integration Suite.
Please follow the step-by-step process in this Link to setup Integration flow in CPI and Configure SAP API Management in your BTP subaccount.
Step-1: Navigate to Instances and Subscription of your BTP Subaccount.
Step-2: Click on Create to create an instance of “Process Integration Runtime”
Click on Create.
Step-3: Create service key (say, cpiruntime_skey) for the instance you just created.
Step-4: Navigate to the created service key and download.
Step-1: Open the postman. Import the postman collection “WorkingWithDocManagementServiceAPIs”.
Step-2: Select the Collection and go to Variables section. Fill up the details in Current value column of respective variable as and when you get the information.
Please note: sdm_token will be generated automatically via postman script. Do not enter manually.
Firstly we would need to create a repository using Document Management service (Integration Option). We can do that using Postman.
Step-1: Open the postman. Select the collection “WorkingWithDocManagementServiceAPIs”.
Step-2: Call below API to get the token to create Doc repository.
(Refer the Postman Collection WorkingWithDocManagementServiceAPIs -> Get Token)
Please note: Please make sure, you already filled the values of oauthserver, sdm_clientid and sdm_clientsecret in Variables tab of Collection already.
Step-3: After getting the access_token, execute the API request to create Document Repository.
(Refer the Postman Collection WorkingWithDocManagementServiceAPIs -> Create Repository)
Body - JSON Payload:
On successful execution of the API, you will see that your requested repository is created. Please take a note on two values cmisRepositoryId and id.
Step-1: Open the postman. Select the collection “WorkingWithDocManagementServiceAPIs”.
Step-2: Call below API to post the file to Document repository.
(Refer the Postman Collection WorkingWithDocManagementServiceAPIs -> Post a Document)
Please note:
You need to change the repositoryId, objectId, propertyValue[0] and filename.
Step-3: You can see that the Document posted successfully and you can always get that document later by using the cmis:ObjectId of the response.
Now, we will see a simplified way to upload a document to the Document repository, i.e. upload the document using XML payload with base64 of the image.
Step-1: Open the postman. Select the collection “WorkingWithDocManagementServiceAPIs”.
Step-2: Call below API to post the file to Document repository.
(Refer the Postman Collection WorkingWithDocManagementServiceAPIs -> Post a Document - Atom)
Note 1: You need to change the Repository ID, Object ID, cmis:value, chemistry:filename and cmisra:base64
Note 2: When we are going to post the Image from Build Apps, it has inbuilt plugin to do the base64 conversion.
Step-3: You can see that the document posted successfully, and you can always get that document later by using the cmis:value of the response.
Step-1: Download the CPI package zip file from the below mentioned github repository.
DMSRepoUpload.zip
Step-5: Click on the connector from Sender and navigate to connection tab.
Note the Address field content. i.e. “/docrepofileupload”
Step-7: Click on Connector to the Receiver and Navigate to Connection Tab
Also, please note the credential name “sdmrepocred”. This we need to create under “Security Material” and deploy.
Step-9: Save and Deploy the iFlow.
Step-10: Navigate to “Monitor-Integrations and APIs”. Click on “Security Material” tile and click on to create new oAuth2 Client Credentials “sdmrepocred”.
Enter the Token service url, client id and client secret from the service key json document of “Document Management Service- Integration Option” which you have downloaded in previous section.
Step-11: Click on Deploy.
Step-12: Click again on “Monitor-Integrations and APIs”. Navigate to group “Manage Integration Content” and click on “All Started” tile.
Step-13: Search with “DocUploadiFlow” integration Flow. You will get the details of the flow with the Endpoint URL. Please take a note of this. It may take a while to show the Endpoint URL.
Step-14: Let’s verify the API endpoint using PostMan.
Open the postman. Select the collection “WorkingWithDocManagementServiceAPIs”.
Call below API to post the file to Document repository.
(Refer the Postman Collection WorkingWithDocManagementServiceAPIs -> Post a Document - Atom - CPI iFlow)
Body JSON payload :
Please note: Filename should be different, when you are sending to Document Repository.
You can see that the Document posted successfully.
Step-1: Log into the API Portal and click on configure to create API provider.
Step-2: Click on Create to create API provider for Process Integration Runtime URL.
Step-3: Enter the API provider details:
And Click on Save.
Note: You can get Process Integration Runtime URL from the service key file of the Process Integration Runtime Instance.
For this blog, we have created the service key “cpiruntime_skey” in previous section.
Step-4: Now that we have our API provider ready, lets create API.
Step-5: Download the APIM package zip file from the below mentioned github repository.
doc_repo_upload_api.zip
Step-6: Navigate to the API Portal. Go to Design Section. Click on “Import API” to import the doc_repo_upload_api.zip file.
Step-8: You can see the details of API, which you just imported.
Step-9: Click on Edit and go to Policy.
Here, you need to change the variable “boc.basic” value with required Basic authentication string value.
The basic authentication string can be calculated as below in any browser console.
"Basic " + btoa("<ClitentID>:<Secret>")
Please Note: There is a blank space after Basic, with in quotes.
e.g:
ClientID: you can get the clientid from Process Integration runtime instance service key
Secret: you can get the clientsecret from Process Integration runtime instance service key
Click on "Preflow" and select the policy "tokencall".
Update the URL with the tokenurl from service key “cpiruntime_skey".
Please note: No need of any other change here. Please keep the policies as it is.
Step-12: After change, click on Update.
Open the postman collection “WorkingWithDocManagementServiceAPIs”
Execute the API Request “Post a Document - Atom - CPI iFlow - API Proxy”
Please note: Before executing this API, make sure you update the value of api_proxy as <API Proxy URL from previous Section> in Postman collection Variable.
Body JSON payload :
Step-16: You can see that the Document posted successfully. Please note the cmisvalue->TEXT to get the Object ID of the created Document.
Now that we are ready with the API proxy URL, we can start building application in our low code no code Build Apps to create a quick application to upload any image to Document Repository
To quickly build the application, here we will import a sample app built by Kanishka and Evgeniy.
Step-1: Log into the SAP Build Lobby
Step-2: Download the Build Apps MTAR file from the below mentioned github repository.
InvoicePostingToDocRepo.mtar
Step-3: Click on Import Button to import the existing Build Apps project InvoicePostingToDocRepo.mtar file.
Please note: The Project is already built for you, where you can pick the invoice image and upload to Document Repository.
Click on the “PostDocument” Data entity.
Step-7: Change the Resource URL with your API Proxy URL. Save the Data Entity.
i.e. <API Proxy URL from previous Section>/docrepofileupload
Please note: The UI and required logic is already in place. No Need to change to make it work. However, you can alter this based on your requirement.
Step-9: This UI shows to enter few details like Name and Email. Pick the invoice Image and then Submit.
Step-10: Check the logic for both the buttons “Pick Invoice Image” and “Submit” to understand the flow.
Step-12: Select your project and click on “Open”
Note: In this blog, we have seen how to upload the document directly under repository. However, you can always create folder structures in the repository and then upload the document to the folder.
In this blog post, we explained, how you can connect SAP Build Apps to SAP Document Management Service using SAP Integration Suite. This way you will be able to post the documents in order to later retrieve them from the Document Management Service repository in different applications.
As of our target scenario, we would like to acquire this document on the SAP Build Process Automation level in order to extract the data and post it ot the SAP S/4HANA system.
After we retrieve this object ID, we can leverage it to acquire this document in the Build Process Automation, as described in the blog: Utilizing BTP DMS in SAP Build Process Automation automations and forms | SAP Blogs
In order to connect Build Apps to Build Process Automation, please refer to this blog post: How-to: Combine SAP Build Process Automation with SAP Build Apps – Version 2 | SAP Blogs
This ends our tale of fusion development for Invoice processing. This will improve the invoice management in SAP Build Roadshows and also in many of your scenarios. This is just an end of Invoice processing scenario, but not the tale fusion development and enterprise automation by SAP. For more details on the fusion development, please refer to this blog post (Fusion development – when professional and citizen developers come together | SAP Blogs).
Feel free to share your thoughts, questions, and fusion development experiences in the comments, and suggest additional use cases you would like us to cover.
We will Return!!!! 🪖🛠️💻
Join the SAP Builders group to get the latest and greatest on SAP Build. And follow us on social media for daily news: LinkedIn, Twitter.
In a brief recap of the previous blog A Tale of Fusion Development with SAP Build | SAP Blogs, our citizen developer Kanishka explained our invoices scenario and how we are solving it using the offerings of the SAP Business Technology Platform. We are Building an end-to-end solution for the invoice hassle using SAP Build Apps, SAP Build Process Automation, SAP Integration Suite, and SAP Document Management Service.
Now, let's dive into the technical configuration to understand how this integration can be achieved. This scenario is also an example of SAP’s new functionality Enterprise Automation approach by SAP. In this blog Introducing New Capabilities for Enterprise Automation | SAP Blogs, you can know more about this functionality and the purpose using of SAP Build and SAP Integration Suite jointly.
SAP Build is an amazing low-code solution to create automations and apps with drag and drop ease, allowing us to rapidly address process inefficiencies and SAP Integration Suite helps us to reduce the complexity across on-premises and multi-cloud environments and allows us to support end-to-end process optimization.
Architecture: The Breakdown

This invoice processing scenario has three integrations. In this blog post, we can look in details on how to connect SAP Build Apps to SAP Document Management Service (1).
How to connect Build Apps to Build Process Automation (2) is explained in this very detailed guide by Manuel Namyslo: How-to: Combine SAP Build Process Automation with SAP Build Apps – Version 2 | SAP Blogs
How to connect Build PA to Document Management Service (3) is explained in this very detailed guide by Bota Zhatakbayeva: Utilizing BTP DMS in SAP Build Process Automation automations and forms | SAP Blogs
Prerequisite:
- You have following services entitled in your BTP subaccount:
- SAP Build Apps
- SAP Document Management Service, Integration Option
- SAP Document Management Service, Repository Option
- SAP Integration Suite
- You have downloaded the postman collection json file, which will help in speeding up the setup.
WorkingWithDocManagementServiceAPIs.postman_collection.json
- For Build Apps, you should have custom IAS setup in your account. And you should have BuildApps Developer roles assigned to you.
Getting Started:
Build Apps setup:
Please subscribe to the Build Apps as described here: Prerequisites | SAP Help Portal
Setup of Document Management Service:
Create Instance and Service Key for ‘Document Management Service, Integration Option’
Step-1: Navigate to Instances and Subscription of your BTP Subaccount.

Step-2: Click on Create to create an instance of “Document Management Service- Integration Option”

Step-3: Create service key (say, skey).

Step-4: Download the key json file for future reference.

Please note: Please note the ecmservice endpoint URL, clientid, clientsecret and authentication URL. It will be used in future sections.
For More Info: Configure SAP Document Management Service for Process Attachments | SAP Help Portal
Setup of SAP Integration Suite:
SAP Integration Suite combines the integration capabilities such as Cloud Integration (Process Integration), API Management, Integration Advisor, Trading Partner Management, Integration Assessment, and Open Connectors into a cohesive and simplified toolkit for enterprise integrations. To provide a comprehensive integration experience, these services are available as part of the Integration Suite.
Please follow the step-by-step process in this Link to setup Integration flow in CPI and Configure SAP API Management in your BTP subaccount.
Create Instance and Service Key for ‘Process Integration runtime’
Step-1: Navigate to Instances and Subscription of your BTP Subaccount.

Step-2: Click on Create to create an instance of “Process Integration Runtime”

Click on Create.
Step-3: Create service key (say, cpiruntime_skey) for the instance you just created.

Step-4: Navigate to the created service key and download.

Keep the downloaded key json file for future reference. Please take a note for clientid, clientsecret, url and tokenurl. It will be used in future sections.
Postman Setup:
Step-1: Open the postman. Import the postman collection “WorkingWithDocManagementServiceAPIs”.
Step-2: Select the Collection and go to Variables section. Fill up the details in Current value column of respective variable as and when you get the information.
> You already have client ID and Secret for both CPI and SDM, which you have created in previous sections. 
Please note: sdm_token will be generated automatically via postman script. Do not enter manually.
SAP Build in Action: How to connect Build Apps to Document Management Service through Integration Suite
Section A: Create Document Repository and upload the document using Postman.
Firstly we would need to create a repository using Document Management service (Integration Option). We can do that using Postman.
Subsection 1: Create Document Repository using Postman.
Step-1: Open the postman. Select the collection “WorkingWithDocManagementServiceAPIs”.
Step-2: Call below API to get the token to create Doc repository.
(Refer the Postman Collection WorkingWithDocManagementServiceAPIs -> Get Token)
Please note: Please make sure, you already filled the values of oauthserver, sdm_clientid and sdm_clientsecret in Variables tab of Collection already.

Step-3: After getting the access_token, execute the API request to create Document Repository.
(Refer the Postman Collection WorkingWithDocManagementServiceAPIs -> Create Repository)
Body - JSON Payload:
{

  "repository": {

    "displayName": "DOCPOC_REPOSITORY",

    "description": "DOCPPOC REPOSITORY",

    "repositoryType": "internal",

    "repositoryCategory": "Collaboration",

    "isVersionEnabled": true,

    "isVirusScanEnabled": false,

    "hashAlgorithms": "SHA-256"

  }

} 
On successful execution of the API, you will see that your requested repository is created. Please take a note on two values cmisRepositoryId and id.
- id : It denotes the Document Repository ID
- cmisRepositoryId : It denotes the Object ID.
Subsection 2: Upload Document to the created repository [Created in last section] using Postman
Step-1: Open the postman. Select the collection “WorkingWithDocManagementServiceAPIs”.
Step-2: Call below API to post the file to Document repository.
(Refer the Postman Collection WorkingWithDocManagementServiceAPIs -> Post a Document)
Please note:
You need to change the repositoryId, objectId, propertyValue[0] and filename.
- repositoryId >> Repository ID
- objectId >> Repository Object ID,
- propertyValue[0] >> cmis filename,
- filename >> File to be uploaded.

Step-3: You can see that the Document posted successfully and you can always get that document later by using the cmis:ObjectId of the response.
Subsection 3: Upload Document to the created repository [Using DMS atom API] using Postman
Now, we will see a simplified way to upload a document to the Document repository, i.e. upload the document using XML payload with base64 of the image.
Step-1: Open the postman. Select the collection “WorkingWithDocManagementServiceAPIs”.
Step-2: Call below API to post the file to Document repository.
(Refer the Postman Collection WorkingWithDocManagementServiceAPIs -> Post a Document - Atom)

Note 1: You need to change the Repository ID, Object ID, cmis:value, chemistry:filename and cmisra:base64
- Repository ID >> Document Repository ID
- Object Id >> Repository Object ID
- cmis:value >> File name.
- chemistry:filename >> File name with extension.
- cmisra:base64 >> Base64 of the Image [For base64 conversion of the image, we can use any available online tool]
Note 2: When we are going to post the Image from Build Apps, it has inbuilt plugin to do the base64 conversion.

Step-3: You can see that the document posted successfully, and you can always get that document later by using the cmis:value of the response.
Section B: Create Integration Flow to act as a Proxy for the DMS ATOM API
Subsection 1: Creating Integration Flow
Step-1: Download the CPI package zip file from the below mentioned github repository.
DMSRepoUpload.zip
Step-2: Navigate to the Integration Suite Design time. Click on the “Import” button to import the DMSRepoUpload.zip file as package.
 Step-3: You will see newly added package “DMSRepoUpload”. Click on the package and navigate to Artifacts tab.
 Step-4: Click on “DocUploadiFlow” integration flow. You will see a simple flow.
Step-5: Click on the connector from Sender and navigate to connection tab.
Note the Address field content. i.e. “/docrepofileupload”

Step-6: Click Groovy script and open the script file content. Here, you will see that the atom payload for document upload to SDM is already framed, which can take data from iFlow API endpoint.

 No need of any change in the Groovy script
Step-7: Click on Connector to the Receiver and Navigate to Connection Tab

Step-8: Please note that you need to change your Repository ID & Object ID [Which you created in previous section] in Address & Query field respectively.

Also, please note the credential name “sdmrepocred”. This we need to create under “Security Material” and deploy.
Step-9: Save and Deploy the iFlow.
Step-10: Navigate to “Monitor-Integrations and APIs”. Click on “Security Material” tile and click on to create new oAuth2 Client Credentials “sdmrepocred”.


Enter the Token service url, client id and client secret from the service key json document of “Document Management Service- Integration Option” which you have downloaded in previous section.
Step-11: Click on Deploy.
Step-12: Click again on “Monitor-Integrations and APIs”. Navigate to group “Manage Integration Content” and click on “All Started” tile.


Step-13: Search with “DocUploadiFlow” integration Flow. You will get the details of the flow with the Endpoint URL. Please take a note of this. It may take a while to show the Endpoint URL.

Step-14: Let’s verify the API endpoint using PostMan.
Open the postman. Select the collection “WorkingWithDocManagementServiceAPIs”.
Call below API to post the file to Document repository.
(Refer the Postman Collection WorkingWithDocManagementServiceAPIs -> Post a Document - Atom - CPI iFlow)
Body JSON payload :
{

"fileName": "<image filename with extension",

"base64": "<Base64 of the Image>"

}
Please note: Filename should be different, when you are sending to Document Repository.

You can see that the Document posted successfully.
Subsection 2: Creation of API Proxy to resolve the CORS.
Step-1: Log into the API Portal and click on configure to create API provider.

Step-2: Click on Create to create API provider for Process Integration Runtime URL.
Step-3: Enter the API provider details:
- In Overview tab, enter the followings:
- Name: cpiruntime (same name has to be referred while creating API)
- Description: Any description of your choice

- In Connection tab, enter the followings:
- Type: Internet
- Host: Process Integration Runtime URL without https://
- Port: 443
- Use SSL : Selected
And Click on Save.
Note: You can get Process Integration Runtime URL from the service key file of the Process Integration Runtime Instance.

For this blog, we have created the service key “cpiruntime_skey” in previous section.

Step-4: Now that we have our API provider ready, lets create API.
Step-5: Download the APIM package zip file from the below mentioned github repository.
doc_repo_upload_api.zip
Step-6: Navigate to the API Portal. Go to Design Section. Click on “Import API” to import the doc_repo_upload_api.zip file.
 Step-7: You will see newly added API “doc_repo_upload_api”. Click on the API and navigate to details of API. tab.

Step-8: You can see the details of API, which you just imported.

Step-9: Click on Edit and go to Policy.


Step-10: The existing API policy will open in Policy editor. You can navigate to ProxyEndpoint (PreFlow and PostFlow) to see the details of the policies included in this API.

Step-11: Open Scripts section and click on client.js file.

Here, you need to change the variable “boc.basic” value with required Basic authentication string value.
The basic authentication string can be calculated as below in any browser console.
"Basic " + btoa("<ClitentID>:<Secret>")
Please Note: There is a blank space after Basic, with in quotes.
e.g:

ClientID: you can get the clientid from Process Integration runtime instance service key
Secret: you can get the clientsecret from Process Integration runtime instance service key

For this blog, we have created the service key "cpiruntime_skey" in previous section. Please note the tokenurl as well.Click on "Preflow" and select the policy "tokencall".
Update the URL with the tokenurl from service key “cpiruntime_skey".

Please note: No need of any other change here. Please keep the policies as it is.
Step-12: After change, click on Update.

Step-13: Click on Deploy.

Step-14: After successful deployment, you will see the status as “Deployed” and the deployed API Proxy URL.

Step-15: Let us check the API endpoint using PostMan.
Open the postman collection “WorkingWithDocManagementServiceAPIs”
Execute the API Request “Post a Document - Atom - CPI iFlow - API Proxy”
Please note: Before executing this API, make sure you update the value of api_proxy as <API Proxy URL from previous Section> in Postman collection Variable.
Body JSON payload :
{

"fileName": "<image filename with extension",

"base64": "<Base64 of the Image>"

}

Step-16: You can see that the Document posted successfully. Please note the cmisvalue->TEXT to get the Object ID of the created Document.
Now that we are ready with the API proxy URL, we can start building application in our low code no code Build Apps to create a quick application to upload any image to Document Repository
Section B: Create Sample App in Build Apps and upload the image to Document Repository using API Proxy Endpoint.
To quickly build the application, here we will import a sample app built by Kanishka and Evgeniy.
Subsection 1: Create Application using Build Apps
Step-1: Log into the SAP Build Lobby

Step-2: Download the Build Apps MTAR file from the below mentioned github repository.
InvoicePostingToDocRepo.mtar
Step-3: Click on Import Button to import the existing Build Apps project InvoicePostingToDocRepo.mtar file.

Step-4: After successful import, you will see the project under All Projects section.

Step-5: Click on the Project to open it in Build Apps design time.
Please note: The Project is already built for you, where you can pick the invoice image and upload to Document Repository.

Step-6: Click on “Data” tab. You will see one data entity “PostDocument” [Type: REST API Direct Integration], which connects to the API proxy endpoint which we created and tested in last section.
Click on the “PostDocument” Data entity.
Step-7: Change the Resource URL with your API Proxy URL. Save the Data Entity.
i.e. <API Proxy URL from previous Section>/docrepofileupload

Step-8: Go to UI canvas.
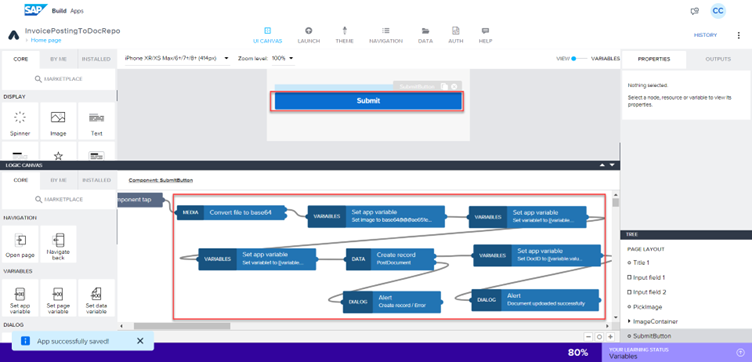
Please note: The UI and required logic is already in place. No Need to change to make it work. However, you can alter this based on your requirement.
Step-9: This UI shows to enter few details like Name and Email. Pick the invoice Image and then Submit.

Step-10: Check the logic for both the buttons “Pick Invoice Image” and “Submit” to understand the flow.

Step-11: Click on Launch tab to preview the App. Then Click on “Open preview portal” button.


Step-12: Select your project and click on “Open”
 Step-13: Enter your details and click on Pick Invoice Image.
 Step-14: After successfully selecting the image, Click on Submit.

Step15: After successful submission to the Document Repository, you will get a success dialog box with Document Object ID.

Note: In this blog, we have seen how to upload the document directly under repository. However, you can always create folder structures in the repository and then upload the document to the folder.
Conclusion:
In this blog post, we explained, how you can connect SAP Build Apps to SAP Document Management Service using SAP Integration Suite. This way you will be able to post the documents in order to later retrieve them from the Document Management Service repository in different applications.
As of our target scenario, we would like to acquire this document on the SAP Build Process Automation level in order to extract the data and post it ot the SAP S/4HANA system.
After we retrieve this object ID, we can leverage it to acquire this document in the Build Process Automation, as described in the blog: Utilizing BTP DMS in SAP Build Process Automation automations and forms | SAP Blogs
In order to connect Build Apps to Build Process Automation, please refer to this blog post: How-to: Combine SAP Build Process Automation with SAP Build Apps – Version 2 | SAP Blogs
This ends our tale of fusion development for Invoice processing. This will improve the invoice management in SAP Build Roadshows and also in many of your scenarios. This is just an end of Invoice processing scenario, but not the tale fusion development and enterprise automation by SAP. For more details on the fusion development, please refer to this blog post (Fusion development – when professional and citizen developers come together | SAP Blogs).
Feel free to share your thoughts, questions, and fusion development experiences in the comments, and suggest additional use cases you would like us to cover.
We will Return!!!! 🪖🛠️💻
Join the SAP Builders group to get the latest and greatest on SAP Build. And follow us on social media for daily news: LinkedIn, Twitter.
Labels:
2 Comments
You must be a registered user to add a comment. If you've already registered, sign in. Otherwise, register and sign in.
Labels in this area
-
ABAP CDS Views - CDC (Change Data Capture)
2 -
AI
1 -
Analyze Workload Data
1 -
BTP
1 -
Business and IT Integration
2 -
Business application stu
1 -
Business Technology Platform
1 -
Business Trends
1,658 -
Business Trends
114 -
CAP
1 -
cf
1 -
Cloud Foundry
1 -
Confluent
1 -
Customer COE Basics and Fundamentals
1 -
Customer COE Latest and Greatest
3 -
Customer Data Browser app
1 -
Data Analysis Tool
1 -
data migration
1 -
data transfer
1 -
Datasphere
2 -
Event Information
1,400 -
Event Information
76 -
Expert
1 -
Expert Insights
177 -
Expert Insights
351 -
General
1 -
Google cloud
1 -
Google Next'24
1 -
GraphQL
1 -
Kafka
1 -
Life at SAP
780 -
Life at SAP
14 -
Migrate your Data App
1 -
MTA
1 -
Network Performance Analysis
1 -
NodeJS
1 -
PDF
1 -
POC
1 -
Product Updates
4,575 -
Product Updates
393 -
Replication Flow
1 -
REST API
1 -
RisewithSAP
1 -
SAP BTP
1 -
SAP BTP Cloud Foundry
1 -
SAP Cloud ALM
1 -
SAP Cloud Application Programming Model
1 -
SAP Datasphere
2 -
SAP S4HANA Cloud
1 -
SAP S4HANA Migration Cockpit
1 -
Technology Updates
6,871 -
Technology Updates
488 -
Workload Fluctuations
1
Related Content
- Unlocking the Potential of Business AI: Engineering Best Practices in Technology Blogs by SAP
- Unleashing the Power of Custom Widgets in SAP Analytics Cloud in Technology Blogs by Members
- IoT: RFID integration with SAP HANA Cloud via SAP BTP in Technology Blogs by Members
- How to Install SAP Cloud Connector on a Mac M2 chipset in Technology Q&A
- How to Install SAP Cloud Connector on a Mac M2 Processor in Technology Q&A
Top kudoed authors
| User | Count |
|---|---|
| 19 | |
| 14 | |
| 11 | |
| 10 | |
| 9 | |
| 8 | |
| 7 | |
| 7 | |
| 7 | |
| 6 |