
- SAP Community
- Products and Technology
- Technology
- Technology Blogs by Members
- SCP Tutorial: Integrate Google Calendar and Mobile...
Technology Blogs by Members
Explore a vibrant mix of technical expertise, industry insights, and tech buzz in member blogs covering SAP products, technology, and events. Get in the mix!
Turn on suggestions
Auto-suggest helps you quickly narrow down your search results by suggesting possible matches as you type.
Showing results for
former_member35
Explorer
Options
- Subscribe to RSS Feed
- Mark as New
- Mark as Read
- Bookmark
- Subscribe
- Printer Friendly Page
- Report Inappropriate Content
11-13-2018
9:36 AM
Hello Dear Community,
in this tutorial we’re going to perform entralling journey and take a look at how we can solve the task of delivering Google Calendar events into SAP Mobile Cards application on a mobile phone.
This is called a Tutorial (instead of just an article) because here I’m going to describe step-by-step path from the goal discovery up to the finish. Though be awared that this is not a guide for very beginners as I’m not going to post screenshots of how to register for SCP trial account or how to install Mobile Cards application. I will also share some thoughts (many thoughts) urging you to leave your comments. Those of you who come here in order to get pure technical stuff can skip large texts. Let’s start!
First of all, why (except just interest) should we at all consider SAP Cloud Platform as a technology for solving our task. I would love to see any suggestions in comments. Meanwhile kindly let me suggest the following answer: while being a strategic decision for an enterprise grade customers SCP offers them a wide toolset of services which allow solving many different tasks relatively easy and relatively fast. That is, you may already have a bunch of solutions running for you in SCP and bringing desired benefits to your business users (this is the main goal, isn’t it?). And once they say: Hey, what about a little (they do really believe in this word) new feature which will throw a Google Calendar events to our users? Here you come at the stage saying exactly what they always expect but so rarely hear: Yes, with our existing SCP we can do this little feature fast and seamless.
The architecture is simple and thus dares to be called charming or at least pretty. Note that there is no Java or any other custom applications. Still there is one not necessary thing which prevents me of calling this as an ideal architecture for this particular task. We will hopefully discuss it later.

But let’s start our step-by-step journey. It will be consisting of the following steps:
Backend for our data
Frontend on a mobile phone
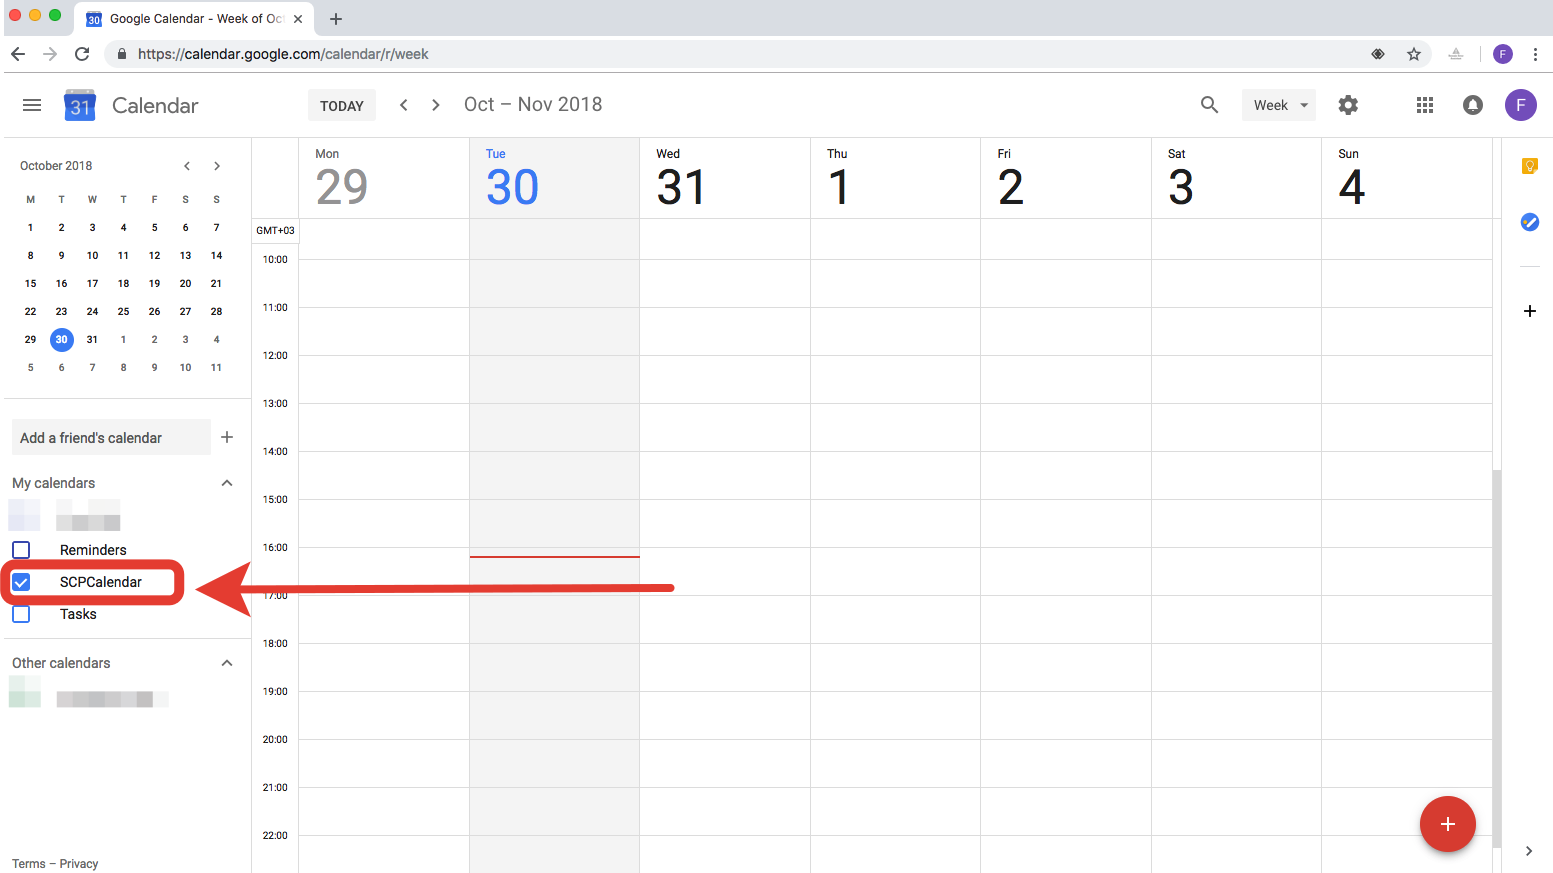
Log in to your Google account and go to Calendar page. There I created new Calendar called SCPCalendar.
Our Calendar is yet empty, we will create some events later.
Now we’re about to get the access to this calendar by API. Go to https://console.developers.google.com and create a new project, call it SCPCalendar.

You will see the notification as on the screenshot below (1). Switch to your newly created project by choosing it from the dropdown in the left top corner (2).

Then click “Enable APIs and Services” (3).
Find the Google Calendar API and click on it.

Then click on ENABLE.
Okay, you’ve enabled your Calendar API, now you should create credentials for it as Google prompts you.

On the next page Google will tries helping you to decide what type of credentials you need for your purposes. As we’re going to call the API from SAP Cloud Platform without any UI I’m pretty sure we choose “Web Server”.

Click on “What credentials do I need” and Google will offer you to create Oauth 2.0 Cliend ID.
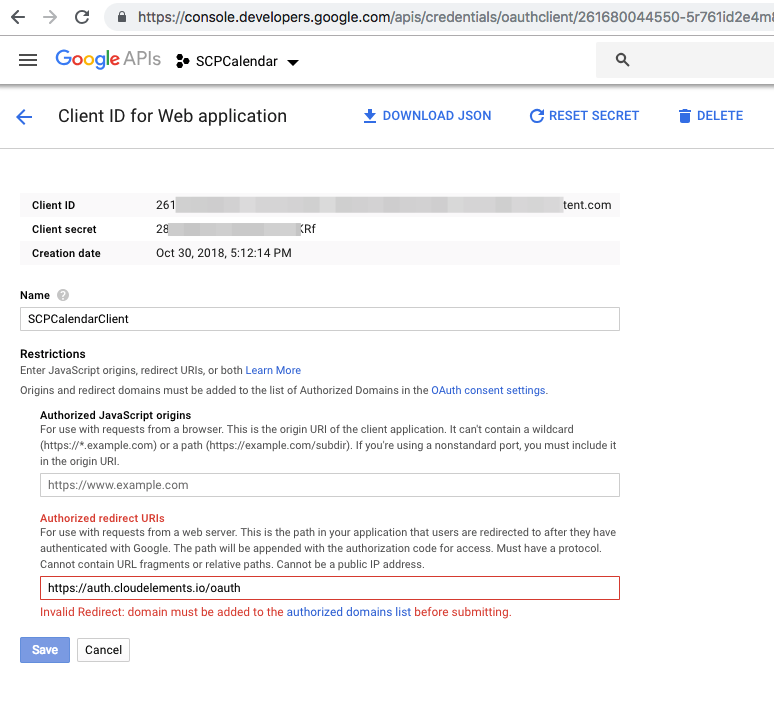
Choose and enter the name your OAuth client ID. I choose “SCPCalendarClient”. Next we are prompted to enter authorized redirect URIs. Sounds great, but at a time we don’t know any URIs to redirect so leave fields blank for now. We click “Create OAuth Client ID”.

Next you can set up the consent screen, I will leave it on your own.
Finally Google creates your Client ID. You don’t need to immediately downoad it as it will be accessible later. Click Done!
Great, we have created OAuth client ID. We can see the Client ID and the Client secret by clicking at the pencil icon.

We have prepared our Google Account and generated OAuth credentials for future use. Please note that even though we created separate Calendar “SCPCalendar” we in fact grant the access to all calendars of this Google Account.
SAP provides growing number of services inside SCP. Here we will take a step into fresh Open Connectors service. There is already pre-defined connector to Google Calendar which we immediately take.
Go to Open Connectors service (Neo environment) and from the list of pre-defined connectors find Google Calendar. Hover the mouse on it and choose Authenticate. Expand optional fields. Copy and paste OAuth API Key (your Client ID) and OAuth API Secret (your Client Secret), then press Create Instance.

Oops, something went wrong as you see the error screen on the new browser tab.

If you switch your browser back to the SCP Open Connector tab you will see loading bar.

Let’s cancel the process and fix it.
Google showed the redirect URI: https://auth.cloudelements.io/oauth.
We must authorize the URI for our OAuth client.
The way we got the redirect URI looks a bit tricky, isn’t it? Unfortunatelly I haven’t found this URI in the SCP official documentation. If some of you know where it is located, please kindly provide a link in comments.
Okay, go back to your Google Developer Console, click at the pencil near your OAuth Client and paste https://auth.cloudelements.io/oauth into Authorized redirect URIs. You will see immediatelly the message saying you should also add the domain to the authorized domains list.
No problem, just click on the link (or head to the tab labeled “OAuth consent screen”) and in the “Authorized domains” field paste: cloudelements.io.

Click on Save and don’t forget to go back to your OAuth Client and add Redirect URI https://auth.cloudelements.io/oauth as it hasn’t been saved yet.
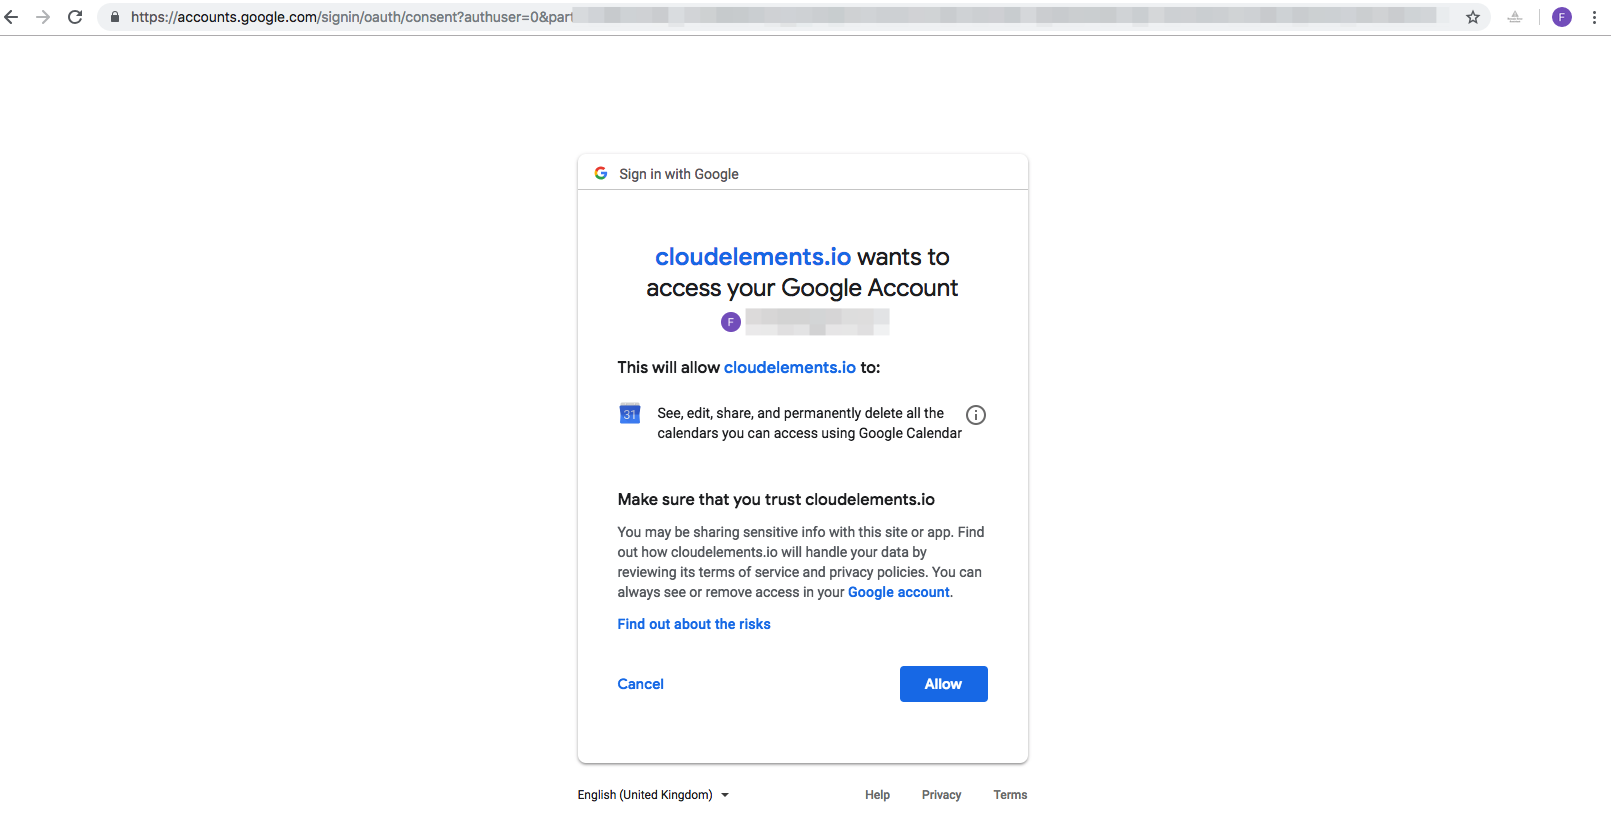
Now go back to your Open Connector tab and again click Create Instance. Wow, now we see completely different picture! It looks like we do right things as you can see the invitation from Google to grant the access to your account.
After you allow the access you are automatically redirected back to SCP Open Connectors service. It congratulates you!

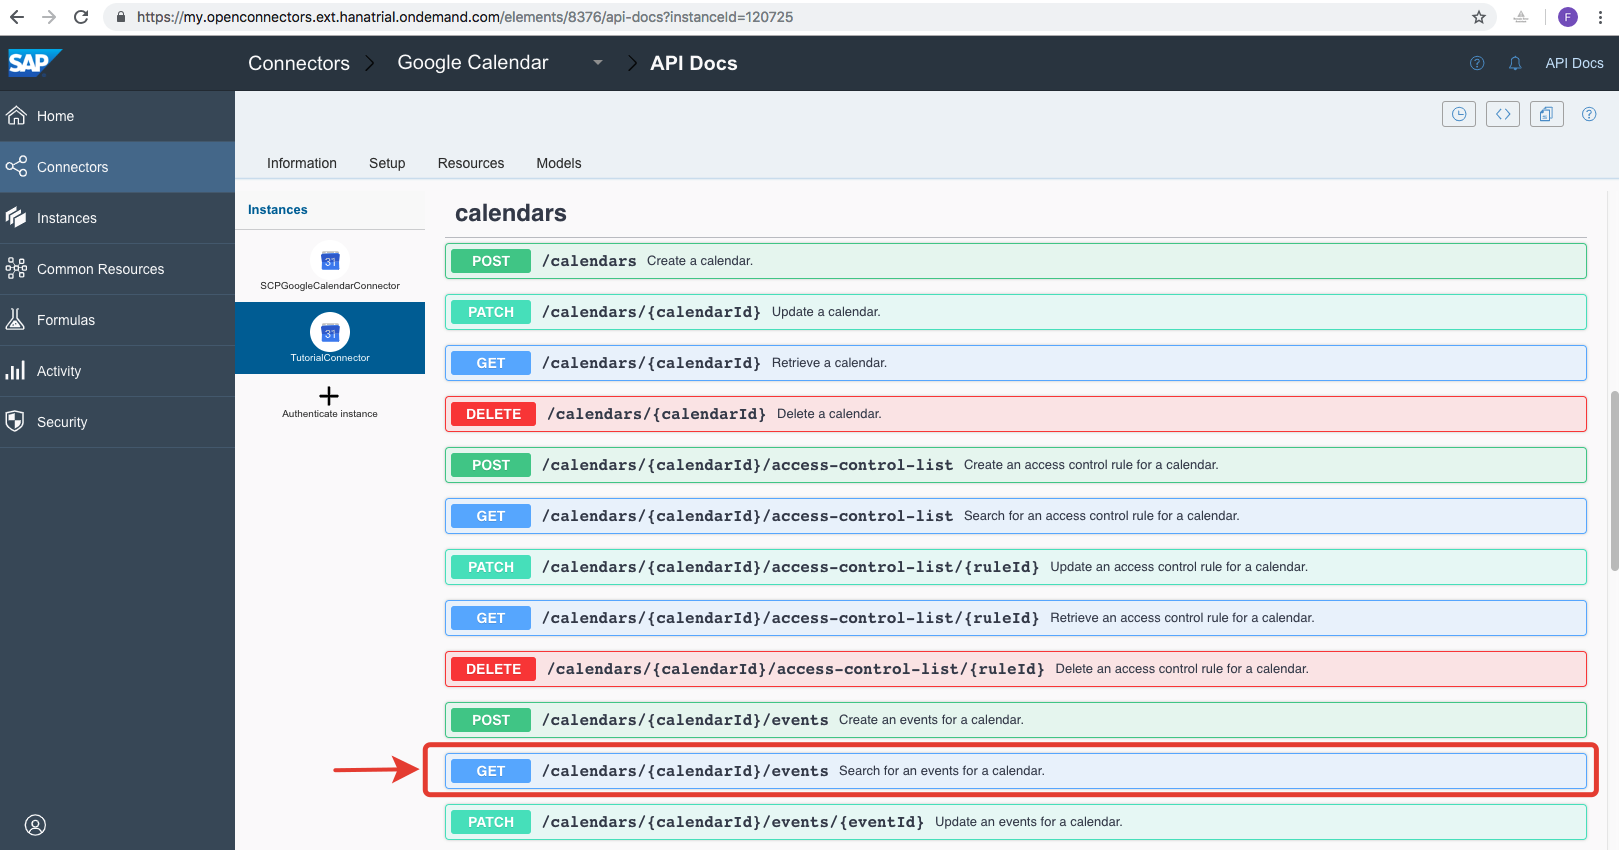
Can’t wait to try what we have just created? Nothing can be easier! Go to Instances area and find your connector there. Let’s test it, click at “API Docs” button from the right.
You will see the list of all possible pre-defined request you are now able to work with.
Let’s explore the list of calendars. To do this we use the GET request /calendar-list.

Click on it and you will see info expanded. There will be a button “Try it out” on the right. What’re you waiting for, just click on it and then click Execute!
Scroll down to see hopefully the same what I see. Response code 200 (means OK) and the response body. If you take a closer look at the response body (it is scrollable) you will find all your calendars including our SCPCalendar.
Please note the id of our SCP calendar which is looks like “yourCalendarGuidHere@group.calendar.google.com”.

Now when we know our calendar ID let’s read its events! Copy the id and let’s now try another GET request: /calendars/{calendarId}/events
Click on it, then “Try it out”, but this time don’t be hurry executing it. We should pass the required parameter calendarId. Paste it and then click on Execute.

We’ve got an empty response body. Oh yes, we haven’t created any events yet, let’s fix this.

I create new event in my Calendar.

Now if I repeat my request through Open Connector I expect to see the result.
It is there!

We’ve succesfully connected to our Google Calendar and received its event via API call.
We can now call our Open Connector instance via https://api.openconnectors.ext.hanatrial.ondemand.com/elements/api-v2/.
Take a look at what we exactly send as a request:

The request contains Authorization Header which consists of User, Organization, Element fields. These fields are needed for Open Connectors Service to be able to recognize you.
You can find your credentials by clicking at the button from the bottom left in the Open Connectors Cockpit.

We will be doing something with these credentials to make all this stuff work later on.
Congratulations, we’ve built our data backend as shown below.

The time to prepare our frontend.
We want events from our SCP Calendar to be moved as Mobile Cards on user’s mobile phone. SAP Cloud Platform Mobile Services is exactly something that we need for this purpose.
Go to SAP Cloud Platform Mobile Services, then expand Mobile Applications menu and go to SAP Mobile Cards.
First of all we should prepare the connection to our backend. Go to Features tab and there click on Connectivity.

Create the new Mobile Destination, I will call it CalendarConnector.
Set the URL: https://api.openconnectors.ext.hanatrial.ondemand.com/elements/api-v2

***Warning – the next step will not work. I believe we should step through it because I position this article as a tutorial, remember? We will fix it later on.***
Next it offers us to add custom headers. Great, this is what we need! You remember there are Authorization header right? We can add our Authorization header with User, Organization and Element fields. (spoiler: this wan’t work! But honestly, how would’ve we knew it?)

Next when it prompts choose SSO Mechanism “No Authentication” as all credentials passed via Authorization header.
Okay, we now have our destination. We can even succesfull Ping it.

It will not work.
But don’t panic, just continue.
Okay, now when we have the Destination it’s time to create our Mobile Card template.
Go to Card Templates and create a new one.
I will name it: CalendarForTutorial.
I also choose the HTML template and so on as shown on the screenshot below.

Select our destination: CalendarConnector (Ping is succesfull).
Please note that I choose Card Template: Automatic Instance Generation. This option is needed when you are going to push new cards from server to mobile devices from time to time.
Collection handling is set to Use Collection as our backend (Google) gives us an array of events.
Query field must be filled. Query is related to destination. Our query is:
/calendar/{your-calendar-id-here}/events
Check the Query by clicking the Check link.

Oops, it gives us 401 error – authentication failed.
We will back to it later and now let’s finish our card template creation.
Go to Sample Data tab and replace the content there with the following:
You should be already familiar with this structure as it is exactly what we get when testing our Open Connector. (I have changed the UUIDs for confidentional reasons).
Please note that we paste only one entity, but Google gives us an array of entities. We do not paste an array and even brackets [ ] because we set ‘Use Collection’ in card template, thus SCP Mobile Service understands what to expect from backend.
Then go to Editor tab. I just changed the content there for the very simple HTML:

For simplicity reasons I use only 3 variables: EventName, EventAuthor, EventDate. All of them are presented in our Sample Data, we just need to prepare the Data Mapping.
Go to Data Mapping tab.
Let’s set the mapping manually.

We have prepared our card. Despite there is a problem with our Query let’s now save the template.
When it asks if we want to save as locked cards, I prefer to choose No.
Now we finally can see our card.

Good, but what with the connection problem?
I think things like this are something to be solved by every developer all the time. It takes time. The platform in turn should eager to help its developers live and deal with it. I hope SCP is gonna be an adult platform and will continue improving developer support.
For our connection issue I spent some time digging and finally discovered that headers which have been set by us in the CalendarConnector destination are got cut out. Other headers except Authorization are passed while the Authorization header is just being deleted. And nowhere in documentation I was able to find anything about this behaviour.
So go back to our CalendarConnector and just delete Authorization header.
I’ve created the Question at https://answers.sap.com/questions/670667/scp-open-connectors-authorization-header.html and got the Answer that for now the only way to go is using SCP API Management Service.
We only need to pass Header to our request. To my mind API Management is too huge for it. Will only hope that guys from SCP work on it. As Divya said: “We are also working with our teams to support this from Connectivity services in a standard manner for our future releases”.
We’ve prepared the look of our Mobile Card. We’ve also realized the problem with passing Authorization header from SCP Mobile Service directly to SCP Open Connectors. We’ve been answered that we should use SCP API Management service.
So now our architecture looks as something like this:

It’s pretty easy thanks to series of posts by Divya Mary (https://blogs.sap.com/2018/09/24/blog-series-simplify-integration-with-third-party-application-with-....
We want our API proxy to be connected to Open Connectors. From Mobile Service we will send the request to a proxy, which in turn will wrap the request to Open Connectors adding the desired headers to it.
Go to SAP Cloud Platform API Management service, then Develop tab and Create a new API proxy.
I will call it CalendarConnectorProxy.
Select the URL radiobutton and paste the full URL of our Open Connector including Calendar id:
https://api.openconnectors.ext.hanatrial.ondemand.com/elements/api-v2/calendars/your-own-calendar-id...
Let’s set the API Base Path the same pretty short name: /CalendarConnectorProxy.


Click Save.
After save click Policies to be forwarded into the Policy Editor. What we need is to apply one policy for our PreFlow. Policy is called AssignMessage.
I called the policy “setAuth”.
The code follows:
From where did I get this code? I wrote it after reading the documentation which can be found here: https://docs.apigee.com/api-platform/reference/policies/assign-message-policy

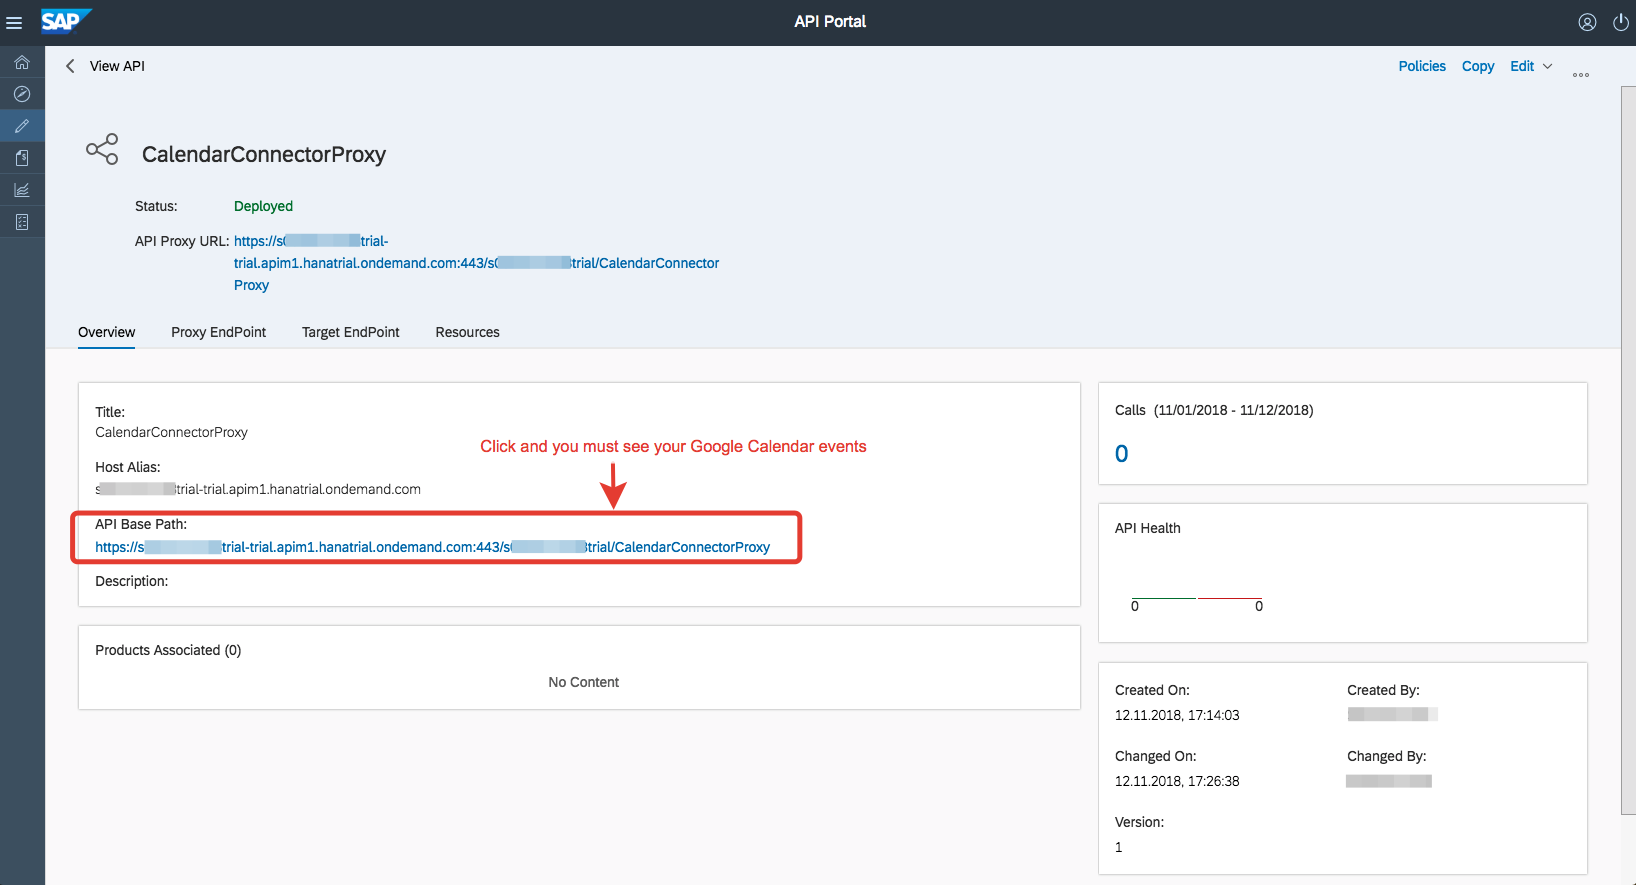
Update the policy and save and deploy the proxy.
After the proxy is deployed you can click on API Proxy URL (or API Base Path) and the new browser tab will open showing you the events of your Google Calendar!
It’s now the very time to go back to our Mobile Service and fix the destination!
Go to SCP Mobile Services, Destinations, find our CalendarConnector destination, edit it. Change the URL from the Open Connector’s URL to newly created API Proxy URL:
https://your-trial-user-trial.apim1.hanatrial.ondemand.com:443/
Use only part of the URL with domain and port. The relative path will be the Query in our Mobile Card Template.
Make sure there are no custom headers and SSO Mechanism is set to No Authentication.

When the destination updated go to our mobile card CalendarForTutorial and change the Query field for the second part of API Base Path: /your-user-trial/CalendarConnectorProxy
If you now click Check, you should finally see the success.

The only what is left to do and what I’m not going to describe (because it’s trivial) is to take your smartphone, install SAP Mobile Cards application, subscribe to CalendarForTutorial card and voila!

Our completed architecture after all.

In this step we leveraged API Management service in order to wrap the request from Mobile Service to Open Connector. We were able to pass Authorization header needed for Open Connectors.
In this tutorial I tried to show the path a developer must go through in order to build something on SAP Cloud Platform.
Actually there was not much code-development, wasn’t it? Just a little HTML for Card Template and some XML lines in API Management Service and that is it.
At the same time we connected three separate SCP services together and got working prototype as a result.
Thank you!
in this tutorial we’re going to perform entralling journey and take a look at how we can solve the task of delivering Google Calendar events into SAP Mobile Cards application on a mobile phone.
This is called a Tutorial (instead of just an article) because here I’m going to describe step-by-step path from the goal discovery up to the finish. Though be awared that this is not a guide for very beginners as I’m not going to post screenshots of how to register for SCP trial account or how to install Mobile Cards application. I will also share some thoughts (many thoughts) urging you to leave your comments. Those of you who come here in order to get pure technical stuff can skip large texts. Let’s start!
Why
First of all, why (except just interest) should we at all consider SAP Cloud Platform as a technology for solving our task. I would love to see any suggestions in comments. Meanwhile kindly let me suggest the following answer: while being a strategic decision for an enterprise grade customers SCP offers them a wide toolset of services which allow solving many different tasks relatively easy and relatively fast. That is, you may already have a bunch of solutions running for you in SCP and bringing desired benefits to your business users (this is the main goal, isn’t it?). And once they say: Hey, what about a little (they do really believe in this word) new feature which will throw a Google Calendar events to our users? Here you come at the stage saying exactly what they always expect but so rarely hear: Yes, with our existing SCP we can do this little feature fast and seamless.
Architecture overview
The architecture is simple and thus dares to be called charming or at least pretty. Note that there is no Java or any other custom applications. Still there is one not necessary thing which prevents me of calling this as an ideal architecture for this particular task. We will hopefully discuss it later.
But let’s start our step-by-step journey. It will be consisting of the following steps:
Backend for our data
- Prepare Google Calendar account and generate credentials;
- Somehow receive data from the Calendar;
Frontend on a mobile phone
- Design the look of our frontend;
- Connect our frontend to our data.
Step 1: Prepare Google account with Calendar
Log in to your Google account and go to Calendar page. There I created new Calendar called SCPCalendar.
Our Calendar is yet empty, we will create some events later.
Now we’re about to get the access to this calendar by API. Go to https://console.developers.google.com and create a new project, call it SCPCalendar.
You will see the notification as on the screenshot below (1). Switch to your newly created project by choosing it from the dropdown in the left top corner (2).
Then click “Enable APIs and Services” (3).
Find the Google Calendar API and click on it.
Then click on ENABLE.
Okay, you’ve enabled your Calendar API, now you should create credentials for it as Google prompts you.
On the next page Google will tries helping you to decide what type of credentials you need for your purposes. As we’re going to call the API from SAP Cloud Platform without any UI I’m pretty sure we choose “Web Server”.
Click on “What credentials do I need” and Google will offer you to create Oauth 2.0 Cliend ID.
Choose and enter the name your OAuth client ID. I choose “SCPCalendarClient”. Next we are prompted to enter authorized redirect URIs. Sounds great, but at a time we don’t know any URIs to redirect so leave fields blank for now. We click “Create OAuth Client ID”.
Next you can set up the consent screen, I will leave it on your own.
Finally Google creates your Client ID. You don’t need to immediately downoad it as it will be accessible later. Click Done!
Great, we have created OAuth client ID. We can see the Client ID and the Client secret by clicking at the pencil icon.
Step 1 summary
We have prepared our Google Account and generated OAuth credentials for future use. Please note that even though we created separate Calendar “SCPCalendar” we in fact grant the access to all calendars of this Google Account.
Step 2: Receiving data from Google Calendar
SAP provides growing number of services inside SCP. Here we will take a step into fresh Open Connectors service. There is already pre-defined connector to Google Calendar which we immediately take.
Go to Open Connectors service (Neo environment) and from the list of pre-defined connectors find Google Calendar. Hover the mouse on it and choose Authenticate. Expand optional fields. Copy and paste OAuth API Key (your Client ID) and OAuth API Secret (your Client Secret), then press Create Instance.
Oops, something went wrong as you see the error screen on the new browser tab.
If you switch your browser back to the SCP Open Connector tab you will see loading bar.
Let’s cancel the process and fix it.
Google showed the redirect URI: https://auth.cloudelements.io/oauth.
We must authorize the URI for our OAuth client.
The way we got the redirect URI looks a bit tricky, isn’t it? Unfortunatelly I haven’t found this URI in the SCP official documentation. If some of you know where it is located, please kindly provide a link in comments.
Okay, go back to your Google Developer Console, click at the pencil near your OAuth Client and paste https://auth.cloudelements.io/oauth into Authorized redirect URIs. You will see immediatelly the message saying you should also add the domain to the authorized domains list.
No problem, just click on the link (or head to the tab labeled “OAuth consent screen”) and in the “Authorized domains” field paste: cloudelements.io.
Click on Save and don’t forget to go back to your OAuth Client and add Redirect URI https://auth.cloudelements.io/oauth as it hasn’t been saved yet.
Now go back to your Open Connector tab and again click Create Instance. Wow, now we see completely different picture! It looks like we do right things as you can see the invitation from Google to grant the access to your account.
After you allow the access you are automatically redirected back to SCP Open Connectors service. It congratulates you!
Can’t wait to try what we have just created? Nothing can be easier! Go to Instances area and find your connector there. Let’s test it, click at “API Docs” button from the right.
You will see the list of all possible pre-defined request you are now able to work with.
Let’s explore the list of calendars. To do this we use the GET request /calendar-list.
Click on it and you will see info expanded. There will be a button “Try it out” on the right. What’re you waiting for, just click on it and then click Execute!
Scroll down to see hopefully the same what I see. Response code 200 (means OK) and the response body. If you take a closer look at the response body (it is scrollable) you will find all your calendars including our SCPCalendar.
Please note the id of our SCP calendar which is looks like “yourCalendarGuidHere@group.calendar.google.com”.
Now when we know our calendar ID let’s read its events! Copy the id and let’s now try another GET request: /calendars/{calendarId}/events
Click on it, then “Try it out”, but this time don’t be hurry executing it. We should pass the required parameter calendarId. Paste it and then click on Execute.
We’ve got an empty response body. Oh yes, we haven’t created any events yet, let’s fix this.
I create new event in my Calendar.
Now if I repeat my request through Open Connector I expect to see the result.
It is there!
Step 2 summary
We’ve succesfully connected to our Google Calendar and received its event via API call.
We can now call our Open Connector instance via https://api.openconnectors.ext.hanatrial.ondemand.com/elements/api-v2/.
Take a look at what we exactly send as a request:
The request contains Authorization Header which consists of User, Organization, Element fields. These fields are needed for Open Connectors Service to be able to recognize you.
You can find your credentials by clicking at the button from the bottom left in the Open Connectors Cockpit.
We will be doing something with these credentials to make all this stuff work later on.
Congratulations, we’ve built our data backend as shown below.
The time to prepare our frontend.
Step 3: Design Mobile Cards for our Calendar events
We want events from our SCP Calendar to be moved as Mobile Cards on user’s mobile phone. SAP Cloud Platform Mobile Services is exactly something that we need for this purpose.
Go to SAP Cloud Platform Mobile Services, then expand Mobile Applications menu and go to SAP Mobile Cards.
First of all we should prepare the connection to our backend. Go to Features tab and there click on Connectivity.
Create the new Mobile Destination, I will call it CalendarConnector.
Set the URL: https://api.openconnectors.ext.hanatrial.ondemand.com/elements/api-v2
***Warning – the next step will not work. I believe we should step through it because I position this article as a tutorial, remember? We will fix it later on.***
Next it offers us to add custom headers. Great, this is what we need! You remember there are Authorization header right? We can add our Authorization header with User, Organization and Element fields. (spoiler: this wan’t work! But honestly, how would’ve we knew it?)
Next when it prompts choose SSO Mechanism “No Authentication” as all credentials passed via Authorization header.
Okay, we now have our destination. We can even succesfull Ping it.
It will not work.
But don’t panic, just continue.
Okay, now when we have the Destination it’s time to create our Mobile Card template.
Go to Card Templates and create a new one.
I will name it: CalendarForTutorial.
I also choose the HTML template and so on as shown on the screenshot below.
Select our destination: CalendarConnector (Ping is succesfull).
Please note that I choose Card Template: Automatic Instance Generation. This option is needed when you are going to push new cards from server to mobile devices from time to time.
Collection handling is set to Use Collection as our backend (Google) gives us an array of events.
Query field must be filled. Query is related to destination. Our query is:
/calendar/{your-calendar-id-here}/events
Check the Query by clicking the Check link.
Oops, it gives us 401 error – authentication failed.
We will back to it later and now let’s finish our card template creation.
Go to Sample Data tab and replace the content there with the following:
{

    "summary": "Say hello to Community",

    "reminders": {

      "useDefault": true

    },

    "creator": {

      "displayName": "Yourname",

      "email": "yourmail@gmail.com"

    },

    "kind": "calendar#event",

    "htmlLink": "",

    "created": "2018-11-06T11:41:58.000Z",

    "iCalUID": "asdsadsadsadasasd@google.com",

    "start": {

      "dateTime": "2018-11-06T15:00:00+03:00"

    },

    "sequence": 0,

    "extendedProperties": {

      "private": {

        "everyoneDeclinedDismissed": "-1"

      }

    },

    "organizer": {

      "displayName": "SCPCalendar",

      "self": true,

      "email": "sdadasdadadafd0@group.calendar.google.com"

    },

    "etag": "\"33424324234340\"",

    "end": {

      "dateTime": "2018-11-06T16:00:00+03:00"

    },

    "id": "7fdsfdsfsdfdfdgf2",

    "updated": "2018-11-06T11:41:58.457Z",

    "status": "confirmed"

}
You should be already familiar with this structure as it is exactly what we get when testing our Open Connector. (I have changed the UUIDs for confidentional reasons).
Please note that we paste only one entity, but Google gives us an array of entities. We do not paste an array and even brackets [ ] because we set ‘Use Collection’ in card template, thus SCP Mobile Service understands what to expect from backend.
Then go to Editor tab. I just changed the content there for the very simple HTML:
<body>

    <div id="mySimpleTemplate" class="myTemplate"

data-type="text/x-handlebars-template">

        <div class="header" style="height: 30px">

            <div style="text-align: left;">

                <span style="font-weight: bold; font-size: 24px; float: left; color: #ffffff; display: inline; padding-top: 8px">

                    {{EventName}}

                </span>

            </div>

        </div>


        <div class="listitem">

                <div class="listitem-label">

                    <span>

                        Author

                    </span>

                </div>

                <br>

                <div class="listitem-value">

                    <span>

                        {{EventAuhor}}

                    </span>

                </div>

        </div>


        <div class="listitem">

                <div class="listitem-label">

                    <span>

                        Event date

                    </span>

                </div>

                <br>

                <div class="listitem-value">

                    <span style="float: right; clear: right; display: inline; font-size: 17px;  padding-top: 4px">

                        {{EventDate}}

                    </span>

                </div>

         </div>


    </div>

</body>
For simplicity reasons I use only 3 variables: EventName, EventAuthor, EventDate. All of them are presented in our Sample Data, we just need to prepare the Data Mapping.
Go to Data Mapping tab.
Let’s set the mapping manually.
We have prepared our card. Despite there is a problem with our Query let’s now save the template.
When it asks if we want to save as locked cards, I prefer to choose No.
Now we finally can see our card.
Good, but what with the connection problem?
I think things like this are something to be solved by every developer all the time. It takes time. The platform in turn should eager to help its developers live and deal with it. I hope SCP is gonna be an adult platform and will continue improving developer support.
For our connection issue I spent some time digging and finally discovered that headers which have been set by us in the CalendarConnector destination are got cut out. Other headers except Authorization are passed while the Authorization header is just being deleted. And nowhere in documentation I was able to find anything about this behaviour.
So go back to our CalendarConnector and just delete Authorization header.
I’ve created the Question at https://answers.sap.com/questions/670667/scp-open-connectors-authorization-header.html and got the Answer that for now the only way to go is using SCP API Management Service.
We only need to pass Header to our request. To my mind API Management is too huge for it. Will only hope that guys from SCP work on it. As Divya said: “We are also working with our teams to support this from Connectivity services in a standard manner for our future releases”.
Step 3 summary
We’ve prepared the look of our Mobile Card. We’ve also realized the problem with passing Authorization header from SCP Mobile Service directly to SCP Open Connectors. We’ve been answered that we should use SCP API Management service.
So now our architecture looks as something like this:
Step 4: SCP API Management to connect Backend and Frontend
It’s pretty easy thanks to series of posts by Divya Mary (https://blogs.sap.com/2018/09/24/blog-series-simplify-integration-with-third-party-application-with-....
We want our API proxy to be connected to Open Connectors. From Mobile Service we will send the request to a proxy, which in turn will wrap the request to Open Connectors adding the desired headers to it.
Go to SAP Cloud Platform API Management service, then Develop tab and Create a new API proxy.
I will call it CalendarConnectorProxy.
Select the URL radiobutton and paste the full URL of our Open Connector including Calendar id:
https://api.openconnectors.ext.hanatrial.ondemand.com/elements/api-v2/calendars/your-own-calendar-id...
Let’s set the API Base Path the same pretty short name: /CalendarConnectorProxy.
Click Save.
After save click Policies to be forwarded into the Policy Editor. What we need is to apply one policy for our PreFlow. Policy is called AssignMessage.
I called the policy “setAuth”.
The code follows:
<!-- This policy can be used to create or modify the standard HTTP request and response messages -->

<AssignMessage async="false" continueOnError="false" enabled="true" xmlns='http://www.sap.com/apimgmt'>

	<!-- Sets a new value to the existing parameter -->

	<Add>

		<Headers>

		    <Header name="Authorization">User paste-your-user-credential=, Organization paste-your-organization-credential, Element paste-your-element-guid=</Header>

		    <Header name="Accept">application/json</Header>

		</Headers>

	</Add>

	<IgnoreUnresolvedVariables>false</IgnoreUnresolvedVariables>

	<AssignTo createNew="false" type="request">request</AssignTo>

</AssignMessage>
From where did I get this code? I wrote it after reading the documentation which can be found here: https://docs.apigee.com/api-platform/reference/policies/assign-message-policy
Update the policy and save and deploy the proxy.
After the proxy is deployed you can click on API Proxy URL (or API Base Path) and the new browser tab will open showing you the events of your Google Calendar!
It’s now the very time to go back to our Mobile Service and fix the destination!
Go to SCP Mobile Services, Destinations, find our CalendarConnector destination, edit it. Change the URL from the Open Connector’s URL to newly created API Proxy URL:
https://your-trial-user-trial.apim1.hanatrial.ondemand.com:443/
Use only part of the URL with domain and port. The relative path will be the Query in our Mobile Card Template.
Make sure there are no custom headers and SSO Mechanism is set to No Authentication.
When the destination updated go to our mobile card CalendarForTutorial and change the Query field for the second part of API Base Path: /your-user-trial/CalendarConnectorProxy
If you now click Check, you should finally see the success.
The only what is left to do and what I’m not going to describe (because it’s trivial) is to take your smartphone, install SAP Mobile Cards application, subscribe to CalendarForTutorial card and voila!
Step 4 summary
Our completed architecture after all.
In this step we leveraged API Management service in order to wrap the request from Mobile Service to Open Connector. We were able to pass Authorization header needed for Open Connectors.
Conclusion
In this tutorial I tried to show the path a developer must go through in order to build something on SAP Cloud Platform.
Actually there was not much code-development, wasn’t it? Just a little HTML for Card Template and some XML lines in API Management Service and that is it.
At the same time we connected three separate SCP services together and got working prototype as a result.
Thank you!
- SAP Managed Tags:
- SAP Mobile Cards,
- SAP Business Technology Platform
You must be a registered user to add a comment. If you've already registered, sign in. Otherwise, register and sign in.
Labels in this area
-
"automatische backups"
1 -
"regelmäßige sicherung"
1 -
"TypeScript" "Development" "FeedBack"
1 -
505 Technology Updates 53
1 -
ABAP
19 -
ABAP API
1 -
ABAP CDS Views
4 -
ABAP CDS Views - BW Extraction
1 -
ABAP CDS Views - CDC (Change Data Capture)
1 -
ABAP class
2 -
ABAP Cloud
3 -
ABAP DDIC CDS view
1 -
ABAP Development
5 -
ABAP in Eclipse
3 -
ABAP Platform Trial
1 -
ABAP Programming
2 -
abap technical
1 -
abapGit
1 -
absl
2 -
access data from SAP Datasphere directly from Snowflake
1 -
Access data from SAP datasphere to Qliksense
1 -
Accrual
1 -
action
1 -
adapter modules
1 -
Addon
1 -
Adobe Document Services
1 -
ADS
1 -
ADS Config
1 -
ADS with ABAP
1 -
ADS with Java
1 -
ADT
2 -
Advance Shipping and Receiving
1 -
Advanced Event Mesh
3 -
Advanced formula
1 -
AEM
1 -
AI
8 -
AI Launchpad
1 -
AI Projects
1 -
AIML
10 -
Alert in Sap analytical cloud
1 -
Amazon S3
1 -
Analytic Models
1 -
Analytical Dataset
1 -
Analytical Model
1 -
Analytics
1 -
Analyze Workload Data
1 -
annotations
1 -
API
1 -
API and Integration
4 -
API Call
2 -
API security
1 -
Application Architecture
1 -
Application Development
5 -
Application Development for SAP HANA Cloud
3 -
Applications and Business Processes (AP)
1 -
Architecture
1 -
Artificial Intelligence
1 -
Artificial Intelligence (AI)
6 -
Artificial Intelligence (AI) 1 Business Trends 363 Business Trends 8 Digital Transformation with Cloud ERP (DT) 1 Event Information 462 Event Information 15 Expert Insights 114 Expert Insights 76 Life at SAP 418 Life at SAP 1 Product Updates 4
1 -
Artificial Intelligence (AI) blockchain Data & Analytics
1 -
Artificial Intelligence (AI) blockchain Data & Analytics Intelligent Enterprise
1 -
Artificial Intelligence (AI) blockchain Data & Analytics Intelligent Enterprise Oil Gas IoT Exploration Production
1 -
Artificial Intelligence (AI) blockchain Data & Analytics Intelligent Enterprise sustainability responsibility esg social compliance cybersecurity risk
1 -
AS Java
1 -
ASE
1 -
ASR
2 -
Asset Management
2 -
Associations in CDS Views
1 -
ASUG
1 -
Attachments
1 -
Authentication
1 -
Authorisations
1 -
Authorizations
1 -
Automate the Interim Account Update rule using Integration Center Job (Time Off)
1 -
Automating Processes
1 -
Automation
2 -
aws
2 -
Azure
2 -
Azure AI Studio
1 -
Azure API Center
1 -
Azure API Management
1 -
B2B Integration
1 -
Background job
1 -
Backorder Processing
1 -
Backpropagation
1 -
Backup
1 -
Backup and Recovery
1 -
Backup schedule
1 -
BADI_MATERIAL_CHECK error message
1 -
Bank
1 -
Bank Communication Management
1 -
BAS
1 -
basis
2 -
Basis Monitoring & Tcodes with Key notes
2 -
Batch Management
1 -
BDC
1 -
Best Practice
1 -
BI
1 -
bitcoin
1 -
Blockchain
3 -
bodl
1 -
BOP in aATP
1 -
BOP Segments
1 -
BOP Strategies
1 -
BOP Variant
1 -
BPC
1 -
BPC LIVE
1 -
BTP
17 -
BTP AI Launchpad
1 -
BTP Destination
2 -
BTP for Sustainability
1 -
Business AI
1 -
Business and IT Integration
1 -
Business application stu
1 -
Business Application Studio
1 -
Business Architecture
1 -
Business Communication Services
1 -
Business Continuity
2 -
Business Data Fabric
3 -
Business Fabric
1 -
Business Partner
13 -
Business Partner Master Data
11 -
Business Technology Platform
2 -
Business Trends
4 -
BW4HANA
1 -
C4C cloud root certificate
1 -
CA
1 -
calculation view
1 -
CAP
5 -
CAP development
1 -
Capgemini
1 -
CAPM
1 -
Catalyst for Efficiency: Revolutionizing SAP Integration Suite with Artificial Intelligence (AI) and
1 -
CCMS
2 -
CDQ
13 -
CDS
2 -
CDS Views
1 -
Cental Finance
1 -
Certificates
1 -
CFL
1 -
Change Management
1 -
chatbot
1 -
chatgpt
3 -
CICD
1 -
CL_SALV_TABLE
2 -
Class Runner
1 -
Classrunner
1 -
Cloud ALM Monitoring
1 -
Cloud ALM Operations
1 -
cloud connector
1 -
Cloud Extensibility
1 -
Cloud Foundry
4 -
Cloud Integration
6 -
Cloud Platform Integration
2 -
cloudalm
1 -
communication
1 -
Compensation Information Management
1 -
Compensation Management
1 -
Compliance
1 -
Compound Employee API
1 -
Configuration
1 -
Connectors
1 -
Consolidation
1 -
Consolidation Extension for SAP Analytics Cloud
3 -
Control Indicators.
1 -
Controller-Service-Repository pattern
1 -
Conversion
1 -
Corrective Maintenance
1 -
Cosine similarity
1 -
CPI
2 -
cryptocurrency
1 -
CSI
1 -
ctms
1 -
Custom chatbot
3 -
Custom Destination Service
1 -
custom fields
1 -
Custom Headers
1 -
Customer Experience
1 -
Customer Journey
1 -
Customizing
1 -
cyber security
5 -
cybersecurity
1 -
Data
1 -
Data & Analytics
1 -
Data Aging
1 -
Data Analytics
2 -
Data and Analytics (DA)
1 -
Data Archiving
1 -
Data Back-up
1 -
Data Flow
1 -
Data Governance
5 -
Data Integration
2 -
Data Quality
13 -
Data Quality Management
13 -
Data Synchronization
1 -
data transfer
1 -
Data Unleashed
1 -
Data Value
9 -
Database
1 -
Database and Data Management
1 -
database tables
1 -
Databricks
1 -
Dataframe
1 -
Datasphere
4 -
Datasphere Delta
1 -
datenbanksicherung
1 -
dba cockpit
1 -
dbacockpit
1 -
Debugging
2 -
Defender
1 -
Delimiting Pay Components
1 -
Delta Integrations
1 -
Destination
3 -
Destination Service
1 -
Developer extensibility
1 -
Developing with SAP Integration Suite
1 -
Devops
1 -
digital transformation
1 -
Disaster Recovery
1 -
Documentation
1 -
Dot Product
1 -
DQM
1 -
dump database
1 -
dump transaction
1 -
e-Invoice
1 -
E4H Conversion
1 -
Eclipse ADT ABAP Development Tools
2 -
edoc
1 -
edocument
1 -
ELA
1 -
Embedded Consolidation
1 -
Embedding
1 -
Embeddings
1 -
Emergency Maintenance
1 -
Employee Central
1 -
Employee Central Payroll
1 -
Employee Central Time Off
1 -
Employee Information
1 -
Employee Rehires
1 -
Enable Now
1 -
Enable now manager
1 -
endpoint
1 -
Enhancement Request
1 -
Enterprise Architecture
2 -
Enterprise Asset Management
2 -
Entra
1 -
ESLint
1 -
ETL Business Analytics with SAP Signavio
1 -
Euclidean distance
1 -
Event Dates
1 -
Event Driven Architecture
1 -
Event Mesh
2 -
Event Reason
1 -
EventBasedIntegration
1 -
EWM
1 -
EWM Outbound configuration
1 -
EWM-TM-Integration
1 -
Existing Event Changes
1 -
Expand
1 -
Expert
2 -
Expert Insights
2 -
Exploits
1 -
Fiori
16 -
Fiori App Extension
2 -
Fiori Elements
2 -
Fiori Launchpad
2 -
Fiori SAPUI5
13 -
first-guidance
2 -
Flask
2 -
Fragment Forms
1 -
Fragment Forms using ABA[
1 -
FTC
1 -
Full Stack
9 -
Funds Management
1 -
gCTS
1 -
GenAI hub
1 -
General
3 -
Generative AI
1 -
Getting Started
1 -
GitHub
11 -
Google cloud
1 -
Grants Management
1 -
groovy
2 -
GTP
1 -
HANA
6 -
HANA Cloud
3 -
hana cloud database
2 -
Hana Cloud Database Integration
2 -
HANA DB
2 -
Hana Vector Engine
1 -
HANA XS Advanced
1 -
HanaDB
1 -
Historical Events
1 -
home labs
1 -
HowTo
1 -
HR Data Management
1 -
html5
9 -
HTML5 Application
1 -
Identity cards validation
1 -
idm
1 -
Implementation
1 -
Improvement Maintenance
1 -
Infuse AI
1 -
input parameter
1 -
instant payments
1 -
Integration
3 -
Integration Advisor
1 -
Integration Architecture
1 -
Integration Center
1 -
Integration Suite
1 -
intelligent enterprise
1 -
Internal Table
1 -
IoT
2 -
Java
1 -
Java Script
1 -
JMS Receiver channel ping issue
1 -
job
1 -
Job Information Changes
1 -
Job-Related Events
1 -
Job_Event_Information
1 -
joule
4 -
Journal Entries
1 -
Just Ask
1 -
Kafka
1 -
Kerberos for ABAP
10 -
Kerberos for JAVA
9 -
KNN
1 -
Launch Wizard
1 -
Learning Content
3 -
Life at SAP
4 -
lightning
1 -
Linear Regression SAP HANA Cloud
1 -
Live Sessions
1 -
Loading Indicator
1 -
local tax regulations
1 -
LP
1 -
Machine Learning
4 -
Marketing
1 -
Master Data
3 -
Master Data Management
15 -
Maxdb
2 -
MDG
1 -
MDGM
1 -
MDM
1 -
Message box.
1 -
Messages on RF Device
1 -
Microservices Architecture
1 -
Microsoft
1 -
Microsoft Universal Print
1 -
Middleware Solutions
1 -
Migration
5 -
ML Model Development
1 -
MLFlow
1 -
Modeling in SAP HANA Cloud
9 -
Monitoring
3 -
MPL
1 -
MTA
1 -
Multi-factor-authentication
1 -
Multi-Record Scenarios
1 -
Multilayer Perceptron
1 -
Multiple Event Triggers
1 -
Myself Transformation
1 -
Neo
1 -
NetWeaver
1 -
Neural Networks
1 -
New Event Creation
1 -
New Feature
1 -
Newcomer
1 -
NodeJS
3 -
ODATA
2 -
OData APIs
1 -
odatav2
1 -
ODATAV4
1 -
ODBC
1 -
ODBC Connection
1 -
Onpremise
1 -
open source
2 -
OpenAI API
1 -
Optimized Story Experience
1 -
Oracle
1 -
Overhead and Operational Maintenance
1 -
PaPM
1 -
PaPM Dynamic Data Copy through Writer function
1 -
PaPM Remote Call
1 -
Partner Built Foundation Model
1 -
PAS-C01
1 -
Pay Component Management
1 -
Personal story
1 -
PGP
1 -
Pickle
1 -
PLANNING ARCHITECTURE
1 -
Plant Maintenance
2 -
Popup in Sap analytical cloud
1 -
Postgresql
1 -
PostgrSQL
1 -
POSTMAN
1 -
Practice Systems
1 -
Prettier
1 -
Proactive Maintenance
1 -
Process Automation
2 -
Product Updates
6 -
Product Updates
1 -
PSE
1 -
PSM
1 -
Public Cloud
1 -
Python
5 -
python library - Document information extraction service
1 -
Qlik
1 -
Qualtrics
1 -
RAP
3 -
RAP BO
2 -
React
1 -
Reactive Maintenance
2 -
Record Deletion
1 -
Recovery
1 -
recurring payments
1 -
redeply
1 -
Release
1 -
Remote Consumption Model
1 -
Replication Flows
1 -
Report Malfunction
1 -
report painter
1 -
research
1 -
Research and Development Custom Widgets in SAP Analytics Cloud
1 -
Resilience
1 -
REST
1 -
REST API
1 -
Retagging Required
1 -
RFID
1 -
Risk
1 -
rolandkramer
3 -
Rolling Kernel Switch
1 -
route
1 -
Route determination
1 -
Router Non-XML condition
1 -
rules
1 -
S4 HANA
2 -
S4 HANA Cloud
2 -
S4 HANA On-Premise
3 -
S4HANA
6 -
S4HANA Cloud
1 -
S4HANA_OP_2023
2 -
SAC
11 -
SAC PLANNING
10 -
SAN
1 -
SAP
4 -
SAP ABAP
1 -
SAP Advanced Event Mesh
2 -
SAP AI Core
10 -
SAP AI Launchpad
9 -
SAP Analytic Cloud
1 -
SAP Analytic Cloud Compass
1 -
Sap Analytical Cloud
1 -
SAP Analytics Cloud
6 -
SAP Analytics Cloud for Consolidation
3 -
SAP Analytics cloud planning
1 -
SAP Analytics Cloud Story
1 -
SAP analytics clouds
1 -
SAP API Management
1 -
SAP Application Lifecycle Management
1 -
SAP Application Logging Service
1 -
SAP BAS
1 -
SAP Basis
6 -
SAP BO FC migration
1 -
SAP BODS
1 -
SAP BODS certification.
1 -
SAP BODS migration
1 -
SAP BPC migration
1 -
SAP BTP
26 -
SAP BTP Build Work Zone
2 -
SAP BTP Cloud Foundry
8 -
SAP BTP Costing
1 -
SAP BTP CTMS
1 -
SAP BTP Generative AI
1 -
SAP BTP Innovation
1 -
SAP BTP Migration Tool
1 -
SAP BTP SDK IOS
1 -
SAP BTPEA
1 -
SAP Build
12 -
SAP Build App
1 -
SAP Build apps
1 -
SAP Build CodeJam
1 -
SAP Build Process Automation
3 -
SAP Build work zone
11 -
SAP Business Objects Platform
1 -
SAP Business Technology
2 -
SAP Business Technology Platform (XP)
1 -
sap bw
1 -
SAP CAP
2 -
SAP CDC
1 -
SAP CDP
1 -
SAP CDS VIEW
1 -
SAP Certification
1 -
SAP Cloud ALM
5 -
SAP Cloud Application Programming Model
2 -
SAP Cloud Integration
1 -
SAP Cloud Integration for Data Services
1 -
SAP cloud platform
9 -
SAP Companion
1 -
SAP CPI
3 -
SAP CPI (Cloud Platform Integration)
2 -
SAP CPI Discover tab
1 -
sap credential store
1 -
SAP Customer Data Cloud
1 -
SAP Customer Data Platform
1 -
SAP Data Intelligence
1 -
SAP Data Migration in Retail Industry
1 -
SAP Data Services
1 -
SAP DATABASE
1 -
SAP Dataspher to Non SAP BI tools
1 -
SAP Datasphere
10 -
SAP DRC
1 -
SAP EWM
1 -
SAP Fiori
3 -
SAP Fiori App Embedding
1 -
Sap Fiori Extension Project Using BAS
1 -
SAP GRC
1 -
SAP HANA
1 -
SAP HANA PAL
1 -
SAP HANA Vector
1 -
SAP HCM (Human Capital Management)
1 -
SAP HR Solutions
1 -
SAP IDM
1 -
SAP Integration Suite
10 -
SAP Integrations
4 -
SAP iRPA
2 -
SAP LAGGING AND SLOW
1 -
SAP Learning Class
2 -
SAP Learning Hub
1 -
SAP Master Data
1 -
SAP Odata
3 -
SAP on Azure
2 -
SAP PAL
1 -
SAP PartnerEdge
1 -
sap partners
1 -
SAP Password Reset
1 -
SAP PO Migration
1 -
SAP Prepackaged Content
1 -
sap print
1 -
SAP Process Automation
2 -
SAP Process Integration
2 -
SAP Process Orchestration
1 -
SAP Router
1 -
SAP S4HANA
2 -
SAP S4HANA Cloud
3 -
SAP S4HANA Cloud for Finance
1 -
SAP S4HANA Cloud private edition
1 -
SAP Sandbox
1 -
SAP STMS
1 -
SAP successfactors
3 -
SAP SuccessFactors HXM Core
1 -
SAP Time
1 -
SAP TM
2 -
SAP Trading Partner Management
1 -
SAP UI5
1 -
SAP Upgrade
1 -
SAP Utilities
1 -
SAP-GUI
9 -
SAP_COM_0276
1 -
SAPBTP
1 -
SAPCPI
1 -
SAPEWM
1 -
sapfirstguidance
4 -
SAPHANAService
1 -
SAPIQ
2 -
sapmentors
1 -
saponaws
2 -
saprouter
1 -
SAPRouter installation
1 -
SAPS4HANA
1 -
SAPUI5
5 -
schedule
1 -
Script Operator
1 -
Secure Login Client Setup
9 -
security
11 -
Selenium Testing
1 -
Self Transformation
1 -
Self-Transformation
1 -
SEN
1 -
SEN Manager
1 -
Sender
1 -
service
2 -
SET_CELL_TYPE
1 -
SET_CELL_TYPE_COLUMN
1 -
SFTP scenario
2 -
Simplex
1 -
Single Sign On
9 -
Singlesource
1 -
SKLearn
1 -
Slow loading
1 -
SOAP
2 -
Software Development
1 -
SOLMAN
1 -
solman 7.2
2 -
Solution Manager
3 -
sp_dumpdb
1 -
sp_dumptrans
1 -
SQL
1 -
sql script
1 -
SSL
10 -
SSO
9 -
Story2
1 -
Substring function
1 -
SuccessFactors
1 -
SuccessFactors Platform
1 -
SuccessFactors Time Tracking
1 -
Sybase
1 -
Synthetic User Monitoring
1 -
system copy method
1 -
System owner
1 -
Table splitting
1 -
Tax Integration
1 -
Technical article
1 -
Technical articles
1 -
Technology Updates
15 -
Technology Updates
1 -
Technology_Updates
1 -
terraform
1 -
Testing
1 -
Threats
2 -
Time Collectors
1 -
Time Off
2 -
Time Sheet
1 -
Time Sheet SAP SuccessFactors Time Tracking
1 -
Tips and tricks
2 -
toggle button
1 -
Tools
1 -
Trainings & Certifications
1 -
Transformation Flow
1 -
Transport in SAP BODS
1 -
Transport Management
1 -
TypeScript
3 -
ui designer
1 -
unbind
1 -
Unified Customer Profile
1 -
UPB
1 -
Use of Parameters for Data Copy in PaPM
1 -
User Unlock
1 -
VA02
1 -
Validations
1 -
Vector Database
2 -
Vector Engine
1 -
Vectorization
1 -
Visual Studio Code
1 -
VSCode
2 -
VSCode extenions
1 -
Vulnerabilities
1 -
Web SDK
1 -
Webhook
1 -
work zone
1 -
workload
1 -
xsa
1 -
XSA Refresh
1
- « Previous
- Next »
Related Content
- Connectivity guaranteed with Cloud Integration version and Cloud Connector version in Technology Q&A
- Lowest SAP ECC version that can be integrated with SAP BTP through Cloud Connector in Technology Q&A
- Accelerate Business Process Development with SAP Build Process Automation Pre-Built Content in Technology Blogs by SAP
- 10+ ways to reshape your SAP landscape with SAP Business Technology Platform - Blog 5 in Technology Blogs by SAP
- CAP LLM Plugin – Empowering Developers for rapid Gen AI-CAP App Development in Technology Blogs by SAP
Top kudoed authors
| User | Count |
|---|---|
| 6 | |
| 5 | |
| 5 | |
| 4 | |
| 4 | |
| 4 | |
| 3 | |
| 3 | |
| 3 | |
| 3 |