- SAP Community
- Products and Technology
- Supply Chain Management
- SCM Blogs by SAP
- Premium Hub CoE – DSC Knowledge Bits – How to mass...
- Subscribe to RSS Feed
- Mark as New
- Mark as Read
- Bookmark
- Subscribe
- Printer Friendly Page
- Report Inappropriate Content
Dear TM friends,
When supporting our customers during their TM implementations we often get asked how transportation zones and lanes can be mass-uploaded. Although there is already an insightful blog article be Marcus Zahn and KBA 2538890 - Mass creation of transportation zones in SAP Transportation Management - SAP for Me we thought it might be helpful to shed some light into the exact process. We hope you find this useful and please feel free to comment underneath with your experiences/thoughts so we can all learn from it!
Mass Creation of Transportation Zones
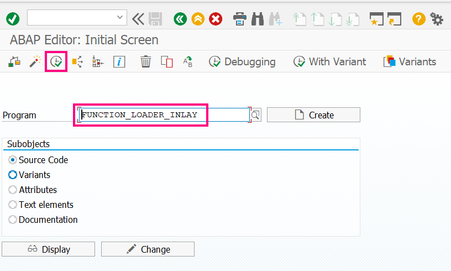
- Call transaction SE38 in the backend and enter the program FUNCTION_LOADER_INLAY in the search field. Then choose "Execute".
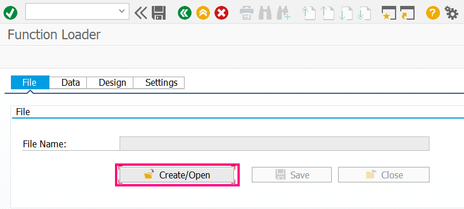
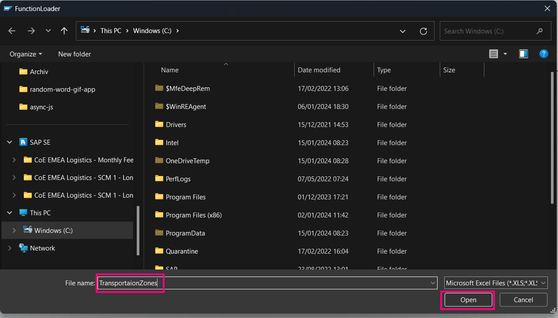
2. Choose "Create/Open", enter a name for your file in the dialog box, and choose "Open".
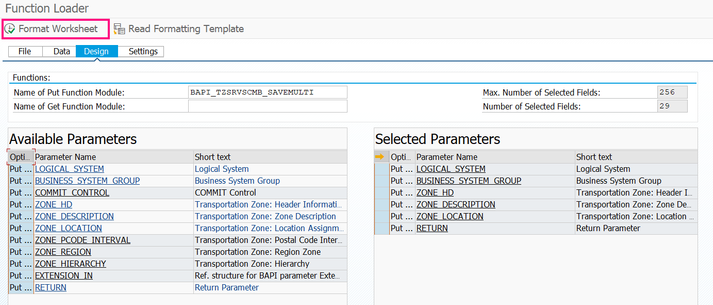
3. It should open an empty Excel-sheet. Ignore this for the time being and leave it open. Then switch to the Design tab and enter BAPI_TZSRVSCMB_SAVEMULTI in the put function module. Press Enter. Then move the necessary parameters to the right side, e.g.:
LOGICAL_SYSTEM |
BUSINESS_SYSTEM_GROUP |
ZONE_HD |
ZONE_DESCRIPTION |
ZONE_LOCATION |
RETURN |
Please note, if you do not want to add any postal code areas or regions you do not need to add them. It’s better to add them only if they will be filled. We also do not need the COMMIT_CONTROL and EXTENSION_IN parameter as this is set to the default value ‘A’, which indicates that the COMMIT_WORK is done in the case of non-critical errors and the return table will contain potential error messages. Alternative commit scenarios are the following:
- ‘E’ = in the case of any error a rollback will be forced.
- ‘S’ or any other value (not initial) = This enables the external commit control, which requires an external COMMIT_WORK – either explicitly or implicitly triggered.
4. Then click on "Format Worksheet".
5. Now the Excel you had opened in the previous step will be formatted and look like this:
6. Save this Excel on your local machine e.g. on your desktop and close it.
7. Go out of the transaction and re-enter(step 1)
8. Click again on “Create/Open” but this time, choose the excel you saved in step 6.
9. Now the worksheet opens again. Fill it in accordingly. Make sure that the fields in the excel all have the Format TEXT as explained below already.
10. Now go back to the SAP system and click on “SAP System”.
Now your transportation zones will be uploaded into the system!
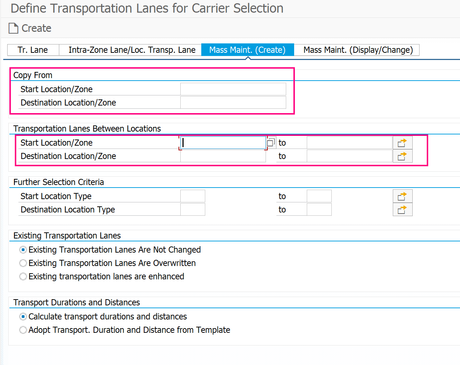
Transportation Lanes
- In SAP Easy Access go to Logistics -> Transportation Management -> Transportation Network -> Define Transportation Lanes
- Go to the tab Mass Maint. (Create) and enter the transportation lane from which you want to copy the new lanes under the area Copy From.
- Enter your relevant locations / zones in the area Transportation Lanes Between Locations
4. Click Create.
We hope you found this useful and if you’re missing something please let us know in the comments!
Discover further insights into SAP Premium Engagement and explore how an international team of specialists can assist you in maximizing the value of your SAP solutions.
If you already are a Premium Engagement customer, contact your Technical Quality Manager (TQM) to discuss how Premium Engagement Service can help you with a custom-tailored and efficient service portfolio to make your project a success!
- SAP Managed Tags:
- SAP Transportation Management,
- SAP Community
You must be a registered user to add a comment. If you've already registered, sign in. Otherwise, register and sign in.
-
Business Trends
169 -
Business Trends
24 -
Catalog Enablement
1 -
Event Information
47 -
Event Information
4 -
Expert Insights
12 -
Expert Insights
39 -
intelligent asset management
1 -
Life at SAP
63 -
Product Updates
500 -
Product Updates
66 -
Release Announcement
1 -
SAP Digital Manufacturing for execution
1 -
Super Bowl
1 -
Supply Chain
1 -
Sustainability
1 -
Swifties
1 -
Technology Updates
187 -
Technology Updates
17
- Premium Hub CoE – DSC Knowledge Bits Series in Supply Chain Management Blogs by SAP
- Transforming Cell Gene Therapy Operations: The Power of Integrated Scheduling and Resource Planning Systems in Supply Chain Management Blogs by SAP
- Enriched version of Transportation Management Incident Creation with Support Assistant in Supply Chain Management Blogs by SAP
- The 2023 SAP Logistics Private Cloud Advent Calendar Week 2: Get Your Projects Running in Supply Chain Management Blogs by SAP
| User | Count |
|---|---|
| 8 | |
| 7 | |
| 6 | |
| 4 | |
| 4 | |
| 4 | |
| 3 | |
| 3 | |
| 3 | |
| 3 |
