
- SAP Community
- Products and Technology
- Spend Management
- Spend Management Blogs by Members
- SAP Sourcing Tool view from the Suppliers
Spend Management Blogs by Members
Check out community member blog posts about spend management and SAP Ariba, SAP Fieldglass, and SAP Concur solutions. Post or comment about your experiences.
Turn on suggestions
Auto-suggest helps you quickly narrow down your search results by suggesting possible matches as you type.
Showing results for
marcobuescher
Active Contributor
Options
- Subscribe to RSS Feed
- Mark as New
- Mark as Read
- Bookmark
- Subscribe
- Printer Friendly Page
- Report Inappropriate Content
01-05-2020
2:19 PM
SAP Sourcing View for Suppliers
- Accessing data
After a user account has been created for you as an SAP Sourcing user, you will receive a system-generated e-mail with your user ID and a temporary password (see Figure 1).

By clicking on the hyperlink, you will access the Logon window for SAP Sourcing. Here, enter – in the fields provided – your user name and the password from the welcome e-mail (see Figure 2). We recommend using Microsoft Internet Explorer as your browser.
Please note that the system differentiates between upper and lower case. If you ever forget your password, click on the ‘Forgot your Password?’ button and the system will generate a new one for you. This will be sent to you by e-mail. Please remember to check your spam folder if necessary.

The first time you log on to SAP Sourcing, you will be asked to change your initial password (see Figure 3):

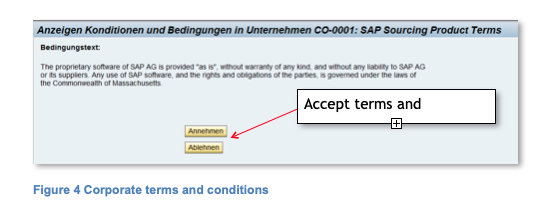
The first time you log on to the system, you may be asked to accept the terms and conditions of use for the system. To do this, click on the ‘Accept’ button (see Figure 4).
After logging on, you will be directed to your personal start screen. Here you will receive an overview of tenders relevant to you and to which you have been invited (see Figure 5).

- Participating in the tender
When a company invites you to participate in a tender (‘RFx’) via SAP Sourcing, you will be informed about this by a system-generated e-mail. Please ensure that SAP Sourcing’s sender address is not blocked by your spam filter. This e-mail is shown in the screenshot in Figure 6:

Clicking the link in the e-mail will take you directly to the ‘RFx’ screen. After logging on (see Chapter 2), you will be able to access this screen. In the ‘RFx Response’ column you will find the link to your tender documents, e.g. ‘PROP-1320’, as shown in Figure 7.

If you are already logged onto the system, as shown in Figure 5, the ‘RFx’ button will take you to the overview of all active tenders (see Figures 8 and 9).

The purchaser can always ascertain your intention to bid prior to the tendering process. This means that, at the beginning of a tender, you indicate whether you wish to participate. In this case, when you access the ‘RFx’ screen, the message ‘Confirm Intention to Respond’ (shown in Figure 10) will be displayed. The purchaser will automatically be notified by e-mail of your decision to take part (or otherwise) in the tender.
When you confirm your intention to bid, you will access the tender overview page (see Figure 11). If you select the option ‘Decline To Participate, you retain the option of notifying us of your intention to bid at a later date by accessing the ‘RFx’ screen. If, by the date specified, you have not confirmed (or otherwise) your intention to bid, you will from then on no longer be able to access this tender.

- Overview screen for tendering
In the start screen for the tendering process, you will see the most important tab pages, ‘Header’, ‘Schedule’, ‘Information’, ‘Questions’ and ‘Line Items’. Other buttons that will be important for you are ‘Done’, ‘Save’, ‘In Progress’ and ‘Log Off’, as shown in Figure 11.

You should, at intervals, save the work on your bid. Clicking on the button will save the document and close the current session. By clicking on the button, you will save the current status of your work in the database. Please note that, by merely saving your bid, you are not submitting it.
- ‘Schedule’ tab page
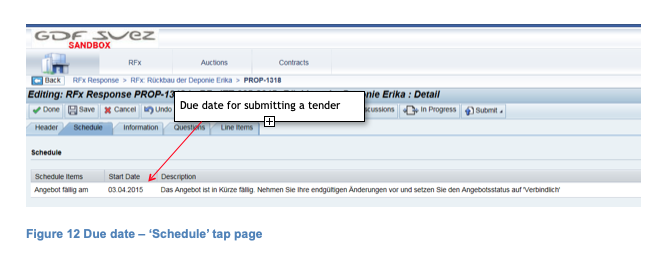
During the period between the invitation to tender (‘RFx’) and the due date for the bid, you (the supplier) have the option of submitting a tender bid (‘RFx Response’). As shown in Figure 12, the bid due date is given in the ‘Schedule’ tab page. Please note and adhere to this deadline for bidding, as bids can no longer be submitted thereafter.
- ‘Information’ tab page – attachments concerning the tender
Under the ‘Information’ tab page you will find attachments that the purchaser has made available to you, including drawings and service specifications. You can download these documents onto your PC or laptop and work with them. To do this, click with the mouse on the ‘Information’ tab page, then on the desired information section and subsequently on ‘Attachments’, as shown in Figures 13 and 14:

After clicking on the ‘Attachments’ button, you will access an overview of the attachments made available to you within the active tender (see Figure 15).

- ‘Questions’ tab page
In the course of a tender, it may be the case that the purchaser asks you questions (not to be confused with ‘discussions’). You can access these questions via the ‘Questions’ tab page.
Questions put to you by the purchaser may be about your products, services, company, etc. (see Figure 16).
Please answer these questions by first clicking on the question sections and then on each question separately.

- ‘Line Items’ tab page
The purchaser may request that you price defined items (see Figure 17). These items relate to goods or services that the purchaser wishes to acquire. You have the option of bidding for these items in accordance with the agreed Incoterms. Please note the number of pages within the tender.

9. Discussion forum
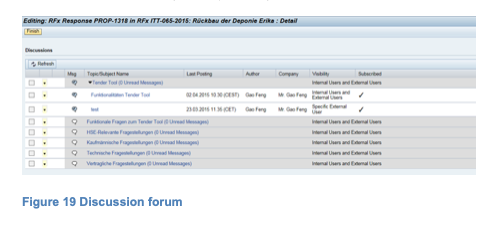
With a view to secure documentation of correspondence in the course of the tender, GDF SUEZ E&P Deutschland GmbH uses only the discussion forum within the SAP Sourcing Tool. This ensures that all suppliers taking part in the tender have access to the same information. Communication with the suppliers in connection with a tender is not permitted outside the SAP Sourcing Tool. You can reach the discussion forum by clicking on the ‘Discussions’ button (see Figure 18).

Here you can see (shaded in grey) the various discussion topics. The individual postings to these topics are listed (see Figure 19).
If you wish to view already existing postings, click on the relevant subject name (see Figure 20).

After selecting the posting, you can read the content in its entirety (see Figure 21). 
By clicking on the ‘Answer’ button, you can add your message (or a follow-up question) to the existing discussion (see Figure 22):

Attachments can be attached to the message. Please note that your replies or questions can be viewed by all those participating, including all suppliers.
As mentioned above, you can also ask a question by first clicking on the desired topic. This will generate a screen in which you can see all the postings on this topic. Then click on the ‘New Message’ button (see Figure 23).

This will take you to the ‘Creating: New Message in New Subject’ tab page, within which you can ask your questions. To post your message, click on the ‘Finish’ button (see Figure 24).

Please note: as soon as a new contribution has been posted in the discussion forum, you will be notified by the system via e-mail.

- 10.Submitting a bid
When you have completed your bid and wish to submit it to the purchaser in the form of attachments, you can do so by uploading these attachments. The first step is to click on the ‘Attachments’ button which, as shown in Figure 26, can be found in the menu bar.

The first thing you will see is the bid attachments that have been made available to you. In the bottom third of the screen you will also see another folder, ‘RFx Response Attachments’. If you now click on the ‘Attach Files’ button, you have the option of uploading the files. The screen will then appear as shown in Figure 26. If you have put together your bid from a large number of documents, you can compress these into a ZIP file and then attach it.

After you have entered your tender bid and uploaded all attachments, the bid must be submitted. This involves changing the status of your bid from ‘In Progress’ to ‘Firm’; if this is not done, the bid is deemed not to have been submitted.
To do this, first click on the ‘In Progress’ button (see Figure 28).

This will take you to the ‘Change Phase’ screen (see Figure 29). To submit your bid, click with the mouse on the ‘Firm’ button; your bid, and all attachments that form part of it, will be transmitted to the relevant purchaser. As soon as your bid is assigned the status ‘Firm’, no further changes can be made to it.

Thank you for reading.
Regards
Marco
- SAP Managed Tags:
- SAP Sourcing and SAP Contract Lifecycle Management,
- SRM Sourcing Cockpit
You must be a registered user to add a comment. If you've already registered, sign in. Otherwise, register and sign in.
Labels in this area
Related Content
- AP Automation Solutions Natively Integrated with SAP S/4HANA Cloud ERP in Spend Management Blogs by SAP
- Advanced Returns Management for Supplier Returns in Spend Management Blogs by SAP
- Mastering Procurement Analytics: Essential Strategies and Safeguards for Success in Spend Management Blogs by SAP
- SAP Ariba 2405 Release Key Innovations Preview in Spend Management Blogs by SAP
- SAP Ariba Procure to Order 2405 Release Key Innovations in Spend Management Blogs by SAP