
- SAP Community
- Products and Technology
- Product Lifecycle Management
- PLM Blogs by Members
- SAP Digital Manufacturing Cloud -Custom Plugin to ...
Product Lifecycle Management Blogs by Members
Get insider knowledge about product lifecycle management software from SAP. Tap into insights and real-world experiences with community member blog posts.
Turn on suggestions
Auto-suggest helps you quickly narrow down your search results by suggesting possible matches as you type.
Showing results for
vignesh_9842
Participant
Options
- Subscribe to RSS Feed
- Mark as New
- Mark as Read
- Bookmark
- Subscribe
- Printer Friendly Page
- Report Inappropriate Content
01-03-2023
8:52 AM
SAP Digital Manufacturing Cloud has some very powerful features that allow you to integrate it into other platforms, including SAP and non-SAP applications. I would like to share a new custom enhancement that is used to retrieve the “Operation Long text” from the ECC System to DMC via CPI.
High-Level Overview
- Create a web service in ECC
- Create a custom Integration flow in CPI
- Create a Production Process to consume the Integration I-Flow.
- Develop a POD Plugin to consume the production process.
- Create a POD to view the POD Plugin.

1. Create Webservice in ECC
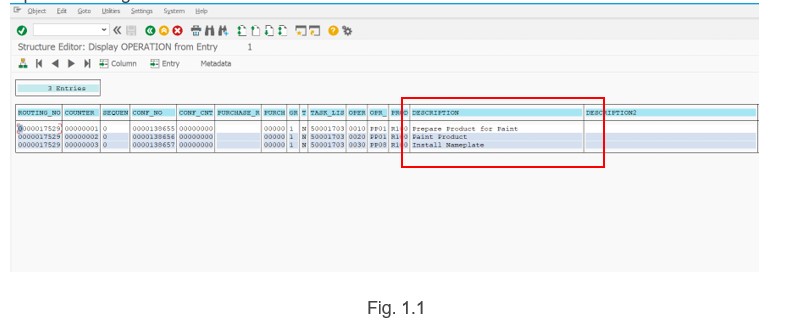
- Operation Long text maintained in SAP ERP
- Enter t-code SE37 in the SAP command field and execute it.

- On the next screen enter Function Module “BAPI_PRODORD_GET_DETAIL” and click

Next, go to Utilities->More Utilities-> Creating a Web Service-> From Function Module.

- Now in the Web Service Creation Wizard, input the name and description for the Web Service

- Now in the Web Service Creation Wizard, input the name and description for the Web Service

- On the next screen enter the following details and click the Continue button.
- SOAP Application
- Profile

- Next, Enter the Package name and select the Local Object check box. Click the Continue button.
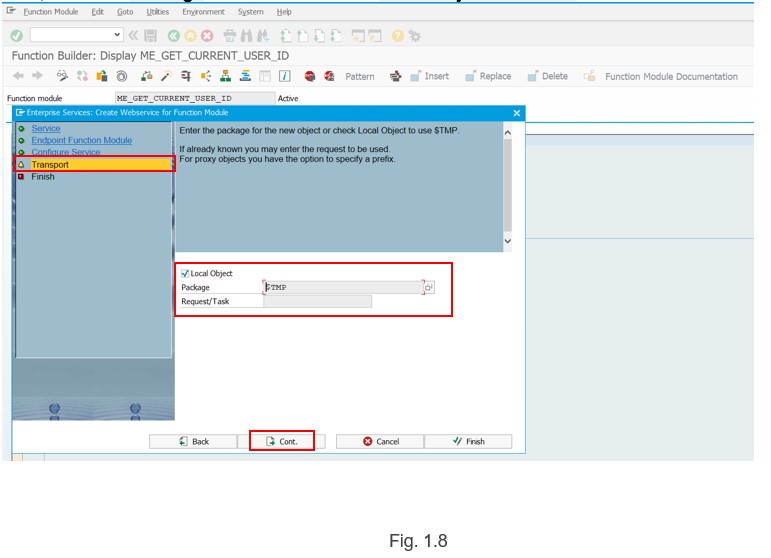
- Next, Enter the Package name and select the Local Object check box. Click the Continue button.

- Once completed it will navigate you here, click on the Save button to save the new web service

- Once completed it will navigate you here, click on the Save button to save the new web service

2. Create a custom Integration flow in CPI
Step 1: Create an I-Flow Artifact
- Open the CPI Tenant link in a browser.
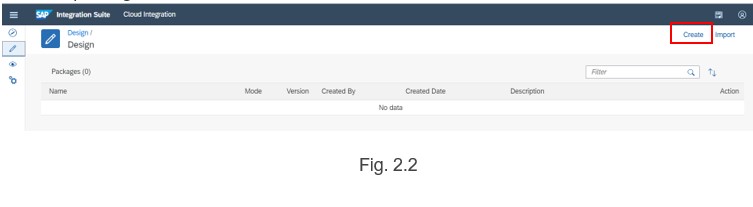
- Click Design in the left panel.

- Click Create present on the top right corner of the page. This will take you to the page where you can create a package.
- Enter the package name and short description as Integration Suite and save it.

- Click on the Artifacts tab and click Edit. The Add & Delete buttons are now made visible.

- Click on the Artifacts tab and click Edit. The Add & Delete buttons are now made visible.

- Click on the Artifacts tab and click Edit. The Add & Delete buttons are now made visible.

Step 2: Develop the flow
- Clicking the I-Flow will open up the default template.

- To make changes to the template and click on edit (on the top right). This activates the pallet (greyed icons) on the screen.

Step 2.1: Setup the Sender and Receiver System
- Click the box on the left that reads ‘sender’. This will open a tab below with the properties of the component you just clicked
- Change the Sender component name to REST. Repeat the process & change the receiver component name to HTTP.
Step 2.2: Setup the Sender Adapter
- Now click on the arrow next to the sender component & drag it into the Start Icon in the integration process.
- This will show us a pop-up with a variety of sender adapters to choose from. For our scenario, we will choose REST as we will be sending data from the DMC production process that can be used as a REST client.
- You can give the adapter a different name (only if you want to) in the General tab of the properties window that just opened at the bottom.
- You can establish the connection details in the Connection
- Maintain the message size in the Conditions
- We will open the Connection tab and type in a string in the address field with a forward slash before it. Uncheck the CSRF Protected check box for now.

Step 2.3: Setup the Receiver Adapter
- Let’s set up the receiver adapter (HTTP). Click on the End An arrow will be visible next to it. Click & drag the arrow to the receiver component.
- Maintain the Connection tab details
- In the Credential Name field, give the name of the credential you created.
- In the Processing Tab, provide the same mail ID in the From& To
- Save & Deploy the flow

Step 3: Create credentials in CPI
- Now that you have S4 Credentials, let’s maintain the same in CPI. On the CPI Home page, click the Monitor Icon on the left panel.

- Open the Security Material Tile in the Manage Security section.

- Open the Security Material Tile in the Manage Security section.

- Fill the popup. Provide your respective mail ID & password.

- The Name You Provide here is to be maintained in our I-Flow -> mail Properties -> Connection Tab -> Credential Name.
- Click Deploy.
Step 4: Test The I-Flow
- Open CPI’s Monitoring Area & Open the Started tile in the Manage Integration Content
- Search your I-Flow by Name & click on it once you find it on the left panel. You’ll have a screen similar to the one
- Copy the URL displayed in the Endpoints tab.
- Open (Sender System URL) in a browser.
- Click on Send a request.
- Change the request type from GET to POST & paste the copied URL next to it.
- In the Authorization section, choose the type Basic Auth & provide your CPI Username & Password. Make sure your CPI username has the user role ESBMessaging.send assigned to it in the SAP Cloud Platform Cockpit.
To summarize, you have now walked through different work areas (Design & Monitor) of CPI, understood how to set up HTTP adapters & have learned how to maintain security credentials in CPI & test your flow.
3.Create a Production Process to consume the SAP CPI service
- Manage Web Server - Web server objects can be connected to other web servers to design and run production processes

- In the “Manage Service Registry” under the API Services you can find the created Webserver.

- Open the app Design Production Process and choose ‘Create’.

- Switch to ‘Edit’ mode and choose the service you created by clicking ‘Select Services
- Browse the service and toggle it, then save
- You can select it from the left list and drag it to the right designer
- In the “Design Production Process” Under the Services and Processes you can find the “Operation Long Text” which is maintained in the “Manage Service Registry. Click
and drag the services to the production Process. Define your production process, debug and fix issues.
- Deploy the production process and edit the header to make sure it’s public to Service Registry you will be able to verify the new service generated from the app Manage Service Registry.
4.Develop a POD Plugin to consume the production process
Installation Steps
- Open SAP Business Application

- Choose to Create Dev Space.

- At the “Create New Dev Space” screen execute the following steps:
- Enter the POD Plugins name for your dev
- Choose Full Stack Cloud Application as the application
- By selecting Full Stack Cloud Application your dev space comes with several extensions out-of-the-box that you need to develop
- Choose to Create Dev Space.
- The Dev Space will then begin starting and the process will take a minute or so as your cloud environment is being You see the status for your dev Space will change from STARTING to RUNNING.

- Once the Dev Space reaches the green status of RUNNING, you can click on the name of the Dev Space and it will load into the editor within your browser

- You’ll be redirected to your newly created SAP Business Application Studio Dev Space. Recommend you bookmark this URL so it’s easier for you to access this dev space of your SAP Business Application Studio in the future.

- You’ll be redirected to your newly created SAP Business Application Studio Dev Space. Recommend you bookmark this URL so it’s easier for you to access this dev space of your SAP Business Application Studio in the future.

- In the Cloud Foundry Targets window, you can expand Services and then click on the Logon icon to continue the configuration process.

- The command window will then open at the top of the SAP Business Application The first input will prompt you for the Cloud Foundry endpoint.
- The default value proposed is likely the correct value, but if you need to confirm; the value can be found in the SAP BTP cockpit at the Subaccount level.

- Press Enter to confirm your input of the Cloud Foundry endpoint.
- Provide registered SAP BTP trial account email id.
- The next input will ask you for your SAP BTP trial account password.
- The next input will ask you for your organization. In most situations, you will have a single choice. But like the API endpoint earlier, if you need to confirm the correct value it will be displayed in the top navigation of the SAP BTP cockpit

- The final input will ask you for your Space. If you choose the endpoint API and Organization correctly, then you should have a single option for the dev
- Upon completion of all the inputs, you should see that the Organization and Space have been
- The next step is to add a project with a POD View Plugin example and POD View Plugin Template to the workspace. From the SAP Business Application Studio Welcome page, click Clone from

- Specify the URL in the input field: https://github.com/SAP-samples/digital-manufacturing-extension- git

- Specify the URL in the input field: https://github.com/SAP-samples/digital-manufacturing-extension- git

- Explorer view shows the project with the content below.

- Explorer view shows the project with the content below.

- Navigate to the path DMC_UIExtensions\ViewPodPluginTemplate_And_Example\project\, choose the ViewPodPlugin folder and click the Open BUTTON.

- You will get such a project structure

- We should replace the “vendor” word in a project with the actual vendor name value
- Choose Edit Replace in Files from the menu

- And replace ‘vendor’ with your actual vendor’s name value. We used ‘sapdmc’ in this document for the vendor’s name. Choose Replace All icon.

- It should replace occurrences in all Choose OK.

- Open YAML file and replace <DMC_HOST1> with the hostname where POD is located, for example

- Right-click the MTA. YAML file and choose to Build MTA Project

- As a result of this step two new folders are created:
- mta_archives folder is created containing the newly generated 0.1.mtar file
- node_modules folder is created with all required dependencies

- Right-click on the generated ExampleViewPluginsMTA_0.0.1.mtar file and choose to Deploy MTA Archive.

- After deployment is done, your application should be available in your Cloud Foundry To access your application, go to your space in the SAP Cloud Platform cockpit and select Applications from the side menu.

- Choose a sapdmc-view plugin application to see details and
The application should have Started
 Configuration Steps
- Go to your space in the SAP Cloud Platform cockpit and select Applications from the side menu.
- Choose the sapdmc-view plugin application.

- Click on the Application Routes URL to verify that the application was deployed.

- Here is the result of the successful deployment to Cloud

5.Create a POD to trigger the POD Plugin.
- Open the app POD Designer and create one POD or modify the existing one.

- Add the POD Plugin we created into a plugin container

- Configure the Plugin parameters you exposed to designer

Conclusion:
By default, when the LOIPRO is triggered from ECC, the operation long text will not be pushed to DMC. In this circumstance, using CPI custom IFlow, one can achieve getting the operation long text from ECC to DMC.
For any further clarification in this regard, I will be more than happy to help.
Please give your valuable feedback..
- SAP Managed Tags:
- SAP Digital Manufacturing
10 Comments
You must be a registered user to add a comment. If you've already registered, sign in. Otherwise, register and sign in.
Labels in this area
-
Automation
1 -
Billing plan
1 -
Milestone
1 -
Monitoring
1 -
PFAS
1 -
SAP DM
1 -
SAP DMC
1 -
SAP Production Connector
1 -
SPC Control Charts
1
Related Content
- How to use Digital Manufacturing MDOs within PPD Example: Where-Used Report with Follow-up Actions in Product Lifecycle Management Blogs by SAP
- Quick Start guide for PLM system integration 3.0 Implementation in Product Lifecycle Management Blogs by SAP
- Consumption of an API within a Custom POD Plugin in SAP DMC in Product Lifecycle Management Q&A
- MII configuration and content transport management in Product Lifecycle Management Blogs by SAP
- A day in the life of Mike, a Shop Floor Worker using SAP Digital Manufacturing in Product Lifecycle Management Blogs by SAP