
- SAP Community
- Products and Technology
- Human Capital Management
- HCM Blogs by Members
- Configuration for SAP eRecruitment for using TREX ...
Human Capital Management Blogs by Members
Gain valuable knowledge and tips on SAP SuccessFactors and human capital management from member blog posts. Share your HCM insights with a post of your own.
Turn on suggestions
Auto-suggest helps you quickly narrow down your search results by suggesting possible matches as you type.
Showing results for
former_member18
Participant
Options
- Subscribe to RSS Feed
- Mark as New
- Mark as Read
- Bookmark
- Subscribe
- Printer Friendly Page
- Report Inappropriate Content
08-30-2016
10:19 AM
Configuration for SAP eRecruitment for using TREX 7.1 as search engine
In this process we had to create a new index category as the old index category was not working with the new version of TREX. This document will speak about the steps required to do re-create a new catergory and generate the re-indexing process.
1. Setup Access to documents.
In this setup step we provided the access to eRecuirtment documents through the Content Server. The communication user for content service should have the role SAP_RFC_CONTENT_SERVER.
1.1 Goto transaction SICF and check the service CONTENTSERVER. Type CONTENTSERVER in service name and click on execute.

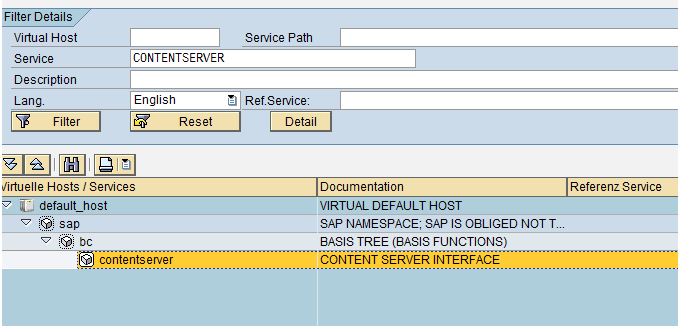
1.2 Double click on content server service to display the service details. The logon data tab of content service would have the user as RCF_CONTENT.

1.3 The RCF_CONTENT user should have the role x. In most of the scenarios you would need to create a cusotm role which will have the same authorizations.
2. Create Search Server Relationship
2.1 Execute the transaction SRMO - > Create SSR from the menu. Enter SSR_TREX as the search server relation ID.

2.2 Enter the search engine as DRFUZZY and the RFC destination trough which it will connect to TREX server. In our case the RFC name is TREX_GPD. This RFC is created through TREX admin tool. Also enter a suitable description for the SSR.

2.3 After this we can see that two search server IDs are created. One if for Indexing (I) and the other for seraching (S).

2.4 Do the connection test on both of the Search Server ID to make sure that they are working.

3. Activating Indexing for documents.
3.1 We need to enable the document area HR_DOC and HR_KW for indexing by the serach engine. Goto transaction SPRO to open the customizing screen. Then open the customizing for SAP E-Recruitment -> Technical Settings -> Search Engine -> Setup Access to document.

3.2 Select the document area HR_DOC and HR_KW for E-Recruitment as shown below. And also enter the search server relation ID . In our case the SSR ID is SSR_TREX and save the settings.

4. Create Index Category and Test search.
4.1 For creation of index category the transaction is SKPRO07. Some documents shoud be present in the system before an index category is created and a test search is carried out. Select on Document class as HR_DOC. Deselect the option Limited to Selected Language. Select Document Area and then select HR_KW as the document area. Select the appropiate Index category. Click on Re-Index to initiate the indexing of document again.

4.2 In some cases the re-indexing process can result in an error. We changed our backend TREX from TREX 7.0 to TREX 7.1 and this caused an indexing error. So we need to re-create the index category. The same problem can occur if your old index category gets corrupted. In such cases you need to re-create the index category and then start the re-indexing process.

To re-create a new index category it is required to stop the periodic job RCF_PERIODICAL_SERVICES. To do so go to transaction SM36 and select the job selection button. Do the necessary selections to display the entries with respect to the periodical service. Mark the entry that refers to the periodical service with status Released. In the menu, choose Job and then choose Released -> Scheduled.
After the index has been created we need to release the job.

To re-create the index category go to transaction SRMO. Then switch to index category tab. Select the index category and then select the display button. Then click on delete category to delete the index category.

Then call transaction SKPR07 and select the document class as HR_DOC and click on clean uptable entries.

Then follow the step 4.1 to create the index. Once the indexing is completed you will get a success message.

4.3 Once the indexing is completed we can run a sample search for testing. To test if the search is working properly. Click on the Test Search button in the Extras. This will open up the KPRO search screen. Enter * as the search paramter and click on Find.

Result of search
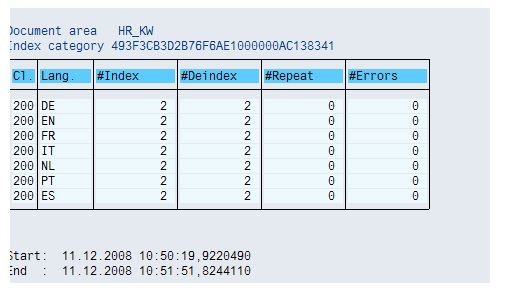
We have now completed all the steps required for configuration. We have also run a sample test for searching.
1
- SAP Managed Tags:
- SAP E-Recruiting
You must be a registered user to add a comment. If you've already registered, sign in. Otherwise, register and sign in.
Labels in this area
-
1H 2024 Product Release
5 -
2H 2023 Product Release
1 -
ACCRUAL TRANSFER
1 -
Advanced Workflow
1 -
Anonymization
1 -
BTP
1 -
Business Rules
1 -
Canvas Report
1 -
Career Development
1 -
Certificate-Based Authentication
1 -
Cloud Platform Integration
1 -
Compensation
1 -
Compensation Information Management
1 -
Compensation Management
1 -
Compliance
2 -
Content
1 -
Conversational AI
2 -
Custom Data Collection
1 -
custom portlet
1 -
Data & Analytics
1 -
Data Integration
1 -
Dayforce
1 -
deep link
1 -
deeplink
1 -
Delimiting Pay Components
1 -
Deprecation
1 -
Employee Central
1 -
Employee Central Global Benefits
1 -
Employee Central Payroll
1 -
employee profile
1 -
Employee Rehires
1 -
external terminal
1 -
external time events
1 -
Generative AI
2 -
Getting Started
1 -
Global Benefits
1 -
Guidelines
1 -
H2 2023
1 -
HR
2 -
HR Data Management
1 -
HR Transformation
1 -
ilx
1 -
Incentive Management Setup (Configuration)
1 -
Integration Center
2 -
Integration Suite
1 -
internal mobility
1 -
Introduction
1 -
learning
3 -
LMS
2 -
LXP
1 -
Massively MDF attachments download
1 -
Mentoring
1 -
Metadata Framework
1 -
Middleware Solutions
1 -
OCN
1 -
OData APIs
1 -
ONB USA Compliance
1 -
Onboarding
2 -
Opportunity Marketplace
1 -
Pay Component Management
1 -
Platform
1 -
portlet
1 -
POSTMAN
1 -
Predictive AI
2 -
Recruiting
1 -
recurring payments
1 -
Role Based Permissions (RBP)
2 -
SAP Build CodeJam
1 -
SAP Build Marketplace
1 -
SAP CPI (Cloud Platform Integration)
1 -
SAP HCM (Human Capital Management)
2 -
SAP HR Solutions
2 -
SAP Integrations
1 -
SAP release
1 -
SAP successfactors
5 -
SAP SuccessFactors Customer Community
1 -
SAP SuccessFactors OData API
1 -
SAP Workzone
1 -
SAP-PAYROLL
1 -
skills
1 -
Skills Management
1 -
sso deeplink
1 -
Stories in People Analytics
3 -
Story Report
1 -
SuccessFactors
2 -
SuccessFactors Employee central home page customization.
1 -
SuccessFactors Onboarding
1 -
successfactors onboarding i9
1 -
Table Report
1 -
talent
1 -
Talent Intelligence Hub
2 -
talents
1 -
Tax
1 -
Tax Integration
1 -
Time Accounts
1 -
Workflows
1 -
XML Rules
1
Related Content
- New 1H 2024 SAP Successfactors Time (Tracking) Features in Human Capital Management Blogs by SAP
- From Code to Logic: XML to Business Rule Shift in Human Capital Management Blogs by Members
- SAP SuccessFactors Opportunity Marketplace & SAP Business AI-powered Recommendation in Human Capital Management Blogs by SAP
- Say hello to Joule - Your Digital Assistant for SuccessFactors and other SAP Cloud products in Human Capital Management Blogs by Members
- Talent Intelligence Hub & SAP SuccessFactors Learning Integration in Human Capital Management Blogs by SAP
Top kudoed authors
| User | Count |
|---|---|
| 12 | |
| 12 | |
| 3 | |
| 3 | |
| 3 | |
| 1 | |
| 1 | |
| 1 | |
| 1 | |
| 1 |