
- SAP Community
- Products and Technology
- Enterprise Resource Planning
- ERP Blogs by SAP
- Onboarding SAP Asset Performance Management with B...
Enterprise Resource Planning Blogs by SAP
Get insights and updates about cloud ERP and RISE with SAP, SAP S/4HANA and SAP S/4HANA Cloud, and more enterprise management capabilities with SAP blog posts.
Turn on suggestions
Auto-suggest helps you quickly narrow down your search results by suggesting possible matches as you type.
Showing results for
Advisor
Options
- Subscribe to RSS Feed
- Mark as New
- Mark as Read
- Bookmark
- Subscribe
- Printer Friendly Page
- Report Inappropriate Content
10-30-2023
10:26 AM
Until recently, the integration for SAP Asset Performance Management ( hereinafter abbreviated as APM) with SAP S/4HANA Cloud or on-premise SAP ERP systems was to on-board based on integration guides, help pages, or other written documentation.
Now, Cloud Integration Automation Service (CIAS) provides a guided approach with workflows with the following features that make use of
Please refer to this short video for a quick introduction and the steps for SAP APM onboarding.
To set up the integration scenario using Cloud Integration Automation Service, perform the following tasks in sequence:
Launching CIAS Application from Global Account
In addition to BTP, you must have the following access as well.
Once your user has been assigned roles, open the CIAS.
Post-launching of BTP CIAS, you will see the below screen.
Now click on Plan for Integration.
Here, in the plan for integration section, you will find the list of SAP Products that can be automated by using CIAS. Now here you can search the product name SAP APM as shown below:
Here, we have a brief overview of SAP APM and the list of systems involved in onboarding SAP APM.
On the same page, you can view the Entities and Scenario Tasks tabs for steps, that are necessary for the SAP APM onboarding.
Now, select the systems button and choose your SAP ERP, Cloud Connector, and BTP Global account information like below.
Navigate each system tile, select your corresponding system, and Generate Workflow.
Before the workflow is generated, a popup will appear with a summary of the selected systems. Once you have completed your verification click the Next Step and Generate button to begin the workflow.

If all the system details are correct(i.e. SAP S/4HANA, Cloud Connector, and SAP BTP) then click on the Confirm Systems button below.
In the next step, Assign users to required roles for each system, so that workflow tasks will be pushed to their inbox according to their role. Here you can add more than one user to the same role by separating commas.
If the admin has access to all the systems, then you can assign all roles by clicking on the highlighted button.
To continue click on Confirm Role Assignment button and proceed.
In the next step, Confirm the Execution scope scenario based on your ERP system release;
To enable the Integration couple of actions should be done manually by the customer.
Implement the following Asset Management SNOTES in your S/4HANA system.
Click on the SNOTE link as shown in the above image, it will download the SAP GUI and navigate Transaction for note implementation. Post-implementation click on Task Completed for further steps of S/4HANA steps.
Activate Asset Management OData V2 Services
Post-activation of Services click on Task Completed for further steps of S/4HANA steps.
in the next step, You would need to Publish the following Asset Management OData V4 Services
Publish the following Asset Management OData v4 Service Groups on the SAP Gateway Foundation hub for consumption.
Follow the below link for more information on Publishing Services
Post publishing services click on Task Completed for further steps of S/4HANA steps.
In the Upcoming steps, you would need to create a Technical user using Transaction SU01, it needs all the technical access to EAM roles, SAP Gateway, and RFC execution access. Please follow the below link for more information on Authorising a Technical user
Now, you have reached the Key automation BTP steps, which will be totally controlled by the CIAS Framework.
To onboard SAP APM, you must create a new sub-account, enabling cloud foundry, Space, instance generation, and subscription.
The moment you enter into the BTP step, you will see the below screen to enter a few details to create a new subaccount.
As part of Manual instruction, we have defined steps for the required information to create a sub-account. Enter the Name of the subaccount, Domain Name, and administrator credentials and execute the Task.
once the subaccount is created successfully, you will receive a success message as shown in the above figure. To view a newly created subaccount, you can verify it in the Global account with the same name.
Click on Task completed for further step;
Post the Success message, Click on the Task Completed button for further steps.
The next step is to create Space for your Subaccount.
In the creation of BTP space, provide the space name as "apm-space" which is recommended, and customer can change this name according to their business case. Post entering/changing the space click on execute Task button.
Post the Success message, Click on the Task Completed button for further steps.
The next step is to Subscribe to SAP APM.
In this step, you will have 3 tasks, which execute sequentially, these steps have a dependency on each other. They are,
in the first task, you can decide the quota of the application based on your business need( default is 1,1)
The second Task, creating a service instance, and here you do not need to edit any data unless you want to change the name of the instance name.
The third step is executed on its own since the values are derived from the previous steps, so the subscription will be done automatically.
After reviewing the values, you can click Execute Task and it will start the execution in the background sequentially.
Once you have received the success message shown in the above figure, Click on the Task Completed button for further steps.
Create and assign the Role collection to the Reliability Engineer and Administrator.
As part of SAP APM with CIAS Integration, we will create a couple of roles and these will be assigned to the mentioned administrators and Reliability engineer.
Once you have received the success message shown in the above figure, Click on the Task Completed button for further steps.
Create a Destination for SAP S/4HANA or ERP system;
The destination is needed to synchronise the data from S/4HANA to APM and APM to S/4HANA. To create a destination you have to enter only a few steps; they are
and then click on Execute Task to create the destination in your subaccount.
Once you have received the success message shown in the above figure, Click on the Task Completed button for further steps.
The next step is to Create a Destination for IOT Rules;
To synchronise your Technical object with IOT or to reach sensor data from IOT to APM, this destination will ensure your synchronization, as part of CIAS automation for apm we have added this step as well.
You would need to enter only the name of the Destination and the Description and then Execute the Task, It will create a Rules Destination for IOT Enablement.
Once you have received the success message shown in the above figure, Click on the Task Completed button for further steps.
The Next step is Configuring Event Mesh Service which is applicable only for the S/4HANA FPS01 above Release systems. As part of the Initial release, we have not automated this scenario and will be available in upcoming releases. Please follow the link for Event Mesh Setup
With this, you will be able to complete all the steps of BTP, and you can launch the BTP application and check all your access and you can extend the access from the BTP as well.
The next step is Cloud Connector Deeplink Navigation which is the last step in onboarding SAP APM.
Just click on the Cloud connector link as shown in the image, it will navigate your SCC and you can configure. make sure your systems are reachable and Green.
Click on the Task Completed button and then you will see a completion message on your screen.
Now you are successfully onboarded to SAP APM.
Please refer to the following SAP Help Document for further information on boarding the SAP APM solution.
What is the benefit?
Now, Cloud Integration Automation Service (CIAS) provides a guided approach with workflows with the following features that make use of
- Standardized workflows: All workflows for the configuration of different scenarios have the same appearance.
- Role-Based Execution: Tasks are assigned to the right appropriate person based on role assignments
- System Landscape Information: available as a drop-down list from known SAP systems
- Partially Automated: Some tasks are automated, therefore reducing the manual work that comes with the configuration.
- Integrated Parameter Management: Data can be entered once and reused throughout the workflow.
- Traceability of Activity: Information will be stored on who performed what steps during the integration setup.
Please refer to this short video for a quick introduction and the steps for SAP APM onboarding.

Prerequisite for onboarding SAP Asset Performance Management using CIAS:
To set up the integration scenario using Cloud Integration Automation Service, perform the following tasks in sequence:
Launching CIAS Application from Global Account
In addition to BTP, you must have the following access as well.
- SAP S/4HANA or SAP ECC
- SAP Cloud Connector (SCC)
Once your user has been assigned roles, open the CIAS.
Post-launching of BTP CIAS, you will see the below screen.
- Plan for Integration: The list of SAP Products that are accessible through CIAS is located here
- My Inbox: A new message to start the onboarding process will appear after the workflow is generated.
- Scenario Monitoring: You can manage every workflow instance of CIAS automation that is managed by your organization.
Now click on Plan for Integration.

Welcome Screen
Here, in the plan for integration section, you will find the list of SAP Products that can be automated by using CIAS. Now here you can search the product name SAP APM as shown below:

Quick Intro on SAP Asset Performance Management
Here, we have a brief overview of SAP APM and the list of systems involved in onboarding SAP APM.
On the same page, you can view the Entities and Scenario Tasks tabs for steps, that are necessary for the SAP APM onboarding.
- All SAP S/4HANA or SAP ERP tasks will be automated as a Deep linking this means you will be able to click on a link to download the SAP GUI file, The launching file will take you directly to the SAP Transaction
- The CIAS automation will also automate all SAP BTP Tasks are automated by the CIAS automation.
Now, select the systems button and choose your SAP ERP, Cloud Connector, and BTP Global account information like below.

Select BTP Global Account, cloud connector, and S/4 HANA or ERP system
Navigate each system tile, select your corresponding system, and Generate Workflow.
Note: If you are unable to find the needed systems here(which suggests they belong to other CRM IDs) you can manually enter them post-generation of workflow.
Before the workflow is generated, a popup will appear with a summary of the selected systems. Once you have completed your verification click the Next Step and Generate button to begin the workflow.

Generate workflow
If the workflow is generated successfully, you will receive the following confirmation on the same screen; The integration scenario has been successfully generated. You may now work on this scenario by navigating to Inbox. You can see additional details about this scenario, below
To view workflow messages, Go to the home page( i.e. Welcome Screen) and select my Inbox tile.
Click on the first message on the left side panel which will show you the Disclaimer.
This disclaimer will help you understand how the CIAS automation workflow helps you with upcoming steps and involved systems.
Disclaimer on Integration Solution
To proceed, click on I Agree.
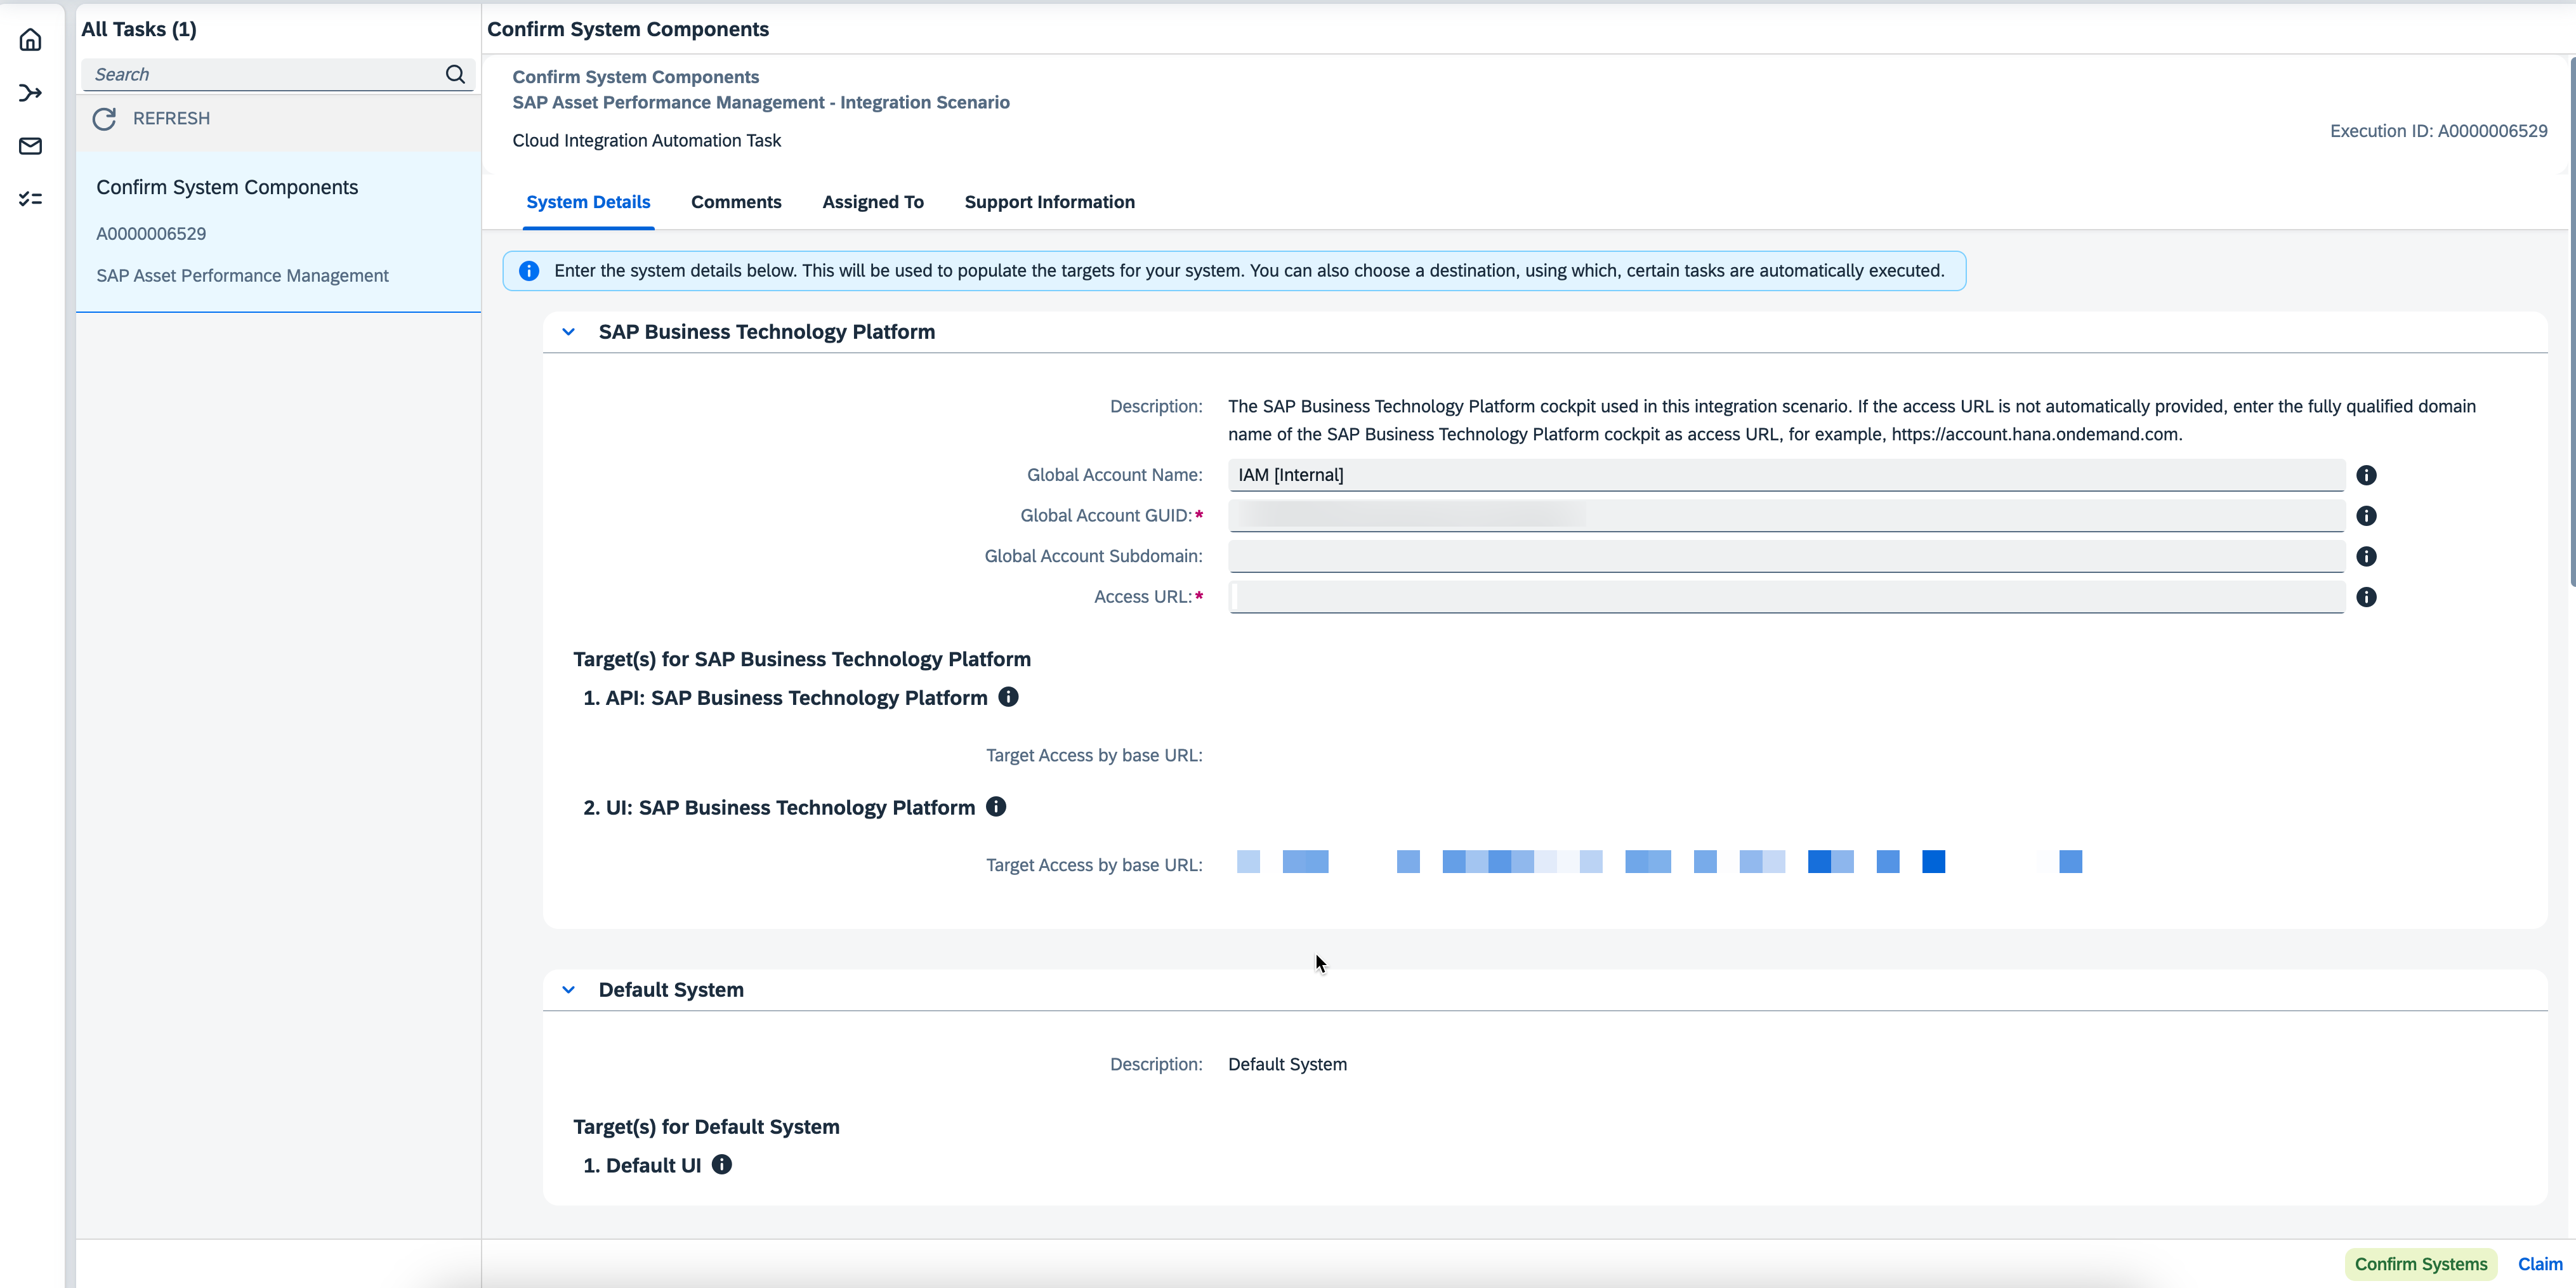
The next step is to confirm the system component. The system information that you selected in the previous steps, will be displayed you can update the target system information in the section.
Note: In the SAP S/4HANA or SAP ERP section, select the access options as Via Host according to SAP recommendations, if any Mandatory information required followed screens, maintain it manually.
Select system components
If all the system details are correct(i.e. SAP S/4HANA, Cloud Connector, and SAP BTP) then click on the Confirm Systems button below.
In the next step, Assign users to required roles for each system, so that workflow tasks will be pushed to their inbox according to their role. Here you can add more than one user to the same role by separating commas.

Assign required roles to the corresponding system user
If the admin has access to all the systems, then you can assign all roles by clicking on the highlighted button.
To continue click on Confirm Role Assignment button and proceed.
In the next step, Confirm the Execution scope scenario based on your ERP system release;

Confirm your ERP System
Note: SAP APM Product is supporting the customers who were on S/4HANA higher and ECC releases as well. The key difference here is that the way of onboarding is slightly different, key difference is SNOTES implementation from the backend system. Hence two radio buttons are provided.
Difference tasks between S/4HANA and ECC releases.
S/4HANA Higher Release:
- Implement SNOTES that are related to S/4HANA 2020FPS01 Release
- Activating Asset Management OData v2 Services
- Publishing Asset Management OData v4 Services
- Setting up Event-mesh service
ECC Release:
- Implement Mobile-addon-based Odata service SNOTES
- Activating Business Configuration set
- Activating Mobile-addon-based Asset Management OData V2 Services
To enable the Integration couple of actions should be done manually by the customer.
Implement the following Asset Management SNOTES in your S/4HANA system.

Click on the SNOTE link as shown in the above image, it will download the SAP GUI and navigate Transaction for note implementation. Post-implementation click on Task Completed for further steps of S/4HANA steps.
Activate Asset Management OData V2 Services

Click on the on-premise system link as shown in the figure to navigate the Transaction /n/IWFND/MAINT_SERVICE transaction and activate the services. The procedure and sequence steps are also provided within the Manual instructions.
Post-activation of Services click on Task Completed for further steps of S/4HANA steps.
in the next step, You would need to Publish the following Asset Management OData V4 Services
Publish the following Asset Management OData v4 Service Groups on the SAP Gateway Foundation hub for consumption.
API_MEASURINGPOINT
API_MEASUREMENTDOCUMENT
API_MAINTENANCETASKLIST
CDI_CDS
API_CATALOGPROFILE
Follow the below link for more information on Publishing Services
Post publishing services click on Task Completed for further steps of S/4HANA steps.
In the Upcoming steps, you would need to create a Technical user using Transaction SU01, it needs all the technical access to EAM roles, SAP Gateway, and RFC execution access. Please follow the below link for more information on Authorising a Technical user
SAP Business Technology Platform Automation Steps:
Now, you have reached the Key automation BTP steps, which will be totally controlled by the CIAS Framework.
To onboard SAP APM, you must create a new sub-account, enabling cloud foundry, Space, instance generation, and subscription.
The moment you enter into the BTP step, you will see the below screen to enter a few details to create a new subaccount.
As part of Manual instruction, we have defined steps for the required information to create a sub-account. Enter the Name of the subaccount, Domain Name, and administrator credentials and execute the Task.

Create a Subaccount in BTP for SAP APM
once the subaccount is created successfully, you will receive a success message as shown in the above figure. To view a newly created subaccount, you can verify it in the Global account with the same name.
Click on Task completed for further step;
In the next step, Create an organization for your subaccount. Enter the name of the organization and click on Execute Task.

Create an Organization to enable cloud foundry
Post the Success message, Click on the Task Completed button for further steps.
The next step is to create Space for your Subaccount.
In the creation of BTP space, provide the space name as "apm-space" which is recommended, and customer can change this name according to their business case. Post entering/changing the space click on execute Task button.

Create a BTP Space
Post the Success message, Click on the Task Completed button for further steps.
The next step is to Subscribe to SAP APM.
In this step, you will have 3 tasks, which execute sequentially, these steps have a dependency on each other. They are,
- Assigning entitlement of SAP APM Application
- Create SAP APM Service Instance and Key
- Subscription of application
in the first task, you can decide the quota of the application based on your business need( default is 1,1)
The second Task, creating a service instance, and here you do not need to edit any data unless you want to change the name of the instance name.
The third step is executed on its own since the values are derived from the previous steps, so the subscription will be done automatically.
Note: you can click Eye symbol to view hidden data about the Quota allocation assignment to which entitlements. Also here the subscription part take more time to complete.
After reviewing the values, you can click Execute Task and it will start the execution in the background sequentially.

Subscribing to SAP Asset Performance Management
Once you have received the success message shown in the above figure, Click on the Task Completed button for further steps.
Create and assign the Role collection to the Reliability Engineer and Administrator.
As part of SAP APM with CIAS Integration, we will create a couple of roles and these will be assigned to the mentioned administrators and Reliability engineer.
Please note; we are unable to assign all the roles while creating collection, but you can edit them from the BTP subaccount.

Create and assign the Roles collection
Once you have received the success message shown in the above figure, Click on the Task Completed button for further steps.
Create a Destination for SAP S/4HANA or ERP system;
The destination is needed to synchronise the data from S/4HANA to APM and APM to S/4HANA. To create a destination you have to enter only a few steps; they are
- Name of the Destination
- Destination URL
- ERP Username and Password
and then click on Execute Task to create the destination in your subaccount.
Note: Destination URL will be different for S/4HANA OData api's and Mobile-addon OData api's. Customer has to derive the rite host and url from the Integration Document

Create a Destination for S/4HANA or ERP system
Once you have received the success message shown in the above figure, Click on the Task Completed button for further steps.
The next step is to Create a Destination for IOT Rules;
To synchronise your Technical object with IOT or to reach sensor data from IOT to APM, this destination will ensure your synchronization, as part of CIAS automation for apm we have added this step as well.
You would need to enter only the name of the Destination and the Description and then Execute the Task, It will create a Rules Destination for IOT Enablement.

Create a Destination for IOT Rules
Once you have received the success message shown in the above figure, Click on the Task Completed button for further steps.
The Next step is Configuring Event Mesh Service which is applicable only for the S/4HANA FPS01 above Release systems. As part of the Initial release, we have not automated this scenario and will be available in upcoming releases. Please follow the link for Event Mesh Setup
With this, you will be able to complete all the steps of BTP, and you can launch the BTP application and check all your access and you can extend the access from the BTP as well.

SAP Asset Performance Management FLP
The next step is Cloud Connector Deeplink Navigation which is the last step in onboarding SAP APM.
Post BTP automation, the workflow task will be moved to the Network Administrator who will ensure and enable the security and authenticate the cloud requests before reaching them into the private cloud system.

Setup Cloud Connector
Just click on the Cloud connector link as shown in the image, it will navigate your SCC and you can configure. make sure your systems are reachable and Green.
Click on the Task Completed button and then you will see a completion message on your screen.
Now you are successfully onboarded to SAP APM.
Please refer to the following SAP Help Document for further information on boarding the SAP APM solution.
Labels:
You must be a registered user to add a comment. If you've already registered, sign in. Otherwise, register and sign in.
Labels in this area
-
Artificial Intelligence (AI)
1 -
Business Trends
363 -
Business Trends
29 -
Customer COE Basics and Fundamentals
1 -
Digital Transformation with Cloud ERP (DT)
1 -
Event Information
461 -
Event Information
28 -
Expert Insights
114 -
Expert Insights
187 -
General
1 -
Governance and Organization
1 -
Introduction
1 -
Life at SAP
414 -
Life at SAP
2 -
Product Updates
4,679 -
Product Updates
270 -
Roadmap and Strategy
1 -
Technology Updates
1,499 -
Technology Updates
99
Related Content
- SAP Business ByDesign – What’s New 24.05 in Enterprise Resource Planning Blogs by SAP
- Subscription Billing with Convergent Invoicing and Contract-Based Revenue Recognition in Enterprise Resource Planning Blogs by SAP
- Why YCOA? The value of the standard Chart of Accounts in S/4HANA Cloud Public Edition. in Enterprise Resource Planning Blogs by SAP
- 4 Expert Tips for Setting Up the Organizational Structure in SAP Central Business Configuration in Enterprise Resource Planning Blogs by SAP
- Speeding up your SAP HCM move to the cloud in 2024 - Part 2: Customer Evolution Kit for HCM in Enterprise Resource Planning Blogs by SAP
Top kudoed authors
| User | Count |
|---|---|
| 7 | |
| 6 | |
| 5 | |
| 4 | |
| 4 | |
| 4 | |
| 4 | |
| 3 | |
| 3 | |
| 3 |