
- SAP Community
- Products and Technology
- Technology
- Technology Blogs by SAP
- Get data from a JSON Object by scanning a QR Code ...
Technology Blogs by SAP
Learn how to extend and personalize SAP applications. Follow the SAP technology blog for insights into SAP BTP, ABAP, SAP Analytics Cloud, SAP HANA, and more.
Turn on suggestions
Auto-suggest helps you quickly narrow down your search results by suggesting possible matches as you type.
Showing results for
Advisor
Options
- Subscribe to RSS Feed
- Mark as New
- Mark as Read
- Bookmark
- Subscribe
- Printer Friendly Page
- Report Inappropriate Content
05-08-2022
2:39 AM
In this quick blogpost I'll show you how to read data from a QR code and convert it into variables to use in the app, leveraging the recently acquired by SAP, the low-code no code solution: SAP Build Apps.
SAP Build Apps reads the QR Code as a text. For this exercise, we need to make sure that this text is written as a JSON Object, because we'll use it to convert it from text to a JSON Object to extract the variables that are inside.
Prerequisites:
What we'll do first, is to create the QR Code. Go to your QR Code generator of preference or use the generator that I used and past this JSON Object:
I'm simulating we're reading relevant data from a specific refrigerator.
You should be seeing the already generated QR Code like this:
Now, go to your SAP Build Apps trial account and create a new application.
I named mine "QR Demo App". You'll immediately see a single page app with a headline and a sample text description. I changed the Headline to "QR Demo App" and the text description as you see in the image.
What you need to do now is to drag and drop a Button component into the app, to make it consistent I changed the label to "Read QR".
Before going to the Button's logic flow, let's create first a page variable which will contain the variables from the JSON Object. Click on "View - Variables".
Add a Page Variable and name it "parsedJson", and select "Object" as the variable value type. Then add 3 new properties and change the names to brand, model and imgURL -following the format as illustrated above- selecting as well these variable value types as you see them in the screen shot:
Click again in "View - Variables" to return to the app page editor.
Now we need to add the logic flow for this Button. Select the Button and click on "Show logic for Button 1".
The first thing you need to do is to drag and drop the logic component "Scan QR barcode", and add a name to the QR/Barcode to be recognized. I named mine "qr".
Then add a JavaScript component to the logic flow. Here is where we are going to write a few lines of code to parse our JSON and extract data outputs from the QR code. This video helped me to understand how to put the custom code.

Double click on the JavaScript component to open the editor. Make sure "qr" is set as the input and reading the output of the QR code scanned, like this:
Copy and paste this code into the editor:
It should look like the image below. Now you have to set 2 different outputs. I named it "json", this would be the object that will convert the values into the variables we want to extract.
Same case for the "error" output, set it as an Object and enter its properties (code and message as text and rawError as any value).
Now add a Toast dialog component to show up if an error occurs. Make sure you link the second output to this component. On the right side where the properties are located, click on Toast message and select "PARSE JSON / error".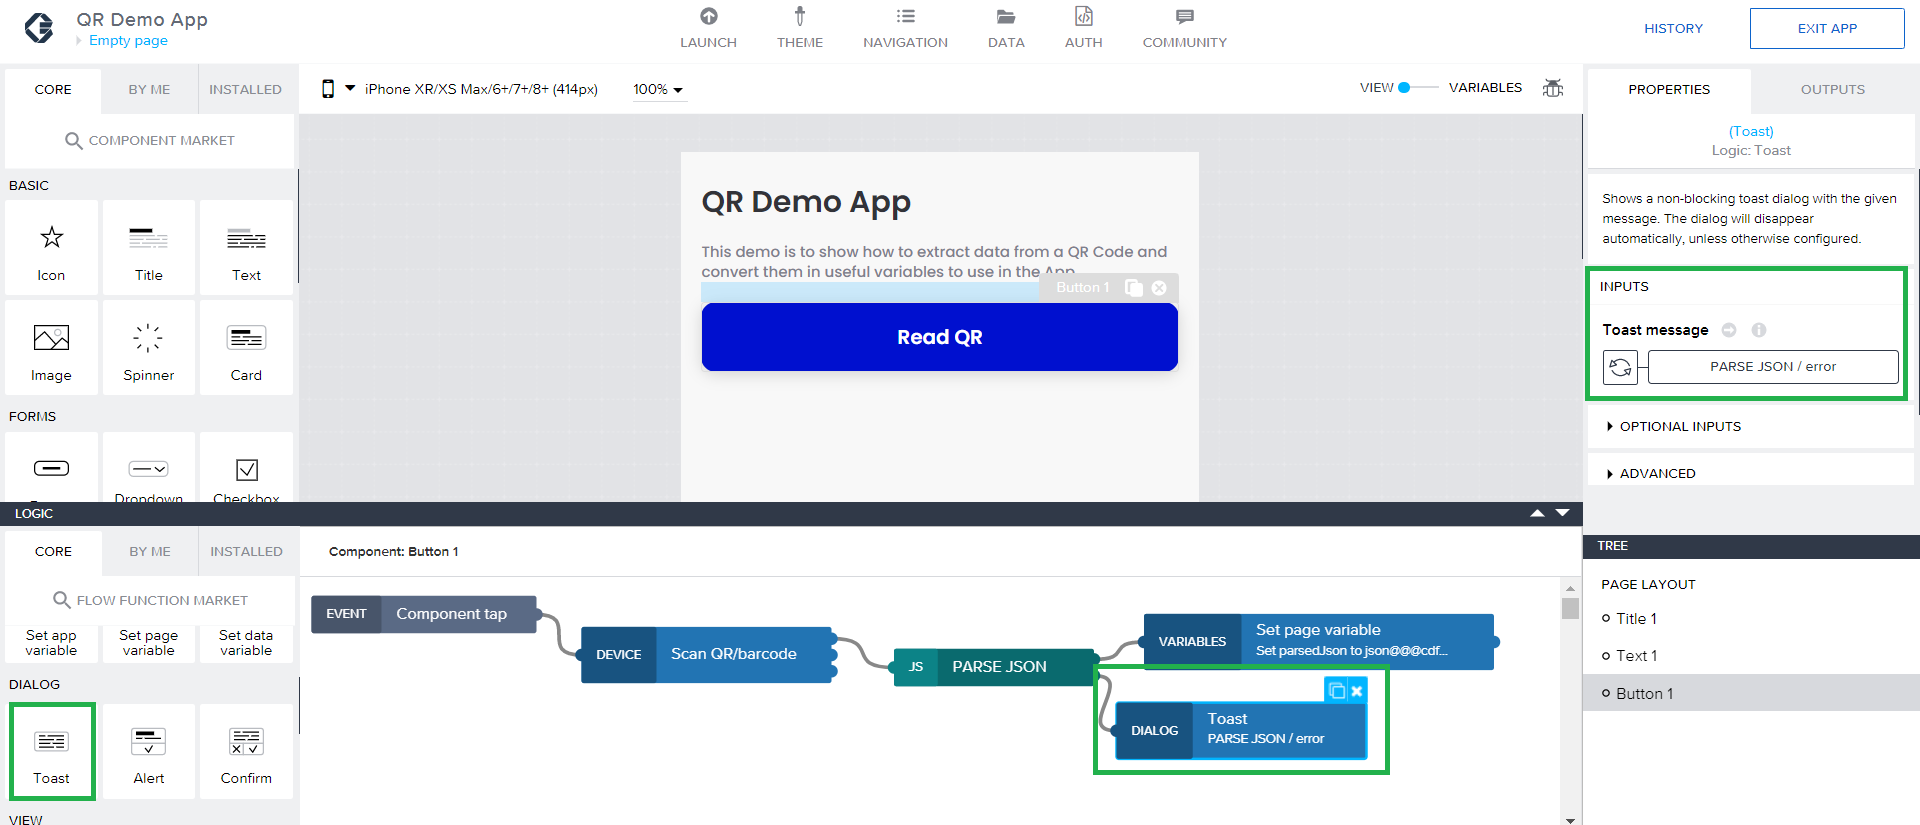
Now add the output we want :). Look for "Set page variable" and in the Variable name, select the Page Variable we created earlier and assigned the value to the "json" Object output of the JavaScript code.
Open the "QR Demo App" in your SAP Build Apps mobile App, and then click on the "Read QR" Button, this will open your device camera so you scan the QR code previously generated. You should see the result like this: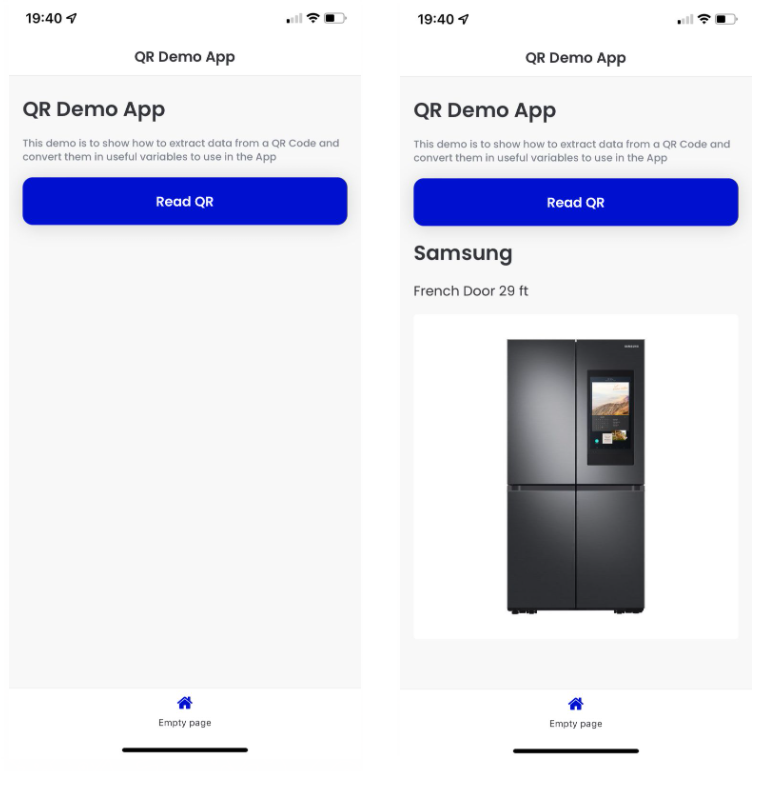
Hope you've enjoyed this quick exercise leveraging low-code no-code capabilities with SAP Build Apps. Of course you can take this data to keep using them in the app 🙂
To learn more about SAP BTP, see the learning journey Discover SAP Business Technology Platform, a great introduction to BTP and the Intelligent Enterprise strategy to see what it’s all about for free. Discover BTP, LCNC plus much more free learning at SAP Learning site.
SAP Build Apps reads the QR Code as a text. For this exercise, we need to make sure that this text is written as a JSON Object, because we'll use it to convert it from text to a JSON Object to extract the variables that are inside.
Prerequisites:
- If you don't a SAP Build Apps account, get a trial account here.
- Download the SAP Build Apps mobile app in your App Store.
- Search for a QR Code generator. In my case I used this generator.
What we'll do first, is to create the QR Code. Go to your QR Code generator of preference or use the generator that I used and past this JSON Object:
{

"brand": "Samsung",

"model": "French Door 29 ft",

"imgURL": "https://samsungmx.vtexassets.com/arquivos/ids/180853-800-auto?width=800&height=auto&aspect=true"

}
I'm simulating we're reading relevant data from a specific refrigerator.
You should be seeing the already generated QR Code like this:
Now, go to your SAP Build Apps trial account and create a new application.
I named mine "QR Demo App". You'll immediately see a single page app with a headline and a sample text description. I changed the Headline to "QR Demo App" and the text description as you see in the image.
What you need to do now is to drag and drop a Button component into the app, to make it consistent I changed the label to "Read QR".
Before going to the Button's logic flow, let's create first a page variable which will contain the variables from the JSON Object. Click on "View - Variables".
Add a Page Variable and name it "parsedJson", and select "Object" as the variable value type. Then add 3 new properties and change the names to brand, model and imgURL -following the format as illustrated above- selecting as well these variable value types as you see them in the screen shot:
Click again in "View - Variables" to return to the app page editor.
Now we need to add the logic flow for this Button. Select the Button and click on "Show logic for Button 1".
The first thing you need to do is to drag and drop the logic component "Scan QR barcode", and add a name to the QR/Barcode to be recognized. I named mine "qr".
Then add a JavaScript component to the logic flow. Here is where we are going to write a few lines of code to parse our JSON and extract data outputs from the QR code. This video helped me to understand how to put the custom code.
Double click on the JavaScript component to open the editor. Make sure "qr" is set as the input and reading the output of the QR code scanned, like this:
Copy and paste this code into the editor:
try {

  const json = JSON.parse(inputs.qr)

  return  { json }

} catch (err) {

  const error = {

    code: 'jsonError',

    message: 'Could not parse json',

    rawError: err

  }

  return [1, { error }]

}
It should look like the image below. Now you have to set 2 different outputs. I named it "json", this would be the object that will convert the values into the variables we want to extract.
Same case for the "error" output, set it as an Object and enter its properties (code and message as text and rawError as any value).
Now add a Toast dialog component to show up if an error occurs. Make sure you link the second output to this component. On the right side where the properties are located, click on Toast message and select "PARSE JSON / error".
Now add the output we want :). Look for "Set page variable" and in the Variable name, select the Page Variable we created earlier and assigned the value to the "json" Object output of the JavaScript code.

Now, minimize the Logic flow and let's drag and drop an image, title and text components. If you want, put them inside of a container.
Now select the content in each of these components (and source for the image), the Page variable we created earlier now with the output of the parsed JSON object. This is the example for "brand":
Repeat the same steps for "imgURL" and "model" and Save the app.
Now let's test it. Click on "Launch" and "reveal QR code". Read this QR Code using your mobile SAP Build Apps app (this is to link your account to your mobile app).

Open the "QR Demo App" in your SAP Build Apps mobile App, and then click on the "Read QR" Button, this will open your device camera so you scan the QR code previously generated. You should see the result like this:
Hope you've enjoyed this quick exercise leveraging low-code no-code capabilities with SAP Build Apps. Of course you can take this data to keep using them in the app 🙂
Want to know more about SAP Business Technology Platform?
To learn more about SAP BTP, see the learning journey Discover SAP Business Technology Platform, a great introduction to BTP and the Intelligent Enterprise strategy to see what it’s all about for free. Discover BTP, LCNC plus much more free learning at SAP Learning site.
- SAP Managed Tags:
- SAP Build Apps,
- SAP Business Technology Platform
Labels:
4 Comments
You must be a registered user to add a comment. If you've already registered, sign in. Otherwise, register and sign in.
Labels in this area
-
ABAP CDS Views - CDC (Change Data Capture)
2 -
AI
1 -
Analyze Workload Data
1 -
BTP
1 -
Business and IT Integration
2 -
Business application stu
1 -
Business Technology Platform
1 -
Business Trends
1,658 -
Business Trends
93 -
CAP
1 -
cf
1 -
Cloud Foundry
1 -
Confluent
1 -
Customer COE Basics and Fundamentals
1 -
Customer COE Latest and Greatest
3 -
Customer Data Browser app
1 -
Data Analysis Tool
1 -
data migration
1 -
data transfer
1 -
Datasphere
2 -
Event Information
1,400 -
Event Information
67 -
Expert
1 -
Expert Insights
177 -
Expert Insights
301 -
General
1 -
Google cloud
1 -
Google Next'24
1 -
GraphQL
1 -
Kafka
1 -
Life at SAP
780 -
Life at SAP
13 -
Migrate your Data App
1 -
MTA
1 -
Network Performance Analysis
1 -
NodeJS
1 -
PDF
1 -
POC
1 -
Product Updates
4,577 -
Product Updates
346 -
Replication Flow
1 -
REST API
1 -
RisewithSAP
1 -
SAP BTP
1 -
SAP BTP Cloud Foundry
1 -
SAP Cloud ALM
1 -
SAP Cloud Application Programming Model
1 -
SAP Datasphere
2 -
SAP S4HANA Cloud
1 -
SAP S4HANA Migration Cockpit
1 -
Technology Updates
6,873 -
Technology Updates
430 -
Workload Fluctuations
1
Related Content
- SAP Build Apps - より簡単になったSAP Build Process Automationとの連携 in Technology Blogs by SAP
- Retreiving AppGyver project in Technology Q&A
- What’s new in Mobile development kit client 24.4 in Technology Blogs by SAP
- SAP BTP, Kyma Runtime internally available on SAP Converged Cloud in Technology Blogs by SAP
- Launching an application built with SAP Mobile Services directly through SAP Mobile Start in Technology Q&A
Top kudoed authors
| User | Count |
|---|---|
| 29 | |
| 17 | |
| 15 | |
| 13 | |
| 11 | |
| 9 | |
| 8 | |
| 8 | |
| 8 | |
| 7 |