
- SAP Community
- Products and Technology
- Enterprise Resource Planning
- ERP Blogs by SAP
- Set up your SAP S/4HANA system for EAM Inspection ...
Enterprise Resource Planning Blogs by SAP
Get insights and updates about cloud ERP and RISE with SAP, SAP S/4HANA and SAP S/4HANA Cloud, and more enterprise management capabilities with SAP blog posts.
Turn on suggestions
Auto-suggest helps you quickly narrow down your search results by suggesting possible matches as you type.
Showing results for
Advisor
Options
- Subscribe to RSS Feed
- Mark as New
- Mark as Read
- Bookmark
- Subscribe
- Printer Friendly Page
- Report Inappropriate Content
01-12-2022
4:24 PM
This blog will explain step-by-step how to set up your SAP S/4HANA system to work with inspection checklists in the SAP Enterprise Asset Management (SAP EAM) maintenance process. In step 1 to 7 we will set-up the necessary customizing and master data. In step 8 we will verify, whether the set up has been successful by simulating the checklist generation for the quarterly mechanical check of a technical object.
Checklists are very often needed in Plant Maintenance to perform inspections and checks of assets, and serve as a legally binding documentation agenda. For more information about the inspection checklist process please read SAP Help Portal - Overview of the Inspection Checklist Process.
Pre-configured customizing content is delivered with the SAP S/4HANA 2021 FSP1 solution. This can be used directly or as a reference. If available in one of the followings steps, it will be mentioned, see also in the SAP Help Portal - Maintenance Order with Inspection Checklists.
Screenshots have been taken in an SAP S/4HANA 2021 FSP1 system.
Remark: To successfully set up and test SAP EAM inspection checklists, the roles SAP_BR_MAINTENANCE_PLANNER and SAP_BR_QUALITY_PLANNER should be assigned to your SAP S/4HANA system user.
Execute transaction SFW5 to activate business function LOG_EAM_CHECKLIST, which can be found in the folder ENTERPRISE_BUSINESS_FUNCTIONS.
Remark: SAP EAM Inspection Checklists will be listed in the “Feature Scope Description” document with release SAP S/4HANA 2021 FPS01.
Open Customizing via transaction SPRO and navigate to 'Quality Management→Quality Inspection→Inspection Lot Creation'. First select customizing activity 'Maintain Inspection Types'.
Remark: You could use inspection type 8914 and related customizing that gets delivered in 000 client with release SAP S/4HANA 2021 FPS01.
Create a new inspection type using button 'New Entries', for example "CL", with the following settings seen in the screenshot.
Open 'Maintain Inspection Lot Origin and Assign Inspection Types' under same customizing path. Assign your inspection type to inspection lot origin 89. For this select origin 89 in the 'Inspection Lot Origins' list and double-click in the 'Dialog Structure' on 'Inspection Types for the Origin'. Using button 'New Entries' you can now add your inspection type.
Lastly open 'Define Default Values for Inspection Types' again under same customizing path and add your inspection type with following default values using the button 'New Entries' in the overview list.
Here we will create follow up actions, which later will be triggered in the inspection checklist process after setting the usage decision for the inspection lots.
For example, we have added follow up action 'CL' including all function modules delivered with SAP S/4HANA EAM standard, but you can of course add other (incl. custom-developed) function modules as well. For this add a new entry in the list 'Define Follow-Up Actions for Inspection Results' with Object Type 'Usage Decision for Inspection Lot'. (Pre-delivered Content: Follow up actions CL_AC and CL_RE)
Subsequently select the newly created follow-up action in the list and double click in the 'Dialog Structure' on 'Function Modules', where you then add the relevant function modules to be executed for this follow up action. For information on the standard delivered function modules, please read their documentation.
Navigate in customizing to 'Quality Management→Quality Inspection→Inspection Lot Completion' and first open 'Edit Code Groups and Codes for Usage Decisions'.
Create a new code group in list 'Code Groups for Usage Decision' with Status 'Released', for example "CL". (Pre-delivered Content: Code Group CL)
Select the code group and double click on 'Codes for Usage Decision' in the 'Dialog Structure' and define codes available for usage decision.
Then open 'Edit Selected Sets for Usage Decisions' under same customizing path. Here you define a new selected set of codes relevant for a specific plant in list 'Selected Sets for Usage Decision'. For example, add entry for plant '0001' and name the 'Selected Set' CL in status 'Released'.
After saving this, select the new entry and double click on 'Selected Set Codes for Usage Decision'. Here add the previously created codes and define whether it is an accepted or rejected code, the quality score and the follow up action (defined in step 2.2) which should be executed.
Lastly going back to first QM customizing activity 'Maintain Inspection Types' (step 2.1), update the selected set and check the flag 'Selected Set in Same Plant'.
Navigate in customizing to 'Quality Management→Basic Settings→Maintain Settings at Site Level' and open 'Maintain Settings at Plant Level'.
Select the plant you want to maintain the automatic usage decision setting for in the list 'Plant-Dependent QM Settings' (same as in previous step) and double-click on 'Inspection Type-Specific Settings for Plant' in the 'Dialog Structure'. Create a new entry for created inspection type "CL". The 'UD Plant' attribute should be the same as you have selected at 'UD Sel. Set' creation in step 2.3. Enter these values in the corresponding columns as well as the UD Code / Code Group, which should be set at result recording as automatic usage decision. This setting is also used in collective usage decision transaction IW93 as default value.
You can use any of your existing order types to enable the inspection checklist process for the maintenance orders of this chosen type. We use the pre-configured order type for inspection checklists PM07 in our settings below.
Remark: You can also use order type PM07 and related customizing that gets delivered in 000 client with release SAP S/4HANA 2021 FPS01. However, there is no need to create specific order types for inspection process. You would rather enable existing order types to add checklists where needed.
For maintenance orders the print form EAM_CL_PRINT is delivered by SAP standard to print the inspection checklists incl. recorded results. As an option, also a DMS document with that 'Checklist Report' can be automatically created as a follow-up action (see step 2.2, function modules EAM_CL_CREATE_DMS_LOT and EAM_CL_CREATE_DMS_ORDER) . The precondition for this is the customizing of a shop paper for maintenance order.
Navigate in customizing to 'Plant Maintenance→Maintenance and Service Processing→Maintenance and Service Orders→Print Control' and open 'Define Shop Papers, Forms and Output Programs'.
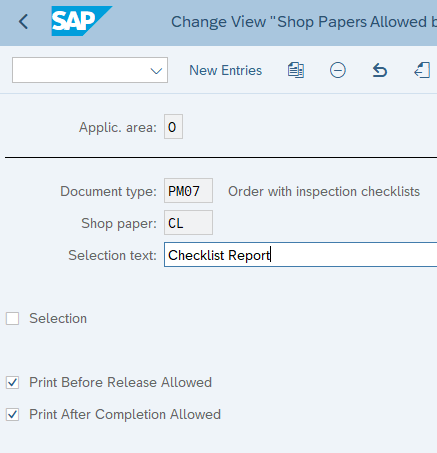
In pop-up window select activity 'Define Shop Papers'. Create new shop paper for checklist print outs by clicking button 'New Entries'. Please enter values as seen in following screenshot, whereby the application area is 'Maintenance orders'. Of course, you can choose a different name than "CL" for your shop paper. The program and the form both with name EAM_CL_PRINT are the standard delivered print program and form for checklists. (Pre-delivered Content: Shop paper CL)
Navigate back to 'Select Activity:' popup window and choose 'Assign Permitted Shop Papers'.
Add a new entry ('New Entries' button) for your order type and shop paper CL.
Now navigate back to customizing window and choose 'Define Printer' in customizing menu entry 'Print Control'. Select Activity 'User-Specific Print Control' and add for all users a new entry (button 'New Entries') for shop paper CL as seen in screenshot.
In this step we define a document type for the creation of a DMS document 'Checklist Report'. Therefore, open customizing 'Cross-Application Components→Document Management→Control Data→Define DMS Document Types'.
Create a new document type (button 'New Entries'), for example CL, with this setting.
Remark: Use any existing document type for inspection protocols, if available in your system. Pre-delivered Content: Document Type CL.
Save and go back to 'Define document types' overview and select new document type in the list. Then double-click on 'Define document status' in the 'Dialog Structure' and define two document status one for 'Archived' and one for 'Released'.
After saving, double-click on 'Define object links' in 'Dialog Structure' and add following two entries.
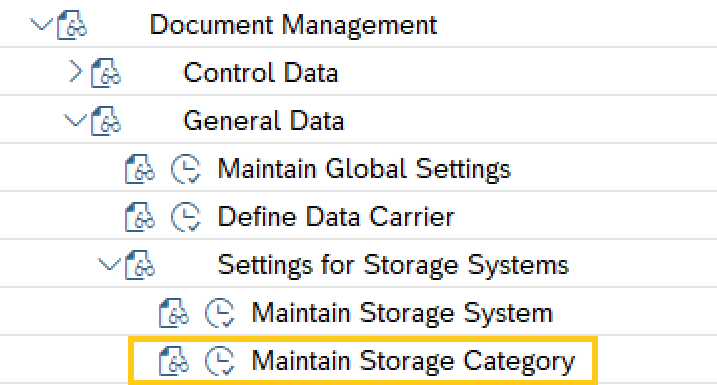
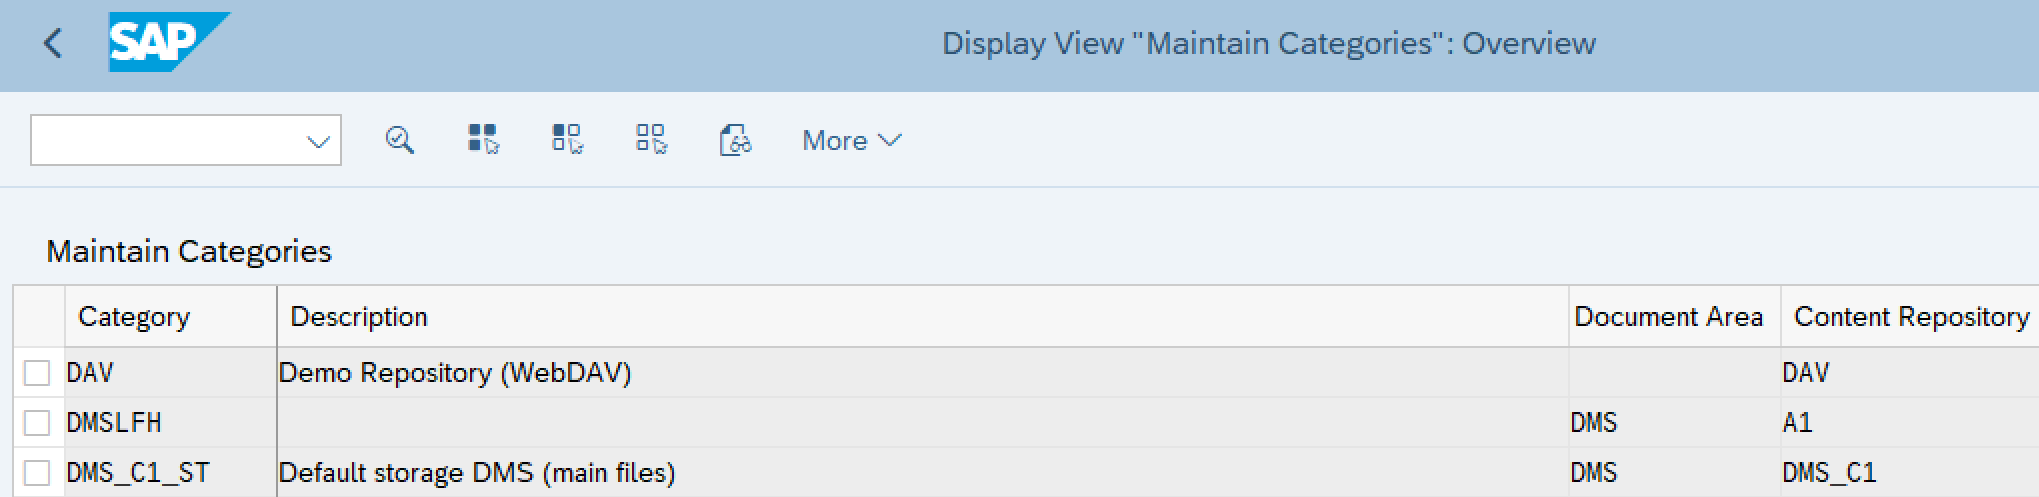
Lastly go to customizing 'Cross-Application Components→Document Management→General Data→Settings for Storage System→Maintain Storage Category' and check that category DMS_C1_ST is set up.
A new customizing entry 'Configure Checklists for Maintenance Order Types and Planning Plants' has been introduced by the checklist solution under 'Plant Maintenance→Maintenance and Service Processing→Maintenance and Service Orders→Functions and Settings for Order Types'.
Open customizing and add a new entry (button 'New Entries') for the order type and maintenance planning plant combination for which you want to configure inspection checklists and have set up the customizing in the last steps. In our example we add inspection type 'CL' for order type PM07 and plant 0001.
Also enter the customized shop paper and document type and add optionally a notification type for notifications to be created at usage decision of the inspection checklists. Otherwise keep the default checkbox settings for now.
See field help description in this transaction for more details. Sample:
To be able to match inspection plans (inspection checklist templates) with the checklist type field in the maintenance order operation, we create a new characteristic in transaction CT04. Enter name "CL_TYPE" and click 'Create' button. Open tab 'Addnl data' and enter table name "AFVC" and field name "CL_TYPE".
Confirm pop up and the information on 'Basic data' tab is automatically filled with the reference field data. Adjust description and select 'Multiple Values' to allow selection of multiple checklist types for one inspection plan.
Next open tab 'Values' and click on button 'Other Value Check' and select 'Check Table' on pop up. Enter table "EAM_CL_CU_TYPE" containing allowed checklist types, which we will maintain in a later step.
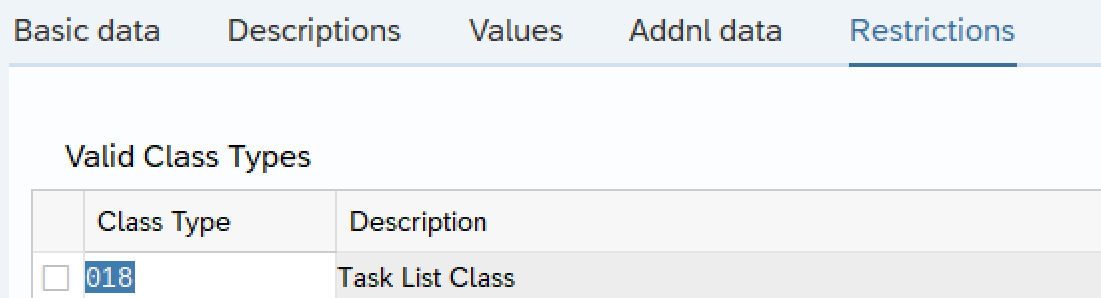
Lastly go to tab 'Restrictions' and enter class type '018' so that this characteristic is only valid for class type task list / inspection plan.
In this step we define the matching of characteristics between inspection plan and technical object. Open new transaction IW98.
The value "EAM_CL_TYPE" indicates the characteristic that must match with checklist type field in maintenance order operation for checklist generation. This table can also be used to define other matchings:
See also field help description in this transaction for more details. Sample:
As mentioned, we will now define the applicable checklist types in the new transaction IW99. Click button 'New Entries' and first enter checklist types, for example CL01ME etc. In a second step select one checklist type after another and double click in 'Dialog Structure' on 'Short Texts' to maintain the description for different languages.
See also field help description in this transaction for more details.
Checklist types can be deleted when they are not used in any task list operation or order operation. If a checklist type is used, instead mark it as "inactive" to mute the usage of this checklist type. No inspection plan search is executed for inactive entries and users get a warning if they use inactive checklist types in operations.
Our sample equipment, for which we want to generate inspection checklists, is a gas boiler with assigned class GASBOILER, screenshot from transaction IE02. Remark: Create the same equipment / class or use one of your sample equipment with classification.

Finding a matching inspection plan for a technical object needs classification. The class name assigned to the technical object must be same as for inspection plan (but different class types).
As an option, any classification characteristic of the technical object can also be used for search of a matching inspection plan. The classification characteristic could be from any class of the technical object (if multiple classes are assigned to the technical object). For our example, characteristic “Gas Boiler Type” could be used to find separate inspection checklists according to the value of Gas Boiler Type.
Inspection checklists get created for certain maintenance order operations. You define the type of checklist at operation level with new field “Checklist Type”. The setup for checklist types is already done in transaction IW99.
In our sample general task list CL_GASB1 we assign checklist type CL03MM to operation 0020 in transaction IA06. Remark: Create a new general task list or modify one of your existing ones adding the checklist type to operation(s).
You find the checklist type field at the right end of the operation list.
Now, we create the inspection plan that is used as a template for generation of inspection checklists, i.e. QM inspection lots assigned to maintenance work order operation and technical object.
An inspection plan must have a reference to a material master and a class. This master data needs to be created first.
An inspection plan must have a reference to a material master with settings for Quality Management. If you do not already have such a material master, create a new one in transaction MM01. Use any material type that allows Quality Management settings, e.g. HIBE or UNBW. In our example, we use material type “HIBE Operating supplies” and name the material master "CL_0001". Select plant 0001 as the organizational level and fill out any mandatory fields of the material master.
Then open the 'Quality management' tab and click button 'Insp. Setup'.
On the pop-up window click 'Create Inspection Types' button and assign the inspection type "CL" (step 2.1) to the material master. Also make sure that the indicators “Insp. with Task List” and “Inspect Charcs.” are set.
To be sure check that the material type you choose is assigned to task list type Q in customizing 'Quality Management→Quality Planning→Inspection Planning→General→Assign Task List Types to Material Types'.
Create a class in transaction CL01 of class type 018 (Task List class) with same name as the one for the technical object (step 5).
For our sample equipment, we create the class GASBOILER.
After filling in mandatory attributes, open tab 'Char.'. Add characteristic CL_TYPE that was defined in step 4.1 for characteristic matching and assigned to EAM_CL_TYPE literal in transaction IW98 in step 4.2.
This class is used to match with (see also field help in transaction IW98):
Optional are other characteristics that would match with technical object, e. g. characteristic “Gas Boiler Type”. You use other characteristics if they are needed for finding different inspection plans.
The inspection plan serves as template for inspection checklists or QM inspection lots, respectively.
Create inspection plan in transaction QP01 with the material number created in step 7.1, plant and (optional) a group number.
Enter a short text, usage, overall status and other required entries on header level. Then switch to “Operations” overview.
Create an operation by entering control key and description. Then mark this operation and click button 'Inspection Characteristics'.
For our example, we want to create three checklist items, i.e. inspection characteristics. There is one item that has a multiple-choice catalog with choices Yes and No and two items with a quantitative value incl. minimum and maximum values.
Create the inspection characteristics by entering a short text and indicators for Qn (Quantitative value/measurement) or Ql (Qualitative item with multiple choice catalog).
For the quantitative items, enter decimal places, unit, lower and/or upper limit.
For qualitative items, enter a catalog in “Selected Set” column.
After pressing Enter on your keyboard for a new inspection characteristic, you confirm the indicator pop-up window that appears for each item.
Save the QM inspection plan.
Remark: See SAP Help - Inspection Planning with Inspection Plans for more details on QM inspection plans.
For the inspection lot generation, the classification of QM inspection plan must match with:
Open transaction QP02 for changing the inspection plan created in the previous step. Enter group number and choose “Header” (hat icon).
Choose menu function 'Extras→Classification→Header'.
Add here the class created in step 7.2 with same class name as for technical objects to be inspected, in our example 'GASBOILER'.
Add a value to the characteristic checklist type to match the checklist type of the operation of step 6, in our example 'CL03MM'.
Save the inspection plan.
Transaction IW97 allows to execute a what-if-analysis: what inspection plans and inspections characteristics would be created if the master data is setup in this constellation.
Open transaction IW97 to simulate what inspection plans / characteristics are generated for our set up created in the previous steps. (SAP menu path: Plant Maintenance→Maintenance Processing→Order→Inspection Processing)
Transaction IW97 helps to verify, view and analyze master data of the inspection process. The simulation creates a simulation order from task list, executes object list generation and inspection lot generation for the selected master data and will show all inspection plans with their inspection characteristics in the simulation list. No simulation data will be saved at the database.
Entry with different data objects is possible:
At selection screen, user can choose different levels of summarization/granularity for the result list of simulation. Default is the most detailed list with all inspection characteristics.
We execute the simulation for the equipment 10253080 (step 5) and the general task list where operation 0020 has checklist type CL_MM03 (step 6). We indicate the order type PM07 for simulation, as well (step 3.1).
Execute the simulation and the log appears. One checklist has been generated.
The checklist has been generated based on the template of the QM inspection plan created in step 7 hence our master data setup was successful.
The simulation list shows all inspection characteristics that would be created from a maintenance order with header equipment 10253080 and task list A/CL_GASB1/1.
You can click at hotspot fields to navigate to the corresponding master data object display transaction, e.g. equipment, task list, inspection plan.
Congratulations! The system has been set up successfully and you can now begin working with inspection checklists in the maintenance process.
If you have encountered any issues or have any other feedback, please leave a comment. Thank you!
frauge
(Blogpost has been created in collaboration with uwe.malzahn)
Activate Business Function
Quality Management (QM) Customizing
Set Up Inspection Type
Define Follow-Up Actions
Configure Usage Decision Codes
Default Setting at Plant Level
Plant Maintenance (PM) Customizing
Maintenance Order Type
Define Shop Papers for Order Type
Define Document Type CA-DMS
Checklist Customizing: Order Type and Plant
Characteristics and Checklist Types
Create Characteristic for Checklist Type Matching
Assignment Characteristic Name of Inspection Plan and Object
Define Checklist Types
Classify Technical Object
Checklist Type in Task List Operation
QM Inspection Plan
Material Master for QM Inspection
Create Class for Inspection Plan
Create QM Inspection Plan
Classify QM Inspection Plan
Master Data Simulation
Checklists are very often needed in Plant Maintenance to perform inspections and checks of assets, and serve as a legally binding documentation agenda. For more information about the inspection checklist process please read SAP Help Portal - Overview of the Inspection Checklist Process.
Pre-configured customizing content is delivered with the SAP S/4HANA 2021 FSP1 solution. This can be used directly or as a reference. If available in one of the followings steps, it will be mentioned, see also in the SAP Help Portal - Maintenance Order with Inspection Checklists.
Screenshots have been taken in an SAP S/4HANA 2021 FSP1 system.
Remark: To successfully set up and test SAP EAM inspection checklists, the roles SAP_BR_MAINTENANCE_PLANNER and SAP_BR_QUALITY_PLANNER should be assigned to your SAP S/4HANA system user.
1. Activate Business Function
Execute transaction SFW5 to activate business function LOG_EAM_CHECKLIST, which can be found in the folder ENTERPRISE_BUSINESS_FUNCTIONS.

See also the business function documentation and the “Feature Scope Description” document downloadable on the product page of SAP S/4HANA.
Remark: SAP EAM Inspection Checklists will be listed in the “Feature Scope Description” document with release SAP S/4HANA 2021 FPS01.
2. Quality Management (QM) Customizing
2.1 Set Up Inspection Type
Open Customizing via transaction SPRO and navigate to 'Quality Management→Quality Inspection→Inspection Lot Creation'. First select customizing activity 'Maintain Inspection Types'.

Remark: You could use inspection type 8914 and related customizing that gets delivered in 000 client with release SAP S/4HANA 2021 FPS01.
Create a new inspection type using button 'New Entries', for example "CL", with the following settings seen in the screenshot.

Open 'Maintain Inspection Lot Origin and Assign Inspection Types' under same customizing path. Assign your inspection type to inspection lot origin 89. For this select origin 89 in the 'Inspection Lot Origins' list and double-click in the 'Dialog Structure' on 'Inspection Types for the Origin'. Using button 'New Entries' you can now add your inspection type.

Lastly open 'Define Default Values for Inspection Types' again under same customizing path and add your inspection type with following default values using the button 'New Entries' in the overview list.

2.2 Define Follow-Up Actions
Open 'Define Follow-Up Actions for Usage Decisions' via transaction SPRO under 'Quality Management→Quality Inspection→Inspection Lot Completion'.
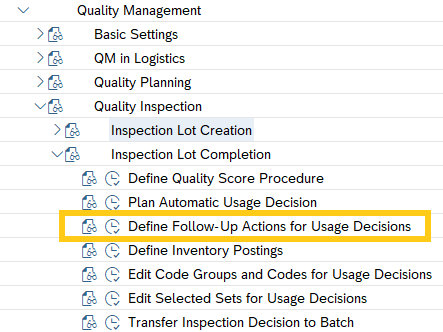
Here we will create follow up actions, which later will be triggered in the inspection checklist process after setting the usage decision for the inspection lots.
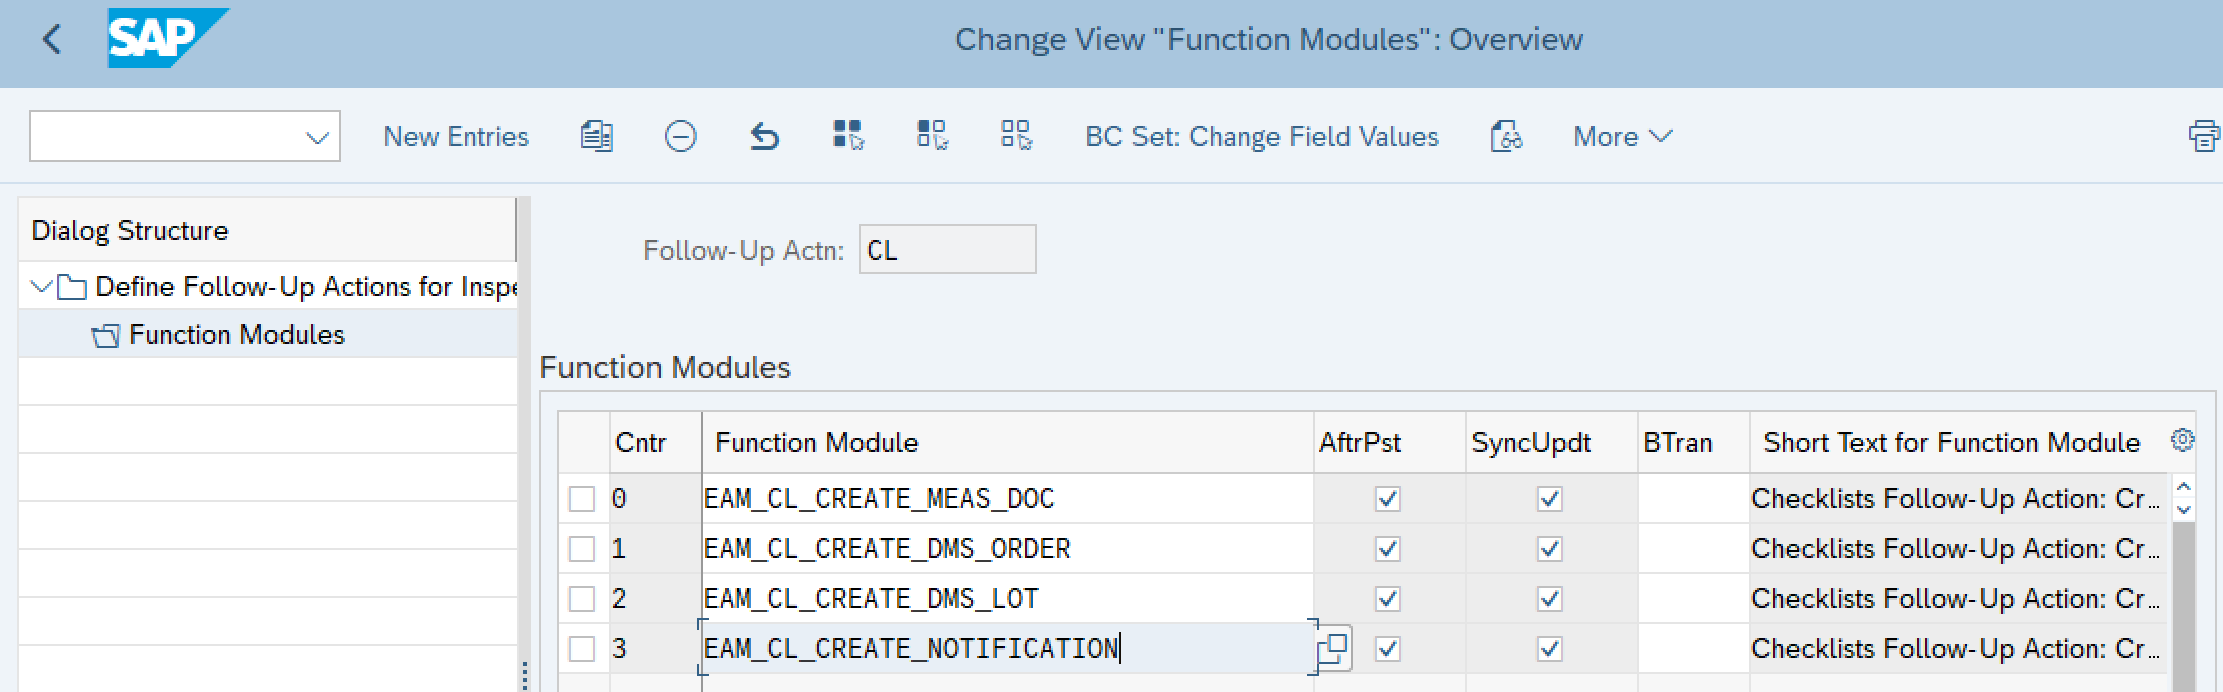
For example, we have added follow up action 'CL' including all function modules delivered with SAP S/4HANA EAM standard, but you can of course add other (incl. custom-developed) function modules as well. For this add a new entry in the list 'Define Follow-Up Actions for Inspection Results' with Object Type 'Usage Decision for Inspection Lot'. (Pre-delivered Content: Follow up actions CL_AC and CL_RE)

Subsequently select the newly created follow-up action in the list and double click in the 'Dialog Structure' on 'Function Modules', where you then add the relevant function modules to be executed for this follow up action. For information on the standard delivered function modules, please read their documentation.
2.3 Configure Usage Decision Codes
Navigate in customizing to 'Quality Management→Quality Inspection→Inspection Lot Completion' and first open 'Edit Code Groups and Codes for Usage Decisions'.

Create a new code group in list 'Code Groups for Usage Decision' with Status 'Released', for example "CL". (Pre-delivered Content: Code Group CL)

Select the code group and double click on 'Codes for Usage Decision' in the 'Dialog Structure' and define codes available for usage decision.

Then open 'Edit Selected Sets for Usage Decisions' under same customizing path. Here you define a new selected set of codes relevant for a specific plant in list 'Selected Sets for Usage Decision'. For example, add entry for plant '0001' and name the 'Selected Set' CL in status 'Released'.

After saving this, select the new entry and double click on 'Selected Set Codes for Usage Decision'. Here add the previously created codes and define whether it is an accepted or rejected code, the quality score and the follow up action (defined in step 2.2) which should be executed.

Lastly going back to first QM customizing activity 'Maintain Inspection Types' (step 2.1), update the selected set and check the flag 'Selected Set in Same Plant'.

2.4 Default Setting at Plant Level
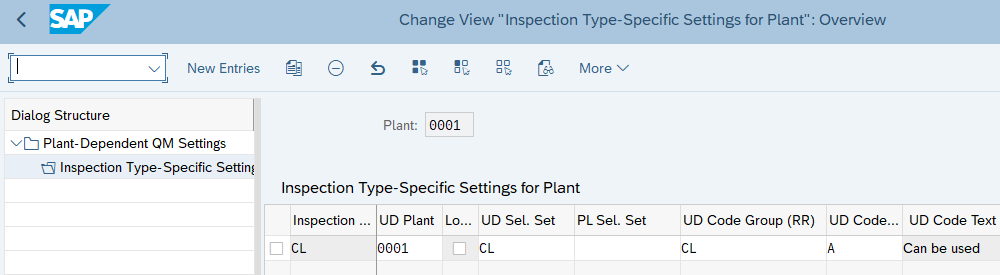
Navigate in customizing to 'Quality Management→Basic Settings→Maintain Settings at Site Level' and open 'Maintain Settings at Plant Level'.

Select the plant you want to maintain the automatic usage decision setting for in the list 'Plant-Dependent QM Settings' (same as in previous step) and double-click on 'Inspection Type-Specific Settings for Plant' in the 'Dialog Structure'. Create a new entry for created inspection type "CL". The 'UD Plant' attribute should be the same as you have selected at 'UD Sel. Set' creation in step 2.3. Enter these values in the corresponding columns as well as the UD Code / Code Group, which should be set at result recording as automatic usage decision. This setting is also used in collective usage decision transaction IW93 as default value.
3. Plant Maintenance (PM) Customizing
3.1 Maintenance Order Type
You can use any of your existing order types to enable the inspection checklist process for the maintenance orders of this chosen type. We use the pre-configured order type for inspection checklists PM07 in our settings below.
Remark: You can also use order type PM07 and related customizing that gets delivered in 000 client with release SAP S/4HANA 2021 FPS01. However, there is no need to create specific order types for inspection process. You would rather enable existing order types to add checklists where needed.
3.2 Define Shop Papers for Order Type
For maintenance orders the print form EAM_CL_PRINT is delivered by SAP standard to print the inspection checklists incl. recorded results. As an option, also a DMS document with that 'Checklist Report' can be automatically created as a follow-up action (see step 2.2, function modules EAM_CL_CREATE_DMS_LOT and EAM_CL_CREATE_DMS_ORDER) . The precondition for this is the customizing of a shop paper for maintenance order.
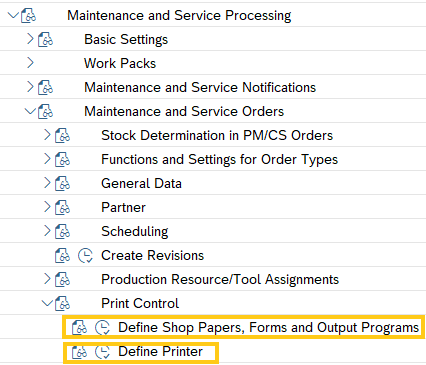
Navigate in customizing to 'Plant Maintenance→Maintenance and Service Processing→Maintenance and Service Orders→Print Control' and open 'Define Shop Papers, Forms and Output Programs'.
In pop-up window select activity 'Define Shop Papers'. Create new shop paper for checklist print outs by clicking button 'New Entries'. Please enter values as seen in following screenshot, whereby the application area is 'Maintenance orders'. Of course, you can choose a different name than "CL" for your shop paper. The program and the form both with name EAM_CL_PRINT are the standard delivered print program and form for checklists. (Pre-delivered Content: Shop paper CL)

Navigate back to 'Select Activity:' popup window and choose 'Assign Permitted Shop Papers'.

Add a new entry ('New Entries' button) for your order type and shop paper CL.
Now navigate back to customizing window and choose 'Define Printer' in customizing menu entry 'Print Control'. Select Activity 'User-Specific Print Control' and add for all users a new entry (button 'New Entries') for shop paper CL as seen in screenshot.

3.3 Define Document Type CA-DMS
In this step we define a document type for the creation of a DMS document 'Checklist Report'. Therefore, open customizing 'Cross-Application Components→Document Management→Control Data→Define DMS Document Types'.

Create a new document type (button 'New Entries'), for example CL, with this setting.
Remark: Use any existing document type for inspection protocols, if available in your system. Pre-delivered Content: Document Type CL.

Save and go back to 'Define document types' overview and select new document type in the list. Then double-click on 'Define document status' in the 'Dialog Structure' and define two document status one for 'Archived' and one for 'Released'.


After saving, double-click on 'Define object links' in 'Dialog Structure' and add following two entries.

Lastly go to customizing 'Cross-Application Components→Document Management→General Data→Settings for Storage System→Maintain Storage Category' and check that category DMS_C1_ST is set up.
3.4 Checklist Customizing: Order Type and Plant
A new customizing entry 'Configure Checklists for Maintenance Order Types and Planning Plants' has been introduced by the checklist solution under 'Plant Maintenance→Maintenance and Service Processing→Maintenance and Service Orders→Functions and Settings for Order Types'.

Open customizing and add a new entry (button 'New Entries') for the order type and maintenance planning plant combination for which you want to configure inspection checklists and have set up the customizing in the last steps. In our example we add inspection type 'CL' for order type PM07 and plant 0001.

Also enter the customized shop paper and document type and add optionally a notification type for notifications to be created at usage decision of the inspection checklists. Otherwise keep the default checkbox settings for now.
See field help description in this transaction for more details. Sample:

4. Characteristics and Checklist Types
4.1 Create Characteristic for Checklist Type Matching
To be able to match inspection plans (inspection checklist templates) with the checklist type field in the maintenance order operation, we create a new characteristic in transaction CT04. Enter name "CL_TYPE" and click 'Create' button. Open tab 'Addnl data' and enter table name "AFVC" and field name "CL_TYPE".

Confirm pop up and the information on 'Basic data' tab is automatically filled with the reference field data. Adjust description and select 'Multiple Values' to allow selection of multiple checklist types for one inspection plan.

Next open tab 'Values' and click on button 'Other Value Check' and select 'Check Table' on pop up. Enter table "EAM_CL_CU_TYPE" containing allowed checklist types, which we will maintain in a later step.

Lastly go to tab 'Restrictions' and enter class type '018' so that this characteristic is only valid for class type task list / inspection plan.
4.2 Assignment Characteristic Name of Inspection Plan and Object
In this step we define the matching of characteristics between inspection plan and technical object. Open new transaction IW98.

In edit mode click 'New Entries' and enter the previously created characteristic name "CL_TYPE" into the table as 'Characteristic of inspection plan' and value "EAM_CL_TYPE" as 'Characteristic of Technical Object'.

The value "EAM_CL_TYPE" indicates the characteristic that must match with checklist type field in maintenance order operation for checklist generation. This table can also be used to define other matchings:
- Match characteristic names when inspection plan and technical object have different names
- Indicate characteristic names of inspection plan that are not used for matching by leaving “Characteristic of Technical Object” empty
See also field help description in this transaction for more details. Sample:

4.3 Define Checklist Types
As mentioned, we will now define the applicable checklist types in the new transaction IW99. Click button 'New Entries' and first enter checklist types, for example CL01ME etc. In a second step select one checklist type after another and double click in 'Dialog Structure' on 'Short Texts' to maintain the description for different languages.
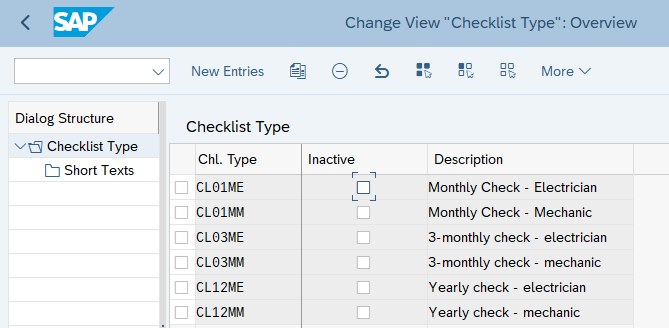
See also field help description in this transaction for more details.

Checklist types can be deleted when they are not used in any task list operation or order operation. If a checklist type is used, instead mark it as "inactive" to mute the usage of this checklist type. No inspection plan search is executed for inactive entries and users get a warning if they use inactive checklist types in operations.
5. Classify Technical Object
Our sample equipment, for which we want to generate inspection checklists, is a gas boiler with assigned class GASBOILER, screenshot from transaction IE02. Remark: Create the same equipment / class or use one of your sample equipment with classification.
Finding a matching inspection plan for a technical object needs classification. The class name assigned to the technical object must be same as for inspection plan (but different class types).
As an option, any classification characteristic of the technical object can also be used for search of a matching inspection plan. The classification characteristic could be from any class of the technical object (if multiple classes are assigned to the technical object). For our example, characteristic “Gas Boiler Type” could be used to find separate inspection checklists according to the value of Gas Boiler Type.

6. Checklist Type in Task List Operation
Inspection checklists get created for certain maintenance order operations. You define the type of checklist at operation level with new field “Checklist Type”. The setup for checklist types is already done in transaction IW99.
In our sample general task list CL_GASB1 we assign checklist type CL03MM to operation 0020 in transaction IA06. Remark: Create a new general task list or modify one of your existing ones adding the checklist type to operation(s).
You find the checklist type field at the right end of the operation list.

7. QM Inspection Plan
Now, we create the inspection plan that is used as a template for generation of inspection checklists, i.e. QM inspection lots assigned to maintenance work order operation and technical object.
An inspection plan must have a reference to a material master and a class. This master data needs to be created first.
7.1 Material Master for QM Inspection
An inspection plan must have a reference to a material master with settings for Quality Management. If you do not already have such a material master, create a new one in transaction MM01. Use any material type that allows Quality Management settings, e.g. HIBE or UNBW. In our example, we use material type “HIBE Operating supplies” and name the material master "CL_0001". Select plant 0001 as the organizational level and fill out any mandatory fields of the material master.

Then open the 'Quality management' tab and click button 'Insp. Setup'.

On the pop-up window click 'Create Inspection Types' button and assign the inspection type "CL" (step 2.1) to the material master. Also make sure that the indicators “Insp. with Task List” and “Inspect Charcs.” are set.

To be sure check that the material type you choose is assigned to task list type Q in customizing 'Quality Management→Quality Planning→Inspection Planning→General→Assign Task List Types to Material Types'.


7.2 Create Class for Inspection Plan
Create a class in transaction CL01 of class type 018 (Task List class) with same name as the one for the technical object (step 5).
For our sample equipment, we create the class GASBOILER.

After filling in mandatory attributes, open tab 'Char.'. Add characteristic CL_TYPE that was defined in step 4.1 for characteristic matching and assigned to EAM_CL_TYPE literal in transaction IW98 in step 4.2.

This class is used to match with (see also field help in transaction IW98):
- Class name of technical object, i. e. equipment or functional location
- CL_TYPE: specific classification characteristic at QM inspection plan that matches with maintenance order operation field "Checklist type"
Optional are other characteristics that would match with technical object, e. g. characteristic “Gas Boiler Type”. You use other characteristics if they are needed for finding different inspection plans.
7.3 Create QM Inspection Plan
The inspection plan serves as template for inspection checklists or QM inspection lots, respectively.
Create inspection plan in transaction QP01 with the material number created in step 7.1, plant and (optional) a group number.

Enter a short text, usage, overall status and other required entries on header level. Then switch to “Operations” overview.

Create an operation by entering control key and description. Then mark this operation and click button 'Inspection Characteristics'.

For our example, we want to create three checklist items, i.e. inspection characteristics. There is one item that has a multiple-choice catalog with choices Yes and No and two items with a quantitative value incl. minimum and maximum values.
| Gas Boiler Checklist Items | |||
| Heating Zone Valves Fitted? | Yes/No | Yes | No |
| Burner Operating Pressure | Min=48/Max=52 | Value | mbar |
| Central Heating Flow Temperature | Min=40/Max=50 | Value | °C |
Create the inspection characteristics by entering a short text and indicators for Qn (Quantitative value/measurement) or Ql (Qualitative item with multiple choice catalog).
For the quantitative items, enter decimal places, unit, lower and/or upper limit.
For qualitative items, enter a catalog in “Selected Set” column.

After pressing Enter on your keyboard for a new inspection characteristic, you confirm the indicator pop-up window that appears for each item.
Save the QM inspection plan.
Remark: See SAP Help - Inspection Planning with Inspection Plans for more details on QM inspection plans.
7.4 Classify QM Inspection Plan
For the inspection lot generation, the classification of QM inspection plan must match with:
- Class name at technical object and (optional) additional characteristics
- Checklist type of operation at classification characteristics
Open transaction QP02 for changing the inspection plan created in the previous step. Enter group number and choose “Header” (hat icon).

Choose menu function 'Extras→Classification→Header'.
Add here the class created in step 7.2 with same class name as for technical objects to be inspected, in our example 'GASBOILER'.
Add a value to the characteristic checklist type to match the checklist type of the operation of step 6, in our example 'CL03MM'.
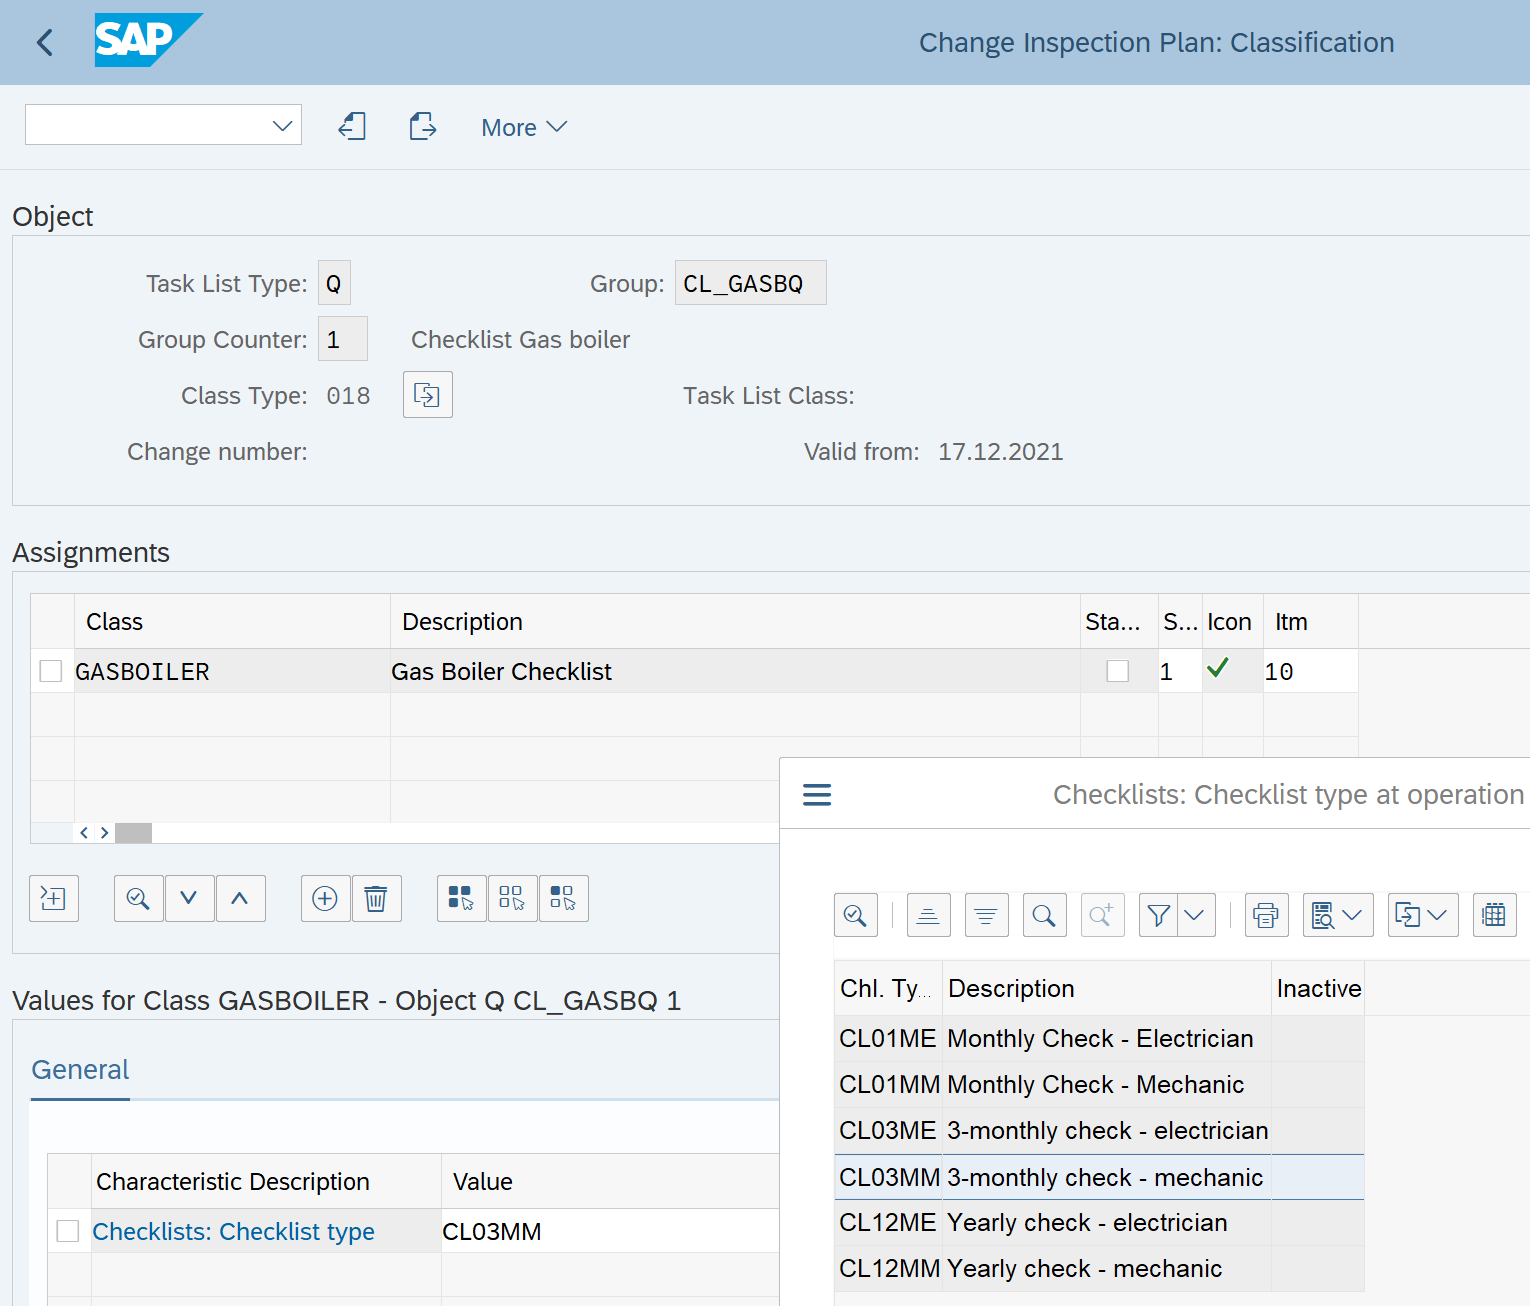
Save the inspection plan.
8. Master Data Simulation
Transaction IW97 allows to execute a what-if-analysis: what inspection plans and inspections characteristics would be created if the master data is setup in this constellation.
Open transaction IW97 to simulate what inspection plans / characteristics are generated for our set up created in the previous steps. (SAP menu path: Plant Maintenance→Maintenance Processing→Order→Inspection Processing)

Transaction IW97 helps to verify, view and analyze master data of the inspection process. The simulation creates a simulation order from task list, executes object list generation and inspection lot generation for the selected master data and will show all inspection plans with their inspection characteristics in the simulation list. No simulation data will be saved at the database.
Entry with different data objects is possible:
- Technical object
- Maintenance plan(s) and item(s)
- Order(s)
At selection screen, user can choose different levels of summarization/granularity for the result list of simulation. Default is the most detailed list with all inspection characteristics.
We execute the simulation for the equipment 10253080 (step 5) and the general task list where operation 0020 has checklist type CL_MM03 (step 6). We indicate the order type PM07 for simulation, as well (step 3.1).

Execute the simulation and the log appears. One checklist has been generated.

The checklist has been generated based on the template of the QM inspection plan created in step 7 hence our master data setup was successful.
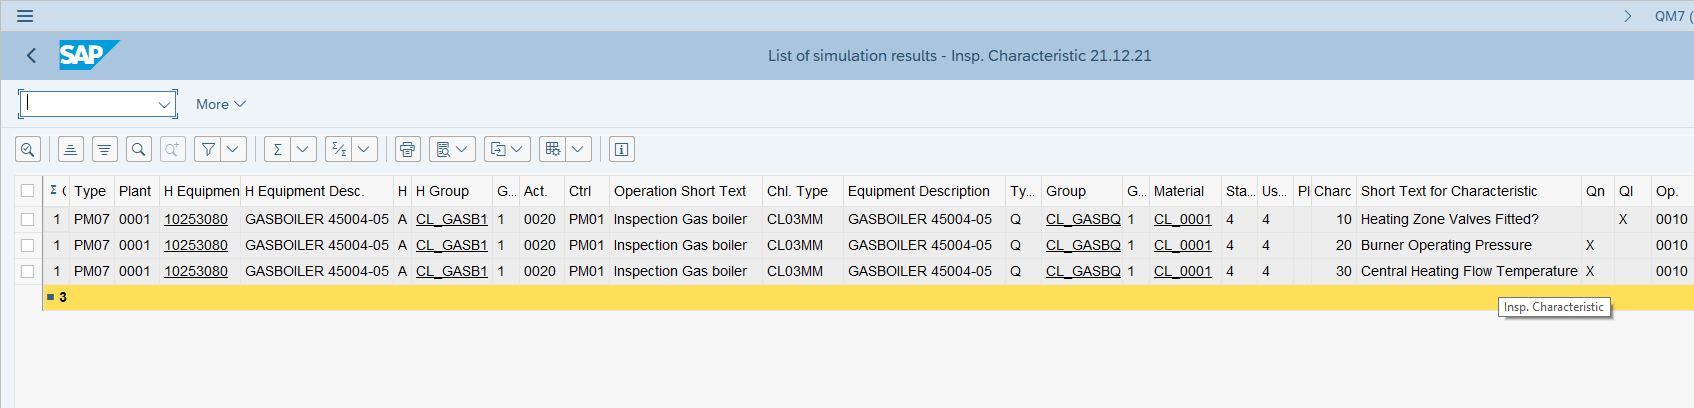
The simulation list shows all inspection characteristics that would be created from a maintenance order with header equipment 10253080 and task list A/CL_GASB1/1.
You can click at hotspot fields to navigate to the corresponding master data object display transaction, e.g. equipment, task list, inspection plan.
Congratulations! The system has been set up successfully and you can now begin working with inspection checklists in the maintenance process.
If you have encountered any issues or have any other feedback, please leave a comment. Thank you!
frauge
(Blogpost has been created in collaboration with uwe.malzahn)
Labels:
25 Comments
You must be a registered user to add a comment. If you've already registered, sign in. Otherwise, register and sign in.
Labels in this area
-
Artificial Intelligence (AI)
1 -
Business Trends
363 -
Business Trends
28 -
Customer COE Basics and Fundamentals
1 -
Digital Transformation with Cloud ERP (DT)
1 -
Event Information
461 -
Event Information
26 -
Expert Insights
114 -
Expert Insights
171 -
General
1 -
Governance and Organization
1 -
Introduction
1 -
Life at SAP
415 -
Life at SAP
2 -
Product Updates
4,683 -
Product Updates
247 -
Roadmap and Strategy
1 -
Technology Updates
1,501 -
Technology Updates
91
Related Content
- SAP Activate methodology Prepare and Explore phases in the context of SAFe. in Enterprise Resource Planning Blogs by SAP
- Advance Return Management complete configuration(SAP ARM) in Enterprise Resource Planning Blogs by Members
- Enterprise Portfolio and Project Management in SAP S/4HANA Cloud, Private Edition 2023 FPS1 in Enterprise Resource Planning Blogs by SAP
- Quick Start guide for PLM system integration 3.0 Implementation/Installation in Enterprise Resource Planning Blogs by SAP
- Print customer specific inspection plan results on Outbound Certificate of Analysis in SAP QM in Enterprise Resource Planning Q&A
Top kudoed authors
| User | Count |
|---|---|
| 31 | |
| 6 | |
| 5 | |
| 5 | |
| 5 | |
| 4 | |
| 4 | |
| 3 | |
| 3 | |
| 3 |