
- SAP Community
- Products and Technology
- Technology
- Technology Blogs by SAP
- Enhancing Custom Application as Workflow Task UI i...
Technology Blogs by SAP
Learn how to extend and personalize SAP applications. Follow the SAP technology blog for insights into SAP BTP, ABAP, SAP Analytics Cloud, SAP HANA, and more.
Turn on suggestions
Auto-suggest helps you quickly narrow down your search results by suggesting possible matches as you type.
Showing results for
Product and Topic Expert
Options
- Subscribe to RSS Feed
- Mark as New
- Mark as Read
- Bookmark
- Subscribe
- Printer Friendly Page
- Report Inappropriate Content
08-31-2020
6:05 PM
In my previous blogs (blog 1 | blog 2) I discussed about two most commonly asked queries in workflow and explained (a) how-to start workflow from custom application and (b) how-to embed this custom application as a tile in Fiori Launchpad. In this blog I will cover yet another most-asked-question – “how to create Workflow Task UI from existing custom UI”
A task UI in a workflow could be a Form or SAPUI5 component. For latter, you have two choices:
note: only SAPUI5 based applications, deployed in the cloud platform are supported for Task UI.
If you do want to build the UI from scratch instead want to reuse any existing SAPUI5 application, then you can do so with slight adjustments in the Component.js and View.xml files. These adjustments are mandatory to upgrade your UI to have task properties like task-name, task-subject, task-priority etc.
Add the route in xs-app-json of your custom application. This router is needed as you will be calling workflow APIs. Read Step 3 of the documentation to know more.
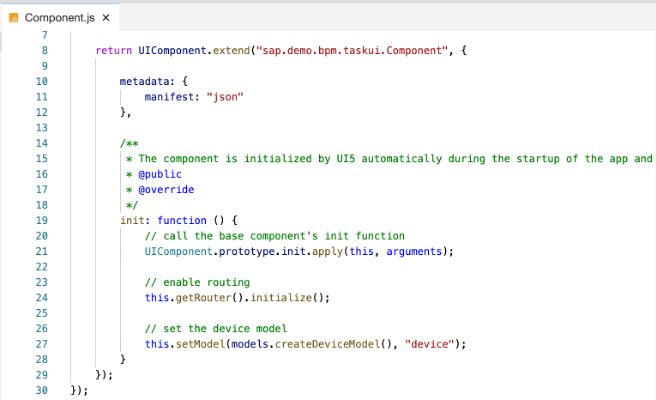
Let us see code-snippets you need to add in Component.js. For this I have an empty Component.js as seen in screenshot below.
Update the file step-by-step as guided below:
Adjust the view.xml file of your UI5 component to include the Task Information Header and delete the footer. You may also choose to adjust the code to not show footer for Task UI and keep it enabled for independent use.
Add a user task in Workflow and associate it with your Task UI. You can use Select option in User Interface properties of the user task to discover your SAPUI5 component.
[Optional] Additionally, to access the My Inbox and Monitor Workflow applications, you need to add the respective tiles in your existing Launchpad with the given App ID and Intent Navigations. This is needed only if you have not configured any launchpad with workflow applications.
Finally build and deploy the MTA project and open the launchpad application from cockpit. You will see the new tiles to track the workflow instance and view the work items with Task UIs respectively.
You can now start the workflow using the form (Capital Expenditure Request) and then see the task in My Inbox. Notice the task properties header and the footer.
In few simple steps, you can bring your own UI to reuse it as Task UI. If you want to build the Task UI from scratch then you have to completely design your component.js and view.xml files.
For your reference I have uploaded the sample code in GitHub that you can use for your reference while building your own application.
In the final chapter of the series, I will show you how to call external APIs in Task UI.
Related Resources
A task UI in a workflow could be a Form or SAPUI5 component. For latter, you have two choices:
- Build task UI from scratch or
- Reuse existing UI5 application.
note: only SAPUI5 based applications, deployed in the cloud platform are supported for Task UI.
If you do want to build the UI from scratch instead want to reuse any existing SAPUI5 application, then you can do so with slight adjustments in the Component.js and View.xml files. These adjustments are mandatory to upgrade your UI to have task properties like task-name, task-subject, task-priority etc.
Step 1: Update xs-app.json file
Add the route in xs-app-json of your custom application. This router is needed as you will be calling workflow APIs. Read Step 3 of the documentation to know more.
{

        "source": "^/bpmworkflowruntime/(.*)$",

        "target": "/$1",

        "service": "com.sap.bpm.workflow",

        "endpoint": "workflow_rest_url",

        "authenticationType": "xsuaa"

}, 
Step 2: Update Component.js file
Let us see code-snippets you need to add in Component.js. For this I have an empty Component.js as seen in screenshot below.
Update the file step-by-step as guided below:
- Get Task Model Data.

- Read Task Context using Workflow Task APIs.

Note1: You have to append the Application ID (like shown in screenshot: sapdemobpmtaskui) to the relative API URL. You can get the application ID as explained in the Result section here.
Note 2: You will get 404 – Not Found error if you have not added a route in your Task UI application xs-app.json.

- Update UI Context Model with the Task Model Data.

- Create task action buttons to complete task.
- Task completion operation will call workflow user task APIs.

- Add action buttons to Task UI.

Note 1: After you enhance your existing custom UI, the buttons’ action script is updated to complete the task and these buttons are attached to the task (as shown in step 4 & 5 above). You need to therefore delete the footer in your view.xml that were having the buttons to complete the UI operations like OK, Cancel, Confirm etc.
Note 2: you can find the updated Component.js in the sample workflow application here to understand the changes in detail.
- Add the code to complete the task using Workflow Task APIs. Do not forget the XSRF token call before any workflow API call that you make from the user interface.

Step 3: Adjust view.xml file
Adjust the view.xml file of your UI5 component to include the Task Information Header and delete the footer. You may also choose to adjust the code to not show footer for Task UI and keep it enabled for independent use.

Step 4: Add User Task in Workflow
Add a user task in Workflow and associate it with your Task UI. You can use Select option in User Interface properties of the user task to discover your SAPUI5 component.

[Optional] Additionally, to access the My Inbox and Monitor Workflow applications, you need to add the respective tiles in your existing Launchpad with the given App ID and Intent Navigations. This is needed only if you have not configured any launchpad with workflow applications.
| App Title | App ID | Intent Navigation |
| Workflow Instances | com.sap.bpm.monitorworkflow | bpmworkflowmonitor-DisplayInstances |
| My Inbox | cross.fnd.fiori.inbox | WorkflowTask-DisplayMyInbox |

Finally build and deploy the MTA project and open the launchpad application from cockpit. You will see the new tiles to track the workflow instance and view the work items with Task UIs respectively.

You can now start the workflow using the form (Capital Expenditure Request) and then see the task in My Inbox. Notice the task properties header and the footer.

In few simple steps, you can bring your own UI to reuse it as Task UI. If you want to build the Task UI from scratch then you have to completely design your component.js and view.xml files.
For your reference I have uploaded the sample code in GitHub that you can use for your reference while building your own application.
In the final chapter of the series, I will show you how to call external APIs in Task UI.
Related Resources
Labels:
50 Comments
You must be a registered user to add a comment. If you've already registered, sign in. Otherwise, register and sign in.
Labels in this area
-
ABAP CDS Views - CDC (Change Data Capture)
2 -
AI
1 -
Analyze Workload Data
1 -
BTP
1 -
Business and IT Integration
2 -
Business application stu
1 -
Business Technology Platform
1 -
Business Trends
1,658 -
Business Trends
93 -
CAP
1 -
cf
1 -
Cloud Foundry
1 -
Confluent
1 -
Customer COE Basics and Fundamentals
1 -
Customer COE Latest and Greatest
3 -
Customer Data Browser app
1 -
Data Analysis Tool
1 -
data migration
1 -
data transfer
1 -
Datasphere
2 -
Event Information
1,400 -
Event Information
66 -
Expert
1 -
Expert Insights
177 -
Expert Insights
301 -
General
1 -
Google cloud
1 -
Google Next'24
1 -
GraphQL
1 -
Kafka
1 -
Life at SAP
780 -
Life at SAP
13 -
Migrate your Data App
1 -
MTA
1 -
Network Performance Analysis
1 -
NodeJS
1 -
PDF
1 -
POC
1 -
Product Updates
4,577 -
Product Updates
346 -
Replication Flow
1 -
REST API
1 -
RisewithSAP
1 -
SAP BTP
1 -
SAP BTP Cloud Foundry
1 -
SAP Cloud ALM
1 -
SAP Cloud Application Programming Model
1 -
SAP Datasphere
2 -
SAP S4HANA Cloud
1 -
SAP S4HANA Migration Cockpit
1 -
Technology Updates
6,873 -
Technology Updates
429 -
Workload Fluctuations
1
Related Content
- Deployment of Seamless M4T v2 models on SAP AI Core in Technology Blogs by SAP
- Supporting Multiple API Gateways with SAP API Management – using Azure API Management as example in Technology Blogs by SAP
- My inbox application with multiple backends(ECC,CRM) configuration Guide in Technology Q&A
- SAP Build Process Automation Pre-built content for Finance Use cases in Technology Blogs by SAP
- Streamlining Time Sheet Approvals in SuccessFactors: Time Sheet Approval Center in Technology Blogs by Members
Top kudoed authors
| User | Count |
|---|---|
| 43 | |
| 25 | |
| 17 | |
| 15 | |
| 11 | |
| 7 | |
| 7 | |
| 6 | |
| 6 | |
| 6 |