- SAP Community
- Products and Technology
- Technology
- Technology Blogs by SAP
- Extending SAP Data Intelligence Part 2: Packaging,...
Technology Blogs by SAP
Learn how to extend and personalize SAP applications. Follow the SAP technology blog for insights into SAP BTP, ABAP, SAP Analytics Cloud, SAP HANA, and more.
Turn on suggestions
Auto-suggest helps you quickly narrow down your search results by suggesting possible matches as you type.
Showing results for
lochner_louw
Participant
Options
- Subscribe to RSS Feed
- Mark as New
- Mark as Read
- Bookmark
- Subscribe
- Printer Friendly Page
- Report Inappropriate Content
08-18-2020
9:20 AM
Just a side note – You will need to log a ticket to activate custom applications
on SAP Data Intelligence Cloud. I recently tried and found a bunch of errors when trying to active one. Please log ticket under CA-DI-OPS or CA-DI.
Introduction
This post documents the hands-on technical steps I followed during my journey of exploring extensibility of SAP Data Intelligence and is a continuation of my post titled "Extending SAP Data Intelligence Part 1: Configuring a Custom Solution for TensorBoard". In the first post, I described how to develop the application descriptor and solution manifest file required to create a custom solution. As with the first post, take this as the result of personal experience and not as a “best practice” guide.
Prerequisites
- Access to an SAP Data Intelligence instance.
- SAP Data Intelligence (cloud edition) Version: 2006.1.8 was used in this post.
- You will need to have
adminpermissions on the SAP DI tenant to install the application and create custom policies. - To use
Jupyter Notebooksyou will need a user that has access toML Scenario ManagerandTensorBoard App
Overview
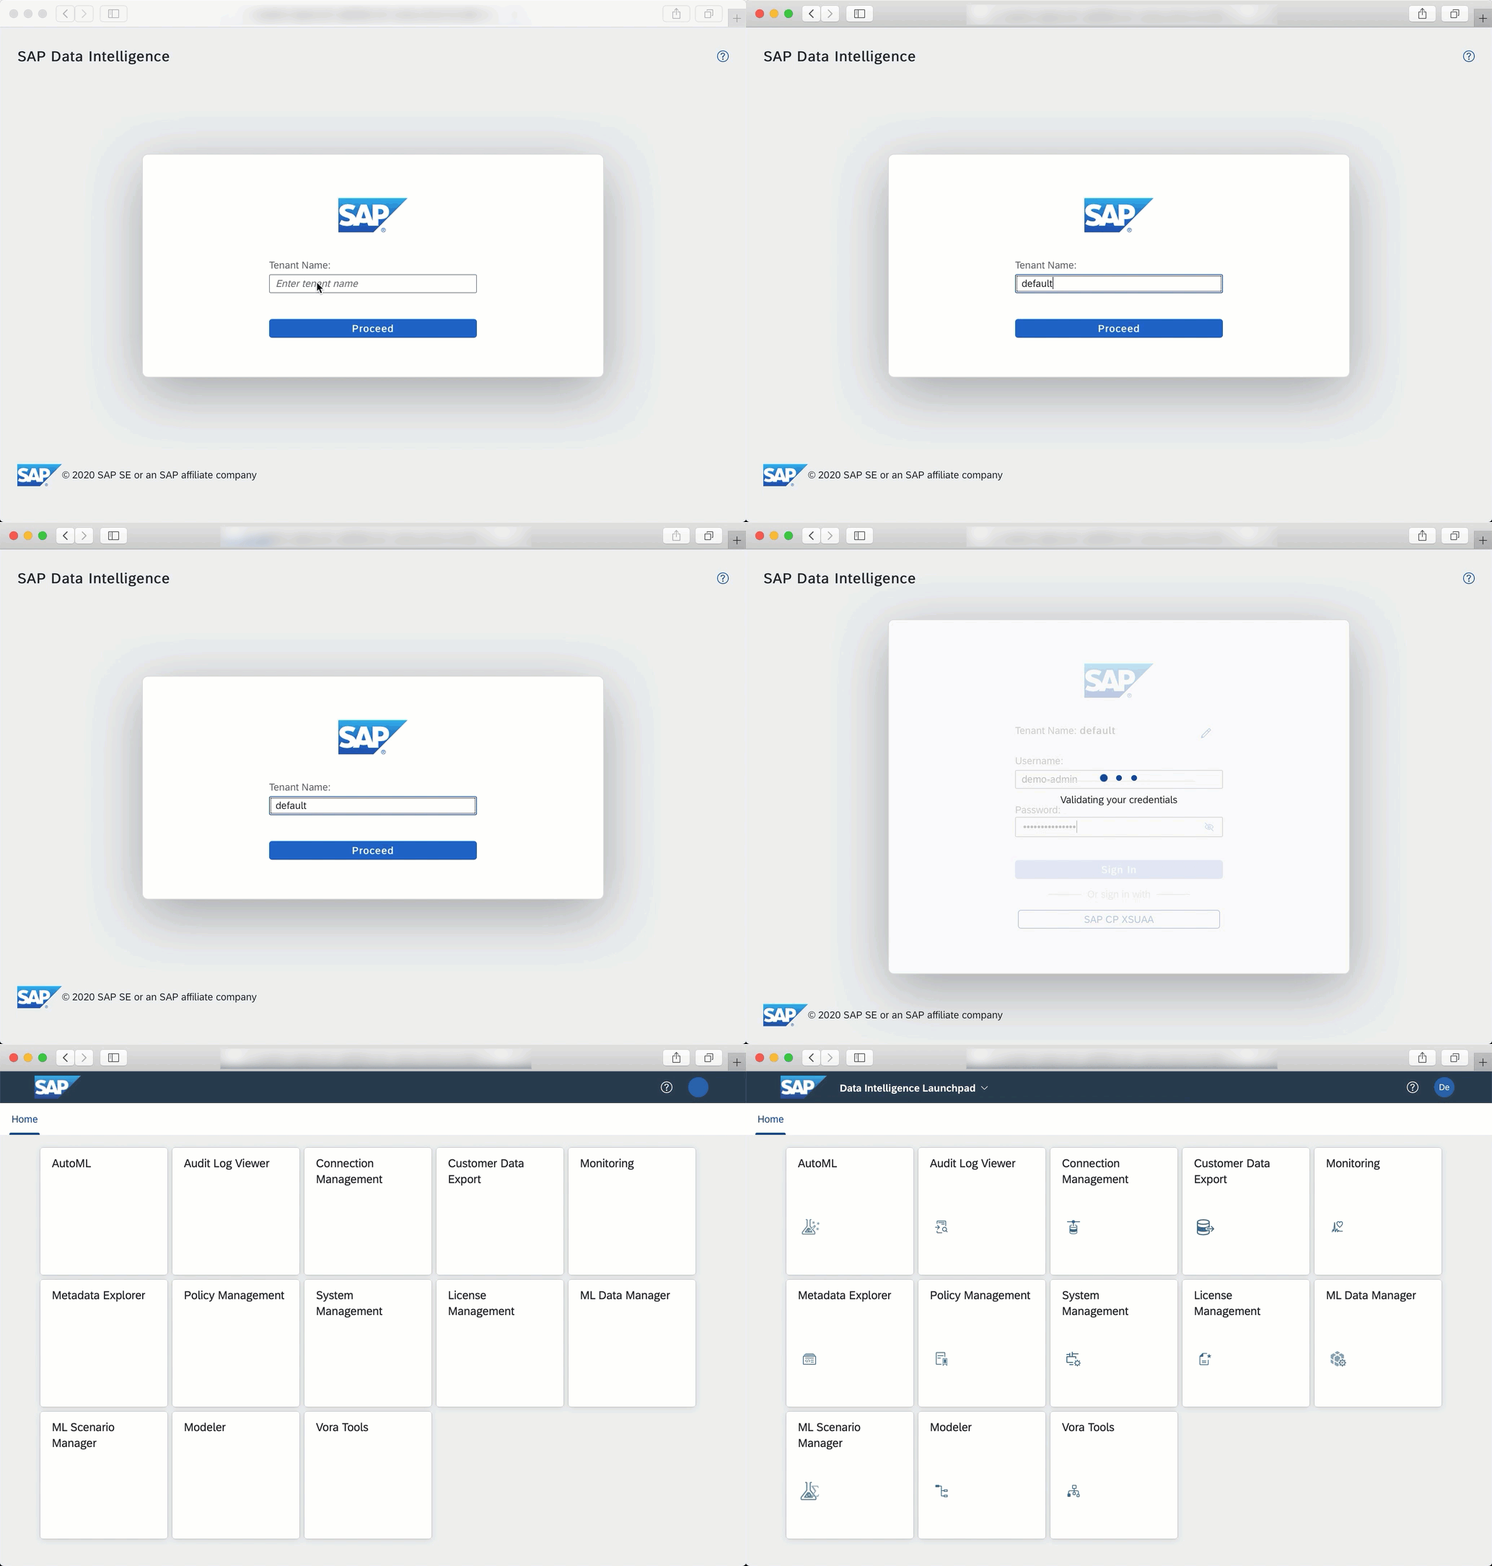
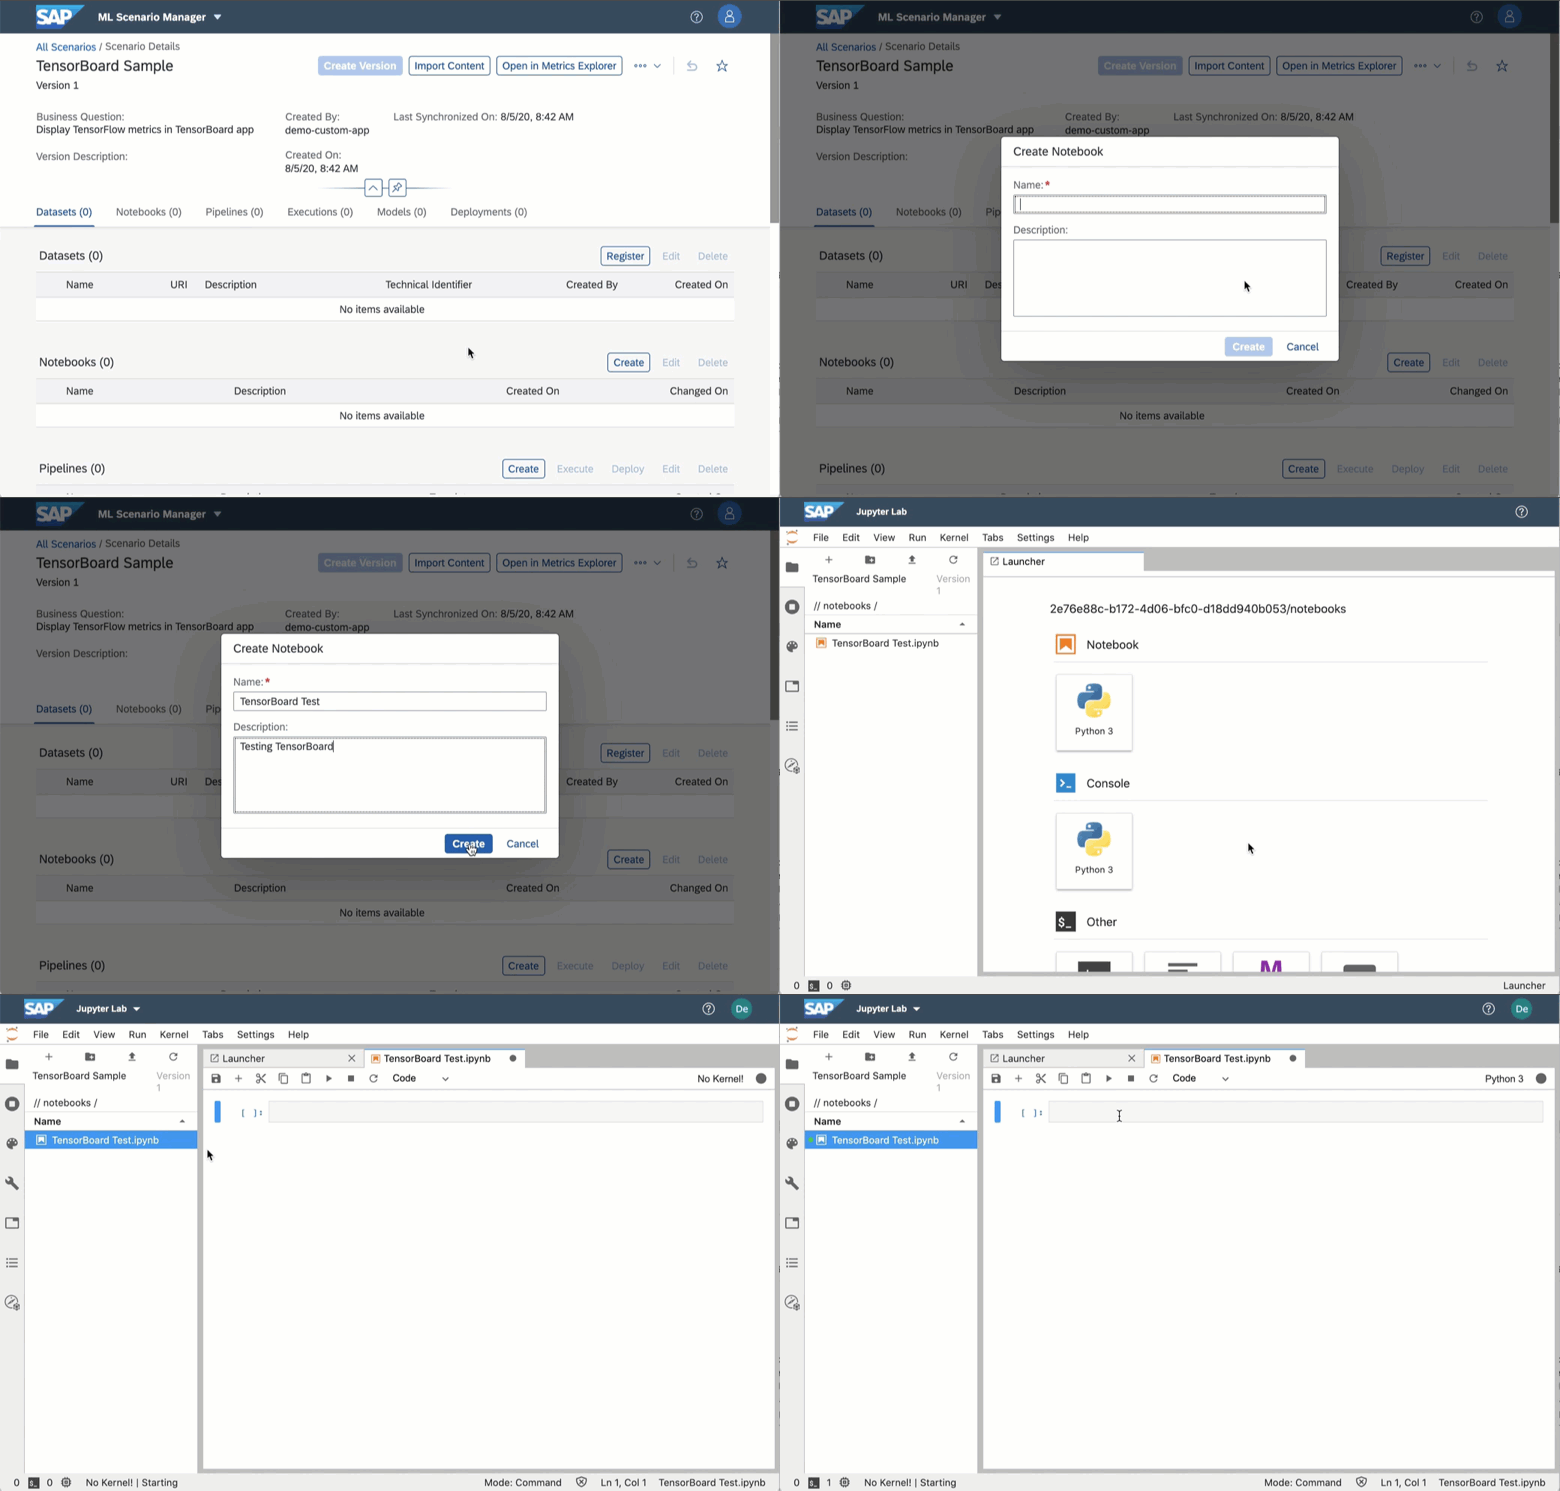
In this post, I will go through the steps of packaging, deploying a custom solution for SAP Data Intelligence. I also included animated GIFs that I created to visually explain where to go if you are not familiar with the UI.
At the time writing the post I noticed that it was a bit too lengthy to pack into a single post. For that reason, I split it into 2 separate posts to show what I did for my colleagues:
- Part 1: Configuring a Custom Solution for TensorBoard in SAP DI (previous post) and
- Part 2: Packaging, deploying and running solution containing the custom application (this post).
The environment to TensorBoard consists of the following systems and tools:
- SAP Data Intelligence
- ML Scenario Manager
- TensorBoard
- Tensorflow installed in Jupyter Lab

Create a deployable Solution
- Create the Solution directory structure:
user@home ~ % mkdir -p custom_tensorboard_solution/content/vsystem/{apps,icons}
- Create
manifest.json:
user@home ~ % cd custom_tensorboard_solution

user@home ~ % cat << EOF > manifest.json

{

    "name": "tensorboard-app",

    "version": "0.0.2",

    "format": "2",

    "dependencies": []

}

EOF
- Create blank application descriptor and copy/paste descriptor from the previous article or download from a GitHub Gist link:
user@home ~ % touch content/vsystem/apps/tensorboard-app.json
- Get an icon for the project:
user@home ~ % curl https://tensorboard.dev/static/tb_sharing_2.png -o \

  content/vsystem/icons/TensorBoard.png
- Display solution structure:
user@home ~ % tree .

.

├── content

│   └── vsystem

│       ├── apps

│       │   └── tensorboard-app.json

│       └── icons

│           └── TensorBoard.png

└── manifest.json


4 directories, 3 files
- Create a solution package
user@home ~ % zip -r tensorboard-app.zip manifest.json content/
Alternatively, if you have the System Management Command-Line Client (vctl) installed then the packaging can be done as follows:
user@home ~ % vctl solution bundle custom_tensorboard_solution/
Deploy Custom Solution
- Find the Solution package
tensorboard-app.zipcreated in the previous step. - Add the Solution to your tenant as described in the official Manage Strategies documentation. The steps are:
- Log in as
tenant administratoron your SAP Data Intelligence tenant.

- Open the
System Managementapplication. - Go to
Tenant, selectSolutions, and click+. - Choose the
tensorboard-app.zipfile in the file dialog and confirm. - Go to the
Strategiessection and clickEdit Pencil.
Add the newly addedtensorboard-appto the strategy and click save.
NOTE: In case you are not able to edit the strategy (edit button does not exist) you need to login to the SAP Data Intelligence system tenant and assign the solution to the strategy there.

- The
TensorBoardapplication will now show up in the launchpad of all users who have rights to start any application.

- Log in as
Create custom policies
- Create the policies and user in your tenant as described in the official Manage Policies and Manage Users documentation. The steps to do this are:
- Log in as
tenant administratoron your SAP DI tenant. - Open the
Policy Managementapplication. - Create a new policy by clicking on
+. - Enter
custom.tensorboard.startas thePolicy Idand deselect theExposedoption. Add a new resource by clicking+and enter the app nametensorboard-app, clickOkayand thenCreate. - Create another policy by clicking on + once again.
- Enter
custom.developeras thePolicy Id, add the policy created in step 4 and clickCreate. - Navigate to the
System Managementapplication. - Go to
Users, create a new user or select an existing user. - Click on
+and select the role created in step 6 and clickAssign.

- Log in as
The user will now have access to start an instance of the TensorBoard application
Create a scenario in ML Scenario Manager
- Log in as an
ML Useron your SAP Data Intelligence tenant. - Open the
ML Scenario Managerapplication. - Click
Create, enterTensorBoard Sampleinnameand clickCreate.

- Navigate to the Notebooks section and click
Create. In the dialog window, enterTensorBoard Testinnameand clickCreate.

- Launch a terminal from the file menu and install TensorFlow by entering
pip install tensorflow==1.15in the terminal and pressingenter.

- Add sample code to notebook
TensorBoard Testrun each cell and clicksave icon.
NOTE: I used a tutorial for TensorBoard code from this link to test if the app is working.
# Import TensorFlow and show version
import tensorflow as tf
tf.__version__
import numpy as np


X_train = (np.random.sample((10000,5)))

y_train =  (np.random.sample((10000,1)))

X_train.shape


feature_columns = [

      tf.feature_column.numeric_column('x', shape=X_train.shape[1:])]

DNN_reg = tf.estimator.DNNRegressor(feature_columns=feature_columns,

# Indicate where to store the log file

     model_dir='/vhome/tf/train/linreg',

     hidden_units=[500, 300],

     optimizer=tf.train.ProximalAdagradOptimizer(

          learning_rate=0.1,

          l1_regularization_strength=0.001

      )

)


# Train the estimator

train_input = tf.estimator.inputs.numpy_input_fn(

     x={"x": X_train},

     y=y_train, shuffle=False,num_epochs=None)

DNN_reg.train(train_input,steps=3000)

- Click on the Quick Launch navigation for TensorBoard and see written logs.

Closing and further reading
It was a great experience exploring how to extend SAP Data Intelligence with custom solutions and applications. Creating and deploying is really easy once you understand the components and the steps in creating a Solution.
I hope you enjoyed this blog post and that it gives you a general understanding of components that are part of a custom solution and how to deploy a solution in SAP Data Intelligence. Let me know if you have questions or feedback in the comments section.
If you want more information about everything SAP Data Intelligence related I recommend the following:
- openSAP: SAP Data Intelligence for Enterprise AI
- openSAP: Freedom of Data with SAP Data Hub
- Official SAP Data Intelligence 3.0 Administration Guide
- Official SAP Data Intelligence Cloud Page
- SAP Data Intelligence: Git Workflow and CI/CD Process Blog by christian.sengstock (@christian.sengstock)
- SAP Data Intelligence 3.0 Walkthrough Blog by swapan.saha (@swapan.saha)
- Zen and the Art of SAP Data Intelligence. Episode 3: vctl, the hidden pearl you must know by gianlucadelorenzo (@gianlucadelorenzo)
- SAP Managed Tags:
- SAP Data Intelligence,
- Big Data
Labels:
7 Comments
You must be a registered user to add a comment. If you've already registered, sign in. Otherwise, register and sign in.
Labels in this area
-
ABAP CDS Views - CDC (Change Data Capture)
2 -
AI
1 -
Analyze Workload Data
1 -
BTP
1 -
Business and IT Integration
2 -
Business application stu
1 -
Business Technology Platform
1 -
Business Trends
1,658 -
Business Trends
110 -
CAP
1 -
cf
1 -
Cloud Foundry
1 -
Confluent
1 -
Customer COE Basics and Fundamentals
1 -
Customer COE Latest and Greatest
3 -
Customer Data Browser app
1 -
Data Analysis Tool
1 -
data migration
1 -
data transfer
1 -
Datasphere
2 -
Event Information
1,400 -
Event Information
74 -
Expert
1 -
Expert Insights
177 -
Expert Insights
348 -
General
1 -
Google cloud
1 -
Google Next'24
1 -
GraphQL
1 -
Kafka
1 -
Life at SAP
780 -
Life at SAP
14 -
Migrate your Data App
1 -
MTA
1 -
Network Performance Analysis
1 -
NodeJS
1 -
PDF
1 -
POC
1 -
Product Updates
4,575 -
Product Updates
391 -
Replication Flow
1 -
REST API
1 -
RisewithSAP
1 -
SAP BTP
1 -
SAP BTP Cloud Foundry
1 -
SAP Cloud ALM
1 -
SAP Cloud Application Programming Model
1 -
SAP Datasphere
2 -
SAP S4HANA Cloud
1 -
SAP S4HANA Migration Cockpit
1 -
Technology Updates
6,871 -
Technology Updates
482 -
Workload Fluctuations
1
Related Content
- MDK Mobile Application - How to keep variables between synchronizations in Technology Q&A
- Using Postgresql Database in Cloud Application Programming model in Technology Blogs by Members
- SAP UI5 Dynamic Input of Token into Smart Table Multiinput SmartFilter in Technology Q&A
- UI5 Build Error when deploying to SAPUI5 ABAP Repo in Technology Q&A
- Unleashing the Power of Custom Widgets in SAP Analytics Cloud in Technology Blogs by Members
Top kudoed authors
| User | Count |
|---|---|
| 15 | |
| 11 | |
| 10 | |
| 9 | |
| 8 | |
| 8 | |
| 7 | |
| 7 | |
| 7 | |
| 7 |