
- SAP Community
- Products and Technology
- Technology
- Technology Blogs by SAP
- [SAP Cloud Platform on Alibaba Cloud series] Devel...
Technology Blogs by SAP
Learn how to extend and personalize SAP applications. Follow the SAP technology blog for insights into SAP BTP, ABAP, SAP Analytics Cloud, SAP HANA, and more.
Turn on suggestions
Auto-suggest helps you quickly narrow down your search results by suggesting possible matches as you type.
Showing results for
Product and Topic Expert
Options
- Subscribe to RSS Feed
- Mark as New
- Mark as Read
- Bookmark
- Subscribe
- Printer Friendly Page
- Report Inappropriate Content
08-10-2020
5:49 AM
This topic Develop Python App with Authentication and Authorization in Cloud Foundry will guide you through creating a Python application, setting up authentication checks and authorization checks in Cloud Foundry (for ease of reading “CF).
Since this is a large topic, in order to give you a better reading experience, I would like to divide it into 3 parts:
Part 1: Create and Deploy a Python Application
Part 2: Authentication Checks in Python Application
Part 3: Authorization Checks in Python Application
This blog post is Part 3.
Authorization in the Cloud Foundry environment is provided by the XSUAA service. In the last blog post, the
In order to consume the service from the application, you need to enable application to read the service settings and credentials from the application. To do that, we can use the Python module
Besides, you need to set restrictions on the content you serve as well. The
Thus, let's add these two dependencies to the
To get
From there you can download the
Then vendor
Modify the
Update the XSUAA instance
Modify the
Push your app again via:
Try to access the
Open Cockpit, navigate to your subaccount, under
Go into the
Go back to your subaccount, click on the
Enter your email in the
Then you can assign the new Role Collection you just defined to yourself by clicking on the
Now, you can try to access the
Until now, you can still access the
We should modify
Push your app again via:
Access the
Of course, if you, however, access the application through the application router, you should see the
This blog post shared how to leverage XSUAA service in SAP Cloud Platform to:
Moreover, this blog post shared how to protect backend services from outside.
Until now, all the parts on the topic Develop Python App with Authentication and Authorization in Cloud Foundry have been shared.
If you would like to get more step-by-step hands-ons on SAP Cloud Platform Alibaba Cloud, please follow me!
Since this is a large topic, in order to give you a better reading experience, I would like to divide it into 3 parts:
Part 1: Create and Deploy a Python Application
Part 2: Authentication Checks in Python Application
Part 3: Authorization Checks in Python Application
This blog post is Part 3.
Authorization in the Cloud Foundry environment is provided by the XSUAA service. In the last blog post, the
@Sap/approuter package was added to provide a central entry point for the business application and enable authentication. Now to extend our sample app, authorization will be added. The authorization concept includes elements such as Roles, Scopes, and Attributes provided in the security descriptor file xs-security.json of XSUAA, more details can be found here: What Is Authorization and Trust Management.Step 1: Add and Vendor Dependencies
In order to consume the service from the application, you need to enable application to read the service settings and credentials from the application. To do that, we can use the Python module
cfenv. Besides, you need to set restrictions on the content you serve as well. The
sap_xssec security library can do this.Thus, let's add these two dependencies to the
requirements.txt file as below (you can specify the version number or not):Flask==1.1.0
cfenv==0.5.3
sap_xssecTo get
sap_xssec and other SAP developed Python modules:- go to https://support.sap.com/en/my-support/software-downloads.html,
- select
Access downloadslocated underSupport Packages and Patches, - in the search bar type
XS PYTHON, - select the
XS PYTHON 1.0component.
From there you can download the
XS_PYTHON archive and extract it in a local directory, for example: sap_dependenciesThen vendor
sap_xssec by executing the following command from the root of the application:pip download -d vendor -r requirements.txt --find-links ./sap_dependenciesStep 2: Define Scope and Role Template
Modify the
xs-security.json file in the python-with-xsuaa directory with scopes and role-templates section as below:{
"xsappname":"myapp",
"tenant-mode":"dedicated",
"scopes":[
{
"name":"$XSAPPNAME.Display",
"description":"display"
}
],
"role-templates":[
{
"name":"Viewer",
"description":"View Hello World",
"scope-references":[
"$XSAPPNAME.Display"
]
}
],
"oauth2-configuration":{
"redirect-uris":[
"https://*.<custom-domain>/**"
]
}
}Update the XSUAA instance
myuaa via the following command:cf update-service myuaa -c xs-security.jsonStep 3: Add Role Scope Check
Modify the
xs-app.json file in the approuter directory with scope as below:{
"routes": [
{
"source": "^/myapp/(.*)$",
"target": "$1",
"destination": "myapp",
"scope": "$XSAPPNAME.Display"
}
]
}Push your app again via:
cf pushTry to access the
approuter application and click into the myapp link, you should see 403 Forbidden since you haven't assigned the role you defined to yourself yet.
Step 4: Create Role Collection
Open Cockpit, navigate to your subaccount, under
Security, click on Role Collections , create a new Role Collection named Myapp Administrator by clicking on the New Role Collection button:
Go into the
Myapp Administrator Role Collection, add roles you defined by clicking on the Add Role button:
Step 5: Assign Role Collection
Go back to your subaccount, click on the
Trust Configuration under Security, then click on sap.default:
Enter your email in the
E-Mail Address field, and click on the Show Assignment button. Then you can assign the new Role Collection you just defined to yourself by clicking on the
Assign Role Collection button: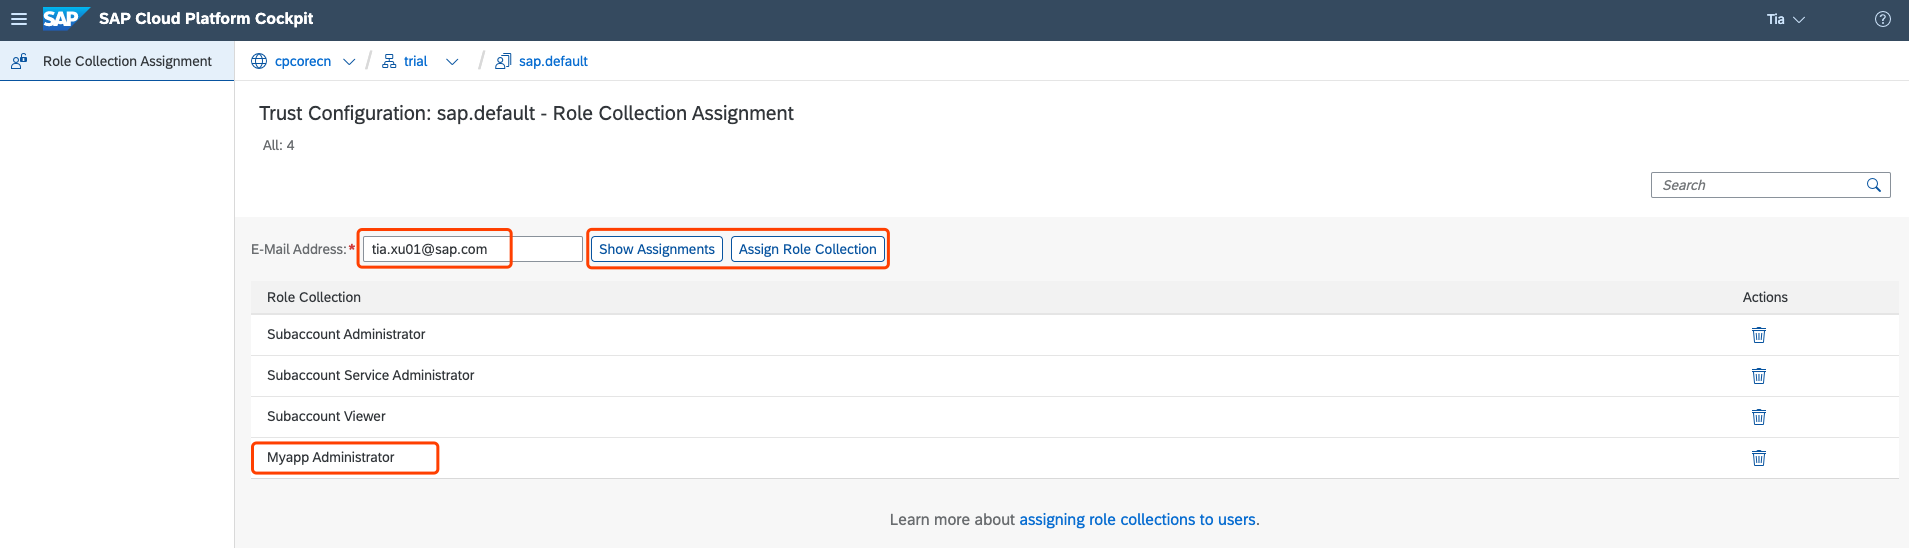
Now, you can try to access the
approuter application and click into the myapp link again. You will find you got the access permission to myapp finally.Step 6: Add Authorization Checks
Until now, you can still access the
myapp application directly without approuter, which doesn't make sense:
We should modify
server.py to use the security library and make authorization check as below:import os
from flask import Flask
from flask import request
from flask import abort
from cfenv import AppEnv
from sap import xssec
app = Flask(__name__)
env = AppEnv()
port = int(os.environ.get('PORT', 3000))
uaa_service = env.get_service(name='myuaa').credentials
@app.route('/')
def hello():
if 'authorization' not in request.headers:
abort(403)
access_token = request.headers.get('authorization')[7:]
security_context = xssec.create_security_context(access_token, uaa_service)
isAuthorized = security_context.check_scope('openid')
if not isAuthorized:
abort(403)
return "Hello World"
if __name__ == '__main__':
app.run(host='0.0.0.0',port=port)Push your app again via:
cf pushAccess the
myapp application directly again, you should see 403 Forbidden error:
Of course, if you, however, access the application through the application router, you should see the
Hello World.Conclusion
This blog post shared how to leverage XSUAA service in SAP Cloud Platform to:
- define scopes and add the scope checks to your services
- define roles and assign them to users
Moreover, this blog post shared how to protect backend services from outside.
Until now, all the parts on the topic Develop Python App with Authentication and Authorization in Cloud Foundry have been shared.
If you would like to get more step-by-step hands-ons on SAP Cloud Platform Alibaba Cloud, please follow me!
- SAP Managed Tags:
- SAP Cloud Identity Services,
- SAP Business Technology Platform
Labels:
You must be a registered user to add a comment. If you've already registered, sign in. Otherwise, register and sign in.
Labels in this area
-
ABAP CDS Views - CDC (Change Data Capture)
2 -
AI
1 -
Analyze Workload Data
1 -
BTP
1 -
Business and IT Integration
2 -
Business application stu
1 -
Business Technology Platform
1 -
Business Trends
1,658 -
Business Trends
93 -
CAP
1 -
cf
1 -
Cloud Foundry
1 -
Confluent
1 -
Customer COE Basics and Fundamentals
1 -
Customer COE Latest and Greatest
3 -
Customer Data Browser app
1 -
Data Analysis Tool
1 -
data migration
1 -
data transfer
1 -
Datasphere
2 -
Event Information
1,400 -
Event Information
66 -
Expert
1 -
Expert Insights
177 -
Expert Insights
300 -
General
1 -
Google cloud
1 -
Google Next'24
1 -
Kafka
1 -
Life at SAP
780 -
Life at SAP
13 -
Migrate your Data App
1 -
MTA
1 -
Network Performance Analysis
1 -
NodeJS
1 -
PDF
1 -
POC
1 -
Product Updates
4,577 -
Product Updates
345 -
Replication Flow
1 -
RisewithSAP
1 -
SAP BTP
1 -
SAP BTP Cloud Foundry
1 -
SAP Cloud ALM
1 -
SAP Cloud Application Programming Model
1 -
SAP Datasphere
2 -
SAP S4HANA Cloud
1 -
SAP S4HANA Migration Cockpit
1 -
Technology Updates
6,873 -
Technology Updates
429 -
Workload Fluctuations
1
Related Content
- SAP Fiori for SAP S/4HANA - Empowering Your Homepage: Enabling My Home for SAP S/4HANA 2023 FPS01 in Technology Blogs by SAP
- SAP Cloud ALM and Identity Authentication Service (IAS) in Technology Blogs by SAP
- SAP LICENSE RENEWAL FROM BASIS END #ATR in Technology Blogs by Members
- Using PINGFED, would that be considered as MFA for SAP BI login? in Technology Q&A
- Consuming SAP with SAP Build Apps - Mobile Apps for iOS and Android in Technology Blogs by SAP
Top kudoed authors
| User | Count |
|---|---|
| 43 | |
| 25 | |
| 17 | |
| 15 | |
| 10 | |
| 7 | |
| 7 | |
| 6 | |
| 6 | |
| 6 |